


 Loading...
Mac OS X Server
Podcast Composer User Guide
Version 10.6 Snow Leopard
KKApple Inc.
© 2009 Apple Inc. All rights reserved.
The owner or authorized user of a valid copy of Mac OS X Server software may reproduce this publication for the purpose of learning to use such software. No part of this publication may be reproduced or transmitted for commercial purposes, such as selling copies of this publication or for providing paid-for support services.
Every effort has been made to make sure that the information in this manual is correct. Apple Inc. is not responsible for printing or clerical errors.
Apple
1 Infinite Loop
Cupertino CA 95014 408-996-1010 www.apple.com
The Apple logo is a trademark of Apple Inc., registered in the U.S. and other countries. Use of the“keyboard”
Apple logo (Option-Shift-K) for commercial purposes without the prior written consent of Apple may constitute trademark infringement and unfair competition in violation of federal and state laws.
Apple, the Apple logo, Final Cut Studio, iCal, iChat, Keynote, Leopard, Mac, Macintosh, Numbers, Pages,
QuickTime, Xgrid, and Xserve are trademarks of Apple
Inc., registered in the U.S. and other countries. Finder, iPhone, and Snow Leopard are trademarks of Apple Inc.
Adobe and PostScript are trademarks of Adobe Systems
Incorporated.
UNIX® is a registered trademark of The Open Group.
Other company and product names mentioned herein are trademarks of their respective companies. Mention of third-party products is for informational purposes only and constitutes neither an endorsement nor a recommendation. Apple assumes no responsibility with regard to the performance or use of these products.
019-1407/2009-08-01

Contents
5 Preface: About This Guide
5What’s in This Guide
6Using Onscreen Help
7Document Map
7Viewing PDF Guides Onscreen
8Printing PDF Guides
8Getting Documentation Updates
9Getting Additional Information
10Chapter 1: Podcast Composer Overview
11How Podcast Composer Works
12Navigating the Podcast Composer Stages
12 Obtaining Help
12 Creating a Workflow
14 Chapter 2: Configuring Basic Workflow Information
14 Configuring Basic Workflow Information
16 Chapter 3: Configuring the Import Stage
18 Configuring Single Source
20 Configuring Dual Source
22 Configuring Montage
25 Chapter 4: Configuring the Edit Stage
28Adding and Configuring an Introduction Movie
29Adding and Configuring a Title Movie
30Adding and Configuring a Watermark and an Introduction Overlay
32Adding and Configuring an Exit Movie
33Configuring Transitions
34Previewing the Podcast
35 Chapter 5: Configuring the Export Stage
37Adding QuickTime Encoding Formats
38Adding Compressor Formats
3
39Chapter 6: Configuring the Publish Stage
40Sending Content to the Podcast Library
42Sending Content to an Apple Wiki Server
43Sending Content Using File Transfer Protocols
45Sending Content to the Watch Folder of Final Cut Server
46Sending Content to a Shared Folder
47Sending Content to a Workflow
49Chapter 7: Configuring the Notify Stage
50Adding Email Notifications
51Adding iChat Notifications
53Adding iTunes Podcast Directory Notifications
54Adding iTunes U Notifications
55Adding Third-Party Service Notifications
56Chapter 8: Managing Workflows
56Viewing a Summary of the Workflow
57Saving a Workflow
58Using the Workflow Inspector
59Verifying a Workflow
60Deploying a Workflow
61Opening a Workflow Remotely
62Chapter 9: Advanced Podcast Composer Topics
62Extending Podcast Composer Workflows
63Making Resources Available to Podcast Composer
65 Working with Themes
65 Customizing Podcast Composer Themes
70 Applying a Theme to a Podcast
70 Working with Quartz Composer Compositions
70 Creating Quartz Composer Compositions
72Selecting a Custom Quartz Composer Compositions
73Customizing the Email Template
75 Index
4 |
Contents |
|
|

About This Guide
Preface
This guide describes how to use Podcast Composer to create
Podcast Producer workflows.
Mac OS X Server includes Podcast Composer, an application for creating and deploying
Podcast Producer workflows.
Important: Before you read this guide, make sure you familiarize yourself with Podcast Producer workflows by reading the relevant sections of the Podcast Producer Administration guide.
What’s in This Guide
This guide includes the following chapters:
ÂÂ Chapter 1,“Podcast Composer Overview,”provides an overview of the Podcast Composer application.
ÂÂ Chapter 2,“Configuring Basic Workflow Information,”describes how to set basic workflow information such as workflow title, copyright, and description.
ÂÂ Chapter 3,“Configuring the Import Stage,”explains how to specify the source types of the input movies that your workflow processes.
ÂÂ Chapter 4,“Configuring the Edit Stage,”covers podcast branding, which can include adding a watermark and introduction, title, and exit movies to the input movie.
ÂÂ Chapter 5,“Configuring the Export Stage,”shows you how to specify the types of podcast you want your workflow to publish.
ÂÂ Chapter 6,“Configuring the Publish Stage,”describes how to specify podcast publishing destinations.
ÂÂ Chapter 7,“Configuring the Notify Stage,”describes how to create notifications to announce the publishing of your podcast.
ÂÂ Chapter 8,“Managing Workflows,”explains how to save, verify, and deploy your podcast to a Podcast Producer server.
ÂÂ Chapter 9,“Advanced Podcast Composer Topics,”discusses advanced Podcast Composer such as customizing the email template and extending workflows.
5
Note: Because Apple periodically releases new versions and updates to its software, images shown in this book may be different from what you see on your screen.
Using Onscreen Help
You can get task instructions onscreen in Help Viewer while you’re managing
Mac OS X Server v10.6. You can view help on a server or an administrator computer. (An administrator computer is a Mac OS X computer with Mac OS X Server v10.6 administration software installed on it.)
To get the most recent onscreen help for Mac OS X Server v10.6: mm Open Server Admin or Workgroup Manager and then:
ÂÂ Use the Help menu to search for a task you want to perform.
ÂÂ Choose Help > Server Admin Help or Help > Workgroup Manager Help to browse and search the help topics.
The onscreen help contains instructions taken from Server Administration and other advanced administration guides described later.
To see the most recent server help topics:
mm Make sure the server or administrator computer is connected to the Internet while you’re getting help.
Help Viewer retrieves and caches the most recent server help topics from the Internet. When not connected to the Internet, Help Viewer displays cached help topics.
6 |
Preface About This Guide |
|
|

Document Map
Mac OS X Server v10.6 has a suite of guides that cover management of individual services. Each service may be depend other services for maximum utility.The documentation map below shows some related documentation that you may need in order to configure your desired service to your specifications.You can get these guides in PDF format from the Mac OS X Server Resources website:
www.apple.com/server/macosx/resources/
Podcast Composer
Explains how to create Podcast Producer workflows using
Podcast Composer.
Podcast
Capture Help
|
Provides onscreen |
|
instructions and answers |
|
when you’re using |
|
Podcast Capture to |
Podcast Producer |
record and submit |
content for processing |
|
Administration |
by Podcast Producer. |
Describes advanced |
|
options for setting up, |
|
configuring, and |
|
Podcast Producer |
|
|
Podcast Producer |
|
WorkflowTutorial |
|
Walks you through |
|
the process of creating |
|
a complete Podcast |
|
Producer workflow. |
Viewing PDF Guides Onscreen
While reading the PDF version of a guide onscreen, you can:
ÂÂ Show bookmarks to see the guide’s outline, and click a bookmark to jump to the corresponding section.
ÂÂ Search for a word or phrase to see a list of places where it appears in the document.
Click a listed place to see the page where it occurs.
ÂÂ Click a cross-reference to jump to the referenced section. Click a web link to visit the website in your browser.
Preface About This Guide |
7 |
|
|
Printing PDF Guides
If you want to print a guide, you can take these steps to save paper and ink: ÂÂ Save ink or toner by not printing the cover page.
ÂÂ Save color ink on a color printer by looking in the panes of the Print dialog for an option to print in grays or black and white.
ÂÂ Reduce the bulk of the printed document and save paper by printing more than one page per sheet of paper. In the Print dialog, change Scale to 115% (155%
for Getting Started). Then choose Layout from the untitled pop-up menu. If your printer supports two-sided (duplex) printing, select one of the Two-Sided options.
Otherwise, choose 2 from the Pages per Sheet pop-up menu, and optionally choose
Single Hairline from the Border menu. (If you’re using Mac OS X v10.4 or earlier, the Scale setting is in the Page Setup dialog and the Layout settings are in the Print dialog.)
You may want to enlarge the printed pages even if you don’t print double sided, because the PDF page size is smaller than standard printer paper. In the Print dialog or Page Setup dialog, try changing Scale to 115% (155% for Getting Started, which has CD-size pages).
Getting Documentation Updates
Periodically, Apple posts revised help pages and new editions of guides. Some revised help pages update the latest editions of the guides.
ÂÂ To view new onscreen help topics for a server application, make sure your server or administrator computer is connected to the Internet and click“Latest help topics”or “Staying current”in the main help page for the application.
ÂÂ To download the latest guides in PDF format, go to the Mac OS X Server Resources website:
www.apple.com/server/macosx/resources/
ÂÂ An RSS feed listing the latest updates to Mac OS X Server documentation and onscreen help is available.To view the feed use an RSS reader application, such as Safari or Mail:
feed://helposx.apple.com/rss/snowleopard/serverdocupdates.xml
8 |
Preface About This Guide |
|
|
Getting Additional Information
For more information, consult these resources:
ÂÂ Read Me documents—get important updates and special information. Look for them on the server discs.
ÂÂ Mac OS X Server website (www.apple.com/server/macosx/)—enter the gateway to extensive product and technology information.
ÂÂ Mac OS X Server Support website (www.apple.com/support/macosxserver/)—access hundreds of articles from Apple’s support organization.
ÂÂ Apple Discussions website (discussions.apple.com/)—share questions, knowledge, and advice with other administrators.
ÂÂ Apple Mailing Lists website (www.lists.apple.com/)—subscribe to mailing lists so you can communicate with other administrators using email.
ÂÂ AppleTrainingandCertificationwebsite (www.apple.com/training/)—hone your server administration skills with instructor-led or self-paced training, and differentiate yourself with certification.
Preface About This Guide |
9 |
|
|

Podcast Composer Overview |
1 |
|
|
|
|
Use this chapter to learn concepts about Podcast Composer and how you can use it to create Podcast Producer workflows.
Podcast Producer workflows are self-contained file bundles that contain all the information, code, and resources that Podcast Producer needs to produce podcasts.
Developing a workflow manually can be a challenging task for developers and nondevelopers alike because it involves editing XML files, using Podcast Producer command-line tools, and ensuring that all resources are included in the right place in the bundle.The more complicated the workflow is, the more time it takes to build.
Podcast Composer, an application that ships with Mac OS X Server, simplifies and speeds up the process of building workflows by providing you with a simple graphical user interface. All you do is provide information about the workflow, without writing
XML code or worrying about where to store resources and credentials.
With Podcast Composer, creative individuals and administrators can easily develop workflows that can be immediately used, or customized later by developers.
Podcast Composer builds highly optimized workflows that take advantage of the parallel processing capability offered by Xgrid.
10
How Podcast Composer Works
Podcast Composer groups the process of building a workflow into seven stages that step you through the process of creating a workflow:
Stage 1.Information You specify basic workflow information:workflow name, workflow author’s name, and a brief description of the workflow.
Stage 2.Import You tell the workflow what to expect as input:a single QuickTime movie, two QuickTime movies, or a set of documents that are compatible with Quick
Look.The output of this stage is a single QuickTime movie. If the input to this stage is two movies, Podcast Composer produces a picture-in-picture movie. If the input to this stage is documents, Podcast Composer produces treats document pages as images and renders them into a movie with transitions between the images. If a document is a video, Podcast Composer concatenates it with the other documents as a movie.
Stage 3.Edit You specify how you want to brand the podcast that this workflow produces by adding watermarks, introduction, title, and exit movies.The output of this stage is called the Edited Master movie. This stage produces a high-quality movie at the highest possible resolution based on the resolution of the input movies. The
Edited Master movie is a flat QuickTime media file that is used in the following stages of the workflow.
Stage 4.Export You select the different types of encodings to be used for publishing your podcast. For example, you might want your podcast to be available in three flavors:iPhone/iPod, Apple TV, and AAC (audio-only).
Stage 5.Publish You determine how the podcast is published. For example, you can configure the Publish stage to publish the different versions of the podcast to the
Podcast Library.
Stage 6.Notify You create the notifications that you want the workflow to send after the podcast is published.You can send notifications to users and administrators with instruction on how to access the podcast.You can also send notifications to services to let them know that new content is published to the Podcast Library.
Stage 7.Summary You verify your selections. If no more changes are required, you deploy the workflow to Podcast Producer server.
When working on a particular stage, Podcast Composer keeps the previous and next stages in view to provide context.
The workflow that you generate using Podcast Composer is a file bundle. A workflow bundle contains the code, resources, credentials, workflow description, and all the information needed to execute the workflow.
In the Export, Publish, and Notify stages, you can’t have more than nine elements per stage.
Chapter 1 Podcast Composer Overview |
11 |
|
|
Navigating the Podcast Composer Stages
Podcast Composer provides several ways to view and navigate stages.
Using the Arrow Keys
ÂÂ Use the Up and Down arrow keys to move from one stage to another. ÂÂ Use the Right and Left arrow keys to move among items in a stage.
Using the Commands in the Stages Menu
ÂÂ To move to a stage, choose Stage > stage name or use the Command-[stage number] shortcut. For example, to go to the Edit stage, choose Stages > Edit or press Command-3.
ÂÂ To move up or down the stages, use the Stages > Previous or Stages >
Next command.
ÂÂ To view all stages at once, choose Stages > Overview or press Command-Return.
To return to the normal view, use the same command. This command lets you switch between normal and overview views.You can also double-click the header of a stage to run the Overview mode.
You can also use the Tab and Shift-Tab keys for navigation.
Obtaining Help
To access Podcast Composer onscreen help, use the Help menu.
To access context-sensitive help about a stage, click the Help (?) button at the bottom right of the active stage.
Creating a Workflow
This section describes how to create a workflow using Podcast Composer.
To create a workflow in Podcast Composer:
1Open Podcast Composer (in /Applications/Server/).
2Choose File > New.
3Choose File > Save.
4In the Save As dialog box, enter the name of the workflow bundle and specify where to store it.
The name that you enter in this field can be different from the name you specify in the Information stage.
5Go through stages 1 to 6 to configure your workflow.
12 |
Chapter 1 Podcast Composer Overview |
|
|
Remember to periodically save your workflow while working on it.
ÂÂ To configure basic workflow settings, see Chapter 2,“Configuring Basic Workflow
Information.”
ÂÂ To specify the input source type, see Chapter 3,“Configuring the Import Stage.” ÂÂ To brand your podcast, see Chapter 4,“Configuring the Edit Stage.”
ÂÂ To specify the output formats for your podcast, see Chapter 5,“Configuring the Export Stage.”
ÂÂ To specify destinations for your podcast, see Chapter 6,“Configuring the Publish Stage.”
ÂÂ To configure notifications announcing the publishing of your podcast, see Chapter 7,“Configuring the Notify Stage.”
6Save your workflow (see“Saving a Workflow”on page 57).
7Verify your workflow (see“Verifying a Workflow”on page 59).
8Deploy your workflow (see“Deploying a Workflow”on page 60).
To extend your workflow, or to learn about advanced Podcast Composer topics, see Chapter 9,“Advanced Podcast Composer Topics.”
Chapter 1 Podcast Composer Overview |
13 |
|
|

Configuring Basic Workflow |
2 |
Information |
Use this chapter to set the name, author, and description information of a workflow.
Every workflow defines a set of metadata or information about the workflow. Podcast Composer lets you define three fields that are referenced in Podcast Producer server: Workflow Name, Author, and Description.
Configuring Basic Workflow Information
In the first Podcast Composer stage, Information, you specify the following information or metadata:
ÂÂ Workflow Name—The name of the workflow.This is the name that appears in the Workflow pane of the Podcast Producer service. It also appears in the Workflow drop-down menu in Podcast Capture.This name can be different from the name you give to the Workflow bundle you create with Podcast Composer.
ÂÂ Author—The name of the workflow’s author information for your workflow.When building your workflow in Podcast Composer, you can configure the workflow settings to display the author information in the resulting podcast.
14
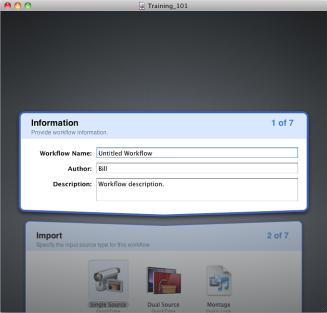
ÂÂ Description—A brief description of your workflow.The description you enter here helps Podcast Producer administrators and Podcast Capture users understand what the workflow does.
When you create a workflow bundle with Podcast Composer, the Workflow Name, Author, and Description metadata is stored in the Info.plist file inside the workflow’s bundle.
To set the workflow name, author, and description information:
1In Podcast Composer, go to the Information stage (choose Stages > Information or press Command-1).
2In the Workflow Name field, enter the name of the workflow as you want it to appear in Server Admin and Podcast Capture.
3In the Author field, enter the author information for your workflow.
4In the Description field, enter a brief description of your workflow.
5Choose File > Save.
Chapter 2 Configuring Basic Workflow Information |
15 |
|
|

Configuring the Import Stage |
3 |
|
|
|
|
Use this chapter to learn how to specify the types of the input sources to the workflow in the Import stage of Podcast Composer.
In the Import stage, you select the input source of the content your workflow processes. Podcast Composer provides three choices:
ÂÂ Single Source—A single QuickTime movie as input to the workflow.The QuickTime movie can be a video recording, a screen recording, or an audio-only recording.
ÂÂ Dual Source—Two QuickTime movies (with video tracks) as input to the workflow. For this choice, you cannot use a source with only an audio track. For example, a video recording of a lecturer and a screen recording of the lecturer’s slides. The video recordings can come from a remote camera and a local screen, two remote cameras, or a local camera and local screen.
16
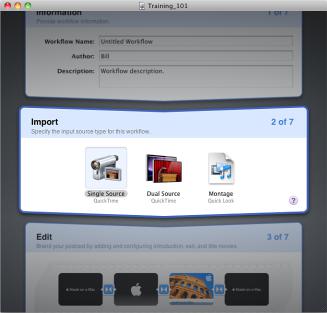
ÂÂ Montage—Documents as input to the workflow.These documents can be movies, images, Keynote presentations, Pages documents, PDF files,Word files, and PowerPoint files.
The output of the Import stage is a single movie, which is also the input movie to the next stage, Edit.
Chapter 3 Configuring the Import Stage |
17 |
|
|
Configuring Single Source
If you want the workflow to create a podcast from only one QuickTime movie, select and configure the Single Source option of the Import stage.
To configure the Single Source option of the Import stage:
1In Podcast Composer, go to the Import Stage (choose Stages > Import or press Command-2).
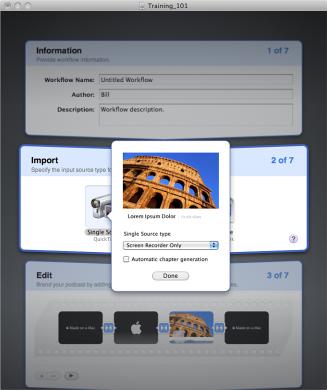
2Double-click Single Source, or move your mouse over the Single Source icon and click the Information button in the bottom-right corner of the icon.
If Single Source is selected, you can press Enter to display the Information dialog.
3From the Single Source Type pop-up menu, choose one of the following options to specify the type of recording Podcast Capture users can use with this workflow:
ÂÂ Any—The input movie can be a video recording, a screen recording, or an audioonly recording.
ÂÂ Video Device Only—The input movie is a video recording.
ÂÂ Screen Recorder Only—The input movie is a screen recording.
ÂÂ Audio Only—The input movie is an audio-only recording.
18 |
Chapter 3 Configuring the Import Stage |
|
|
4If you want the workflow to automatically detect changes in the input movie and use this information to assign chapters in the generated podcast, select Automatic Chapter
Generation.
In the case of a screen recording, the workflow inserts a chapter marker in the video when it detects a slide transition or when no changes occur in the video at a certain moment. This is useful when doing a screen recording or for any video that includes presentations.
The tool used by the workflow to add chapter markers detects stability in a movie by comparing frames and after the tool finds a stable sequence, it considers it a chapter.
Then, when the sequence changes to another sequence, the tool consider that change a transition.
Chapter markers are recommended for screen recordings, but not for video and audio recordings. However, there are instances when adding these markers is useful, such as when the source video is for a screen recording captured from the VGA or DVI stream of a computer screen. Screen recording using Podcast Capture works only on a computer running Mac OS X v10.5 or later.
5Click Done.
6Choose File > Save.
Chapter 3 Configuring the Import Stage |
19 |
|
|
Configuring Dual Source
If you want the workflow to create a podcast from two QuickTime movies, select and configure the Dual Source option of the Import stage—for example, a screen recording of a presentation and a video of the presenter.
Important: It is recommended that you provide the audio of the entire recording in the video of the presenter and not within the screen recording.
To configure the Dual Source option of the Import stage:
1In Podcast Composer, go to the Import Stage (choose Stages > Import or press Command-2).
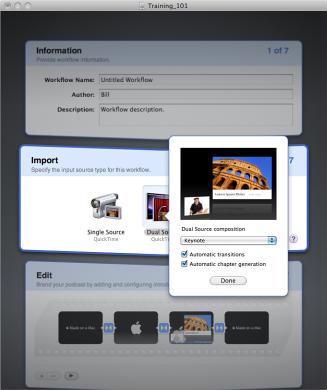
2Double-click Dual Source, or move your mouse over the Dual Source icon and click the
Information button in the lower-right corner.
A dialog appears, displaying the settings that you can configure and a live preview box that reflects your selections.
3From the Dual Source Composition pop-up menu, choose one of the following composition options to specify how the two input videos are going to be composed to create the final movie:
20 |
Chapter 3 Configuring the Import Stage |
|
|
ÂÂ Keynote Presentation—This picture-in-picture composition displays the screen recording movie in full screen and hides the second movie. After 15 seconds (by default) this composition minimizes the screen recording movie, moves it to the right, and displays the second movie in the bottom-left corner of the screen. Finally, after 15 seconds (by default) the composition brings back the screen recording movie into full screen and hides the second movie. This process repeats for the duration of the movie.
ÂÂ Overlay—This picture-in-picture composition displays the screen recording movie in full screen and overlays the second movie in the bottom-right corner of the screen.Then, in response to conditions in the screen recording (for example, a slide doesn’t change for more than 20 seconds) the location of the overlay is switched, if transition detection is enabled. If transition detection is not enabled, both movies remain in their original positions.
ÂÂ Overlay with Fade—This composition is similar to the Overlay composition, but instead of keeping the second movie in view all the time, this composition fades the movie in and out at certain intervals (10 seconds by default).
ÂÂ Theater—This composition is similar to the Overlay composition, except that you always have a full view of the screen recording movie. This option is ideal if you don’t want any part of the screen recording to be covered by the other movie.
4If you want Podcast Composer to automatically detect transitions in the screen recording movie, select Automatic Transitions.
With this option enabled, Podcast Composer can detect slide transitions in the movie and use this information to determine when to switch movies in the composition.
If you choose not to automatically detect transitions, there will be no transition.
The selected dual source composition remains static. Both movies remain in their original positions.
5If you want Podcast Composer to automatically detect changes in the input movies and use this information to assign chapters in the generated podcast, select Automatic
Chapter Generation.
For example, you might want chapters in the podcast to mark each transition to a new slide.
In the case of a screen recording, the workflow inserts a chapter marker in the video when it detects a slide transition or when no changes occur in the video for a certain moment. This is useful when doing a screen recording or for any video that includes presentations.
The tool used by the workflow to add chapter markers detects stability in a movie by comparing frames.When the tool finds a stable sequence, it considers it a chapter.
Then, when the sequence changes to another sequence, the tool consider that change a transition.
6Click Done.
7Choose File > Save.
Chapter 3 Configuring the Import Stage |
21 |
|
|
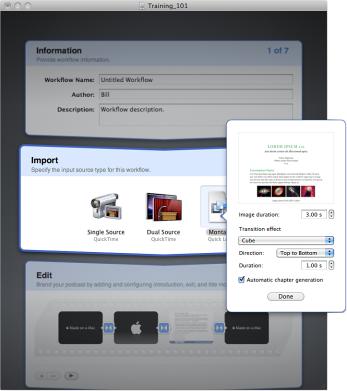
Configuring Montage
If you want the workflow to create a podcast from movies, images, Keynote presentations, Pages documents, PDF files,Word files, and PowerPoint files, select and configure the Montage option of the Import stage.
Podcast Composer treats the pages of these documents as images. It combines all pages of all documents into one slide presentation and generates a QuickTime video of the presentation.
For example, if your input is a PDF document and a Word document, Podcast
Composer treats each page in these documents as an image. Then, Podcast Composer assembles these images into one presentation and uses the settings you specify for the Montage option to generate a QuickTime movie of a slide show of the images.
If a document isn’t in landscape mode, displaying a page in full for each slide results in text that might be hard to read because the page can’t fill the entire width of the slide.
To solve this problem, Podcast Composer slices each document page in half. The upper half image of a page appears on one slide and the bottom half image appears on the following slide. Podcast Composer also adds a transition between the two slides to provide a scrolling effect.
22 |
Chapter 3 Configuring the Import Stage |
|
|
The documents are ordered in the slide show by their alpha-numeric order based on the file names of the source documents.
To configure the Montage option of the Import stage:
1In Podcast Composer, go to the Import Stage (choose Stages > Import or press Command-2).
2Double-click Montage, or move your mouse over the Montage icon and click the
Information button in the lower-right corner.
A dialog appears, displaying the settings that you can configure and a live preview video that reflects your selections.
3In the Image Duration field, enter the number of seconds that each slide is displayed.
4To specify a transition effect:
ÂÂ From the Transition Effect pop-up menu, choose an effect.
ÂÂ From the Direction pop-up menu, choose the direction of the effect (if applicable). ÂÂ In the Duration field, specify the duration of the transition in seconds.
Chapter 3 Configuring the Import Stage |
23 |
|
|
Loading...