


DVD Studio Pro 4
Table of contents
 Loading...
DVD Studio Pro 4
User Manual

Copyright © 2009 Apple Inc. All rights reserved.
Your rights to the software are governed by the
accompanying software license agreement. The owner or
authorized user of a valid copy of Final Cut Studio software
may reproduce this publication for the purpose of learning
to use such software. No part of this publication may be
reproduced or transmitted for commercial purposes, such
as selling copies of this publication or for providing paid
for support services.
The Apple logo is a trademark of Apple Inc., registered in
the U.S. and other countries. Use of the “keyboard” Apple
logo (Shift-Option-K) for commercial purposes without
the prior written consent of Apple may constitute
trademark infringement and unfair competition in violation
of federal and state laws.
Every effort hasbeen made to ensure thatthe information
in this manual is accurate. Apple is not responsible for
printing or clerical errors.
Note: Because Apple frequently releases new versions
and updates to its system software, applications, and
Internet sites,images shownin this manualmay beslightly
different from what you see on your screen.
Apple
1 Infinite Loop
Cupertino, CA 95014
408-996-1010
www.apple.com
Apple, the Apple logo, Apple Cinema Display,
DVD Studio Pro, Exposé, Final Cut, Final Cut Pro,
Final Cut Studio, FireWire, GarageBand, iDVD, iMovie,
iPhoto, iTunes, Keynote, LiveType, Logic, Mac, Macintosh,
Mac OS, Panther, PowerBook, QuickTime, Soundtrack,
SuperDrive, and Tiger are trademarks of Apple Inc.,
registered in the U.S. and other countries.
DVD@CCESS and Finder are trademarks of Apple Inc.
AppleCare and iTunes Store are service marks of Apple Inc.,
registered in the U.S. and other countries.
Adobe and Photoshop are trademarks or registered
trademarks of Adobe Systems Incorporated in the U.S.
and/or other countries.
“Dolby,” “Pro Logic,” and the double-D symbol are
trademarks of Dolby Laboratories. Confidential
Unpublished Works,© 1992–1997 Dolby Laboratories, Inc.
All rights reserved.
Other company and product names mentioned herein
are trademarks of their respective companies. Mention of
third-party products is for informational purposes only
and constitutes neither an endorsement nor a
recommendation. Apple assumes no responsibility with
regard to the performance or use of these products.

Welcome to DVD Studio Pro11Preface
About DVD Studio Pro11
About DVD Studio Pro Documentation11
Additional Resources11
Overview of Using DVD Studio Pro13Chapter 1
Moving from iDVD to DVD Studio Pro13
About Standard and High Definition DVDs14
About DVD Studio Pro and HD Resolution DVDs15
HD Video Assets17
Brief Overview of the DVD Creation Process19
What Makes a DVD Authoring System?25
Hard Disk Storage25
SCSI Devices25
DVD Burners26
DLT Drives29
External Video and Audio Monitoring29
Audio and Video Assets31
Planning Your Project33Chapter 2
Investigating Existing DVDs33
Determining Your Target Audience and Playback Device34
Deciding Which DVD Standard to Use34
Deciding Which Video Standard to Use35
Deciding What Content to Include35
Creating a Storyboard35
Designing the Menus and Buttons37
Making Sure Your Content Will Fit37
General DVD Limitations42
How Do You Do That?45Chapter 3
Creating a Simple DVD45
Creating a Play One or Play All Project47
Grabbing a Still Image from Your Movie50
3
Contents

Adding Easter Eggs to Your Menus51
Preparing Video Assets53Chapter 4
Introduction to Preparing Video Sources53
NTSC or PAL?54
Using 24 fps Video55
Choosing an Aspect Ratio56
About MPEG Video60
Encoding Video Materials for DVD61
Using the Integrated MPEG Encoder68
Encoding Video for Multi-Angle Tracks74
Adding Markers to Your Video76
About H.264 Video80
About HDV Video81
DVD Video Source Settings Summary82
Preparing Audio Assets87Chapter 5
Introduction to Preparing Audio Sources87
Audio Formats Not Supported by the DVD Specification88
Audio Formats Supported by the DVD Specification and DVD Studio Pro88
Using Multiple Audio Formats in Your Project91
Required Audio Formats for SD Projects91
DVD Audio Source Settings Summary92
Preparing Menu Assets95Chapter 6
Introduction to Preparing Menu Sources95
What Is a Menu?96
Creating a Menu96
Creating Graphics to Use in Menus97
Creating Overlays101
Creating a Layered Menu106
Creating Video for Motion Menus106
Defining the Menu Loop Point107
Creating Shapes108
Creating Graphics for Drop Zones and Buttons112
Preparing Slideshow Assets113Chapter 7
Slideshow File Formats113
Aspect Ratio and Resolution114
Colors114
Audio114
Preparing Alpha Transitions115Chapter 8
Introduction to Preparing Alpha Transitions115
4 Contents

Transition Asset Folder116
Asset Movie117
Asset Matte Movie118
Background Matte Movie119
About Alpha Transition Durations119
About NTSC and PAL Alpha Transitions120
Starting a Project121Chapter 9
Opening DVD Studio Pro121
Setting DVD Studio Pro Preferences124
Creating a New Project138
Opening an Existing Project143
Video Standards of the World145
Changing a Project’s Video Standard145
Changing a Project’s DVD Standard146
The DVD Studio Pro Interface149Chapter 10
Introduction to the DVD Studio Pro Interface150
Configuring the Interface152
Working with the Quadrants154
Working with the Tabs157
Overview of the Quadrant Tabs161
Inspector167
Palette168
Toolbar174
Drop Palette177
Comparing the Outline and Graphical Project Views177
Using the Outline Tab178
Using the Graphical Tab180
Managing Elements Using the Outline and Graphical Tabs190
Importing and Managing Assets195Chapter 11
How DVD Studio Pro Manages Assets195
About the Assets Tab201
Importing Assets207
Removing Selected Assets213
Renaming Assets213
Refreshing Still and QuickTime Assets214
Opening Assets in Their Editor216
Identifying an Asset216
Previewing Assets216
Asset Inspector218
5Contents

Introduction to Creating Menus219Chapter 12
About Menus219
About the Menu Editor224
Starting and Working with a Menu231
Creating Menus Using the Standard Method241Chapter 13
About Standard Menus242
Choosing the Menu’s Background243
Choosing the Menu’s Overlay246
Understanding Color Mapping248
Configuring the Menu Inspector for Standard Menus256
Adding Buttons to Your Menu265
Configuring Button Navigation281
Adding Drop Zones to Your Menu285
Working with Assets in Buttons and Drop Zones288
Adding Text Objects to a Menu288
Adding Audio to a Menu291
Configuring the Menu’s Drop Shadow Settings292
Configuring Motion Menu Settings293
Options in the Drop Palette for Standard Menus296
Drop Palette for Standard Menus—Dragging Assets296
Drop Palette for Standard Menus—Dragging Project Elements304
Drop Palette for Standard Menus—Dragging Templates and Styles309
Using Templates, Styles, and Shapes to Create Your Menus313Chapter 14
Introduction to Templates, Styles, and Shapes313
What Are Templates and Styles?314
Templates and Styles in the Palette316
Applying a Template or Style321
Setting Default Styles323
Creating a Template or Style324
Importing Templates and Styles326
Deleting Templates and Styles327
Managing Shapes329
Creating Menus Using the Layered Method335Chapter 15
About Layered Menus335
Choosing the Menu’s Background336
Choosing the Menu’s Overlay338
About the Menu Inspector for Layered Menus338
Adding Buttons to Your Layered Menu343
About Layered Menu Button Properties344
6 Contents

Options in the Drop Palette for Layered Menus348
Drop Palette for Layered Menus—Dragging Assets349
Drop Palette for Layered Menus—Dragging Project Elements353
Using Advanced Menu Features357Chapter 16
Adding Intro and Transition Clips to Menus357
Using Languages with Menus364
Creating and Editing Tracks369Chapter 17
About Track Limits in a DVD370
Working with a Track’s Assets370
How Many Tracks Should You Have?371
About Subtitle Streams371
DVD Studio Pro Tools for Working with Tracks371
Creating Tracks372
Opening Tracks373
Setting Track Properties373
About the Track Editor377
Configuring the Track Editor377
Understanding Time Information in the Track Editor380
Supported Asset Types384
Adding Video and Audio Assets386
Editing Video and Audio Clips390
Setting Stream Properties392
Exporting an MPEG Clip393
Working with Markers393
About Marker Placement394
Creating and Editing Markers395
Adding Markers to a Track Without a Video Clip Assigned397
Importing Markers from an Editor397
Importing Markers from a Text List399
About the Marker Types399
Setting Marker Properties401
Introduction to Stories403
Creating a Story for a Track404
Using the Story Editor404
Setting Story Properties405
Setting Story Entry Properties407
Simulating a Story407
Adding Alternate Video Streams408
Using Still Clip Transitions410
Viewing a Track413
7Contents

Creating Slideshows417Chapter 18
Introduction to Slideshows417
Want Your Slideshows to Do More?418
File Formats for Slideshows418
Adding a Slideshow to Your Project419
Creating a Slideshow Using the Menu Editor420
Working with Slides in a Slideshow421
Adding Audio to Your Slideshow424
Working with Slideshows427
Setting Slideshow Properties437
Setting Slide Properties440
Previewing a Slideshow441
Simulating a Slideshow442
Creating Subtitles443Chapter 19
Introduction to Subtitles443
Importing Older DVD Studio Pro Subtitles445
Subtitles and Overlays445
About Subtitles and Closed Captions445
Subtitle Stream Basics446
Subtitle Inspector448
What Happens with Different Aspect Ratios?454
Viewing Subtitles455
Creating Subtitles with DVD Studio Pro457
Importing Graphics Files for Subtitles463
Creating and Importing Subtitle Files464
Importing a Subtitle File465
Creating an STL Format Subtitle File467
Creating Buttons over Video471
Configuring a Button over Video Subtitle Clip473
Creating Scripts477Chapter 20
Introduction to Scripts477
Pre-Scripts478
Scripting Overview479
The Scripting User Interface480
About the Script Tab481
About the Script Inspector484
About the Script Command Inspector485
Creating and Testing Scripts486
Script Command Details489
System Parameter Register Memories List499
8 Contents

System Parameter Register Memories Details500
Using Bit-Wise Operations511
General Purpose Register Memories512
Scripting Examples517
Language Code Table525
Establishing Connections531Chapter 21
About Connections531
Connections Tab532
Connection Items533
Making Connections537
Connection Details540
Source Details540
Target Details547
Finishing a Project549Chapter 22
About the Final Steps of DVD Creation549
Should You Burn, Build, Format, or Build and Format?550
Options for Testing Your Project552
Simulating Your Project552
Setting Disc Properties559
Building Your Project566
Emulating Your Project Using DVD Player575
Setting Disc Format Properties577
About DVD-ROM Discs577
About Dual-Layer Discs580
About Two-Sided Discs584
Formatting Your Project584
Reading a DLT Drive590
Using Advanced Features591Chapter 23
VTS Editor591
DVD@CCESS598
User Operations602
Display Condition607
Remote Control Settings612
Line 21 Settings for Closed Captions614
Keyboard Shortcuts617Appendix A
General Interface and Application Controls618
General Project Controls619
Adding Project Elements620
Scrolling Through Lists621
9Contents

Assets Tab622
Connections Tab622
Graphical Tab623
Log Tab624
Menu Tab (Menu Editor)624
Outline Tab626
Palette627
Script Tab (Script Editor)627
Simulator627
Slideshow Tab (Slideshow Editor)628
Story Tab (Story Editor)628
Subtitle Editor628
Track Tab ( Track Editor)629
Viewer Tab631
Importing Other Projects633Appendix B
Importing DVD Studio Pro 2 and DVD Studio Pro 3 Projects into DVD Studio Pro 4633
Calculating Disc Space Requirements635Appendix C
Calculating a Project’s Disc Space Requirements635
Using the Calculated Bit Rate640
Transition Parameters641Appendix D
Transition Duration641
Video Transition641
Alpha Transitions642
Standard Transitions642
647Glossary
10 Contents

DVD Studio Pro is software for authoring DVD-Video titles. It is both powerful and easy
to use.
This preface covers the following:
• About DVD Studio Pro (p. 11)
• About DVD Studio Pro Documentation (p. 11)
• Additional Resources (p. 11)
About DVD Studio Pro
DVD Studio Pro lets you work with audio, video, graphics, and text materials that you
have already created and edited and orchestrate them into a DVD that can be played on
a DVD player or a suitably equipped computer.
If you have used such production tools as Final Cut Pro, Adobe Photoshop, Media 100,
or Discreet cleaner, DVD Studio Pro will be easy for you to learn. You can use
DVD Studio Pro for everything from constructing sophisticated training materials, corporate
presentations, sales tools with web links, or high-quality event videos, to preparing a
motion picture for release on DVD.
About DVD Studio Pro Documentation
DVD Studio Pro comes with documentation that will help you get started as well as
provide detailed information about the application.
• DVD Studio Pro User Manual: This is a comprehensive document that describes the
DVD Studio Pro interface, commands, and menus, and gives step-by-step instructions
for creating DVD Studio Pro projects and for accomplishing specific tasks. It is written
for users of all levels of experience.
Additional Resources
Along with the documentation that comes with DVD Studio Pro, there are a variety of
other resources you can use to find out more about the application.
11
Welcome to DVD Studio Pro
Preface

DVD Studio Pro Website
For general information and updates, as well as the latest news on DVD Studio Pro, go
to:
• http://www.apple.com/finalcutstudio/dvdstudiopro
Apple Service and Support Websites
For software updates and answers to the most frequently asked questions for all Apple
products, go to the general Apple Support web page. You’ll also have access to product
specifications, reference documentation, and Apple and third-party product technical
articles.
• http://www.apple.com/support
For software updates, documentation, discussion forums, and answers to the most
frequently asked questions for DVD Studio Pro, go to:
• http://www.apple.com/support/dvdstudiopro
For discussions forums for all Apple products from around the world, where you can
search for an answer, post your question, or answer other users’ questions, go to:
• http://discussions.apple.com
12 Preface Welcome to DVD Studio Pro

DVD Studio Pro plays a key part in delivering your video projects to your viewers. This
chapter covers many of the basics you need to know about to author and burn successful
DVDs.
This chapter covers the following:
• Moving from iDVD to DVD Studio Pro (p. 13)
• About Standard and High Definition DVDs (p. 14)
• About DVD Studio Pro and HD Resolution DVDs (p. 15)
• HD Video Assets (p. 17)
• Brief Overview of the DVD Creation Process (p. 19)
• What Makes a DVD Authoring System? (p. 25)
• Hard Disk Storage (p. 25)
• SCSI Devices (p. 25)
• DVD Burners (p. 26)
• DLT Drives (p. 29)
• External Video and Audio Monitoring (p. 29)
• Audio and Video Assets (p. 31)
Moving from iDVD to DVD Studio Pro
The Apple entry-level DVD authoring application is iDVD. It allows you to create simple
DVD-Video titles with some of the most popular features found in Hollywood-style releases,
without having to know any technical details about the process. The interface and feature
set are configured to make the process nearly foolproof.
Eventually, however, you will find yourself requiring features beyond those that iDVD
offers. DVD Studio Pro gives you access to a wide range of professional features outlined
in the DVD specification:
• Support for multiple video, audio, and subtitle streams, making it easy to create discs
that support multiple languages or add features such as a director’s commentary
13
Overview of Using DVD Studio Pro
1

• Additional menu functionality. For example, you can create and add up to 36 buttons,
control the navigation between them, and have more flexibility when assigning their
functions.
• Alternate ways to play back movies. You can use the DVD Studio Pro story feature to
control how a movie plays.
• Support for web interactivity. You can embed links to websites or other documents
into your DVD title.
• Many advanced features supported by the DVD specification, such as dual-layer discs
and copy protection
DVD Studio Pro offers several workflows and work styles for creating DVD projects,
including templates and the drag-and-drop method used within iDVD. This makes
DVD Studio Pro easy to learn while still providing the advanced features you need.
About Standard and High Definition DVDs
Standard definition (SD) DVDs provided most viewers with their first digital video
experience. The great video quality, interactive menus, and surround sound audio found
on currentDVDs set a high standard for viewer expectations. Meanwhile,the establishment
of high definition (HD) video format standards and the increasing availability of HD
broadcasts have led to more and more viewers having HD video monitors, and even
higher expectations for DVDs.
These expectations, along with the development of improved compression technologies
and a blue laser technology that greatly increases a disc’s storage capacity, have led to
the ability of recording HD video onto a DVD.
14 Chapter 1 Overview of Using DVD Studio Pro

But Aren’t DVDs Already High Definition?
In addition to traditional 4:3 aspect ratio video, traditional DVDs support widescreen
16:9 video, which is often mistaken for being high definition. The 16:9 video used on
current DVDs, however, is the same resolution as the 4:3 video, which is the same as
the standard NTSC and PAL broadcast resolutions. The 16:9 video must be anamorphic,
which makes it appear horizontally squashed when viewed on a 4:3 monitor.
This leads to a logical next question—what constitutes high definition video? While
most HD video formats use a 16:9 aspect ratio, what generally defines whether or not
they are HD is the resolution.
Video resolutions that result in more pixels per frame than are used in SD-based DVDs
are considered high definition. There are two common HD vertical resolutions: 720 lines
and 1080 lines (used for both NTSC and PAL). These compare to NTSC’s 480 lines and
PAL’s 576 lines for SD video.
As withSD-based DVDs, the scanning method used on HD-based DVDs can be interlaced,
with a video frame containing one field with the odd lines and another field with the
even lines, or progressive, where each frame is complete. Not all HD formats support
progressive scanning, however. See Supported Video Resolutionsfor details on supported
SD and HD video formats, including frame rates and scanning methods.
See About DVD Studio Pro and HD Resolution DVDs and HD Video Assets for more
information about creating HD projects in DVD Studio Pro.
About DVD Studio Pro and HD Resolution DVDs
In addition to supporting standard definition (SD) format video DVDs, DVD Studio Pro
supports creating high definition (HD) format video DVDs.
With the exception of support for HD video resolutions and the number of buttons on
menus and button over video subtitles, HD projects in DVD Studio Pro have the same
limits as SD projects.
There are two aspects to creating DVDs with HD content: what you can put into the DVD
video zone and the DVD disc media.
DVD Video Zone with HD Content
While the contents of the DVD video zone for an HD-based DVD (HVDVD_TS) are similar
to thoseof an SD-basedDVD video zone(VIDEO_TS), there are some important differences:
• HD-based DVDs support a broad range of video resolutions, including most of those
used in SD-based DVDs. See Supported Video Resolutions for a complete list of
supported resolutions.
15Chapter 1 Overview of Using DVD Studio Pro

• In addition to supporting SD MPEG-2 video encodes, HD-based DVDs support HD
MPEG-2 and H.264 video encodes. These are discussed in HD Video Assets.
Blue Laser Disc Media
Due to the improved video resolution possible with HD video, the encoded video files
for HD resolution DVDs can be larger than those used with SD resolution DVDs. For that
reason, a media format based on a blue laser was designed specifically for DVD projects
containing HD video. See the following table for a comparison of SD and HD disc sizes.
Blue laser capacityRed laser capacityDisc
15 GB4.7 GBSingle-sided, single-layer
30 GB8.54 GBSingle-sided, dual-layer
In addition to blue laser based DVD media, an HD project’s DVD video zone can be written
to DVD media based on the red lasers used by traditional DVDs. (The obvious limitation
is that you will not be able to fit as much video data on the disc.)
Important: SD-based DVD players are not able to play DVD projects containing HD content,
whether they are on red or blue laser media. Additionally, only HD projects on special 3x
DVD-ROM red laser media are officially supported in the HD DVD specification. You can
burn HD projects to traditional red laser media on your system; however, the discs might
not play in all HD DVD players.
Supported Video Resolutions
All video resolutions supported by SD-based DVDs are also supported by HD-based DVDs.
This means that an HD-based DVD can use an HD video resolution for the main feature,
then use an SD video resolution for extras. The following list includes the SD and HD
video resolutions supported by DVD Studio Pro.
Note: MPEG-1 encoded video files are not supported in HD projects.
NTSC
Frame rates with an “i” indicate the interlaced scanning method; those with a “p” indicate
the progressive scanning method.
NotesAspect ratioFrame rateResolution
Also known as SIF format4:329.97i352 x 240
Also known as 1/2 D14:329.97i352 x 480
Also known as Cropped D1; 16:9 is anamorphic4:3, 16:929.97i704 x 480
Also known as Full D1; 16:9 is anamorphic4:3, 16:929.97i720 x 480
HD only, also known as 480p; is anamorphic16:959.94p720 x 480
HD only, also known as 720p16:959.94p1280 x 720
HD only; 16:9 is anamorphic16:929.97i1440 x 1080
16 Chapter 1 Overview of Using DVD Studio Pro

NotesAspect ratioFrame rateResolution
HD only, also known as 1080i16:929.97i1920 x 1080
PAL
Frame rates with an “i” indicate the interlaced scanning method; those with a “p” indicate
the progressive scanning method.
NotesAspect ratioFrame rateResolution
Also known as SIF format4:325i352 x 288
Also known as 1/2 D14:325i352 x 576
Also known as Cropped D1; 16:9 is anamorphic4:3, 16:925i704 x 576
Also known as Full D1; 16:9 is anamorphic4:3, 16:925i720 x 576
HD only, also known as 576p; is anamorphic16:950p720 x 576
HD only, also known as 720p16:950p1280 x 720
HD only; 16:9 is anamorphic16:925i1440 x 1080
HD only, also known as 1080i16:925i1920 x 1080
Using 24P Video Formats
Both SD and HD projects can use assets encoded at 24 fps, as long as they are encoded
specifically with NTSC or PAL flags set.
Note: For NTSC, 24 fps is actually 23.976 fps, although it is most often referred to as
23.98 fps
Video at 24 fps has two main advantages: it matches the film frame rate, and, in the case
of NTSC, provides much smaller files due to having six fewer frames per second.
See Importing 24 fps Assets for more information.
HD Video Assets
There are a variety of sources for HD video assets to use in your HD projects, with the
most common being DVCPRO HD and HDV camcorders.
• With DVCPRO HD, once you have finished editing the video, the result will need to be
encoded to the HD MPEG-2 or H.264 video format.
• With HDV, which is already compliant MPEG-2 HD video, you can edit the video in
Final Cut Pro and import the result directly in your HD projects.
17Chapter 1 Overview of Using DVD Studio Pro

DVD Studio Pro supports HD video encoded using the HD MPEG-2 codec and the H.264
codec. Both of these formats are playable with the Apple DVD Player. You can use
Compressor to encode video to either of these formats. When you import HD resolution
QuickTime video, such as DVCPRO HD video, into DVD Studio Pro, it is HD MPEG-2 encoded
using the integrated MPEG encoder.
Using HDV Assets
The HDV format uses MPEG-2 encoding to store HD video on a standard DV or Mini DV
tape. Two video resolutions supported by the HDV format:
• 1280 x 720 (720p) at 19 Mbps
• 1440 x 1080 (1080i or 1080p) at 25 Mbps (which is anamorphic 16:9)
Imported HDV assets have the video and audio separated into elementary streams (the
HDV format combines the video and audio into a single file), but are not otherwise
processed or converted.
Important: The HD DVD specification does not support all HDV frame rates. See About
HDV Video for more information.
Using H.264 Assets
You can use the H.264 for HD DVD presets included with Compressor to encode several
supported HD and SD video resolutions for use in your HD projects.
The H.264 encoder is twice as efficient as the standard MPEG-2 encoder. When compared
to encoding with MPEG-2, this means that with the H.264 encoder:
• You can use a lower bit rate to get the same quality, resulting in smaller files.
• You can use the same bit rate and get better quality with the same file size.
See About H.264 Video for more information.
Using DVCPRO HD and Uncompressed HD Assets
Another source of HD assets for your HD projects is video encoded with the DVCPRO HD
compression types or uncompressed video. DVCPRO HD video, like DVCPRO SD video,
and uncompressed video cannot be used directly in your DVD Studio Pro projects. You
can import them, however, and DVD Studio Pro will automatically encode them to
compatible HD MPEG-2 assets using the integrated MPEG encoder. You can also encode
them to HD MPEG-2 or H.264 using Compressor or QuickTime.
Note: Using the Animation codec with HD resolution video can significantly reduce your
computer’s performance and should be avoided if possible. An alternative is to use the
Apple Intermediate Codec.
18 Chapter 1 Overview of Using DVD Studio Pro
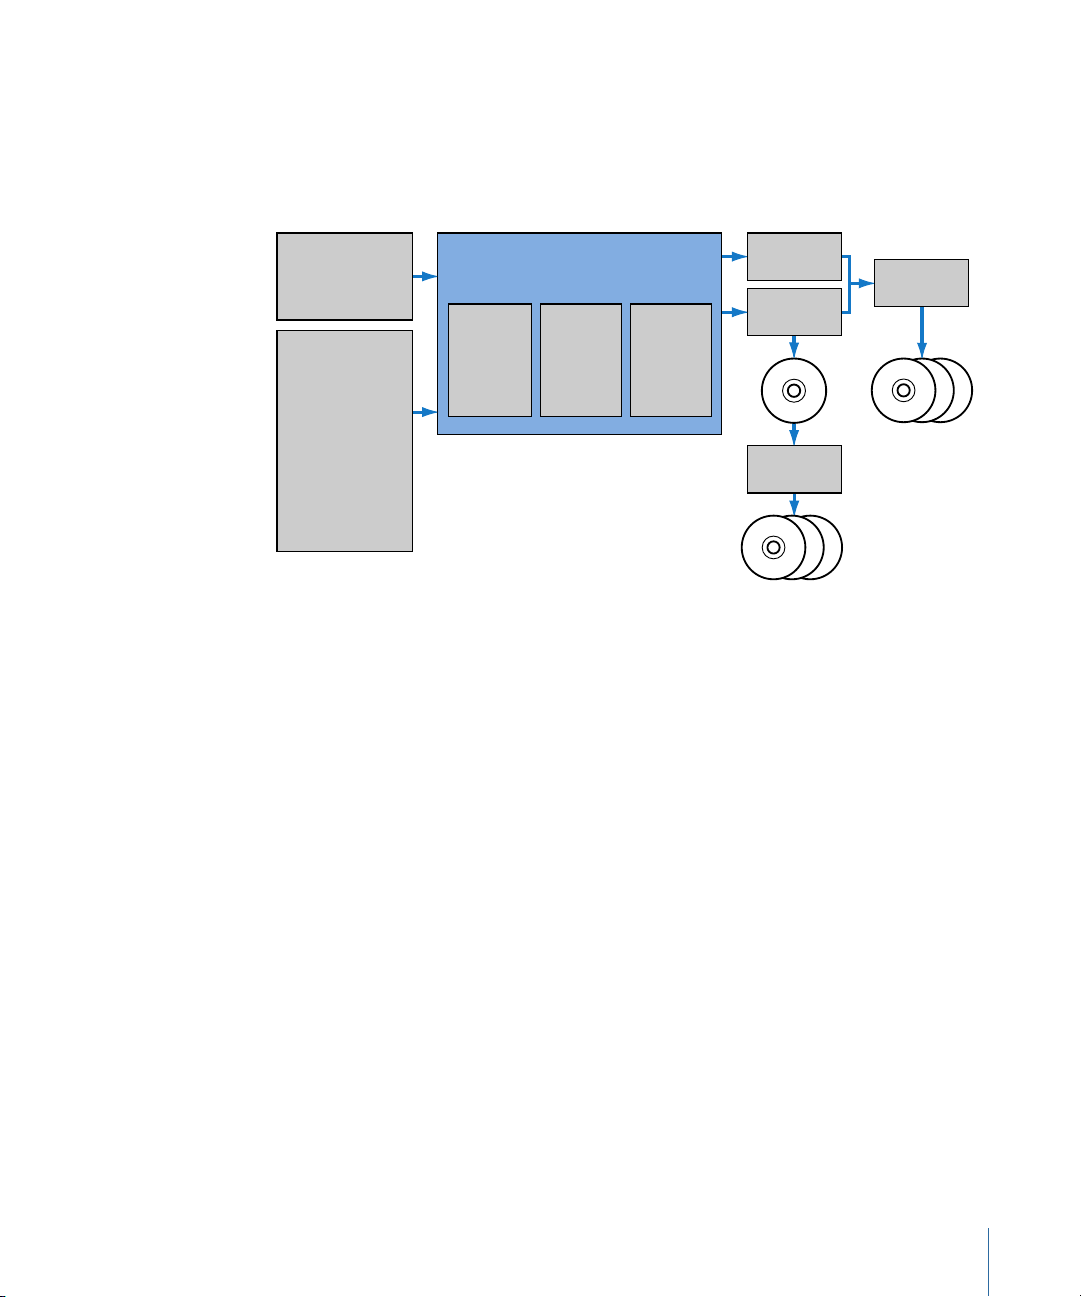
Brief Overview of the DVD Creation Process
You can create many different styles of DVDs with DVD Studio Pro, from corporate
presentations to training materials to event videos to feature films. While the content
and structure of each style may vary considerably, they all use the same basic DVD creation
process.
Edit raw sources
• iMovie
• Final Cut Pro
• Final Cut Express
Author the DVD with
DVD Studio Pro
DVD burner
(SuperDrive)
DLT
drive
Replication
facility
Encode
assets.
Create
menus,
tracks,
slideshows.
Build and
format
the
project.
Duplication
facility
Other sources
• Compressor
• Motion
• Soundtrack Pro
• Color
• LiveType
• Logic Pro
• GarageBand
• iTunes
• iPhoto
• Keynote
There are four stages to the DVD creation process:
Stage 1: Creating Your Source Material
The first part of the DVD creation process is to create or assemble your source material.
See Creating Source Material for more information.
Stage 2: Encoding Audio and Video to Compatible Formats
Once you have created your source materials, they must be encoded to comply with the
DVD specification. See Encoding Video and Audio for more information.
Stage 3: Authoring Your DVD Title
You use DVD Studio Pro to orchestrate your video, audio, and graphics material into an
interactive DVD-Video title, complete with menus, buttons, subtitles, and alternate
languages or soundtracks. See Authoring with DVD Studio Pro for more information.
Stage 4: Building the Project and Creating Your Disc
Creating adisc involves two steps: building the DVD-formatted video zone and formatting
it for how you intend to deliver it. See Creating a Disc for more information.
It’s important to understand the entire process, and how DVD Studio Pro is used in the
process, before you begin your DVD projects.
19Chapter 1 Overview of Using DVD Studio Pro

Creating Source Material
The first part of the DVD creation process is to create or assemble your source material.
This might mean shooting video, recording voice or music tracks, designing graphics to
be included, and planning the general functionality of your project. If you are converting
an existing video program into a DVD, you may only need to gather your original video
and audio material and design graphics for the menus that will weave them together.
You can use whatever tools you prefer for creating your video and audio material, as long
as the resulting files are compatible with the MPEG or H.264 encoder that you plan to
use. In most cases, your video and audio assets will be created and saved as QuickTime
movie files or in standard sound file formats like AIFF, WAVE, or SoundDesigner II.
Your program material should be completely edited, including any special effects, audio
fades, and scene transitions, before you encode it.
Menu graphics can be still image files, multilayer Photoshop files, or full-motion video.
To create the menu graphics, you can use virtually any graphics program. DVD Studio Pro
includes extra support for Adobe Photoshop (PSD) files, taking advantage of Photoshop’s
“layers” feature to simplify the creation of backgrounds and overlays. Also included is
support for the menu loop point you can set in Motion.
If you plan to include alternate-language subtitles in your DVD project, you will want to
have your soundtrack transcribed and translated.
The most important thing you can do when preparing your assets is to use the
highest-quality settings available. Any flaws in your material will be revealed on DVD
much more quickly than in any other medium.
Once they are encoded into a DVD-compliant format, DVD Studio Pro does not improve
or degrade the quality of your source material in any way; if you use high-quality source
materials, you’ll get high-quality results.
Here are some guidelines to help you maintain high quality.
• Capture and edit your video material at the same resolution that you will use on the
DVD (typically 720 x 480 at 29.97 frames per second [fps] for NTSC or 720 x 576 at 25 fps
for PAL for SD-based DVDs).
• When recording and editing audio, use a 48 kilohertz (kHz) sample rate and no
compression. This assures the best quality whether you use the uncompressed audio
on the DVD or decide to use the Compressor AC-3 encoder to compress it.
Important: When creating DVDs, your audio must have either a 48 kHz or 96 kHz sample
rate. You cannot use the 44.1 kHz sample rate found on standard audio CDs. In most
cases, the DVD Studio Pro embedded AIFF encoder will convert your audio to the correct
sample rate if necessary.
20 Chapter 1 Overview of Using DVD Studio Pro

• When saving video material to the QuickTime format, either specify no compression
(which requires a lot of disk space) or use a high-quality compression codec like DV or
Motion JPEG.
Encoding Video and Audio
Once you have created your source materials, they must be encoded to comply with the
DVD specification. DVD Studio Pro can use materials encoded using its integrated MPEG
and AIFF encoders, as well as materials encoded using the Apple Compressor application
and other methods.
What Is Needed for DVD?
Before video or audio material can be used on a DVD, it must be prepared in one of the
formats defined in the DVD specification. This usually means MPEG-2 format for video
and Dolby AC-3 format for audio files (although you can also use standard PCM audio
formats, such as AIFF files, DTS format files, and MPEG-1 Layer 2 formatted files).
SD projects also accept the older MPEG-1 video format, most commonly seen in web-based
applications. Because MPEG-1 is about one quarter the resolution of MPEG-2 (352 x 240
as opposed to 720 x 480 for NTSC or 352 x 288 versus 720 x 576 for PAL) and utilizes much
lower data rates, the quality is significantly lower. However, MPEG-1 is useful for very long
programs if the picture quality is not of primary importance. Using MPEG-1 encoding,
you can fit many hours of material on a single DVD.
Important: You cannot use MPEG-1 formatted video assets in HD projects.
MPEG encoding performs extremely complex calculations on your source material to
determine what can be safely “thrown away” with minimal impact on the visual quality.
As a result, MPEG encoding can produce files that are less than ten percent the size of
the source files, while still looking great.
Using the DVD Studio Pro Tools
DVD Studio Pro includes integrated MPEG and AIFF encoders. When you add a QuickTime
asset directly to your DVD Studio Pro project, it is automatically encoded to be
DVD-compliant. You can choose whether the asset is encoded in the background while
you continue authoring or whether the encode waits until you build your project.
Also included with Final Cut Studio is Compressor, an encoding tool that provides
additional MPEG encoding configurations and can process batches of video and audio
clips in one step.
21Chapter 1 Overview of Using DVD Studio Pro

For many projects you will probably want to use a Dolby-certified AC-3 encoder (such as
the AC-3 encoder included with Compressor). An AC-3 encoder can be used to encode
multichannel surround soundtracks for inclusion on a DVD, as well as for stereo or mono
soundtracks. Using AC-3 encoded audio results in smaller files and a lower playback bit
rate. Uncompressed PCM audio formats (WAV or AIFF) have significantly larger file sizes
and generally do not support specialized soundtrack formats, such as surround channels.
Using Pre-Encoded Sources
Many other available tools, including software and hardware encoders, produce MPEG
streams. You can use any MPEG encoder you prefer, as long as it creates DVD-compliant
elementary streams. This means that the audio and video information is contained in
separate files (the streams).
Important: DVD Studio Pro cannot use MPEG multiplexed System, Program, or Transport
streams for DVD projects.
See About MPEG Video for more information on DVD-compliant requirements.
Authoring with DVD Studio Pro
You use DVD Studio Pro to orchestrate your video, audio, and graphics material into an
interactive DVD-Video title, complete with menus, buttons, subtitles, and alternate
languages or soundtracks.
DVD Studio Pro gives you complete control over every aspect of your DVD and lets you
view its elements and simulate your DVD in real time as you create it.
You can easily create menus, add buttons, and specify the actions that occur when the
buttons are activated. You can define powerful linking and scripting functionality with
just a few clicks. And the Inspector gives you a complete picture of all the characteristics
of any item in your project.
Authoring in DVD Studio Pro consists of these basic steps:
Stage 1: Setting the DVD and Video Standard
You can use DVD Studio Pro to author traditional SD-based DVDs or HD-based DVDs using
either NTSC or PAL frame rates. It is important to set this before importing your assets
because these settings control what happens when QuickTime assets are imported.
Stage 2: Importing Assets
Import your video, audio, graphics, and subtitle assets into DVD Studio Pro. If they are
not already DVD-compliant, the integrated MPEG encoder automatically encodes them.
Stage 3: Creating Menus
Create one or more menus to define the structure and navigation of your DVD. The menus
can rely completely on the supplied templates and styles or can use your own graphics.
22 Chapter 1 Overview of Using DVD Studio Pro

Stage 4: Adding Buttons to the Menus
Add one or more buttons to your menus. The display mode (4:3, 16:9 Letterbox, and so
on) and DVD standard (SD DVD or HD DVD) determine the maximum number of buttons
each menu can have. Each button can initiate a wide variety of actions, themost common
being to open a different menu, play a track, or run a script. This hierarchy of menus and
buttons gives you tremendous flexibility in constructing an “interactive” program in which
the viewer has numerous options to choose from.
Stage 5: Creating Tracks and Slideshows
Create one or more tracks, each consisting of one or more video streams, audio streams,
subtitle streams, chapter markers, and stories. Create one or more slideshows, each
consisting ofstill images and, optionally, audio. Tracks and slideshows can also be created
by dragging assets to the Menu Editor and choosing options from the Drop Palette.
Stage 6: Linking the Project Elements
Set up the various actions and links that will make your project work as it should when
viewed. For example, you can set what happens when a DVD player first starts playing
the disc, what happens when a track finishes playing, and what happens if the player sits
idle at a menu for a specific amount of time.
Stage 7: Simulating Your Project
View your elements and test your project as you go using the real-time DVD Simulator
built in to DVD Studio Pro. This process allows you to verify the links between the project
elements.
Stage 8: Building and Burning Your Project
Build the completed project and either send it to a replication facility or burn a DVD on
your own system.
Creating a Disc
Creating a disc involves two steps: building the DVD-formatted video zone (VIDEO_TS
for SD-based DVDs and HVDVD_TS for HD-based DVDs) and formatting it for how you
intend to deliver it.
Building the Video Zone
When you build your SD-based DVD project, a set of files is created and stored on your
hard disk in a folder named “VIDEO_TS” (video title set). The contents and structure of
this folder are strictly defined by the DVD specification. HD projects store their files in a
folder named “HVDVD_TS.”
When you build your project within DVD Studio Pro, it combines all the material you’ve
included (video, audio, and subtitles for the menus and tracks) into a single stream and
writes it to this special folder. Using DVD Player, which is included with your operating
system, you can open and play the contents of this folder, just as if it were on a DVD disc.
23Chapter 1 Overview of Using DVD Studio Pro

Formatting and Burning
Depending on the quantity of DVD discs you need, you can:
• Burn oneor moreDVDs onyour system(if properly equipped): This is a quick way to create
a test disc.
Note: You cannot add high-end features such as copy protection.
• Send a burned disc to a duplicator who can burn additional copies for you: This allows
you to create more discs than you would want to burn on your own system at a lower
cost than using a replicator. Because the copies are based on a disc you burn on your
system, the duplicated discs have the same restrictions as when you burn on your
system.
• Prepare suitablefiles to send toa DVD replicationfacility: Use a replicator to make copies
that are compatible with all DVD players, to create larger quantities of discs, and to
include specialized features not supported by your system’s DVD burner.
If you are using a DVD replication facility, you can deliver your project to the facility in
several ways:
• DLT: Digital Linear Tape (DLT) is the preferred method for sending an SD DVD project
to a DVD replication facility. DVD Studio Pro supports writing directly to a DLT drive.
DLT is well suited to transporting DVD projects because of its reliability and very high
capacity.
Important: You cannot write HD DVD projects to a DLT drive.
• Burned DVD: ManyDVD replicators accept DVD discs that you’ve burned on your system
for replication. There are special requirements if you want to include high-end features
such as dual-layer and copy protection. See DVD Burners for more informationon using
burned DVD discs for replication, including information about the Cutting Master
Format (CMF).
• Hard Disk: You can format your SD or HD project to an external hard disk and send the
hard disk to your replicator. By selecting a CMF or DDP format, you can also include
advanced features such as copy protection. This method works especially well for large
HD projects.
• Electronic Copy: Some replicators have provisionsthat allow you to transfer the project’s
build files directly to their server using the Internet.
See Output Devices for information on using these methods for delivering projects to
replicators.
24 Chapter 1 Overview of Using DVD Studio Pro

What Makes a DVD Authoring System?
The DVD Studio Pro installation booklet lists the minimum hardware and software
requirements for using DVD Studio Pro to build DVD titles. However, you may find you
need additional items beyond the minimum requirements to make up your DVD authoring
system. Depending on the types of DVD titles you intend to create, your DVD authoring
system can be an off-the-shelf Mac Pro with a SuperDrive or a specialized system with
additional drives and hardware.
See the following for more information:
• Hard Disk Storage
• SCSI Devices
• DVD Burners
• DLT Drives
• External Video and Audio Monitoring
Hard Disk Storage
No matter what sort of titles you intend to create, you will be working with very large
files.
You should have at least twice as much hard disk storage space as the size of your project.
(For DVD-5, for example, which can hold about 4.4 GB, you need 4.4 GB for the MPEG-2
encoded asset files and another 4.4 GB to hold the built, or compiled, project. An HD
project can require about 60 GB to hold the asset and built project. Original asset files,
such as DV format video, require much more space than the MPEG-2 encoded versions
used in your DVD project.) For best build performance, dedicate two or three Ultra Wide
A/V or FireWire hard disks to your project. (Make sure they contain only your media and
no other programs that might fragment the disk and decrease performance.) If you have
three disks, use one for video assets, one for audio assets, and the third for the finished
files. If you have two disks, use one for source assets and one for final files.
SCSI Devices
Depending on your needs, you may need to add external devices—such as hard disks
and DLT drives—that require SCSI support.
To use SCSI devices, you must either have your Mac properly equipped when ordering
it or add a third-party SCSI PCI card to your existing desktop computer. Contact your
Apple Authorized Reseller or see the Support area of the Apple website for a list of
suggested SCSI cards and devices.
25Chapter 1 Overview of Using DVD Studio Pro

DVD Burners
Being able to burn a DVD is useful for both proofing your titles on set-top DVD players
and burning the finished project (when only a small number of discs are required). You
can also burn a disc for a duplication or replication facility to use as a master when larger
quantities are needed.
You cannot burn discs that support Macrovision copy-protection or Content Scrambling
System (CSS) encryption. These must be created at a replication facility.
Note: For best results, it is recommended that you supply the replication facility with a
DLT tape or hard disk instead of a burned DVD disc. Be sure to confirm with the facility
what formats it supports.
Choosing a DVD Burner
When choosing a DVD burner for your system, you have the option of using an Apple
SuperDrive or other drives. Your choice depends in part on which media you want to
use: whether you intend to burn on red laser or blue laser media and, in the case of red
laser burners, whether to use general or authoring media.
Note: You cannot burn SD projects to blue laser media.
General Versus Authoring Media
The first drives created to write DVD-R discs used a special red laser and expensive media
and are known as authoring media drives. The most common DVD drives, however, use
a less expensive red laser and media. Such drives are known as general media drives.
Red laser DVD drives can write to either general or authoring media—not both. The
SuperDrive supplied with many Apple systems supports only general media. To use
authoring media, you need to connect a special DVD-R drive.
Important: Be sure you write only to media supported by your drive. If the media is not
labeled either general or authoring, it was likely manufactured before the existence of
general drives and can be assumed to be authoring-compatible.
The type of media you use only affects the writing of the disc. Both types of DVD drives
and most DVD-ROM drives and set-top DVD players can read and play both general and
authoring media.
For most projects, there is no significant difference between a DVD created using general
or authoring drives and discs. However, if you intend to use a replicator and require
high-end features such as Macrovision copy-protection and CSS data encryption, you
must use authoring media with an authoring drive.
26 Chapter 1 Overview of Using DVD Studio Pro

Even with authoring media, you cannot burn a DVD that supports any of these high-end
features on your own system. However, authoring media supports the Cutting Master
Format (CMF), which can be used to add information required by the replicator to put
these features on your discs. General media does not support CMF.
See The Cutting Master Format for more information on the CMF standard.
An Alternative Way to Use General Media
While you cannot use the CMF format directly on general media discs, you can still use
general media discs to deliver DVD projects with high-end features to your replicator
by using them as data discs. In general, you format your project to your hard disk using
a CMF or DDP format. You can then copy the resultant Layer 0 and Layer 1 folders to
your DVD media (each layer to its own disc). While these discs are not DVD-Video discs
and cannot be played in a DVD player, they do contain all the information the replicator
needs to create the final discs. See Output Devices for more information about formatting
to your hard disk.
Important: Be sure to check with your replicator before making the discs.
About the Different Types of General DVD Media
There are several types of DVD media available that DVD Studio Pro can use. The type
you should use depends on your requirements. For example,
• If playback compatibility is a primary concern: Burning discs that can be played back on
most set-top DVD players is often a high priority. Several variables affect this, including
the media type, the brand of media, and the DVD player itself. In general, newer DVD
players can play a wider variety of media types; however, there are exceptions to this.
You should always test your burned DVDs on a variety of DVD players to verify
compatibility.
• If rewritable media is more efficient for you: Using rewritable DVD media can be very
useful when you want to burn a test disc of a project to verify various aspects of it. For
example, you might want to burn a disc just to verify that a menu or script works
correctly on a set-top DVD player or to see the video quality of a clip on a variety of
external monitors. Being able to make a change to the project and then reuse the disc
to burn it saves having to use a new disc each time.
• If you needto burn a dual-layer project: Being able to burn a dual-layer project to a DVD
disc can be very useful. You should be aware, though, that there are big differences
between DVD+R double-layer and DVD-R dual-layer media.
Following is some general information on the types of media you are able to choose
from.
DVD-R and DVD+R
These are “write-once” discs that tend to be the most widely compatible with DVD players.
27Chapter 1 Overview of Using DVD Studio Pro

DVD-RW and DVD+RW
These rewritable discs can be erased and reused multiple times. While they cost a bit
more than “write-once” discs, the ability to use them multiple times to verify various
aspects of your project as you work on it can be very useful. However, rewritable discs
tend to not be as compatible with DVD players as “write-once” discs.
When you use DVD-RW and DVD+RW media, DVD Studio Pro first checks to see if the disc
contains any files. If it is empty, the format proceeds. If there are files on the disc, an alert
appears warning you that the disc will be erased if the format continues—you can then
continue or cancel the format process.
DVD+R Double-Layer
You can use DVD+R double-layer media, often referred to as DVD+R DL, for burning your
dual-layer projects. With DVD+R double-layer media, DVD Studio Pro places the layer
break point and sets the switch point to be nonseamless as specified in your project.
DVD+R double-layer discs require you to use the Opposite Track Path (OTP) direction
setting when burning the disc. This means that the first layer must be larger than the
second layer. See Setting the Dual-Layer Direction for more information.
While DVD+R double-layer discs allow you to burn your dual-layer projects, they tend to
have more compatibility issues than the other types of DVD media.
DVD-R Dual-Layer
If your system contains a DVD drive that can write to the new DVD-R dual-layer media,
you can burn your DVD project to it with DVD Studio Pro. However, there are several
issues:
• Because currently DVD Studio Pro has no way to identify DVD-R dual-layer media as
having two layers, burning a dual-layer project to it results in the appearance of an
alert message telling you that the DVD media may have insufficient room to hold the
project. This message is based on the assumption that the disc is single layer. Both
layers of the disc will be written to as needed, however, when you click Continue.
• If you are burning a dual-layer project, the break point you set will not affect where
the layer break actually occurs. Instead, the first layer is written to until filled, at which
point the drive switches to writing to the second layer.
• The switch between layers is a seamless layer change not supported by some DVD
players, which may stop playing the disc when the switch point is reached.
Important: Do not use DVD-R dual-layer media unless these issues do not impact your
project.
Determining Which Media Types Your DVD Drive Supports
Before using any of the media types described in About the Different Types of General
DVD Media, you should verify that your DVD drive supports that type.
28 Chapter 1 Overview of Using DVD Studio Pro

To verify the media types supported by your DVD drive
1 Choose Apple menu > About This Mac.
2 Click the More Info button in the About This Mac window.
3 Click the disclosure triangle next to Hardware to show the list of hardware devices.
4 Select the Disc Burning item in the hardware list.
The DVD-Write line that appears in the information pane lists the supported media types.
DLT Drives
Digital Linear Tape (DLT) drives are the most reliable way to deliver SD DVD content to
a replicator. They are also a good way to back up completed projects so that you can
remove them from your hard disks and make room for your next project.
SD DVD data written to DLT drives with DVD Studio Pro can use Data Description Protocol
(DDP) version 2.0 or version 2.1. You can also write using CMF version 1.0.
Important: You cannot write HD DVD projects to a DLT drive.
External Video and Audio Monitoring
You can configure your system to support external video and audio monitors. This makes
it possible to more closely simulate a viewer’s environment before you build the project
and burn a test DVD.
When using external monitors, keep the following in mind:
• External video monitors are only used during simulation.
• External audio monitors are active during simulation and while playing fromthe Assets
tab or any of the editors (Track, Story, Slideshow, and Menu Editors).
• When youare using an external video monitor, the Simulator window on your computer
is inactive.
• You cannot use the pointer to click buttons on the external video monitor. You must
control the simulation by using the Simulator window’s controls.
• Depending on your system and the video being simulated, frames may be skipped
during playback to maintain synchronized playback with the audio.
The Simulator pane in DVD Studio Pro Preferences contains settings that control whether
the external video and audio monitors are used. Additionally, the Simulator contains
settings that allow you to change the display mode (4:3 Pan-Scan, 4:3 Letterbox, or 16:9)
and resolution (SD, HD 720, or HD 1080). See Simulator Preferences and Simulating with
an External Video and Audio Monitor for more information.
29Chapter 1 Overview of Using DVD Studio Pro

Connecting an External Video Monitor
When simulating your project on your computer’s video monitor, you do not see video
exactly as a viewer would when playing the video using a set-top DVD player connected
to an NTSC or PAL monitor. There are two primary differences:
• Pixel aspect ratio: Computer monitors always use square pixels, while SD video uses
rectangular pixels. When viewed on the computer’s monitor, the Simulator scales the
pixels to make them fit the 4:3 or 16:9 aspect ratio, which can affect the video
appearance.
• Color space: Computer monitors generally use RGB color space for their displays while
most monitors used to view DVDs use the YUV color space.
The advantage of connecting an external video monitor is that, depending on the monitor
you connect and whether your project’s assets are already encoded for use on a DVD,
you are able to see the video as the viewer would see it.
The external video monitor uses the second monitor as configured in the Displays pane
of System Preferences. You must set the resolution and refresh rate to match the external
monitor. There are two common approaches to connecting an external video monitor:
• Connecting a video monitor to your computer’s S-Video output (if present)
• Connecting a second monitor to your system (if supported)
For example, you could connect an NTSC or PAL monitor to the S-Video output of a
PowerBook G4 system.
Note: When connected to an NTSC or PAL monitor, this video output provides only an
approximation of what the video will look like when burned to a disc and played on a
DVD player. Due to rendering, rescaling, and interlacing issues, you should not rely on
this output as a true representation of the video quality, especially with SD projects.
Connecting an External Audio Monitor
There are two primary issues with monitoring your project’s audio using the computer’s
built-in audio system:
• The built-in system cannot play surround sound audio. The audio is first downmixed
to stereo, then played.
• The built-in system cannot play DTS audio.
There are two common approaches to connecting an external audio monitor:
• Connecting a suitable AC-3 or DTS decoder to the computer’s optical digital audio
output (also known as an S/PDIF output)
• Connecting a suitable AC-3 or DTS decoder to the computer’s FireWire or USB port
30 Chapter 1 Overview of Using DVD Studio Pro
Loading...