


PowerBook 


Getting Started
Setup and important health-related information for the PowerBook 
 notebook computers
K Apple Computer, Inc.
© 1994 Apple Computer, Inc. All rights reserved.
Under the copyright laws, this manual may not be copied, in whole or in part, without the written consent of Apple. Your rights to the software are governed by the accompanying software license agreement.
The Apple logo is a trademark of Apple Computer, Inc., registered in the U.S. and other countries. Use of the “keyboard” Apple logo (Option-Shift-K) for commercial purposes without the prior written consent of Apple may constitute trademark infringement and unfair competition in violation of federal and state laws.
Every effort has been made to ensure that the information in this manual is accurate. Apple is not responsible for printing or clerical errors.
Apple Computer, Inc. 1 Infinite Loop
Cupertino, CA 95014-6299 (408) 996-1010
Apple, the Apple logo, AppleShare, AppleTalk, EtherTalk, LaserWriter, LocalTalk, Macintosh, PowerBook, and StyleWriter are trademarks of Apple Computer, Inc., registered in the U.S. and other countries.
AppleColor, Apple Desktop Bus, Disk First Aid, Finder, Macintosh PC Exchange, and PowerBook Duo are trademarks of Apple Computer, Inc.
Adobe, Adobe Illustrator, Adobe Photoshop, and PostScript are trademarks of Adobe Systems Incorporated, which may be registered in certain jurisdictions.
Aldus, PageMaker, and SuperPaint are registered trademarks of Aldus Corporation.
Canvas is a trademark of Deneba Software.
CompuServe is a registered service mark of CompuServe, Inc.
Exposure is a registered trademark of Preferred Publishers, Inc.
Helvetica and Times are registered trademarks of Linotype Company.
Lotus is a registered trademark of Lotus Development Corporation.
Macintosh Basics was developed using VideoWorks Interactive. MacroMind is a registered trademark, and VideoWorks is a trademark of Macromedia, Inc. (formerly MacroMind, Inc.).
MacDraw and MacWrite are registered trademarks, and Claris Resolve is a trademark, of Claris Corporation.
Microsoft is a registered trademark, and Windows is a trademark, of Microsoft Corporation.
NuBus is a trademark of Texas Instruments.
QMS is a registered trademark of QMS, Inc.
QuarkXPress is a registered trademark of Quark, Inc.
Quattro is a trademark of Borland International, Inc.
Tektronix is a registered trademark of Tektronix, Inc.
Trinitron is a registered trademark of Sony Corporation.
Ventura Publisher is a registered trademark of Ventura Software, Inc.
WordPerfect is a registered trademark of WordPerfect Corporation.
WriteNow is a registered trademark of T/Maker Company.
Simultaneously published in the United States and Canada.
Mention of third-party products is for informational purposes only and constitutes neither an endorsement nor a recommendation. Apple assumes no responsibility with regard to the performance or use of these products.

Contents
Communications regulation information vii
1 Setting Up Your PowerBook Duo |
1 |
|
Step 1 |
Plug in the power adapter |
1 |
Step 2 |
Open the display 3 |
|
Step 3 |
Turn on the computer 4 |
|
What to do next |
6 |
|
|
|
Turning your computer off |
7 |
|
|
|
Putting your computer to sleep |
7 |
|
||
Restarting a computer that’s already on |
8 |
|||
2 Learning to Use Your Computer |
9 |
|
Part 1 |
Starting the Macintosh Basics tour 10 |
|
Part 2 |
Practicing your new skills |
15 |
Answers to the review questions |
19 |
|
Practice session 21 |
|
|
Clues on your screen 29 |
|
|
iii

3 Basic Skills |
31 |
|
|
|
|
Working with icons |
32 |
|
|
|
|
Working with windows |
34 |
|
|
||
Working with documents |
36 |
|
|
||
Working with disks |
38 |
|
|
|
|
Organizing your desktop |
39 |
|
|
||
Working with pull-down menus |
40 |
|
|||
Keyboard shortcuts in the Finder and in directory dialog boxes |
40 |
||||
4 Health, Safety, and Maintenance Tips |
41 |
|
|
Important care and safety instructions |
41 |
|
|
Caring for batteries |
43 |
|
|
Health-related information about computer use |
44 |
||
5 The Control Strip |
49 |
|
|
|
What is the Control Strip? |
49 |
|
|
|
How does the Control Strip differ from control panels? |
50 |
|||
Closing, opening, and resizing the Control Strip |
50 |
|
||
Hiding the Control Strip |
51 |
|
|
|
Moving the Control Strip |
52 |
|
|
|
Rearranging the modules in the Control Strip |
52 |
|
||
Using the Control Strip |
|
52 |
|
|
6 Power Management |
59 |
|
|
|
Power sources |
59 |
|
|
|
Monitoring the battery charge level |
59 |
|||
Responding to low-power messages |
61 |
|||
Recharging the battery |
62 |
|
|
|
Removing or replacing the battery |
65 |
|||
Disposing of dead batteries |
66 |
|
||
Replacing the backup battery |
67 |
|
||
Reconditioning the battery |
67 |
|
||
Maximizing work time |
70 |
|
|
|
iv Contents

7 Customizing and Traveling With Your PowerBook |
77 |
||
Customizing your PowerBook |
77 |
|
|
Traveling with the PowerBook |
87 |
|
|
Storing the PowerBook |
88 |
|
|
Service and support |
88 |
|
|
8 Building a PowerBook Duo System |
89 |
|
The PowerBook Duo Dock and Duo Dock II |
89 |
|
The PowerBook Duo MiniDock 92 |
|
|
The PowerBook Duo Floppy Adapter |
93 |
|
Using other equipment with your Duo system |
94 |
|
9 Using SCSI Devices |
99 |
Connecting SCSI devices |
99 |
Using your PowerBook as a SCSI disk 104 |
|
Quitting SCSI disk mode |
108 |
10 Tips and Troubleshooting 109
The PowerBook Duo |
110 |
||
Power |
112 |
|
|
The screen 114 |
|
||
The trackball |
116 |
|
|
Memory |
116 |
|
|
The Duo Dock |
117 |
|
|
The Duo MiniDock |
118 |
||
SCSI devices |
119 |
|
|
Disk drives and disks |
120 |
||
Modems |
122 |
|
|
Printers |
122 |
|
|
Networks |
124 |
|
|
Application programs |
125 |
||
Contents v

Appendix A Installing System Software |
127 |
|
|
|
Before you begin |
128 |
|
|
|
Installing system software for the first time |
128 |
|||
Reinstalling system software |
131 |
|
|
|
Installing customized system software |
133 |
|
||
Appendix B Using the PowerBook File Assistant |
|
135 |
|
||
What is file synchronization? |
135 |
|
|
|
|
Starting the PowerBook File Assistant |
136 |
|
|||
Linking files or folders for synchronization |
136 |
|
|||
Synchronizing linked folders or files |
|
141 |
|
|
|
Understanding the alert messages |
143 |
|
|
||
Setting up completely automatic synchronization |
144 |
||||
Appendix C Exchanging Files with DOS or Windows |
145 |
Macintosh PC Exchange at a glance 145 |
|
Using DOS-format disks on your Macintosh |
146 |
Opening DOS documents on your Macintosh |
149 |
Assigning Macintosh programs to DOS documents 150 |
|
Saving documents onto a DOS-format disk |
159 |
Index |
163 |
vi Contents

Communications regulation information
FCC statement
This equipment has been tested and found to comply with the limits for a Class B digital device in accordance with the specifications in Part 15 of FCC rules. See instructions if interference to radio or television reception is suspected.
Radio and television interference
The equipment described in this manual generates, uses, and can radiate radio-frequency energy. If it is not installed and used properly—that is, in strict accordance with Apple’s instructions—it may cause interference with radio and television reception.
This equipment has been tested and found to comply with the limits for a Class B digital device in accordance with the specifications in Part 15 of FCC rules. These specifications are designed to provide reasonable protection against such interference in a residential installation. However, there is no guarantee that interference will not occur in a particular installation.
You can determine whether your computer system is causing interference by turning it off. If the interference stops, it was probably caused by the computer or one of the peripheral devices.
If your computer system does cause interference to radio or television reception, try to correct the interference by using one or more of the following measures:
mTurn the television or radio antenna until the interference stops.
mMove the computer to one side or the other of the television or radio.
mMove the computer farther away from the television or radio.
mPlug the computer into an outlet that is on a different circuit from the television or radio. (That is, make certain the computer and the television or radio are on circuits controlled by different circuit breakers or fuses.)
If necessary, consult an Apple-authorized service provider or Apple. See the service and support information that came with your Apple product. Or, consult an experienced radio/television technician for additional suggestions. You may find the following booklet helpful: Interference Handbook (stock number 004-000-00493-1). This booklet, prepared by the Federal Communications Commission, is available from the U.S. Government Printing Office, Washington, DC 20402.
IMPORTANT Changes or modifications to this product not authorized by Apple Computer, Inc., could void the FCC Certification and negate your authority to operate the product.
This product was tested for FCC compliance under conditions that included the use of Apple peripheral devices and Apple shielded cables and connectors between system components. It is important that you use Apple peripheral devices and shielded cables and connectors between system components to reduce the possibility of causing interference to radios, television sets, and other electronic devices. You can obtain Apple peripheral devices and the proper shielded cables and connectors through an Apple-authorized dealer. For non-Apple peripheral devices, contact the manufacturer or dealer for assistance.
Communications Regulation Information |
vii |

DOC statement
DOC Class B Compliance This digital apparatus does not exceed the Class B limits for radio noise emissions from digital apparatus as set out in the interference-causing equipment standard entitled “Digital Apparatus,” ICES-003 of the Department of Communications.
Observation des normes—Classe B Cet appareil numérique respecte les limites de bruits radioélectriques applicables aux appareils numériques de Classe B prescrites dans la norme sur le matériel brouilleur : “Appareils Numériques”, NMB-003 édictée par le ministre des Communications.
VCCI statement
viii Communications Regulation Information

Follow the steps in this chapter to set up your PowerBook Duo, and learn about turning your computer on and off.
1 Setting Up Your PowerBook Duo
To set up your PowerBook Duo for the first time, you need the power adapter and the power cord that came with your PowerBook.
Step 1 Plug in the power adapter
When you plug in the power adapter, the computer’s battery recharges. You should plug the power adapter in now in case the battery has drained during shipping and storage.
WARNING Use only a PowerBook Duo power adapter with your PowerBook computer. Adapters for other electronic devices (including other portable computers) may look similar, but they may damage your computer.
Your computer’s power adapter comes with a detached power cord.
1
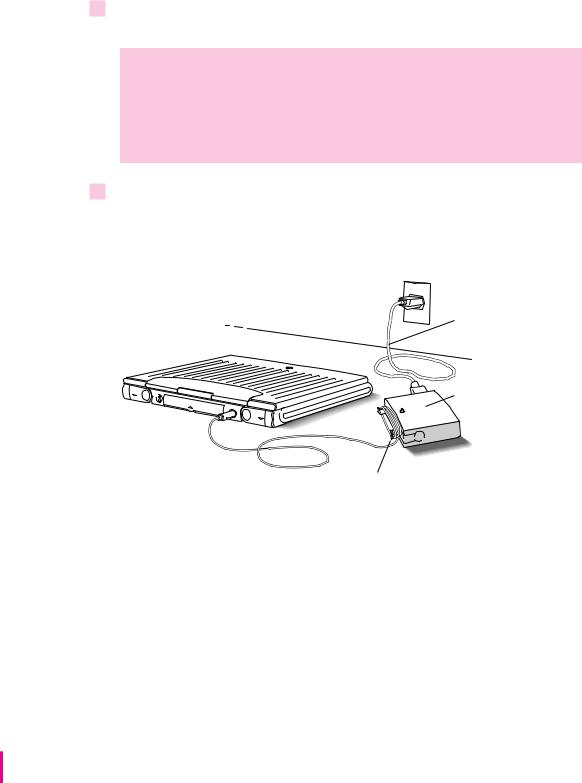
1Plug one end of the power cord into the power adapter and the other end into a threehole grounded outlet or power strip.
WARNING Your PowerBook is equipped with a three-wire grounding plug—a plug that has a third (grounding) pin. This plug is a safety feature, and is meant to fit only a grounded AC outlet. If you are unable to insert the plug into an outlet, contact a licensed electrician to replace the outlet with a properly grounded outlet.
2Plug the power adapter cable into the power adapter port on the back panel of the computer.
If the cable is too long, you can wind it around the hooks that open out from the power adapter.
Power cord
Power adapter
Wrap the cable around the hooks.
Depending on where you purchased your computer, you may also have received a wall mount plug. You can use this plug instead of the power cord to plug the power adapter directly into an electrical outlet.
2 Chapter 1

Step 2 Open the display
m Slide the latch to the right and lift up the display.
Position the display at a comfortable viewing angle. You can adjust the angle of the display at any time.
Setting Up Your PowerBook Duo |
3 |
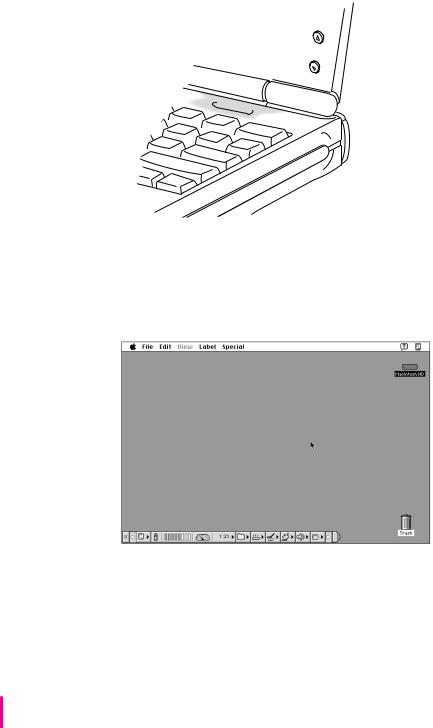
Step 3 Turn on the computer
m Turn on the computer by pressing the Power On key above the keyboard.
 Power On key
You hear a tone when you turn on the computer. It takes the computer a moment to start up.
When you see something like this on your screen, the computer is ready to use:
Note: Your screen should look very similar to this picture but it might not look exactly the same.
4 Chapter 1
Problems turning on your computer?
mThe computer made a sound, but you can’t see anything on the screen.
Use the brightness control buttons and contrast control buttons (if your computer has them) to adjust the screen. (Some models have brightness control buttons only.)
Contrast
Brightness
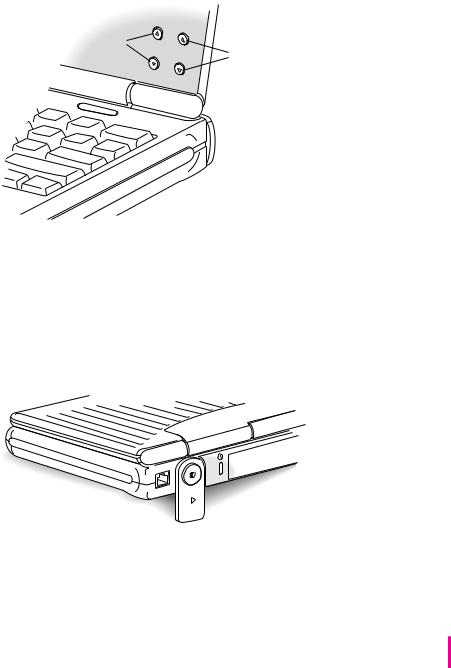
mNothing happened when you pressed the Power On key.
Make sure the power adapter is firmly connected to both the computer and a power source. If the power adapter is plugged into a power strip, make sure the power strip is plugged in and turned on. Then try pressing the Power On key again.
If you still get no results, press the power button on the back of the computer.
 Power button
If neither the Power On key nor the power button turns the computer on, see Chapter 10, “Tips and Troubleshooting,” for help.
Setting Up Your PowerBook Duo |
5 |

mYou see a picture of a disk with a blinking question mark on the screen.
This picture means that you need to install system software on the computer’s hard disk. System software includes the programs the computer uses to start itself up. You received a set of system software disks in the box with your computer. For instructions on installing system software, see Appendix A in this book.
What to do next
mNew Macintosh users: If you have never used a Macintosh computer before, go to Chapter 2 now to learn how to use your PowerBook. Then go to Chapter 4 for important health and safety instructions. For help turning your PowerBook off, or putting your PowerBook to sleep, come back to this chapter once you have learned to use your PowerBook.
mNew PowerBook users: If you have used other Macintosh computers but are new to the PowerBook, read the rest of this chapter for instructions on turning the PowerBook off and putting the PowerBook to sleep. Then go to Chapter 5 to learn about using the Control Strip. Make sure you read Chapter 4 for important health and safety instructions.
mExperienced PowerBook users: Skim this book for information about your new PowerBook. Important health and safety instructions are in Chapter 4.
6 Chapter 1

Turning your computer off
m If the computer is on, choose Shut Down from the Special menu.
mIf the computer is in sleep, wake it by pressing any key on the keyboard (except Caps Lock), and then choose Shut Down.
mIf a problem with the computer prevents you from choosing Shut Down, press the power button on the back of the computer. This turns off the power and you will lose any unsaved work. Use the power button only in an emergency.
Putting your computer to sleep
When the PowerBook is in sleep, it has a darkened screen and appears to be off, though it is still drawing battery power at a low level. The computer is on, but almost completely inactive. To put your PowerBook to sleep:
m If the computer is on, choose the Sleep command from the Special menu.
m You can also put the computer to sleep by closing the display.
Note: If you have a PowerBook Duo 280c, a green light flashes on the upper right of the display when your computer is in sleep.
Setting Up Your PowerBook Duo |
7 |

Automatic sleep
If you don’t use the computer for several minutes, it goes to sleep automatically (unless you change the sleep preferences). This conserves battery power.
To wake the computer, press any key on the keyboard (except Caps Lock). In a few seconds, the screen will go back to the way it looked before the computer went to sleep.
For more information on sleep and automatic sleep, see Chapter 6.
Restarting a computer that’s already on
You need to restart your computer—turn it off and back on again immediately—when you want to make certain changes to your control panels, use a newly installed system software file, or start up the computer from a different disk. You also need to restart if you see a “system error” message on the screen (indicating a temporary software problem). In this case, use the trackball to click the Restart button that appears.
To restart your computer:
m Choose Restart from the Special menu.
When you choose Restart, the computer prompts you to save your work, closes all open programs, and restarts itself.
Choosing Restart does not affect your RAM disk (if you created one) or its contents.
8 Chapter 1

Go through the exercises in this
chapter to learn how to use
your computer
2 Learning to Use Your Computer
Your computer comes with a tutorial that teaches you the basics. The tutorial is divided into two parts:
mPart 1 You start the Macintosh Basics tour on your computer, which presents the basic skills you need to master.
mPart 2 After you complete the Macintosh Basics tour, you return to this chapter to practice what you learned. You also learn some additional skills.
If you’ve never used a Macintosh computer before, you should complete both parts of the tutorial.
If you are an experienced Macintosh user, you may want to look over the rest of this book to learn about special features of this computer. Then, as you work with your Macintosh, consult the Macintosh Reference book for answers to questions about the system software that came with your computer.
IMPORTANT If you need to turn off your computer at any point before finishing the tutorial, please see “Turning Your Computer Off” in Chapter 1.
9
Part 1 Starting the Macintosh Basics tour
Your Macintosh Basics tour is on the hard disk that’s inside your computer. To take the tour, follow the steps in this section.
Make sure your computer is turned on. If the screen is dark, try adjusting the screen (see “Problems Turning On Your Computer?” in Chapter 1) until you see words and small pictures on your screen.
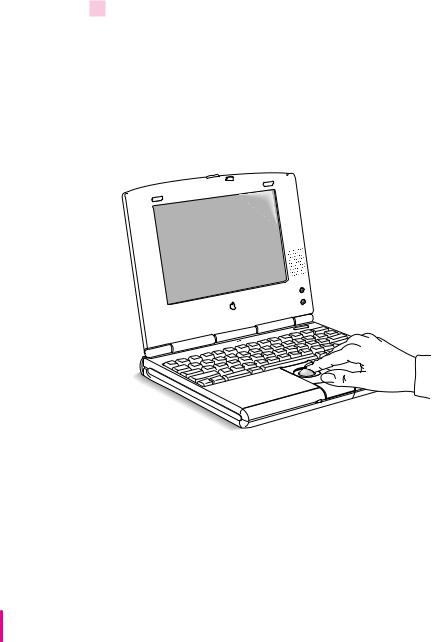
1Roll the trackball to move the arrow pointer (8) around on the screen.
Place your index finger on the trackball and your thumb on the lower trackball button. Don’t press either button yet.
Roll the trackball, watching the arrow on the screen. Notice that the arrow moves in the same direction as you roll the trackball.
You may need to roll the trackball around for a few seconds to “break in” the mechanism so it works smoothly.
10 Chapter 2
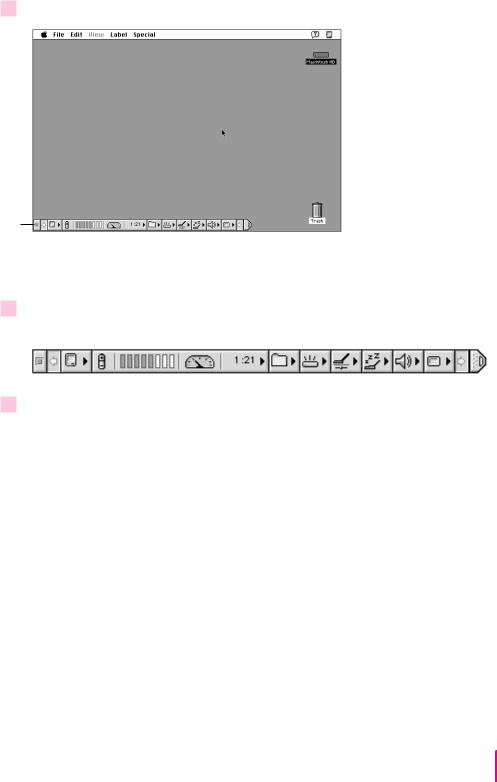
2 Notice the Control Strip at the bottom of your screen.
The Control Strip
The Control Strip is the line of pictures at the lower left of your screen. You’ll learn more about the Control Strip in Chapter 5.
3Roll the trackball so that the tip of the arrow is on the tab at the right end of the Control Strip.
4Being careful not to move the trackball, press the button once.
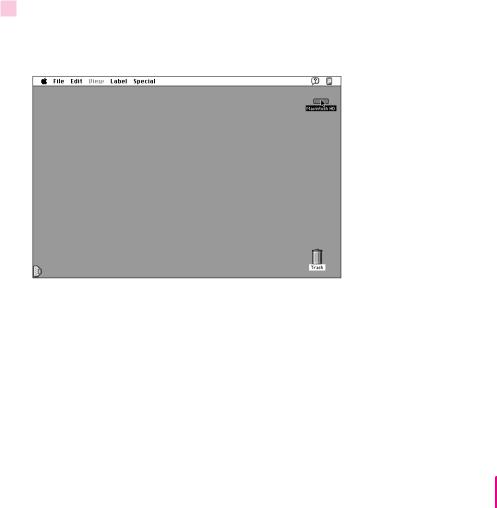
The Control Strip closes and only the tab appears in the lower-left corner of the screen.
Learning to Use Your Computer |
11 |

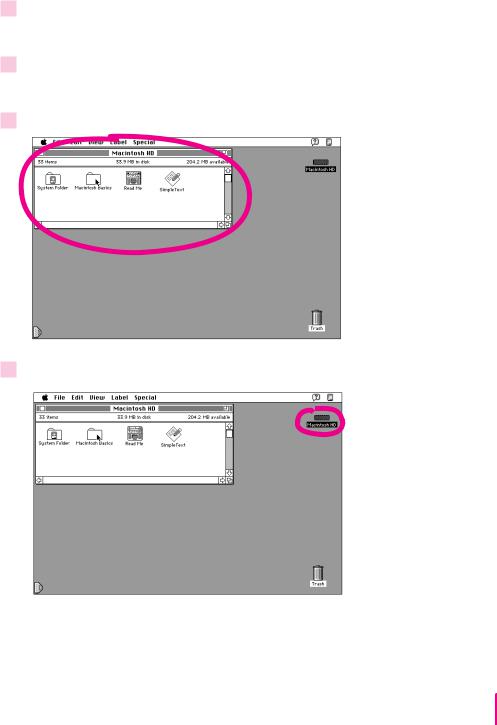
5Roll the trackball so that the tip of the arrow is on the picture labeled “Macintosh HD.”
Make sure the tip of the arrow is over the picture, not over the words “Macintosh HD.”
Note: Your screen should look similar to the one below, but may not look exactly the same.
Move the arrow so that it is on top of this picture.
Different name? The picture on your screen may be labeled “PowerBook HD” instead of “Macintosh HD.” The different name is not important; you can still follow directions in this manual by replacing references to “Macintosh HD” with “PowerBook HD.”
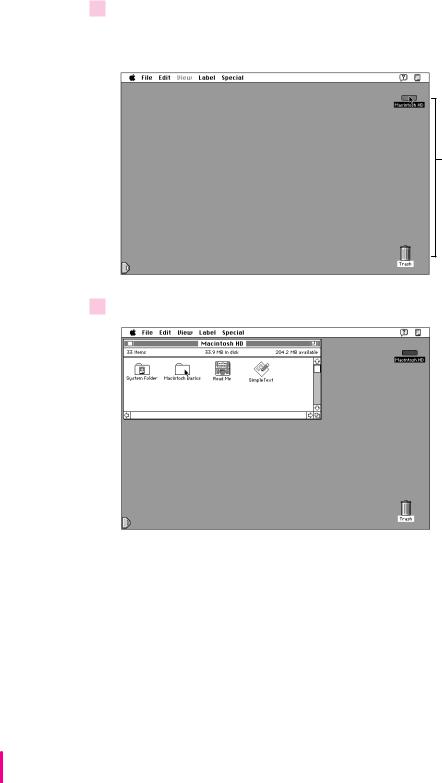
6Being careful not to roll the trackball, press the button twice in quick succession. (This is called “double-clicking.”)
Now your screen should look like the illustration following step 7. The items in that illustration may not exactly match those on your screen. The only item you need right now is the Macintosh Basics folder.
If the screen doesn’t look right, try steps 5 and 6 again, paying special attention to the following:
m Make sure the tip of the arrow is touching the picture, not the words beneath it.
m Be sure to press the trackball button twice.
m Press twice quickly and be careful not to roll the trackball while you press.
12 Chapter 2
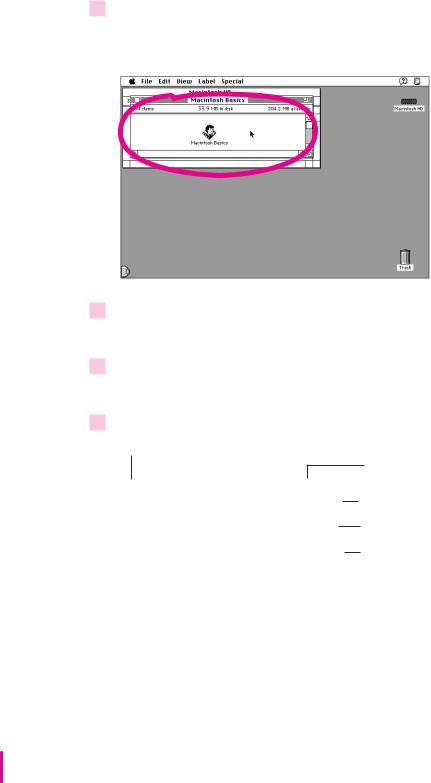
7Roll the trackball to place the tip of the arrow on the picture of the folder labeled “Macintosh Basics.”
Move the arrow so that it is on top of this picture.
You may see other items on the screen. Your screen should look similar, but may not look exactly the same.
8Being careful not to roll the trackball, press the button twice in quick succession.
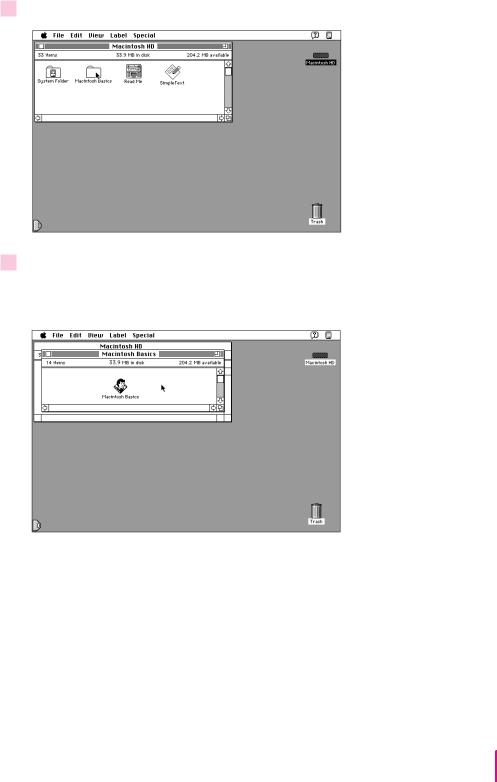
Now your screen should look like the following illustration:
Learning to Use Your Computer |
13 |

9Roll the trackball so that the arrow is on the picture of the man labeled “Macintosh Basics.”
Move the arrow so that it is on top of this picture.
10Press the trackball button twice in quick succession.
Now your screen should look like the following picture:
If you don’t see this screen, try again, paying special attention to the following:
mMake sure the tip of the arrow is touching the picture, not the words beneath it.
mBe sure to press the trackball button twice.
mPress twice quickly and be careful not to roll the trackball while you press.
11Follow the instructions on the screen and work through the tour.
When you finish the tour, continue with the rest of this chapter.
14 Chapter 2
Part 2 Practicing your new skills
You should now have completed the Macintosh Basics tour.
The second part of your training gives you an opportunity to think about what you’ve learned so far and to practice your new skills.
Reviewing what you’ve learned
Before continuing, take a few moments to answer these questions. They will help you summarize the information you learned in Macintosh Basics. You may want to write (or circle) your answers as appropriate. The correct answers are in the next section of this chapter.
If you have any trouble answering the questions, look in Chapter 3, “Basic Skills.”
Question: What is the name of the area where you do all your work? (It’s shown below.)
Answer:____________________________________________
Learning to Use Your Computer |
15 |
Question: What are pictures on the Macintosh desktop called? Two examples are shown below.
Answer:____________________________________________
What is the name for these pictures on the Macintosh desktop?
Circle the hard disk window in the illustration below.
16 Chapter 2
Circle the hard disk icon in the illustration below.
Question: Circle the active window on the desktop below. How do you make a window active?
Answer:____________________________________________
Learning to Use Your Computer |
17 |

Question: Which menu is the Save command in?
Answer:____________________________________________
Question: How do you throw an item away?
Answer:____________________________________________
Label the parts of this window.
A.
B.
C.
D.
E.
18 Chapter 2
Answers to the review questions
These are the answers to the review questions that you completed earlier.
Question: What is the area called where you do all your work?
Answer: the desktop
Question: What are pictures called on the Macintosh desktop?
Answer: icons
Circle the hard disk window in the illustration below.
Circle the hard disk icon in the illustration below.
Learning to Use Your Computer |
19 |
Question: Circle the active window shown on the desktop below. How do you make a window active?
Answer: by clicking anywhere inside of it
Question: Which menu is the Save command in?
Answer: the File menu
Question: How do you throw an item away?
Answer: by dragging it to the Trash
Label the parts of this window.
A. The close box
B. The title bar
C. A scroll arrow
D. The scroll bar
E. The size box
20 Chapter 2

Practice session
Now you can practice what you learned in Macintosh Basics. You’ll be practicing your skills using real programs that came with your computer, rather than the sample ones in Macintosh Basics.
IMPORTANT If you get lost at any point during the practice session, or if something unexpected happens, please turn to “Clues on Your Screen” in this chapter. These clues will help you get back on track.
1: Creating a new document
1 Open the hard disk icon and then open the SimpleText program, as shown below.
1 Double-click the hard disk icon to open it.
2 If a window with the name of your hard disk doesn’t appear, click the disk icon again twice.
3 To open the SimpleText program, double-click the SimpleText icon.
When the SimpleText program opens, a window appears with “Untitled 1” in the title bar. This is your blank document.
Learning to Use Your Computer |
21 |

2 Use the keyboard to type a few lines of text into the blank document.
Type text in the blank document.
It doesn’t matter what you type. If you make an error, press the Delete key to backspace over the incorrect letters, then retype.
3Open the File menu and choose the Save command to save your new document.
When you save a document, you are storing it on the hard disk. You need to save every document you create. If you don’t save it, the document is lost when you turn off the computer.
Choose Save from the File menu.
A box like the one in the next step appears, with “Untitled 1” near the bottom. This box lets you name and save your document.
22 Chapter 2
 Loading...