


 Loading...
MasterSwitchTM 100V
AP9210 j
User
Guide

2 MasterSwitch 100V – User Guide 2
MasterSwitch – User Guide
SOFTWARE LIMITED WARRANTY
WITH RESPECT TO THE PHYSICAL DISKETTE AND PHYSICAL MATERIAL ENCLOSED WITHIN, APC WARRANTS THE SAME TO BE FREE OF DEFECTS IN MATERIALS AND WORKMANSHIP FOR A PERIOD OF 90 DAYS FROM THE DATE OF PURCHASE. IN THE EVENT OF NOTIFICATION WITHIN THE WARRANTY PERIOD OF DEFECTS IN MATERIAL OR WORKMANSHIP, APC WILL REPLACE THE DEFECTIVE DISKETTE OR MATERIAL. IF YOU NEED TO RETURN A PRODUCT, CALL THE APC CUSTOMER SERVICE DEPARTMENT TO OBTAIN A RETURN MATERIAL AUTHORIZATION (RMA) NUMBER. THE REMEDY FOR BREACH OF THIS WARRANTY SHALL BE LIMITED TO REPLACEMENT AND SHALL NOT ENCOMPASS ANY OTHER DAMAGES , INCLUDING BUT NOT LIMITED TO LOSS OF PROFIT, AND SPECIAL , INCIDENTAL, CONSEQUENTIAL OR OTHER SIMILAR CLAIMS.
APC SPECIFICALLY DISCLAIMS ALL OTHER WARRANTIES , EXPRESSED OR IMPLIED, INCLUDING BUT NOT LIMITED TO IMPLIED WARRANTIES OF MERCHANTABILITY AND FITNESS FOR A PARTICULAR PURPOSE WITH RESPECT TO THE SOFTWARE, INCLUDING THE DISKETTE, DOCUMENTATION, AND CABLES. IN NO EVENT SHALL APC
BE LIABLE FOR ANY LOSS OF PROFIT OR OTHER COMMERCIAL DAMAGE, INCLUDING BUT NOT LIMITED TO SPECIAL , INCIDENTAL, CONSEQUENTIAL OR OTHER DAMAGES.
LICENSES & TRADEMARKS
The following are product and corporate names used in this guide that are trademarks or registered trademarks of American Power Conversion Corporation: APC™ , Back-UPS® , Back-UPS® Pro, MasterSwitch, Matrix-UPS™ , Measure-UPS™ , NetShelter™ , PowerChute® , PowerChute® plus, PowerNet™ , SNMP Adapter™ , Smart-UPS and Smart-UPS® v/s™ .
All other trademarks, product and corporate names are the property of their respective owners and used here for informational purposes only.
© Copyright American Power Conversion Corporation, 1998. All Rights Reserved. Reproduction in whole or in part without permis sion is prohibited.
APC Corporate |
APC Europe |
APC Ireland |
APC Japan |
132 Fairgrounds Road |
|
|
Omodaka Bldg 5F 1-9-7 Shibaura |
P.O. Box 278 |
4 Rue St Claire Deville |
Ballybritt Industrial Estates |
Minato-ku |
West Kingston, RI 02892 |
Lognes F-77185 |
Galway |
Tokyo, 105 |
United States of America |
France |
Ireland |
Japan |
Toll Free: 800 800 4APC |
Toll Free: 0 800 09 24 07 |
Toll Free: 1 800 702000 |
Free Dial: 0120-80-60-90 |
Tel: 401 789 5735 |
Tel: 01 64 62 59 00 |
Tel: 353 91 702000 |
Tel: (81) (03) 3798-3888 |
Fax: 401 789 3180 |
Fax: 33 1 60 17 80 29 |
Fax: 353 91 756909 |
Fax: (81) (03) 3798-3880 |
990-0207 |
Rev 1 |
5/98 |

3 |
|
|
|
3 |
|
MasterSwitch 100V – User Guide |
|||
|
|
|
|
|
|
|
|
|
|
Contents
About This Guide |
6 |
Who Should Read This Guide .......................................................................................................................... |
6 |
Associated Documents ..................................................................................................................................... |
6 |
Registering Your Product .................................................................................................................................. |
6 |
Abbreviations .................................................................................................................................................... |
6 |
The APC Web Site ............................................................................................................................................ |
6 |
APC Product Information and Technical Support .............................................................................................. |
7 |
Chapter 1: |
|
Introduction |
8 |
Overview ........................................................................................................................................................... |
8 |
Front Panel ........................................................................................................................................................ |
9 |
Chapter 2: |
|
Initial |
|
Setup |
10 |
Chapter 3: |
|
Logging On |
11 |
Types of Access .............................................................................................................................................. |
11 |
Login Control .................................................................................................................................................. |
11 |
Chapter 4: |
|
Configuring the |
|
MasterSwitch |
12 |
Functions ........................................................................................................................................................ |
12 |
Master Power On Delay .................................................................................................................................. |
13 |
Outlet Power On Delay ................................................................................................................................... |
13 |
Reboot Duration .............................................................................................................................................. |
14 |
MasterSwitch Device Name ............................................................................................................................ |
14 |
Outlet Device Name ........................................................................................................................................ |
14 |
URL Links ....................................................................................................................................................... |
14 |
Chapter 5: |
|
Controlling the |
|
MasterSwitch |
15 |
Overview ......................................................................................................................................................... |
15 |
Master Power Control ..................................................................................................................................... |
15 |
Outlet Power Control ....................................................................................................................................... |
15 |

4 |
MasterSwitch 100V – User Guide |
4 |
Chapter 6: |
|
|
Using the |
|
|
Console Program |
|
16 |
Functions ........................................................................................................................................................ |
|
16 |
Accessing the Console Program .................................................................................................................... |
|
17 |
Via the Serial Port |
|
17 |
Via telnet |
|
17 |
The Main Menu ............................................................................................................................................... |
|
17 |
Outlet Submenu .............................................................................................................................................. |
|
18 |
Auto Power On |
|
20 |
Master Outlet Configuration and Control |
20 |
|
Network Submenu .......................................................................................................................................... |
|
21 |
TCP/IP Submenu |
|
21 |
Telnet Submenu |
|
22 |
HTTP Submenu |
|
22 |
SNMP Submenu |
|
23 |
SNMP Summary Page |
|
23 |
SNMP Access Control Submenu |
|
24 |
MasterSwitch Submenu .................................................................................................................................. |
|
24 |
Password Submenu |
|
24 |
Tools Submenu |
|
25 |
Control Console Submenu |
|
25 |
About Submenu |
|
26 |
Chapter 7: |
|
|
Using |
|
|
SNMP |
|
27 |
Functions ........................................................................................................................................................ |
|
27 |
apcmgmt OIDs ................................................................................................................................................ |
|
28 |
Management Control (mcontrol) OIDs |
28 |
|
Management Configuration (mconfig) OIDs |
28 |
|
MasterSwitchV1 OIDs ..................................................................................................................................... |
|
29 |
Identification (sPDUIdent) OIDs |
|
29 |
Master Control (sPDUMasterControl) OIDs |
29 |
|
Master Configuration (sPDUMasterConfig) OIDs |
29 |
|
Outlet Control (sPDUOutletControl) OIDs |
30 |
|
Outlet Configuration (sPDUOutletConfig) OIDs |
30 |
|
Traps ............................................................................................................................................................... |
|
31 |
MasterSwitch-MIB Traps |
|
31 |
MIB-II Traps |
|
31 |
Chapter 8: |
|
|
Using Embedded |
|
|
Web Control |
|
32 |
Accessing Web Control................................................................................................................................... |
32 |
Functions ........................................................................................................................................................ |
32 |

5 |
MasterSwitch 100V – User Guide |
5 |
Chapter 9: |
|
|
User-Interface |
|
|
Components |
|
34 |
Reset Button ................................................................................................................................................... |
|
34 |
Outlet LEDs .................................................................................................................................................... |
|
34 |
Network LEDs ................................................................................................................................................. |
|
34 |
Index |
|
35 |

6 |
|
|
|
6 |
|
MasterSwitch 100V – User Guide |
|
||
|
|
|
|
|
|
|
|
|
|
About This Guide
This user guide contains information about configuring and using the American Power Conversion (APC) MasterSwitch™, a stand-alone power distribution unit ( PDU).
Who Should Read This Guide
This guide is for anyone responsible for using the MasterSwitch to control power.
Associated Documents
This guide explains how to use the MasterSwitch only. Refer to your APC UPS Owners Manual for operational information for your specific UPS systems. Refer to the MasterSwitch Installation Guide that came with the MasterSwitch for information on how to install the MasterSwitch.
Registering Your Product
Please fill out and return the enclosed warranty card. This card not only provides us with valuable, welcomed feedback on how we can refine our products to better serve your needs, but it also enables us to notify you about important product updates and changes.
Abbreviations
APC refers to American Power Conversion; EEPROM refers to Electrical Erasable Programmable Read Only Memory; IP refers to Internet Protocol; MIB refers to management information base; OID refers to object identification; SNMP refers to simple network management protocol; UPS refers to Uninterruptible Power Supply.
The APC Web Site
For more information on this or any other APC product, visit the APC Web site at http://www.apc.co.jp/. APC is continuously updating the information you obtain from its Web site, including its product documentation.

7 |
|
|
|
7 |
|
MasterSwitch 100V – User Guide |
|||
|
|
|
|
|
|
|
|
|
|
APC Product Information and Technical Support
Call 0120-80-6090 or 813-5434 2021 to directly access APC’s product information database and request to have the latest APC product information faxed directly to you.
If you have any questions concerning the MasterSwitch, or concerning any other APC product, please contact the technical support center nearest you. APC Technical Support is provided at no charge. APC Technical Support teams can be accessed in any of the following ways:
Worldwide Web Site: |
http://www.apc.co.jp/ |
CompuServe™ : |
GO APCSUPPORT |
Internet (US): |
apctech@apcc.com |
Internet (Europe): |
apceurtsg@apcc.com |
Telephone Access:
Japan |
Free Dial: |
0120-80-6090 |
|
Phone: |
+813-5434 2021 |
|
Fax: |
+613-5434 2022 |
Worldwide Headquarters |
Toll Free: |
(800)800-4APC |
European Headquarters |
Phone: |
(33)(1)64 62 59 00 |
|
Fax: |
(33)(1)60 17 80 29 |
European Tech Support |
Phone: |
(353)91 702020 |
|
Fax: |
(353)91 755275 |
US and Canada |
Phone: |
(401)789-5735 |
|
Fax: |
(401)789-3180 |
Austria |
Toll Free: |
0660 6480 |
Belgium |
Toll Free: |
0800 15063 |
Czech Republic |
Toll Free: |
0800 102063 |
Denmark |
Toll Free: |
800 18 153 |
Finland |
Toll Free: |
9800 13 374 |
France |
Toll Free: |
0 800 906 483 |
|
Paris: |
01 64 62 59 00 |
Germany |
Toll Free: |
0130 818907 |
Holland |
Toll Free: |
0800 0224655 |
Hungary |
Toll Free: |
00800 12221 |
Ireland |
Toll Free: |
1 800 702000 x 2045 |
Israel |
Toll Free: |
177 353 2206 |
Italy |
Toll Free: |
1678 74731 |
Luxembourg |
Toll Free: |
0800 2091 |
Norway |
Toll Free: |
800 11 632 |
Poland |
Toll Free: |
00800 353 1202 |
Portugal |
Toll Free: |
050 553182 |
Russia |
Phone: |
+7095 916 7166 |
South Africa |
Toll Free: |
0800 994206 |
Spain |
Toll Free: |
900 95 35 33 |
Sweden |
Toll Free: |
020 795 419 |
Switzerland |
Toll Free: |
0800 556 177 |
Turkey |
Toll Free: |
0800 35390275 |
United Kingdom |
Toll Free: |
0800 132990 |

8 |
|
|
|
8 |
|
MasterSwitch 100V – User Guide |
|
||
|
|
|
|
|
|
|
|
|
|
Chapter 1:
Introduction
The APC MasterSwitch is a network-manageable power control unit (PCU) that allows you complete, independent control of power to eight relay-controlled outlets. This control is programmable using any of the following strategies:
nWeb-based control. The MasterSwitch features embedded Web management.
nSimple network management protocol (SNMP) control. The MasterSwitch comes with its own
PowerNet™ and MIB-II compliant MIB (APC MasterSwitch-MIB) to allow a remote network management station to use SNMP to program control of the MasterSwitch and its eight outlets.
nConsole control. The MasterSwitch has a built-in serial port which allows you to connect a terminal (or terminal emulator) directly to the MasterSwitch to use its internal console program to configure power control.
nTelnet support. The MasterSwitch provides a telnet interface that permits remote access to the terminal console program.
Note: MasterSwitch Web control functions and the MasterSwitch console program are protected by a user name/password pair. The default user name is apc, in lower case. The default password is apc.
Note: This guide focuses on providing information on how to use SNMP, telnet, or a terminal to program the MasterSwitch. Information on how to program the MasterSwitch using its embedded Web management feature is provided by a separate on-line help application that focuses solely on how to use the Web management capabilities.
Overview
The MasterSwitch is a network manageable power control unit (PCU) that:
nConnects a single 100VAC, 50/60Hz input to eight 100VAC, 50/60Hz outlets. The overall output of these outlets is limited to 15 amps and protected by a resettable 15-amp circuit breaker. The outlets, circuit breaker and inlet connector are all located on the MasterSwitch rear panel.
nAllows programmable control of the MasterSwitch, such as defining a delay between power coming on for the MasterSwitch and master power going to the outlets, or turning on, off or rebooting all outlets at one time.
nAllows independent, programmable control over each of its eight outlets, such as defining when an outlet will provide power after master power is provided, or turning on, off or rebooting each outlet individually without affecting the output from any other outlet.
n Is designed to mount in an APC NetShelter™ and connect to a UPS for its input power.
Note: The MasterSwitch does not provide power protection. Therefore, APC does not recommend plugging the MasterSwitch directly into any unprotected power source, such as a wall outlet.
9 |
|
|
|
9 |
|
MasterSwitch 100V – User Guide |
|||
|
|
|
|
|
|
|
|
|
|
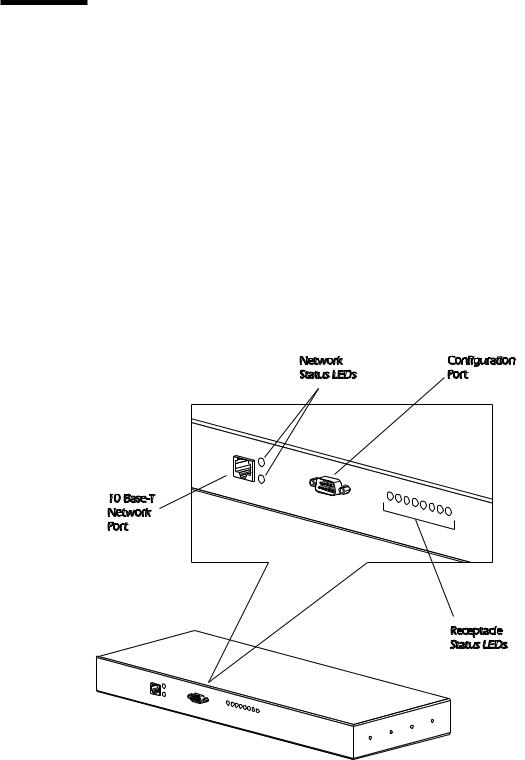
Front Panel
The primary feature of the MasterSwitch is the programmable control of eight power outlets using embedded Web-based control, SNMP control, or the console program via telnet or the onboard serial port. Two connectors provide for the physical link for programming:
nA built-in serial port, which connects a terminal (or terminal emulator) to access the console program.
nA built-in 10Base-T network connector, which connects the MasterSwitch to an Ethernet LAN to allow using the embedded Web control, telnet, or SNMP to configure the MasterSwitch. The MasterSwitch must connect to an Ethernet LAN to use telnet, SNMP or embedded Web control.
As shown in Figure 1, both of these connectors are located on the front panel. Figure 1 also identifies the following:
nEight receptacle LEDs. When an outlet is on, the corresponding LED is lit.
nTwo network status LEDs— Status and Link - TX/RX. LEDs provide visual indications about the Ethernet LAN connection.
nA reset button, which reinitializes the MasterSwitch without affecting its outlet power.
Figure 1: MasterSwitch Front Panel

10 |
|
|
|
10 |
|
MasterSwitch 100V – User Guide |
|
||
|
|
|
|
|
|
|
|
|
|
Chapter 2:
Initial
Setup
The MasterSwitch must have its network settings defined for it to function properly for SNMP, telnet, or embedded Web control of its output power:
nIts IP address
nThe IP address of the default gateway
nThe subnet mask
nHTTP and telnet port number (for Web-based or telnet control)
How the MasterSwitch initially gets these values depends on whether or not you will be using a BOOTP server:
nThe MasterSwitch comes with the Bootstrap Protocol (BOOTP) setting enabled. This allows you to configure a BOOTP server to provide the needed subnet mask and IP values:
1)Identify the MAC address of the MasterSwitch. This address is provided on a label that is attached to the MasterSwitch side panel.
2)Refer to your BOOTP server documentation for information on how to use that server to configure the MasterSwitch network values.
nIf you will not be using a BOOTP server you must use a terminal to access the MasterSwitch, and use its console program. To access the console program:
1)Connect one end of the cable that comes with the MasterSwitch to the connector labeled “Serial Port” at the front of the MasterSwitch.
2)Connect the cable to the serial port of the terminal (or terminal emulator).
3)Set the terminal serial port for 19200 baud, 8 data bits, no parity, 1 stop bit and press <Enter>.
4)When the User Name: prompt appears, enter the case-sensitive, default user name (apc).
5)When the Password: prompt appears, enter the case-sensitive, default password (apc).
6)Once the main configuration menu appears:
rUse the Passwords option under the MasterSwitch submenu to change the login password.
Note: The console, telnet, and Web control share the same password. When you change the password using the console, telnet, or Web control, you change the password for all three control functions.
rUse the TCP/IP option under the Network submenu to disable BOOTP and define:
a)The IP address for the MasterSwitch.
b)The IP address for the default gateway.
c)The subnet mask value.
rUse the Logout option to exit the console program, or use any of the other main configuration menu options to further define the MasterSwitch operation before you log out.
Note: See Chapter 6 for more information on how to use the console program.
11 |
|
|
|
11 |
|
MasterSwitch 100V – User Guide |
|||
|
|
|
|
|
|
|
|
|
|
Chapter 3:
Logging On
This chapter describes how Web control, console program, and SNMP access is controlled so that only one control option (Web control, console or SNMP) can be used at a time for write activity.
Note: References throughout this document to the console program apply to telnet sessions and serial communications sessions, which provide identical terminal-style menus.
Types of Access
The MasterSwitch allows simultaneous read-only access from Web control, console session (via the serial cable or telnet) and SNMP. It does not allow simultaneous write access. You can use Web control, console sessions or SNMP access to configure and control the MasterSwitch, but only one of these can be used to write new configuration and control values at a time.
Web control and terminal console sessions have protected access using a shared user name/ password pair (the default password is apc, all lower case). SNMP access simply requires that the NMS be defined as having SNMP access, and that the NMS uses the proper community name for the defined type of SNMP access.
Login Control
Terminal console and telnet sessions have the highest access priority. If someone has logged on to the MasterSwitch using either of these interfaces, Web control access is disabled, and SNMP access is limited to reads (GETs) only.
The embedded Web control has the second highest access priority. If someone has logged on to the MasterSwitch using the embedded Web control, then SNMP access is limited to reads (GETs) only. However, if someone logs on to the MasterSwitch using the terminal console or telnet while someone is logged on to the Web control, the Web control user is automatically logged off.
SNMP write (SETs) access to the MasterSwitch can only occur when no one is logged on to the MasterSwitch using either Web control or the terminal console.
Note: SNMP access is controlled by MasterSwitch-MIB OIDs that define what NMSs can access the MasterSwitch, the access they have (read/write or just read) and what community name must be used for that access.
Loading...