


American Standard 3232Y1.SW.XXX, 6032Y1.SW.XXX, 3636Y1.SW.XXX, 3838Y1.CWT.XXX, 4834Y1.SW.XXX User Manual

INSTALLATION INSTRUCTIONS
Acrylux Builder Series Shower Walls
Models: 3232Y1.SW.XXX, 3636Y1.SW.XXX, 4834Y1.SW.XXX, 6032Y1.SW.XXX, 3838Y1.CWT.XXX
Thank you for selecting American Standard – the benchmark of fine quality for over 100 years. To ensure this product is installed properly, please read these instructions carefully before you begin. Local building codes vary by location. Observe all local plumbing and building codes.
|
|
RECOMMENDED TOOLS |
|
3232Y1.SW.XXX |
|
|||||
|
|
|
|
Shower Wall |
|
|||||
|
|
|
|
|
Back Panel |
|
|
|||
|
Tape Measure |
|
Hole or Saber Saw |
32" |
|
|
|
|
||
|
|
|
|
|
|
|
||||
|
|
Side Panel |
813mm |
|
|
STUD LAYOUT: |
|
|||
|
Safety Glasses |
|
Caulk Gun |
|
|
|
|
|||
|
|
|
|
|
Shower wall will fit all standard |
|||||
|
|
|
|
|
|
|||||
|
3/16" Drill Bit |
|
Pencil |
|
|
|
|
32" x 32" shower bases. |
||
|
|
|
|
|
|
|
|
|||
|
Screwdriver |
|
Square |
|
30" |
|
|
|
|
|
|
Drill |
|
|
Level |
|
|
|
|
|
|
|
|
|
|
762mm |
|
|
|
|
||
|
|
|
|
|
|
Door |
70" |
|
33-1/2" |
|
|
|
|
|
|
|
Opening |
|
|
||
|
|
MATERIALS: |
|
|
|
1778mm |
851mm |
|
||
|
|
|
|
|
|
|
|
|||
• |
2 Tubes of Adhesive Compatible with Polystyrene |
|
|
|
|
|
|
|||
• |
Screws 1" Flathead Stainless |
|
|
|
|
|
32" |
|
||
• 2" Masking Tape |
|
|
|
|
|
|
813mm |
|||
|
|
|
|
|
|
= stud location |
||||
• |
Caulk (for Faucet Installation) |
|
|
|
|
|
||||
|
|
|
|
|
|
|
||||
• Shims |
|
|
|
|
|
|
|
|
|
|
|
|
3636Y1.SW.XXX |
|
|
4834Y1.SW.XXX |
|
||||
|
Back |
Shower Wall |
Back |
34" |
Shower Wall |
|
||||
|
36" |
|
|
Panel |
|
|
|
|
||
Side |
Panel |
914mm |
|
|
Side |
864mm |
|
|
|
|
|
|
|
|
|
|
|
|
|||
|
|
|
STUD LAYOUT: |
|
|
|
|
|
||
Panel |
|
|
|
Panel |
|
|
|
|
|
|
|
|
|
|
Shower wall will fit all standard |
|
|
|
|
STUD LAYOUT: |
|
|
|
|
|
36" x 36" shower bases. |
|
|
|
|
|
|
|
|
|
|
|
|
|
|
Shower wall will fit all standard |
||
|
|
|
|
|
|
|
|
|
||
|
|
|
|
|
|
46" |
|
|
34" x 48" shower bases. |
|
|
|
34" |
|
|
|
70" |
|
|
|
|
|
|
|
|
|
1168mm |
|
|
|
||
|
|
(864mm) |
|
|
|
1778mm |
|
|
||
|
|
|
|
|
Door |
|
|
|||
|
|
Door |
|
|
|
|
|
|
|
|
|
|
70" |
|
|
Opening |
|
|
|
|
|
|
|
Opening |
|
|
|
|
|
|
||
|
|
37-1/2" |
|
|
|
|
|
|
||
|
|
(1778mm) |
|
|
|
|
|
|
||
|
|
|
|
953mm |
|
|
|
|
|
|
|
|
|
|
|
|
|
|
35-1/2" |
|
|
|
|
|
|
36" |
|
|
|
902mm |
|
|
|
|
|
|
|
|
|
|
|
|
|
|
|
|
|
914mm |
|
|
|
|
48" |
|
|
|
|
|
|
|
|
|
|
|
|
|
|
|
|
= stud location |
|
|
|
|
1219mm |
|
|
|
|
|
|
|
|
|
|
= stud location |
|
|
|
32" |
6032Y1.SW.XXX |
|
|
3838Y1.CWT.XXX |
|
|||
|
Back |
813mm |
Shower Wall |
|
38" |
Shower Wall |
|
|||
|
Panel |
|
|
|
|
|
|
|
|
|
Side |
|
|
|
|
|
965mm |
|
|
|
|
Panel |
|
|
|
|
|
|
|
|
STUD LAYOUT: |
|
|
|
|
|
|
|
|
|
|
|
|
|
|
|
|
STUD LAYOUT: |
|
|
|
|
Shower wall will fit all |
|
|
|
58" |
70" |
|
|
|
|
standard 38" x 38" |
|
|
|
|
Shower wall will fit all |
|
|
|
|
Corner Entry/Neo |
|
||
|
|
1473mm |
1778mm |
|
|
|
|
|
||
|
|
Door |
|
standard 32" x 60" |
|
|
|
|
shower bases. |
|
|
|
Opening |
|
shower bases. |
|
|
|
|
|
|
|
|
|
|
|
|
|
72" |
|
|
|
|
|
|
|
|
|
|
1829mm |
|
39-1/2" |
39-1/2" |
|
|
|
|
|
|
|
|
|
||
|
|
|
33-1/2" |
|
|
|
|
|
1003mm |
1003mm |
|
|
|
|
|
|
|
|
|
|
|
|
|
|
851mm |
|
|
|
|
|
|
|
|
|
|
|
60" |
|
|
|
|
|
|
|
|
|
|
1524mm |
|
|
|
|
|
|
|
|
|
|
= stud location |
|
|
|
|
= stud location |
|
|
|
|
|
|
|
|
|
|
|
|
P r o d u c t n a m e s l i s t e d h e r e i n a r e t r a d e m a r k s o f A S A m e r i c a , I n c . © A S A m e r i c a , I n c . 2 0 0 8
754286-100 Rev. A
INSTALLATION INSTRUCTIONS
IMPORTANT
•Allow panels to reach room temperature before installation.
•Before you begin, locate appropriate product reference (see page 1).
•Read installation instructions carefully before starting project.
•Keep instructions for warranty information.
•Caulk will be necessary when installing American Standard walls on a shower base from another manufacturer.
STEP 1. PREPARING ALCOVE
•Strip alcove to the bare studs. It may be necessary to add a stud at each front corner to provide attachment for side panels as shown in appropriate stud layout on page 1.
•Check that there are no screws, nails or staples in the studs which would interfere with the base or wall installation.
•If installing over existing base, check that studs are plumb to the base, then go to
Step 3.
•For new construction, place studs as shown in appropriate stud layout on page 1.
•Check that the sub floor for the base is level and studs are plumb to the sub floor.
(Fig. 1)
STEP 2. BASE INSTALLATION
• Follow Manufacturer’s instructions for installing your base.
IMPORTANT: Shower base must be plumb and square to alcove for proper wall installation.
STEP 3. TRIAL FITTING PANELS
•Place back panel first. The stud on each side of the back panel should contact the entire length of the back panel. (Fig. 2)
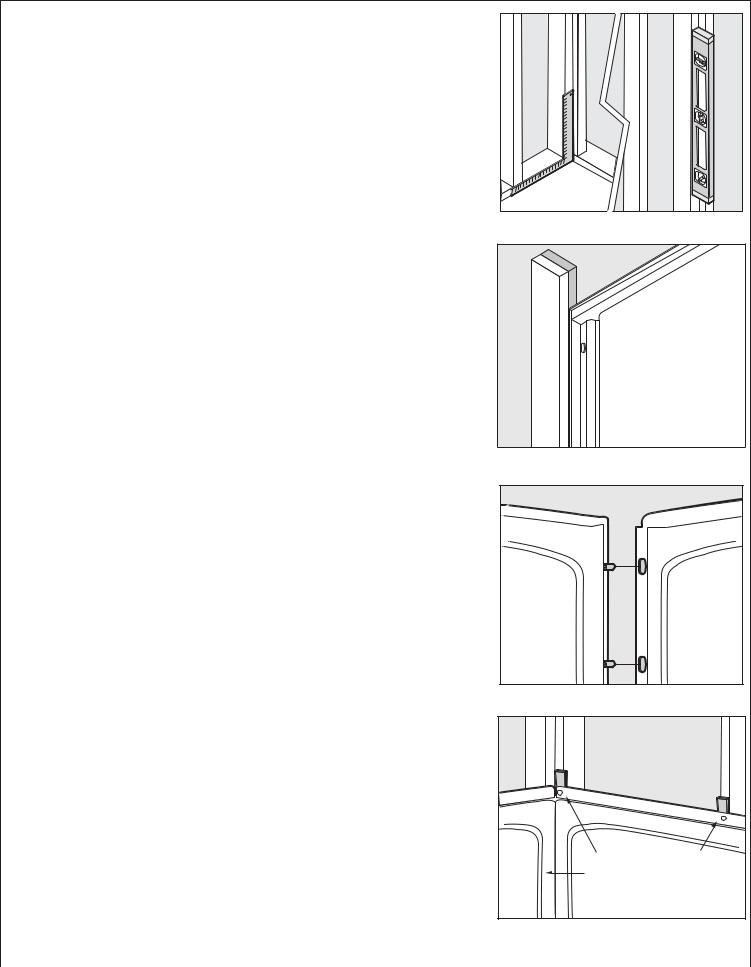
•Fit the side panels by aligning pins on side panels with slots on back panel. (Fig. 3)
•If the studs and back panel do not contact correctly you will need to shim for support.
(Fig. 4)
•Center assembled wall on base. Make sure panels are resting flat on base.
•Align the front of the side walls and the front of the base. This makes drywall installation easier.
•If necessary, shim between wall panels and studs to provide a tight fit between the back and side panels. (Fig. 4)
•Measure and mark all control holes. After removing side panels, drill or saw necessary holes.
FIGURE 1. Check that studs are plumb with floor/shower.
FIGURE 2. Stud must contact entire length of back panel.
FIGURE 3. Align pins with slots on back wall.
IMPORTANT: Drill or saw holes from the front side. Cover area to be cut with masking tape to prevent chipping and scratching.
•Mark the height of the wall on each stud to indicate where to apply adhesive on the stud. (Fig. 5)
•Remove panels from alcove.
(INSTRUCTIONS CONTINUED ON NEXT PAGE)
SHIM PANELS AT EACH STUD IF |
NECESSARY TO ASSURE THEY |
SIT FLAT ON SHOWER BASE |
AND FIT TIGHTLY TOGETHER |
|
FIGURE 4. You can shim against the stud. |
|
|
-2- |
754286-100 Rev. A |
 Loading...