


American Standard 6032Y1.118.XXX, 6030Y1.218.XXX, 6030Y1.118.XXX, 6030Y2A.118.XXX, 6032Y1.218.XXX User Manual
...
INSTALLATION INSTRUCTIONS
Acrylux Builder Series Whirlpools
Model 6030Y2A.118.XXX |
Model 6030Y1.118.XXX |
Model 6032Y1.118.XXX |
Model 6030Y2A.218.XXX |
Model 6030Y1.218.XXX |
Model 6032Y1.218.XXX |
Thank you for selecting American Standard – the benchmark of fine quality for over 100 years. To ensure this product is installed properly, please read these instructions carefully before you begin. Local building codes vary by location. Observe all local plumbing and building codes.
RECOMMENDED TOOLS AND MATERIALS
Tape Measure |
Mortar Compound (optional) |
Pencil |
Saber Saw |
Safety Glasses |
Screws, 1" Flathead, Stainless |
Drill |
Level |
IMPORTANT:
•Read installation instructions carefully before starting project.
•Before you begin, locate appropriate product reference (below).
•Allow tub to reach room temperature before installation.
•Water test tub before installation.
•Keep instructions for warranty information.
6030Y2A.118.XXX
6030Y2A.218.XXX
1"
25mm |
19" |
|
483mm |
||
|
||
18" |
|
|
457mm |
|
|
59-7/8" |
Motor / Pump |
|
Access Cover |
||
1521mm |
|
|
30" |
|
|
762mm |
|
STUD LAYOUT:
The American Standard Acrylux Bathtub will fit all standard 30" x 60" tub walls.
10" |
14" |
|
254mm |
356mm |
|
31-1/2" |
6" |
GFI Electrical |
152mm |
||
800mm |
Drain C |
Outlet |
8" |
|
|
L |
|
|
203mm Floor Cut Out 6" x 10" |
||
|
(152 x 254mm) |
|
|
60" |
|
|
1524mm |
|
= stud location
6030Y1.118.XXX |
|
|
|
|
6032Y1.118.XXX |
|
|
32" |
6030Y1.218.XXX |
|
|
|
|
6032Y1.218.XXX |
|
|
|
|
|
|
30" |
59-7/8" |
|
813mm |
||
|
59-7/8" |
|
|
762mm |
|
1521mm |
|
|
|
|
|
|
|
|
|
|
|
|
1521mm |
|
|
|
|
|
|
|
|
|
|
|
|
|
|
|
18" |
|
|
|
|
15" |
|
|
|
457mm |
|
|
|
|
381mm |
|
|
|
|
|
|
|
|
Motor / Pump |
|
|
|
Motor / Pump |
|
|
|
|
Access Cover |
|
|
|
Access Cover |
STUD LAYOUT: |
|
10" |
14" |
|
STUD LAYOUT: |
12" |
15" |
|
The American |
|
254mm |
356mm |
|
The American |
305mm |
381mm |
|
Standard Acrylux |
31-1/2" |
|
6" |
GFI Electrical |
Standard Acrylux |
33-1/2" |
6" |
GFI Electrical |
Whirlpool will fit all |
|
152mm |
Whirlpool will fit all |
152mm |
||||
800mm |
|
851mm |
||||||
standard 30" x 60" |
|
Drain C |
Outlet |
standard 32" x 60" |
Drain C |
Outlet |
||
|
8" |
|
8" |
|
||||
tub walls. |
|
L |
|
tub walls. |
L |
|
||
|
203mm |
Floor Cut Out 6" x 10" |
203mm |
Floor Cut Out 6" x 12" |
||||
|
|
|
(152 x 254mm) |
|
|
(152 x 305mm) |
||
= stud location |
|
60" |
|
= stud location |
60" |
|
||
|
1524mm |
|
1524mm |
|
||||
Left-hand drain shown - reverse layout for right-hand drain.
Subject to manufacturing tolerance of [+] or [-] 1/8"
P r o d u c t n a m e s l i s t e d h e r e i n a r e t r a d e m a r k s o f A S A m e r i c a , I n c . © A S A m e r i c a , I n c . 2 0 0 8
754282-100 Rev. A
INSTALLATION INSTRUCTIONS
STEP 1. PREPARING ALCOVE
•Alcove studs should be constructed as shown.
•Floor must be clean, smooth, and level (check with level). Sub floor must be installed. Do not install tub on open floor joists.
•Cut hole in sub floor as shown, to accommodate drain.
•Access panels must be located on both ends of whirlpool alcove to service pump/motor and drain assembly after installation. Failure to provide access to these areas may result in added removal and re-installation costs in the event service may be required.
STEP 2. ELECTRICAL CONNECTIONS
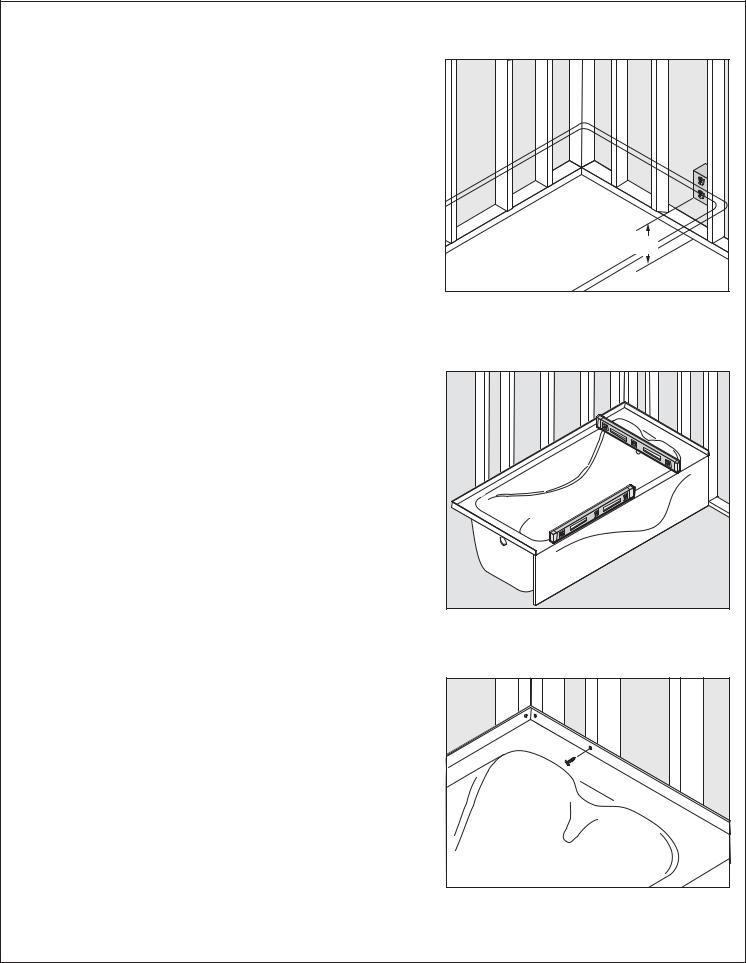
•Install a 110 volt, 20 amp duplex outlet to the stud wall underneath the whirlpool at least 4" (102mm) above the sub floor. (Figure 1)
•Motor/pump must have a separate 110 volt, 20 amp service from the breaker panel to the motor/pump location. Do not combine any other electirc service with whirlpool supply line.
•Service supply line must be connected to a ground fault interrupter (GFI) at the breaker panel for added protection and to meet code requirement. Install breaker after all other electrical connections have been made.
•Your whirlpool wiring should be installed by a licensed electrician. All electrical preparation and connections must be made in strict compliance with local and national electrical codes.
WARNING: If whirlpool is not properly wired, there is danger of electrical shock or fire.
STEP 3. LEAK TEST WHIRLPOOL
•Water test tub in area where all fittings and connections can be inspected.
•Fill tub with water, make sure water is above jets. Run for 10 minutes. Inspect all fittings, plugs and connections for possible leaks.
•Drain tub. If any leaks are found, call American Standard Customer Service Department at 1-800-442-1902.
STEP 4. INSTALLING WHIRLPOOL
•Install drain, waste and overflow.
•Trial fit whirlpool in prepared alcove. With whirlpool sitting flat on floor, check with level on top of tub. Whirlpool should be level from front to back and side to side (Figure 2). If tub is not level, remove tub and level floor using leveling compound.
•A floor leveling compound (smooth mortar) or a similar quick-setting compound specifically made for leveling floors may be used to fully support and level tub.
•If alcove is larger than tub, shim between tub and studs to create a tight fit. Screw tub flange to studs. (Figure 3)
•Connect drain piping to drain.
4" |
102mm |
Wire to ground |
fault interrupter |
FIGURE 1. Locate receptacle in same end of alcove as motor.
FIGURE 2. Check to assure tub is level.
FIGURE 3. If necessary, shim between tub and studs for tight fit and screw to each stud.
-2- |
754282-100 Rev. A |
 Loading...