


R |
TME-M790
EN
MOBILE MULTIMEDIA MONITOR
• OWNER'S MANUAL
Please read before using this equipment.
DE
• MODE D'EMPLOI
Veuillez lire avant d’utiliser cet appareil.
• MANUAL DE OPERACIÓN
Léalo antes de utilizar este equipo.
FR
ES
ES
ALPINE ELECTRONICS, INC. |
ALPINE ELECTRONICS OF AUSTRALIA PTY. LTD. |
ALPINE ELECTRONICS FRANCE S.A.R.L. |
|
|
Tokyo office: 1-1-8 Nishi Gotanda, |
6-8 Fiveways Boulevarde Keysborough, |
(RCS PONTOISE B 338 101 280) |
|
|
|
|
|||
Shinagawa-ku, |
Victoria 3173, Australia |
98, Rue De La Belle Etoile, Z.I. Paris Nord Il |
|
|
Tokyo 141-8501, Japan |
Tel.: (03) 9769-0000 |
B.P. 50016 F-95945, Roissy, Charles De Gaulle |
|
|
Tel.: (03) 3494-1101 |
ALPINE ELECTRONICS GmbH |
Cedex, France |
|
|
ALPINE ELECTRONICS OF AMERICA, INC. |
Tel.: 01-48 63 89 89 |
|
|
|
Kreuzerkamp 7-11 40878 Ratingen, Germany |
|
SE |
||
|
|
|||
19145 Gramercy Place, Torrance, |
Tel.: 02102-45 50 |
ALPINE ELECTRONICS OF U.K., LTD. |
|
|
California 90501, U.S.A. |
ALPINE ITALIA S.p.A. |
13 Tanners Drive, Blakelands, Milton Keynes |
|
|
Tel.: 1-800-ALPINE-1 (1-800-257-4631) |
MK14 5BU, U.K. |
|
|
|
Via C. Colombo 8, 20090 Trezzano Sul Naviglio |
|
|
||
|
Tel.: 01908-61 15 56 |
|
|
|
ALPINE ELECTRONICS OF CANADA, INC. |
MI, Italy |
|
|
|
|
|
|
||
Suite 203, 7300 Warden Ave. Markham, |
Tel.: 02-48 47 81 |
ALPINE ELECTRONICS DE ESPAÑA, S.A. |
|
|
Ontario L3R 9Z6, Canada |
|
Portal De Gamarra 36, Pabellón 32 |
|
|
|
|
|
||
Tel.: 1-800-ALPINE-1 (1-800-257-4631) |
|
01013 Vitoria (Alava)-Apdo. 133, Spain |
|
|
|
|
Tel.: 34-45-283588 |
|
|
|
Designed by ALPINE Japan |
Sankei Kikaku Co., Ltd. |
Printed in Japan (S) |
1-13-38, Hinodai, Hino, Tokyo, Japan |
68P30540Y57-A |
Contents |
|
Operating Instructions |
|
WARNING |
|
WARNING .................................................. |
2 |
CAUTION ................................................... |
3 |
PRECAUTIONS ......................................... |
3 |
Basic Operations |
|
Using Face Cover ............................................... |
4 |
Initial System Start-up ....................................... |
4 |
Raising the Monitor ........................................... |
4 |
Lowering the Monitor ........................................ |
4 |
Turning Power On or Off ................................... |
5 |
Selecting the Monitor Opening Angle ............... |
5 |
Adjusting the Monitor Viewing Angle ............... |
5 |
Adjusting the Volume ........................................ |
5 |
Switching the Source ......................................... |
5 |
Switching Display Modes .................................. |
6 |
Other Useful Features |
|
Adjusting Brightness of Picture ......................... |
8 |
Adjusting Color Density of Picture ................... |
8 |
Adjusting Tint of Picture .................................... |
8 |
Setting the Brightness of the Backlight ............. |
9 |
Adjusting the Lowest Level of the Backlight .... |
9 |
Setting Automatic Opening/ |
|
Closing of Monitor ............................................. |
9 |
Selecting Rear Monitor .................................... |
10 |
Setting the External Device Interrupt Mode .... |
10 |
Switching the Opening Screen ......................... |
11 |
Turning Sound Guide Function On or Off ....... |
11 |
Switching the Video Screen ............................. |
11 |
Using the External Input Terminal ................... |
11 |
Operating with the Remote Control Unit |
|
(RUE-4165 Sold Separately) ........................... |
12 |
ENGLISH
Information
In Case of Difficulty ........................................ |
13 |
Specifications ................................................... |
13 |
Installation and Connections
Warning ............................................................ |
14 |
|
.............................................................Caution |
14 |
|
Precautions ....................................................... |
15 |
|
Installation ....................................................... |
16 |
FR |
Connections ..................................................... |
18 |
|
System Connections |
19 |
|
|
LIMITED WARRANTY
ES
DE
IT
SE
1-EN

 WARNING
 WARNING
This symbol means important instructions. Failure to heed them can result in serious injury or death.
DO NOT OPERATE ANY FUNCTION THAT TAKES
YOUR ATTENTION AWAY FROM SAFELY DRIVING YOUR VEHICLE.
Any function that requires your prolonged attention should only be performed after coming to a complete stop. Always stop the vehicle in a safe location before performing these functions. Failure to do so may result in an accident.
KEEP THE VOLUME AT A LEVEL WHERE YOU CAN STILL HEAR OUTSIDE NOISE WHILE DRIVING.
Failure to do so may result in an accident.
MINIMIZE DISPLAY VIEWING WHILE DRIVING.
Viewing the display may distract the driver from looking ahead of the vehicle and cause an accident.
DO NOT DISASSEMBLE OR ALTER.
Doing so may result in an accident, fire or electric shock.
USE THIS PRODUCT FOR MOBILE 12V APPLICATIONS.
Use for other than its designed application may result in fire, electric shock or other injury.
KEEP SMALL OBJECTS SUCH AS BATTERY OUT OF THE REACH OF CHILDREN.
Swallowing them may result in serious injury. If swallowed, consult a physician immediately.
DO NOT PLACE HANDS, FINGERS OR FOREIGN OBJECTS IN INSERTION SLOTS OR GAPS.
Doing so may result in personal injury or damage to the product.
USE THE CORRECT AMPERE RATING WHEN REPLACING FUSES.
Failure to do so may result in fire or electric shock.
DO NOT BLOCK VENTS OR RADIATOR PANELS.
Doing so may cause heat to build up inside and may result in fire.
DO NOT WATCH VIDEO WHILE DRIVING.
Watching the video may distract the driver from looking ahead of the vehicle and cause an accident.
INSTALL THE PRODUCT CORRECTLY SO THAT THE DRIVER CANNOT WATCH TV/VIDEO UNLESS THE VEHICLE IS STOPPED AND THE EMERGENCY BRAKE IS APPLIED.
It is dangerous (and illegal in many states) for the driver to watch TV/Video while driving a vehicle. Installing this product incorrectly enables the driver to watch TV/Video while driving. This may cause a distraction, preventing the driver from looking ahead, thus causing an accident. The driver or other people could be severely injured.
2-EN

 CAUTION
This symbol means important instructions. Failure to heed them can result in injury or material property damage.
HALT USE IMMEDIATELY IF A PROBLEM APPEARS.
Failure to do so may cause personal injury or damage to the product. Return it to your authorized Alpine dealer or the nearest Alpine Service Center for repairing.
KEEP FINGERS AWAY WHILE THE MOTORIZED FRONT PANEL OR MOVING MONITOR IS IN
MOTION.
Failure to do so may result in personal injury or damage to the product.
 PRECAUTIONS
Temperature
Be sure the temperature inside the vehicle is between +45°C (+113°F) and 0°C (+32°F) before turning your unit on.
Fuse Replacement
When replacing the fuse(s), the replacement must be of |
|
|
the same amperage as shown on the fuse holder. If the |
|
|
|
||
fuse(s) blows more than once, carefully check all |
|
|
electrical connections for shorted circuitry. Also have your |
FR |
|
vehicle’s voltage regulator checked. |
||
|
|
|
Maintenance |
|
|
If you have problems, do not attempt to repair the unit |
|
|
|
||
yourself. Return it to your Alpine dealer or the nearest |
|
|
Alpine Service Station for servicing. |
|
|
|
|
|
Installation Location |
ES |
|
Make sure the TME-M790 will not be exposed to: |
||
•Direct sun and heat
•High humidity
•Excessive dust
•Excessive vibrations
•After turning the system off, a slight ghost of the image
will remain temporarily. This is an effect peculiar to
LCD technology and is normal. DE
• Under cold temperature conditions, the screen may lose contrast temporarily. After a short warm-up period, it will return to normal.
IT
SE
3-EN
Basic Operations
9 8 OPEN/CLOSE / -
RESET switch PWR
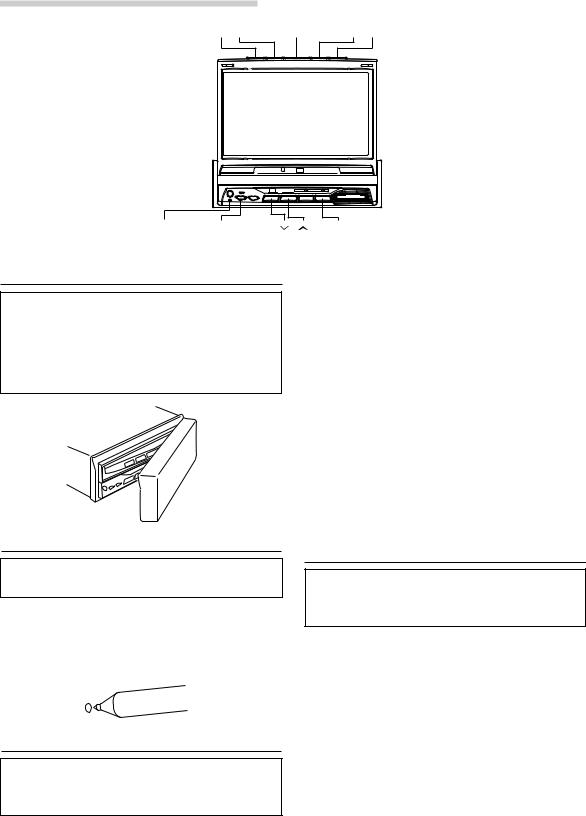
Using Face Cover
An anti-theft face cover is provided with the TMEM790.
Put the face cover onto the TME-M790 when you leave the vehicle.
Be sure to remove the anti-theft face cover when you drive.
AUX
NOTES
•If the monitor touches an obstacle while it is being raised, the unit will stop raising the monitor immediately. Should this occur, remove the obstacle and press the OPEN/CLOSE button again to raise the monitor.
•When the movable monitor is opened, do not place any object on the monitor and be careful not to bump or apply any pressure to the monitor while it is open.
This can cause damage to the mechanism.
•Under low ambient temperature conditions, the display may be dark for a short period of time immediately after the power is turned on. Once the LCD has warmed up, the display will return to normal.
•For your safety, some operation of the unit cannot be performed while the vehicle is in motion. In this case, first stop the vehicle and engage the parking brake, then perform the operation.
Initial System Start-up
Immediately after installing or applying power to the unit, it should be initialized.
1 At the lower left corner of the screen front panel, there is a small button. Using a pencil or other pointed object, press this RESET switch to complete the initialization procedure.
Raising the Monitor
NOTE
The TME-M790 is a precision device. With careful handling, its performance can be maintained at a high level for a long time.
1 Press the OPEN/CLOSE button.
The unit beeps 3 times and raises the monitor automatically.
Lowering the Monitor
NOTE
The TME-M790 is a precision device. With careful handling, its performance can be maintained at a high level for a long time.
1 Press the OPEN/CLOSE button.
The unit will beep 3 times and lower the monitor automatically.
NOTE
If the monitor touches an obstacle while it is being lowered, the unit will stop lowering the monitor immediately.
Should this occur, remove the obstacle and press the
OPEN/CLOSE button again to lower the monitor.
4-EN
Turning Power On or Off
1 Press the PWR (Power) button to turn on the unit. The opening screen appears automatically.
2 Press the PWR (Power) button again to turn off the unit.
NOTES
•The TME-M790 draws minimal current even when its power switch is turned off. If the switched power (ignition) lead of the TME-
M790 is connected directly to the positive (+) post of the vehicle's battery, the battery may be discharged. If this lead is unswitched, it must be disconnected from the battery post should the vehicle be left unused for an extended period of time.
An SPST (Single-Pole, Single-Throw) switch (sold separately) can be added to simplify this procedure.
Then, you can simply place it in the OFF position when you leave the vehicle. Turn the SPST switch back ON before using the TME-M790. For connecting the SPST switch, refer to the Installation.
•Some operation of the unit cannot be performed while the vehicle is in motion. In this case, be sure to first stop your vehicle and apply the parking brake, then perform the operation.
•After turning the system off, a slight ghost of the image will remain temporarily. This is an effect peculiar to LCD technology and is normal.
•Under cold temperature conditions, the screen may lose contrast temporarily. After a short warm-up period, it will return to normal.
Selecting the Monitor Opening
Angle
The monitor opening angle can be set in 2 positions.
1 Press and hold the OPEN/CLOSE button for at least 2 seconds while the monitor is being raised. Each press changes the monitor angle back or forth.
NOTE
When the OPEN/CLOSE button is pressed and held for at least 2 seconds when the neck angle is adjusted, the neck angle adjustment is canceled.
After doing this, adjust the display in the front/rear direction.
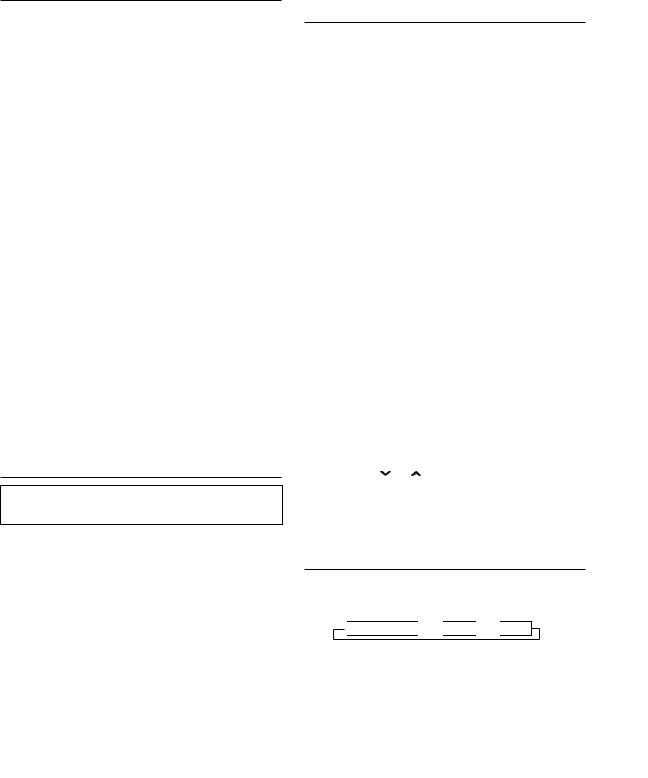
Adjusting the Monitor Viewing
Angle
Adjust the monitor's angle for better visibility. |
|
|
|
|
|||
|
|
|
|
1 While viewing the screen that is shown press the |
|
||
|
9 or 8 button to adjust the display to the ideal |
|
|
|
viewing angle. |
|
|
|
The display viewing angle can be adjusted |
|
|
2 |
between 40 and 105 degrees. |
|
|
Press the 4 or 3 button to adjust the right-left |
|
||
|
viewing angle. It is possible to adjust the display |
|
|
|
viewing angle up to 15 degrees to the left or |
|
|
|
right. |
|
|
|
Press and hold the OPEN/CLOSE button for at |
FR |
|
|
least 2 seconds to cancel the neck angle |
||
|
adjustment. |
|
|
|
NOTES |
|
|
|
|
||
|
• The angle changes continuously if the 9 and 8 |
|
|
|
buttons or the 4 and 3 buttons are held down. |
|
|
|
• If there are any obstructions to the monitor |
|
|
|
when adjusting the angle, first remove the |
|
|
|
obstruction and then readjust the angle. |
|
|
|
• The screen color will vary when viewed at certain |
ES |
|
|
angles. Adjust the screen angle for the best viewing |
||
position.
•If the voltage of the vehicle's battery power is low, the screen may blink when the screen angle is changed. This is normal and not a malfunction.
•The adjusted angle is stored in the memory.
Adjusting the Volume
1 Press the |
or |
|
DE |
button to adjust the volume. |
|||
NOTE
The volume changes continuously if the  or
or  button is held down.
Switching the Source
1 Press the AUX button. Each press of the button IT will cycle through the modes as follows:
 NAVIGATION

 AUX1
AUX1

 AUX2
AUX2
SE
5-EN

Basic Operations
DISP
Switching Display Modes
Viewing the switching display modes
To watch a video source, your vehicle must be parked with the ignition key in the ACC or ON position. To do this, follow the procedure below.
1.Push the foot brake to bring your vehicle to a complete stop at a safe location. Engage the parking brake.
2.Keep pushing the foot brake and release the parking brake once then engage it again.
3.While the parking brake is being engaged the second time, release the foot brake.
NOTE
For automatic transmission vehicles, place the transmission lever in the Park position.
The video lock-out system is now disabled. Unless ignition is turned OFF, this mode can be reactivated by simply engaging the parking brake, without performing the entire procedure above (1 through 3).
If the ignition is turned OFF position, you must perform the entire procedure above.
NOTE
Trying to access the switching display modes while driving will display the warning - PICTURE OFF
FOR YOUR SAFETY.
1 Press and hold the DISP button for at least 2 seconds. Each press changes the display modes as follows:
 MODE 1

 MODE 2

 MODE 3

 MODE 4 (WIDE) (ZOOM) (CINEMA) (NORMAL)
MODE 1 (WIDE)
Stretches the normal image evenly in a horizontal direction so that it is displayed on the entire screen.
MODE 2 (ZOOM)
Stretches the normal image evenly in a horizontal direction so that it is displayed on the entire screen. The stretching ratio increases the closer to the left or right edge of the screen.
6-EN
 Loading...