


R
CDA-7990R
FM/MW/LW/RDS CD Player
• OWNER’S MANUAL
Please read before using this equipment.
• BEDIENUNGSANLEITUNG
Lesen Sie diese Bedienungsanleitung bitte vor Gebrauch des Gerätes.
• MODE D’EMPLOI
Veuillez lire avant d’utiliser cet appareil.
• MANUAL DE OPERACIÓN
Léalo antes de utilizar este equipo.
• ISTRUZIONI PER L’USO
Si prega di leggere prima di utilizzare l’attrezzatura.
• ANVÄNDARHANDLEDNING
Innan du använder utrustningen bör du läsa igenom denna användarhandledning.
ENGLISH
DEUTSCH
FRANÇAIS
ESPAÑOL
ITALIANO
SVENSKA

Contents |
|
WARNING |
|
WARNING............................................. |
2 |
CAUTION .............................................. |
3 |
PRECAUTIONS .................................... |
3 |
Basic Operation |
|
Detaching the Front Panel ........................... |
6 |
Attaching the Front Panel ............................ |
7 |
Initial System Start-Up ................................ |
7 |
Turning Power On and Off .......................... |
8 |
Adjusting Volume/Subwoofer/Bass/Treble/ |
|
Balance (Between Left and Right)/ |
|
Fader (Between Front and Rear) .............. |
9 |
Audio Mute Function .................................. |
9 |
Adjusting the Bass/Treble Center |
|
Frequencies ............................................. |
10 |
Setting when Using the |
|
Remote Control ....................................... |
12 |
Adjusting Source Signal Level .................. |
13 |
Changing Backlighting Colour .................. |
14 |
Switching the Tuner Mode ........................ |
15 |
CD Text Scroll Setting ............................... |
16 |
Subwoofer On and Off .............................. |
17 |
Digital Optical Output On and Off ............ |
18 |
Setting the AUX Mode .............................. |
19 |
Turning Mute Mode On/Off ...................... |
20 |
Blackout Mode On and Off ....................... |
21 |
Recalling the Stored Settings .................... |
21 |
Radio Operation |
|
Manual Tuning .......................................... |
22 |
Automatic Seek Tuning ............................. |
23 |
Manual Storing of Station Presets ............. |
24 |
Automatic Memory |
|
of Station Presets .................................... |
25 |
Tuning to Preset Stations ........................... |
26 |
RDS Operation |
|
Setting RDS Reception Mode |
|
and Receiving RDS Stations ................... |
27 |
Recalling Preset RDS Stations .................. |
28 |
Receiving RDS Regional (Local) |
|
Stations ................................................... |
29 |
Receiving Traffic Information ................... |
30 |
PTY (Programme Type) Tuning ................ |
31 |
Receiving Traffic Information |
|
While Playing CD or Radio .................... |
32 |
Priority PTY (Programme Type) ............... |
33 |
Turning Emergency Alarm On or Off ....... |
34 |
Displaying Radio Text ............................... |
35 |
CD Player Operation |
|
Playback .................................................... |
36 |
Music Sensor (Skip) .................................. |
37 |
Fast Forward and Backward ...................... |
37 |
Repeat Play ................................................ |
38 |
M.I.X. (Random Play) ............................... |
39 |
Scanning Programmes ............................... |
40 |
Displaying the Title/Text ........................... |
41 |
Titling Discs .............................................. |
42 |
Searching for Titled Discs/CD-TEXT ....... |
44 |
Erasing Disc Title ...................................... |
45 |
Switching the Disc Mode .......................... |
45 |
Controlling CD Changer (Optional) .......... |
46 |
Multi-Changer Selection ........................... |
47 |
Information |
|
In Case of Difficulty .................................. |
48 |
Specifications ............................................ |
50 |
1-EN

WARNING
 WARNING
This symbol means important instructions.
Failure to heed them can result in serious injury or death.
DO NOT OPERATE ANY FUNCTION THAT TAKES YOUR ATTENTION AWAY FROM SAFELY DRIVING YOUR VEHICLE.
Any function that requires your prolonged attention should only be performed after coming to a complete stop. Always stop the vehicle in a safe location before performing these functions. Failure to do so may result in an accident.
KEEP THE VOLUME AT A LEVEL WHERE YOU CAN STILL HEAR OUTSIDE NOISE WHILE DRIVING.
Failure to do so may result in an accident.
MINIMIZE DISPLAY VIEWING WHILE DRIVING.
Viewing the display may distract the driver from looking ahead of the vehicle and cause an accident.
DO NOT DISASSEMBLE OR ALTER.
Doing so may result in an accident, fire or electric shock.
USE THIS PRODUCT FOR MOBILE 12V APPLICATIONS.
Use for other than its designed application may result in fire, electric shock or other injury.
2-EN
KEEP SMALL OBJECTS SUCH AS BATTERIES OUT OF THE REACH OF CHILDREN.
Swallowing them may result in serious injury. If swallowed, consult a physician immediately.
USE THE CORRECT AMPERE RATING WHEN REPLACING FUSES.
Failure to do so may result in fire or electric shock.
USE ONLY IN CARS WITH A 12 VOLT NEGATIVE GROUND.
(Check with your dealer if you are not sure.) Failure to do so may result in fire, etc.
DO NOT BLOCK VENTS OR RADIATOR PANELS.
Doing so may cause heat to build up inside and may result in fire.
DO NOT PLACE HANDS, FINGERS OR FOREIGN OBJECTS IN INSERTION SLOTS OR GAPS.
Doing so may result in personal injury or damage to the product.
 CAUTION
This symbol means important instructions.
Failure to heed them can result in injury or material property damage.
HALT USE IMMEDIATELY IF A PROBLEM APPEARS.
Failure to do so may cause personal injury or damage to the product. Return it to your authorized Alpine dealer or the nearest Alpine Service Centre for repairing.
 PRECAUTIONS
Temperature
Be sure the temperature inside the vehicle is between +60°C (+140°F) and –10°C (+14°F) before turning your unit on.
Moisture Condensation
You may notice the CD playback sound wavering due to condensation. If this happens, remove the disc from the player and wait about an hour for the moisture to evaporate.
Damaged Disc
Do not attempt to play cracked, warped, or damaged discs. Playing a bad disc could severely damage the playback mechanism.
Maintenance
If you have problems, do not attempt to repair the unit yourself. Return it to your Alpine dealer or the nearest Alpine Service Station for servicing.
3-EN
Never Attempt the Following
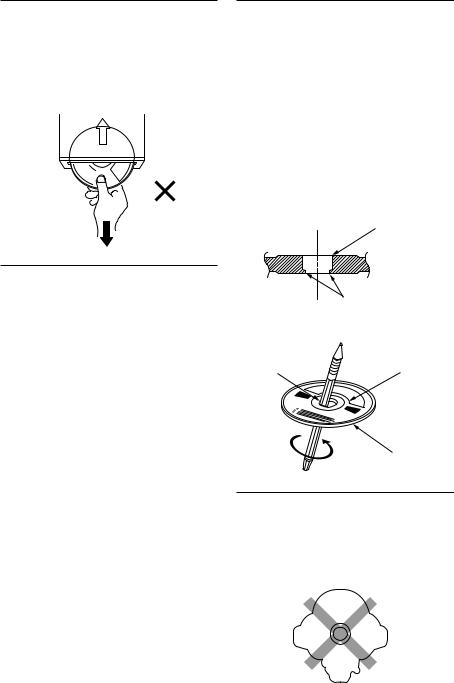
Do not grip or pull out the disc while it is being pulled back into the player by the automatic reloading mechanism.
Do not attempt to insert a disc into the unit when the unit power is off.
New Discs
As a protective measure to prevent the CD from jamming, the CD player will automatically eject discs with irregular surfaces or inserted incorrectly. When a new disc is inserted into the player and ejected after initial loading, using your finger, feel around the inside of the centre hole and outside edge of the disc. If you feel any small bumps or irregularities, this could inhibit proper loading of the disc. To remove the bumps, rub the inside edge of the hole and outside edge of the disc with a ball-point pen or other such instrument, then insert the disc again.
Centre Hole
Inserting Discs
Your player accepts only one disc at a time for playback.
Do not attempt to load more than one disc. Make sure the label side is facing up when you insert the disc. Your player will automatically eject any disc that is inserted incorrectly. If the player continues to eject a correctly inserted disc, push the Reset switch with a pointed object such as a ball-point pen.
Playing a disc while driving on a very bumpy road may result in skips, but this will not scratch the disc or damage the player.
Bumps
Centre Hole
New Disc
Outside (Bumps)
Irregular Shaped Discs
Be sure to use round shape discs only for this unit and never use any special shape discs. Use of special shape discs may cause damage to the mechanism.
4-EN
Installation Location
Make sure the CDA-7990R will not be installed in a location subjected to:
•Direct sun and heat
•High humidity and water
•Excessive dust
•Excessive vibrations
Handling the Detachable Front Panel
•Do not expose to rain or water.
•Do not drop or apply shock.
Correct Handling
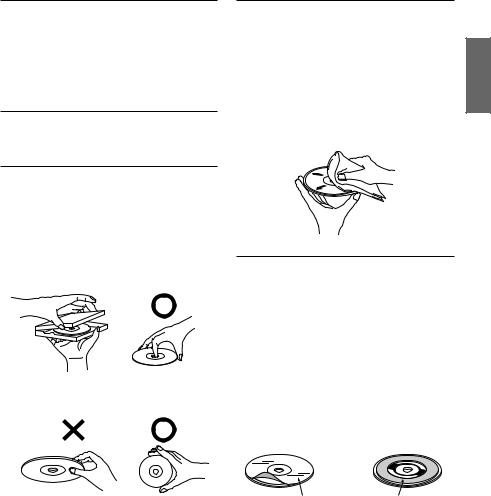
Do not drop the disc while handling. Hold the disc so you will not leave fingerprints on the surface. Do not affix tape, paper, or gummed labels to the disc. Do not write on the disc.
CORRECT
INCORRECT CORRECT
Disc Cleaning
Fingerprints, dust, or soil on the surface of the disc could cause the CD player to skip. For routine cleaning, wipe the playing surface with a clean, soft cloth from the centre of the disc to the outer edge. If the surface is heavily soiled, dampen a clean, soft cloth in a solution of mild neutral detergent before cleaning the disc.
Disc Accessories
There are various accessories available on the market for protecting the disc surface and improving sound quality.
However, most of them will influence the thickness and/or diameter of the disc. Using such accessories can cause the disc to be out of standard specifications and may create operational problems. We recommend not using these accessories on discs played in Alpine CD players.
Transparent Sheet |
Disc Stabilizer |
5-EN
Basic Operation
RLS |
POWER |
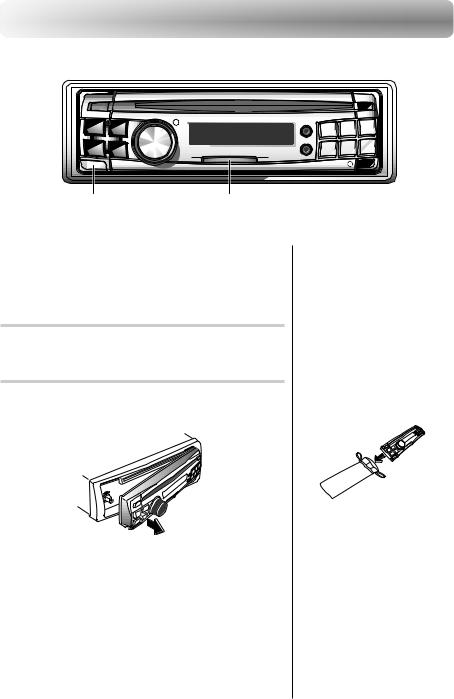
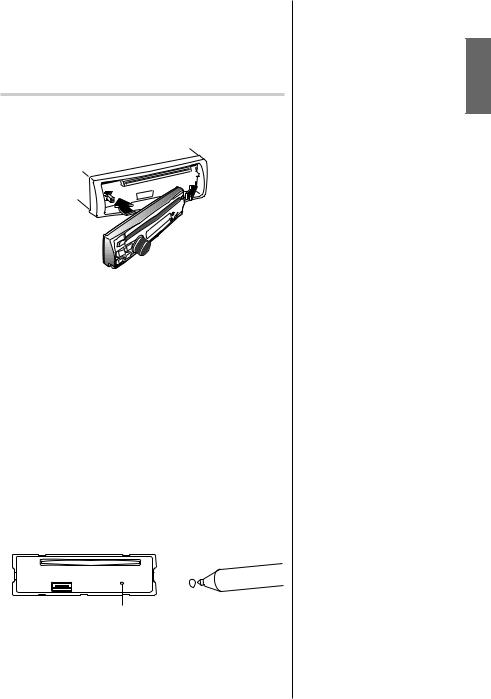
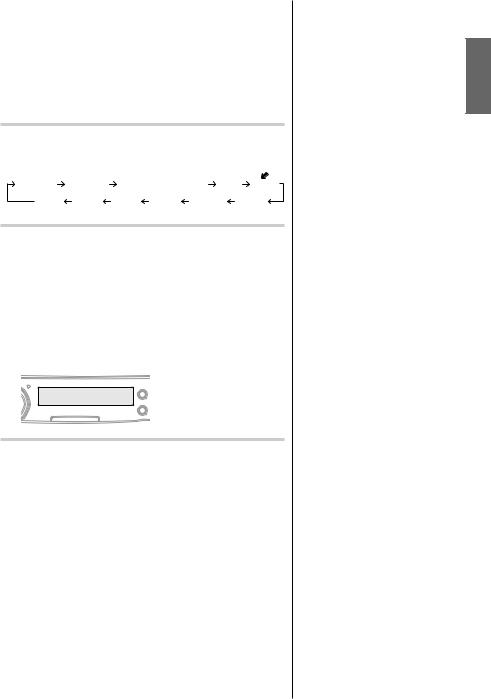
Detaching the Front Panel
1 Press the POWER button for more than 3 seconds to turn off the power.
2 Press the RLS (Release) button at lower left corner until the front panel pops out.
3 Grasp the left side of the front panel and pull it out.
•The front panel may become hot in normal usage (especially the connector terminals), this is not malfunction.
•To protect the front panel, place it in the supplied carrying case.
6-EN
Attaching the Front Panel
1 First, insert the right side of the front panel into the main unit. Align the groove on the front panel with the projections on the main unit.
2 Push the left side of the front panel until it locks firmly into the main unit.
2
 1
1
Initial System Start-Up
Make sure that the Power is turned off. When the power is on, press and hold the POWER button for at least 3 seconds to turn off the power.
Immediately after installing or applying power to the unit, it should be initialized. To do this, first, remove the detachable front panel. Behind the front panel, to the right of the connector, there is a small hole.
Using a ball-point pen or other pointed object, press the reset switch mounted behind this hole to complete the initialization procedure.
RESET switch
• Before attaching the front panel, make sure that there is no dirt or dust on the connector terminals and no foreign object between the front panel and the main unit.
7-EN
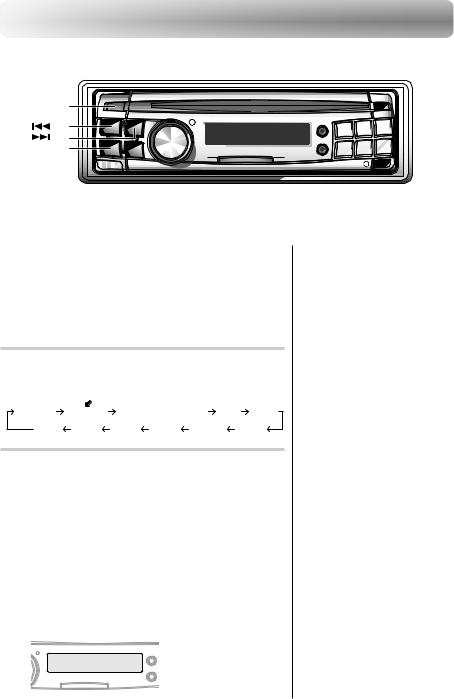
Basic Operation
MUTE |
DN |
UP |
MODE (Audio Control) POWER
Turning Power On and Off |
|
1 Press the POWER button to turn on the unit. |
• Controllable with Remote |
|
Control |
|
This unit can be controlled with |
The volume level gradually increases to the |
an optional Alpine remote |
control. For details, consult your |
|
previous level you were listening to before the unit |
Alpine dealer. |
was turned off. Press the POWER button for more |
|
than 3 seconds to turn off the unit. |
Point the optional remote control |
|
transmitter at the remote control |
|
sensor. |
|
Remote control sensor |
• Connectable to Remote Control Interface Box
You can operate this unit from the vehicle’s control unit when an Alpine Remote Control Interface Box (optional) is connected. For details, contact your Alpine dealer.
• The unit can be turned on by pressing any other button except the eject  button.
• The very first time the power is turned on, the volume will start from –67dB.
8-EN
Adjusting Volume/Subwoofer/
Bass/Treble/Balance (Between Left
and Right)/Fader (Between Front
and Rear)
1 Press the MODE (Audio Control) knob repeatedly to choose the desired mode.
Each press changes the modes as follows:
|
|
|
* |
* * |
|
* * |
|
|
VOLUME SUB-W BASS TREBLE |
|
|||||
|
|
||||||
|
|
FADER |
|
BALANCE |
|
|
|
|
|
|
|
|
|||
2 Rotate the MODE (Audio Control) knob until the desired sound is obtained in each mode.
Audio Mute Function
Activating this function will instantly lower the volume level by
20dB.
1Press the MUTE button to activate the MUTE mode. The audio level will decrease by about 20 dB.
Pressing the MUTE button again will bring the audio back to its previous level.
•* Not displayed when setting the SUB-W mode to OFF. (For the setting of the SUB- W mode, refer to page 17.)
•** To display the BASS or
TREBLE mode:
1Press and hold the SETUP button for at least 3 seconds.
2Press the DN or
DN or  UP button to select the BASS/
TRE mode.
3Press the TUNE button to set the BASS/TRE to ON.
4 Press the SETUP button to complete the setting. Then perform the step 1 in the left column.
**“BASS”, “TREBLE” is not displayed when an external audio processor is connected.
•If the MODE (Audio Control) knob is not rotated in 5 seconds after selecting the BASS, TREBLE, BALANCE, or FADER mode, the unit automatically returns to the VOLUME mode.
•When the subwoofer mode is ON, its respective levels may be adjusted.
•The settings of the Bass and Treble will be individually memorized for each source (FM, MW (LW) and CD) until the setting is changed. Depending on the connected devices, some functions and display indications do not work.
9-EN

Basic Operation
SETUP |
DN |
UP |
TUNE |
Adjusting the Bass/Treble
Center Frequencies
You can change the Bass/Treble center frequencies on this unit. This gives you flexibility in creating your ideal sound field.
1 Press and hold the SETUP button for at least 3 seconds.
2 Press the
 UP button to select the BASS/TRE mode. Each press changes the modes as shown:
BASS/TRE REM CONT FM-LEVEL REGIONAL PTY31 TUNER
MUTE AUX-IN D-OUT SUB-W SCROLL ILLUMI
3 After pressing the TUNE button, press the
 UP or
UP or DN button to select mode to change.
• If you press the 
 DN button the display scrolls in reverse sequence.
BASS/TRE BC BW TC REM CONT
10-EN
4 Press the TUNE button to select the desired setting.
1. BC (Setting the Bass Center Frequency):
 BC 60Hz
 BC 70Hz
  BC 80Hz
  BC 90Hz BC 200Hz
  BC 150Hz
  BC 130Hz BC 100Hz
Emphasizes the displayed Bass frequency ranges.
2.BW (Setting the Bass Band Width): (Q-Factor)
BW WIDE1 BW WIDE2 BW WIDE3 |
BW WIDE4 |
(Narrow) |
(Wide) |
Changes the displayed frequency’s band width to narrow or wide.
3. TC (Setting the Treble Center Frequency):
TC 10.0kHz TC 12.5kHz
 TC 15.0kHz TC 17.5kHz
Emphasizes the displayed treble frequency ranges.
Default values
BC: 80 Hz
BW: WIDE1
TC: 10.0kHz
5 Press the SETUP button again to return to normal operation.
11-EN
Basic Operation
SETUP |
DN |
UP |
TUNE |
Setting when Using the Remote Control
1 Press and hold the SETUP button for at least 3 seconds.
2 Press the
 UP or
UP or DN button to select REM CONT mode. Each press changes the modes as shown:
BASS/TRE REM CONT FM-LEVEL REGIONAL PTY31 TUNER
MUTE AUX-IN D-OUT SUB-W SCROLL ILLUMI
3 Press the TUNE button to toggle the REM CONT mode between On and Off.
REM CONT OFF  REM CONT ON
•REM CONT ON: Set to ON when using the optional Remote Control to operate the CDA-7990R.
•REM CONT OFF: Resist the inference from the noise such as ultraviolet rays exist in the natural to provide a much higher quality sound.
Set to OFF when not using the optional Remote Control.
• If you press the 
 DN button the display scrolls in reverse sequence.
• The initial setting at the factory is “REM CONT OFF”.
<Display of “REM CONT ON”>
R EM CON T ON
12-EN

4 When the setting is completed, press the SETUP button to return to the normal mode.
Adjusting Source Signal Level
If the difference in volume level between the CD player and FM radio is too great, adjust the FM signal level as follows.
1 Press and hold the SETUP button for at least 3 seconds.
2 Press the
 UP button repeatedly to select “FMLEVEL.”
Each press of the
 UP button scrolls the modes as follows:
BASS/TRE REM CONT FM-LEVEL REGIONAL PTY31 TUNER
MUTE AUX-IN D-OUT SUB-W SCROLL ILLUMI
3 Press the TUNE button to select the FM signal level mode. Each press toggles between “FMLEVEL HI” and “FM-LEVEL LO”.
4 Press the SETUP button to activate the normal mode.
• When you press the DN button, the display scrolls in the reverse sequence.
13-EN

Basic Operation
SETUP |
DN |
UP |
TUNE |
Changing Backlighting Colour
1 Press and hold the SETUP button for at least 3 seconds.
2 Press the
 UP button repeatedly to select “ILLUMI”.
Each press of the
 UP button changes the modes as shown:
BASS/TRE REM CONT FM-LEVEL REGIONAL PTY31 TUNER
MUTE AUX-IN D-OUT SUB-W SCROLL ILLUMI
3 Press the TUNE button to toggle the mode between Blue and Green.
ILLUMI BLUE  ILLUMI GREEN
• If you press the  DN button the display scrolls in reverse sequence.
• The initial setting at the factory is “ILLUMI BLUE”.
<Display of “ILLUMI BLUE”>
I L LUM I B L U E
4 Press the SETUP button to set the selected mode.
14-EN
Switching the Tuner Mode
The CDA-7990R incorporates the MAX TUNE Pro for the highest quality tuner audio. Moreover, you can choose between two settings to suit your own personal sound preferences and usage.
1 Press and hold the SETUP button for at least 3 seconds.
2 Press the
 UP or
UP or DN button to select TUNER mode. Each press changes the modes as shown:
BASS/TRE REM CONT FM-LEVEL REGIONAL PTY31 TUNER
MUTE AUX-IN D-OUT SUB-W SCROLL ILLUMI
3 Press the TUNE button to switch the TUNER mode.
TUNER Hi-Fi  TUNER NORMAL
  TUNER STABLE
NORMAL: Standard setting
Hi-Fi: |
Sound quality priority setting |
STABLE: Noiseless priority setting
<Display of “TUNER NORMAL”>
T UNER NORMA L
4 When the setting is completed, press the SETUP button to return to the normal mode.
•If you press the 
 DN button the display scrolls in reverse sequence.
•The initial setting at the factory is “TUNER Hi-Fi”.
•If you find the sound is very noisy while listening to the tuner in the Hi-Fi mode, we recommend you change to the NORMAL mode.
• How Max Tune Pro works its magic
Interference from neighboring stations on the FM band is one of the biggest obstacles to good reception. We developed a high performance ceramic filter that uses a complex algorithm to automatically select Wide or Narrow mode for best reception. Judgment is based on interference level, modulation level of the tuned station, and strength of both interfering and desired signals. As a result, whenever a station is tuned in, the tuner is continually analysing conditions to determine the optimum settings for the cleanest, most stable reception. The MW section also has new parts and circuitry that are more resistant to interference.
15-EN
 Loading...