


Contents |
|
Operating Instructions |
|
WARNING |
|
WARNING .................................................. |
3 |
CAUTION ................................................... |
3 |
PRECAUTIONS ......................................... |
3 |
Getting Started |
|
Turning Power On and Off ............................... |
6 |
Initial System Start-Up ..................................... |
6 |
Opening and Closing the Movable Display ...... |
6 |
Display Tilt Adjustment .................................... |
6 |
Adjusting Volume ............................................. |
6 |
Changing the Display Type |
|
(CDA-9833R only) ....................................... |
6 |
Switching the Display modes |
|
(CDA-9835R only) ........................................ |
6 |
Detaching and Attaching the Front Panel ......... |
7 |
Radio |
|
Listening to Radio ............................................. |
7 |
Manual Storing of Station Presets .................... |
8 |
Automatic Memory of Station Presets .............. |
8 |
Tuning to Preset Stations .................................. |
8 |
Station Title Search Function ............................ |
8 |
Frequency Search Function .............................. |
8 |
RDS |
|
Setting RDS Reception Mode and Receiving |
|
RDS Stations ................................................. |
9 |
Recalling Preset RDS Stations .......................... |
9 |
Receiving RDS Regional (Local) Stations ....... |
9 |
PI SEEK Setting.............................................. |
10 |
Receiving Traffic Information ........................ |
10 |
PTY (Programme Type) Tuning ..................... |
10 |
Receiving Traffic Information While Playing |
|
CD or Radio ................................................. |
11 |
Priority PTY (Programme Type) .................... |
11 |
Displaying Radio Text .................................... |
12 |
ENGLISH
CD/MP3/WMA |
|
Playback .......................................................... |
12 |
Playing back a Playlist .................................... |
13 |
Repeat Play ..................................................... |
14 |
M.I.X. (Random Play) .................................... |
14 |
Scanning Programmes .................................... |
15 |
Searching from CD Text ................................. |
15 |
File/Folder Name Search (concerning MP3/ |
|
WMA) ........................................................... |
15 |
Quick Search ................................................... |
15 |
About MP3/WMA .......................................... |
16 |
Sound Setting |
|
Adjusting Balance (Between Left and Right)/ |
|
Fader (Between Front and Rear)/Defeat...... |
17 |
Equalizer Presets ............................................. |
18 |
Adjusting and Storing the Equalizer Curve .... |
18 |
Recalling the Stored Equalizer Curve ............. |
18 |
About the Crossover ....................................... |
18 |
Adjusting and Storing the Crossover Settings ... |
19 |
Recalling the Stored Crossover Settings ......... |
20 |
About Time Correction ................................... |
20 |
Bass Focus ...................................................... |
21 |
Adjusting and Storing the Time Correction ...... |
22 |
Recalling the Stored Time Correction |
|
Settings ........................................................... |
22 |
Setting the MX Mode ..................................... |
23 |
Other Functions |
|
Displaying the Title/Text................................. |
23 |
Titling Discs/Stations ...................................... |
25 |
Erasing Disc Title/Station Title ....................... |
25 |
Blackout Mode On and Off ............................. |
25 |
Setting an Amplifier Link ............................... |
26 |
Displaying the External Amplifier |
|
Information .................................................. |
26 |
Setting the Multicolour Illumination .............. |
27 |
Changing the Lighting Colour of |
|
All the Buttons ............................................. |
27 |
Verifying the Software Version ....................... |
27 |
Windows Media and the Windows logo are trademarks, or registered trademarks of Microsoft Corporation in the United States and /or other countries.
1-EN

i-Personalize™ Operation |
|
About i-Personalize™ ..................................... |
28 |
Data Downloading .......................................... |
28 |
SETUP |
|
Sound Customizing |
|
Adjusting Source Signal Levels ...................... |
29 |
Switching the Tuner Mode .............................. |
29 |
Subwoofer On and Off .................................... |
29 |
Setting the Subwoofer Output......................... |
29 |
Setting the Response Slope for the High Range |
|
Speaker (TW SETUP) ................................. |
29 |
Sound (Beep) Guide Function ........................ |
29 |
Visual Customizing |
|
Dimmer Control .............................................. |
29 |
Scroll Setting................................................... |
30 |
Switching the Character Font |
|
(CDA-9833R only) ...................................... |
30 |
Adjusting Display Contrast |
|
(CDA-9833R only) ...................................... |
30 |
Switching the Animation Display type |
|
(CDA-9835R only) ...................................... |
30 |
Demonstration ................................................. |
30 |
MP3/WMA |
|
Playing MP3/WMA Data................................ |
30 |
External Device |
|
Turning Mute Mode On/Off ........................... |
30 |
Setting the AUX Mode (V-Link) ..................... |
30 |
Connecting to an External Amplifier .............. |
30 |
Setting the Temperture Display |
|
for the External Amplifier ........................... |
30 |
Setting Tone Defeat for External Devices ....... |
30 |
MobileHub™ Link Operation |
|
(Optional) |
|
About MobileHub™ Link .............................. |
31 |
Telephone Mode ON/OFF .............................. |
31 |
Incoming Calls ................................................ |
31 |
Setting the Automatic Calling ......................... |
31 |
Calling ............................................................. |
32 |
SMS (Short Message Service) Operation ....... |
32 |
Changer (Optional) |
|
Controlling CD Changer (Optional) ............... |
33 |
Playing MP3 Files with the CD Changer |
|
(Optional) .................................................... |
33 |
Multi-Changer Selection (Optional) ............... |
33 |
Remote Control |
|
Controls on Remote Control ........................... |
34 |
Operating the Audio Processor ....................... |
34 |
Battery Replacement ....................................... |
35 |
Information |
|
In Case of Difficulty ....................................... |
35 |
Specifications .................................................. |
37 |
Installation and Connections
Warning ........................................................... |
38 |
Caution ............................................................ |
38 |
Precautions ...................................................... |
38 |
Installation ...................................................... |
39 |
Connections ...................................................... |
40 |
2-EN
Operating Instructions
WARNING
 WARNING
This symbol means important instructions. Failure to heed them can result in serious injury or death.
DO NOT OPERATE ANY FUNCTION THAT TAKES YOUR ATTENTION AWAY FROM SAFELY DRIVING YOUR VEHICLE.
Any function that requires your prolonged attention should only be performed after coming to a complete stop. Always stop the vehicle in a safe location before performing these functions. Failure to do so may result in an accident.
KEEP THE VOLUME AT A LEVEL WHERE YOU CAN STILL HEAR OUTSIDE NOISE WHILE DRIVING.
Failure to do so may result in an accident.
DO NOT DISASSEMBLE OR ALTER.
Doing so may result in an accident, fire or electric shock.
USE ONLY IN CARS WITH A 12 VOLT NEGATIVE GROUND.
(Check with your dealer if you are not sure.) Failure to do so may result in fire, etc.
KEEP SMALL OBJECTS SUCH AS BATTERIES OUT OF THE REACH OF CHILDREN.
Swallowing them may result in serious injury. If swallowed, consult a physician immediately.
USE THE CORRECT AMPERE RATING WHEN REPLACING FUSES.
Failure to do so may result in fire or electric shock.
DO NOT BLOCK VENTS OR RADIATOR PANELS.
Doing so may cause heat to build up inside and may result in fire.
USE THIS PRODUCT FOR MOBILE 12V APPLICATIONS.
Use for other than its designed application may result in fire, electric shock or other injury.
DO NOT PLACE HANDS, FINGERS OR FOREIGN OBJECTS IN INSERTION SLOTS OR GAPS.
Doing so may result in personal injury or damage to the product.
 CAUTION
This symbol means important instructions. Failure to heed them can result in injury or material property damage.
HALT USE IMMEDIATELY IF A PROBLEM APPEARS.
Failure to do so may cause personal injury or damage to the product. Return it to your authorized Alpine dealer or the nearest Alpine Service Centre for repairing.
DO NOT MIX NEW BATTERIES WITH OLD BATTERIES. INSERT WITH THE CORRECT BATTERY POLARITY.
When inserting the batteries, be sure to observe proper polarity (+ and –) as instructed. Rupture or chemical leakage from the battery may cause fire or personal injury.
KEEP FINGERS AWAY WHILE THE MOTORIZED FRONT PANEL OR MOVING MONITOR IS IN MOTION.
Failure to do so may result in personal injury or damage to the product.
 PRECAUTIONS
Product Cleaning
Use a soft dry cloth for periodic cleaning of the product. For more severe stains, please dampen the cloth with water only. Anything else has the chance of dissolving the paint or damaging the plastic.
Temperature
Be sure the temperature inside the vehicle is between +60°C (+140°F) and –10°C (+14°F) before turning your unit on.
Moisture Condensation
You may notice the CD playback sound wavering due to condensation. If this happens, remove the disc from the player and wait about an hour for the moisture to evaporate.
Damaged Disc
Do not attempt to play cracked, warped, or damaged discs. Playing a bad disc could severely damage the playback mechanism.
Maintenance
If you have problems, do not attempt to repair the unit yourself. Return it to your Alpine dealer or the nearest Alpine Service Station for servicing.
3-EN
 PRECAUTIONS
Never Attempt the Following
Do not grip or pull out the disc while it is being pulled back into the player by the automatic reloading mechanism.
Do not attempt to insert a disc into the unit when the unit power is off.
Inserting Discs
Your player accepts only one disc at a time for playback. Do not attempt to load more than one disc.
Make sure the label side is facing up when you insert the disc. Your player will automatically eject any disc that is inserted incorrectly. If the player continues to eject a correctly inserted disc, push the RESET switch with a pointed object such as a ballpoint pen.
Playing a disc while driving on a very bumpy road may result in skips, but this will not scratch the disc or damage the player.
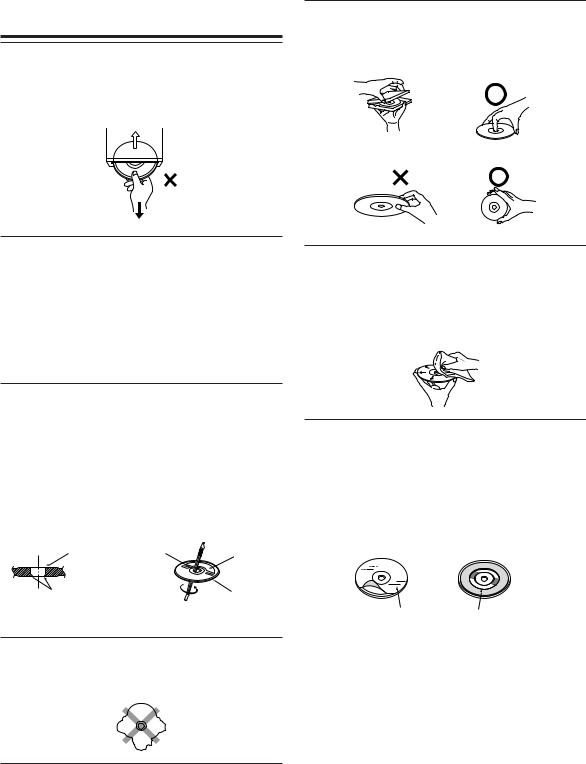
New Discs
As a protective measure to prevent the CD from jamming, the CD player will automatically eject discs with irregular surfaces or inserted incorrectly. When a new disc is inserted into the player and ejected after initial loading, using your finger, feel around the inside of the centre hole and outside edge of the disc. If you feel any small bumps or irregularities, this could inhibit proper loading of the disc. To remove the bumps, rub the inside edge of the hole and outside edge of the disc with a ballpoint pen or other such instrument, then insert the disc again.
Centre Hole |
Centre Hole |
New |
|
|
|
|
|
Disc |
Bumps |
|
Outside |
|
|
(Bumps) |
Irregular Shaped Discs
Be sure to use round shape discs only for this unit and never use any special shape discs.
Use of special shape discs may cause damage to the mechanism.
Installation Location
Make sure the CDA-9835R/CDA-9833R will not be installed in a location subjected to:
•Direct sun and heat
•High humidity and water
•Excessive dust
•Excessive vibrations
Correct Handling
Do not drop the disc while handling. Hold the disc so you will not leave fingerprints on the surface. Do not affix tape, paper, or gummed labels to the disc. Do not write on the disc.
CORRECT
INCORRECT CORRECT
Disc Cleaning
Fingerprints, dust, or soil on the surface of the disc could cause the CD player to skip. For routine cleaning, wipe the playing surface with a clean, soft cloth from the centre of the disc to the outer edge. If the surface is heavily soiled, dampen a clean, soft cloth in a solution of mild neutral detergent before cleaning the disc.
Disc Accessories
There are various accessories available on the market for protecting the disc surface and improving sound quality. However, most of them will influence the thickness and/or diameter of the disc. Using such accessories can cause the disc to be out of standard specifications and may create operational problems. We recommend not using these accessories on discs played in Alpine CD players.
Transparent Sheet Disc Stabilizer
4-EN

On handling Compact Discs (CD/CD-R/CD-RW)
•Do not touch the surface.
•Do not expose the disc to direct sunlight.
•Do not affix stickers or labels.
•Clean the disc when it is dusty.
•Make sure that there are no bumps around the disc.
•Do not use commercially available disc accessories.
Do not leave the disc in the car or the unit for a long time. Never expose the disc to direct sunlight. Heat and humidity may damage the CD and you may not be able to play it again.
To customers using CD-R/CD-RW
•If a CD-R/CD-RW cannot be played back, make sure the last recording session was closed (finalized).
•Finalize the CD-R/CD-RW if necessary, and attempt playback again.
About media that can be played.
Use only compact discs with the label side showing the CD logo marks below.
If you use unspecified compact discs, correct performance cannot be guaranteed.
You can play CD-Rs (CD-Recordable)/CD-RWs (CDReWritable) which have been recorded only on audio devices. You can also play CD-Rs/CD-RWs containing MP3/WMA formatted audio files.
•Some of the following CDs may not play on this unit: Flawed CDs, CDs with fingerprints, CDs exposed to extreme temperatures or sunlight (e.g., left in the car or this unit), CDs recorded under unstable conditions, CDs on which a recording failed or a re-recording was attempted, copyprotected CDs which do not conform to the audio CD industry standard.
•Use discs with MP3/WMA files written in a format compatible with this unit. For details, see pages 16-17.
5-EN

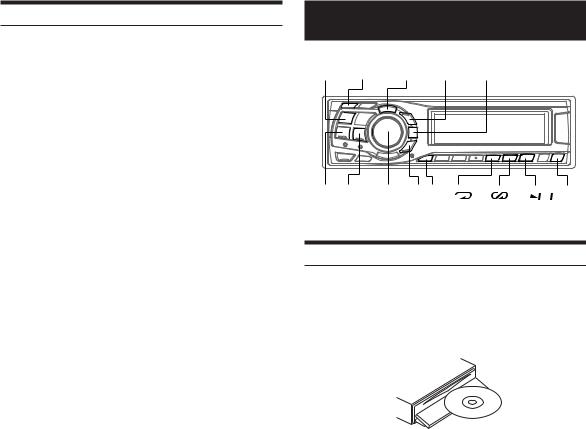
Getting Started
SOURCE/
POWER DISP/B.OUT Rotary encoder
RESET |
TILT 98 c |
Turning Power On and Off
Press SOURCE/POWER to turn on the unit.
•The unit can be turned on by pressing any other button except eject c.
Press and hold SOURCE/POWER for at least 2 seconds to turn off the unit.
• The first time power is turned on, the volume will start from level 12.
Initial System Start-Up
Be sure to press the RESET switch when using the unit for the first time, after installing the CD changer, after changing the car battery, etc.
1 Turn off the unit power.
2 Press RESET with a ballpoint pen or similar pointed object.
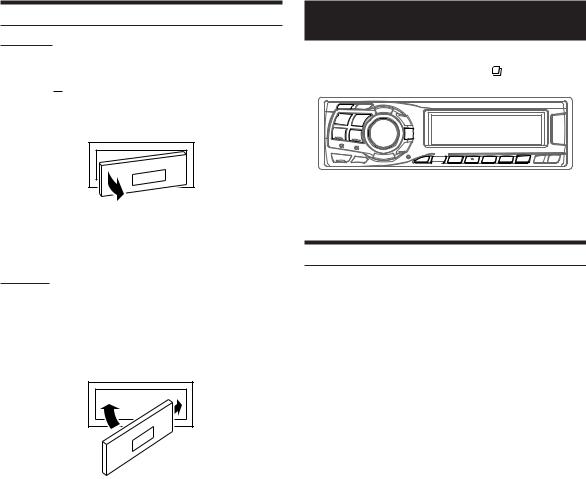
Opening and Closing the Movable Display
Press c.
The movable display will open.
Display Tilt Adjustment
Movable display
The movable display may be adjusted to 3 different tilt angles depending upon user preference.
Press TILT 98 to adjust the tilt angle of the movable display.
•The display will close a half minute after the ignition key is turned to the OFF position.
•The adjusted tilt angle of the display is stored in memory. There is no need to re-adjust the tilt angle when the power is turned back on.
Caution
Keep hands (or any other object) away from the display while it is opening or closing to avoid damage or injury. The back of the movable display will get very warm under normal operating conditions. This is not a malfunction. Do not touch.
Adjusting Volume
Turn the Rotary encoder until the desired sound is obtained.
Changing the Display Type (CDA-9833R only)
There are three selectable display types. You can also deactivate the display.
Press DISP/B.OUT to switch the display type.
TYPE1 → TYPE2 → TYPE3 → OFF → TYPE1
TYPE1 : The indicator on the left changes in a fixed sequence. TYPE2 : The indicator on the left changes according to the
setting (see “Setting the Multicolour Illumination” on page 27)
TYPE3 : The indicator on the left changes according to audio level.
To close the movable display, press c again.
The movable display will close.
•Do not apply shock to the movable display when it is open as it may result in malfunction of the unit.
•The display may be dim during low temperatures and immediately after turning on the power. The brightness will return to normal as time elapses.
•The display will stop at the set tilt angle when closing.
Caution
Keep hands (or any other object) away from the display while it is opening or closing to avoid damage or injury. The back of the movable display will get very warm under normal operating conditions. This is not a malfunction. Do not touch.
Switching the Display modes (CDA-9835R only)
You can select the display pattern mode from three display patterns.
Press DISP/B.OUT to select the desired display pattern mode.
Each press changes the display patterns.
Basic display of each source → Animation display pattern1 → Animation display pattern2 → Basic display of each source
6-EN
Detaching and Attaching the Front Panel
Detaching
1 Turn off the unit power.
2 Press  (Release) at the upper left side until the front panel pops out.
3 Grasp the left side of the front panel and pull it out.
•The front panel may become hot in normal usage (especially the connector terminals on the back of the front panel.) This is not a malfunction.
•To protect the front panel, place it in the supplied carrying case.
Attaching
1 Insert the right side of the front panel into the main unit. Align the groove on the front panel with the projections on the main unit.
2 Push the left side of the front panel until it locks firmly into the main unit.
2 |
1 |
•Before attaching the front panel, make sure that there is no dirt or dust on the connector terminals and no foreign object between the front panel and the main unit.
•Attach the front panel carefully, holding the sides of the front panel to avoid pushing buttons by mistake.
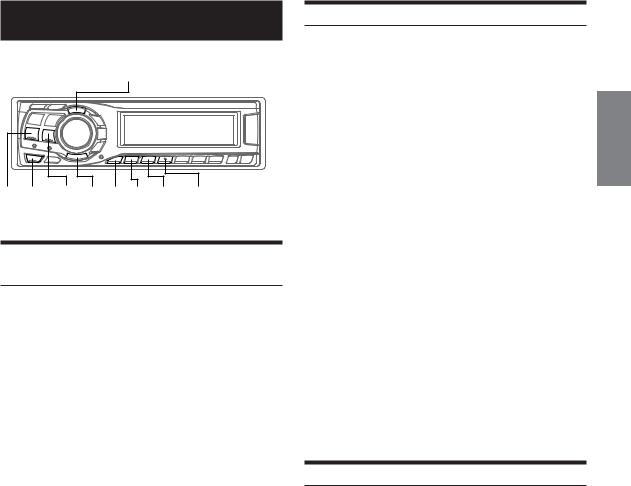
Radio
SOURCE/ TUNE/ BAND/
POWER A.ME TEL. SEARCH/Q.S.
|
|
|
|
|
|
|
|
|
|
|
|
|
|
|
|
|
|
|
|
|
|
|
|
|
|
|
|
|
|
|
|
|
|
|
|
|
|
|
|
|
|
|
|
|
|
|
|
|
|
|
|
|
|
|
|
|
|
|
|
|
|
|
|
|
|
|
|
|
|
|
|
|
|
|
|
|
|
|
|
|
|
|
|
|
|
|
|
|
|
|
|
|
|
|
|
|
|
|
|
|
|
|
|
|
|
|
|
|
|
|
|
|
|
|
|
|
|
|
|
|
|
|
|
|
|
|
|
|
|
|
|
|
|
|
|
|
|
|
|
|
|
|
|
|
|
|
|
|
|
|
|
|
|
|
|
|
|
|
|
|
|
|
|
|
|
|
|
|
|
|
|
|
|
|
|
|
|
|
|
|
|
|
|
|
|
|
|
|
|
|
|
|
|
|
|
|
|
|
|
|
|
|
|
|
|
|
|
|
|
|
|
|
|
|
|
|
|
|
|
|
|
|
|
|
|
|
|
|
|
|
|
|
|
|
|
|
|
|
|
|
|
|
|
|
|
|
|
|
|
|
|
|
|
|
|
|
|
|
|
|
|
|
|
|
|
|
|
|
|
|
|
|
|
|
g |
|
|
|
|
f Rotary |
|
F Preset buttons |
|
||||||||||||||||
|
|
|
|
|
|
|
|
|
encoder |
|
|
|
|
(1 through 6) |
|
|||||||||
Listening to Radio
1 Press SOURCE/POWER until a radio frequency appears in the display.
2 Press BAND/TEL. repeatedly until the desired radio band is displayed.
FM1 → FM2 → FM3 → MW → LW → FM1
3 Press TUNE/A.ME to select the tuning mode.
CDA-9835R:
DX (Distance mode) → LOCAL (Local mode) →
MANUAL (Manual mode) → DX
CDA-9833R:
DX SEEK (Distance mode) → SEEK (Local mode) →
OFF (Manual mode) → DX SEEK
• The initial mode is Distance mode.
Distance mode:
Both strong and weak stations will be automatically tuned in (Automatic Seek Tuning).
Local mode:
Only strong stations will be automatically tuned in (Automatic Seek Tuning).
Manual mode:
The frequency is manually tuned in steps (Manual tuning).
4 Press gor fto tune in the desired station.
Holding down gor fwill change the frequency continuously.
•The ST indicator appears on the display when a stereo FM station is tuned in.
7-EN

Manual Storing of Station Presets
1 Select the radio band and tune in a desired radio station you wish to store in the preset memory.
2 Press and hold, for at least 2 seconds, any one of the preset buttons (1 through 6) into which you wish to store the station.
The selected station is stored.
The display shows the band, preset no. and station frequency memorized.
•A total of 30 stations can be stored in the preset memory (6 stations for each band; FM1, FM2, FM3, MW and LW).
•If you store a station in a preset memory which already has a station, the current station will be cleared and replaced with the new station.
•If the function mode is activated (the "FUNC" indicator for the CDA-9833R model is lit), press F to return to normal mode.
Automatic Memory of Station Presets
1 Press BAND/TEL. repeatedly until the desired radio band is displayed.
2 Press and hold TUNE/A.ME for at least 2 seconds.
The frequency on the display continues to change while the automatic memory is in progress. The tuner will automatically seek and store 6 strong stations in the selected band. They will be stored into buttons 1 to 6 in order of signal strength.
When the automatic memory has been completed, the tuner goes to the station stored in preset location no. 1.
•If no stations are stored, the tuner will return to the original station you were listening to before the auto memory procedure began.
Tuning to Preset Stations
1 Press BAND/TEL. repeatedly until the desired band is displayed.
2 Press any one of the station preset buttons (1 through 6) that has your desired radio station in memory.
The display shows the band, preset number and frequency of the station selected.
•If the function mode is activated (the “FUNC” indicator for the CDA-9833R model is lit), press F to return to normal mode.
Station Title Search Function
If the title of a radio station is entered, you can search for that radio station by its title while listening to the currently received radio station.
.
1 Press SEARCH/Q.S.
Title Search mode.
The first title input blinks in the display.
2 Select the desired title by turning the Rotary encoder within 10 seconds.
3 Press the Rotary encoder to receive the frequency of the selected title.
•Search mode in Title Search mode is cancelled by pressing and holding SEARCH/Q.S. for at least 2 seconds.
•If a station has no title, “NO TITLE” is displayed for 2 seconds.
•Any radio station can be searched by the Station Title Search function. The station titles are displayed in the order they were input.
Freqency Search Function
You can search for a radio station by its frequency.
1 Press and hold SEARCH/Q.S. for at least 2 seconds in Radio mode to activate Frequency Search mode.
2 Turn the Rotary encoder within 10 seconds to select the desired frequency.
3 Press the Rotary encoder to receive the selected frequency.
•Search mode in Frequency Search mode is cancelled by pressing and holding SEARCH/Q.S. for at least 2 seconds.
8-EN
RDS
TITLE
gMENU f T.INFO F 1/AF 2/P.PTY 3/PTY
Setting RDS Reception Mode and Receiving
RDS Stations
The RDS (Radio Data System) is a radio information system using the 57 kHz subcarrier of regular FM broadcast. The RDS allows you to receive a variety of information such as traffic information, station names, and to automatically re-tune to a stronger transmitter that is broadcasting the same programme.
1 Press F to activate function mode (for the CDA9833R model, press F to illuminate the “FUNC” indicator).
2 Press 1/AF to activate the RDS mode.
3 Press gor fto tune in the desired RDS station.
4 Press 1/AF again to deactivate the RDS mode.
5 Press F to activate the normal mode (for the CDA9833R model, the “FUNC” indicator goes out).
•When the unit receives the PTY31 (Emergency Broadcast) signal, the unit will show “ALARM” in the display automatically.
The RDS digital data includes the following:
PI |
Programme Identification |
PS |
Programme Service Name |
AF |
List of Alternative Frequencies |
TP |
Traffic Programme |
TA |
Traffic Announcement |
PTY |
Programme Type |
EON |
Enhanced Other Networks |
Recalling Preset RDS Stations
1 Press F to activate function mode (for the CDA9833R model, press F to illuminate the “FUNC” indicator).
2 Press 1/AF to activate the RDS mode.
3 Press F to activate the normal mode (for the CDA9833R model, the “FUNC” indicator goes out).
4 Make sure that the function mode returns to normal mode (the “FUNC” indicator for the CDA9833R model goes out), then press the preset button in which your desired RDS station is preset.
If the preset station's signal is weak, the unit automatically searches and tunes to a stronger station in the AF (Alternative Frequencies) list.
5 If the preset station and the stations in the AF list cannot be received:
When the PI SEEK setting is on (refer to “PI SEEK Setting” page 10), the unit searches again for a station in the PI (Programme Identification) list.
If there are still no stations receivable in the area, the unit displays the frequency of the preset station and the preset no. disappears.
If the signal level of the Regional (Local) station being tuned becomes too weak to receive, press the same preset button to tune in a Regional station in other district.
•For presetting the RDS stations, refer to the Radio Operation section. The RDS stations can be preset in the FM1, FM2 and FM3 bands only.
Receiving RDS Regional (Local) Stations
1 Press MENU to select the SETUP mode.
2 Select the “RDS REGIONAL” mode by pressing gor f.
3 Choose either ON or OFF by turning the Rotary encoder.
In the RDS REG OFF mode, the unit automatically keeps receiving the related local RDS station.
4 Press and hold MENU for at least 2 seconds to return to normal mode, or press MENU and select RETURN to return to normal mode.
9-EN

•If the traffic information broadcast signal falls below a certain level, the unit remains in the receiving mode for 70 seconds. If the signal remains below a certain level for over 70 seconds, the “T.INFO” indicator blinks.
•If you do not want to listen to the traffic information being received, lightly press T.INFO to skip that traffic information message. The T.INFO mode will remain in the ON position to receive the next traffic information message.
•If the volume level is changed while receiving traffic information, the changed volume level will be memorized. When traffic information is received next time, the volume level will be automatically adjusted to the level memorized.
•In the T.INFO mode, the SEEK tuning selects only the TP stations.
PTY (Programme Type) Tuning
1 Press F to activate function mode (for the CDA9833R model, press F to illuminate the “FUNC” indicator).
2 Press 3/PTY to activate the PTY mode, while the unit is in Radio (FM receiving) mode.
The Programme Type of the station being currently received will be displayed for 5 seconds.
If there is no receivable PTY broadcast, “NO PTY” will be displayed for 5 seconds.
If no RDS station can be received, the display shows “NO PTY.”
•If no operation is performed within 5 seconds after pressing 3/PTY, the PTY mode will be automatically cancelled.
3 Press gand fwithin 5 seconds after activating the PTY mode to choose the desired programme type while the PTY (programme type) is being displayed.
Each press scrolls the programme type by one.
LIGHT M ↔ CLASSICS ↔ OTHER M
4 Press 3/PTY within 5 seconds after selecting the programme type to start searching for a station in the selected programme type.
The chosen programme type display blinks during searching and lights when a station is found.
If no PTY station is found, “NO PTY” will be displayed for 5 seconds.
5 Press F to activate the normal mode (for the CDA9833R model, the “FUNC” indicator goes out).
•When the function mode is activated (the “FUNC” indicator for the CDA-9833R model is lit), perform the operation. The function mode returns to normal mode if no operation is performed within 5 seconds for the CDA-9833R model.
10-EN
Receiving Traffic Information While Playing CD or Radio
1 Press T.INFO so that the “T.INFO” indicator lights up.
2 Press gand fto select a traffic information station if necessary.
When a traffic information broadcast starts, the unit automatically mutes the CD player/changer or the regular FM broadcast.
When the traffic information broadcast finishes, the unit automatically returns to the original source play before the traffic information broadcast began.
When traffic information stations cannot be received:
In the tuner mode:
When the TP signal can no longer be received for over 70 seconds, the “T.INFO” indicator blinks.
In the CD mode:
When the TP signal can no longer be received, the traffic information station of another frequency will be selected automatically.
•The receiver is equipped with the EON (Enhanced Other Networks) function in order to keep track of additional alternate frequencies to the AF list. The “EON” indicator lights up while an RDS EON station is being received. If the station being received does not broadcast the traffic information, the receiver automatically tunes in the related station that broadcasts the traffic information when it occurs.
3 Press T.INFO to deactivate the Traffic Information mode.
The “T.INFO” indicator goes out.
Priority PTY (Programme Type)
This function allows presetting of a programme type such as music category, news, etc. You can listen to a programme in the preset programme type as the unit automatically gives priority to the preset programme type when it begins broadcasting, and interrupts the programme you are currently listening. This feature is functional when your unit is set to a mode other than the LW and MW.
1 Press F to activate function mode (for the CDA9833R model, press F to illuminate the “FUNC” indicator).
2 Press 2/P.PTY to activate the PRIORITY PTY mode.
“PRIO-PTY” is displayed for 2 seconds and then the programme type for 3 seconds. The initial setting is “NEWS.”
•If no operation is performed within 5 seconds after pressing 2/P.PTY, the PRIORITY PTY mode is automatically cancelled.
3 Press gor fwithin 5 seconds while “NEWS” is being displayed to choose a desired programme type.Then press 2/P.PTY.
The PRIORITY PTY function will activate.
4 Press 2/P.PTY to activate the PRIORITY PTY mode again.
To change the programme category, perform the step 3. To disable the PRIORITY PTY function, press and hold 2/P.PTY for at least 2 seconds.
•In the PRIORITY PTY function, unlike in the T.INFO function, the volume does not increase during operation.
5 Press F to activate the normal mode (for the CDA9833R model, the “FUNC” indicator goes out).
•When the function mode is activated (the “FUNC” indicator for the CDA-9833R model is lit), perform the operation. The function mode returns to normal mode if no operation is performed within 5 seconds for the CDA-9833R model.
11-EN
Displaying Radio Text
Text messages from a radio station can be displayed.
Press TITLE while receiving FM in the radio mode to select the Radio Text display.
The display will change every time the button is pressed.
CDA-9835R*1 |
|
|
|
|
|
|
|
|
|
|
|
|
|
|
|
|
|
|
|
|
|
|
|
|
|
|
|
|
|
|
|||||||||||||||
|
|
|
|
|
|
|
|
|
|
|
|
|
|
|
|
|
|
|
|
|
|
|
|
|
|
|
|
|
|
|
|
||||||||||||||
|
PS (Programme |
|
|
|
Radio Text*2 |
|
|
|
|
|
TITLE*3 |
|
|||||||||||||||||||||||||||||||||
|
Service Name) |
→ |
|
|
|
|
|
|
|
|
|
|
|
|
→ |
|
|
|
|
|
|
|
|
|
|
|
|
→ |
|||||||||||||||||
|
|
|
|
|
|
|
|
|
|
|
|
|
|
|
|
|
|
|
|
|
|
|
|
|
|
|
|
|
|
|
|
|
|
|
|
|
|
|
|
||||||
|
FREQUENCY |
FREQUENCY |
FREQUENCY |
||||||||||||||||||||||||||||||||||||||||||
|
|
|
|
|
|
|
|||||||||||||||||||||||||||||||||||||||
|
|
|
|
|
|
|
|
|
|
|
|
|
|
|
|
|
|
|
|
|
* |
4 |
|
|
|
|
|
|
|
|
|
|
|
|
|
|
|
|
|
|
|
|
|
|
|
|
|
|
|
|
|
EXTERNAL AMPLIFIER |
|
|
|
|
|
PS (Programme |
|
||||||||||||||||||||||||||||||||
|
|
|
|
|
|
|
|
|
|
INFORMATION |
|
→ |
|
|
Service Name) |
|
|||||||||||||||||||||||||||||
|
|
|
|
|
|
|
|
|
|
|
|
|
|
|
|
|
|
|
|
|
|
|
|
|
|
|
|
|
|
|
|
|
|
|
|
|
|
|
|
|
|
|
|||
|
|
|
|
|
|
|
|
FREQUENCY |
|
|
|
FREQUENCY |
|
|
|
|
|
|
|||||||||||||||||||||||||||
|
|
|
|
|
|
|
|
|
|
|
|
|
|
|
|||||||||||||||||||||||||||||||
CDA-9833R |
|
|
|
|
|
|
|
|
|
|
|
|
|
|
|
|
|
|
|
|
|
|
|
|
|
|
|
|
|
|
|||||||||||||||
|
|
|
|
|
|
|
|
|
|
|
|
|
|
|
|
|
|
|
|
|
|
|
|
|
|
|
|
|
|
|
|
|
|
|
|
|
|
|
|
||||||
|
PS (Programme |
|
|
|
Radio Text*2 |
|
|
|
|
|
TITLE*3 |
|
|||||||||||||||||||||||||||||||||
|
Service Name) |
→ |
|
→ |
|
|
→ |
||||||||||||||||||||||||||||||||||||||
|
|
|
|
|
|
|
|
|
|
|
|
|
|
|
|
|
|
|
|
|
|
|
|
|
|||||||||||||||||||||
|
|
|
|
|
|
|
|
|
|
|
|
|
|
|
|
|
|
|
|
|
|
|
|
|
|
|
|
|
|
|
|
|
|
|
|
|
|
|
|
||||||
|
FREQUENCY |
|
|
FREQUENCY |
|
|
|
FREQUENCY |
|
||||||||||||||||||||||||||||||||||||
|
|
*4 |
|
|
|
|
|
|
|
|
|
|
|
|
|
|
|
|
|
|
|
|
|
|
|
|
|
|
|
|
|
|
|||||||||||||
|
FREQUENCY |
|
|
PS (Programme |
|
|
|
|
|
|
|
|
|
|
|
|
|
|
|
|
|||||||||||||||||||||||||
|
→ |
Service Name) |
|
|
|
|
|
|
|
|
|
|
|
|
|
|
|
|
|||||||||||||||||||||||||||
|
|
|
|
|
|
|
|
|
|
|
|
|
|
|
|
|
|
|
|
|
|
|
|
|
|
|
|
|
|
|
|
||||||||||||||
|
|
|
|
|
|
|
|
|
|
|
|
|
|
|
|
|
|
|
|
|
|
|
|
|
|
|
|
|
|
|
|
|
|
|
|
|
|
|
|
|
|
|
|
||
|
EXTERNAL AMPLIFIER |
FREQUENCY |
|
|
|
|
|
|
|
|
|
|
|
|
|
|
|
|
|||||||||||||||||||||||||||
|
|
|
|
|
|
|
|
|
|
|
|
|
|
|
|
|
|
|
|||||||||||||||||||||||||||
|
|
INFORMATION |
|
|
|
|
|
|
|
|
|
|
|
|
|
|
|
|
|
|
|||||||||||||||||||||||||
|
|
|
|
|
|
|
|
|
|
|
|
|
|
|
|
|
|
|
|
|
|
|
|
|
|
|
|
|
|
|
|
||||||||||||||
The display shows “WAITING” for a few seconds, then starts scrolling the text message.
*1 The display example for the normal display mode is described. The display changes depending on the display indication pattern. (See “Switching the Display modes” on page 6)
*2 If there is no receivable text message or the unit cannot receive a text message properly, the display shows “NO TEXT.”
*3 TITLE can be input or erased.
*4 Only when an external Amplifier Link compatible amplifier is connected. For details, refer to “Displaying the External Amplifier Information” (page 26).
CD/MP3/WMA
SOURCE/
POWER -/J TITLE 8 SEARCH/Q.S.
g f Rotary 9 F 4( ) 5( ) 6(  ) c encoder
Playback
1 Press c.
The movable display will open.
2 Insert a disc with the label side facing up.
The disc will be pulled into the unit automatically.
The movable display will close and playback will begin. When a disc is already inserted, press SOURCE/POWER to switch to the CD mode.
The mode will change every time the button is pressed.
TUNER → CD → CD CHANGER* → TUNER
* Only when the CD changer is connected
3 While playing back MP3/WMA, press 8 or 9 to select the desired folder.
Pressing and holding 8 or 9 will change folders continuously.
4 Press gor fto select the desired track (file).
Returning to the beginning of the current track (file):
Press g.
Fast backward :
Press and hold g.
Advancing to the beginning of the next track (file) :
Press f.
Fast forward :
Press and hold f.
5 To pause playback, press -/J.
Pressing -/J again will resume playback.
6 To eject the disc, press c.
•Do not remove a CD during its eject cycle. Do not load more than one disc at a time. A malfunction may result from doing either.
•If the CD does not eject, press and hold c for at least 2 seconds with the movable display open.
12-EN
•The CD-player can play discs containing audio data, MP3 data and WMA data.
•A WMA format file that is protected by DRM (Digital Rights Management) cannot be played back on this unit.
•“MP3” is displayed during MP3 playback.
•“WMA” is displayed during WMA playback.
•The track display for MP3/WMA data playback is the file numbers recorded on the disc.
•If the HDA-5460 model is connected to the unit, some operations (for example changing the source, selecting the file by holding buttons up or down, etc.), can be carried out on this unit.
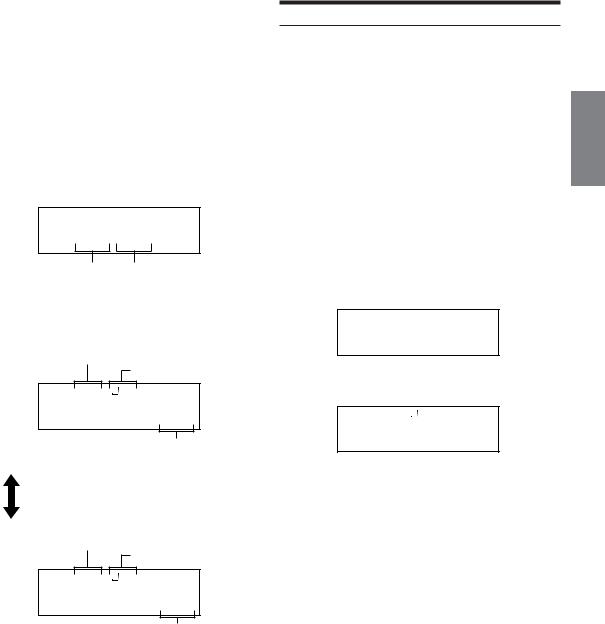
MP3/WMA Play Display
CDA-9835R
The folder number and file number will be displayed as described below.
 19
19  20
20
Folder number display |
File number display |
CDA-9833R
The folder number, file number, sampling rate, and bit rate will be displayed as described below.
Folder number display
File number display
 01
01  03
03
44 .1kHz
Sampling rate display
The sampling rate and the bit rate (frame display) are alternately displayed.*
Folder number display
File number display
 01
01  03
03
160 kbps
Bit rate display
*When the unit is connected to the Amplifier Link, the temperature is automatically indicated.
Sampling rate → Bit rate → Temperature → Sampling rate
•Press TITLE to switch the display. Please see “Displaying the Title/Text” (page 23) for information about display switching.
Playing back a Playlist
You can play playlists you have prepared in advance on the computer. Both MP3 and WMA playlists can be played.
Playlists that can be played back by this device have the file extension “m3u”/“asx.”
Press 8 or 9 to select a playlist.
By pressing and holding 8 or 9, the playlists move up or down continuously.
•If there is a playlist and folder on the disc, the playlist starts to play back prior to the folder.
•Up to 5 playlist can be played back. Playlists from the 6th onwards cannot be played back.
•Refer to the software instruction manual on how to create a playlist.
Playlist Display
While playing back a playlist, the folder and file numbers that are stored in the playlist are displayed.
CDA-9835R
Playlist  19
19  20
20
CDA-9833R
 01
01  03
03
LIST
13-EN
 Loading...