


NANOVERB 2
QUICKSTART GUIDE
ENGLISH (3 - 6)
GUÍA DE INICIO RÁPIDO
ESPAÑOL (7 - 10)
GUIDE D'UTILISATION RAPIDE
FRANÇAIS (11 - 14)
GUIDA RAPIDA
ITALIANO (15 - 18)
KURZANLEITUNG
DEUTSCH (19 – 22)

QUICKSTART GUIDE (ENGLISH)
1.Make sure all items listed in the Box Contents are included.
2.READ SAFETY INSTRUCTION BOOKLET BEFORE USING THE PRODUCT.
3.Place the product in an appropriate location for operation.
4.Ensure high quality, shielded audio cables are used away from sources of electromagnetic interference.
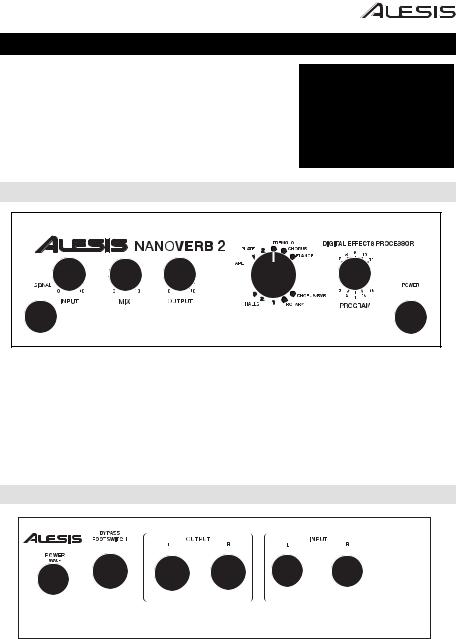
FRONT PANEL
BOX CONTENTS
NANOVERB 2
Power Adapter
Quickstart Guide
Safety Instructions & Warranty Information Booklet
2 5 4 


 6
6 


 7
7

3 |
1 |
1.POWER LED – Light will illuminate once the unit is powered on
2.INPUT – Controls both the Left (Mono) and Right channel analog input signal level
3.SIGNAL LED – LED will light up if the signal level is too high which may cause distortion. If this occurs, turn down the Input control knob and/or reduce the output level from your instrument source
4.OUTPUT – Adjusts the analog output signal level
5.MIX – Adjusts the balance between the incoming "dry" signal and the effect-processed signal. When this knob is turned to the far left, no processed signal will be heard. When the knob is turned to the middle position, an equal mix of the dry and processed signal will be heard. When the knob is turned to the far right, only the processed signal will be heard
6.EFFECTS SELECTOR – Select one of the 16 factory presets with this knob
7.PROGRAM – This will switch between different variations of the effect
REAR PANEL
8 11 10 10 9 9
8.POWER CONNECTOR – Plug the included AC adapter here (9v AC 500mA)
9.INPUT – Connect the ¼” unbalanced inputs to your source, such as Aux Sends on a mixer. For mono sources, just connect to the Left (Mono) input on the NANOVERB 2
10.OUTPUT – Connect the ¼” unbalanced outputs to an Aux Return on a mixer, powered speakers, or amplifer input
11.BYPASS – Attach a momentary (non-latching) footswitch to this 1/4" phone jack. When the footswitch is pressed, the NANOVERB 2 will bypass the effects and only the dry signal will pass through the unit. If the footswitch is pressed again, effects will continue to output
3

POWERING UP
Before turning on the NANOVERB 2’s power, check the following items:
•Ensure all cable connections have been made correctly
•Ensure the volume controls of your amplifier or mixer are turned down
•Insert the Power jack into the [POWER] input on the rear panel of the NANOVERB 2 and plug the power adapter into an AC outlet
•Then power-up the NANOVERB 2, the Power On LED will illuminate
•Turn on the power of the amplifier/mixer, and adjust the volume
SETUP
When connecting audio cables and/or turning the NANOVERB 2 on and off, make sure all connected devices have their volume controls turned down.
Typical Applications
The audio inputs and outputs of the NANOVERB 2 are typically used in one of three ways:
1)From one or two effect/aux send outputs of a mixer, sent back to the effect return inputs of the mixer
2)From a line-level instrument (like a guitar or keyboard with either a mono or stereo output), sent out to an amplifier or mixer input
3)From the stereo bus outputs of a mixer to a recorder or amplifier
MONO- Connect an audio cable from the output of a mono source or Aux Send to the LEFT input of the NANOVERB 2 and then connect another audio cable from the LEFT output of the NANOVERB 2 to the input of a mixer, amplifier, or Aux Return.
MONO IN, STEREO OUT- Connect a mono output source or Aux Send to the LEFT input of the NANOVERB 2. Then connect two audio cables from the LEFT and RIGHT outputs of the NANOVERB 2 to the inputs of your mixer, amplifier, or Aux Return.
STEREO- Connect audio cables from the output of a stereo source or Aux Send to the LEFT and RIGHT inputs of the NANOVERB 2. Then connect the LEFT and RIGHT outputs of the NANOVERB 2 to the stereo inputs of a mixer, amplifier, or Aux Return.
SETTING MIXER AUX SEND/RETURN LEVELS
1.First set your mixer's input levels appropriately, following the instructions for the mixer.
2.Turn up the mixer channels AUX SEND to a nominal level (this is usually between "noon" and "3:00" on a rotary knob).
3.Play the audio source.
4.Turn up the NANOVERB 2's [INPUT] level until you see the [SIGNAL] LED turn red on peaks; then reduce it slightly until the LED doesn't flash.
5.Depending on the input sensitivity of the mixer's channels or Aux Returns, the [OUTPUT] knob of the NANOVERB 2 should be set between "2:00" and fully clockwise ("5:00").
6.Turn up the AUX RETURN level until you get the desired level of effect in the mix. If you want "just a hint" of reverb, turn down the Aux Return. Leave the input levels where they were set in step 4, unless you see the [SIGNAL] LED flash.
4
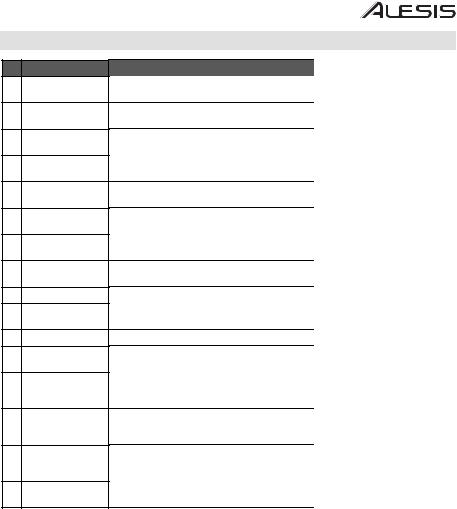
EFFECTS
#PRESET
1HALL1
2HALL2
3HALL3
4SPRING1
5SPRING2
6TAPE
7PLATE1
8PLATE2
9TREMOLO
10CHORUS
11FLANGER
12DELAY
13REVERB+DELAY
14REVERB+FLANGER
15REVERB+CHORUS
16ROTARY
DESCRIPTION
Reverb, simulating the acoustics of a stage space
Reverb, simulating a large acoustic space
simulate a medium size, bright hall with no predelay
Stretched sound popular for use with organs and guitar amps
Stretched sound popular for use with organs and guitar amps
Simulates classic tape delay created by multiple playback heads
Classic bright vocal plate
Warmer plate variation, good for strings and guitar
Creates a warbly effect to the sound
Simulates the full, complex, watery sound of several instruments playing together
Classic stereo effect, similar to a jet plane taking off
Reproduces the input signal back to the output with a timing delay
Delay effect with room reverb
Stereo flanger effect with large room reverb
Stereo chorus effect with large room reverb
Simulates the sound effect of rotating horn speakers and a bass cylinder
PARAMETER |
|
RANGE |
Decay time |
|
0.7~2.9s |
Pre-delay |
|
54ms |
Decay time |
|
3.6~6.1s |
Pre-delay |
|
77ms |
Decay time |
|
0.7~2.9s |
|
|
|
Decay time |
|
0.7~2.9s |
Pre-delay |
|
3ms |
Decay time |
|
3.6~6.1s |
Pre-delay |
|
9ms |
Decay time |
|
0.7~6.1s |
Pre-delay |
|
19ms |
Decay time |
|
0.7~2.9s |
Pre-delay |
|
19ms |
Decay time |
1.2~2.9 |
|
Pre-delay |
|
19ms |
Rate |
|
0.3~5.0Hz |
|
|
|
Rate |
|
0.1~3.5Hz |
|
|
|
Rate |
|
0.07~1.88Hz |
|
|
|
Decay Period |
|
30-650ms |
|
|
|
Decay period |
|
30-650ms |
Reverse decay |
|
0.7-6.1s |
time |
|
|
Flanger rate |
|
0.07~1.88Hz |
Reverse decay |
|
0.7-6.1s |
time |
|
|
Chorus rate |
|
0.3~3.5Hz |
Reverse decay |
|
|
time |
|
0.7~6.1s |
Rate |
|
1.0~5.0Hz |
|
|
|
5

TROUBLESHOOTING GUIDE
SYMPTOM |
CAUSE |
SOLUTION |
The Power LED does not |
No power |
Check that the power cable |
light when the unit is |
|
is plugged in properly |
powered on |
|
|
|
|
|
Sound is distorted, signal |
Input level is too high |
Turn down the Input Level |
LED is lit red |
|
control |
|
|
|
Sound is excessively noisy |
Input level is too low |
Turn up the Input Level |
|
|
control |
|
|
|
Green “Input” LED barely lit |
Output level is too low |
Turn Output up and reduce |
|
and Aux Return on mixer |
Aux Return level on mixer |
|
is up full |
|
|
|
|
No audio is heard |
Bypass function is on |
Turn the Mix control to the |
|
with Mix turned 100% |
left or press the Bypass |
|
wet |
footswitch |
|
|
|
|
Output level is too low |
Turn the Output control to |
|
|
the right |
|
|
|
Hum or noise from output |
Ground loop, unshielded |
Try plugging the unit into |
|
cables |
another power outlet or use |
|
|
different audio cables |
|
|
|
6
GUÍA DE INICIO RÁPIDO (ESPAÑOL)
1.Asegúrese de que estén presentes todos los elementos enumerados en Contenido de la caja.
2.LEA EL FOLLETO DE INSTRUCCIONES DE SEGURIDAD ANTES DE UTILIZAR EL PRODUCTO.
3.Coloque el producto en un lugar adecuado para su funcionamiento.
4.Asegúrese de usar cables de audio blindados de alta calidad y alejados de las fuentes de interferencia electromagnética.
CONTENIDO DE LA CAJA
NANOVERB 2
Adaptador de alimentación
Guía de inicio rápido
Folleto de instrucciones de seguridad e información sobre la garantía
PANEL FRONTAL
2 5 4 


 6
6 


 7
7

3 |
1 |
1.LED DE ENCENDIDO– La luz se enciende una vez que está encendida la unidad
2.ENTRADA – Controla el nivel de señal de entrada analógica de los canales izquierdo (mono) y derecho
3.LED DE SEÑAL– El LED se enciende si el nivel de señal es demasiado alto y puede causar distorsión. Si esto ocurre, gire la perilla de control de entrada para disminuir el nivel y/o reduzca el nivel de salida de su instrumento fuente
4.SALIDA – Ajusta el nivel de la señal de salida analógica
5.MEZCLA – Ajusta el equilibrio(saldo) entre la señal entrante "seca" y la señal procesada por efecto. Cuando esta perilla es girada al lejano izquierdo, ninguna señal procesada será oída. Cuando la perilla es girada a la posición media, una mezcla igual de la señal seca y procesada será oída. Cuando la perilla es girada al derecho lejano, sólo la señal procesada será oída
6.SELECTOR DE EFECTOS – Esta perilla se usa para seleccionar uno de los 16 presets de fábrica
7.PROGRAMA – Esto cambiará entre las variaciones diferentes del efecto
PANEL TRASERO
8 |
11 |
10 |
10 |
9 |
9 |
|
|
|
|
|
8.CONECTOR DE ALIMENTACIÓN – Enchufe aquí el adaptador de CA incluido (9 VCA 500 mA)
9.ENTRADA – Conecte las entradas no balanceadas de ¼” a su fuente, tal como Aux Sends (Envío de auxiliares) de un mezclador. En el caso de fuentes mono, conecte sólo a la entrada izquierda (mono) del NANOVERB 2
10.SALIDA – Conecte las salidas de ¼” no balanceadas a Aux Return (Retorno de auxiliares) de un mezclador, altavoces alimentados o entrada de un amplificador
11.DERIVACIÓN – Conecte a este conector fonográfico de 1/4" un interruptor de pedal momentáneo (sin enganche). Cuando se presiona el interruptor de pedal, el NANOVERB 2 deriva los efectos y sólo pasa por la unidad la señal seca . Si se presiona el interruptor otra vez, los efectos continuarán saliendo
7
ENCENDIDO
Antes de encender el NANOVERB 2, verifique lo siguiente:
•Que todas las conexiones de cable hayan sido realizadas correctamente
•Que los controles de volumen de su amplificador o mezclador se ajustaron al mínimo
•Inserte el conector de alimentación en la entrada [POWER] del panel trasero del NANOVERB 2 y enchufe el adaptador de alimentación a un tomacorriente de CA
•A continuación, encienda el NANOVERB 2 —se ilumina el LED de encendido
•Encienda el amplificador o mezclador y ajuste el volumen
INSTALACIÓN
Cuando conecte los cables de audio y/o encienda o apague el NANOVERB 2, asegúrese de que todos los dispositivos conectados tengan sus controles de volumen ajustados al mínimo.
Aplicaciones típicas
Las entradas y salidas de audio del NANOVERB 2 se usan típicamente en una de tres maneras:
1)Desde uno o dos salidas de envío de efectos/auxiliares de un mezclador, enviadas de regreso a las entradas de retorno del mezclador
2)Desde un instrumento de nivel de línea (como una guitarra o teclado con salida mono o estéreo), enviadas a la entrada de un amplificador o mezclador
3)Desde las salidas del bus estéreo de un mezclador a un grabador o amplificador
MONO- Conecte un cable de audio desde la salida de una fuente o Aux Send (Envío de auxiliares) mono a la entrada IZQUIERDA del NANOVERB 2 y luego otro cable de audio desde la salida IZQUIERDA del NANOVERB 2 a la entrada de un mezclador, amplificador o Aux Return (Retorno de auxiliares).
ENTRADA MONO, SALIDA ESTÉREO- Conecte una fuente de salida o envío de auxiliares mono a la entrada IZQUIERDA del NANOVERB 2. Conecte luego dos cables de audio desde las salidas IZQUIERDA y DERECHA del NANOVERB 2 a las entradas de su mezclador, amplificador o retorno de auxiliares.
ESTÉREO- Conecte cables de audio desde la salida de una fuente o Aux Send (Envío de auxiliares) estéreo a las entradas IZQUIERDA y DERECHA del NANOVERB 2. Conecte luego las salidas IZQUIERDA y DERECHA del NANOVERB 2 a las entradas estéreo de un mezclador, amplificador o retorno de auxiliares.
CÓMO AJUSTAR LOS NIVELES DE ENVÍO Y RETORNO DE AUXILIARES DEL MEZCLADOR
1.Ajuste primero los niveles de entrada de su mezclador en forma correcta, siguiendo las instrucciones correspondientes al mismo.
2.Ajuste los canales AUX SEND (Envío de auxiliares) del mezclador a un nivel nominal (normalmente entre las posiciones de 0 y 90 grados de la perilla rotativa).
3.Reproduzca la fuente de audio.
4.Aumente el nivel de [INPUT] (Entrada) del NANOVERB 2 hasta que vea que el LED [SIGNAL] (Señal) se pone rojo en los picos y entonces redúzcala levemente hasta que el LED deje de parpadear.
5.En función de la sensibilidad de los canales o retornos de auxiliares del mezclador, la perilla [OUTPUT] (Salida) del NANOVERB 2 se debe ajustar entre las posiciones de 60 grados y totalmente en sentido horario (150 grados).
6.Aumente el nivel de AUX RETURN (Retorno de auxiliares) hasta que obtenga el nivel deseado de efecto en la mezcla. Si sólo desea "una pizca" de reverberación, disminuya el ajuste de retorno de auxiliares. Deje los niveles de entrada como estaban en el paso 4, a menos que vea que el LED [SIGNAL] parpadea.
8
 Loading...