


 Loading...
SpeedTouch™580
Wireless Residential ADSL Gateway
User’s Guide
Release R4.3.1

SpeedTouch™
580
User’s Guide
R4.3.1

Copyright
Copyright ©1999-2005 THOMSON. All rights reserved.
Passing on, and copying of this document, use and communication of its contents is not permitted without written authorization from THOMSON. The content of this document is furnished for informational use only, may be subject to change without notice, and should not be construed as a commitment by THOMSON. THOMSON assumes no responsibility or liability for any errors or inaccuracies that may appear in this document.
Thomson Telecom Belgium Prins Boudewijnlaan, 47 B-2650 Edegem
Belgium www.speedtouch.com
Trademarks
The following trademarks are used in this document: SpeedTouch™ is a trademark of THOMSON.
Microsoft®, MS-DOS®, Windows® and Windows NT® are either registered trademarks or trademarks of Microsoft Corporation in the United States and/or other countries.
UNIX® is a registered trademark of UNIX System Laboratories, Incorporated.
Apple® and Mac OS® are registered trademarks of Apple Computer, Incorporated, registered in the United States and other countries.
Adobe, the Adobe logo, Acrobat and Acrobat Reader are trademarks or registered trademarks of Adobe Systems, Incorporated, registered in the United States and/or other countries.
Netscape® and Netscape Navigator® are registered trademarks of Netscape Communications Corporation. Ethernet™ is a trademark of Xerox Corporation.
UPnP™ is a certification mark of the UPnP™ Implementers Corporation.
Wi-Fi® and the Wi-Fi logo are registered trademarks of the Wi-Fi Alliance. "Wi-Fi CERTIFIED", "Wi-Fi ZONE", "Wi-Fi Alliance", their respective logos and "Wi-Fi Protected Access" are trademarks of the Wi-Fi Alliance.
Other products may be trademarks or registered trademarks of their respective manufacturers.
Document Information
Status: v1.0 (May 2005)
Reference: E-DOC-CTC-20050429-0102
Short Title: User’s Guide ST580 R4.3.1

Contents
Contents
About this User’s Guide .............................................. |
1 |
1 |
Your SpeedTouch™ ...................................................... |
3 |
1.1 |
SpeedTouch™ Features.................................................................. |
4 |
1.1.1 |
Hardware Specifications.................................................................................. |
5 |
1.1.2 |
Software Features .......................................................................................... |
6 |
1.2 |
SpeedTouch™ LED Behaviour ........................................................ |
8 |
1.3 How to Access your SpeedTouch™.............................................. |
10 |
|
1.3.1 Access via the Web Interface......................................................................... |
11 |
|
1.3.2 |
Access via CLI ............................................................................................. |
12 |
1.3.3 |
Access via FTP ............................................................................................ |
14 |
1.3.4 |
Remote Assistance ....................................................................................... |
17 |
2 |
Local Network Setup .................................................. |
19 |
2.1 |
Wired Ethernet ............................................................................. |
20 |
2.2 |
USB .............................................................................................. |
21 |
2.3 |
Wireless Ethernet ......................................................................... |
23 |
2.3.1 |
Wireless Basics ............................................................................................ |
24 |
2.3.2 Connecting First-time Wireless Clients............................................................. |
26 |
|
2.3.3 |
Wireless Security.......................................................................................... |
29 |
2.3.4 Connecting Additional Wireless Clients............................................................ |
31 |
|
2.3.5 Extending the Range of Your Wireless Network ................................................ |
33 |
|
3 Internet Connectivity Dial-In Clients ......................... |
35 |
3.1 SpeedTouch™ Web Pages ............................................................ |
37 |
E-DOC-CTC-20050429-0102 v1.0
i

Contents
ii
3.2 |
IGD Control Agent ....................................................................... |
39 |
3.3 |
MS Windows XP BroadBand Connection ..................................... |
41 |
3.4 |
Mac OS X PPPoE Dial-in Client.................................................... |
45 |
4 |
SpeedTouch™ Web Interface .................................... |
47 |
4.1 |
Navigation.................................................................................... |
48 |
4.1.1 |
Menu .......................................................................................................... |
49 |
4.1.2 |
Language Bar............................................................................................... |
50 |
4.1.3 |
Navigation Bar ............................................................................................. |
51 |
4.1.4 |
Notification Area .......................................................................................... |
52 |
4.1.5 |
Tasks.......................................................................................................... |
53 |
4.2 |
Home ............................................................................................ |
54 |
4.3 |
SpeedTouch ................................................................................. |
55 |
4.3.1 |
Information.................................................................................................. |
56 |
4.3.2 |
SpeedTouch™ Easy Setup .............................................................................. |
57 |
4.3.3 |
Restart........................................................................................................ |
58 |
4.3.4 |
Configuration ............................................................................................... |
59 |
4.3.5 |
Backup & Restore......................................................................................... |
60 |
4.3.6 Reset to Factory Defaults .............................................................................. |
61 |
|
4.3.7 |
Event Logs .................................................................................................. |
62 |
4.3.8 |
Update........................................................................................................ |
63 |
4.4 |
Broadband Connection................................................................. |
64 |
4.4.1 |
Connectivity Check....................................................................................... |
65 |
4.4.2 |
DSL Connection ........................................................................................... |
66 |
4.4.3 |
Internet Services .......................................................................................... |
67 |
4.4.4 |
Internet Service Settings ............................................................................... |
68 |
E-DOC-CTC-20050429-0102 v1.0

Contents
4.5 |
Toolbox ........................................................................................ |
69 |
4.5.1 |
Remote Assistance ....................................................................................... |
70 |
4.5.2 |
Game & Application Sharing .......................................................................... |
71 |
4.5.3 |
Defined Games & Applications ....................................................................... |
72 |
4.5.4 |
Game or Application Definition ....................................................................... |
73 |
4.5.5 |
New Game or Application .............................................................................. |
74 |
4.5.6 |
Parental Control ........................................................................................... |
75 |
4.5.7 |
Web Filtering Activation ................................................................................ |
78 |
4.5.8 |
Content Level .............................................................................................. |
79 |
4.5.9 |
New Content Level ....................................................................................... |
80 |
4.5.10 |
Firewall ....................................................................................................... |
82 |
4.5.11 |
Intrusion Detection ....................................................................................... |
83 |
4.5.12 |
Dynamic DNS .............................................................................................. |
84 |
4.5.13 |
User Management ........................................................................................ |
85 |
4.5.14 |
Edit User ..................................................................................................... |
86 |
4.5.15 |
Change Default User..................................................................................... |
87 |
4.5.16 |
Add User..................................................................................................... |
88 |
4.6 |
Home Network ............................................................................. |
89 |
4.6.1 |
Devices.................................................................................................... |
90 |
4.6.2 |
Device Settings ............................................................................................ |
91 |
4.6.3 |
Assign Public IP ........................................................................................... |
92 |
4.6.4 |
Wireless Device Settings ............................................................................... |
93 |
4.6.5 |
Access Point Settings ................................................................................... |
94 |
4.6.6 |
Configuring WDS.......................................................................................... |
97 |
4.6.7 |
Interfaces .................................................................................................... |
98 |
4.6.8 |
Interface Settings ......................................................................................... |
99 |
4.6.9 |
DHCP Pool................................................................................................. |
100 |
5 Software Upgrade..................................................... |
103 |
5.1 Upgrade Wizard on Setup CD..................................................... |
104 |
6 Troubleshooting........................................................ |
107 |
E-DOC-CTC-20050429-0102 v1.0
iii

Contents
6.1 |
General SpeedTouch™ Troubleshooting .................................... |
108 |
6.1.1 |
Wired Ethernet Troubleshooting.................................................................... |
109 |
6.1.2 |
Wireless Ethernet Troubleshooting ................................................................ |
110 |
6.1.3 |
Upgrade Troubleshooting............................................................................. |
111 |
6.2 |
UPnP™ on Windows XP Systems............................................... |
113 |
6.3 |
Reset to Factory Defaults .......................................................... |
115 |
iv
E-DOC-CTC-20050429-0102 v1.0
About this User’s Guide
About this User’s Guide
Used Symbols
!
A note provides additional information about a topic.
A tip provides an alternative method or shortcut to perform an action.
A caution warns you about potential problems or specific precautions that need to be taken.
Terminology |
Generally, the SpeedTouch™580(i) will be referred to as SpeedTouch™ in this User’s |
|
Guide. |
Typographical |
|
In interactive input and output, typed input is displayed in a bold font and |
|
Conventions |
commands are displayed like this. |
|
Comments are added in italics. |
|
Example: |
=>language list
CODE |
LANGUAGE VERSION |
FILENAME |
|
en* |
english 4.2.0.1 |
<system> |
Only one language is available |
Documentation and
software updates
E-DOC-CTC-20050429-0102 v1.0
THOMSON continuously develops new solutions, but is also committed to improve its existing products.
For more information on THOMSON's latest technological innovations, documents and software releases, visit us at:
www.speedtouch.com
1

About this User’s Guide
2 |
E-DOC-CTC-20050429-0102 v1.0 |
|
Chapter 1
Your SpeedTouch™
1 Your SpeedTouch™
Introduction With the SpeedTouch™580(i) Wireless Residential ADSL Gateway you can build a secure home or small office network, seamlessly connecting wired and wireless devices and surf the Internet at high speed, all combined in one device.
Installation For more information on how to set up your SpeedTouch™, installation and wiring and how to do a first Internet connection setup, refer to the provided Installation and Setup Guide.
Contents This User’s Guide will assist you in configuring your SpeedTouch™.
Safety instructions Before connecting the SpeedTouch™, please read the SpeedTouch™ Quick Installation Guide and the Safety Instructions and Regularity Notices.
E-DOC-CTC-20050429-0102 v1.0 |
3 |
|

Chapter 1
Your SpeedTouch™
1.1 SpeedTouch™ Features
Introduction Your SpeedTouch™ offers you a wide range of outstanding features.
In this section you will find a comprehensive overview of the:
Hardware Specifications
Software Features
4 |
E-DOC-CTC-20050429-0102 v1.0 |
|

Chapter 1
Your SpeedTouch™
1.1.1 |
Hardware Specifications |
|
|
Gateway Integrated multi-mode ADSL modem, supporting: |
|
|
ADSL over POTS for a SpeedTouch™ADSL/POTS variant) |
|
ADSL over ISDN for a SpeedTouch™ ADSL/ISDN variant) |
Physical interfaces |
|
WAN: |
|
|
One RJ-11 port for ADSL/POTS or ADSL/ISDN connection |
|
LAN: |
|
A USB 1.1 port to connect one PC over USB |
|
Four RJ-45 ports to connect up to 4 PCs to a 10/100 Base-T Ethernet |
|
network |
|
Wireless LAN: IEEE 802.11b/g Wi-Fi compliant access point |
|
Power inlet |
|
|
LEDs LED indicators for all interfaces |
|
Reset button |
One recessed reset button for restoring the default settings |
Association button |
|
One push button for wireless association and registration |
|
Wireless performance |
|
Typical indoor coverage: 60m |
|
|
Dynamic rate switching |
|
Manual / Automatic channel selection |
|
Manual / Automatic selection of pure 802.11g, pure 802.11b or mixed mode |
|
(802.11b/g) network |
|
Wireless Distribution System (WDS) |
|
WPA-PSK / WEP data encryption |
Power requirement |
|
Power supply: 15V AC, 1000mA |
E-DOC-CTC-20050429-0102 v1.0 |
5 |
|

Chapter 1
Your SpeedTouch™
1.1.2 |
Software Features |
ADSL compliance |
|
If POTS in overlay: G. handshake, Full Rate ADSL, G.dmt, G.lite (splitterless |
|
|
ADSL) |
|
If ISDN in overlay: G.handshake, G.dmt |
ATM features |
|
Up to 16 simultaneous PVCs, allowing multiple simultaneous destinations |
|
|
ATM QoS per PVC: CBR, VBR-rt, VBR-nrt, UBR |
|
RFC 1483 / 2684 multiprotocol encapsulation over AAL5 / ATM: both LLC / |
|
SNAP and VC-based multiplexing supported |
Bridging features |
|
Multiport self-learning transparent bridge per IEEE 802.1D for LAN interconnect |
|
|
Remote bridge ports are isolated from each other |
|
Pre-defined bridge filters to WAN (no filter, no CPE-to-WAN broadcast, PPPoE |
|
only) and to LAN (no filter, multicast filter) |
Routing features |
|
Multi-port (up to 16 PVCs) router |
|
|
Static routing, automatic routes (PPP, LAN) |
|
IP address multi-homing |
Services |
|
UPnP with NAT traversal capability: |
|
|
enables game technologies (Xbox live, Direct X, and many others) |
|
enables conferencing functions of Microsoft Messenger |
|
Transparent bridging (IEEE802.1D) |
|
PPPoE routing/bridging with integrated PPP Relay |
|
PPPoA routing, PPPoA-to-PPTP relaying |
|
IP routing with static routing, packet classified routing and residential RIP |
|
Hyper-NAT with virtual server mapping (for instance for Web, FTP, Mail |
|
servers) and ALGs (such as NetMeeting, MSN Messenger, VPN passthrough, |
|
and others) |
|
Quality of Service: |
|
IP QoS |
|
Integrated Dynamic DNS client |
Security |
|
PAP (RFC1334), CHAP (RFC1994) for PPP session |
|
|
Integrated Stateful Inspection Firewall, Intrusion Detection |
|
Parental Control, URL Filtering |
|
Wireless security: |
|
64/128bit WEP encryption, WPA-PSK |
|
Wireless client registration/access control (with physical push button) |
|
Multi-level SpeedTouch™ access policies, Digest Authentication |
6 |
E-DOC-CTC-20050429-0102 v1.0 |
|

Chapter 1
Your SpeedTouch™
Configuration Home Install Wizard, Easy Setup wizard
Intuitive web-based GUI (HTTP/HTTPs)
Advanced configuration via telnet - Command Line Interface (CLI)
Remote management access control
Management Multi-level user protection, Event logging
DHCP server, client and relay, DHCP-to-PPP spoofing
DNS server, client and relay
Time synchronization:
SNTPv1, SNTPv2, SNTPv3 and SNTPv4
System logging
SNMPv1 agent with MIB-II
Firmware upgradeable via upgrade wizard on Setup CD
E-DOC-CTC-20050429-0102 v1.0 |
7 |
|
Chapter 1
Your SpeedTouch™
1.2 SpeedTouch™ LED Behaviour
Front panel LEDs The SpeedTouch™ is equipped with a number of LEDs on its front panel, indicating the state of the device during normal operation.
Power Ethernet |
USB |
WLAN |
DSL |
Internet |
|
|
Following table shows the meaning of the different LEDs:
Indicator |
|
|
Description |
|
|
|
|
Name |
Colour |
State |
|
|
|
|
|
Power |
Green |
On |
Power on, normal operation |
|
|
|
|
|
Red |
On |
Power on, self-test failed, indicating |
|
|
|
device malfunction |
|
|
|
|
|
Orange |
On |
Bootloader active |
|
|
|
|
|
Off |
|
Power off |
|
|
|
|
Ethernet |
Green |
Flashing |
Ethernet activity |
|
|
|
|
|
|
On |
Ethernet connection, no activity |
|
|
|
|
|
Off |
|
No Ethernet connection |
|
|
|
|
USB |
Green |
Flashing |
USB activity |
|
|
|
|
|
|
On |
USB connection, no activity |
|
|
|
|
|
Off |
|
No USB connection |
|
|
|
|
WLAN |
Green |
Flashing |
Wireless activity, WPA encryption |
|
|
|
|
|
|
On |
No wireless activity, WPA encryption |
|
|
|
|
|
Amber |
Flashing |
Wireless activity, WEP encryption |
|
|
|
|
|
|
On |
No wireless activity, WEP encryption |
|
|
|
|
|
Red |
Flashing |
Wireless activity, no security |
|
|
|
|
|
|
On |
No wireless activity, no security |
|
|
|
|
|
Off |
|
WLAN disabled |
|
|
|
|
8 |
E-DOC-CTC-20050429-0102 v1.0 |
|

Ethernet LEDs
E-DOC-CTC-20050429-0102 v1.0
Chapter 1
Your SpeedTouch™
Indicator |
|
|
Description |
|
|
|
|
Name |
Colour |
State |
|
|
|
|
|
DSL |
Green |
Flashing |
Pending DSL line synchronisation |
|
|
|
|
|
|
On |
DSL line synchronised |
|
|
|
|
|
Off |
|
No DSL line |
|
|
|
|
Internet |
Green |
Flashing |
Internet activity |
|
|
|
|
|
|
On |
Internet connectivity, no activity |
|
|
|
|
|
Red |
On |
Internet connection setup failed |
|
|
|
|
|
Off |
|
No Internet connection |
|
|
|
|
A LED may be provided per Ethernet port to indicate link integrity (or activity). Depending on the SpeedTouch™ product you are using, a second LED (A) may be provided to indicate the 10/100Base-T selection:
A  B
B
Indicator |
|
|
Description |
|
|
|
|
|
|
Name |
|
LED Status |
|
|
|
|
|
|
|
A |
Integrity |
Off |
No connection on this port |
|
(Optional) |
(Activity) |
|
|
|
On |
Ethernet link up |
|||
|
|
|||
|
|
|
|
|
|
|
Flashing |
Data is flowing from/to this port |
|
|
|
|
|
|
B |
10/100Base-T |
Off |
10Base-T Ethernet connection |
|
|
|
|
|
|
|
|
On |
100Base-T Ethernet connection |
|
|
|
|
|
9

Chapter 1
Your SpeedTouch™
1.3 How to Access your SpeedTouch™
Access methods Your SpeedTouch™ is accessible in one of following ways:
Access Method |
Can be used to: |
|
|
Web |
Configure your SpeedTouch™ via HTTP or |
|
HTTPS. |
|
For more information, see “1.3.1 Access via |
|
the Web Interface” on page 11. |
|
|
Command Line Interface (CLI) |
Fine tune your SpeedTouch™ configuration. |
|
For more information, see “1.3.2 Access via |
|
CLI” on page 12. |
|
|
File Transfer Protocol (FTP) |
Backup and restore data on your SpeedTouch™. |
|
For more information, see “1.3.3 Access via |
|
FTP” on page 14. |
|
|
Remote Assistance |
Allow a remote user to help you configuring |
|
your SpeedTouch™. |
|
For more information, see “1.3.4 Remote |
|
Assistance” on page 17. |
|
|
10 |
E-DOC-CTC-20050429-0102 v1.0 |
|
Chapter 1
Your SpeedTouch™
1.3.1 Access via the Web Interface
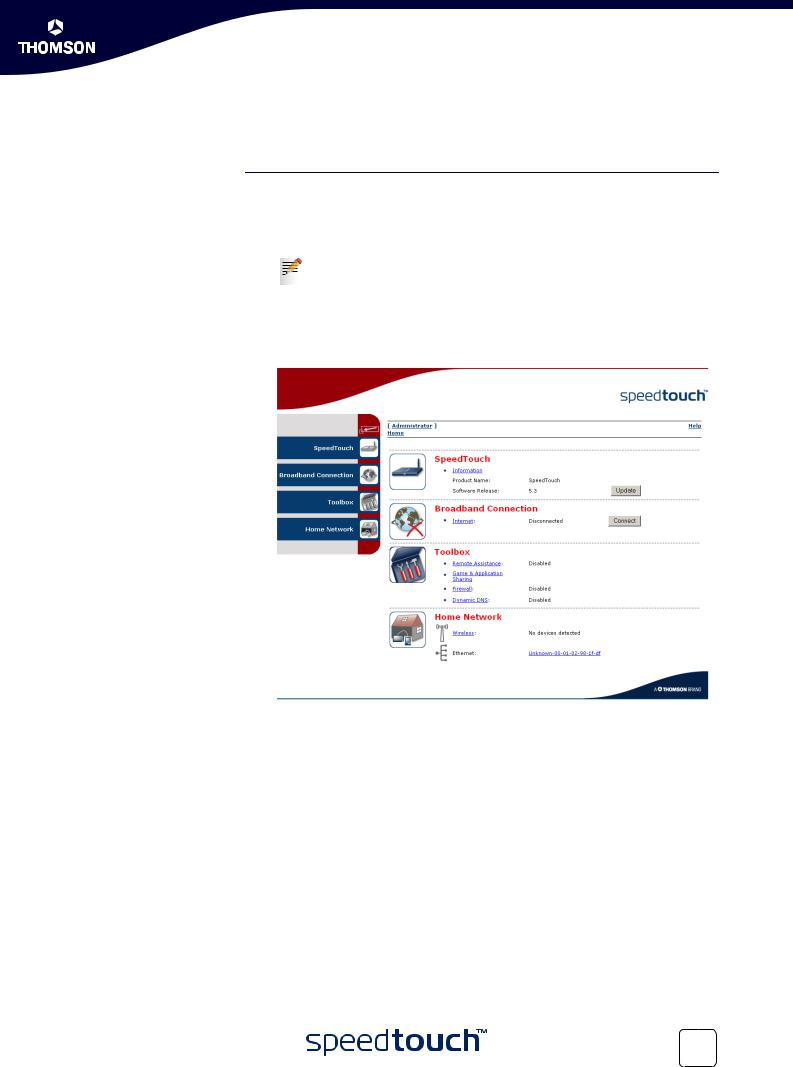
Procedure To access the SpeedTouch™ via the web interface:
1Open a web browser.
2In the address bar type your SpeedTouch™’s IP address or DNS host name, by default that is ‘http://speedtouch.lan’ or ‘192.168.1.254’.
You can access the pages via the http protocol. For remote assistance the secure version, https, in combination with certificates is used; provide your ISP with the https link, user name and password before he can log on to the pages. For more information, see “1.3.4 Remote Assistance” on page 17.
3As a result the SpeedTouch™ Home page appears, from where you can navigate to all the configurable aspects of the SpeedTouch™.
For more information on the web pages, see “4 SpeedTouch™ Web Interface” on page 47.
E-DOC-CTC-20050429-0102 v1.0 |
11 |
|

Chapter 1
Your SpeedTouch™
1.3.2 Access via CLI
Command Line
Interface (CLI)
12
You can access the Command Line Interface (CLI) via: A Telnet session
This requires that TCP/IP connectivity exists between the host from which the Telnet session is opened and the SpeedTouch™. Your SpeedTouch™ and the connected PC must have an IP address in the same subnet.
Quote site commands (over FTP)
For more information, see “ Quote site command” on page 16.
For information on CLI commands, see the SpeedTouch™ CLI Reference Guide.
E-DOC-CTC-20050429-0102 v1.0
Telnet session
E-DOC-CTC-20050429-0102 v1.0
Chapter 1
Your SpeedTouch™
Proceed as follows:
1 Open a telnet application.
You can use the Command Prompt window. In Windows XP for instance:
1On the Windows task bar, click Start.
2Select (All) Programs > Accessories > Command Prompt.
2 Connect to your SpeedTouch™. .
In the Command Prompt window:
At the prompt, type telnet followed by the IP address of your SpeedTouch™ (default is 192.168.1.254).
3 Enter your SpeedTouch™ security user name and password.
The default user is ‘Administrator’ and the default password is blank.
4As soon as you’ve opened a session to the CLI, the SpeedTouch™ banner is displayed, followed by the CLI prompt, as shown in the example below:
Username : Administrator
-----------------------------------------------------------------------
- |
|
|
|
|
|
|
|
|
|
|
|
|
* |
|
|
|
|
|
|
______ |
SpeedTouch |
|
|||
* |
|
|
|
|
___/_____/\ |
|
|
|
|
|||
* |
|
|
|
|
/ |
|
|
/\\ |
Version 5.3 |
|||
* |
|
|
|
_____/__ |
|
|
/ |
\\ |
|
|
|
|
* |
|
|
|
_/ |
/\_____/___ \ |
Copyright (c) 1999-2005, |
||||||
* |
|
|
|
// |
/ |
\ |
|
/\ \ |
|
|
THOMSON |
|
* |
|
_______//_______/ |
|
\ |
/ _\/______ |
|
|
|||||
* |
|
/ |
/ \ |
\ |
|
/ |
/ / |
|
/\ |
|
|
|
* |
__/ |
/ |
|
\ |
\ / |
|
/ / |
|
/ _\__ |
|||
* |
/ / |
/ |
|
\_______\/ |
|
|
/ / |
|
/ / |
|
/\ |
|
* /_/______/___________________/ /________/ /___/ |
\ |
|||||||||||
* \ \ |
\ |
|
___________ |
|
|
\ \ |
|
\ \ |
\ |
/ |
||
* |
\_\ |
\ |
/ |
|
/\ |
|
|
\ \ |
|
\ \___\/ |
||
* |
\ |
\/ |
|
/ |
\ |
|
\ \ |
|
\ |
/ |
|
|
* |
|
\_____/ |
|
|
/ |
|
\ |
\ \________\/ |
|
|
||
* |
|
/__________/ |
|
\ |
\ |
/ |
|
|
|
|||
* |
|
\ |
|
_____ |
\ |
|
/_____\/ |
|
|
|
||
* |
|
\ / |
/\ |
\ |
|
/___\/ |
|
|
|
|
||
* |
|
|
/____/ |
\ \ |
/ |
|
|
|
|
|
|
|
* |
|
|
\ |
\ |
/___\/ |
|
|
|
|
|
|
|
* |
|
|
\____\/ |
|
|
|
|
|
|
|
|
|
-----------------------------------------------------------------------
{Administrator}=>
13
Chapter 1
Your SpeedTouch™
1.3.3 Access via FTP
File Transfer Protocol
(FTP)
You can access the file system of the SpeedTouch™ via the File Transfer Protocol (FTP), in order to:
Restore or backup configuration files, templates or language packs. Upgrade your configuration or firmware.
File system The SpeedTouch™ file system is stored on nonvolatile memory, and contains the SpeedTouch™ software, service template files and (optionally) default setting files.
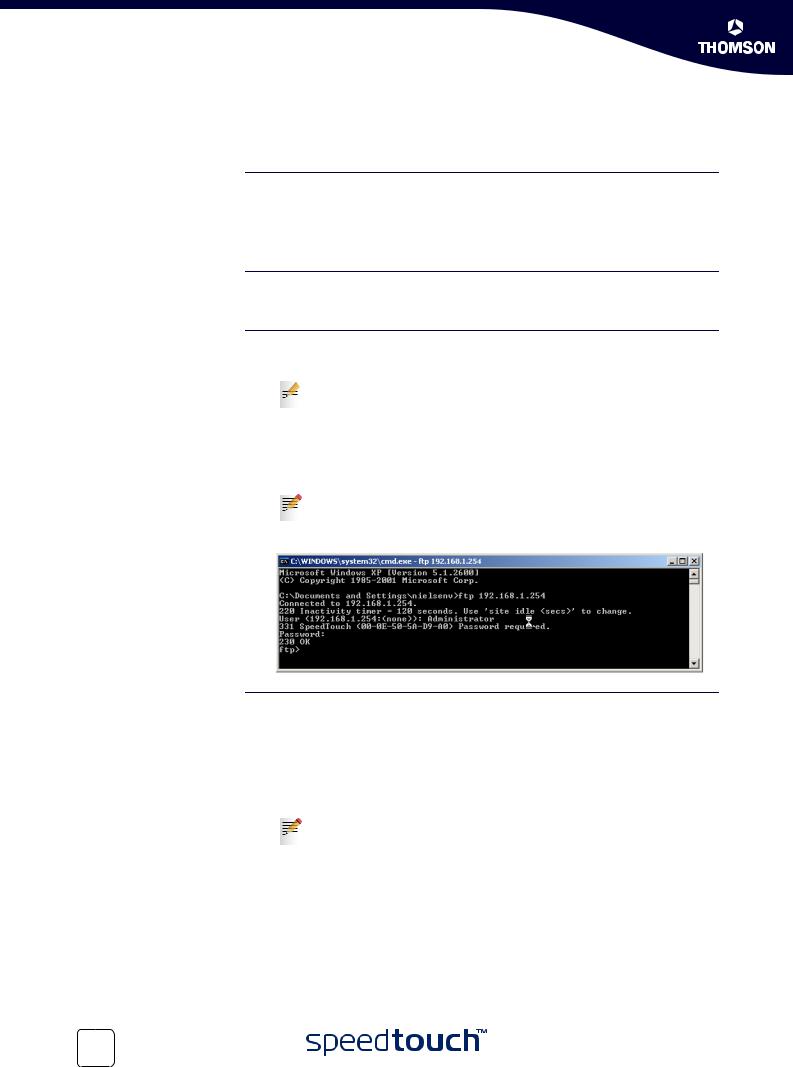
FTP session To open an FTP session:
1 Open a Command Prompt window.  In Windows XP for instance:
1On the Windows task bar, click Start.
2Select (All) Programs > Accessories > Command Prompt.
2At the prompt, type ftp followed by the IP address of your SpeedTouch™ (default is 192.168.1.254).
3Enter your SpeedTouch™ security user name and password.
The default user is ‘Administrator’ and the default password is blank.
4 The example below shows an FTP session to the SpeedTouch™ file system:
File system structure The structure of the file system is very simple: It consists of a single root directory called root and a subdirectory called dl.
The root directory contains:
all the necessary files for the SpeedTouch™ to boot correctly the dl directory
The dl (download) directory contains the software image.
If you made changes to the SpeedTouch™ configuration and saved them, a user.ini configuration settings file is created in the dl subdirectory.
14 |
E-DOC-CTC-20050429-0102 v1.0 |
|

Chapter 1
Your SpeedTouch™
File system access On the different directories you have following privileges: rights
Directory |
Access rights |
|
|
root |
NO read/write |
|
|
dl |
read/write |
|
|
Common FTP
commands
Depending on the access rights you have on a directory, you can use one of following commands:
Command... |
You can use to... |
|
|
cd |
access another directory than the one currently open. |
|
Example: ftp>cd dl. |
|
|
dir |
list the directory files. |
|
Example: ftp>dir. |
|
|
bin |
set the transfer mode to ‘binary’. |
|
|
hash |
turn on the hashing option. |
|
|
put |
upload files. |
|
Example: ftp>put C:/MyBackupFiles/user.ini. |
|
A configuration file must be uploaded to the dl directory. |
|
|
get |
download files. |
|
Example: ftp>get user.ini. |
|
Downloading the configuration file must be done from the dl |
|
directory. |
|
|
delete |
delete files. |
|
|
bye |
quit FTP. |
|
|
E-DOC-CTC-20050429-0102 v1.0 |
15 |
|
Chapter 1
Your SpeedTouch™
FTP file transfer To allow correct file transfers, set the transfer mode to “binary”: At the ftp prompt, type bin and press Enter.
Turn on the hashing option to see the progression of the file transfer: At the ftp prompt type hash and press Enter.
Example:
/home/doejohn{1}$ftp 192.168.1.254 Connected to 192.168.1.254
220 Inactivity timer = 120 seconds. Use 'site idle <secs>' to change. Name (192.168.1.254:doejohn):
331 SpeedTouch™ (00-90-D0-01-02-03) User 'doejohn' OK. Password requir ed.
Password : ######
330 OK ftp> ftp>bin
200 TYPE is now 8-bit binary ftp>
ftp>hash
200Hash mark printing on (8192 bytes/hash mark). ftp>cd dl
250 Changed to /dl ftp>put C:\user.ini
200 Connected to 192.168.1.10 port 1271
150 Opening data connection for user.ini
226 File written successfully
ftp: 256 bytes sent in 0,000Seconds 256000,000Kbytes/sec. ftp>
Quote site command All the CLI commands can be executed from within an FTP session. Only complete CLI commands (in other words, the complete command syntax with all the parameters already specified) can be executed.
Example: To execute the CLI command :software cleanup: At the FTP prompt type ‘quote site software cleanup’ and press Enter.
ftp> quote site software cleanup 200-
200 CLI command "software cleanup" executed ftp>
For more information on CLI commands, see the CLI Reference Guide.
16 |
E-DOC-CTC-20050429-0102 v1.0 |
|

Chapter 1
Your SpeedTouch™
1.3.4 Remote Assistance
Remote access You can make your SpeedTouch accessible from the Internet with regard to remote support. This way, you can allow your helpdesk to access your SpeedTouch™ remotely.
Enabling remote access To enable remote assistance:
1Go to the SpeedTouch™ pages, as described in “1.3.1 Access via the Web Interface” on page 11.
2In the menu select Toolbox > Remote Assistance.
3Click Enable Remote Assistance.
4Provide the following parameters to your helpdesk:
URL (the HTTPS link)
User name
Password
Disabling remote access
5Your ISP is now able to access your SpeedTouch™ via the secure HTTPs link in combination with the provided certificate (a secure authentication mechanism).
For security reasons, after 20 minutes of inactivity, or on reboot, Remote Assistance will be automatically disabled.
To disable remote assistance:
1Go to the SpeedTouch™ pages, as described in “1.3.1 Access via the Web Interface” on page 11.
2In the menu select Toolbox > Remote Assistance.
3Click Disable Remote Assistance.
E-DOC-CTC-20050429-0102 v1.0 |
17 |
|

Chapter 1
Your SpeedTouch™
18
E-DOC-CTC-20050429-0102 v1.0
Chapter 2
Local Network Setup
2 Local Network Setup
Introduction The SpeedTouch™ offers you following local networking solutions:
Wired Ethernet
USB (1.1)
Wireless Ethernet
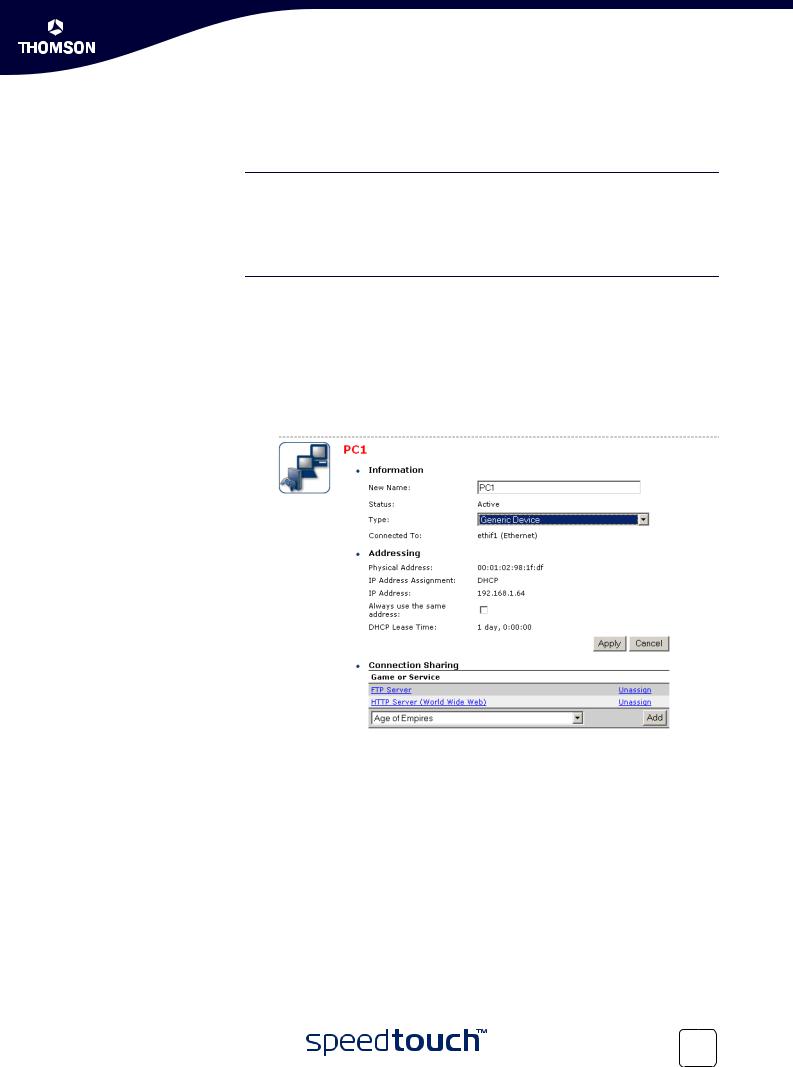
Device settings Once you’ve connected a device, you are able to personalise its settings:
1Go to the SpeedTouch™ web pages.
2In the menu select Home Network > Devices.
3Click the name of your device, or if the device’s settings haven’t been personalised yet, click the MAC address of the device.
4On the top right, click Configure.
5Now you can change the device’s name, lock its IP address and assign applications and services to the device.
E-DOC-CTC-20050429-0102 v1.0 |
19 |
|
Chapter 2
Local Network Setup
2.1 Wired Ethernet
Local network The Ethernet ports on the backpanel allow you to connect the SpeedTouch™ to an existing 10 or 100 Base-T Ethernet network or one (or more) computer(s) with installed Ethernet card.
Using the SpeedTouch™ Ethernet switch, you can create a local Ethernet network of up to four devices, without needing extra networking devices.
In the SpeedTouch™ package, a yellow full-wired straight-through RJ-45/RJ- 45 Ethernet cable is included.
Standard wiring Use the yellow Ethernet cable provided to wire your computer's Ethernet port to one procedure of the SpeedTouch™'s Ethernet ports.
The Ethernet cable can also be used to wire any Ethernet port of your SpeedTouch™ to an external hub or switch.
Please follow the installation instructions supplied with the external hub or switch for connections and Ethernet cabling.
Ethernet link check LED indicators allow you to check your Ethernet. See “1.2 SpeedTouch™ LED Behaviour” on page 8 for more information.
Device settings Once you’ve connected a device, you are able to personalise its settings. For more information, see “ Device settings” on page 19.
20 |
E-DOC-CTC-20050429-0102 v1.0 |
|

Chapter 2
Local Network Setup
2.2 USB
Supported operating systems
Installing and using the SpeedTouch™ USB connection on the SpeedTouch™ is supported for following operating systems:
Microsoft Operating Systems:
MS Windows 98SE
MS Windows Millennium MS Windows 2000
MS Windows XP
You may need the Windows installation CD-ROM during installation.
The installation procedures might be slightly different depending on the MS Windows OS you are using.
|
Mac Operating Systems: |
|
Mac OS X Jaguar (10.2) |
|
Mac OS X Panther (10.3) |
System requirements |
|
For Windows 98SE/ME: |
Pentium processor 166 MHz or compatible 32 megabytes (MB) of memory
30 MB of free disk space For Windows 2000/XP:
Pentium II processor or compatible 64 MB of memory
30 MB of free disk space For Mac OS X:
128 MB of memory
30 MB of free disk space
Prerequisites It is strongly advised to remove any SpeedTouch™ USB driver installation that may reside on your PC before you install USB drivers from the SpeedTouch™ Setup CD delivered with your SpeedTouch™ product.
Make sure both your PC and SpeedTouch™ are turned on and operational.
In the SpeedTouch™ package, a blue USB cable is included to connect a single computer to your SpeedTouch™.
E-DOC-CTC-20050429-0102 v1.0 |
21 |
|
Chapter 2
Local Network Setup
Installing Windows USB
driver
Verifying USB connectivity in Windows
Installing Mac USB
drivers
Device settings
22
The installation is plug and play, meaning that installation will require almost no effort.
Proceed as follows:
1Insert the blue USB cable provided into the SpeedTouch™ USB port marked with the USB logo:
2The other end of the USB cable fits in (one of) the USB port(s) of your PC. In most cases your PC's USB port is marked with the same USB symbol.
You can also connect your PC to the SpeedTouch™ via a USB hub.
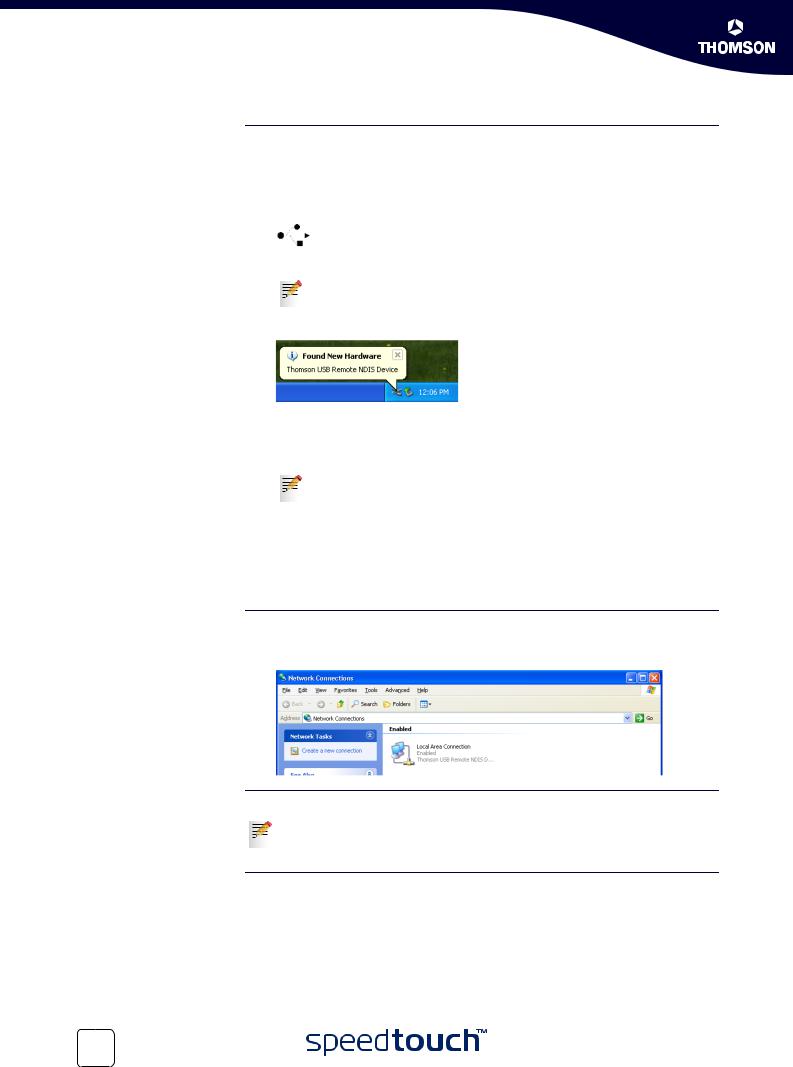
3Windows will automatically recognise the Thomson USB Remote NDIS device:
4The Windows Found New Hardware Wizard appears:
This wizard will guide you through the installation procedure of the USB drivers.
Click Next to continue.
The Windows Found New Hardware Wizard may ask your authorisation to connect to Window Update to search for software. If this is the case, select No, not this time and click Next.
5Select Install the software automatically (Recommended), and click Next.
6The USB driver is being installed. After a while a completing dialogue will appear. Click Finish to complete the installation.
7As a result your USB connection is installed and ready for use.
The SpeedTouch™ USB connection is represented as a local network interface. You can easily check this interface by opening the Network Connections window from Windows’ Control Panel:
The USB driver will be installed automatically on your Mac.
On the Setup CD, the Mac USB driver is located in stInstall.app > Contents > MacOS > CDCdriver.
Once you’ve connected a device, you are able to personalise its settings. For more information, see “ Device settings” on page 19.
E-DOC-CTC-20050429-0102 v1.0
Loading...