


 Loading...

 /
/ 
SAMPLER
User Guide
WARNING
To prevent fire or shock hazard, do not expose this appliance to rain or moisture.
使用説明書をよくお読み下さい。
Important Notice
The material in this document is copyright to AKAI professional M.I. Corp., and may not be quoted or reproduced in any form without written permission from the company.
LIMITED SOFTWARE WARRANTY POLICY
All the software provided with, or purchased especially for, AKAI professional products has been tested for functionality. AKAI professional M.I. Corp. will make its best efforts to correct reported software defects for future releases subject to technical practicabilities.
AKAI professional M.I. Corp. makes no warranty or representation either expressed or implied with respect to the system's performance or fitness for a particular purpose.
In no event will AKAI professional M.I. Corp. be liable for direct or indirect damages arising from any defect in the software or its documentation. Further, AKAI professional M.I. Corp. will not accept any liability for any programs, sounds, audio recording or sequences stored in or used with AKAI professional products, including the cost of recovery of such data.
The warranties, remedies and disclaimers above are exclusive and take precedence over all others, oral or written, express or implied, to the extent permitted by law in the geographical area of the product's use. No employee of AKAI professional M.I. Corp., agent, distributor or employee of an agent or distributor is authorised to offer any variation from this policy.
WARNING!!
To prevent fire or shock hazard, do not expose this appliance to rain or moisture.
1-En
CAUTION
RISK OF ELECTRIC SHOCK
DO NOT OPEN
CAUTION: TO REDUCE THE RISK OF ELECTRIC SHOCK
DO NOT REMOVE COVER (OR BACK).
NO USER-SERVICEABLE PARTS INSIDE.
REFER SERVICING TO QUALIFIED SERVICE PERSONNEL.
THE SYMBOLS ARE RULED BY UL STANDARDS (U.S.A.)
The lightning flash with arrowhead symbol, within an equilateral triangle, is intended to alert the user to the presence of uninsulated “dangerous voltage” within the product’s enclosure; that may be of sufficient magnitude to constitute a risk of electric shock to persons.
The exclamation point within an equilateral triangle is intented to alert the user to the presence of important operating and maintenance (servicing) instructions in the literature accompanying the appliance.
5B-En
Lithium battery
This product uses a lithium battery for memory backup.
The lithium battery should only be replaced by qualified service personnel. Improper handling may cause risk of explosion.
24A-En
02/15/2002

WARNING ii
WARNING: WHEN USING ELECTRIC PRODUCTS, BASIC PRECAUTIONS SHOULD ALWAYS BE FOLLOWED, INCLUDING THE FOLLOWING:
WARNING
The Z4/Z8 is designed to be used in a standard household environment.
Power requirements for electrical equipment vary from area to area. Please ensure that your Z4/Z8 meets the power requirements in your area. If in doubt, consult a qualified electrician or AKAI professional dealer.
120 VAC |
@ 60 Hz for USA and Canada |
220~240 VAC |
@ 50 Hz for Europe |
240 VAC |
@ 50 Hz for Australia |
PROTECTING YOURSELF AND THE Z4/Z8
•Never touch the AC plug with wet hands.
•Always disconnect the Z4/Z8 from the power supply by pulling on the plug, not the cord.
•Allow only an AKAI professional dealer or qualified professional engineer to repair or reassemble the Z4/Z8. Apart from voiding the warranty, unauthorized engineers might touch live internal parts and receive a serious electrical shock. There are no user serviceable parts inside.
•Do not put, or allow anyone to put any object, especially metal objects, into the Z4/Z8.
•Use only a household AC power supply. Never use a DC power supply.
•If water or any other liquid is spilled into or onto the Z4/Z8, disconnect the power, and call your dealer.
•Make sure that the unit is well-ventilated, and away from direct sunlight.
•To avoid damage to internal circuitry, as well as the external finish, keep the Z4/Z8 away from sources of direct heat (stoves, radiators, etc.).
•Avoid using aerosol insecticides, etc. near the Z4/Z8. They may damage the surface, and may ignite.
•Do not use denatured alcohol, thinner or similar chemicals to clean the Z4/Z8. They will damage the finish.
•Modification of this equipment is dangerous, and can result in the functions of the Z4/Z8 being impaired. Never attempt to modify the equipment in any way.
•Make sure that the Z4/Z8 is always well-supported when in use (either in a specially-designed equipment rack, or on a firm level surface).
•When installing the Z4/Z8 in a 19” rack system, always allow 1U of ventilated free space above it to allow for cooling. Make sure that the back of the rack is unobstructed to allow a clear airflow.
•In order to assure optimum performance of your Z4/Z8, select the setup location carefully, and make sure the equipment is used properly. Avoid setting up the Z4/Z8 in the following locations:
1.In a humid or dusty environment
2.In a room with poor ventilation
3.On a surface which is not horizontal
4.Inside a vehicle such as a car, where it will be subject to vibration
5.In an extremely hot or cold environment
Z4/Z8 User Guide—Version 1.0

iii WARNING
For U.K. customers only
WARNING
THIS APPARATUS MUST BE EARTHED
IMPORTANT
This equipment is fitted with an approved non-rewireable UK mains plug.
To change the fuse in this type of plug proceed as follows:
1)Remove the fuse cover and old fuse.
2)Fit a new fuse which should be a BS1362 5 Amp A.S.T.A or BSI approved type.
3)Refit the fuse cover.
If the AC mains plug fitted to the lead supplied with this equipment is not suitable for your type of AC outlet sockets, it should be changed to an AC mains lead, complete with moulded plug, to the appropriate type. If this is not possible, the plug should be cut off and a correct one fitted to suit the AC outlet. This should be fused at 5 Amps.
If a plug without a fuse is used, the fuse at the distribution board should NOT BE GREATER than 5 Amp.
PLEASE NOTE: |
THE SEVERED PLUG MUST BE DESTROYED TO AVOID A POSSIBLE |
|
SHOCK HAZARD SHOULD IT BE INSERTED INTO A 13 AMP SOCKET |
|
ELSEWHERE. |
The wires in this mains lead are coloured in accordance with the following code:
GREEN and YELLOW |
— |
Earth |
BLUE |
— |
Neutral |
BROWN |
— |
Live |
As the colours of the wires in the mains lead of this apparatus may not correspond with the coloured markings identifying the terminals in your plug, please proceed as follows:
The wire which is coloured GREEN and YELLOW must be connected to the terminal which is marked with the letter E or with the safety earth symbol  or coloured GREEN or coloured GREEN and YELLOW.
The wire which is coloured BLUE must be connected to the terminal which is marked with the letter N or coloured BLACK.
The wire which is coloured BROWN must be connected to the terminal which is marked with the letter L or coloured RED.
THIS APPARATUS MUST BE EARTHED
Ensure that all the terminals are securely tightened and no loose strands of wire exist.
Before replacing the plug cover, make certain the cord grip is clamped over the outer sheath of the lead and not simply over the wires.
6D-En
Z4/Z8 User Guide—Version 1.0

WARNING iv
FCC WARNING
This equipment has been tested and found to comply with the limits for a Class B digital device pursuant to Part 15 of the FCC rules. These limits are designed to provide reasonable protection against harmful interference in a residential installation. This equipment generates, uses, and can radiate radio frequency energy and, if not installed and used in accordance with the instructions, may cause harmful interference to radio communications. However, there is no guarantee that interference will not occur in a particular installation. If this equipment does cause harmful interference to radio or television reception, which can be determined by turning the equipment off and on, the user is encouraged to try to correct the interference by one or more of the following measures:
•Reorient or relocate the receiving antenna.
•Increase the separation between the equipment and receiver.
•Connect the equipment into an outlet on a circuit different from that to which the receiver is connected.
•Consult the dealer or an experienced radio/TV technician for help.
21B-En
AVIS POUR LES ACHETEURS CANADIENS DU Z4/Z8
Le présent appareil numérique n’ément pas de bruits radioélectriques dépassant les limites applicables aux appareils numériques de la Class B prescrites dans le Règlement sur le brouillage radioélectrique édicté par le ministère des Communications du Canada.
27-F
This digital apparatus does not exceed the Class B limits for radio noise emissions from digital apparatus set out in the Radio Interference Regulations of the Canadian Department of Communications.
27-En
VENTILATION
Do not prevent the unit’s ventilation, especially by placing the unit on soft carpet, in a narrow space, or by placing objects on the unit’s chassis— top, side, or rear panels. Always keep the unit’s chassis at least 10 centimeters from any other objects.
31C-En
CHANGES OR MODIFICATIONS NOT EXPRESSLY APPROVED BY THE MANUFACTURER FOR COMPLIANCE COULD VOID THE USER’S AUTHORITY TO OPERATE THE EQUIPMENT.
32-En
COPYRIGHT NOTICE
The AKAI professional Z4/Z8 is a computer-based device, and as such contains and uses software in ROMs. This software, and all related documentation, including this Operator’s Manual, contain proprietary information which is protected by copyright laws. All rights are reserved. No part of the software or its documentation may be copied, transferred or modified. You may not modify, adapt, translate, lease, distribute, resell for profit or create derivative works based on the software and its related documentation or any part thereof without prior written consent from AKAI professional M.I. Corp., Yokohama, Japan.
Z4/Z8 User Guide—Version 1.0

v Contents
Contents
1 Introduction . . . . . . . . . . . . . . . . . . . . . . . . . . . . . . . . . . . . . 1
Features . . . . . . . . . . . . . . . . . . . . . . . . . . . . . . . . . . . . . . . . . . . . . . . . . . . . . . 1
Architecture . . . . . . . . . . . . . . . . . . . . . . . . . . . . . . . . . . . . . . . . . . . . . . . . . . . 2
2 Front & Rear Panels . . . . . . . . . . . . . . . . . . . . . . . . . . . . . . . 6
Front Panel. . . . . . . . . . . . . . . . . . . . . . . . . . . . . . . . . . . . . . . . . . . . . . . . . . . . 6
Rear Panel . . . . . . . . . . . . . . . . . . . . . . . . . . . . . . . . . . . . . . . . . . . . . . . . . . . . 9
3 Getting Started . . . . . . . . . . . . . . . . . . . . . . . . . . . . . . . . . . |
11 |
Installation . . . . . . . . . . . . . . . . . . . . . . . . . . . . . . . . . . . . . . . . . . . . . . . . . . . 11 Hookup Example . . . . . . . . . . . . . . . . . . . . . . . . . . . . . . . . . . . . . . . . . . . . . . 11 Connecting USB Devices . . . . . . . . . . . . . . . . . . . . . . . . . . . . . . . . . . . . . . . 12 Connecting SCSI Devices . . . . . . . . . . . . . . . . . . . . . . . . . . . . . . . . . . . . . . . 12 Detaching the Removable Panel (Z8 only) . . . . . . . . . . . . . . . . . . . . . . . . . . 13 Connecting the Power Cord. . . . . . . . . . . . . . . . . . . . . . . . . . . . . . . . . . . . . . 13 Switching On & Off . . . . . . . . . . . . . . . . . . . . . . . . . . . . . . . . . . . . . . . . . . . 13 Navigating the User Interface . . . . . . . . . . . . . . . . . . . . . . . . . . . . . . . . . . . . 14 Using the PLAY Button. . . . . . . . . . . . . . . . . . . . . . . . . . . . . . . . . . . . . . . . . 15 Using the Clipboard. . . . . . . . . . . . . . . . . . . . . . . . . . . . . . . . . . . . . . . . . . . . 16 Entering Names . . . . . . . . . . . . . . . . . . . . . . . . . . . . . . . . . . . . . . . . . . . . . . . 17
4 Loading . . . . . . . . . . . . . . . . . . . . . . . . . . . . . . . . . . . . . . . . |
18 |
Loading . . . . . . . . . . . . . . . . . . . . . . . . . . . . . . . . . . . . . . . . . . . . . . . . . . . . . 18
Sound Library CD-ROM . . . . . . . . . . . . . . . . . . . . . . . . . . . . . . . . . . . . . . . . 19
5 Recording Samples . . . . . . . . . . . . . . . . . . . . . . . . . . . . . . . 22
Sampling . . . . . . . . . . . . . . . . . . . . . . . . . . . . . . . . . . . . . . . . . . . . . . . . . . . . 22 Adding New Samples to Programs . . . . . . . . . . . . . . . . . . . . . . . . . . . . . . . . 25 Auto Sampling. . . . . . . . . . . . . . . . . . . . . . . . . . . . . . . . . . . . . . . . . . . . . . . . 26 Sampling with Q-FX . . . . . . . . . . . . . . . . . . . . . . . . . . . . . . . . . . . . . . . . . . . 27
6 Editing Samples . . . . . . . . . . . . . . . . . . . . . . . . . . . . . . . . . . 29
About Sample Editing . . . . . . . . . . . . . . . . . . . . . . . . . . . . . . . . . . . . . . . . . . 29 Selecting Samples for Editing . . . . . . . . . . . . . . . . . . . . . . . . . . . . . . . . . . . . 29 Tagging Samples . . . . . . . . . . . . . . . . . . . . . . . . . . . . . . . . . . . . . . . . . . . . . . 30 Selecting a Monitoring Item . . . . . . . . . . . . . . . . . . . . . . . . . . . . . . . . . . . . . 30 Trimming Samples . . . . . . . . . . . . . . . . . . . . . . . . . . . . . . . . . . . . . . . . . . . . 30 Viewing the Waveform . . . . . . . . . . . . . . . . . . . . . . . . . . . . . . . . . . . . . . . . . 31 Zooming Samples . . . . . . . . . . . . . . . . . . . . . . . . . . . . . . . . . . . . . . . . . . . . . 31 Special Sample Playback for Auditioning. . . . . . . . . . . . . . . . . . . . . . . . . . . 31 Setting the Start Point . . . . . . . . . . . . . . . . . . . . . . . . . . . . . . . . . . . . . . . . . . 32 Setting the End Point . . . . . . . . . . . . . . . . . . . . . . . . . . . . . . . . . . . . . . . . . . . 32 Sample Edit . . . . . . . . . . . . . . . . . . . . . . . . . . . . . . . . . . . . . . . . . . . . . . . . . . 33 Resampling with Q-FX . . . . . . . . . . . . . . . . . . . . . . . . . . . . . . . . . . . . . . . . . 38 Setting Loops. . . . . . . . . . . . . . . . . . . . . . . . . . . . . . . . . . . . . . . . . . . . . . . . . 40 Setting and Fine-tuning the Loop Start & End Points. . . . . . . . . . . . . . . . . . 41 Auto Loop Find Functions . . . . . . . . . . . . . . . . . . . . . . . . . . . . . . . . . . . . . . 42
Z4/Z8 User Guide—Version 1.0

Contents vi
Crossfading Loops . . . . . . . . . . . . . . . . . . . . . . . . . . . . . . . . . . . . . . . . . . . . 42 Setting Regions . . . . . . . . . . . . . . . . . . . . . . . . . . . . . . . . . . . . . . . . . . . . . . . 43 Adjusting Region Start & End Points . . . . . . . . . . . . . . . . . . . . . . . . . . . . . . 43 Slicing Regions . . . . . . . . . . . . . . . . . . . . . . . . . . . . . . . . . . . . . . . . . . . . . . . 44 BPM Tempo Matching . . . . . . . . . . . . . . . . . . . . . . . . . . . . . . . . . . . . . . . . . 45 Renaming Samples . . . . . . . . . . . . . . . . . . . . . . . . . . . . . . . . . . . . . . . . . . . . 46 Copying Samples . . . . . . . . . . . . . . . . . . . . . . . . . . . . . . . . . . . . . . . . . . . . . 46 Deleting Samples . . . . . . . . . . . . . . . . . . . . . . . . . . . . . . . . . . . . . . . . . . . . . 47 Adding Samples to Programs . . . . . . . . . . . . . . . . . . . . . . . . . . . . . . . . . . . . 47
7 Using Programs . . . . . . . . . . . . . . . . . . . . . . . . . . . . . . . . . . 48
About Program Mode . . . . . . . . . . . . . . . . . . . . . . . . . . . . . . . . . . . . . . . . . . 48
Selecting Programs . . . . . . . . . . . . . . . . . . . . . . . . . . . . . . . . . . . . . . . . . . . . 48
Configuring Programs . . . . . . . . . . . . . . . . . . . . . . . . . . . . . . . . . . . . . . . . . . 49
Creating Keygroup Programs . . . . . . . . . . . . . . . . . . . . . . . . . . . . . . . . . . . . 50
Configuring Keygroup Programs . . . . . . . . . . . . . . . . . . . . . . . . . . . . . . . . . 51
Creating Drum Programs . . . . . . . . . . . . . . . . . . . . . . . . . . . . . . . . . . . . . . . 56
Configuring Drum Programs. . . . . . . . . . . . . . . . . . . . . . . . . . . . . . . . . . . . . 57
Configuring Program Modulation . . . . . . . . . . . . . . . . . . . . . . . . . . . . . . . . . 58
Renaming, Deleting, Copying, Merging, Purging & Converting Programs . 60
Configuring Program MIDI Options . . . . . . . . . . . . . . . . . . . . . . . . . . . . . . . 61
Configuring Pitch Bend. . . . . . . . . . . . . . . . . . . . . . . . . . . . . . . . . . . . . . . . . 62
Configuring the LFOs . . . . . . . . . . . . . . . . . . . . . . . . . . . . . . . . . . . . . . . . . . 63
Configuring the Filters . . . . . . . . . . . . . . . . . . . . . . . . . . . . . . . . . . . . . . . . . 64
Configuring the Amp, Filter & Aux Envelopes . . . . . . . . . . . . . . . . . . . . . . . 65
8 Using Multis. . . . . . . . . . . . . . . . . . . . . . . . . . . . . . . . . . . . . . 67
About Multi Mode. . . . . . . . . . . . . . . . . . . . . . . . . . . . . . . . . . . . . . . . . . . . . 67 Selecting Multis . . . . . . . . . . . . . . . . . . . . . . . . . . . . . . . . . . . . . . . . . . . . . . 67 Creating Multis . . . . . . . . . . . . . . . . . . . . . . . . . . . . . . . . . . . . . . . . . . . . . . . 68 Assigning Programs to Parts . . . . . . . . . . . . . . . . . . . . . . . . . . . . . . . . . . . . . 69 Filtering MIDI Data . . . . . . . . . . . . . . . . . . . . . . . . . . . . . . . . . . . . . . . . . . . 71 Applying FX to Parts . . . . . . . . . . . . . . . . . . . . . . . . . . . . . . . . . . . . . . . . . . 72 Copying Multis . . . . . . . . . . . . . . . . . . . . . . . . . . . . . . . . . . . . . . . . . . . . . . . 72 Deleting Multis . . . . . . . . . . . . . . . . . . . . . . . . . . . . . . . . . . . . . . . . . . . . . . . 73 Playing Songs . . . . . . . . . . . . . . . . . . . . . . . . . . . . . . . . . . . . . . . . . . . . . . . . 74
9 Using Q-Link . . . . . . . . . . . . . . . . . . . . . . . . . . . . . . . . . . . . . 75
About Q-Link . . . . . . . . . . . . . . . . . . . . . . . . . . . . . . . . . . . . . . . . . . . . . . . . 75
Configuring Q-Link. . . . . . . . . . . . . . . . . . . . . . . . . . . . . . . . . . . . . . . . . . . . 75
10 Using FX . . . . . . . . . . . . . . . . . . . . . . . . . . . . . . . . . . . . . . . 78
About the FX. . . . . . . . . . . . . . . . . . . . . . . . . . . . . . . . . . . . . . . . . . . . . . . . . 78
Configuring FX Inputs . . . . . . . . . . . . . . . . . . . . . . . . . . . . . . . . . . . . . . . . . 78
Configuring FX Outputs . . . . . . . . . . . . . . . . . . . . . . . . . . . . . . . . . . . . . . . . 79
Selecting FX Types . . . . . . . . . . . . . . . . . . . . . . . . . . . . . . . . . . . . . . . . . . . . 79
Linking FX . . . . . . . . . . . . . . . . . . . . . . . . . . . . . . . . . . . . . . . . . . . . . . . . . . 80
Setting the FX Level . . . . . . . . . . . . . . . . . . . . . . . . . . . . . . . . . . . . . . . . . . . 81
Editing FX . . . . . . . . . . . . . . . . . . . . . . . . . . . . . . . . . . . . . . . . . . . . . . . . . . . 81
FX Types . . . . . . . . . . . . . . . . . . . . . . . . . . . . . . . . . . . . . . . . . . . . . . . . . . . . 82
Z4/Z8 User Guide—Version 1.0

vii Contents
11 Saving. . . . . . . . . . . . . . . . . . . . . . . . . . . . . . . . . . . . . . . . . 84
Saving . . . . . . . . . . . . . . . . . . . . . . . . . . . . . . . . . . . . . . . . . . . . . . . . . . . . . . 84
12 Disk & File Utilities . . . . . . . . . . . . . . . . . . . . . . . . . . . . . . . |
87 |
Deleting Files & Folders . . . . . . . . . . . . . . . . . . . . . . . . . . . . . . . . . . . . . . . . 87
Formatting Disks . . . . . . . . . . . . . . . . . . . . . . . . . . . . . . . . . . . . . . . . . . . . . . 88
13 General Utilities . . . . . . . . . . . . . . . . . . . . . . . . . . . . . . . . . 89
Setting the Master Level, Tuning, SCSI ID & MIDI OUT/THRU . . . . . . . . 89 Setting the Display Contrast, Note Display, Date & Time . . . . . . . . . . . . . . 89 Setting the System Clock & Digital Out Sync . . . . . . . . . . . . . . . . . . . . . . . 90 Monitoring MIDI Activity . . . . . . . . . . . . . . . . . . . . . . . . . . . . . . . . . . . . . . . 91 Initializing the Z8 . . . . . . . . . . . . . . . . . . . . . . . . . . . . . . . . . . . . . . . . . . . . . 91 Erasing Entire Memory . . . . . . . . . . . . . . . . . . . . . . . . . . . . . . . . . . . . . . . . . 92 Testing Memory. . . . . . . . . . . . . . . . . . . . . . . . . . . . . . . . . . . . . . . . . . . . . . . 92 Defragmenting the Memory Space . . . . . . . . . . . . . . . . . . . . . . . . . . . . . . . . 92
Appendix . . . . . . . . . . . . . . . . . . . . . . . . . . . . . . . . . . . . . . . . |
93 |
Specifications. . . . . . . . . . . . . . . . . . . . . . . . . . . . . . . . . . . . . . . . . . . . . . . . . 93
Index . . . . . . . . . . . . . . . . . . . . . . . . . . . . . . . . . . . . . . . . . . . . 94
Z4/Z8 User Guide—Version 1.0

Introduction 1
1 Introduction
Thank you for choosing an AKAI Professional sampler.
This User Guide uses the model name “Z8” to cover both the AKAI Professional Z8 and Z4. Unless otherwise stated, information applies to both models.
Features
•Removable front panel allows remote operation (Z8 only)
•WAV support provides compatibility with numerous sound libraries
•Assignable Q-Link controls for real-time Program and FX control
•Versatile sample editing includes Loop, Time Stretch, Pitch Shift, Normalize, Join, Fade, Delete Section, Reverse, and Tempo Match, etc.
•64-voice polyphonic, 128-part multitimbral (32-voice polyphonic with the system clock set to 96kHz)
•Drum-type Programs specifically for use with drum and phrase Samples
•Playback SMF (Standard MIDI File) songs in Multi mode
•192 two-pole resonant filters, up to three simultaneous filters per voice, 35 filter types by combination of three filters
•Two independent LFOs
•4 multi-effects processors (Z4 requires EB4JS option)
•Sample and resample with FX (QuickFX)
•Supports 16/24-bit, 44.1/48/96 kHz sampling (32-voice polyphonic with the system clock set to 96kHz)
•24-bit/96 kHz ADC/DAC, with Enhanced Dual Bit 64-times oversampling ADC and Advanced Multi-bit 128-times oversampling DAC
•Balanced analog I/O
•S/PDIF format digital I/O (Z4 requires IB-4D option)
•Built-in sample rate converters enable you to input and output digital signals easily without considering the difference in sampling rates between the devices. (Q-Link Digital Connection)
•Wordclock input for synchronizing the digital output signals to external devices
•Memory expandable up to 512 MB
•32-channel multi-port MIDI interface (MIDI IN x2, OUT/THRU x2)
•SCSI port for connecting hard disks and removable media drives
•USB slave port for connecting a Mac/PC running the AKAI Professional ak.Sys software
•USB master port for connecting USB floppy disk drives, hard disks, removable media drives, or a USB keyboard for quick name entry
•Internal 3.5-inch drive bay for ATA hard disk or removable media drive
•Supports DOS FAT16/FAT32 disk formats for PC compatibility
•Hierarchical filing system uses folders to organize files
•Flash ROM programmable operating system
•Optional 2-in/8-out ADAT board (IB-4ADT)
•Optional 8 individual analog output board (IB-48P)
Note: An optional ADAT card (IB-4ADT) and an Individual Analog Output card (IB-4P) cannot be installed at the same time.
Z4/Z8 User Guide—Version 1.0
2 Chapter 1—Introduction
Note: The Z8 Samplers contain no user serviceable parts. Please consult your AKAI Professional dealer regarding the installation of options and upgrades.
Architecture
This chapter explains how sounds are constructed in the Z8 and the hierarchic relationship between Samples, Programs, and Multis, in which Samples, the sound building blocks, are assigned to Programs, and Programs are assigned to Multis. It also introduces many of the terms used throughout this User Guide.
Samples
Samples are the sound building blocks used to create Programs and Multis. Samples can be recorded in Record mode, or loaded from disk. See “Recording Samples” on page 22 for more information on recording samples. Also, see “Loading” on page 18 for more information on loading samples from disk.
Samples can be edited in Sample mode. See “Editing Samples” on page 29 for more information.
Programs
A Program is, by analogy, a musical instrument, and consists of one or multiple samples that have been processed via filter, envelope, LFO, and other parameters. It could be a piano sound made of few samples that cover different ranges from high to low. Or, it could be a drum kit containing a snare, bass drum, and cymbal samples. There are two types of Programs: Keygroup and Drum. You can use these types to create different sounds.
Keygroup Programs consist of one or multiple Keygroups, which is somewhat like containers of Samples. In Keygroups, a Sample can be assigned to a group of adjacent notes, called a Keyspan. You can also specify the range of a Keyspan. Keygroup Programs are often used for sounds that are played in scales on a keyboard, such as a piano. You can assign up to four Samples to a Keygroup, and play multiple Samples simultaneously, or play different Samples by changing the velocity (how hard you play the keys) (Zone function).
Each Keygroup features various editing parameters, such as a filter and an envelope, which enable you to make detailed adjustments to the sounds.
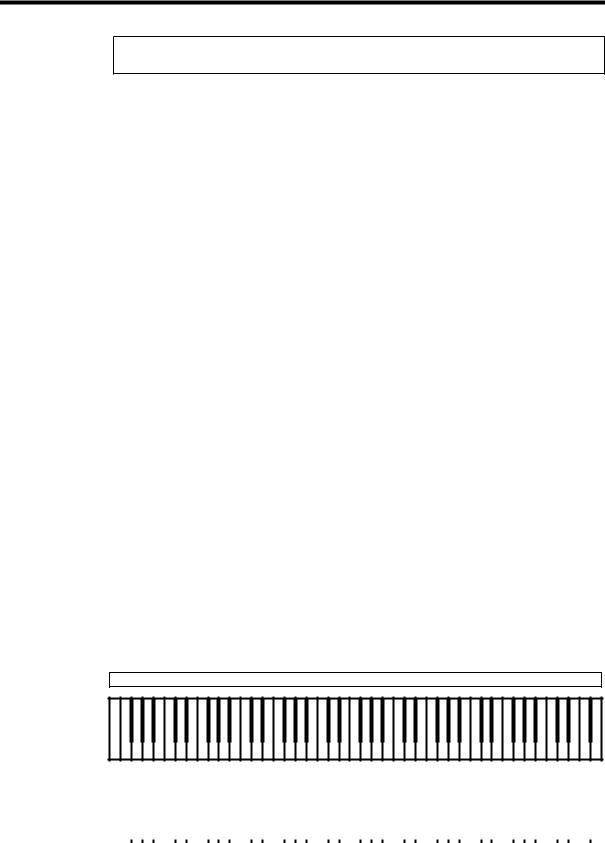
The following example illustrates the most basic Program configuration, with one Sample assigned to one Keygroup and a Keyspan that covers the entire keyboard.
Keygroup 1/Zone 1: Samp 1
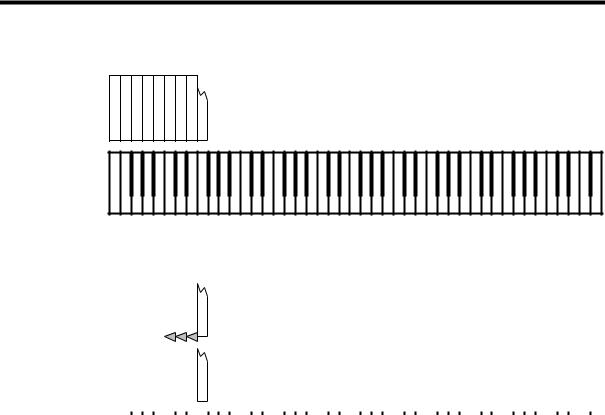
The following Program consists of four Keygroups, each with its own Keyspan, and one Sample assigned to each Keygroup.
|
KG1/ZN1: Samp1 |
|
KG2/ZN1: Samp2 |
|
|
|
|
KG3/ZN1: Samp3 |
|
|
|
KG4/ZN1: Samp4 |
||||||||||||||||||||||||||||||||||||||||||||||||||||||||||||
|
|
|
|
|
|
|
|
|
|
|
|
|
|
|
|
|
|
|
|
|
|
|
|
|
|
|
|
|
|
|
|
|
|
|
|
|
|
|
|
|
|
|
|
|
|
|
|
|
|
|
|
|
|
|
|
|
|
|
|
|
|
|
|
|
|
|
|
|
|
|
|
|
|
|
|
|
|
|
|
|
|
|
|
|
|
|
|
|
|
|
|
|
|
|
|
|
|
|
|
|
|
|
|
|
|
|
|
|
|
|
|
|
|
|
|
|
|
|
|
|
|
|
|
|
|
|
|
|
|
|
|
|
|
|
|
|
|
|
|
|
|
|
|
|
|
|
|
|
|
|
|
|
|
|
|
|
|
|
|
|
|
|
|
|
|
|
|
|
|
|
|
|
|
|
|
|
|
|
|
|
|
|
|
|
|
|
|
|
|
|
|
|
|
|
|
|
|
|
|
|
|
|
|
|
|
|
|
|
|
|
|
|
|
|
|
|
|
|
Z4/Z8 User Guide—Version 1.0
Architecture 3
The following Program consists of two Keygroups with overlapping Keyspans. Crossfade can be applied to the overlapping parts.
|
|
|
|
|
|
|
KG1/ZN1: Samp 1 |
|
|
|
|
|
|
|
|
|
|
|
|
|
|
|
|
KG2/ZN1: Samp 2 |
|||||||||||||||||||||||||||||||||||||||||||||||||||
|
|
|
|
|
|
|
|
|
|
|
|
|
|
|
|
|
|
|
|
|
|
|
|
|
|
|
|
|
|
|
|
|
|
|
|
|
|
|
|
|
|
|
|
|
|
|
|
|
|
|
|
|
|
|
|
|
|
|
|
|
|
|
|
|
|
|
|
|
|
|
|
|
|
|
|
|
|
|
|
|
|
|
|
|
|
|
|
|
|
|
|
|
|
|
|
|
|
|
|
|
|
|
|
|
|
|
|
|
|
|
|
|
|
|
|
|
|
|
|
|
|
|
|
|
|
|
|
|
|
|
|
|
|
|
|
|
|
|
|
|
|
|
|
|
|
|
|
|
|
|
|
|
|
|
|
|
|
|
|
|
|
|
|
|
|
|
|
|
|
|
|
|
|
|
|
|
|
|
|
|
|
|
|
|
|
|
|
|
|
|
|
|
|
|
|
|
|
|
|
|
|
|
|
|
|
|
|
|
|
|
|
|
|
|
|
|
|
|
|
|
|
|
|
|
|
|
|
The following Program consists of three Keygroups: one that spans the entire keyboard, and two with overlapping Keyspans and a crossfade.
KG3/ZN1: Samp 3
|
|
|
|
|
|
|
KG1/ZN1: Samp 1 |
|
|
|
|
|
|
|
|
|
|
|
|
|
|
|
|
KG2/ZN1: Samp 2 |
|||||||||||||||||||||||||||||||||||||||||||||||||||
|
|
|
|
|
|
|
|
|
|
|
|
|
|
|
|
|
|
|
|
|
|
|
|
|
|
|
|
|
|
|
|
|
|
|
|
|
|
|
|
|
|
|
|
|
|
|
|
|
|
|
|
|
|
|
|
|
|
|
|
|
|
|
|
|
|
|
|
|
|
|
|
|
|
|
|
|
|
|
|
|
|
|
|
|
|
|
|
|
|
|
|
|
|
|
|
|
|
|
|
|
|
|
|
|
|
|
|
|
|
|
|
|
|
|
|
|
|
|
|
|
|
|
|
|
|
|
|
|
|
|
|
|
|
|
|
|
|
|
|
|
|
|
|
|
|
|
|
|
|
|
|
|
|
|
|
|
|
|
|
|
|
|
|
|
|
|
|
|
|
|
|
|
|
|
|
|
|
|
|
|
|
|
|
|
|
|
|
|
|
|
|
|
|
|
|
|
|
|
|
|
|
|
|
|
|
|
|
|
|
|
|
|
|
|
|
|
|
|
|
|
|
|
|
|
|
|
|
The following Program consists of two Keygroups. One Sample is assigned to each of four Zones within each Keygroup. via the Zone function.
|
|
|
|
|
|
|
KG1/ZN4: Samp 7 |
|
|
|
|
|
|
|
|
|
|
|
|
|
|
|
|
KG2/ZN4: Samp 8 |
|||||||||||||||||||||||||||||||||||||||||||||||||||
|
|
|
|
|
|
|
KG1/ZN3: Samp 5 |
|
|
|
|
|
|
|
|
|
|
|
|
|
|
|
|
KG2/ZN3: Samp 6 |
|||||||||||||||||||||||||||||||||||||||||||||||||||
|
|
|
|
|
|
|
KG1/ZN2: Samp 3 |
|
|
|
|
|
|
|
|
|
|
|
|
|
|
|
|
KG2/ZN2: Samp 4 |
|||||||||||||||||||||||||||||||||||||||||||||||||||
|
|
|
|
|
|
|
KG1/ZN1: Samp 1 |
|
|
|
|
|
|
|
|
|
|
|
|
|
|
|
|
KG2/ZN1: Samp 2 |
|||||||||||||||||||||||||||||||||||||||||||||||||||
|
|
|
|
|
|
|
|
|
|
|
|
|
|
|
|
|
|
|
|
|
|
|
|
|
|
|
|
|
|
|
|
|
|
|
|
|
|
|
|
|
|
|
|
|
|
|
|
|
|
|
|
|
|
|
|
|
|
|
|
|
|
|
|
|
|
|
|
|
|
|
|
|
|
|
|
|
|
|
|
|
|
|
|
|
|
|
|
|
|
|
|
|
|
|
|
|
|
|
|
|
|
|
|
|
|
|
|
|
|
|
|
|
|
|
|
|
|
|
|
|
|
|
|
|
|
|
|
|
|
|
|
|
|
|
|
|
|
|
|
|
|
|
|
|
|
|
|
|
|
|
|
|
|
|
|
|
|
|
|
|
|
|
|
|
|
|
|
|
|
|
|
|
|
|
|
|
|
|
|
|
|
|
|
|
|
|
|
|
|
|
|
|
|
|
|
|
|
|
|
|
|
|
|
|
|
|
|
|
|
|
|
|
|
|
|
|
|
|
|
|
|
|
|
|
|
|
|
The following Program consists of three Keygroups: one that spans the entire keyboard with three Samples assigned, and two overlapping Keygroups with four Samples assigned.
|
|
|
|
|
|
|
|
|
|
|
|
|
|
|
|
|
|
|
|
|
|
|
|
|
|
|
|
|
|
|
KG3/ZN3: Samp 11 |
||||||||||||||||||||||||||||||||||||||||||||
|
|
|
|
|
|
|
|
|
|
|
|
|
|
|
|
|
|
|
|
|
|
|
|
|
|
|
|
|
|
|
KG3/ZN2: Samp 10 |
||||||||||||||||||||||||||||||||||||||||||||
|
|
|
|
|
|
|
|
|
|
|
|
|
|
|
|
|
|
|
|
|
|
|
|
|
|
|
|
|
|
|
KG3/ZN1: Samp 9 |
||||||||||||||||||||||||||||||||||||||||||||
|
|
|
|
|
|
|
KG1/ZN4: Samp 7 |
|
|
|
|
|
|
|
|
|
|
|
|
|
|
|
|
KG2/ZN4: Samp 8 |
|||||||||||||||||||||||||||||||||||||||||||||||||||
|
|
|
|
|
|
|
KG1/ZN3: Samp 5 |
|
|
|
|
|
|
|
|
|
|
|
|
|
|
|
|
KG2/ZN3: Samp 6 |
|||||||||||||||||||||||||||||||||||||||||||||||||||
|
|
|
|
|
|
|
KG1/ZN2: Samp 3 |
|
|
|
|
|
|
|
|
|
|
|
|
|
|
|
|
KG2/ZN2: Samp 4 |
|||||||||||||||||||||||||||||||||||||||||||||||||||
|
|
|
|
|
|
|
KG1/ZN1: Samp 1 |
|
|
|
|
|
|
|
|
|
|
|
|
|
|
|
|
KG2/ZN1: Samp 2 |
|||||||||||||||||||||||||||||||||||||||||||||||||||
|
|
|
|
|
|
|
|
|
|
|
|
|
|
|
|
|
|
|
|
|
|
|
|
|
|
|
|
|
|
|
|
|
|
|
|
|
|
|
|
|
|
|
|
|
|
|
|
|
|
|
|
|
|
|
|
|
|
|
|
|
|
|
|
|
|
|
|
|
|
|
|
|
|
|
|
|
|
|
|
|
|
|
|
|
|
|
|
|
|
|
|
|
|
|
|
|
|
|
|
|
|
|
|
|
|
|
|
|
|
|
|
|
|
|
|
|
|
|
|
|
|
|
|
|
|
|
|
|
|
|
|
|
|
|
|
|
|
|
|
|
|
|
|
|
|
|
|
|
|
|
|
|
|
|
|
|
|
|
|
|
|
|
|
|
|
|
|
|
|
|
|
|
|
|
|
|
|
|
|
|
|
|
|
|
|
|
|
|
|
|
|
|
|
|
|
|
|
|
|
|
|
|
|
|
|
|
|
|
|
|
|
|
|
|
|
|
|
|
|
|
|
|
|
|
|
|
|
Drum Programs are intended for use with drum and phrase Samples. The main difference from Keygroup Programs is that each drum Sample is assigned to a single note number instead of a Keygroup. Drum Programs are not used to play different tunes (in scales) on the keyboard, unlike Keygroup Programs. Rather, they are useful when you want the different notes to play different sounds, such as drum and phrase Samples. Otherwise, Drum Programs are almost identical to Keygroup Programs.
Z4/Z8 User Guide—Version 1.0
4 Chapter 1—Introduction
The following example illustrates a basic Drum Program, with one Sample assigned to each note.
Zone 1:
Zone 1: Tom3
Zone 1: Tom2
Zone 1: Tom1
Zone 1: C.Hat
Zone 1: O.Hat
Zone 1: Snar
Zone 1: Kick2
Zone 1: Kick1
The following Drum Program uses Zones #1 and #2 to layer drum Samples, with velocity crossfades on certain notes.
Zone 2: Thud |
Zone 2: Boom |
Zone 2: Clap |
Zone 2: Tish |
Zone 2: Click |
Zone 2: Tom4 |
Zone 2: Tom5 |
Zone 2: Tom6 |
Zone 2: |
||||||||||||||||||||||||||||||||||||||||||||||||||||||||||||||
|
|
|
|
|
|
|
|
|
|
|
|
|
|
|
|
|||||||||||||||||||||||||||||||||||||||||||||||||||||||
Zone 1: Kick1 |
Zone 1: Kick2 |
Zone 1: Snar |
Zone 1: O.Hat |
Zone 1: C.Hat |
Zone 1: Tom1 |
Zone 1: Tom2 |
Zone 1: Tom3 |
Zone 1: |
||||||||||||||||||||||||||||||||||||||||||||||||||||||||||||||
|
|
|
|
|
|
|
|
|
|
|
|
|
|
|
|
|
|
|
|
|
|
|
|
|
|
|
|
|
|
|
|
|
|
|
|
|
|
|
|
|
|
|
|
|
|
|
|
|
|
|
|
|
|
|
|
|
|
|
|
|
|
|
|
|
|
|
|
|
|
|
|
|
|
|
|
|
|
|
|
|
|
|
|
|
|
|
|
|
|
|
|
|
|
|
|
|
|
|
|
|
|
|
|
|
|
|
|
|
|
|
|
|
|
|
|
|
|
|
|
|
|
|
|
|
|
|
|
|
|
|
|
|
|
|
|
|
|
|
|
|
|
|
|
|
|
|
|
|
|
|
|
|
|
|
|
|
|
|
|
|
|
|
|
|
|
|
|
|
|
|
|
|
|
|
|
|
|
|
|
|
|
|
|
|
|
|
|
|
|
|
|
|
|
|
|
|
|
|
|
|
|
|
|
|
|
|
|
|
|
|
|
|
|
|
|
|
|
|
|
|
|
|
|
|
|
|
|
|
|
|
|
|
|
|
|
|
|
|
|
|
|
|
|
|
|
|
|
|
|
|
|
|
|
|
|
|
|
|
|
|
|
|
|
|
|
|
|
|
|
|
|
|
|
|
|
|
|
|
|
|
|
|
|
Each Keygroup of the Keygroup Programs and each note of the Drum Programs have independent parameters that include basic parameters, such as level, pan, tuning, etc. Combining these parameters with the Z8’s filters, envelope shapers, and LFOs enables you to perform advanced sound editing.
See “Using Programs” on page 48 for detailed information on creating and editing Programs.
Z4/Z8 User Guide—Version 1.0

Architecture 5
Multis
To play Programs, you need to make various settings in Multis. A Multi is constructed from one or multiple Parts. Each Part provides independent level, pan, MIDI Channel, and other settings required for playing the Z8 via MIDI keyboards or external MIDI devices. You can play Programs when they are assigned to Parts. You can use MIDI Program Change messages to select Programs for Parts inside a Multi, and to select a Multi as a voice or sound from several Multis.
When you use Multis, you can use the Q-Link controls to adjust tonal color in real time. See “Using Q-Link” on page 75 for more information.
FX
The Z8 features four 24-bit/96 kHz multi-effects processors (Z4 requires EB4JS option), offering a whole host of FX types, including reverbs, delays, modulation-based FX, dynamics, wah-wah, and pitch shifting. FX can be applied while sampling (see page 27), re-sampling (see page 38), or in Multi mode. In addition to the various FX types, Quick-FX presets such as Power, Swell, and Crisp provide an intuitive way to apply FX. See “Using FX” on page 78 for information on selecting and editing FX types.
When you use Multis, you can adjust FX parameters via the Q-Link control in real time. See “Using Q-Link” on page 75 for more information.
Loading
Samples, Programs, Multis, Songs, and files can be loaded from hard disks and CD-ROMs. Files can be loaded individually or in groups. See “Loading” on page 18 for more information.
Saving
Individual Samples, Programs, Multis, Songs, and files can be saved to hard disks and removable media drives. Loaded data, recorded Samples, created or edited Programs and Multis are temporarily kept in the memory of the Z8. When the power to the Z8 is turned off, the data in memory will be lost. Be sure to save important data to hard disks or external storage devices. You can load the data saved on an external storage device in Load mode. See “Saving” on page 84 for more information.
Z4/Z8 User Guide—Version 1.0

6 Chapter 2—Front & Rear Panels
2 Front & Rear Panels
Front Panel
|
Z8 Front Panel |
|
|
|
|
1 |
2 |
34 56 |
7 |
8 90A |
B |
|
D E F GH IJ |
|
|
|
|
|
|
|
|
|
|
|
|
|
|
|
|
|
|
|
|
|
|
|
|
|
|
|
|
|
|
|
|
|
|
C |
K |
L M N OP |
||||||
|
Z4 Front Panel |
|
|
|
|
|
|
|
1 |
2 34 56 |
7 |
|
0 A B |
||||
|
|
|
|
|
|
|
|
|
|
|
|
|
|
|
|
|
|
|
|
|
|
|
|
|
|
|
|
|
|
|
|
|
|
|
|
|
|
|
|
|
|
|
|
|
|
|
|
|
|
|
|
|
|
C Q D E F GH IJ |
K |
L 8 M 9 OP |
1POWER switch
This switch is used to turn on and off the power to the Z8. See “Switching On & Off” on page 13 for more information.
2Q-LINK controls
Up to eight parameters (four on the Z4) can be assigned to these controls for real-time control. See “Using Q-Link” on page 75 for more information.
3SAMPLE button & indicator
Pressing this button selects Sample Edit mode, which is used to edit Samples. The SAMPLE button indicator lights up when this mode is selected. See “Editing Samples” on page 29 for more information.
Z4/Z8 User Guide—Version 1.0
Front Panel |
7 |
4MULTI button & indicator
Pressing this button selects Multi mode, in which Multis can be selected, edited, and played. The MULTI button indicator lights up when this mode is selected. This mode is typically used when the Z8 is connected to a MIDI keyboard or MIDI sequencer. Standard MIDI Files (SMF) can also be played in this mode. See “Using Multis” on page 67 for more information.
5FX button & indicator
Pressing this button selects FX mode, which is used to select and edit the four independent FX processors (optional on the Z4). The FX button indicator lights up when this mode is selected. See “Using FX” on page 78 for more information.
6PROGRAM button & indicator
Pressing this button selects Program mode, in which Programs can be selected, edited, and played. See “Using Programs” on page 48 for more information.
7Display
This back-lit 248 by 60 dot LCD (liquid crystal display), together with the illuminated panel buttons, displays the current operating state of the Z8. See “Navigating the User Interface” on page 14 for more information.
8MIDI A activity indicator
This indicator lights up when MIDI data is received at the MIDI IN A port.
9MIDI B activity indicator
This indicator lights up when MIDI data is received at the MIDI IN B port.
10CURSOR buttons
These buttons are used to select items (parameter) on the display pages. See “Navigating the User Interface” on page 14 for more information.
11JOG dial
This dial is used to increment or decrement parameter values. Rotating it clockwise increases values; rotating it counterclockwise decreases them. See “Navigating the User Interface” on page 14 for more information.
12MAIN VOLUME control
This control is used to set the volume of the MAIN OUT and PHONES.
13USB port (Host)
Various USB (Universal Serial Bus) devices can be connected here, including floppy disk drives, hard disk drives, CD-ROM, and removable media drives for additional storage, or USB keyboards for quick name entry. See “Connecting USB Devices” on page 12 for more information.
14Q-LINK SETUP button
This button selects the Q-LINK SETUP page, which is used to assign parameters to the Q-Link controls. See “Using Q-Link” on page 75 for more information.
15CLIPBOARD button
The Clipboard can be used as a temporary store while editing Samples, Programs, or Multis, allowing A/B comparisons. See “Using the Clipboard” on page 16 for more information.
16PLAY button
Pressing the PLAY button plays the currently selected Sample or Program. See “Using the PLAY Button” on page 15 for more information.
17RECORD button & indicator
Pressing this button selects Record mode, which will light up its indicator. This mode is for sampling sounds. See “Recording Samples” on page 22 for more information.
Z4/Z8 User Guide—Version 1.0

8 Chapter 2—Front & Rear Panels
18SAVE button & indicator
Pressing this button selects Save mode, which is used to save Samples, Programs, Multis, Songs, and files. The SAVE button indicator lights up when this mode is selected. See “Saving” on page 84 for more information.
19LOAD button & indicator
Pressing this button selects Load mode, which is used to load Samples, Programs, Multis, Songs, and files. The LOAD button indicator lights up when this mode is selected. See “Loading” on page 18 for more information.
20UTILITIES button & indicator
Pressing this button selects Utilities mode, which contains various global functions. See “General Utilities” on page 89 for more information.
21Function buttons F1 to F6
The functions of these buttons change depending on the selected display page. Each button corresponds to a function on the display. See “Navigating the User Interface” on page 14 for more information.
22WINDOW button
The WINDOW button is used to open and close display windows. See “Navigating the User Interface” on page 14 for more information.
23SHIFT button
This button is used as a short cut to special functions, in conjunction with other buttons.
24Removable Panel release button (Z8 only)
Pressing this button releases the Removable Panel for remote operation of the unit. Removing this panel also allows access to the 3.5" drive bay. See “Detaching the Removable Panel (Z8 only)” on page 13 for more information.
25PHONES jack
This 1/4-inch (6.3 mm) stereo phone jack outputs the headphone signal, which is the same as the MAIN OUT signal.
26REC GAIN control
This control is used to set the recording level. See “Sampling” on page 22 for more information.
27Front Panel 3.5" Drive Bay (Z4 only)
This 3.5" Drive Bay is a mounting for additional storage devices.
Z4/Z8 User Guide—Version 1.0

Rear Panel |
9 |
View of 3.5" Drive Bay (Z8 only)
Removable panel connection
|
|
|
|
|
|
|
|
|
|
|
|
|
|
|
|
|
|
|
|
|
|
|
|
|
|
|
|
|
|
|
|
|
|
|
|
|
|
|
|
|
|
|
|
|
|
|
|
|
|
|
|
|
|
|
|
|
|
|
|
|
|
|
|
|
|
|
|
|
|
|
|
|
|
|
|
|
|
|
|
|
|
3.5" drive bay |
Removable Panel contacts |
||||||
To protect the Removable Panel contacts against corrosion, and to avoid accidentally shorting them, always fit the supplied Contact Cover when the Removable Panel is detached.
Rear Panel
1 |
2 |
34 |
5 |
|||||||||||
|
|
|
|
|
|
|
|
|
|
|
|
|
|
|
|
|
|
|
|
|
|
|
|
|
|
|
|
|
|
|
|
|
|
|
|
|
|
|
|
|
|
|
|
|
6 7 8 |
9 0 A |
B |
1Option slot
This slot is for installing optional interface cards.
2DIGITAL I/O IN (optional on Z4)
This phono connector is used to input S/PDIF format digital audio signals, typically from CD players, DAT decks, or any audio device with S/PDIF format digital I/O. See “Sampling” on page 22 for more information.
3DIGITAL I/O OUT (optional on Z4)
This phono connector is used to output the MAIN OUT signals as S/PDIF format digital audio.
4WORDCLOCK IN (optional on Z4)
This BNC connector is used to receive external wordclock signals.
5Wordclock TERMINATOR switch (optional on Z4)
This switch is used to terminate the external wordclock signal connected to the WORDCLOCK IN.
Z4/Z8 User Guide—Version 1.0

10 Chapter 2—Front & Rear Panels
6MAIN OUT
These two 1/4-inch balanced phone jacks are the main analog audio outputs. They are wired as follows: tip = hot, ring = cold, sleeve = ground.
7REC IN
These two 1/4-inch balanced phone jacks are used to input analog audio signals and are wired as follows: tip = hot, ring = cold, sleeve = ground. See “Sampling” on page 22 for more information.
8MIDI IN x 2
The Z8’s two MIDI IN ports support 32 MIDI channels, referred to as 1A to 16A (MIDI IN A) and 1B to 16B (MIDI IN B). See “Assigning Programs to Parts” on page 69 for more information.
9MIDI OUT/THRU x 2
These MIDI ports transmit MIDI data received at the respective MIDI IN port (A or B). MIDI Song data can also be transmitted. See “General Utilities” on page 89 for more information.
10USB port (Slave)
This USB port is used to connect the Z8 to a PC or Mac for use with AKAI professional Akai ak.Sys software, which allows file transfer between the Z8 and the computer, and remote editing of Programs and Multis. See “Connecting USB Devices” on page 12 for more information.
11SCSI port
This is a 50-way SCSI connector that supports the SCSI standard. It can be used to connect additional storage devices, including hard disk, CD-ROM drives, and removable media drives. See “Connecting SCSI Devices” on page 12 for more information.
12AC inlet
The supplied AC power cord is connected here. See “Getting Started” on page 11 for more information.
Z4/Z8 User Guide—Version 1.0

Getting Started |
11 |
3 Getting Started
This chapter explains how to get the Z8 up and running, including connecting, switching on, navigating the user interface, and some operating basics.
Installation
If the Z8 is rack mounted, 5 cm of space should be left above and below it to provide adequate ventilation. Do not mount the Z8 directly above equipment that produces a lot of heat, such as a power amplifier. If the Z8 is to be free standing, ensure that it is placed on a sturdy, level surface, and that its ventilation grilles are not obstructed.
Hookup Example
Microphone |
Synthesizer |
|
CD player |
||
|
MIDI keyboard
MIDI sequencer
MIDI OUT |
|
MIDI IN |
||||||||
|
|
|
|
|
|
|
|
|
|
|
|
|
|
|
|
|
|
|
|
|
|
|
|
|
|
|
|
|
|
|
|
|
MIDI OUT
Z8 (rear panel)
Mixer Headphones


 To AC outlet
Monitors
Amplifier
Z4/Z8 User Guide—Version 1.0
12 Chapter 3—Getting Started
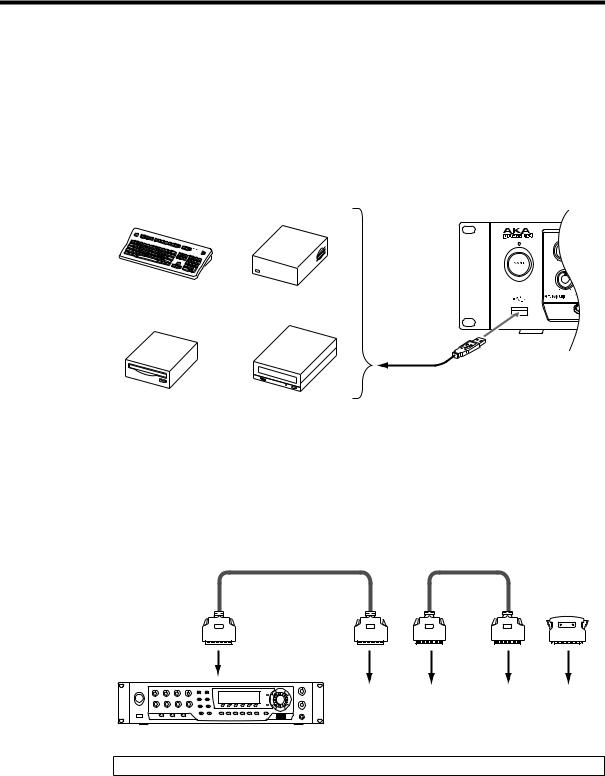
Connecting USB Devices
There are two USB ports on the Z8. The rear panel (slave) port is for connection to a PC or Mac equipped with a USB port, for remote operation of the Z8 using Akai professional ak.Sys software. The front panel (host) port is for connecting USB storage devices, such as floppy disk drives, hard disks, CD-ROM drives, and removable media drives. A USB keyboard can also be connected for quick name entry.
The USB ports are “hot-pluggable,” which means devices can be connected or disconnected even while the Z8 is on. Supported devices are recognized automatically. If a device is not supported, the Z8 simply ignores it.
USB Keyboard |
USB Hard disk |
|
|
|
|
USB Floppy disk drive |
USB CD-ROM drive |
USB cable
Connecting SCSI Devices
The Z8 features a SCSI port on the rear panel for connecting SCSI storage devices, including hard disks and removable media drives.
The Z8 and your SCSI devices must be switched off before they are connected. Up to seven SCSI devices, each with its own unique SCSI ID, can be connected to the Z8. The last device on the bus must be terminated correctly. See your SCSI device’s manual for details.
SCSI terminator
SCSI connector
SCSI device 1 |
|
SCSI device 2 |
|
|
|
(SCSI ID: 0) |
|
(SCSI ID: 1) |
(Default SCSI ID: 6)
Note: Never assign an external SCSI device to the same SCSI ID as that of the Z8.
See page 89 for information on setting the Z8 SCSI ID (The factory default ID number is “6”). Occasionally, depending on the type and number of SCSI devices connected to the bus, you may find that errors occur when trying to access devices, or there are problems operating the Z8. In this case, try the following:
•Ensure that no two devices have the same SCSI ID.
•Disconnect or disable the terminator, or change the order of the connected devices.
•Check the SCSI cables. Use the highest quality shielded cables you can find, and choose the shortest practical length.
For information on the drives that can be used with the Z8, please contact your Akai dealer or Akai Professional M.I. Service Department.
Z4/Z8 User Guide—Version 1.0
Detaching the Removable Panel (Z8 only) |
13 |
Detaching the Removable Panel (Z8 only)
The Z8 features a Removable Panel for remote operation.
Note: Do not attach or detach the Removable Panel while the Z8 is on.
1While pressing the release button, push the Removable Panel to the right in order to release it from the main unit.
2Connect the supplied connecting cable between the removable panel and the Z8, as shown below.
|
|
|
|
|
MAIN VOLUME |
POWER |
|
|
|
|
REC GAIN |
|
|
|
|
|
PHONES |
Q1 |
Q2 |
Q3 |
Q4 |
FX |
CURSOR |
|
|
|
MULTI |
SAMPLER |
JOG
MIDI A
SAMPLE PROGRAM
Q5 |
Q6 |
Q7 |
Q8 |
RECORD UTILITIES
F1 |
F2 |
F3 |
F4 |
F5 |
F6 |
MIDI B |
Connecting
cable
|
|
|
|
|
|
|
|
|
|
|
|
PUSH |
TO MAIN UNIT |
CLIPBOARD |
PLAY |
SAVE |
LOAD |
F1 |
F2 |
F3 |
F4 |
F 5 |
F 6 |
WINDOW |
EJECT |
|
SHIFT
Before reattaching the Removable Panel, switch off the Z8, and disconnect the connecting cable. Fit the Removable Panel into the recessed bay of the main unit and push it to the left until it locks into place.
Note: To avoid accidentally shorting the contact pins on the main unit, always fit the supplied Contact Cover when the Removable Panel is detached.
Connecting the Power Cord
Connect the supplied power cord to the AC inlet socket on the rear panel of the Z8, and connect the other end to a suitable AC wall outlet that conforms to the power requirements stated on the Z8 rear panel.
Switching On & Off
To help protect your loudspeakers (and your hearing) from switch-on clicks and thumps, switch on the Z8 and any other sound sources first. Monitor amps should always be switched on last. Reverse this sequence when switching off your equipment.
1Press the POWER switch to switch on the Z8.
The Startup page appears, as shown below.
The Z8 takes a few seconds to start up.
2 Press the POWER switch again to switch off the Z8.
Z4/Z8 User Guide—Version 1.0
14 Chapter 3—Getting Started
Navigating the User Interface
This section explains how to find your way around the Z8.
Pages & Windows
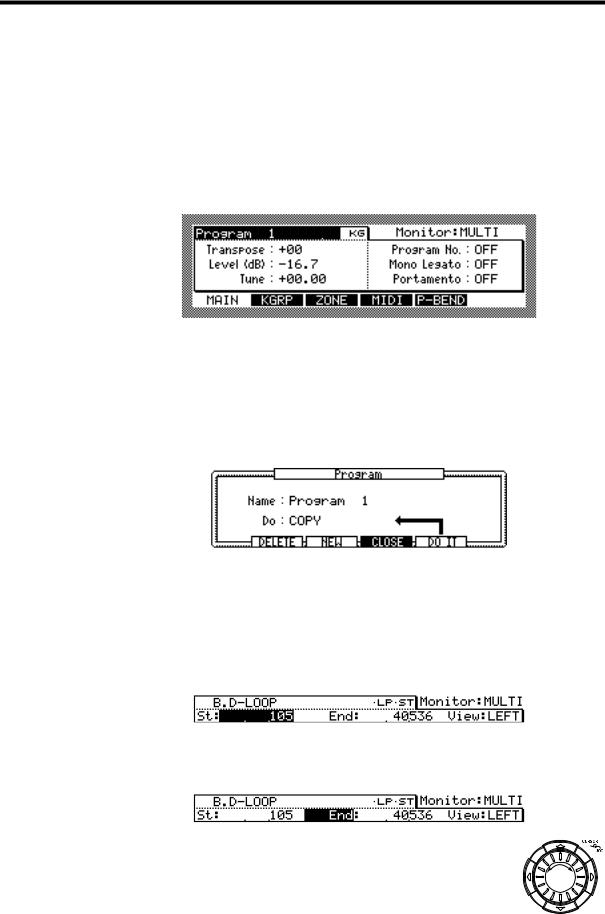
Z8 functions are organized as display pages and windows. Along the bottom of each page or window are the names of additional pages or functions, which can be accessed by pressing the F1 through F6 function buttons located directly below the display. For example, to access the KGRP page from the following page, you’d press F2. To select the ZONE page, you’d press F3, and so on.
Items that indicate the corresponding information on the display or that can be edited are called “parameter.” Parameters that can be edited display a colon (:) after their name, such as “Level: –16.7” (above). Parameters that cannot be edited but are for display purposes only indicate an equal sign (=) after their name.
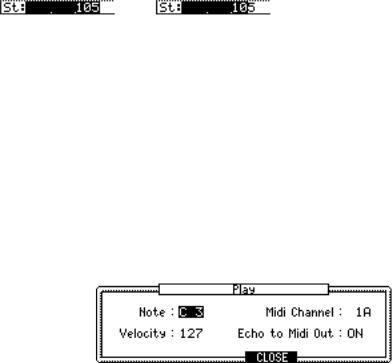
You can access windows by pressing the WINDOW button when certain parameters are selected. Pressing the WINDOW button when the Program name is selected on the display shown above, opens the Program window (shown below).
Windows close and the previous display screens are restored when you press the WINDOW button again, or by pressing “CLOSE” or “CANCEL” (if available). In some parameters, pressing the WINDOW button does not open any windows.
Selecting & Editing Parameters
Parameters are selected for editing by using the CURSOR buttons. The selected parameter appears highlighted, as shown by the “St” parameter below.
For certain parameters, in addition to a value, you can also select the parameter’s name. For example, on the TRIM, LOOP, or REGION page, the “End” parameter name, shown below, is used to set the End parameter display format.
Use the JOG dial to edit parameter values.
Z4/Z8 User Guide—Version 1.0
Using the PLAY Button |
15 |
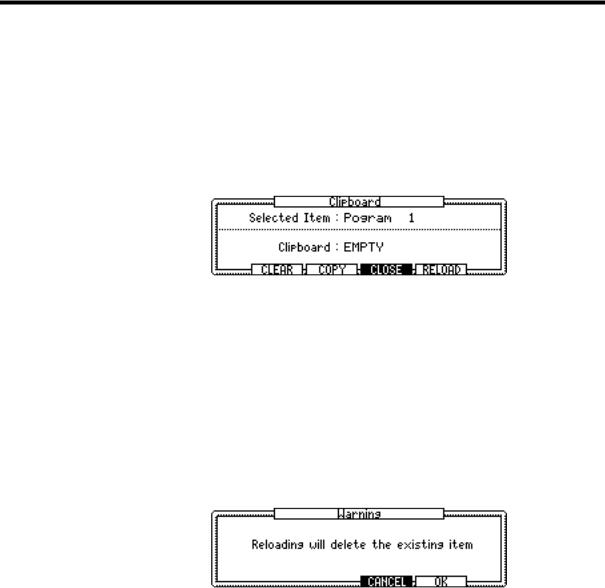
To select the digits in the numeric parameters, for example, during Sample editing, press and hold the SHIFT button, then use the CURSOR Left and Right buttons.
Use the JOG dial to change the value of the selected digits. In this example, the illustration on the left indicates that you can change the value of the units digit (i.e., the rightmost digit). When you press the CURSOR left button while holding down the SHIFT button, the tens digit is selected (as shown in the illustration on the right) enabling you to change the value.
Using the PLAY Button
Samples, Programs, or Multis can be auditioned by pressing the PLAY button even when a MIDI keyboard is not connected. A Note On message is generated when the PLAY button is pressed, and a Note Off message, when it’s released.
You can specify which Note is generated, its velocity, and MIDI Channel as follows.
1While holding down the PLAY button, press the WINDOW button.
The PLAY window appears, as shown below.
2Select the parameters, and use the JOG dial to set them as required.
Note: This determines the note that is generated when the PLAY button is pressed. If you hold down the PLAY button while changing this value, a new Note On message is generated as each note is selected. This is convenient for checking the transitions between Keygroups, and for checking what Samples are assigned to notes in a Drum Program. This technique can also be used while holding notes (i.e., press the SHIFT button while holding down the PLAY button).
Velocity: (0–127) This determines the velocity of the note generated when the PLAY button is pressed. If you hold down the PLAY button while changing this parameter, a new Note On message with the specified velocity is generated each time the value is changed. This is convenient for checking Programs with velocity switching between Samples.
MIDI channel: (1A–16A, 1B–16B) This determines the MIDI Channel used to transmit the generated note.
Echo to Midi Out: (On, Off) This determines whether or not a Note On message is output when the PLAY button is pressed. With the On setting, the note information is output from MIDI OUT when you press the PLAY button.
3Press “CLOSE.”
Z4/Z8 User Guide—Version 1.0
16 Chapter 3—Getting Started
Using the Clipboard
Samples, Programs, and Multis can be stored temporarily in the Clipboard. By copying a Sample, Program, or Multi to the Clipboard before editing, you can use the Clipboard to compare your edits with the original. The Clipboard can also be used as an Undo function. There are separate Clipboards for Samples, Programs, and Multis.
1To copy a Sample, Program, or Multi, to the Clipboard, select the desired Sample, Program, or Multi, then press the CLIPBOARD button.
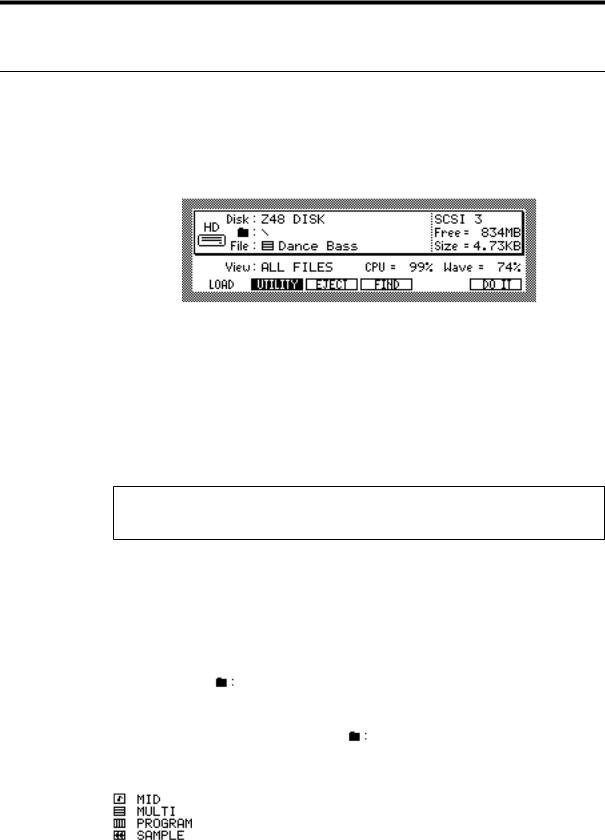
The Clipboard window appears, as shown below.
The selected item appears in the Selected Item parameter, and the item currently stored in the Clipboard appears in the Clipboard parameter.
2Press “COPY” to copy the current Sample, Program, or Multi to the Clipboard.
The name of the item in the Clipboard appears at the top of the window. While the Clipboard window is open, you can play the Sample, Program, or Multi in the Clipboard by pressing the PLAY button, or by pressing a key on a connected MIDI keyboard. When the Clipboard window is closed, you can play the current Sample, Program, or Multi, allowing you to compare it with the Clipboard contents.
3To load the Clipboard Sample, Program, or Multi back into memory, overwriting the Sample, Program, or Multi with the same name, press “RELOAD.”
The Warning window appears.
This works just like an Undo function. If the original Sample, Program, or Multi cannot be found (e.g., it’s been deleted or renamed), the Clipboard item is copied into memory as a new Sample, Program, or Multi.
4Press “OK” to load.
This works just like an Undo function. If the original Sample, Program, or Multi cannot be found (e.g., it’s been deleted or renamed), the Clipboard item is copied into memory as a new Sample, Program, or Multi.
5To erase the contents of the Clipboard, press “CLEAR.”
Z4/Z8 User Guide—Version 1.0

Entering Names |
17 |
Entering Names
Samples, Programs, Multis files are named and renamed by using the Name window, shown below, which appears when the JOG dial is rotated while a nameable parameter is selected. Names can be up to 16 characters long, including spaces.
Use the Left and Right CURSOR buttons to move the CURSOR within the name. Use the Up and Down CURSOR buttons to select uppercase and lowercase characters respectively. To enter a space, while holding down the SHIFT button, press the Right CURSOR button. To delete, while holding down the SHIFT button, press the Left CURSOR button. You can copy and paste the name entry by using the “COPY” and “PASTE” buttons. Press “ENTER” when you have finished. Press “CANCEL” to cancel the Name window. A USB keyboard can be connected to the front panel USB port for quick name entry.
Z4/Z8 User Guide—Version 1.0
18 Chapter 4—Loading
4 Loading
Loading
You can load Samples, Programs, Multis, Songs, and files as follows.
1Press the LOAD button.
The Z8 enters Load mode, and the following page appears.
This page displays the amount of free space available on the currently selected disk (“Free=”), the size of the currently selected file (“Size=”), and the amount of free Z8 memory (“Wave=”).
2Select the “View” parameter, then use the JOG dial to select the type of file that you want to load.
The “View” parameter allows you to filter the file types that can be selected by the File parameter, which is useful when you have many files. For example, if you set the “View” parameter to “SAMPLES,” only Sample files appear at the File parameter. Other options include: ALL FILES, PROGRAMS, MULTIS, FOLDERS, and SONGS.
Note: If a removable storage device is connected, when you want to change the disk, press “EJECT” on the SAVE page, not the eject button on the device. While the device is connected to the Z8, its eject button is disabled.
3Turn the JOG dial in the “Disk” parameter.
The Disk List window appears.
4Use the CURSOR buttons to select the desired disk, and press “CLOSE” to close the Disk List window.
The specified disk is selected. See “Saving” on page 84 for more information on the Disk List window.
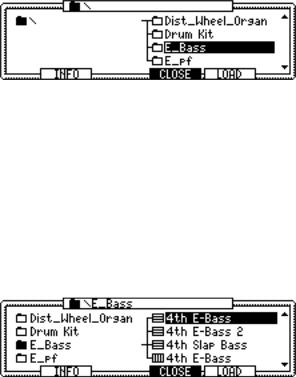
5 Use the Folder ( ) parameter to select the folder that contains the file you wish to load.
If the selected disk does not contain any folders, or if you have selected the root directory (the folder in the upper-most hierarchy), ( ) appears in the display. Only files in the selected folder can be selected by the File parameter. The files listed in the File parameter have icons that correspond to the file types.
To move transversely through the folder hierarchy, while holding down the SHIFT button, use the Left and Right CURSOR buttons. To move down through the hierarchy, hold down the SHIFT button, and press the Right CURSOR button. To move up through the hierarchy, hold down the SHIFT button, and press the Left CURSOR button.
6Press “DO IT” to display the Load Sample, Load Program, Load Multi, or Load Folder window, depending on the selected file.
Z4/Z8 User Guide—Version 1.0
Sound Library CD-ROM |
19 |
Tips for selecting a file:
The File Directory window is useful for navigating through the folder hierarchy and selecting files. To open the File Directory window, press the WINDOW button in the Folder parameter or File parameter.
The file directories (tree) are displayed graphically.
Files are managed hierarchically by the file system, and organized in the tree structure via folders. This system is similar to that often used by common computer operating systems.
In the File Directory window, the left column corresponds to the Folder parameter, and the right column corresponds to the File parameter. The folder selected in the Folder parameter includes the (xxx) icon. In this window, you can also use the Left and Right CURSOR buttons to move transversely through the hierarchy. For example, if you select a folder in the right column (File parameter) and press the Right CURSOR button, the folder you just selected in the File parameter now appears in the left column (Folder parameter), and in the right column, you can select a file from the selected folder.
When you close the window by pressing “CLOSE,” the folder selected in the left column appears in the Folder parameter, and the file selected in the right column appears in the File parameter.
To load the selected file, press “LOAD.”
You can search for files by using the Find File window, which you can access by pressing “FIND.” Here you can enter a few characters of a file name, and specify the type of file that you’re trying to find in the File Type parameter. Press “DO IT” to execute searches. Found files appear in the Found Files window. Use the JOG wheel to select a file, then press “LOAD” to load the file.
Sound Library CD-ROM
To load sounds from the included CD-ROM, you will need to connect a CD-ROM drive. Some Programs and Multis on the CD-ROM may require more memory than the standard memory size (16 MB). You will need to expand the memory to load such files. Consult your local dealer or Akai Professional M.I. Service Department regarding the compatible CD-ROM drives and memory expansion.
Z4/Z8 User Guide—Version 1.0
20 Chapter 4—Loading
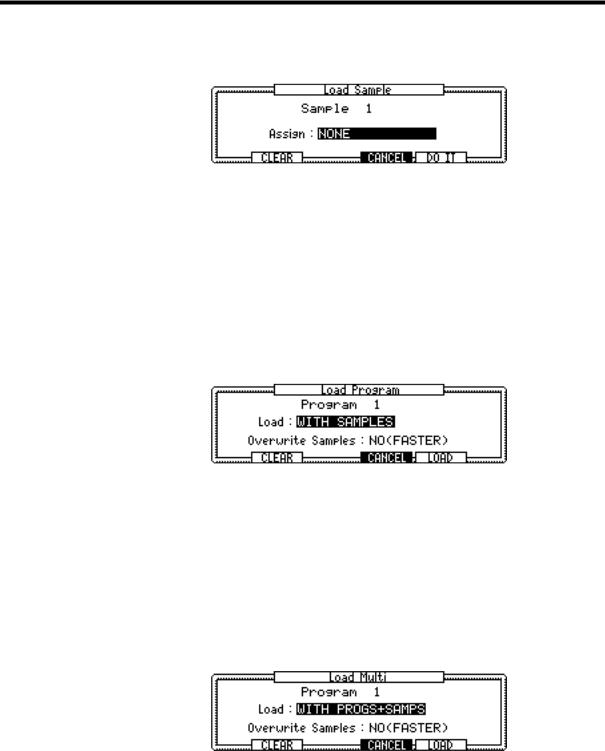
Loading Samples
If you’re loading a Sample, the Load Sample window appears, as shown below.
Set the “Assign” parameter as required, and then press “DO IT,” or press “CLEAR” to clear the entire memory before loading.
The “Assign” parameter options are as follows: “NONE” doesn’t load the Sample into a Program. “Add to Program” adds the Sample to Program, in which case the Add to Program window appears and you can select an existing Program or create a new Program, and specify the Original Note, Key Range, and Keyboard Tracking parameters. For Drum Programs, you can specify the note that will play the Sample. For information on using the Add to Program window, see “Adding New Samples to Programs” on page 25.
Loading Programs
If you’re loading a Program, the Load Program window appears, as shown below.
Set the “Load” and “Overwrite Samples” parameters as required, then press “LOAD,” or press “CLEAR” to clear the entire memory before loading.
The “Load” parameter options are as follows: “WITH SAMPLES” loads the Program with its Samples. “PROGRAM ONLY” loads the Program without its Samples.
The “Overwrite Samples” parameter options are as follows: “YES” overwrites Samples with the same name that are already loaded. “NO (FASTER)” loads only the Samples that are not already loaded.
Loading Multis
If you’re loading a Multi, the Load Multi window appears, as shown below.
Set the “Load” and “Overwrite Samples” parameters as required, then press “LOAD,” or press “CLEAR” to clear the entire memory before loading.
The “Load” parameter options are as follows: “MULTI ONLY” loads only the Multi. “WITH PROGRAMS” loads the Multi with its Programs. “WITH PROGS+SAMPS” loads the Multi with its Programs and Samples.
The “Overwrite Samples” parameter options are as follows: “YES” overwrites Samples with the same name that are already loaded. “NO (FASTER)” loads only the Samples that are not already loaded.
Z4/Z8 User Guide—Version 1.0
Sound Library CD-ROM |
21 |
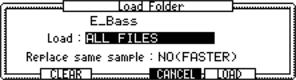
Loading Folders
If you select a folder in the File parameter and press “DO IT,” the Load Folder window appears, as shown below.
Multiple files in the selected folder can be loaded simultaneously.
Set the “Load” and “Replace same sample” parameters as required, and then press “LOAD,” or press “CLEAR” to clear the entire memory before loading.
The “Load” parameter options are as follows: “SAMPLES” loads all Samples in the specified folder. “PROGS+SAMPLES” loads all Programs and Samples in the specified folder. “MULTIS+PROGS+SAMPLES” loads all Multis, Programs, and Samples in the specified folder. “ALL FILES” loads all files in the specified folder.
The “Replace same sample” parameter options are as follows: “YES” overwrites Samples with the same name that are already loaded. “NO (FASTER)” loads only the Samples that are not already loaded.
In addition to WAV files, the Z8 can load files created for the following instruments:
Manufacturer/Model |
File types |
|
|
|
|
AKAI S1000 |
Sample and Program files |
|
|
AKAI S3000 |
Sample and Program files |
|
|
AKAI S5000 & S6000 |
Sample, Program, and Multi files |
|
|
Emu EIII |
Sample and Program files |
|
|
These files can be loaded using the same procedure as for Z8 files.
When Samples that were created for other instruments are loaded, differences may be heard in the sound output. This is due to the different designs and capabilities of the instruments that the sounds were created for. Practical differences arise due to the use of different looping techniques, filter types, the range and types of FX available, and sound output assignments that are not supported.
More file types will be supported in the near future.
Z4/Z8 User Guide—Version 1.0
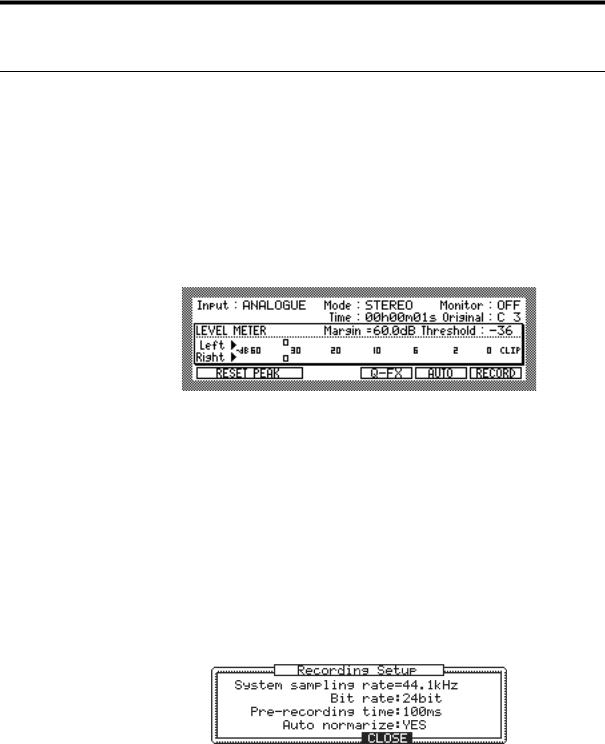
22 Chapter 5—Recording Samples
5 Recording Samples
This chapter explains how to record Samples, plus Auto Sampling and sampling with FX.
Sampling
You’ll need to connect a sound source to the Z8 in order to record. To record from microphones or analog devices, use the REC IN jacks. To record digital signals from CD players or DAT decks, connect to the DIGITAL I/O IN jack. If an optional IB-4ADT interface has been installed, you can also record signals input at the ADAT IN jack.
1Press the RECORD button.
Its indicator lights up showing that Record mode has been selected, and the following page appears.
2Select the “Input” parameter and set the input source to one of the following options:
ANALOGUE: Selects the REC IN as the input source.
DIGITAL: Selects the DIGITAL IN as the input source. (digital inputs are optional on the Z4.)
ADAT (1/2, 3/4, 5/6, 7/8): Selects a pair of ADAT inputs as the input source (requires optional IB-4ADT interface).
MAIN OUT: Selects the Z8’s MAIN OUT as the input source, allowing you to record the output from a Multi.
3Press the WINDOW button to access the “Bit rate,” “Pre-recording time,” and “Auto normalize” parameters.
The Recording Setup window appears. (If the “Time” parameter was selected, the Sample memory window appears instead.)
System sampling rate: The system sampling rate can be viewed only here. The sampling rate is set in Utilities mode. See “Setting the System Clock & Digital Out Sync” on page 90 for more information.
Bit-rate: (16 or 24 bit) This sets the bit rate used for recording. Recording in 24-bit offers broader dynamic range, but requires more memory.
Pre-recording: (0–999 ms) This sets the prerecording time, which allows you to start recording up to 999 ms before the point at which recording is actually triggered, or started manually, ensuring that the beginnings of your Samples are captured in full.
Auto normalize: (YES/NO) When Auto normalize is set to YES, the Z8 automatically adjusts the level of the entire Sample to an optimum level after recording.
Z4/Z8 User Guide—Version 1.0
Loading...