


EIE Pro

QUICKSTART GUIDE
ENGLISH ( 3 – 5 )
MANUAL DE INICIO RÁPIDO
ESPAÑOL ( 6 – 8 )
GUIDE D’UTILISATION RAPIDE
FRANÇAIS ( 9 – 11 )
GUIDA RAPIDA
ITALIANO ( 12 – 14 )
KURZANLEITUNG
DEUTSCH ( 15 – 17 )
WWW.AKAIPRO.COM

g
d
BOX CONTENTS
• EIE Pro • USB cable
• Software/Driver CD • Quickstart Guide
• Power adapter • Safety Instructions & Warranty Information Booklet
SYSTEM REQUIREMENTS
Minimum PC Requirements:
• Pentium III 450 MHz Processor
• 128 MB RAM
• Available USB 2.0 Port
• Windows XP (with Service Pack 2 installed)
Minimum Macintosh Requirements:
• Any Apple computer with native USB support
• 128 MB RAM
• Available USB 2.0 Port
• Mac OS X "Jaguar" version 10.2 or later
DRIVER INSTALLATION
IMPORTANT!: Before connecting EIE Pro to your computer, install the drivers:
1. Check for driver updates online at www.akaipro.com/eiepro. If there are no updates available, insert
the included driver CD.
2. Follow the onscreen instructions to install the drivers. (You will be asked to connect EIE Pro to your
computer during the installation process.)
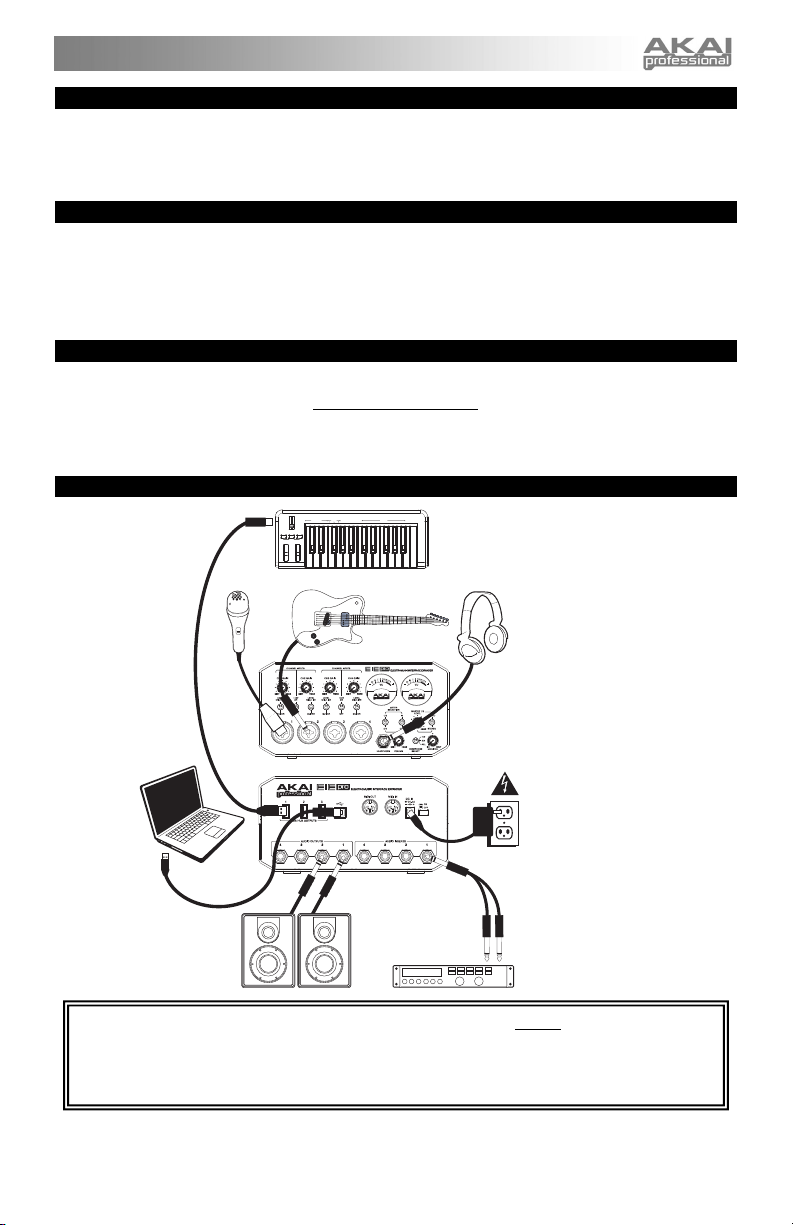
CONNECTION DIAGRAM
MICROPHONE*
ASSIGNMENT DATA ENTRY
REVERB
AFTER
DEPTHCCNOTE
TOUCH
VELOCITY VOLUME
DATA ENTRY
UP
MIDI / SELECT
DOWN
OCTAVE
PITCH MODULATION
TRANSPOSE
RESET
CC
MIDI
PROGRAM
234
1
DATACC NO.
CHANNEL
GUITAR*
NUMERIC KEYPAD
90
6
5
8
7
CANCEL ENTER
USB-MIDI KEYBOARD
CONTROLLER*
HEADPHONES*
COMPUTER*
POWER
SPEAKERS*
* not include
.
EXTERNAL
EFFECTS UNIT*
• WARNING: Only put on your headphones or turn on your speakers AFTER turning on the EIE Pro.
• When recording a guitar or bass with an active pickup, set the EIE Pro's GUITAR / MIC/LINE
SWITCH to "MIC/LINE." If your instrument uses a passive pickup, set the switch to "GUITAR."
• To reduce electrical hum at high gain settings, keep the EIE Pro's power supply away from your
uitar cable and the EIE Pro'schannel inputs.
3

AUDIO SETUP
EIE Pro can be used with any digital audio
workstation or recording software that supports USB
audio. To enable your EIE Pro to send and receive
audio to and from your computer, follow the
instructions below for your computer's operating
system:
WINDOWS 7:
1. Connect EIE Pro to a power source using the included power adapter (6V, 3A, center pin-positive).
2. Use the included USB cable to connect the EIE Pro to your computer.
3. Go to Start Menu Control Panel Hardware and Sound Sound.
4. Click the Playback tab and select EIE Pro as the default device.
5. Click the Recording tab and select EIE Pro as the default device.
6. Click OK to close the Sound control panel.
WINDOWS VISTA:
1. Connect EIE Pro to a power source using the included power adapter (6V, 3A, center pin-positive).
2. Use the included USB cable to connect the EIE Pro to your computer.
3. Go to Start Menu Control Panel Sound. (If you don't see Sound, select Switch to Classic
4. Click the Playback tab and select EIE Pro as the default device.
5. Click the Recording tab and select EIE Pro as the default device.
6. Click OK to close the Sound control panel.
WINDOWS XP:
1. Connect EIE Pro to a power source using the included power adapter (6V, 3A, center pin-positive).
2. Use the included USB cable to connect the EIE Pro to your computer.
3. Go to Start Menu Control Panel Sounds and Audio Devices.
4. Click the Audio tab.
5. Under Sound Playback and Sound Recording, select EIE Pro as the default device.
6. Click OK.
MAC:
1. Connect EIE Pro to a power source using the included power adapter (6V, 3A, center pin-positive).
2. Use the included USB cable to connect the EIE Pro to your computer.
3. Go to Applications Utilities Audio MIDI Setup.
4. In the Audio Devices tab under System Settings, select EIE Pro as your Default Input and Default
5. Close the window.
View, and the Sound Control Panel should become available.)
Output.
Be sure your audio software program is set up to
receive audio via the EIE Pro. This can usually be
done in your software's "Preferences" or "Device
Setup." Please consult your software manual for
more information.
4
7
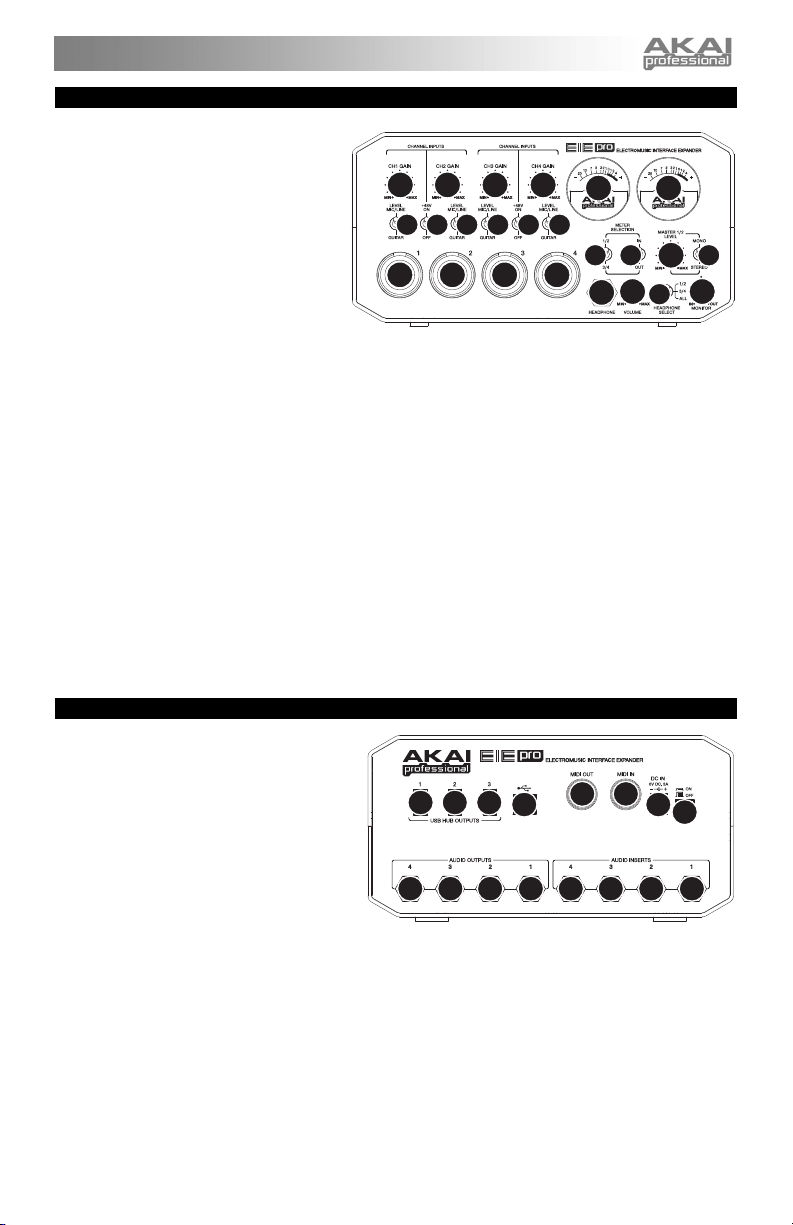
FRONT PANEL FEATURES
1. MIC/LINE / GUITAR INPUT – Connect
a microphone, line-level device or
guitar to this input with an XLR or 1/4"
TRS cable.
2. GAIN – Adjusts the input's gain level.
3. LEVEL MIC/LINE / GUITAR SWITCH
– When the switch is in the
"MIC/LINE" position, the channel will
accept mic or line-level signals. When
this switch is in the "GUITAR" position,
the channel will serve as a highimpedance input for connecting guitar
or bass instruments.
4. PHANTOM POWER SWITCH – This switch activates and deactivates phantom power for each channel
pair (Channels 1 and 2 and/or Channels 3 and 4). When activated, phantom power supplies +48V to
both XLR mic inputs. Please note that most dynamic microphones do not require phantom power, while
most condenser microphones do. Consult your microphone's documentation to find out whether it
needs phantom power.
5. VU METERS – These meters display the volume level of the channel pairs, depending on the setting of
the METER SELECTION CHANNEL SWITCH. These meters will be lit whenever EIE Pro is powered
on. The red light indicates the signal is distorting or "clipping." If the signal is regularly clipping, reduce
the volume of the mix and/or individual channels.
6. METER SELECTION CHANNEL SWITCH – This switch selects which pair of channels the left and
right VU METERS will display (respectively) – Channels 1 and 2 ("1/2") or Channels 3 and 4 ("3/4").
7. METER SELECTION MONITOR SWITCH – This switch selects whether the VU METERS will display
the volume level at the inputs ("IN") or outputs ("OUT").
8. MASTER LEVEL – Adjusts the output volume of the AUDIO OUTPUTS 1 and 2.
9. MONO / STEREO – Adjusts the master mix for mono or stereo operation.
10. HEADPHONE – Connect a set of 1/4" TRS headphones to this output.
11. HEADPHONE VOLUME – Adjusts the output volume of the PHONES output.
12. HEADPHONE SELECT SWITCH – This switch selects what channels are sent out the HEADPHONE
output – Channels 1 and 2 ("1/2"), Channels 3 and 4 ("3/4"), or all channels ("ALL").
13. MONITOR MIX – Blend in any amount of zero-latency signal from your inputs ("IN") with the output of
your computer ("OUT").
2
222
334433
1
111
55
67
11
10
12
9
8
13
REAR PANEL FEATURES
1. DC INPUT – Connect the included power
adapter (6V, 3A, center pin-positive)
here, then connect the adapter to wall
power.
2. POWER SWITCH – Turns the EIE Pro
on and off.
3. USB MIDI – This connection will allow
you to send MIDI information to/from a
computer. Use a USB cable to connect
the EIE Pro to a computer. EIE Pro
requires a USB 2.0 connection.
4. USB HUB OUTPUTS – You can connect
additional USB devices (controllers, hard drives, etc.) to these powered USB ports. In addition to being
an audio interface, these ports allow EIE Pro to function as a powered USB hub.
5. AUDIO INPUTS (INSERTS) – You can use standard 1/4" TRS insert cables to connect external
processors (such as compressors, limiters, external EQ units, etc.) to these jacks. The signal will be
taken after the channel's gain control and returned before the channel's USB audio is sent to the
computer.
6. AUDIO OUTPUTS – Use standard 1/4" TRS cables to connect these outputs to monitors, an amplifier
system, etc. The level of AUDIO OUTPUTS 1 and 2 are controlled by the MASTER LEVEL knob. The
level of AUDIO OUTPUTS 3 and 4 are always at full volume.
7. MIDI OUT – Use a standard five-pin MIDI cable to connect this output to the MIDI IN of an external
MIDI device.
8. MIDI IN – Use a standard five-pin MIDI cable to connect this input to the MIDI OUT of an external MIDI
device.
4
44
3
78
1
2
55556666
5
CONTENIDO DE LA CAJA
• EIE Pro • Cable USB
• CD de software/drivers • Guía de inicio rápido
• Adaptador de alimentación • Folleto de instrucciones de seguridad e información sobre la garantía
REQUISITOS DE SISTEMA
Requisitos mínimos de PC:
• Procesador Pentium III de 450 MHz
• 128 MB de RAM
• Puerto USB 2.0 disponible
• Windows XP (con Service Pack 2 instalado)
Requisitos mínimos de Macintosh:
• Cualquier computadora Apple con soporte de
USB nativo
• 128 MB de RAM
• Puerto USB 2.0 disponible
• Mac OS X "Jaguar" versión 10.2 o posterior
INSTALACIÓN DE LOS DRIVERS
IMPORTANTE: Antes de conectar EIE Pro a su computadora, instale los drivers:
1. Verifique las actualizaciones de los drivers por Internet en www.akaipro.com/eiepro
actualizaciones disponibles, inserte el CD de drivers incluido.
2. Siga las instrucciones de la pantalla para instalar los drivers. (El sistema le solicitará que conecte EIE
Pro a la computadora durante el proceso de instalación.)
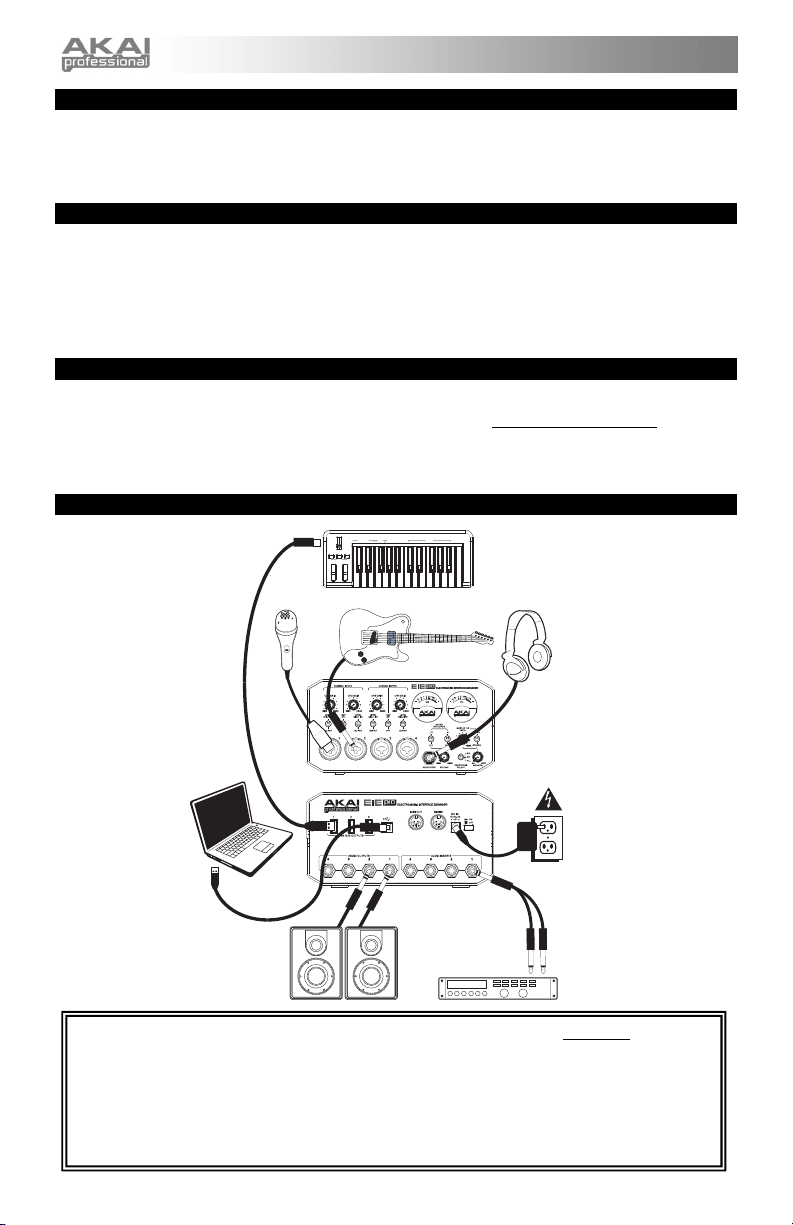
DIAGRAMA DE CONEXIÓN
MICROFÓNO*
ASSIGNMENT DATA ENTRY
REVERB
AFTER
DEPTHCCNOTE
TOUCH
VELOCITY VOLUME
DATA ENTRY
UP
MIDI / SELECT
DOWN
OCTAVE
PITCH MODULATION
NUMERIC KEYPAD
TRANSPOSE
CC
MIDI
90
6
5
8
PROGRAM
234
CANCEL ENTER
1
7
RESET
DATACC NO.
CHANNEL
CONTROLADOR DE
TECLADO USB/MIDI*
GUITARRA*
AURICULARES*
. Si no hay
COMPUTADORA*
SUMINISTRO
ELÉCTRICO
ALTAVOCES*
* Se vende por separado
UNIDAD DE
EFECTOS EXTERNA*
• ADVERTENCIA: Colóquese los auriculares o encienda los altavoces sólo DESPUÉS de encender
el EIE Pro.
• Cuando grabe una guitarra o bajo con captor activo, ajuste el CONMUTADOR GUITARRA /
MICROFÓNO/LÍNEA de EIE Pro a "MIC/LINE". Si su instrumento usa un captor pasivo, ajuste el
conmutador a "GUITAR".
• Para reducir el zumbido eléctrico cuando se usan ajustes altos de ganancia, mantenga la fuente de
alimentación de EIE Pro alejada del cable de su guitarra y de las entradas de los canales del
equipo.
6
 Loading...