


CD Stereo System
NSX-R71
EZ
8C-NF6-906-01 020320AKH-U-M
OPERATING INSTRUCTIONS |
En (English) |
MANUAL DE INSTRUCCIONES |
E (Español) |
MODE D'EMPLOI |
F (Français) |
BEDIENUNGSANLEITUNG |
D (Deutsch) |
ISTRUZIONI PER L'USO |
I (Italiano) |
GEBRUIKSAANWIJZING |
NL (Nederlands) |
NÁVOD K OBSLUZE |
Cz (Česky) |
HASZNÁLATI UTASÍTÁS |
M (Magyar) |
INSTRUKCJA OBS£UGI |
Po (Polski) |
|
|
WARNING
TO REDUCE THE RISK OF FIRE OR ELECTRIC SHOCK, DO NOT EXPOSE THIS APPLIANCE TO RAIN OR
En MOISTURE.
CAUTION
TO REDUCE THE RISK OF ELECTRIC SHOCK, DO NOT REMOVE COVER (OR BACK).
NO USER-SERVICEABLE PARTS INSIDE. REFER SERVICING TO QUALIFIED SERVICE
PERSONNEL.
CAUTION
Use of controls or adjustments or performance of procedures other than those specified herein may result in hazardous radiation exposure.
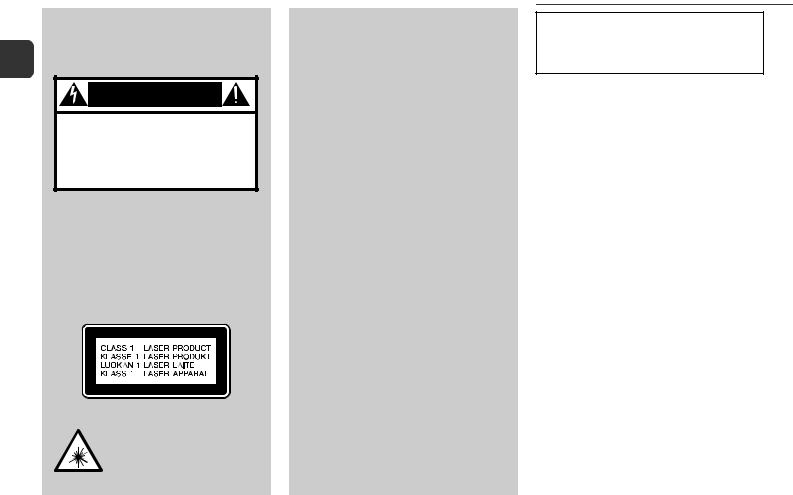
This compact disc player is classified as a CLASS 1 LASER product.
The CLASS 1 LASER PRODUCT label is located on the exterior.
CAUTION!
Invisible laser radiation when open and interlocks defeated. Avoid exposure to beam.
NOTE
AIWA CO. LTD. - JAPAN - DECLARES UNDER ITS OWN RESPONSIBILITY THAT THE PRODUCT DESCRIBED IN THIS MANUAL IS IN COMPLIANCE WITH THE DIRECTIVES OF D.M 28.8.95 No. 548, ACCORDING TO THE STIPULATIONS OF PARAGRAPH 3 OF ATTACHMENT A OF D.M. 25.6.85 AND PARAGRAPH 3 OF ATTACHMENT 1 OF D.M. 27.8.87 (REGULATIONS REGARDING FREQUENCIES).
The above information is only for Italy.
PRECAUTIONS
Read these Operating Instructions carefully and completely before operating the unit. All precautions on this booklet and on the unit should be strictly followed.
Keep the Operating Instructions for future reference.
Installation
1 Water and moisture — Do not use this unit near water, such as near a bathtub, washbowl, swimming pool, or the like.
2Heat — Do not use this unit near sources of heat, including heating vents, stoves, or other appliances that generate heat. It also should not be placed in temperatures less than 5°C or greater than 35°C.
3Mounting surface — Place the unit on a flat, even surface.
4Ventilation — The unit should be situated with adequate space around it so that proper heat ventilation is assured. Allow 10 cm clearance from the rear and the top of the unit, and 5 cm from each side.
-Do not place the unit on a bed, rug, or similar surface that may block the ventilation openings.
-Do not install the unit in a bookcase, cabinet, or airtight rack where ventilation may be impeded.
5Objects and liquid entry — Take care that objects or liquids do not get inside the unit through the ventilation openings.
6Carts and stands — When placed or mounted on a stand or cart, the unit should be moved with care.
Quick stops, excessive force, and uneven surfaces may cause the unit or cart to overturn or fall.
7Condensation — Moisture may form on the CD pickup lens when:
-The unit is moved from a cold spot to a warm spot
-The heating system has just been turned on
-The unit is used in a very humid room
-The unit is cooled by an air conditioner
When this unit has condensation inside, it may not function normally. Should this occur, leave the unit for a few hours, then try to operate again.
2

8 Wall or ceiling mounting — The unit should not be mounted on a wall or ceiling, unless specified in the Operating Instructions.
Electric Power
1 Power sources — Connect this unit only to power sources specified in the Operating Instructions, and as marked on the unit.
2 AC power cord
-When disconnecting the AC power cord, pull it out by the AC power plug. Do not pull the cord itself.
-Never handle the AC power plug with wet hands, as this could result in fire or shock.
-Power cords should be firmly secured to avoid being severely bent, pinched, or walked upon. Pay particular attention to the cord from the unit to the power socket.
-Avoid overloading power socket and extension cords beyond their capacity, as this could result in fire or shock.
3 When not in use — Unplug the AC power cord from the power socket if the unit will not be used for several months or more. When the cord is plugged in, a small amount of current continues to flow to the unit, even when the power is turned off.
Maintenance
Clean the unit only as recommended in the Operating Instructions.
Damage Requiring Service
Have the units serviced by a qualified service technician if:
-The AC power cord or plug has been damaged
-Foreign objects or liquid have gotten inside the unit
-The unit has been exposed to rain or water
-The unit does not seem to operate normally
-The unit exhibits a marked change in performance
-The unit has been dropped, or the cabinet has been damaged DO NOT ATTEMPT TO SERVICE THE UNIT YOURSELF.
TABLE OF CONTENTS
PRECAUTIONS .................................... |
2 |
|
|
PREPARATIONS ................................... |
4 |
En |
|
PARTS AND CONTROLS |
5 |
||
|
|||
ADJUSTMENTS BEFORE OPERATIONS ........ |
8 |
|
|
CD OPERATIONS ................................ |
10 |
|
|
RADIO OPERATIONS ........................... |
12 |
|
|
TAPE OPERATIONS ............................. |
16 |
|
|
SOUND ADJUSTMENTS ........................ |
19 |
|
|
TIMER OPERATIONS ........................... |
20 |
|
|
REFERENCE ..................................... |
22 |
|
System and accessories
NSX-R71
CX-NR71 CD stereo cassette receiver
SX-NR70 Front speakers
Remote control
FM antenna
MW/LW antenna
3

PREPARATIONS
Connection
Plug in the AC power cord to the wall socket after all other En connections are made.
1Connect the front speakers.
Connect the right front speaker (marked "R" on the rear side) to the SPEAKERS R terminals and place it on the right side of the unit. Connect the left (marked "L" on the rear side) to the SPEAKERS L terminals and place it on the left side.The speaker cords with the white stripes go to the 0terminals.
2Connect the supplied antennas.
Connect the FM antenna to the FM 75 Ωterminal and the MW/LW antenna to the MW/LW LOOP terminals.
MW/LW antenna
FM antenna
3Connect the AC power cord to the wall socket.
When the AC power cord is connected to the wall socket for the first time, DEMO appears on the display.
To deactivate the DEMO, press DEMO/ECO.
•Do not short-circuit the 0and 9speaker cord leads. •Do not leave objects generating magnetism or objects
affected by magnetism near the speakers.
Remote control
Detach the battery compartment lid at the rear of the remote control and insert two R6 (size AA) batteries with correct polarity.
•Replace the batteries with new ones when the operational distance between the remote control and main unit becomes shorter.
•Remove the batteries if the unit is not going to be used for an extended period of time.
•The remote control may not operate if it is used under intense sunlight, etc., or if its line of sight is obstructed.
4
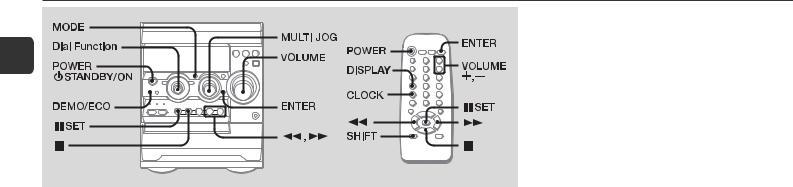
PARTS AND CONTROLS
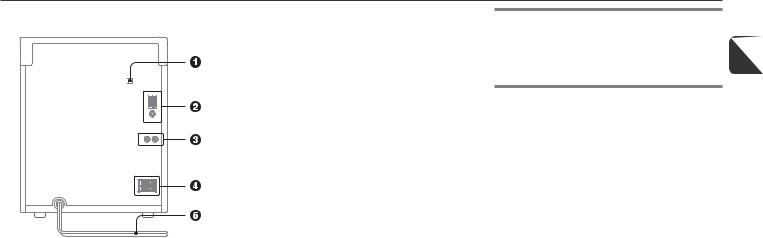
Main unit: rear
1 CD DIGITAL OUT (OPTICAL) jack
Outputs CD digital sound signals to digital audio equipment. Remove the dust cap and connect using an optional optical cable plug. When this jack is not being used, attach the supplied dust cap.
2 MW/LW LOOP, FM 75 Ω terminals
Plug in the supplied MW/LW and FM antennas here.
3 VIDEO/AUX jacks
Accepts analog sound signals from external equipment. Connect using an optional connecting cable with RCA phono plugs (red plug to R jack, white plug to L jack). Refer also to the operating instructions of your equipment. To switch function to external input, turn the Dial Function (see "ADJUSTMENTS BEFORE OPERATIONS") to select the VIDEO/AUX function.
Tip:
To change the displayed name for this function, select the VIDEO/AUX function, then hold down ENTER and press POWER on the unit. Repeat the procedure to select "AUX ", "VIDEO " or "TV ".
4 SPEAKERS3terminals
Dynamic Integrated New Amplifier
is a brand-new amplifier system where clear mid-to-high range frequency sound, as well as rich low frequency sound, can be En reproduced and listeners can enjoy the close-to-original sound
with less distortion at either high or low volume levels.
Connect the speaker cord of the supplied front speakers here.
5 AC power cord
5
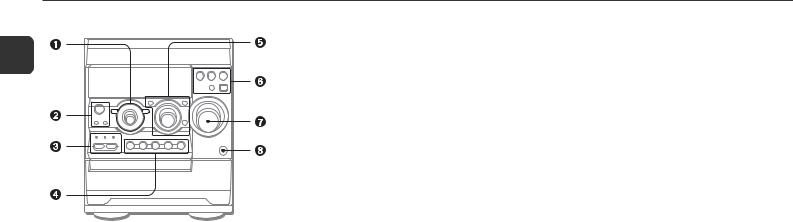
Main unit: front
En
3RT
Displays text information for RDS (Radio Data System).
PTY
Displays a program type for RDS (Radio Data System).
AG
Selects a sound equalization curve for RDS (Radio Data System).
SYNC DUB
Starts dubbing a whole tape.
wREC/REC MUTE
Starts recording.
4aPAUSE/SET
1Dial Function
Selects a function (TAPE, TUNER, VIDEO/AUX or CD).
DECK 1/2
Selects DECK 1 or 2 in Tape function.
BAND
Select a band in Tuner function.
2POWER 6STANDBY/ON
Switches the unit on and off (standby).
DEMO/ECO
When the unit is turned off: switches DEMO on and off. When the unit is turned on: enters ECO or dimmer setting mode.
TIMER
Enters timer setting mode.
CD and Tape: pauses playback.
Radio: stores the received station to preset.
sSTOP/CLEAR
CD and Tape: stops playback. Radio: clears a station preset.
dDIR(DECK1)/PRESET
CD and Tape: starts playback. Radio: tunes into a preset station.
f/rDOWN, g/tUP TUNING
CD: skips to a previous or a succeeding track when pressed, searches a track in fast forward or fast reverse playback when held down.
Tape: fast forwards or rewinds the tape.
Radio: manually tunes down or up within the band.
5MULTI JOG
CD: skips to a previous or a succeeding track. Radio: selects a preset number.
Graphic Equalizer: selects a equalization curve or adjusts the level.
Clock and Timer: sets the time. ECO and Dimmer: selects the mode.
MODE
Enters the setting mode of Graphic Equalizer or Spectrum analyzer display.
SOUND
Selects a frequency range of Graphic Equalizer to adjust the level.
ENTER
Determines the mode and the time (ECO, dimmer, clock and timer).
6DISC DIRECT PLAY 1-3
Selects a CD tray.
DISC CHANGE
Rotates the CD trays.
zCD OPEN/CLOSE
Opens or closes the disc compartment.
7VOLUME
Adjusts the volume.
8PHONES jack
Plug in here an optional headphones set with a mini stereo plug (ø3.5 mm). Speaker output is cancelled.
6
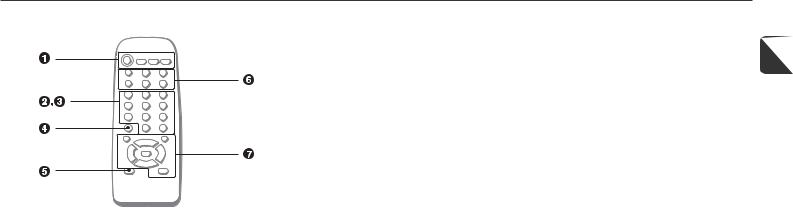
Remote control
Buttons with the same or similar names with the main unit basically have the same function.
1POWER
GEQ
Enters Graphic Equalizer setting mode.
SOUND ENTER
20-9, +10
CD: selects a CD track of the specified number.
Radio: tunes in to the station with the specified preset number.
3The numbered buttons take on these functions when pressed together with SHIFT held down:
PROGRAM
Enters programmed CD playback mode.
RANDOM/REPEAT
Enters random or repeat CD playback mode.
TUNER MODE
Switches between stereo or monaural FM reception.
DISPLAY
Selects a Spectrum analyzer display.
TIMER
SLEEP
Enters sleep-timer setting mode.
CLOCK
Enters clock adjustment mode.
CD EDIT/CHECK
Displays the remaining playback time of a CD when pressed during playback.
Enters AI Edit Recording or Programmed Edit Recording mode when pressed during stop.
4CD DIRECT
Select a CD tray with the numbered button (1-3).
5 SHIFT
Hold down when pressing a numbered button to change En its function to that printed above the number.
e.g.)
"Press SHIFT+SLEEP on the remote control" indicates "Hold down SHIFT and press '6' (SLEEP)", so that you can use 'Sleep timer' function.
6REC MODE
Starts recording with wREC/REC MUTE.
wREC/REC MUTE
Starts recording with REC MODE.
PRESET (N, M)
Performs the same functions as MULTI JOG on the unit.
VOLUME (+, -)
7DECK 1/2 BAND aSET
c/d
The function is the same as that of don the unit. f/r, g/t
sCLEAR
FUNCTION
Switches the active function among TAPE, TUNER, VIDEO/AUX and CD.
7
ADJUSTMENTS BEFORE OPERATIONS
En
Power
Turning the unit on
Press POWER 6STANDBY/ON (POWER on the remote control).
Turning the unit off
Press POWER 6STANDBY/ON again.
The unit goes into standby.
Volume
Turn VOLUME (Press VOLUME +, - on the remote control).
Adjust from 0 (minimum) to 40 and MAX (maximum).
Tip:
Volume level setting is retained during power-off standby. If the unit is turned off with the volume set to 27 or more, it is automatically turned down to 26 the next time the unit is turned on.
DEMO
If the clock has not been set, a DEMO appears on the display when the unit is turned off.
To deactivate and activate the DEMO
Press DEMO/ECO when the unit is turned off.
Spectrum analyzer display
You can change the spectrum analyzer display.
Press MODE twice and then within 4 seconds turn MULTI JOG to select one of the three spectrum analyzer displays.
On the remote control, press SHIFT+DISPLAY repeatedly.
-NORMAL: Displays the fluctuation from low frequencies to high ones
-BASS: Displays the fluctuation of low frequencies only
-LEVEL: Displays the fluctuation of the average of all the frequencies.
Dial Function
Turn the Dial Function to select a function (TAPE, TUNER, VIDEO/AUX or CD).
The red light beside the selected function turns on.
8
 Loading...