


 Loading...
4-245-531-32 030313AMI-DS-SO
Mini Hi-Fi Component System
JAX-S5
WARNING
To prevent fire or shock hazard, do not expose the unit to rain or moisture.
To avoid electrical shock, do not open the cabinet. Refer servicing to qualified personnel only.
Do not install the appliance in a confined space, such as a bookcase or built-in cabinet.
To prevent fire, do not cover the ventilation of the apparatus with newspapers, table-cloths, curtains, etc. And don't place lighted candles on the apparatus.
|
To prevent fire or shock hazard, do not place objects filled |
En |
with liquids, such as vases, on the apparatus. |
|
CAUTION |
RISK OF ELECTRIC SHOCK |
DO NOT OPEN |
“CAUTION:TO REDUCE THE RISK OF |
ELECTRIC SHOCK, |
DO NOT REMOVE COVER (OR BACK). |
NO USER-SERVICEABLE PARTS INSIDE. |
REFER SERVICING TO QUALIFIED |
SERVICE PERSONNEL.” |
This symbol is intended to alert the user to the presence of uninsulated "dangerous voltage" within the product's enclosure that may be of sufficient magnitude to constitute a risk of electric shock to persons.
This symbol is intended to alert the user to the presence of important operating and maintenance (servicing) instructions in the literature accompanying the appliance.
CAUTION
The use of optical instruments with this product will increase eye hazard.
PRECAUTIONS
WARNING
This equipment has been tested and found to comply with the limits for a Class B digital device, pursuant to Part 15 of the FCC Rules. These limits are designed to provide reasonable protection against harmful interference in a residential installation.
This equipment generates, uses, and can radiate radio frequency energy and, if not installed and used in accordance with the instructions, may cause harmful interference to radio communications. However, there is no guarantee that interference will not occur in a particular installation. If this equipment does cause harmful interference to radio or television reception, which can be determined by turning the equipment off and on, the user is encouraged to try to correct the interference by one or more of the following measures:
-Reorient or relocate the receiving antenna.
-Increase the separation between the equipment and receiver.
-Connect the equipment into an outlet on circuit different from that to which the receiver is connected.
-Consult the dealer or an experienced radio/TV technician for help.
CAUTION
You are cautioned that any changes or modifications not expressly approved in this manual could void your authority to operate this equipment.
Note to CATV system installer:
This reminder is provided to call the CATV system installer's attention to Article 820-40 of the NEC that provides guidelines for proper grounding and, in particular, specifies that the cable ground shall be connected to the grounding system of the building, as close to the point of cable entry as practical.
2

On operating voltage
Before operating the system, check that the operating voltage of your system is identical with the voltage of your local power supply.
On safety
•The unit is not disconnected from the AC power source (mains) as long as it is connected to the wall outlet, even if the unit itself has been turned off.
•Unplug the system from the wall outlet (mains) if it is not to be used for an extended period of time. To disconnect the cord (mains lead), pull it out by the plug. Never pull the cord itself.
•Should any solid object or liquid fall into the component, unplug the stereo system and have the component checked by qualified personnel before operating it any further.
•The AC power cord must be changed only at a qualified service shop.
On placement
•Place the unit in a location with adequate ventilation to prevent heat build-up the unit.
•Do not place the unit in an inclined position. •Do not place the unit in locations where it is;
-Extremely hot or cold
-Dusty or dirty
-Very humid
-Vibrating
-Subject to direct sunlight.
On heat buildup
•Although the unit heats up during operation, this is not malfunction.
•Place the unit in a location with adequate ventilation to prevent heat build-up in the unit.
If you continuously use this unit at a large volume, the cabinet temperature of the top, side and bottom rises considerable. To avoid burning yourself, do not touch the cabinet.
On operation
•If the system is brought directly from a cold to a warm location, or is placed in a very damp room, moisture may condense on the lens inside the CD player. Should this occur, the system will not operate properly. Remove the CD and leave the system turned on for about an hour until the moisture evaporates.
•When you move the system, take out any discs.
Notes on discs
•Discs recorded on CD-R/RW drives may not be played back because of scratches, dirt., recording condition or the drive's characteristics.
•CD-R/RW discs which are not finalized at the end of recording cannot be played back.
•Do not attach adhesive label, etc. to either side of a CD-R/ RW disc, as doing so may cause malfunction.
•Do not load an unrecorded CD-R/RW disc. The disc may be damaged.
•Discs with non-standard shapes (e.g., heart, square, star) cannot be played on this unit. Attempting to do so may damage the unit. Do not use such discs.
•DVD, SACD, and VCD cannot be played on this unit.
Music discs encoded with copyright protection technologies
This product is designed to playback discs that conform to the Compact Disc (CD) standard. Recently, various music discs encoded with copyright protection technologies are marketed by some record companies. Please be aware that among those discs, there are some that do not conform to the CD standard and may not be playable by this product.
If you have any questions or problems concerning your stereo system, please consult your nearest Aiwa dealer.
TABLE OF CONTENTS
PRECAUTIONS .................................... |
2 |
|
PREPARATIONS ................................... |
4 |
|
PARTS AND CONTROLS ......................... |
5 |
|
ADJUSTMENTS BEFORE OPERATIONS ........ |
8 |
|
CD OPERATIONS ................................ |
10 |
|
MP3-CD OPERATIONS ......................... |
12 |
|
TUNER OPERATIONS ........................... |
14 |
|
TAPE OPERATIONS ............................. |
16 |
|
SOUND ADJUSTMENTS ........................ |
19 |
|
TIMER OPERATIONS ........................... |
20 |
En |
REFERENCE ..................................... |
22 |
3
PREPARATIONS
Connection
Plug in the AC power cord to the AC power outlet after all other connections are made.
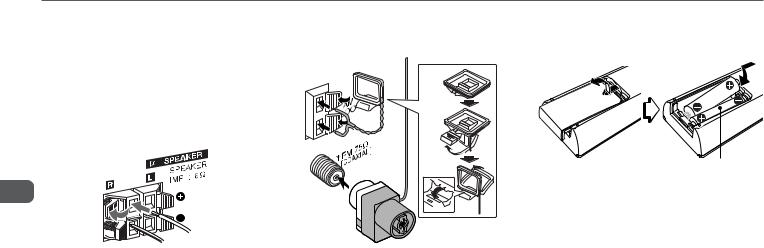
1Connect the front speakers.
Connect the right front speaker (marked with "R") to the SPEAKER R terminals and place it on the right side of the unit. Connect the left (marked with "L") to the SPEAKER L terminals and place it on the left side. The speaker cords with the black stripes go to the 9terminals.
En
2Connect the supplied antennas.
Connect the FM antenna to the  FM 75 Ω terminal and the AM antenna to the AM LOOP terminals.
AM antenna
FM antenna
3Connect the AC power cord to a wall outlet.
When the AC power cord is connected to a wall outlet for the first time, DEMO appears in the display.
To deactivate the DEMO, press c (c/don the remote).
•Do not short-circuit the 0and 9speaker cord leads. •Do not leave objects generating magnetism or objects
affected by magnetism near the speakers.
Remote
Detach the battery compartment lid at the rear of the remote and insert two R6 (size AA) batteries with correct polarity.
R6(AA)
•Replace the batteries with new ones when the operational distance between the remote and main unit becomes shorter.
•Remove the batteries if the unit is not going to be used for an extended period of time.
•The remote may not operate if it is used under intense sunlight, etc., or if its line of sight is obstructed.
4
PARTS AND CONTROLS
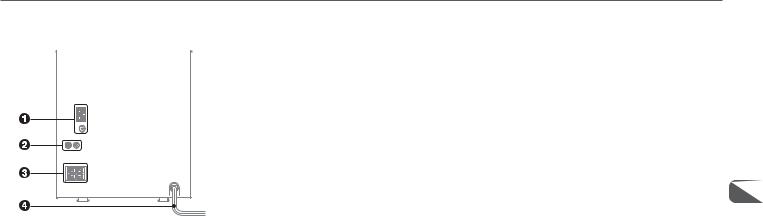
Main unit: rear
Refer to the pages indicated in parentheses for details.
1AM LOOP,  FM 75 Ω terminals (4)
Plug in the supplied AM and FM antennas here.
2VIDEO/AUX jacks
Accepts analog sound signals from external equipment. Connect using an optional connecting cable with RCA phono plugs (red plug to R jack, white plug to L jack). Refer also to the operating instructions of your equipment. To switch function to external input, press VIDEO/AUX.
Tip:
To change the displayed name for this function, turn the unit on, then hold down VIDEO/AUX and press POWER on the unit. Repeat the procedure to select "VIDEO", "AUX" or "TV".
3#SPEAKER terminals (4)
Connect the speaker cord of the supplied front speakers here.
En
4 AC power cord (4)
5
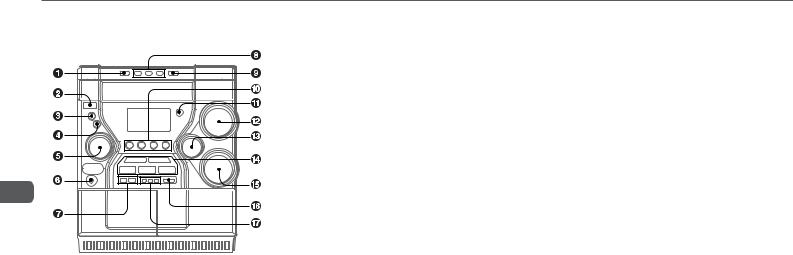
Main unit: front
Refer to the pages indicated in parentheses for details.
En
1DISC CHANGE (10)
Rotates the CD trays.
2POWER 6STANDBY/ON (8)
Switches the unit on and off (standby).
The red indicator flashes when receiving a signal from the remote.
3MODE (8-12, 19)
Selects various modes (ECO and Repeat/Shuffle/ Programed playback, etc.) when used in combination with ENTER and MULTI JOG.
4ENTER (8-12, 14, 19-21)
Fixes the modes and the time (ECO, Repeat/Shuffle/ Programed playback, clock, and timer, etc.) when used in combination with ENTER and MULTI JOG.
5MULTI JOG (8-12, 14, 17-21)
When used in combination with ENTER and MULTI JOG, CD: selects a track and Repeat/Shuffle/Programed playback.
Tuner: selects a preset station. Tape: specifies tape length. Clock and Timer: sets the time. i-Bass: selects a frequency range.
Spectrum analyzer, ECO and Dimmer: selects the mode.
6PHONES jack
Plug in here an optional headphones set with a mini stereo plug (ø3.5 mm). Speaker output is canceled.
7SYNC DUB (17)
Starts dubbing a whole tape. wREC/REC MUTING (16, 17)
Starts recording.
8DISC DIRECT PLAY 1-3 (10)
Selects a disc.
9zOPEN/CLOSE (10)
Opens or closes the disc compartment.
0TAPE A/B (16)
Selects Tape function, and deck A or B.
TUNER/BAND (14)
Selects Tuner function and the radio band.
VIDEO/AUX (5)
Selects the function of external equipment connected to VIDEO/AUX jacks.
CD (10)
Selects CD function.
!Remote sensor
Receives a signal from the remote.
@VOLUME (8)
Adjusts the volume.
#TREBLE (19)
Enhances high frequency sound.
$ cPLAY/PRESET (8, 10-12, 14, 16)
When the unit is turned off: activates or deactivates DEMO.
CD and Tape: starts playback. Tuner: tunes into a preset station.
sSTOP/CLEAR (10, 11, 14, 16-18)
CD and Tape: stops playback. Tuner: clears a station preset.
fTUNING DOWN, gTUNING UP
(10, 14, 16)
CD: searches a track in fast forward or fast reverse playback when held down.
Tape: fast forwards or rewinds the tape.
Tuner: manually tunes down or up within the band.
aPAUSE/SET (10, 14, 16)
CD and Tape: pauses playback.
Tuner: stores the received station in to preset.
%BASS (19)
Emphasizes low frequency sound.
^i-Bass (19)
Produces rich and clear low frequency sound.
&DISPLAY (9, 10)
Displays the time and the remaining time for CD.
ALBUM k, i(12)
Selects a previous album or a succeeding album with MP3-CDs.
6
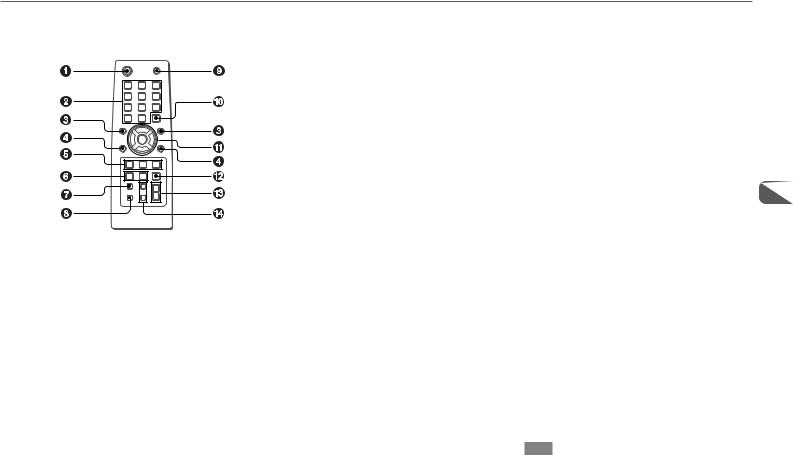
Remote control
Refer to the pages indicated in parentheses for details.
Buttons with the same or similar names with the main unit basically have the same function.
1 POWER (8)
21-0/10, +10 (10-12, 14)
CD: selects a CD track of the specified number.
Tuner: tunes in to the station with the specified preset number.
The numbered buttons take on these functions below when pressed with SHIFT held down:
EDIT (17, 18)
Enters AI Edit Recording or Programed Edit Recording mode when pressed in stop mode.
BAND (14)
Selects Tuner function and the radio band.
TAPE A/B (16)
SPECTRUM (8)
Changes the spectrum analyzer display.
TUNER MODE (15)
Switches between stereo or monaural FM reception.
3r, t(9-11, 14, 17-21)
CD: selects a track.
Tuner: selects a preset station. Tape: specifies tape length.
BASS and TREBLE: adjusts the level. Clock and Timer: sets the time.
4ALBUM M, N(12)
Selects a previous album or a succeeding album.
5PLAY MODE (11)
Selects Shuffle or Programed playback in CD function.
REPEAT (10)
Enters CD repeat playback mode.
ENTER (8-12, 14, 19-21)
6CLOCK/TIMER/SET (9, 20, 21)
Enters timer setting mode.
CLOCK/TIMER/SELECT (20, 21)
Selects timer playback, timer recording or timer off.
7DISPLAY (9, 10)
8SHIFT
Hold down when pressing a numbered button to change its function to that printed above the number.
e.g.)
"Press SHIFT+BAND on the remote" indicates "Hold down SHIFT and press '2' (BAND)". Doing so makes you be able to select Tuner function and the radio band.
9FUNCTION
Switches the active function among CD, TAPE, TUNER and VIDEO (AUX or TV).
0DISC SKIP (10)
Select a disc.
!c/d(8, 10-12, 16)
When the unit is turned off: activates or deactivates DEMO.
CD and Tape: starts playback.
s(10, 11, 16-18)
CD and Tape: stops playback.
f,g(10, 14, 16)
CD: searches a track in fast forward or fast reverse En playback when held down.
Tape: fast forwards or rewinds the tape.
Tuner: manually tunes down or up within the band.
a(10, 16)
CD and Tape: pauses playback.
@SLEEP (20)
Switches the sleep-timer on/off and selects the duration.
#VOLUME (+, -) (8)
Adjusts the volume.
$ SOUND (19)
Selects BASS or TREBLE setting mode
CLEAR (11, 14)
Clears a track of the CD programed playback and a Radio preset station.
Note
The button not explained above (KARAOKE) does not operate for this unit.
7

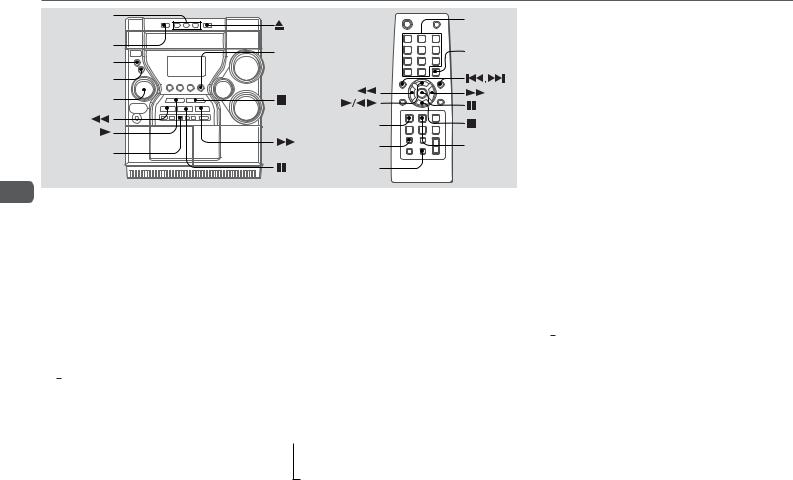
ADJUSTMENTS BEFORE OPERATIONS
POWER
STANDBY / ON
MODE
ENTER
MULTI JOG
En
Power
Turning the unit on
Press POWER 6STANDBY/ON (POWER on the remote). Pressing TAPE A/B, TUNER/BAND, VIDEO/AUX or CD also turns the unit on (Direct Play Function.) When a disc or tape is inserted, the playback will start automatically.
Turning the unit off
Press POWER 6STANDBY/ON again.
The unit goes into standby.
POWER
SPECTRUM 


VOLUME
|
CLOCK/ |
ENTER |
|
TIMER/SET |
|||
|
|||
TAPE A/B, |
DISPLAY |
|
|
TUNER/BAND, |
|
|
|
VIDEO/AUX, |
SHIFT |
VOLUME |
|
CD |
|||
|
|
+,– |
|
Volume
Turn VOLUME (Press VOLUME +, -on the remote).
Adjust from 0 (minimum) to 30 and MAX (maximum).
Tip:
Volume level setting is retained during power-off standby: If the unit is turned off with the volume set to 17 or more, it is automatically set to 16 the next time the unit is turned on.
DEMO
You can enjoy DEMO in the display when the unit is turned off.
To activate or deactivate the DEMO
Press c(c/don the remote) when the unit is turned off.
Spectrum analyzer display
You can change the spectrum analyzer display.
1Press MODE repeatedly until "SPECTRUM?" appears in the display when the unit is turned on and then press ENTER.
2Turn MULTI JOG to select one of the three spectrum analyzer displays (PATTERN 1, 2 and 3).
If there is no MULTI JOG or button operation within 6 seconds, the setting is canceled.
On the remote, press SHIFT+SPECTRUM repeatedly.
8

ECO mode
Saves the power consumption while the unit is turned off (in standby mode).
1Press MODE repeatedly until "ECO MODE?" appears in the display and then press ENTER.
2Turn MULTI JOG to select "ECO ON" and then press ENTER.
In the ECO ON mode, the unit blacks out when the unit is turned off. Only the red indicator on POWER button lights up.
If there is no MULTI JOG or button operation within 6 seconds, the setting is canceled.
To cancel the ECO mode
Repeat the above and select "ECO OFF" in step 2.
Dimmer
Adjusts the brightness of the display.
1Press MODE repeatedly until "DIMMER ?" appears in the display when the unit is turned on and then press ENTER.
2Turn MULTI JOG to select one of the three dimmer modes or "OFF" and then press ENTER.
"OFF" is the brightest and "DIMMER 3" is the dimmest. In DIMMER 3 mode, the spectrum analyzer display does not appear.
If there is no MULTI JOG or button operation within 6 seconds, the setting is canceled.
To cancel the dimmer
Repeat the above and select "OFF" in step 2 .
Setting the clock
Use the remote.
1Press CLOCK/TIMER/SET.
Go to step 3 when the time appears and the 'hour' flashes.
2Press r or t repeatedly until "CLOCK SET" appears in the display and then press ENTER.
3Press r or t repeatedly to set the hour and then press ENTER.
4Press ror trepeatedly to set the minute and then press ENTER.
The time display stops flashing and the clock starts from En 00 seconds.
•MULTI JOG is also available in place of ror t.
To display the time
Press DISPLAY on the remote. The time will be displayed for 6 seconds.
Tip:
"AM 12:00" indicates midnight and "PM 12:00" noon.
If "- -:- -" appears when the unit is turned off
There has been a power interruption. Re-set the clock.
9
CD OPERATIONS
DISC DIRECT |
OPEN/CLOSE |
1–0/10, |
|
PLAY 1-3 |
|||
+10 |
|||
|
|
||
DISC CHANGE |
CD |
DISC SKIP |
|
|
MODE
ENTER
MULTI JOG
|
PLAY MODE |
|
DISPLAY |
DISPLAY |
REPEAT |
|
|
|
|
CLEAR |
|
En
This unit plays back finalized CD-R/RW discs as well as audio CDs.
Playback
1Press CD and load disc(s).
Press zOPEN/CLOSE to open the disc compartment and place one or two disc(s) with the labelled side up.
To place three discs, press DISC CHANGE so that the trays rotate, then place the third one. Lastly, close the compartment with zOPEN/CLOSE.
•When loading an 8-cm (3-inch) disc, place it on the inner circle of the tray.
2To play all discs, press c(c/don the remote), then "ALL DISCS" lights up in the display.
To play one desired disc, press DISC DIRECT PLAY 1-3, then "1 DISC" lights up in the display.
A playing disc indicator flashes in the display.
To stop playback
Press s.
To pause playback
Press a. Press again to resume playback.
To select a track
Turn MULTI JOG or press r or t on the remote repeatedly.
With the numbered buttons on the remote,
-To select track 10, press 0/10.
-To select track 20, press +10, +10 and 0/10.
-To select track 25, press +10, +10 and 5.
To search (playback in fast forward or fast reverse)
Hold down for g. Release at the desired point.
To select a disc
Press DISC DIRECT PLAY 1-3 or DISC SKIP on the remote.
To display the remaining time of the track or the disc
Press DISPLAY repeatedly during playback. The display changes cyclically as follows:
 Track number and elapsed playing time of the current track Track number and remaining time of the current track Remaining time of the current disc
Clock display (for 6 seconds)
To replace disc(s) during playback without interruption
While one disc is being played back, press DISC CHANGE so that the compartment opens, replace disc(s) with other one(s), and press DISC CHANGE to close the compartment.
Repeat playback
Plays all the tracks or one track on the discs repeatedly.
1Press MODE repeatedly until "REPEAT?" appears in the display and then press ENTER.
2Turn MULTI JOG to select one of the two repeat modes as below or "REPEAT OFF", and then press ENTER.
-"REPEAT ALL":
For all the tracks on one desired disc or all discs up to 5 times. """ lights up.
-"REPEAT 1":
For a single track only. ""1" lights up.
If there is no MULTI JOG or button operation within 6 seconds, the setting is canceled.
3To play one desired disc, press DISC DIRECT PLAY 1-3.
To play all discs, press c(c/don the remote).
On the remote, press REPEAT repeatedly until """ or ""1" appears and carry out step 3.
To cancel repeat playback
Carry out step 1 and 2, and select "REPEAT OFF" in step 2. On the remote, press REPEAT repeatedly until """ and ""1" disappear.
10
Shuffle playback
Plays the tracks on one desired disc or all discs in random order.
1Press MODE repeatedly until "PLAY MODE?" appears in the display in stop mode and then press ENTER.
2Turn MULTI JOG to select "SHUFFLE" and then press ENTER.
"SHUF" lights up.
If there is no MULTI JOG or button operation within 6 seconds, the setting is canceled.
3To play one desired disc, press DISC DIRECT PLAY 1-3.
To play all discs, press c(c/don the remote).
On the remote, press PLAY MODE repeatedly until "SHUF" lights up and carry out step 3.
To cancel shuffle playback
Carry out step 1 and 2, and select "CONTINUE" in step 2. On the remote, press PLAY MODE repeatedly until "SHUF" and "PGM" disappear.
Programed playback
Plays back up to 30 selected tracks in programed order.
1Press MODE repeatedly until "PLAY MODE?" appears in the display in stop mode and then press ENTER.
2Turn MULTI JOG to select "PROGRAM" and then press ENTER.
"PGM" lights up.
If there is no MULTI JOG or button operation within 6 seconds, the setting is canceled.
3Press DISC DIRECT PLAY 1-3 to select a disc.
Go to the next step when the tray stops rotating. On the remote, press DISC SKIP.
4Turn MULTI JOG to select a track and then press ENTER.
The selected track number and the program number appear in the display.
On the remote, press ror tand then press ENTER or press the numbered buttons:
-To select the 10th track, press 0/10.
-To select the 20th track, press +10, +10 and 0/10. -To select the 25th track, press +10, +10 and 5.
5Repeat step 3 and 4 to program other tracks.
6Press c(c/don the remote).
On the remote, press PLAY MODE repeatedly until "PGM" lights up and carry out step 3 to 6.
•During programed playback, you cannot select a disc or a track with the numbered buttons.
•If the total playback time of the program exceeds 99:59 minutes, or if a track with a track number exceeding 30 is programed, the playing time is displayed as "- -:- -".
•You cannot program more than 30 tracks. "FULL" is displayed.
To clear a track
Press CLEAR on the remote in stop mode. A track is cleared from the end of the program.
To clear the entire program
Press sin stop mode.
To add tracks to the program
Repeat step 1 to 4 before starting playback. The tracks are added to the end of the program.
To cancel programed playback
Carry out step 1 and 2, and select "CONTINUE" in step 2.
On the remote, press PLAY MODE repeatedly until "PGM" En and "SHUF" disappear.
•The program contents are retained even if the program is canceled or after programed playback finishes. The same program plays back if you carry out step 1, 2 and 6.
•If you cancel programed playback and then select an MP3CD, the program for the previously selected disc will be cleared.
Notes on CDs
•Do not place more than one disc on one tray. •Do not tilt the unit with discs loaded.
11
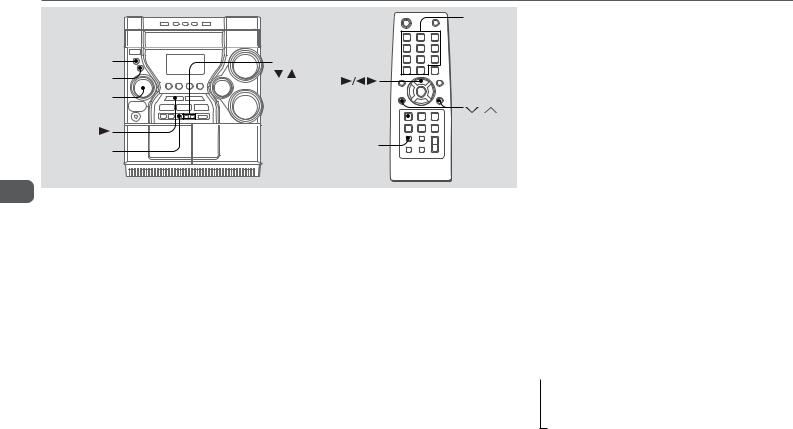
MP3-CD OPERATIONS
|
1–0/10, |
|
+10 |
MODE |
ALBUM |
ENTER |
, |
|
|
MULTI JOG |
ALBUM |
|
, |
DISPLAY |
DISPLAY |
|
En
Playback
This unit plays back MP3-CDs: discs recorded with MP3 tracks (files). (When MP3-CD is selected, "MP3" appears in the display.) Basic operations for MP3-CDs are mostly the same as those in “CD OPERATIONS”. This section explains MP3-CD OPERATIONS where there is additional information or exceptions to the information in “CD OPERATIONS”. Before playing an MP3-CD, also refer to “Descriptions of MP3” for the details of MP3.
To select an album
Press ALBUM ior k(Nor Mon the remote).
To select a track
It is convenient to select an album first and then select a track. If the album or the disc with no album has more than 99 tracks, press the numbered buttons on the remote in the following way to select the 100th track or more.
-To select the track 100, press +10 ten times, and 0/10.
-To select the track 147, press +10 fourteen times, and 7.
-To select the track 235, press +10 twenty-three times, and 5.
Disc playback and Album playback
1 Press MODE repeatedly until "PLAY MODE?" appears in the display in stop mode and then press ENTER.
2 Turn MULTI JOG to select one of the following modes and then press ENTER.
-CONTINUE: Tracks in the disc(s) are played.
-ALBUM CONT: Tracks only in one album are played.
If there is no MULTI JOG or button operation within 6 seconds, the setting is canceled.
3 Press c(c/don the remote).
Shuffle playback
1 Press MODE repeatedly until "PLAY MODE?" appears in the display in stop mode and then press ENTER.
2 Turn MULTI JOG to select one of the following modes and then press ENTER.
-SHUFFLE: Tracks in the disc are played in random.
-ALBM SHUF: Tracks only in one album are played in random..
If there is no MULTI JOG or button operation within 6 seconds, the setting is canceled.
3 Press c(c/don the remote).
Tip:
•In shuffle playback for MP3-CDs, only one disc is playable. Select a disc before carrying out the procedures.
•To cancel it or to use the remote for it, see "Shuffle playback" of “CD OPERATIONS”.
Programed playback
1 Press MODE repeatedly until "PLAY MODE?" appears in the display in stop mode and then press ENTER.
2 Turn MULTI JOG to select "PROGRAM" and then press ENTER. "PGM" lights up.
If there is no MULTI JOG or button operation within 6 seconds, the setting is canceled.
3 Select an album and a track.
4 Repeat step 3 to program other tracks. 5 Press c(c/don the remote).
Tip:
•In programed playback for MP3-CDs, only one disc is selectable. Select a disc before carrying out the procedures.
•To cancel it, to use the remote for it, etc., see "Programed playback" of “CD OPERATIONS”.
•If you cancel programed playback and then select another disc, the program for the previously selected disc (MP3CD) will be cleared.
To display the title of the album and track in the display
Press DISPLAY during playback.
The display changes in the following order:
 Elapsed playing time of the current track Album name* of the current track
The current track (file) name
ID3 information* (track title, artist name, etc.,) Clock display (for 6 seconds)
*Album name and ID3 information (see the next page) are not displayed if they are not registered.
12

Descriptions of MP3
An MP3 file stores audio data compressed using MPEG1/2, the audio layer-3 file-coding scheme.
In this manual, CDs, CD-R discs and CD-RW discs are all referred to as “discs”. We refer to what are called “folder” and “file” in PC terminology as “album” and “track”.
Notes on playing MP3 files
•An MP3 track must be recorded on a disc in the format compliant with ISO 9660.
•The maximum allowable number of tracks and albums in a disc are as follows:
-number of tracks: 510 (including number of albums)
-number of albums: 510 (including number of tracks) •The maximum allowable depth of nested albums is 8
(including root folder (origin folder)).
•It may take 30 seconds or more before the unit can start play of MP3 tracks, depending on the number of recorded tracks and the complexity of the album tree.
•The unit supports a multi-session disc; however, for a multisession disc mixed with CD-DA tracks and MP3 tracks, it plays only one session.
•The unit cannot play MP3 tracks recorded using a packet writing utility.
•The unit can play MP3 tracks having a file extension “.mp3”. •If you play a non-MP3 track that has the “.mp3” file
extension, you may hear some noise.
Notes on display indications during play
•Up to 16 characters (in ASCII code) are displayed for the title of an album or a track. If ID3TAG version 1.X was applied to record additional information for an MP3 track, up to 30 characters showing track title, etc. is displayed. However, if information of ID3TAG version 2.X are also recorded in the same MP3 track, the track title of ID3TAG is not displayed. Characters other than uppercase letters (“A” to “Z”) and numerals (“0” to “9”) may not be displayed correctly.
•The elapsed playing time may not be displayed correctly for MP3 tracks.
•The character codes which cannot be represented in ASCII code are displayed as "  ".
".
•The unit does not support MP3 tracks (file) recorded with UNIX system.
Terminology
•ISO 9660
ISO stands for the “International Organization for Standardization”. ISO 9660 determines the file structure for the CD-ROMs. This unit can play MP3 files recorded in the format compliant with ISO 9660.
•Nesting of folders (albums)
To organize data files stored in a PC, you can store related files in a folder. A folder can contain other folders as well as files. For example, folder A can contain folder B, and folder B can contain folder C; this is called “nesting of folders”. The maximum depth of nested folders, allowed by ISO 9660, is 8.
•Writing utilities
There are 3 utilities used to record data on a disc.
1.DAO (Disc At Once) utility
All data to be written must be prepared in advance and written onto a disc from the beginning to the end in one operation. No data can be added to a disc on which data were already written with DAO utility.
2.TAO (Track At Once) utility
Data are written onto a disc track by track. Data can be added to a disc on which data were written with TAO utility.
3.Packet writing utility
Tracks are divided into smaller pieces while being recorded, depending on the size of available spaces on the disc. Data can be added to a disc on which data were written with packet writing utility.
This unit can play MP3 discs recorded using DAO and TAO utilities.
•ID3TAG
ID3TAG determines the data format for the text to be added to an MP3 file, mainly used to indicate a track title or an artist’s name, etc.
Notes on creating MP3 discs
•When converting audio data to MP3
The unit supports MP3 files with a sampling frequency of 32 kHz, 44.1 kHz or 48 kHz.
To enjoy high sound quality, we recommend storing MP3 files with a sampling frequency of 44.1 kHz and a fixed bit rate of 128 kbps. The assured bit rate range for sound quality on the unit is 8 kbps to 160 kbps.
•When creating MP3 discs
Do not store more than 510 albums in a disc. Also, keep the En total number of albums and tracks 510 or less in a disc.
13
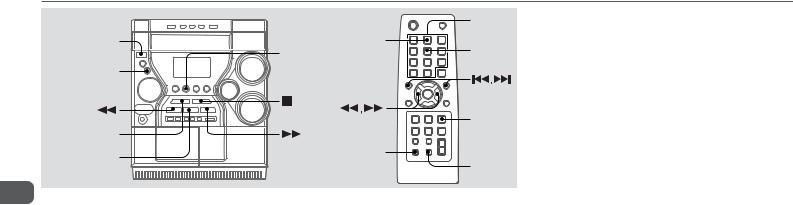
TUNER OPERATIONS
POWER
ENTER
MULTI JOG 
 PRESET
 PAUSE/SET
En
Manual tuning
1Press TUNER/BAND (SHIFT+BAND on the remote) repeatedly to select a band (FM or AM).
2Press for gto tune in to a station.
"TUNE" appears when a station is tuned in. "1" lights up for FM stereo reception.
To search for a station automatically (Auto Search)
Hold down for g.
The unit searches for a station up or down the band and stops at reception.
To stop the search manually, press for g.
•Auto Search may not stop at stations with weak signals.
|
1–0/10, |
|
+10 |
|
BAND |
TUNER/ |
TUNER |
BAND |
MODE |
CLEAR |
|
|
ENTER |
|
SHIFT |
|
CLEAR |
Preset tuning
Preset your favorite stations and tune them in directly.
Presetting stations
1Press TUNER/BAND to select a band.
2Press f or g to tune in to the desired station.
3Press ENTER (or aPAUSE/SET on the unit) to store the station.
The preset number, beginning from "1", appears in the display.
4Repeat step 1 to 3 to preset other stations.
•You cannot store more than a total of 32 preset stations. "FULL" appears.
Tuning in to preset stations
On the unit
1Press TUNER/BAND to select a band.
2Press cPRESET repeatedly or turn MULTI JOG.
With each press, the station with the succeeding preset number is tuned in.
On the remote
1Press SHIFT+BAND to select a band.
2Press the numbered buttons for the preset number of your desired station.
-To select preset number 10, press 0/10.
-To select preset number 15, press +10 and 5.
-To select preset number 20, press +10, +10 and 0/10.
• Pressing ror trepeatedly can also select the preset number.
To clear a preset station
1 Tune in to the station by preset tuning.
2 Press sCLEAR on the unit (CLEAR on the remote), then press ENTER within 6 seconds.
Preset numbers of preset stations in the band with higher numbers decrease by one.
14

Adjustments
Antennas
Keep antennas away from metallic objects, electrical equipment and cords.
FM antenna: Extend fully and position for the best reception. If receiving condition is poor, connect optional outdoor antenna to  FM 75 Ω terminal. Use an adapter as required.
AM antenna: Rotate to find best reception.
To switch to monaural FM reception
Press SHIFT+TUNER MODE on the remote. With each press, "MONO" and "STEREO" appear alternately in the display.
Tip:
When FM stereo reception is poor, switching to monaural reduces noise.
To switch the AM tuning interval
Hold down TUNER/BAND and press POWER on the unit. With each press, the AM tuning interval alternates between 9 kHz/ step and 10 kHz/step.
Tip:
The default is 10 kHz/step. Change it only when using the unit in a 9 kHz/step area. Switching AM tuning interval clears all the preset stations.
En
15
Loading...