


Built-under Oven
Instruction and Installation Manual
EON 946
319 4394-00 |
GB |
K/PM-D 99.05.01 |

Dear Customer !
Carefully please read these instructions for use. First of all pay special attention to the chapter “Hints on safety”.
Keep these instructions for use for later on consultation and hand them over to a possible follow--up owner of the appliance.
 By means of this warning triangle and/or by the

 signal words “precaution” and “attention!” hints are stressed which are of importance for your safety or for the functionability of the appliance. Please do absolutely adhere to.
After this sign you will get further information on attendance and practical application of the appliance.
By means of this sign we have marked tips and hints for the economical and environment--pro- tecting use of the appliance.
For possibly occurring trouble these instructions do contain hints for self--acting remedy, see chapter “What to do, if ...”
Should these hints not be sufficient there are at any time two places to call at for helping you on: (After-- sales--service or Hotline).
Here you will get an answer to any question in relation with the equipment and application of your appliance. We are, of course, ready to accept wishes, suggestions and critics. We are aimed at permanently improving our products and services for the benefit of our customers.
Our after-sales-service will be at your disposal at any time with regard to technical problems (addresses and phone numbers are given in chapter “after-sales-ser- vice agencies”).
2

Contents
Instructions for the user
Hints on safety |
44 |
Disposal |
45 |
Description of the appliance |
46 |
Total view |
46 |
Control panel |
46 |
Safety equipment |
47 |
Prior to first use |
48 |
Daytime setting |
48 |
First cleaning |
48 |
First warming up |
49 |
Hotplate switches |
50 |
The electronic oven control |
51 |
General information |
51 |
Switch-on and switch-off |
52 |
Oven functions |
52 |
Oven temperature |
53 |
Children safety device |
54 |
Short term alarm |
55 |
Automatic program - cooking time |
56 |
Automatic program - switch-off time |
57 |
Switch-on and switch-off automatic |
58 |
Meat probe |
59 |
The oven cavity |
61 |
Oven accessories |
61 |
Grease filter |
61 |
Oven runners |
61 |
Application of the oven functions |
62 |
Top and bottom heat |
62 |
Hot-air |
62 |
Pizza function |
63 |
Infrared grill |
63 |
Large surface grill |
63 |
Turbo grill |
64 |
Oven illumination |
64 |
Hints, tips and charts |
65 |
Roasting |
66 |
Baking |
67 |
Pizza function |
68 |
Grilling |
69 |
What to do in case of.. |
70 |
Cleaning and care |
71 |
Oven and accessories, door and panel |
71 |
Oven runners |
72 |
Fold down top heat elements |
72 |
Oven with stainless steel fascia |
72 |
Instructions for the installer
Installation instructions |
73 |
Hints on safety |
73 |
Built-in in kitchen furniture |
73 |
Built-in dimensions |
73 |
Mains connection |
74 |
Hob connection |
75 |
Technical data, typeplate |
76 |
3
Hints on safety
The safety of this appliance corresponds to the acknowledged rules of technique and to the law on appliance safety. The safety measures existing as a matter of self-understanding would, however, not cover all of possible risks of accidents.
Moreover, we feel compelled as the manufacturer to make you familiar with the following hints on safety.
Electrical safety
Mounting and connection of the new appliance must exclusively be carried out by an approved electric fitter.
Please observe this hint, as otherwise the claim under guarantee will be ruled out with occurring damages.
Built--in appliances must be installed in built--in cupboards. The cupboards have to be located and fastened in a way that they are stable.
Damaged appliances must not be used. Fuselage to be cut off or unscrewed in case of trouble or failure.
Repair work at the appliance must exclusively be carried out by expert technicians. Improper repair work may lead to considerable danger. In need of repair please contact our after--sales--service or your expert dealer.
Besides the accessories supplied with the unit do exclusively make use of suitable and tempera- ture--resistant baking tins and roasting dishes. Do please follow the manufacturers’ instructions.
Safety at cleaning
No heating element must be switched on during the cleaning procedure. Make sure that the oven has cooled down in a way that one may get in touch with interior parts without any danger.
Always keep the oven clean. When heating up fat splashes and spots will cause inconvenient odours.
The oven door must firmly close. Ensure clean sealing surfaces at door and door frame.
The cleaning of the appliance with a steam jet or high--pressure cleaner is not allowed because of the requirements of electrical safety.
Safety for children
When roasting, baking or grilling the oven gets hot. On principle, keep away small children, therefore.
Make use of the door-lock. In this case small children cannot open the oven door.
Make use of the children safety device of the electronic oven control.
Safety during use
This appliance must exclusively be used for the boiling and frying of food as usual in household applications.
Precaution with the connection of electric appliances to sockets in the vicinity of the appliance. Connection leads must not get in touch with the hot oven door or cavity frame.
In case of careless handling there is danger of burning oneself at the heating elements in the oven.
When taking out the hot items do absolutely make use of pot or thermo-gloves.
How to avoid damages on the appliance
Do not use the oven for the purpose of space heating.
The oven bottom must not be covered with alufoil. Pots, pans and vessels must not be placed on the oven bottom. The heat will accumulate and may cause damage to the material.
Make sure that no acetic liquids, such as vinegar, lemon or deliming means get access to the enamelled cavity, as this would result in mat spots. Use the deep enamelled universal pan for preparations like fruit cake etc.
Do’nt keep bread or damp food in the oven cavity.
The opened oven door must not be burdened too heavily, do not sit or step on it.
After use make sure that the appliance is switched off.
4

Disposal
Disposal of packing material
All parts of the packing are re--usable, foils and hard foam correspondingly marked.
PE = Polyethylen (cover, bags of accessories) PS = Polystrol (cushion)
Packing material and possibly old appliances are to be disposed off orderly.
Please do observe the national and regional regulations on appliances and packing material as well as the material marking (material separation, waste collection, depots for valuable substances).
Hints on disposal
The appliance must not be disposed of with the rubbish.
Information on collection dates and places are available from the local towns cleaning dept. or from the municipal administration. This symbol refers to tips and hints on the economic and environment protecting use of the appliance.
 Warning! Past use old appliances do please ren-

 der unserviceable prior to disposal. Cut off the mains.
5

Description of the appliance
Total view
Panel with switches and electronic oven control
oven door handle
oven door
with glass fascia and oven view
Panel
Å
|
|
|
|
|
|
|
|
|
|
|
|
|
|
|
|
|
|
|
|
|
|
|
|
|
|
|
|
|
|
|
|
|
|
|
|
|
|
|
|
|
|
|
|
|
|
|
|
a |
b |
|
|
|
c |
|
d |
|
|
|
|
e f |
|
|
|
|
|
|
|||||||||||||||||
|
|
|
|
|
|
|
|
|
|
|
|
|
|
|
|
|
|
|
|
|
|
|
|
|
|
|
|
|
|
|
|
|
|
|
|
|
|
|
|
|
|
|
|
|
|
|
|
|
|
|
|
|
|
|
|
|
|
|
|
|
|
|
|
|
|
|
|
|
|
|
|
|
|
|
|
|
|
|
|
|
|
|
|
ÀÁ
ÀHotplate switch, front left
Á Hotplate switch, rear left
 Electronic oven control
à Hotplate switch, rear right
Ä Hotplate switch, front right
Å
Scale illumination
 |
à |
Ä |
aPush button ON/OFF
bPush button oven functions
cPush button oven temperature
dPush buttons temperature and time + = forward / -- = backward
ePush button short--term alarm
fPush buttons automatic programs
6
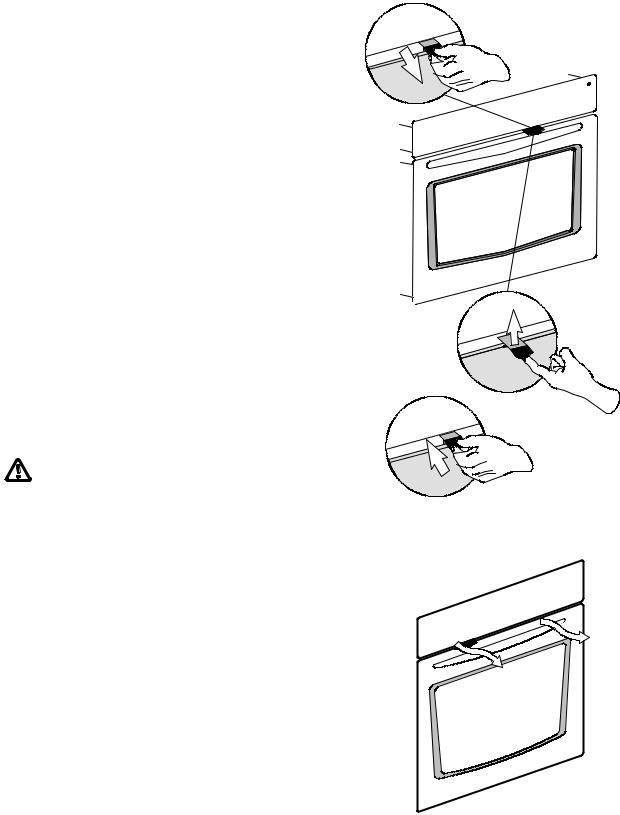
Safety equipment
Oven door locking /
Children safety mechanism
By means of an interlocking mechanism for the oven you can prevent playing children from getting access to it.
Activating of door lock
For interlocking of the oven door pull the interlocking tongue out.
Opening and closing of the oven door with activated interlocking mechanism.
To open the door push the tongue upwards, the door can easily be opened. Make use of thermo-gloves or of a pot cloth in case the appliance will be hot.
When closing the door the interlocking tongue will automatically catch in.
Deactivating of door lock
Push the tongue in. Now the oven may always be opened.
Activation (pull out) or deactivation (push in) of the interlocking mechanism are always to be realized with the door open.
In order to avoid any burns do only activate or deactivate the oven door interlocking mechanism with the appliance in cold state.
Oven cooling fan
The appliance is fitted with a cooling fan that will automatically switch on in case of heat beeing developed and, if need be, continue to run after switch-off of the appliance.
7

Prior to first use
In the chapters ”Daytime setting” and ”First heating-up” the manipulation steps for the electronic oven control are just briefly described with hints on buttons and symbols: Relevant explanatory information you will find in the following chapter ”The electronic oven control”:
Daytime setting
The appliance must be switched off when setting or resetting the daytime. After connection to the power supply or after a power failure 12 00 will flash for about 5 seconds in the display. Afterwards 12 00 will remain on and  between the indicator for hours and minutes will flash. The actual daytime between 0.00 - 23.59 hours has to be set.
As long as 12 00 is flashing:
by means of pushing the buttons  and
and  set the daytime.
With 12.00 already remaining on in the display and with
 flashing:
At first do simultaneously push the buttons 

 (cooking duration) and
 (switch--off
time) for about 5 seconds since 12 00 flashes,
then by means of buttons  and
and  then set the daytime.
After 5 seconds the time will remain in the display and  is flashing between the indication of hours and minutes. The setting procedure is completed.
In case of corrections of time (Summer/Winter time, power failure, etc.) proceed in same manner.
First cleaning
To remove any possible production remnants, the appliance should be cleaned before use.
Remove any possibly existing labels and protective foils from control panel and oven door.
Clean control panel and oven door with warm water and a cleanser and dry afterwards.
Remove the accessories from the oven and rinse them.
Clean the oven and the door with warm water and a cleanser and dry afterwards.
With that the oven light may be switched on:
Push button  (on/off) for switching on the oven light and for switching off.
8
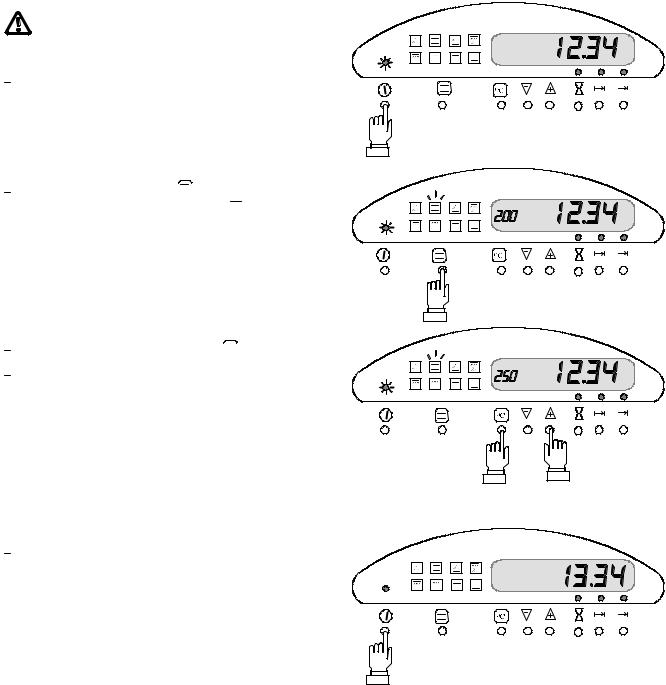
First warming up
The oven must once be heated up prior to first use.
When first heating up take care for a sufficient space ventilation.
Push button  (on/off).
The switch--on control and the oven indicator lamp will come on.
Then push the button 
 (oven function) for
several times, and set position  (Top/bottom heat),
the function symbol lights up in the display and the temperatur indicator shows 200 as pre--set temperature.
Push the temperature button 

 and
and
by means of button  set the oven temperature to 250 oC.
After about 5 seconds the oven function will switch on. In this setting operate the empty and closed oven for about 60 minutes.
Switch--off: push button  (on/off).
The control and oven indicator lamp will go out.
The cooling fan continues to run until the oven is considerably cooled down.
9
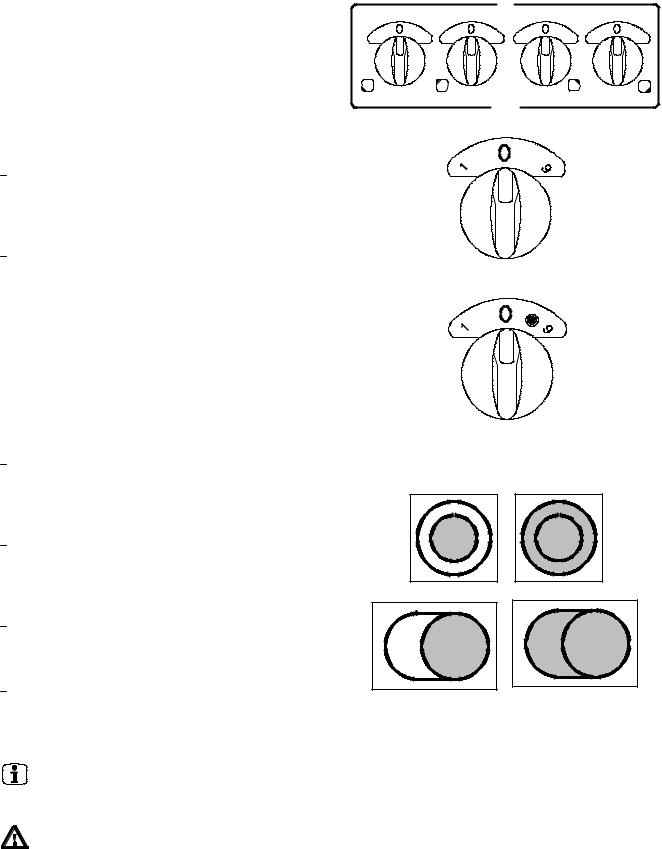
Hotplate switches
Switch-on and switch-off
Cooking zones or hotplates of built--in hobs are switched and regulated by means of four switches at the right on the control panel. With switched on cooking zones the scale section above the switches is lighted up and at the same time serving as a signal lamp. Switches for normal cooking zones or hotplates
Switches for normal cooking zones or hotplates
For switching--on turn the selector knob on the panel to the right or to the left to the desired output to the positions 1 -- 9. Position 9 ist the highest and position 1 the lowest output.
For switching--off turn the selector knob to the
OFF--position.
Switches for dual--circuit zones
With the dual--circuit zone and the griddle zone the greater heating elements can, depending on pots or pans size be added to the smaller heating elements.
Setting of the small cooking zone
Turn the switch knob to the right to the the setting desired between 1 and 9.
Adding dual--circuit of cooking or griddle zone
Turn the switch knob to the right. Continue turning beyond position 9 to symbol  to a clearly noticeable stop (Attention! Do not exceed when turning).
Afterwards turn the setting knob back to the setting desired. Danach die gewünschte Garstufe einstellen.
For termination of the cooking procedure switch back to the OFF--position.
When switching on again the cooking zone and griddle zone the greater heating element has to be added again.
Check after use whether the appliance is switched off. All switches to be in the OFF--positon.
Hints for using the cooking zones pls. find in teh separate instruction manual of your hob.
10
The electronic oven control
Temperatureindicator
|
Indication of daytime and time |
Oven functions |
settings |
|
|
Symbols |
|
|
and |
|
|
Push buttons |
|
Switch--on |
Controllamps for time setting |
|
/--off control |
||
|
General information
Functions
Daytime
The setting is described in chapter ”Prior to first use”.
Oven function selection
Oven temperature selection
Short-term alarm
Automatic program Cooking duration Automatic program Switch-off time Temperature automatism with the meat probe Children safety device
Setting duration 5 seconds
Any setting performed will within 5 seconds be taken over by the electronic control and possibly started.
With initial settings it may happen that, within this short period of time, you will not have completed yet the setting step next to follow. By repeated pushing of the corresponding button you may reactivate the desired setting procedure and continue.
Oven cooling fan
After switch--off the appliance will continue to run until
the oven temperature has dropped below about 160 oC.
Push buttons
Pushing the button switches the oven on or off. The switch--on control lamp and the oven light come on.
With the function setting knob the desired oven function has to be set: pushing the button several times since the symbol of the desired function lights up.
After actuation of the button the oven temperature desired may be set with the buttons -- or +.
Push buttons for all settings Button -- = backward  Button * = forward.

Timer/Short--term alarm -- Setting of sequences of time without any switching on/off effect.
Time settings:
Setting of the duration of cooking time. The function starts at once and is automatically switched off after lapse of the time set.
Setting of the switch--off time. The oven is switched off at the time set.
An automatic switching on and off at pre-set times is possible by combination of programs cooking time and switch-off time. .
11
Safety switch--off device
The electronic oven control is provided with a safety switch-off device for the case where function and temperature are set without any limitation of time (cooking time, switch-off time). Depending on the intensity of the temperature set the oven will be switched off automatically.
with temperature setting up to 115 oC after 12 hours 30 minutes
with temperature setting from 115 up to 195 oC after 8 hours 30 minutes
with temperature setting from 195 up to 245 oC after 5 hours 30 minutes
with temperature setting from 245 up to 270 oC after 1 hour 30 minutes.
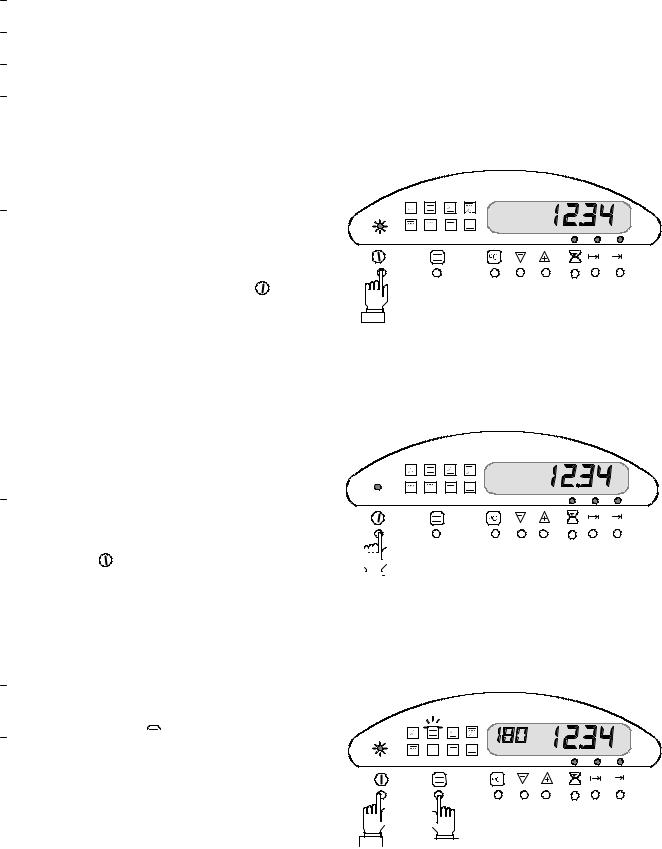
Switch-on
Push button  (On/Off) -
the switch--on control lamp and the oven illumination come on.
Prior to the setting of functions and temperatures the |
|
appliance must be switched on with button . |
|
Within 5 seconds then proceed with the desired setting |
switch-on |
(function, temperature, time). |
You can operate the oven without any setting of time, with function and temperature setting only. In such a case the appliance will have to be switched off
manually with button  at the end of the cooking procedure.
Switch-off and correction
Push button  (On/Off)
the switch--on control lamp and the oven illumination go out.
Push the button |
in order to switch off all functions |
|
|
|
|
|
|
|
|
|
|
|
|
|
|
|
|||
|
|||||||||
|
|||||||||
|
|
||||||||
and time settings, |
this also refers the correction of |
|
|
|
|
|
|
|
switch-off |
|
|
|
|
|
|
||||
wrong settings. Afterwards new settings can at once be |
|
||||||||
made. |
|
|
|
|
|
|
|
|
|
Oven functions
By means of button  (on/off) switch on the oven.
then push button 
 (oven function) for several times until the symbol of the desired function lights up in the display.
The oven functions, their order and distinctive features are represented and described on the page next to follow.
During the cooking procedure you may also switch over to another oven function.
1 

 2
2
push and set the


 oven function switch-on
12
 Loading...