


user manual
Gas oven
EOG 23400
2 electrolux
Electrolux. Thinking of you.
Share more of our thinking at www.electrolux.com
Contents
Safety information |
2 |
Technical data |
13 |
Product description |
3 |
Installation |
14 |
Before first use |
4 |
Gas supply |
16 |
Operation |
5 |
What to do if… |
18 |
Use, tables and tips |
9 |
Service and spare parts |
19 |
Care and cleaning |
12 |
Disposal |
19 |
Subject to change without notice
Safety information
 Warning! This new appliance is easy to use.
However, make sure to read this handbook before installing and using it for the first time. In this way you can obtain best performance, avoid incorrect operations, use the appliance in complete safety and respect the environment.
Installation
•This oven must be installed by qualified personnel in accordance with existing rules and regulations.
•This oven is heavy. Take care when moving it.
•Remove all packaging, both inside and outside the oven, before using the oven.
•This appliance is not connected to a combustion products evacuation device. It must be installed and connected in accordance with current installation regulations. Particular attention shall be given to the relevant requirements regarding ventilation.
•The use of a gas cooking appliance results in the production of heat and moisture in the room in which it is installed. Ensure that the kitchen is well ventilated: keep natural ventilation holes open or install a mechanical ventilation device (mechanical extractor hood).
•Prolonged intensive use of the appliance may call for additional ventilation, for example opening a window, or more effective ventilation, for example increasing the
level of mechanical ventilation where present.
People Safety
•This oven is designed to be operated by adults. Do not allow children to play near or with the oven.
•This appliance is not intended for use by children or other persons whose physical, sensory or mental capabilities or lack of experience and knowledge prevents them from using the appliance safely without supervision or instruction by a responsible person to ensure that they can use the appliance safely.
•The oven gets hot when it is in use. Children should be kept away until it has cooled.
During Use
•This oven is intended for domestic cooking only. It is not designed for commercial or industrial purposes.
•Appliances become very hot with use, and retain their heat for a long period after use. Care should be taken to avoid touching heating elements inside the oven.
•Always stand back from the oven when opening the oven door during cooking or at the end of it to allow any build up of steam or heat to release.
•Do not block any of the oven vents. Never line any part of the oven with aluminium foil.
•Do not allow heatproof cooking material, e.g. roasting bags, to come into contact with oven elements.
•When cleaning the oven, proceed with care: never spray anything onto the grease filter (if fitted), the heating elements and the thermostat sensor.
•Never place plastic or any other material which may melt in or on the oven.
•Do not place sealed cans or aerosols inside the oven. They may explode if they are heated.
•Do not hang towels, dishcloths or clothes from the oven or its handle.
•Do not use this oven if it is in contact with water and never operate it with wet hands.
•Take great care when heating fats and oils as they will ignite if they become too hot.
•Always use oven gloves to remove and replace food in the oven.
•Ensure that all control knobs are in the OFF position when not in use.
•Do not leave cookware containing foodstuffs, e.g. fat or oil in or on the oven in case it is inadvertently switched ON.
electrolux 3
•Do not use harsh abrasive cleaners or sharp metal scraper to clean the oven door glass since they can scratch the surface, which may result in shattering of the glass.
Maintenance and Cleaning
•Only clean this oven in accordance with the instructions.
•This appliance cannot be cleaned with steam or with a steam cleaning machine.
•Do not use abrasive cleaners or sharp metal scrapers. These can scratch the glass in the oven door, which may result in the shattering of the glass.
•The oven should be kept clean at all times. A build-up of fats or other foodstuffs could result in a fire, especially in the grill pan.
•Always allow the oven to cool down and switch off the electrical supply before carrying out any cleaning or maintenance work.
Product description
|
|
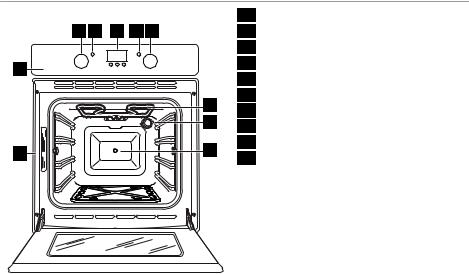
1 |
Control panel |
2 3 4 5 6 |
|
2 |
Thermostat control knob |
|
|
3 |
Thermostat indicator |
1 |
|
4 |
Electronic Programmer |
|
5 |
Block warning light |
|
|
|
||
|
7 |
6 |
Oven Function Control Knob |
|
7 |
Grill |
|
|
8 |
||
|
8 |
Oven lamp |
|
|
|
||
10 |
|
9 |
Turnspit hole |
|
10 |
Rating plate |
|
|
|
4 electrolux
Controls
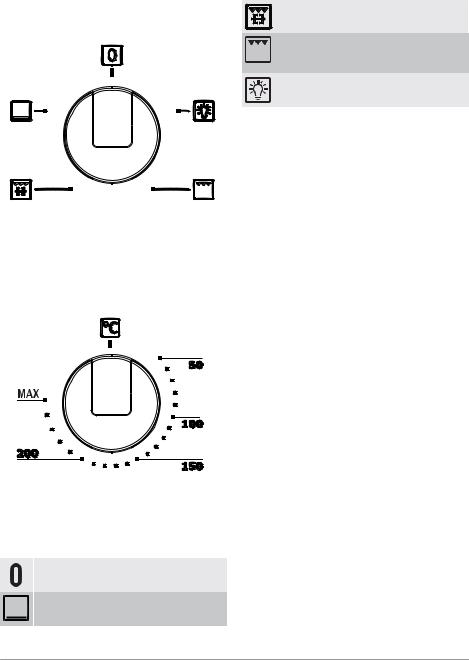
Oven function control knob
This control is used for selecting the type of cooking.
Turn the knob to one of these symbols to obtain the required function. At the same time, the oven light is switched on.
Thermostat control knob
The cooking temperature can be set between 50°C and MAX (240°C), turning the thermostat knob clockwise.
Oven functions
The oven is off
The oven emits heat from the bottom.
Before first use
Electric grill and rotisserie operation.
The grill is switched on: the oven emits heat only from the top (suitable for browning food)
The oven light is switched on but the oven does not heat
Thermostat light
This light on the control panel comes on when the oven is heating. The light goes off when the oven temperature reaches the level selected with the thermostat. Simultaneously, the gas flow is stopped. The light may come on several times during cooking with the automatic lightning of the burner, to keep the temperature constant.
Block” warning light
This light comes on to indicate gas “block” and therefore burner shutdown. To eliminate the block, turn the selector knob to “0” and the thermostat knob to  (off), wait for one minute then repeat the lighting operation.
Safety Thermostat
To prevent dangerous overheating (through incorrect use of the appliance or defective components), the oven is fitted with a safety thermostat, which interrupts the power supply. The oven switches back on again automatically, when the temperature drops. Should the safety thermostat trigger due to incorrect use of the appliance, it is enough to remedy the error after the oven has cooled down; if on the other hand, the thermostat triggers because of a defective component, please contact Customer Service.
Cooling fan
The cooling fan operates during cooking. Air is expelled through vents between the oven door and the control panel, as shown in the diagram.
The cooling fan may run on after the oven is switched off to keep the controls cool. This is quite normal.
 The oven will work only if the time of day has been set.
When using the oven for the first time, set the current time with the programmer (refer to the instructions in the section “The timer”)
electrolux 5
When used for the first time, it is advisable to heat the oven empty in order to eliminate any unpleasant odours caused by the insulation and manufacturing residues.
When switching the oven on for the first time:
1.set the thermostat to MAX;
2.heat the oven EMPTY for about 45 mins;
3.switch the grill on for 5-10 minutes
4.air the room during the entire operation. During the first minutes of operation, IT IS ABSOLUTELY NORMALif the oven produces unpleasant odours and fumes. This is due to heating of the insulation and manufacturing residues.
 Before cooking for the first time, carefully wash the GRILL and DRIP-TRAY (i.e. the enamelled metal tray with raised edges located inside the oven).
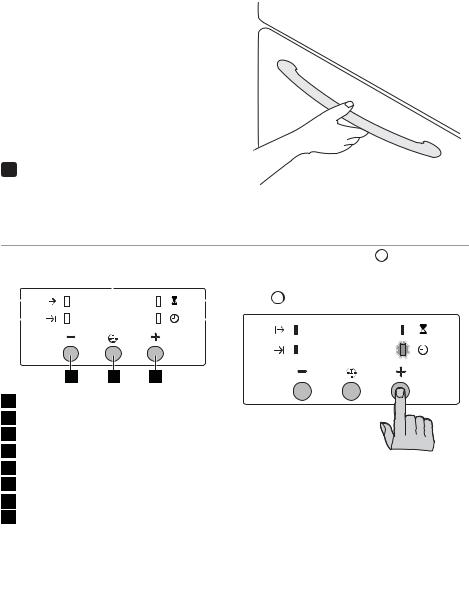
 To open the oven door, always grip the handle in the middle.
Operation
The timer |
|
|
|
|
|
|
|
|
|
|
|
Setting the time of day |
|
|
|
|
|
||||||
|
|
|
|
|
|
|
|
|
|
|
|
|
|
|
|
||||||||
|
|
|
|
|
|
|
|
|
|
|
|
|
|
|
When the power supply is switched on, or |
||||||||
|
|
|
|
|
|
|
4 |
|
|
|
|
|
|||||||||||
|
|
|
|
|
|
|
|
|
|
|
after a power failure, the “Time of day” pilot |
||||||||||||
|
|
|
|
|
|
|
|
|
|
|
|
|
|
|
|||||||||
|
5 |
|
|
|
|
|
|
|
|
|
|
|
|
|
lamp |
|
|
will flash on the display. |
|||||
|
|
|
|
|
|
|
|
||||||||||||||||
|
|
|
|
|
|
|
|
|
|
|
|
|
|
|
|||||||||
|
|
|
|
|
|
|
|
|
|
|
|
|
|
|
|
|
|
|
|
|
|
|
|
6 |
|
|
|
|
|
|
|
|
|
|
|
|
|
|
|
|
|
|
|
|
|
|
|
|
|
|
|
|
|
|
|
|
|
|
|
|
|
|
|
|
|
|
|
|
|
|
|
|
|
|
|
|
|
|
|
|
|
|
|
|
|
|
|
|
|
|
|
|
|
|
|
|
|
|
|
|
|
|
|
|
|
|
|
|
|
|
|
|
|
|
|
|
|
|
|
|
|
|
|
|
|
|
|
|
|
|
|
|
|
|
|
|
|
|
|
|
|
|
|
2 |
1 |
3 |
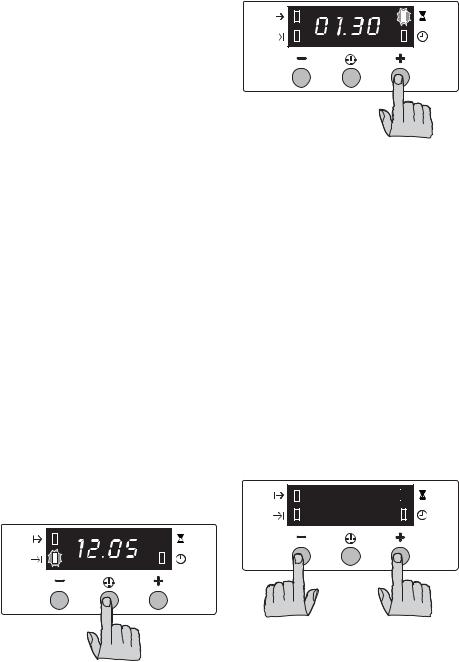
1“Cooking Duration” pilot lamp 

2Display
3“Minute minder” pilot lamp 
4“Time of day” pilot lamp 
5Increasing control button "+"
6Push button for selecting a function
7Decreasing control button "-"
8“End of cooking” pilot lamp 
 The oven will only work if the time of day has been set. However, the oven can also be operated without any programme.
 In the event of a power failure, all the settings (time of day, programme setting or programme in operation) will be cancelled. When the power is restored, the numbers in the display will flash, and the clock/timer has to be reset.
To set the correct time of day:
1.Press button “+” or “-”.
2.After the setting is carried out, wait for 5
seconds: the “Time of day” pilot lamp  will go out and the display will show the set time. The appliance is ready for use.
To reset the correct time of day:
1.Press button repeatedly to select the “Time of day” function. The relevant pilot
lamp will start flashing. Then proceed as described above.
The time of day can only be reset if no automatic function (cooking duration 
 or end of cooking
  ) has been set.

6 electrolux
Cooking Duration function 

This function allows the oven to automatically switch off at the end of a programmed cooking duration time. Place food in the oven, select a cooking function and adjust the cooking temperature. Press button repeatedly to select the “Cooking Duration” function.
The relevant pilot lamp 
 will start flashing.
To set the duration time
1.Press button "+" or "-".
2.After the setting is carried out, wait for 5 seconds: the "Cooking Duration" pilot lamp 
 will come on and the display will revert to the time of day.
3.When cooking time is over, the oven will be switched off automatically and an acoustic alarm will be heard, while the pilot lamp will start flashing. Turn the oven function and the thermostat control knob to zero.
To switch off the acoustic alarm, press any button.
Turning the acoustic alarm off will reset the oven to manual, and if the oven function and the thermostat knobs are not set to zero the oven will start to heat again.
To cancel the duration time
1.Press button repeatedly to select the “Cooking Duration” function. The relevant
pilot lamp 
 will flash and the display will show the remaining cooking time.
2.Press button "-" until the display shows “0:00”. After 5 seconds the pilot lamp will go out and the display will revert to the time of day.
End of cooking 
With this function, you can set the oven to switch off automatically when a programmed end of cooking time is over. Place food in the oven, select a cooking function and adjust the cooking temperature. Press button repeatedly to select the “End of cooking” function. The relevant pilot lamp
  will start flashing.
To set the End of cooking time
1.Press button "+" or "-".
2.After the setting is carried out, wait for 5 seconds: the “End of cooking” pilot lamp  will come on and the display will revert to the time of day.
3.When cooking time is over, the oven will be switched off automatically and an acoustic alarm will be heard, and the pilot lamp will start flashing. Turn the oven function and the thermostat control knob to zero.
To switch off the acoustic alarm, press any button.
Turning the acoustic alarm off will reset the oven to manual, and if the oven function and the thermostat knobs are not set to zero the oven will start to heat again.
To cancel the End of cooking time
1.Press button repeatedly to select the “End of cooking” function. The relevant pilot lamp
  will flash and the display will show the programmed End of cooking time.
2.Press button "-"until the display shows the current time of day. The programmer will beep and the pilot lamp will go out.
Cooking duration 
 and End of cooking time
  combined
The functions “Cooking duration” and “End of cooking time” can be used simultaneously to set the oven to switch on and off automatically at a later time.
1.With the “Cooking duration” function 
 (carry out the cooking duration setting as
described in the relevant chapter) set the duration time. Then, press button and the display will show the programmed setting.
2.With the “End of cooking time” function  (carry out the End of cooking setting as described in the relevant chapter) set the end of cooking time.
The relevant pilot lamps will come on and the display will show the time of day. The oven will switch on and off according to the set programmes.
Minute minder 
The minute minder alarm will sound at the end of a timed period, but the oven will remain on, if it is in use.
electrolux 7
To set the minute minder
1.Press button repeatedly to select the “Minute minder” function. The relevant pilot lamp
  will start flashing.
2.Press button "+"or "-" (maximum: 2 hours, 30 minutes).
3.After the setting is carried out, wait for 5
seconds: the “Minute minder” pilot lamp
 will come on.
4.At the end of the timed period, the pilot lamp will start flashing and an acoustic alarm will be heard. To switch off the acoustic alarm, press any button.
To cancel the minute minder
1.Press button repeatedly to select the “Minute minder” function. The relevant pilot lamp
  will flash and the display will show the remaining time.
2.Press button "-" until the display shows “0:00”. After 5 seconds the pilot lamp will go out and the display will revert to the time of day.
To switch off the display
1.Press two programmer push buttons at the same time and keep them pressed for about 5 seconds. The display will switch off.
2.To switch on the display, press any button.
8 electrolux
 The display can be switched off only if no other functions have been set.
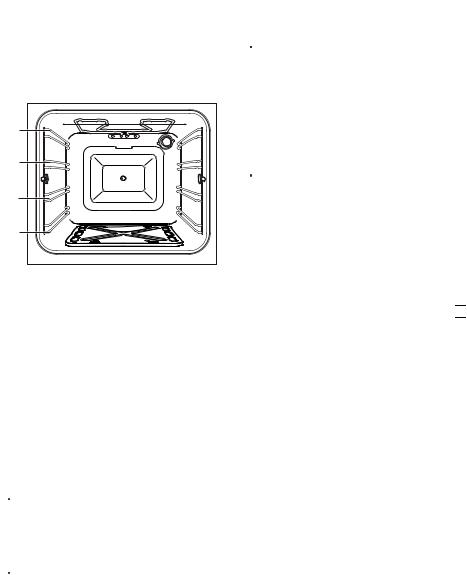
Using the oven
The oven has four shelf levels. The shelf positions are counted from the bottom of the oven as shown in the diagram.
door, it condenses and creates water droplets.
 Warning! Take care not to damage the enamelled parts of the oven when inserting and removing the driptray and grill.
4 |
3 |
2 |
1 |
It is important that these shelves are correctly positioned as shown in the diagram.
Do not place cookware directly on the oven base.
The oven is supplied with an exclusive system which produces a natural circulation of air and the constant recycling of steam.
This system makes it possible to cook in a steamy environment and keep the dishes soft inside and crusty outside. Moreover, the cooking time and energy consumption are reduced to a minimum. During cooking steam may be produced which can be released when opening the oven door. This is absolutely normal.
 Warning! However, always stand back from the oven when opening the oven door during cooking or at the end of it to allow any build up of steam or heat to release.
 Warning! Do not place objects on the oven base and do not cover any part of the oven with aluminium foil while cooking, as this could cause a heat build-up which would affect the baking results and damage the oven enamel. Always place pans, heat-resisting pans and aluminium trays on the shelf which has been inserted in the shelf runners. When food is heated, steam is created, like in a kettle. When the steam comes into contact with the glass in the oven
To reduce condensation, always preheat the empty oven for 10 minutes.
We recommend you wipe the water droplets away after every cooking process.
 Warning! Always cook with the oven door closed. Stand clear when opening the drop down oven door. Do not allow it to fall open - support the door using the door handle, until it is fully open.
Gas oven operation
 The oven cannot be lit with a naked flame.
To light the oven:
1.Turn the selector knob to the symbol 

 (the oven light comes on);
2.Turn the thermostat knob to the required temperature (the thermostat light comes on);
3.The oven starts the lightning phase in about 6 seconds. The “block” light comes on after 6 seconds (safety time) if the oven fails to light. To try lighting again, turn the selector knob to “0” and the thermostat knob to  (off), wait for one minute then repeat the operations described above.
 When used for the first time, several lighting attempts are normally required due to the presence of air in the gas pipe.
4.The thermostat light goes off when the oven temperature reaches the level set with the thermostat. The light may come on several times during cooking, to keep the temperature constant.
 In case of a power failure during gas oven operation, the oven switches off and the gas flow is stopped. The appliance switches on again automatically as soon as the power is restored.
 Loading...