


I N F O
EOB 854
Built-in Oven |
Instruction and Installation Manual |
GB
DEJ-K/RD-SD - 970505 |
319 2881-01 |
This manual will also be printed in the ITALIAN language.
We like to send this manual, if needed to your address and ask you to give us information by mail to Electrolux-Juno
Küchentechnik GmbH K/CS
Junostraße 1 D-35745 Herborn
2

Contents
Important hints on safety . . . . . . . . . . . . . . . . . . . . . . . . . . . . . . . . . . . . . . . . . . . . . . . . . . . . . . . . . . . . . . . . . . . . |
4 |
User instructions
Total view and control panel |
5 |
Safety equipment |
6 |
Prior to the first use |
7 |
First cleaning |
7 |
First heating-up |
7 |
The oven switches |
8 |
Function switch |
8 |
Temperature selector |
8 |
Control indicators |
8 |
The oven cavity |
9 |
Oven accessories |
9 |
Oven runners |
9 |
Application of the oven functions |
10 |
Topand bottom heat |
10 |
Infra-red grilll |
11 |
Large surface grill |
11 |
Turbo grill |
12 |
Remarks for baking and roasting |
12 |
Oven lighting, bulb exchange |
13 |
Electronic clock |
14 |
Charts for roasting |
18 |
Charts for baking, |
19 |
Charts for grilling |
21 |
Useful hints on practical problems |
22 |
Useful hints on technical problems |
22 |
Cleaning |
23 |
Oven and accessories |
23 |
Control panel and oven door |
23 |
Heating elements on top |
24 |
Stainless steel surface |
24 |
Guarantee |
- - |
Spare parts service |
- - |
After sales addresses |
- - |
Installation instructions
Installation instructions |
25 |
Unpacking and disposal |
25 |
Built-in in kitchen furniture |
25 |
Built-in dimensions |
25 |
Mains connection |
26 |
Technical data, type plate |
28 |
3
Important hints on safety
Prior to first use of the appliance do make yourself familiar with the instruction manual. Pay special attention to the hints on safety marked with a . This will prevent from damages to persons as well as to the appliance itself.
Do carefully keep the manual at a safe place and, if need be, pass it on to your successor user.
The appliance is only to be used for its purpose in the household. This appliance is according to international security instructions and quality norms.
The safety measures existing as a matter of selfunderstanding would, however, not cover all of possible risks of accidents.
The oven bottom must not be covered with alu-foil. The heat will accumulate and may cause damage to the material.
When taking out the hot items do absolutely make use of pot or thermo-gloves.
The opened oven door must not be burdened too heavily, do not sit or step on it.
When connecting additional electrical appliances to sockets close to the oven make sure the connecting wires do not come into contact with the hot appliance and do not get jammed with the hot oven door.
Besides the accessories supplied with the unit do exclusively make use of suitable and temperature-- resistant baking tins and roasting dishes. Do please follow the manufacturers’ instructions.
Electrical safety
The connection to the power supply must exclusively be carried out by expert electricians. Moreover, electrical safety has to be ensured by expert installation in standard built-in cabinets.
Damaged appliances must not be used. Fuselage to be cut off or unscrewed in case of trouble or failure.
For safety reasons repairing, in particular at live parts of the appliance, has to be carried out by expert electricians or trained service technicians only, as potential danger will result for the user. If a fault occurs, please contact our after--sales--service.
Children safety
Always keep small children away. Make sure that playing children do not operate the appliance.
To protect against burns from hot heating elements of the oven the oven door is provided with a catch lock, that can normally be opened by adults, only.
Use and operation
Prior to first use the oven must be heated up once. Take care for a sufficient space ventilation.
In case of careless handling there is danger of burning oneself at the heating elements in the oven.
After use make sure that the appliance is switched off. All of the rotary knobs have to be reset into the OFFposition.
Cleaning
No heating element must be switched on during the cleaning procedure. Make sure that the oven has cooled down in a way that one may get in touch with interior parts without any danger.
Always keep the oven clean. When heating up fat splashes and spots will cause inconvenient odours.
The oven door must firmly close. Ensure clean sealing surfaces at door and door frame.
Steam and high--pressure cleaning units are not suitable for cleaning because of the requirements of electrical safety.
4
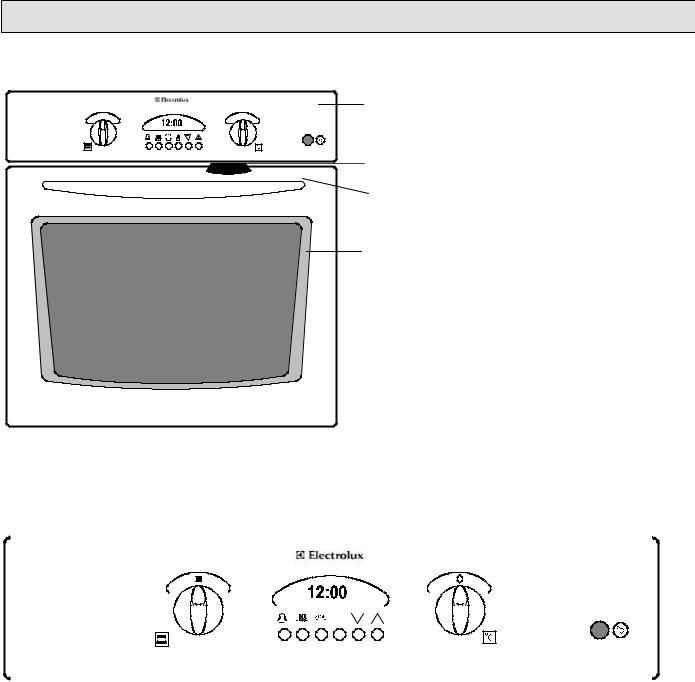
The built-in electric oven
Overall view
control panel with switches for function, temperature and electronic clock
locking mechanism
oven-door handle
full glass oven door with inspection window
Control panel
Ë |
|
Ë |
|
|||||||||||||||||||||||||||||||
|
|
|
|
|
|
|
|
|
|
|
|
|
|
|
|
|
|
|
|
|
|
|
|
|
|
|
|
|
|
|
|
|
|
|
|
|
|
|
|
|
|
|
|
|
|
|
|
|
|
|
|
|
|
|
|
|
|
|
|
|
|
|
|
|
|
|
|
|
|
|
|
|
|
|
|
|
|
|
|
|
|
|
|
|
|
|
|
|
|
|
|
|
|
|
|
|
|
|
|
|
|
|
|
|
|
|
|
|
|
|
|
|
|
|
|
|
|
|
|
|
|
|
|
|
|
|
|
|
|
|
|
|
|
|
|
|
|
|
|
|
|
|
|
|
|
|
|
|
|
|
|
|
|
|
|
|
|
|
|
|
|
|
|
|
|
|
|
|
|
|
|
|
|
|
|
|
|
|
|
|
|
|
|
|
|
|
|
|
|
|
|
|
|
|
|
|
|
|
|
|
|
|
|
|
|
|
|
|
|
|
|
|
|
|
|
|
|
|
|
|
|
|
|
|
|
|
|
|
|
|
|
|
|
|
|
|
|
|
|
|
|
|
|
|
|
|
|
|
|
|
|
|
|
|
|
|
|
|
|
|
|
|
|
|
|
|
|
|
|
|
|
|
|
|
|
|
|
|
|
|
|
|
|
|
|
|
|
|
|
|
|
|
|
|
|
Ê |
|
|
|
Î |
|
Ì |
Í |
||||
Ê Oven function switch
Ë Illuminated scale discs
Ì Electronic clock
ÍOven temperature selector
ÎTemperature control lamp
5
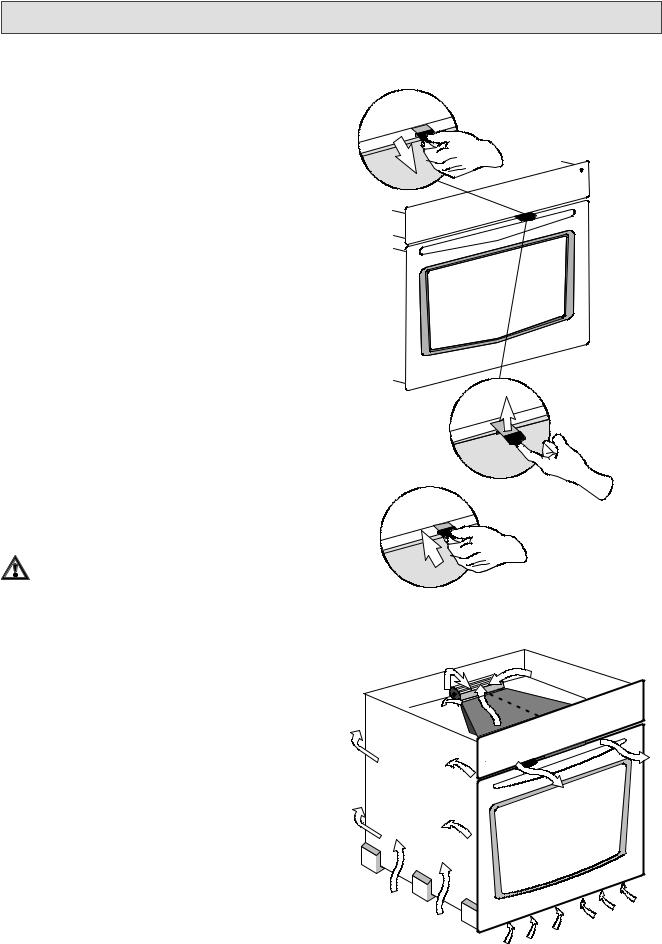
Safety equipment
Oven door locking /
Children safety mechanism
By means of an interlocking mechanism for the oven you can prevent playing children from getting access to it.
Activating of door lock
For interlocking of the oven door pull the interlocking tongue out.
Opening and closing of the oven door with activated interlocking mechanism.
To open the door push the tongue upwards, the door can easily be opened. Make use of thermo-gloves or of a pot cloth in case the appliance will be hot.
When closing the door the interlocking tongue will automatically catch in.
Deactivating of door lock
Push the tongue in. Now the oven may always be opened.
Activation (pull out) or deactivation (push in) of the interlocking mechanism are always to be realized with the door open.
In order to avoid any burns do only activate or deactivate the oven door interlocking mechanism with the appliance in cold state.
Oven cooling fan
The appliance is fitted with a cooling fan that will automatically switch on in case of heat beeing developed and, if need be, continue to run after switch-off of the appliance.
6
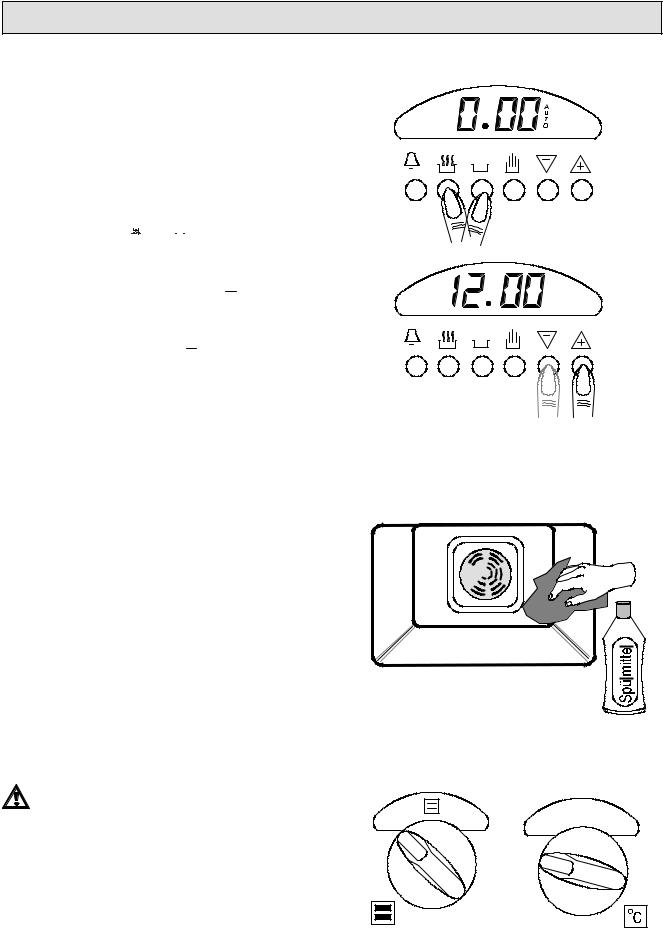
Prior to the first use
Daytime setting
When the oven has been connected to the mains and after failure of electricity, the time display of the electronic autotimer flashes 0.00 and AUTO. The present daytime has to be set. Without this, the oven cannot be used. The time display covers the range from 0.01 to 24.00 hours.
. Push buttons 


 and
and 
 simultaneously and hold it.
. At a time set the present daytime by pushing button  forwards or button
  backwards.
To make corrections of time (summer--/winter--time, etc.) simultaneously press the two adjusting buttons and adjust the actual time with  or
or  .
.
First cleaning
In order to remove possible production remnants, clean the appliance once prior to first use.
Remove any possibly existing labels and protective foils from the front of the appliance.
Clean control panel and oven door with hot water and a washing-up liquid and dry.
Remove the accessories from the oven and wash them.
The clean-enammelled cavity has to be washedo with warm water and a washing-up liquid. Then dry it.
The oven lighting may be switched on for this purpose by setting the function switch to position  .
.
First heating up
Prior to first use the oven must be heated up once. Take care for a sufficient space ventilation.
Set function switch to top / bottom heat and temperature selector knob to 250 oC.
Holding this setting, operate the empty and closed oven for 60 minutes.
STOP
STOP


 D
D
250
7

Oven switches
Oven function switch
The function switch can be turned to the left and to the right to the desired position.
The oven illumination ist switched on with position  and at a time with all oven functions.
Oven illumination
Hot-air
Pizza function
Turbo grill
Infrared grill
Infrared large surface grill
Top heat
Bottom heat
Top and bottom heat
Oven temperature selector
The temperature selector knob is switched on by tur- |
275 |
ning to the right from 50 to 275 oC. Do not turn it beyond |
|
the maximum setting. For switch--off turn left to 0--set- |
|
ting. |
|
The oven will be heated up after setting of function switch and temperature selector.
Indicators
The function control
The scale discs light up, when the oven is switched on. The illumination goes out, when both switches are in the OFF-position.
The temperature control lamp
shines when the oven heating is on. It goes out, when the set temperature has been reached, and lights up again during reheating phase.
Temperature control lamp
8

The oven cavity
AOven runners, removable
BSeparation panel, rear element and fan behind
CInfrared grill
DTop heat element
C+DLarge surface grill
E oven illumination
F type plate
5
4
3 |
Runner level |
2
1
|
D |
|
C |
|
E |
|
5 |
|
4 |
|
E |
|
A |
|
3 |
|
B |
A |
2 |
|
|
|
1 |
F |
|
Oven accessories
Besides the accessories supplied with the unit do exclusively make use of suitable and tempe- rature--resistant baking tins and roasting dishes. Do please follow the manufacturers’ instructions.
The oven has the following accessories: 1 drip pan
2 baking sheets
1 wire shelve
1 grease filter for rear element
Further baking sheets and wire shelves can be ordered with our Central Spareparts Service.
Oven runners
The oven has 4 runners. In the charts and illustrations of these instructions they are numbered from 1 = bottom to 4 = top. Please insert baking sheets, wire shelf or grill pan between the double bars: this will hold them in a secure position when inserting them and taking them out.
5 |
4 |
3 |
2 |
1 |
9
 Loading...