


instruction booklet
CN
built-in oven
EOB33200

Welcome to the world of Electrolux
Thank you for choosing a first class product from Electrolux, which hopefully will provide you with lots of pleasure in the future.
The Electrolux ambition is to offer a wide variety of quality products that make your life more comfortable.
You find some examples on the cover in this manual.
Please take a few minutes to study this manual so that you can take advantage of the benefits of your new machine.
We promise that it will provide a superior User Experience delivering Ease-of-Mind.
Good luck!

4 electrolux |
|
Contents |
|
Warnings and Important Safety Information |
........................................................ 5 |
Description of the appliance............................................................................... |
7 |
Controls............................................................................................................. |
8 |
Before using the oven for the first time ............................................................... |
9 |
Electronic programmer .................................................................................... |
10 |
Using the Oven ............................................................................................... |
15 |
Cooking tables ................................................................................................ |
19 |
Cleaning and Maintenance .............................................................................. |
21 |
If something is wrong ....................................................................................... |
25 |
Technical Data ................................................................................................ |
26 |
Instructions for the Installer .............................................................................. |
27 |
Instructions fo Building In ................................................................................. |
29 |
Service and spare parts ................................................................................... |
31 |
European Warranty .......................................................................................... |
32 |
Guide to using the user instructions
 Safety instructions
Step by step instructions
 Hints and Tips
This appliance conforms with the following ECC Directives:
-2006/95 (Low Voltage Directive);
-89/336 (EMC Directive);
-93/68 (General Directive); and subsequent modifications.
electrolux 5
 WarningsandImportantSafetyInformation
Always keep these user instructions with the appliance. Should the appliance be passed on to third persons or sold, or if you leave this appliance behind when you move house, it is very important that the new user has access to these user instructions and the accompanying information.
These warnings are provided for the safety of the users and those living with them. So read them carefully before connecting and/or using the appliance.
Installation
•The installation must be performed by a qualified person in accordance with the rules and regulations in force. The individual operations for installing the appliance are described under the instructions for the installer.
•Have the appliance installed and connected by a qualified person with specialist knowledge, who will carry it out in accordance with the directives.
•If any modifications to the power supply are required because of the installation, these should also be carried out by a qualified electrician.
Operation
•This oven is designed for cooking foodstuffs; never use it for other purposes.
•When opening the oven door during or at the end of cooking be careful of the stream of hot air, which comes out of the oven.
•Be very careful when using the cooker. The extreme heat of the heating elements makes the shelves and other parts very hot.
•If you should for whatever reason use aluminium foil to cook food in the oven, never allow it to come into direct contact with the floor of the oven.
•When cleaning the oven, proceed with care: never spray anything onto the grease filter (if fitted), the heating elements and the thermostat sensor.
•If is dangerous to make modifications of any kind to this appliance or to its specifications.
•During the baking, roasting and grilling process, the oven window and the other parts of the appliance get hot, so children should be kept away from the appliance. Take care, if connecting electrical appliances to sockets near the oven, that cables do not come into contact with hot rings or get caught in the oven door.
•Always use oven gloves to take hot ovenproof dishes or pots out of the oven.
•Regular cleaning prevents the surface material from deteriorating.
•Before cleaning the oven, either turn the power off or pull the mains plug out.

6electrolux
•Make sure that the oven is in the “OFF” position, when the oven is no longer being used.
•This oven was made as a single appliance or as a combination appliance with electrical hotplate, depending on the model, for singlephase connection to 230 V.
•The appliance must not be cleaned with a superheated steam cleaner or a steam jet cleaner.
•Do not use abrasive cleaners or sharp metal scrapers. These can scratch the glass in the oven door, which may result in the shattering of the glass.
Child Safety
•This appliance is intended for use by adults. It is dangerous to allow children to use it or play with it.
•Children should be kept away while the oven is working. Also, after you have switched the oven off, it remains hot for a long time.
•Children and people, who are not able to use the appliance safely because of their physical, sensory or mental capabilities or who do not have sufficient experience and knowledge, should not use this appliance without being supervised or instructed by a responsible person.
Customer Service
•Have checks and/or repairs carried out by the manufacturer’s service department or by a service department authorised by the manufacturer and use only original spare parts.
•Do not attempt to repair the appliance yourself in the event of malfunctions or damage. Repairs carried out by untrained persons may cause damage or injury.
The symbol |
on the product or its |
packaging indicates that this product is not to be treated as normal household waste. Instead it must be handed over to a collection point for the recycling of electrical and electronic equipment. The correct disposal of this product will help to protect the environment and human health. Environment and health are endangered by incorrect disposal. For more detailed information about recycling of this product, please contact your local town hall, your household waste disposal service or the shop where you purchased the product.
electrolux 7
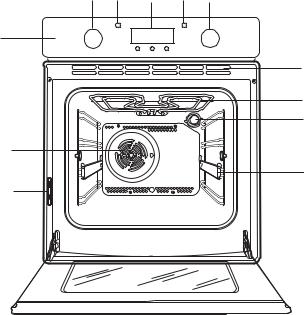
Description of the appliance
4 6 3 5 2
1
7
8
9
10
12
11
1. |
Control Panel |
7. |
Air Vents for Cooling Fan |
2. |
Oven Function Control Knob |
8. |
Grill |
3. |
Electronic programmer |
9. |
Oven light |
4. |
Thermostat Control Knob |
10.Oven Fan |
|
5. |
Mains On Indicator |
11. Rating plate |
|
6. |
Thermostat Control Indicator |
12.Telescopic runner |
|

8 electrolux
Controls
Push-Pull control knobs
Some models are provided with push pull control knobs. These knobs can be completely sunken inside the control panel when the oven is not working.
Oven Function Control Knob
 0
0  The oven is off
Conventional cooking
Fan cooking
Inner Grill
Full Grill
Pizza
Bottom heating element
Mains on Indicator
The mains on light will come on when the oven function control knob is set.
Thermostat Control Knob
Turn the thermostat control knob anticlockwise to select temperatures between 50°C and 250°.
Thermostat Control Indicator
The thermostat control indicator will come on when the thermostat control knob is turned. The indicator will remain on until the correct temperature is reached. It will then cycle on and off to show the temperature is being maintained.
Safety Thermostat
To prevent dangerous overheating (through incorrect use of the appliance or defective components), the oven is fitted with a safety thermostat, which interrupts the power supply. The oven switches back on again automatically, when the temperature drops.
Should the safety thermostat trigger due to incorrect use of the appliance, it is enough to remedy the error after the oven has cooled down; if on the other hand, the thermostat triggers because of a defective component, please contact Customer Service.
electrolux 9
The cooling fan
The cooling fan is designed to cool the the oven and the control panel. The fan switches on automatically after a few minutes of cooking. Warm air is blown out through the aperture near the oven door handle. When the oven is switched off, the fan will remain on in order to cool the oven and kitchen cabinets properly, after which it switches off automatically.
Before using the oven for the first time
Remove all packaging, both inside and outside the oven, before using the oven.
Before using for the first time, the oven should be heated up without food.
During this time, an unpleasant odour may be emitted. This is absolutely normal. It is caused by manufacturing residues.
Ensure the room is well ventilated.
1.Switch the oven function control knob to conventional cooking 

 .
.
2.Set the thermostat control knob to 250°.
4.Open a window for ventilation.
5.Allow the oven to run empty for approximately 45 minutes.
Then let the oven cool down. Then dampen a soft cloth with warm water and a little mild washingup liquid and use this to clean the oven cavity.
Before using for the first time, carefully wash the oven accessories as well.
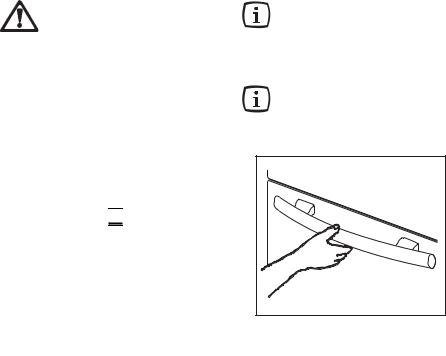
To open the oven door, always hold the handle in the centre.
10 electrolux
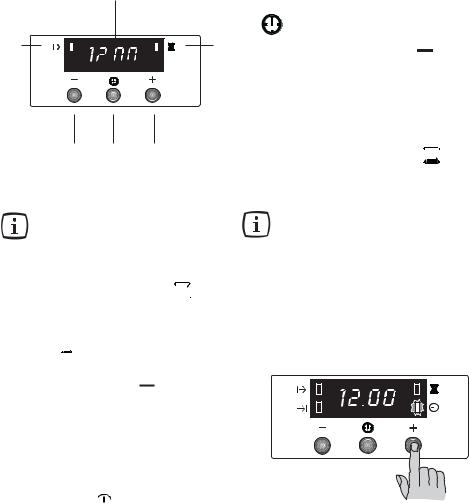
Electronic programmer
4
5 |
7 |
6


 8
8
2 1 3
Fig. 4
1.Push button for selecting a function
2.Decreasing control button “ ”
3.Increasing control button “ ”
”
4.Display
5.“Cooking Duration” pilot lamp 
6.“End of cooking” pilot lamp 
7.“Minute minder” pilot lamp 
8.“Time of day” pilot lamp 
The oven will only work if the time of day has been set.
However, the oven can also be operated without any programme.
Setting the time of day

When the power supply is switched on, or after a power failure, the “Time of day” pilot lamp 
 will flash on the display.
To set the correct time of day:
1.Press button “ ” or “ ”.
2.After the setting is carried out, wait for 5 seconds: the “Time of day” pilot
lamp  will go out and the display will show the set time. The appliance is ready for use.
To reset the correct time of day:
1.Press button repeatedly to select the “Time of day” function. The relevant pilot lamp will start flashing. Then proceed as described above.
The time of day can only be reset if no automatic function (cook duration

 or end of cooking
 ) has been set.
In the event of a power failure, all the settings (time of day, programme setting or programme in operation) will be cancelled.
When the power is restored, the numbers in the display will flash, and the clock/timer has to be reset.
electrolux 11
“Cooking Duration” function
This function allows the oven to automatically switch off at the end of a programmedcookingdurationtime.Place food in the oven, select a cooking function andadjustthecookingtemperature.Press button  repeatedly to select the “Cooking Duration” function. The relevant pilot lamp
  will start flashing. Then, proceed as follows:
To set the duration time: 1. Press button “ ” or “ ”.
2. After the setting is carried out, wait for 5 seconds: the "Cooking Duration" pilot lamp  will come on and the display will revert to the time of day.
3.When cooking time is over, the oven will be switched off automatically and an acoustic alarm will be heard, while the pilot lamp will start flashing. Turn the oven function and the thermostat control knob to zero.
To switch off the acoustic alarm, press any button.
NOTE: turning the acoustic alarm off will reset the oven to manual, and if the oven function and the thermostat knobs are not set to zero the oven will start to heat again.
To cancel the duration time:
1.Press button repeatedly to select the “Cooking Duration” function. The relevant pilot lamp
 will flash and the display will show the remaining cooking time.
2.Press button “ ” until the display shows “0:00”. After 5 seconds the pilot lamp will go out and the display will revert to the time of day.
 Loading...