


user manual bruksanvisning käyttöohje bruksanvisning brugervejledning kullanma kılavuzu
Ръководство за употреба
Microwave Oven Mikrovågsugn Mikroaaltouuni Mikrobølgeovn Mikrobølgeovn Mikrodalga fırın
Микровълнова фурна
EMS21200
2 EMS21200 EN
Contents
Safety information |
2 |
Accessories |
4 |
Product description |
7 |
Before first use |
9 |
Operation |
11 |
Care and cleaning |
14 |
Safety information
The built-in safety interlock switches prevent the microwave oven from operating when the door is open.
Do not tamper with them, or attempt to operate the oven with the door open as open door operation can result in exposure to microwave energy.
Do not allow food spills or cleaner residue to accumulate on door sealing surfaces. See the Cleaning and Care section for cleaning instructions.
It is particularly important that the oven door closes properly and that there is no damage to the: (1) door (warped),
(2) hinges and latches (broken or insecure), (3) door seals and sealing surface.
Warning: If the door, hinges/latches or door seals are damaged, the microwave must not be operated until it has been repaired by an authorized service person.
Warning: It is hazardous for anyone except factory trained service personnel to service or make adjustments to this oven. Contact your
Technical data |
15 |
Installation |
15 |
Environmental information |
17 |
European guarantee |
18 |
nearest authorised service agent if service should be required.
Do not remove the outer case, door or control panel at any time. Doing so may cause exposure to extremely high voltage.
Install or locate this oven only in accordance with ‘installation instructions’ found in this manual.
Use the appliance for its intended use as described in this manual. Do not use corrosive chemicals in this appliance.
This type of oven is specifically designed to heat, cook, or defrost food. It is not designed for industrial or laboratory use neither for commercial use as this will invalidate the guarantee.
Do not operate the oven empty. If food or water is not present to absorb the microwave energy, the magnetron tube can be damaged.
Do not store this appliance outdoors. Do not use this product near water.
Do not attempt to dry clothing or newspapers in the microwave oven. These items can ignite.
Do not use the cavity for storage purposes. Do not leave paper products, cooking utensils, or food in the cavity when not in use.
Microwave oven is a Group 2 ISM equipment in which radio frequency

energy is intentionally generated and used in the form of electromagnetic radiation for the treatment of material.
This oven is a Class B equipment suitable for use in domestic establishments and in establishments directly connected to a low voltage power supply network which supplies buildings used for domestic purposes.
The microwave oven shall not be placed in a cabinet unless it has been tested in a cabinet.
Warning: If smoke is observed, switch off or unplug the appliance and keep the door closed in order to stifle any flames. Never use water.
Warning: Only allow children or infirm persons to use the microwave, without supervision, when adequate instructions have been given so that the child or infirm person is able to use the microwave in a safe way and understand the hazards of improper use.
It is quite normal for steam to be emitted around the door, or for misting to occur on the door, or even for water droplets to appear below the door during the cooking cycle. This is merely condensation from the heat of the food and does not affect the safety of your oven. The door is not intended to seal the oven cavity completely.
Do not force the turntable to rotate by hand. This may cause malfunctioning.
EMS21200 EN 3
Arcing in the oven during microwave operation usually occurs from use of metallic utensils. Continuous arcing, however, can damage the unit. Stop the programme and check the utensil.
Care should be taken not to obstruct any air vents located on the top, rear, side and bottom of the oven.
Warning: Do not use this oven for commercial purposes. This oven is made for domestic use only.
Unpacking
When you unpack the oven, check that the product is free from damage. Damage or any missing parts must be reported immediately to the retailer.
The oven, parts of the oven or the accessories may be wrapped by a protection foil. If so, you must remove this foil before using the oven. Do not leave packing material so that small children can play with it. This can be hazardous.

4 EMS21200 EN
Utensil safety
Most glass, glass ceramic and heatresistant glassware utensils are excellent for use in the microwave oven. Although microwave energy will not heat most glass and ceramic items, these utensils
Oven utensils and accessories guide
can become hot as heat transfers from the food to the container. The use of oven gloves to remove dishes is recommended.
A variety of Utensils and Materials may be used for cooking in your microwave oven. For your safety and to prevent damaging utensils and your oven choose appropriate utensils and materials for each cooking method. The list below is a general guide.
|
Material |
|
Utensils |
|
|
Mode of operation |
|
|
|
|
|
Microwave |
|
||
|
|
|
|
|
|
|
|
|
|
|
|
|
|
|
|
|
Ceramic & |
|
Corning ware |
|
|
YES |
|
|
Glass |
|
|
|
|
||
|
|
|
|
|
|
|
|
|
|
|
Heat resistant |
|
YES*1 |
|
|
|
|
|
glass ware |
|
|
||
|
|
|
|
|
|
||
|
|
|
Glass ware |
|
|
|
|
|
|
|
with metal |
|
NO |
|
|
|
|
|
decoration |
|
|
|
|
|
|
|
Lead crystal |
|
NO |
|
|
|
|
|
glass |
|
|
||
|
|
|
|
|
|
||
|
China |
|
Without metal |
|
YES |
|
|
|
|
decoration |
|
|
|||
|
|
|
|
|
|
||
|
Pottery*2 |
|
|
|
YES |
||
|
|
|
Microwave |
|
|
|
|
|
Plastic |
|
oven |
|
YES |
|
|
|
|
heat-proof |
|
|
|||
|
|
|
|
|
|
||
|
|
|
wear |
|
|
|
|
|
|
|
Plastic wrap |
|
YES |
||
|
Metal |
Baking pan |
|
NO |
|||
|
|
|
Aluminium |
|
YES |
|
|
|
|
|
foil*3 |
|
|
||
|
|
|
|
|
|
||
|
Paper |
|
Cups, plates, |
|
YES |
|
|
|
|
towels |
|
|
|||
|
|
|
|
|
|
||
|
|
|
Waxed paper |
|
YES |
||
|
Wood |
|
|
|
NO |
||
|
Accessories |
Grill rack |
|
NO |
|||
|
|
|
Turntable |
|
YES |
||
YES: Utensils and accessories to use |
NO: Utensils and accessories to avoid |
|
*1 |
Only if there is no metal trim. |
|
*2 |
Only if it does not have a glaze containing metal. |
|
*3 |
Use aluminium foil only for shielding purposes, over use may cause arcing. |
|
Testing suitability of cookware
Utensils should be checked to ensure they are suitable for use in Microwave Ovens.
Place the cookware in the microwave along with a glass half full of water. Heat on full power for one minute. If the cookware feels hot, you should not use it. If it is just slightly warm, you can use it for reheating but not for cooking. If the dish is room temperature, it is suitable for microwave cooking.
Paper napkins, wax paper, paper towels, plates, cups, cartons, freezer wrap and cardboard are great convenience utensils. Always be sure containers are filled with food to absorb energy and thus avoid the possibility of overheating or ignition.
Many plastic dishes, cups, freezer containers and plastic wraps may be used in the microwave oven. Follow manufacturer’s instructions when using plastics in the oven. Avoid using plastic utensils with foods that have high fat or sugar content since these foods reach high temperatures and could melt some plastics.
Do not leave oven unattended, and look at it from time to time when heating or cooking food in plastic, paper or other combustible containers.
Metal utensils and utensils with metallic trim should not be used in the microwave oven, unless specifically recommended for microwave use.
Containers with restricted openings, such as bottles, should not be used for microwave cooking.
Use caution when removing a lid or cover from a dish to avoid steam burns.
Foil containers
Shallow foil containers may safely be used to reheat foods in your microwave
EMS21200 EN 5
oven providing the following rules are observed:
1.Foil containers should not be more than 3 cms (1 1/4”) deep.
2.Foil lids must not be used.
3.The foil containers must be at least two-thirds full of food. Empty containers must never be used.
4.Foil containers should be used singly in the microwave oven and should not be allowed to touch the sides. If your oven has a metal turntable or cooking rack, the foil container should be placed on an upturned ovenproof plate.
5.Foil containers should never be reused in the microwave oven.
If the microwave oven has been in use for 15 minutes or more, allow it to cool before using it again.
The container and turntable may become hot during use; take great care when removing either from the oven. It is advisable to use an oven cloth or glove when doing so.
Remember when using an aluminium foil container that the reheating or cooking times may be longer than you are used to, always ensure that the food is piping hot before serving.
Food safety
Do not heat food in a can in the microwave oven. Always remove the food to a suitable container.
Deep fat frying should not be done in the microwave oven, because the fat temperature cannot be controlled, hazardous situations can result.
Popcorn may be prepared in the microwave oven, but only in special packages or utensils designed specifically for this purpose. This cooking operation should never be unattended.

6 EMS21200 EN
Pierce foods with non-porous skins or membranes to prevent steam build-up and bursting. Apples, potatoes, chicken livers, and egg yolks are examples of items that should be pierced.
The contents of feeding bottles and baby food jars are to be stirred or shaken and the temperature is to be checked before consumption, in order to avoid burns.
Warning: Liquids or other foods must not be heated in sealed containers since they are liable to explode.
Warning: Microwave heating of beverages can result in delayed eruptive boiling; therefore care must be taken when handling the container.
Warning: When heating liquids, e.g. soups, sauces and beverages in your microwave oven, overheating the liquid beyond boiling point can occur without evidence of bubbling. This could result in a sudden
boil over of the hot liquid. To prevent this possibility the following steps should be taken:
Avoid using straight-sided containers with narrow necks.
Do not overheat.
Stir the liquid before placing the container in the oven and again halfway through the heating time.
After heating, allow standing in the oven for a short time, stirring again before carefully removing the container.
Warning: Some products such as whole eggs and sealed containers – for example, closed glass jars – may explode and should not be heated in this oven. Occasionally, poached eggs may explode during cooking. Always pierce the yolk, then cover and allow the standing time of one minute before removing cover.
EMS21200 EN 7
Product description
How to operate your microwave oven
Name and Function of Parts |
Turntable Installation |
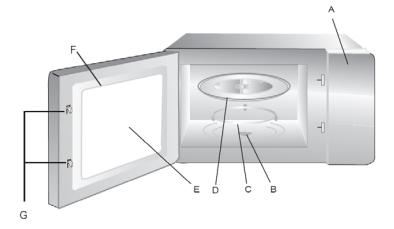
A.Control panel
B.Turntable drive shaft
C.Turntable support and roller assembly. Place on the floor of the oven to support the turntable
D.Glass turntable. Food in suitable container is placed on this tray for cooking. Do not use the oven without the turntable
E.Viewing window. Food can be seen through this window while cooking
F.Oven door and seal. Oven door must always be closed during cooking and the faces free from dirt and build up of food
G.Latch hook
1.Ensure that the turntable drive shaft is located into the hole in the oven floor and engaged with the ‘D’ shaft of the drive motor
2.Place the turntable support and roller assembly so that it sits concentric with the drive shaft
3.Place the glass turntable onto the turntable support and roller assembly and rotate gently until it locates into the drive shaft
N.B.
•Never place the turntable upside down.
•Turntable, support and drive shaft must be used during cooking.
•Food and food containers must always be placed on the turntable
•The turntable can rotate clockwise or anticlockwise. This is normal.
8 EMS21200 EN
1.
2.
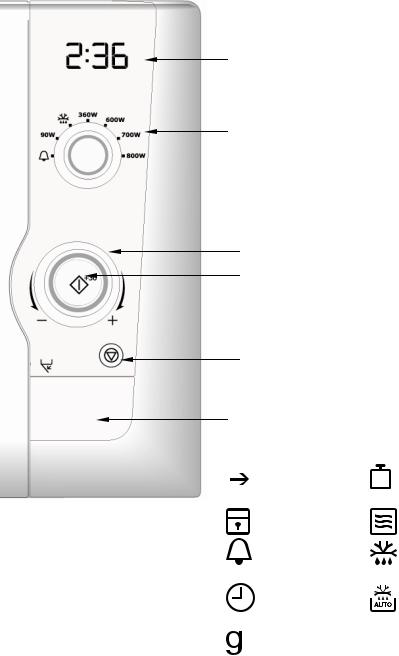
Control Panel
1.Digital Display
2.Power Selector
3.3. Time/ weight selector
4.4. Start +30s push button
5.
6.
5.Stop / Cancel push button
6.Door Release push button
Display Symbols |
|
||
|
|
Start |
Weight |
|
|
||
|
|
||
|
|
Child Lock |
Microwave |
|
|
Minute |
Defrost |
|
|
Timer |
|
|
|
Time of Day |
Auto Defrost |
|
|
Grammes |
|
|
|
|
|
Before first use
IMPORTANT
This oven has an energy saving feature called 'Economode'.
Note 1 When the oven is first connected to the electrical power supply, the default setting is 'Economode'.
Note 2. This ‘Economode function’ switches off the product 3 minutes after the end of any cooking cycle, i.e. there is no digital display visible. This is designed to reduce the power absorbed by the appliance to zero when not in use.
Note 3: You have the option to select and switch on the time of day in the display window. When 'time of day' clock is selected the 'Economode' setting is switched off.
IMPORTANT
You can choose to select
1.the 'time of day' clock.
OR
2. the 'Economode' energy saving feature
It is NOT possible to select 'Economode' and the 'time of day clock'.
1. To set the ‘time of day’ clock:
1. Open the door and keep it open.
EMS21200 EN 9
2.Press and hold the ‘start +30s’ push button for 5 seconds.
3.The oven will ‘beep’ to advise that it has entered ‘time of day’ setting mode and 12h will flash together with the clock symbol in the digital display.
4a. To set ‘Time of Day’ in 12 hour mode:
-rotate the time/weight control knob to set the hour.
-press the ‘start +30s’ push button’. The selected ‘hour’ is confirmed and stops flashing, and the minute digits will start to flash
-rotate the time/weight control knob to set the minutes.
-press the ‘start +30s’ push button’. The selected ‘minutes’ is confirmed and stops flashing. The display shows the time of day and the colon between the hours and minutes flashes and the clock symbol remains on.
4b. To set ‘Time of Day’ in 24 hour mode:
- press ‘start +30s’ push button once more. 24h will show flash in the display.
-rotate the time/weight control knob to set the hour.
-press the ‘start +30s’ push button’. The selected ‘hour’ is confirmed and stops flashing, and the minute digits will start to flash
-rotate the time/weight control knob to set the minutes.
-press the ‘start +30s’ push button’. The selected ‘minutes’ is confirmed and stops flashing. The display shows the time of day and the colon between the hours and minutes flashes.
10 EMS21200 EN
Note 1: If the food is removed from the cavity, on closing the door, the display shows the time of day.
Note 2: If the Stop/Cancel push button is pressed 3 times during a cook cycle, the display shows the time of day.
To restore the ‘Economode’ function once the time of day has been set:
1.Open the door and press the start +30S button for 5 seconds. 12H will flash in the display.
2.Press start + 30S once more. 24H will flash in the display.
3.Press start + 30S once more. Econ will flash in the display.
4.Close the door. The oven will now enter ‘Economode’ and the 3 minute countdown will begin.
Note : If the Stop/Cancel push button is pressed once after the 'Economode' countdown has begun the display will clear immediately.
2. ‘Economode’
IMPORTANT
The energy saving feature below is only available when 'Economode' is selected. This feature is NOT available if the 'time of day' clock is selected.
•When the oven is in Economode and has completed the selected cook cycle, the oven turns off.
•The display shows the selected power level from the previous cook cycle.
•After 3 minutes have elapsed the oven will now enter ‘Economode’ , a further 3 minute countdown will begin.
•The display shows ‘Econ’ followed by, 2.57, 2.56, 2.55 and then ‘Econ’ followed by 2.51, 2.50, 2.49 until 3 minutes has elapsed.
•After the 'Economode' 3 minute countdown is complete there will be no visible digital display
Note 1: If the food is removed from the cavity, on closing the door, the display shows ‘Econ’ and the 3 minute countdown will begin.
Note 2: If the Stop/Cancel push button is pressed 3 times during a cook cycle, the display shows ‘Econ’ and the 3 minute countdown will begin.
Note 3: It is possible to interrupt the 'Economode' countdown by:
•Opening the door, or
•Turning the power selector, or
•Turning the time weight selector, or
•Pushing the Stop/Cancel push button, or
•Pushing the Start +30s push button
Note 4: If the Stop/Cancel push button is pressed once after the 'Economode' countdown has begun the display will clear immediately.
Operation
IMPORTANT
Pressing the Stop/Cancel push button will end the selected cooking cycle.
3. Cooking with Microwave.
The upper power selector control knob is used to select microwave power level and the lower Time/ weight selector is used to set the desired cooking time up to 90 minutes.
Turn the Time/ weight selector to select the cook time and note the increments as shown in the following table:
Between |
Increments are |
0 sec. 5 min. |
15 sec. |
5 min. 10 min. |
30 sec. |
10 min. 30 min. |
1 min. |
30 min. 90 min. |
5 min. |
Select the power level using the power selector.
Press start+30s push button.
Note : the power level and /or cook time can be changed at any time during the cooking process by altering the time or power setting.
Note: During cooking if defrost power level is selected 180 will appear in the display (this is the defrost power level). If the
EMS21200 EN 11
minute timer position is selected 0 will appear in the display.
e.g. To cook for 5 minutes at 700 watt power:
1.Select 700 w power level using the power selector
2.Turn the Time/ weight selector clockwise until 5:00 is shown in the display
3.Press ‘start + 30S’ push button
4. The ‘plus 30 seconds’ function
1. Pressing ‘start +30s’ push button when the oven is in ‘stand by’ mode i.e. when not is use and ‘time of day’ is displayed, will automatically start microwave cooking at the power selected for 30 seconds. The appropriate symbol will switch on in the display.
Any additional operation of this push button will add ’30 seconds’ to the existing cook time. The maximum cook time which can be entered is 90 minutes.
2. During microwave cooking or ‘defrosting by time’ pressing the start button at any time will increase the cook / defrost time by 30 seconds. Note: this function is not available when using the oven in automatic mode i.e. ‘auto defrost by weight’.
12 EMS21200 EN
5. Auto defrosting by weight
1 Set defrost power level using the power selector. The defrost, weight and ‘g’ symbols will flash in the display
2. Rotate the Time/ weight selector anticlockwise to select the frozen weight in grams of the food you are defrosting. (between 2000g and 100g). The manual defrost symbol will switch off and the auto defrost symbol and ‘g’ will continue to flash.
3.Press ‘start +30s’ push button to begin the automatic defrosting function. The oven will calculate the defrosting time and power level required to defrost the food perfectly. The defrosting time left will be shown in the display and the auto defrost symbol will switch on.
Note 1: The oven will pause mid way through the defrosting programme to allow you to turn / stir the food to aid even defrosting
Note 2: Power level or defrosting time cannot be changed during automatic defrosting
6. Defrosting by time.
1 Set defrost power level using the power selector. The defrost symbols and ‘g’ will flash in the display
2. Rotate the Time/ weight selector clockwise to select the defrost time required. The manual defrost symbol will continue to flash and the auto defrost and ‘g’ symbols will switch off.
3.Press ‘start +30s’ push button to begin the manual defrosting function. The defrosting time left will be shown in the display and the manual defrost symbol will switch on.
Note 1: The oven will pause mid way through the defrosting programme to allow you to turn / stir the food to aid even defrosting
Note 2: The power level and defrost time can be changed during the defrost programme, but any change in power level may not provide acceptable defrosting results.
7. Kitchen Timer
Your oven has a useful kitchen timer function to help time those other activities in the kitchen 1.Set to kitchen timer (zero microwave power) using the power selector. The bell symbol will flash in the display.
2.Rotate clockwise to select the time required.
3.Press ‘start +30s’ push button. The bell symbol will switch on 4.The timer will start to countdown.
5. The oven will ‘beep’ three times when the time has elapsed.
Note1: There is no microwave energy generated using this function and the oven lamp and cooling fan do not operate.
De-selection of the minute timer function will cancel the current timer operation.
8. Child Lock.
The oven can be rendered inoperable should you wish to prevent unauthorised use i.e excluding children from using the appliance
In the ‘stand by’ mode, press and hold the cancel button for 5 seconds. You will hear a long ‘beep’ which denotes that the child lock has been engaged and the child lock symbol will illuminate in the display.
The oven cannot now be used unless the child lock function is removed:
To exit the ‘child lock’ mode, press and hold the cancel button for 5 seconds. You will hear a long ‘beep’ which denotes that the child lock has been dis-engaged and the child lock symbol will switch off in the display.
9. Re-Turntable function.
Your oven has a helpful returntable feature. The turntable
EMS21200 EN 13
always stops in the position at which it started at the beginning of the cook cycle. This allows the orientation of cooking utensils to remain in the correct position for removal from the oven cavity after cooking.
Note : at the end of the cook cycle, the oven will not switch off until the turntable has returned to its original position.
10. General information and user guidelines.
1.Each time a push button is pressed a ‘beep’ will sound to confirm this action.
2.The initial rotation of the control knob will be accompanied by a ‘beep’.
3.After any cooking programme has been set, failure to initiate cooking by pressing start button within 3 minutes will result in cancellation, and the ‘time of day’ will be displayed or the oven will enter ‘Economode’.
4.At the end of every cooking cycle, the oven will ‘beep’ three times.
5.Opening the door during the cooking cycle will stop the oven operation.
The start button must be pressed to resume cooking

14 EMS21200 EN
Care and cleaning
The oven must always be clean. Residue of food from spillovers or spatters will attract microwave energy causing it to burn on. This could reduce the efficiency of the oven and may cause bad odours.
Do not attempt to tamper with or make any adjustments or repairs to any part of the oven.
Repairs should only be done by a qualified service technician.
Be sure the oven is off or the unit is unplugged before cleaning.
Cleaning the accessories (turntable, support and Grill rack)
Clean them with mild detergent after removing them for the cavity. Turntable support should be carefully handled.
The inside of the oven and turntable get very hot; so do not touch them immediately after use.
Cleaning the interior
Always keep the inside of the oven clean. Wipe up spillovers and food spatters immediately. Deposits that are allowed to remain on the oven walls, door seal and door surface will absorb microwave energy, reduce the efficiency of the oven, and possibly damage the oven interior. Use mild, liquid detergent, warm water and a soft, clean cloth to remove deposits from the base of the oven. For the side of the oven use a soft damp cloth only, no liquids should be used near the venting holes.
Never use abrasive cleaners, commercial oven cleaners or steel wool pads on any part of the microwave oven.
To loosen difficult deposits, boil a cup of water in the microwave oven for 2 or 3 minutes.
Never use a knife or any utensil to remove deposits from the oven surfaces.
To remove odours from the oven interior, boil a cup of water plus 2 tablespoons of lemon juice for 5 minutes.
Cleaning the door seals
Wipe up spillovers and food spatters immediately. Deposits that are allowed to remain on the door seals will absorb microwave energy, reduce the efficiency of the oven, and possibly damage the oven interior. You can only use mild, liquid detergent, warm water and a soft, clean cloth to remove deposits from the door seals.

Cleaning the exterior
Open the oven door when cleaning the control panel. This will prevent the oven from being turned on accidentally. You should clean outside surfaces of the oven with mild liquid detergent and water followed by a wiping with clear water to remove any excess detergent. Dry with a soft cloth.
EMS21200 EN 15
Spray-on window cleaners or allpurpose spray-on kitchen cleaners can also be used. Never use abrasive cleaners, scouring pads or harsh chemicals on outside surfaces of your oven. To prevent damage to the working parts, do not allow water to seep into ventilation openings.
Technical data
AC Voltage |
230V / 50 Hz |
Absorbed Power |
1250W |
Microwave Output Power |
800W |
Microwave Frequency |
2450 MHz |
Product Dimensions (h x w x d) |
287mm x 485mm x 422mm |
Oven Capacity |
21 litre |
Weight |
12.96 Kg |
Installation
1.Remove any promotion label from the door.
2.The oven should be installed on a flat, level surface. The surface must be strong enough to safely bear the weight (13.5 kg) of the oven, and the contents. To avoid the possibility of causing vibration or noise the oven must be in a stable position.
3.Keep the oven away from heat and water. Exposure to heat and water can lower oven
efficiency and lead to malfunctioning, so be sure to install the oven away from heat and water sources.
4.Do not block air vents on the top and the sides of the cabinet and also do not place any articles on the top of the oven. If air vents are blocked during operation, the oven may overheat, and this may lead to malfunctioning. Hot air escapes from the vents so be sure not to obstruct it or let
16 EMS21200 EN
curtains come between the oven and the rear wall.
5.Place the oven as far away from radios and TV’s as possible. This oven does conform to EEC requirements of radio interference suppression, but some interference may occur if it is placed too close to a radio or TV, so keep them as far apart as possible.
6.If positioned in a corner, leave a gap of at least 15cm from the walls and 15cm above the microwave.
The oven can be placed almost anywhere in the kitchen. Make sure the oven is placed on a flat, level surface and that vents as well as the surface underneath the oven are not blocked (for sufficient ventilation).
Connecting to the mains
The oven is delivered with the power cord and a plug for 230V, 50Hz, earthed socket outlet.
Earth protection minimises the risks should a short circuit occur. Check to ensure the voltage of the oven matches the supply.
If the oven is connected to the socket via an extension cord, make sure the cord is earthed.
This appliance must not be used on a non-earth protected power supply.
Contact an electrician if you are uncertain regarding electrical connection of the oven or provision of earth protection of the
supply.
This appliance must be earthed. If this appliance is fitted with a non-rewireable plug for which your socket is unsuitable, the plug should be cut off and the appropriate plug fitted. If it is necessary to change the fuse in a non-rewireable plug, the fuse cover must be refitted. If the fuse cover is lost or damaged, the plug must not be used until a replacement is obtained.

Electrical connections
WARNING! THIS APPLIANCE MUST BE EARTHED.
The manufacturer declines any liability should this safety measure not be observed.
Environmental information
The symbol  on the product or on its packaging indicates that this product may not be treated as household waste. Instead it shall be handed over to the applicable collection point for the recycling of electrical and electronic equipment. By ensuring this product is disposed of correctly, you will help prevent potential negative consequences for the environment and human health, which could otherwise be caused by inappropriate waste handling of this product. For more detailed information about recycling of this product, please contact your local city office, your household waste disposal service or the shop where you purchased the product
EMS21200 EN 17
If the plug that is fitted to your appliance is not suitable for your socket outlet, please contact service force.
18 EMS21200 EN
European guarantee
This appliance is guaranteed by Electrolux in each of the countries listed below for the period specified in the appliance guarantee or otherwise by law. If you move from one of these countries to another of the countries listed below the appliance guarantee will move with you subject to the following qualifications: -
•The appliance guarantee starts from the date you first purchased the appliance which will be evidenced by production of a valid purchase document issued by the seller of the appliance.
•The appliance guarantee is for the same period and to the same extent for labour and parts as exists in your new country of residence for this
particular model or range of appliances.
•The appliance guarantee is personal to the original purchaser of the appliance and cannot be transferred to another user.
•The appliance is installed and used in accordance with instructions issued by Electrolux and is only used within the home, i.e. is not used for commercial purposes.
•The appliance is installed in accordance with all relevant regulations in force within your new country of residence.
The provisions of this European Guarantee do not affect any of the rights granted to you by law.
2 EMS21200 SV
Innehåll
Säkerhetsinformation |
2 |
Tillbehör |
4 |
Produktbeskrivning |
7 |
Före första användning |
9 |
Användning |
11 |
Skötsel och rengöring |
14 |
Säkerhetsinformation
De inbyggda säkerhetsbrytarna gör att det inte går att använda mikrovågsugnen när luckan är öppen.
Mixtra inte med dem och försök inte att köra ugnen med öppen lucka eftersom du eller någon annan då kan exponeras för mikrovågsenergi.
Låt inte rester av mat eller rengöringsmedel ackumuleras på tätningarna runt luckan. Se avsnittet "Skötsel och rengöring" för anvisningar om rengöring.
Det är särskilt viktigt att ugnsluckan stänger ordentligt och att det inte är någon skada på: (1) luckan (skev), (2) gångjärn och lås (trasiga eller lösa), (3) lucktätningar och tätningsytor.
Varning: Om luckan, gångjärnen/låsen eller tätningarna är skadade får du inte använda mikrougnen förrän den har reparerats av en auktoriserad servicetekniker.
Tekniska data |
15 |
Installation |
16 |
Miljöinformation |
18 |
Europa-garanti |
18 |
Varning: Det är farligt för alla utom specialutbildad servicepersonal att utföra service eller göra justeringar på denna ugn. Kontakta närmaste servicerepresentant om ugnen behöver genomgå service.
Ta aldrig bort ytterhöljet, luckan eller kontrollpanelen. Om du gör det kan du utsättas för mycket höga spänningar.
Installera eller placera inte ugnen på något annat sätt än enligt instruktionerna i avsnittet "Installation" i denna bruksanvisning.
Använd produkten endast för dess avsedda ändamål enligt beskrivning i denna bruksanvisning. Använd aldrig frätande kemikalier i denna produkt.
Denna typ av ugn är speciellt utformad för att värma, tillaga eller tina livsmedel. Ugnen är inte avsedd för användning inom industri, på laboratorier eller för kommersiella ändamål. Sådan användning medför att garantin förfaller.
Kör aldrig ugnen tom. Om det inte finns livsmedel eller något vatten i den som kan absorbera mikrovågsenergin kan magnetronen skadas.
Förvara inte denna produkt utomhus och använd den inte nära vatten.
Försök inte torka kläder eller tidningar i mikrovågsugnen eftersom de kan börja brinna.
Använd inte den tomma ugnen som förvaringsutrymme. Låt inte pappersprodukter, kokkärl eller livsmedel ligga i ugnen när den inte används.
Mikrovågsugnen är klassad som utrustning av Grupp 2 ISM i vilken radiofrekvent energi med avsikt genereras och används i form av elektromagnetisk strålning för att tillaga mat och livsmedel.
Denna ugn är klassad som utrustning av Klass B, lämplig för användning i bostadshus och byggnader direkt anslutna till ett lågspänningsnät som försörjer byggnader som används för bostadsändamål.
Mikrovågsugnen får inte placeras i ett skåp såvida den inte har testats för detta ändamål.
Varning: Om du ser rökutveckling, stäng omedelbart av produkten eller koppla loss den från eluttaget. Låt luckan vara stängd så att elden kvävs. Använd aldrig vatten.
Varning: Barn eller psykiskt funktionshindrade personer får endast använda ugnen utan övervakning om de har fått sådana instruktioner att de kan använda mikrovågsugnen på ett säkert sätt och förstår riskerna med felaktig användning.
EMS21200 SV 3
Vid matlagning är det helt normalt att det kommer ut ånga runt luckan, att det bildas imma på luckan eller t.o.m. att det kommer ut små vattendroppar under den. Detta är endast kondens från den varma maten och påverkar inte ugnens säkerhet. Luckan är inte avsedd att täta ugnsutrymmet helt.
Rotera aldrig plattan manuellt eftersom detta kan skada plattans funktion.
Ljusbågar i ugnen under mikrovågsdrift beror vanligen på att metallkärl används. Om sådana ljusbågar förekommer kontinuerligt kan ugnen dock skadas. Stoppa programmet och kontrollera kärlet.
Var noga med att aldrig blockera någon ventilationsöppning på ugnens ovansida, baksida, sidor eller botten.
Varning: Använd inte ugnen för kommersiella ändamål. Ugnen är endast avsedd för hushållsbruk.
Uppackning
Kontrollera att ugnen inte är skadad när du packar upp den. Informera omedelbart din återförsäljare om någon del är skadad eller saknas.
Ugnen, delar av den eller tillbehör kan vara inslagna i skyddsfolie. I så fall måste du ta bort folien innan du använder ugnen. Lägg inte förpackningsmaterialet så att småbarn kan leka med det eftersom det kan vara farligt.
4 EMS21200 SV
Säkerhet avseende kokkärl
De flesta kokkärl av glas, glaskeramik och värmebeständigt glas är utmärkta att använda i mikrovågsugnen. Även om själva mikrovågsenergin inte värmer upp de flesta föremål av glas eller porslin
Guide om kärl och tillbehör för ugnen
kan de ändå bli heta eftersom värme leds från maten till kärlet. Vi rekommenderar att du använder grytlappar eller grytvantar för att plocka ut mat ur ugnen.
Du kan använda många olika kärl och material i din mikrovågsugn. För din säkerhet och för att undvika skador på kärl och ugn, använd de kärl och material som är mest lämpliga för varje enskild tillagningsmetod. Följande lista är en allmän guide.
|
Material |
|
|
Kärl |
|
|
Användning |
||
|
|
|
|
|
I mikrougn |
|
|||
|
|
|
|
|
|
|
|
||
|
|
|
|
|
|
|
|
|
|
|
Keramik och |
|
|
Pyrexglas |
|
|
JA |
|
|
|
glas |
|
|
|
|
|
|
||
|
|
|
|
|
|
|
|
|
|
|
|
|
|
Ugnsfast glas |
|
JA*1 |
|
|
|
|
|
|
|
Glas med |
|
NEJ |
|
|
|
|
|
|
|
metalldekor |
|
|
|
||
|
|
|
|
|
|
|
|
||
|
|
|
|
Glas av |
|
NEJ |
|
|
|
|
|
|
|
blykristall |
|
|
|
||
|
|
|
|
|
|
|
|
||
|
Porslin |
|
|
Utan |
|
JA |
|
|
|
|
|
|
metalldekor |
|
|
|
|||
|
|
|
|
|
|
|
|
||
|
Keramik*2 |
|
|
|
|
JA |
|
|
|
|
|
|
|
Värmetåliga |
|
|
|
|
|
|
Plast |
|
|
kärl |
|
JA |
|
|
|
|
|
|
avsedda för |
|
|
|
|||
|
|
|
|
|
|
|
|
||
|
|
|
|
mikrovågsugn |
|
|
|
|
|
|
|
|
|
Plastpåsar |
|
JA |
|
|
|
|
Metall |
|
Bakplåt |
|
NEJ |
|
|
||
|
|
|
|
Aluminiumfolie |
|
JA |
|
|
|
|
|
|
*3 |
|
|
|
|
||
|
|
|
|
|
|
|
|
||
|
|
|
|
Koppar, |
|
|
|
|
|
|
Papper |
|
|
tallrikar, |
|
JA |
|
|
|
|
|
|
|
handdukar |
|
|
|
|
|
|
|
|
|
Smörpapper |
|
JA |
|
|
|
|
Trä |
|
|
|
|
NEJ |
|
|
|
|
Tillbehör |
|
Grillgaller |
|
NEJ |
|
|
||
|
|
|
|
Roterande |
|
JA |
|
|
|
|
|
|
|
glasplatta |
|
|
|
||
|
|
|
|
|
|
|
|
||
JA: Kärl och tillbehör som kan användas. |
NEJ: Kärl och tillbehör som skall undvikas. |
||||||||
*1 Endast om metalldekor saknas. |
|
|
|
|
|||||
*2 Endast om den inte har glasyr som innehåller metall.
*3 Använd aluminiumfolie endast för avskärmning. Överanvändning kan ge ljusbågar.
Testa om kokkärl är lämpliga
Kontrollera först om de kokkärl du tänker använda är lämpliga för användning i mikrovågsugnar.
Ställ in kärlet i mikrovågsugnen tillsammans med ett halvfullt glas vatten. Värm vid full effekt i en minut. Om kärlet känns hett skall du inte använda det. Om det bara känns en aning varmt kan du använda det för uppvärmning, men inte för matlagning. Om kärlet har rumstemperatur är det lämpligt för matlagning i mikrougn.
Pappersservetter, smörpapper, pappershanddukar, tallrikar, koppar, pappaskar, fryspåsar och papplådor är alldeles utmärkta att snabbt värma livsmedel i. Tänk dock alltid på att behållarna skall vara fyllda med livsmedel så att energin absorberas och det inte finns någon risk för överhettning eller antändning.
Många plastkärl, plastkoppar, frysbehållare och plastpåsar kan användas i mikrovågsugnen. Följ tillverkarens anvisningar när du använder plastmaterial i ugnen. Undvik att använda plastkärl tillsammans med livsmedel med en hög fetteller sockerhalt eftersom sådana livsmedel uppnår höga temperaturer och kan få vissa plastmaterial att smälta.
Lämna inte mikrougnen obevakad, och titta till den då och då, när du värmer eller tillagar mat i föremål av plast, papper eller andra brännbara material.
Metallföremål och föremål med metalldekor skall inte användas i mikrovågsugnen om de inte uttryckligen rekommenderas för detta ändamål.
Kärl med trånga öppningar, t.ex. flaskor, skall inte användas i mikrougn.
EMS21200 SV 5
Var försiktig när du tar bort locket på ett kokkärl så att du inte bränner dig på ångan.
Folielådor
Låga lådor av folie är säkra att använda för uppvärmning av mat i mikrougnen under förutsättning att du följer nedanstående regler:
1.Lådorna får inte vara djupare än 3 cm.
2.Du får inte lägga på folielocken.
3.Folielådorna måste vara fyllda till åtminstone två tredjedelar med mat. Du får aldrig använda tomma lådor.
4.Du får inte ställa in mer än en folielåda i taget i ugnen och den får inte vidröra sidorna. Om din ugn har en roterande platta av metall eller metallgaller, ställ folielådan på en uppochnedvänd tallrik som tål mikrougn.
5.Folielådor får aldrig återanvändas i mikrougnen.
Om mikrougnen har körts i 15 minuter eller mer måste den få svalna innan den används igen.
Lådan och plattan kan bli heta under användning, så var mycket försiktig när du plockar ut dem ur ugnen. Vi rekommenderar att du använder grytlappar eller grytvantar.
Kom ihåg att när du använder lådor av aluminiumfolie blir tiderna för uppvärmning eller tillagning kanske längre än vad du är van vid. Kontrollera alltid att maten verkligen är varm innan du serverar den.
Säkerhet avseende livsmedel
6 EMS21200 SV
Värm inte mat i konservburkar i mikrougnen. Flytta alltid över maten till ett lämpligt kärl.
Mikrougnen skall inte användas för fritering eftersom temperaturen hos fettet inte kan kontrolleras, vilket kan leda till farliga situationer.
Du kan göra popcorn i mikrougnen, men endast i de speciella förpackningar eller kärl som är särskilt avsedda för detta. Du måste då också ha ständig uppsikt över vad som händer i ugnen.
Stick hål på livsmedel som har skinn eller hinnor utan porer så att de inte sprängs av ångan som bildas i dem. Äpplen, potatis, kycklinglever och äggula är exempel på livsmedel som man måste sticka hål på.
Innehållet i nappflaskor och barnmatsburkar måste skakas eller röras om. Kontrollera temperaturen innan barnet äter så att barnet inte bränner sig.
Varning: Vätskor eller andra livsmedel får inte värmas i slutna behållare eftersom de kan explodera.
Varning: Vid uppvärmning av drycker i mikrougn kan fördröjd stötkokning inträffa. Var därför försiktig när du hanterar behållaren.
Varning: Vid uppvärmning av vätskor i mikrougnen, t.ex. soppor, såser och
drycker, kan vätskan överhettas över kokpunkten utan att det syns några några bubblor. Detta kan göra att den heta vätskan plötsligt kokar över. Gör på följande sätt för att undvika denna risk:
Undvik att använda kärl med raka kanter och smala halsar.
Värm inte för länge.
Rör om vätskan innan du ställer in kärlet i ugnen och en gång till efter halva uppvärmningstiden.
När uppvärmningen är klar, låt kärlet stå kvar en kort stund i ugnen och rör sedan om igen innan du försiktigt tar ut det ur ugnen.
Varning: Vissa produkter såsom hela ägg samt slutna behållare, t.ex. stängda glasburkar, kan explodera och får inte värmas i ugnen. Ibland kan pocherade ägg explodera under tillagningen. Stick alltid hål på gulan. Täck sedan över och låt ägget stå en minut efter tillagningen innan du tar av locket.

EMS21200 SV 7
Produktbeskrivning
Hur du använder din mikrovågsugn
Delarnas namn och funktion |
Sätta in den roterande tallriken |
A.Manöverpanel
B.Drivaxel för den roterande tallriken
C.Roterande tallrikens hjulförsedda stöd. Placera på botten av ugnen som stöd för den roterande tallriken
D.Roterande glastallrik. Mat i lämplig behållare placeras på tallriken för tillagning. Använd inte ugnen utan den roterande tallriken
E.Fönster. Maten kan ses genom fönstret under tillagning
F.Ugnsdörr och tätning. Ugnsdörren måste alltid vara stängd under tillagningen och ytan ren och utan stänk av matrester
G.Låsreglar och säkerhetslås
1.Kontrollera att den roterande tallrikens axel sitter i hålet på ugnens botten och är fäst i drivmotorns ‘D’-axel
2.Placera den roterande tallrikens hjulförsedda stöd så att det är centrerat efter axeln
3.Placera glastallriken på det hjulförsedda stödet och vrid försiktigt tills den kommer rätt på axeln
OBS!
•Lägg aldrig den roterande tallriken upp och ner.
•Den roterande tallriken, stöd och axel måste användas vid tillagning.
•Matvaror och behållare måste alltid placeras på den roterande tallriken
•Tallriken kan rotera medeller moturs. Detta är normalt.

8 EMS21200 SV
Manöverpanel:
1. 1. Digital Display
2. Effektväljare
2.
3. 3. Inställning av tid/vikt
4.
4. Start +30s-knapp
5. |
5. |
Stopp-/avbryt-knapp |
|||
6. |
6. |
Dörrknapp |
|
||
|
|
|
|||
|
|
|
|
||
Displaysymboler |
|
||||
|
|
|
Start |
|
Vikt |
|
|
|
|
||
|
|
|
|
||
|
|
|
Barnlås |
Mikrovågsugn |
|
|
|
|
Minuttimer |
Upptining |
|
|
|
|
Klocka |
Automatisk |
|
|
|
|
|
|
upptining |
Gram
Före första användning
VIKTIGT
Denna ugn har en energisparande funktion som kallas ”Eco-läge”.
Obs 1! När ugnen först ansluts till elnätet är standardinställningen ”Eco-läge”.
Obs 2! Denna ”Eco-lägesfunktion” stänger av ugnen 3 minuter efter en tillagningscykel, dvs. ingen digital display visas. Detta är en design som reducerar hur mycket energi ugnen absorberar till noll när den inte används.
Obs 3! Du har valet att välja och aktivera klockan i displayfönstret. När ”klockan” väljs stängs ”Ecoinställningen” av.
VIKTIGT
Du kan välja
1.”Klockan”. ELLER
2.Den energisparande ”Ecolägesfunktionen”
Det är INTE möjligt att välja ”Eco-läge” och ”klockan”.
1. För att ställa in ‘aktuellt klockslag’:
1.Öppna luckan och håll den öppen.
2.Håll ‘start+30s’-knappen
intryckt i cirka 5 sekunder.
3. Ugnen kommer att ”pipa” för att säga till att den har gått in i ”klockinställningsläge” och 12 tim
EMS21200 SV 9
kommer att blinks tillsammans med klocksymbolen på den digitala displayen.
4a. Ställ in ‘klockslaget’ på 12timmarsläge:
-vrid inställningsvredet för tid/vikt för att ställa in timmarna.
-tryck på ‘start +30s’- knappen’. Den valda ‘timmen’ bekräftas och slutar blinka, och minutsiffrorna börjar blinka
-vrid inställningsvredet för tid/vikt för att ställa in minuterna.
-tryck på ‘start +30s’- knappen’. De valda ‘minuterna’ bekräftas och slutar blinka. På displayen visas klockslaget med ett blinkande kolon mellan timmarna och minuterna samtidigt som klockan förblir tänd.
4b. Ställ in ‘klockslaget’ på 24timmarsläge:
-tryck ”start +30s” tryck på
knappen en gång till. 24 tim kommer att blinka på displayen..
-vrid inställningsvredet för tid/vikt för att ställa in timmarna.
-tryck på ‘start +30s’- knappen’. Den valda ‘timmen’ bekräftas och slutar blinka, och minutsiffrorna börjar blinka
-vrid inställningsvredet för tid/vikt för att ställa in minuterna.
-tryck på ‘start +30s’- knappen’. De valda ‘minuterna’ bekräftas och slutar blinka. På displayen visas klockslaget med ett blinkande kolon mellan timmarna och minuterna.
10 EMS21200 SV
Obs 1! Om maten tas ur från öppningen kommer displayen att visa klockan när dörren stängs. Obs 2! Om Stop/Cancel (stop/avbryt) knappen trycks in 3 gånger under en tillagningscykel kommer displayen att visas klockan.
För att återställa ”Ecolägesfunktionen” när klockan har ställts in:
1.Öppna luckan och tryck start +30s-knappen under 5 sekunder.
12tim kommer att blinka på displayen.
2.Tryck start + 30S en gång till.
24tim kommer att blinka på displayen.
3.Tryck start + 30S en gång till. Econ kommer att blinka på displayen.
4.Stäng luckan. Ugnen kommer nu att gå in i ”Eco-läge” och 3- minutersnedräkningen börjar.
Obs! Om Stop/Cancel (stopp/avbryt) trycks in efter att ”Eco-lägesnedräkningen” har börjar kommer displayen att tömmas omedelbart.
2. ‘Eco-läget’
VIKTIGT
Den energisparande funktionen nedan är endast tillgänglig när ”Eco-läge” väljs. Denna funktion är INTE tillgänglig när ”klockan” väljs.
•När ugnen är i ”Eco-läge” och har avslutad vald tillagningscykel kommer ugnen att stängas av.
•Displayen visar effektnivån från den tidigare tillagningscykeln.
•Efter 3 minuter kommer ugnen att gå in i ”Eco-läge” och en vidare 3-minutersnedräkning börjar.
•Displayen visar “‘Econ” följt av 2.57, 2.56, 2.55 och sedan “Econ” följt av 2.51, 2.50, 2.49 tills 3 minuter har gått.
•Efter ”Eco-lägets” 3- minutersnedräkning är klar kommer ingen digital display att synas.
Obs 1! Om maten tas ur ugnen kommer ugnen efter att luckan stängs att visa "Econ” och 3- minutersnedräkningen kommer att börja.
Obs 2! Om Stop/Cancel (stop/avbryt) knappen trycks in 3 gånger under en tillagningscykel kommer displayen att visa ”Econ” och 3-minutersnedräkningen kommer att börja.
Obs 3! Det är möjligt att avbryta “Eco-lägesnedräkningen” genom att:
•Öppna luckan, eller
•Vrida effektväljaren, eller
•Vrida tidsviktsväljaren, eller
•Trycka på Stop/Cancel (stopp/avbryt) knappen, eller
•Trycka på Start +30s knappen
Obs 4! Om Stop/Cancel (stopp/avbryt) trycks in efter att ”Eco-lägesnedräkningen” har
börjar kommer displayen att tömmas omedelbart.
Användning
VIKTIGT
Att trycka på Stop/Cancel (stopp/avbryt) knappen kommer att avsluta den valda tillagningscykeln.
3. Matlagning med mikrovågor.
Den övre effektväljaren används för att välja mikrovågseffekt och den nedre inställningen av tid/vikt används för att välja tillagningstid upp till 90 minuter.
Vrid tid/viktväljaren till önskad tillagningstid och observera ökningarna i nedanstående tabell:
Mellan |
Ökningarna är |
0 sek. 5 min. |
15 sek. |
5 min. 10 min. |
30 sek. |
10 min. 30 min. |
1 min. |
30 min. 90 min. |
5 min. |
Välj effektnivån med effektväljaren.
Tryck start+30s knappen.
OBS! Effektnivån och/eller tillagningstiden kan ändras när som helst under tillagningen genom att ändra tidseller effektinställningen.
EMS21200 SV 11
OBS! Under tillagningen om upptiningsnivå är vald kommer 180 att visas på displayen (detta är upptiningseffektnivån). Om minuttimern är vald kommer 0 att visas på displayen.
t.ex. tillagning i 5 minuter på 700 watts effekt:
1.Välj 700 w effekt med effektväljaren
2.Vrid tid/viktinställningen medurs tills 5:00 visas på displayen 3.Tryck på ‘start +30s’-knappen
4. Funktionen ‘Plus 30 sekunder’
1. Att trycka ”start +30s” knappen när ugnen är i ”stand by-läge”, dvs. Inte används och “klockan” visas kommer automatiskt att starta mikrovågstillagning med vald effekt under 30 sekunder. Passande symbol kommer att aktiveras i displayen.
Varje ytterligare tryckning på knappen lägger till ’30 sekunder’ till den aktuella tillagningstiden. Den längsta tillagningstid som kan matas in är 90 minuter.
2. Om du (när som helst) trycker på start-knappen under tillagning med mikrovågor eller ‘Upptining enligt tid’ förlängs tillagnings- /upptiningstiden med 30 sekunder. Obs! Denna funktion är inte tillgänglig när ugnen används i autoläge, dvs. ‘Automatisk upptining enligt tid’.
12 EMS21200 SV
5. Automatisk upptining enligt vikt
1 Välj upptiningseffekt med effektväljaren. Symbolerna upptining, vikt och ‘g’ blinkar på displayen
2. Rotera tids-/viktväljaren moturs för att välja frusen vikt i gram för den mat som du ska tina, (mellan 2000 g och 100 g). Den manuella upptiningssymbolen kommer att stängas av och autoupptiningssymbolen och ”g” kommer att fortsätta att blinka.
3.Tryck på ‘start+30s’-knappen för att starta den automatiska upptiningen. Ugnen beräknar den upptiningstid och effektnivå som behövs för att tina maten perfekt. Den återstående upptiningstiden visas på displayen och autoupptiningssymbolerna blinkar.
Anmärkning 1: Ugnen gör en paus halvvägs igenom upptiningsprogrammet, för att du ska kunna vända/röra om maten och bidra till en jämn upptining. Anmärkning 2: Effektnivån eller upptiningstiden kan inte ändras under den automatiska upptiningen.
6. Upptining efter tid.
1 Välj upptiningseffekt med effektväljaren. Upptiningssymbolerna och ‘g’ blinkar på displayen
2. Rotera tids-/viktväljaren medurs för att välja upptiningstiden som önskas. Den manuella upptiningssymbolen kommer att stängas av och autoupptiningssymbolen och ”g” kommer att stängas av.
3.Tryck på ‘start+30s’-knappen för att starta den manuella upptiningen. Den återstående upptiningstiden visas på displayen och symbolen för manuell upptining blinkar.
Anmärkning 1: Ugnen gör en paus halvvägs igenom upptiningsprogrammet, för att du ska kunna vända/röra om maten och bidra till en jämn upptining.
Anmärkning 2: Effektnivån och upptiningstiden kan ändras under upptiningsprogrammet, men det är möjligt att upptiningsresultatet inte blir tillfredställande om effektnivån ändras.
7. Kökstimer
Ugnen har en användbar kökstimer som är till hjälp för att kontrollera tiden på andra aktiviteter i köket. 1.Ställ in kökstimern (ingen mikrovågseffekt) med effektväljaren. Symbolen Ringklocka blinkar på displayen. 2.Vrid medurs för att välja tid. 3.Tryck på knappen ‘start +30s’. Symbolen Ringklocka tänds
4. Tidtagaren kommer att räkna ner.
5. Ugnen kommer att ”pipa” tre gånger när tiden är ute.
Anmärkning1: Funktionen kräver ingen mikrovågseffekt och ugnens lampa och kylfläkt är inte igång
De-selection of the minute timer function will cancel the current timer operation.Bortväljning av minuttimern kommer att avbryta nuvarande tidsfunktion.
8. Barnlås.
Ugnen kan låsas om du vill hindra barn från att att försöka använda ugnen
I ‘stand by’-läget håller du avbrytknappen intryckt i 5 sekunder. Du hör en lång ‘ljudsignal’ som indikerar att barnlåset har aktiverats och barnlåssymbolen tänds på displayen.
Ugnen kan inte användas om inte barnlåset kopplas ur:
För att avaktivera ‘barnlåset’, håll knappen avbryt intryckt i 5 sekunder. Du hör en lång ‘ljudsignal’ som indikerar att barnlåset har avaktiverats och barnlåssymbolen släcks på displayen.
9. Plattan roterar tillbaka.
Din ugn har en praktisk tillbakarotering. Plattan stannar alltid i samma läge som den
EMS21200 SV 13
startade i början av tillagningsprogrammet. På så vis kan placeringen av tillagningsredskapen stanna i rätt läge för att tas bort från ugnen efter tillagningen.
OBS! Vid slutet av tillagningscykeln kommer ugnen inte att stängas av förens den roterande tallriken har återvänt till sin originalposition.
10. Allmän information om ugnens användning.
1.Varje gång en knapp trycks in avges en ‘ljudsignal’ för att bekräfta intryckningen.
2.Den inledande vridningen av inställningsvredet markeras med en ‘ljudsignal’.
3.Efter att ett tillagningsprogram har ställts in kommer det att avbrytas om det inte starta sinom
3minuter, och “klockan” kommer att visas eller så går ugnen in i “Eko-läge”.
4.När varje tillagningsprogram är klart avger ugnen 3 ‘ljudsignaler’.
5.Om luckan öppnas under ett pågående program avbryts ugnens funktioner.
Startknappen måste vara intryckt för att tillagningen ska återupptas.
 Loading...