


EMM2377
AEG-Electrolux EMM2377, EMS2390, EMS2388W, EMS2372, EMS2387 User Manual
...
EMS 2390 English
When using your microwave oven
Before using your microwave oven 4
Heatwave System©& Grill
Safety Instructions 5
Utensil safety
Testing suitability of cookware
Foil containers 6
Food safety
Safety instructions when cooking with grill 7
The microwave and accessories 9
Name and function of parts
Accessories
Control panel 10
Display window
Before using your microwave oven
for the first time 11
Turntable installation
Setting the clock
Child safety lock 12
How to operate your microwave oven
Clear/Stop
Function of Re-turntable
Microwave cooking 13
Manual defrosting
Kitchen timer 14
Microwave setting guide
Start + 1 minute 15
Grill cooking
Microwave and Grill cooking 16
Auto Defrost 17
Bread Defrosting 18
Crunch Dish programmes 19
Crunch Dish programme -quantities 20
Microwave Hints 21
Microwave Tips
Oven utensils and accessories guide 22
Charts 23
Recommendations for cooking with Grill
General recommendations for cooking with
Microwave and Grill
Recommendations for Defrosting using 150W 24
Auto Defrost chart 25
Crunch Dish programme - chart 28
Care and cleaning 30
Care and cleaning (grill)
Cleaning the accessories (turntable, support
and rack)
Cleaning the interior
Cleaning the exterior
Service and spare parts 30
Electrolux Service centres
Installation
Unpacking 7
Technical data
Installation 8
Connecting to the mains
Accessories 9
3
Contents

4
EMS 2390 English
Thank you for having chosen an Electrolux product.
We are convinced that you will find your new
microwave oven very useful and that it will be of
great help to you.
As with all new kitchen appliances, it will take some
time to learn all the new functions and features, but
with time, this oven will become indispensable to you.
Congratulations on the purchase of your new microwave oven
Read through the instruction manual carefully.
In order that you can get the best from your new
Electrolux microwave oven, the following
instructions have been prepared. Please make sure
you read them carefully.
It is important that this instruction book is retained
with the appliance for future reference. Should the
appliance be sold or transferred to another owner,
or if you move house and leave the appliance,
always ensure that the book is supplied with the
appliance so that the new owner can become
acquainted with the functioning of the appliance
and the relevant warnings. Please ensure you have
read the whole instruction book before using the
appliance and that you follow the recommendations
given.
Before using your microwave oven
Heatwave System©
Heatwave System
Heatwave System© is an advanced and
revolutionary microwave distribution system,
ensuring even and uniform cooking, defrosting and
reheating.
Technically, this is achieved by re-positioning the
microwave-generating component – the magnetron
– to feed directly into the cavity. The result is that
microwaves spread smoothly to reach all parts of
the cavity.
Heatwave© ensures an even heat distribution across
and throughout the food.

5
EMS 2390 English
• The built-in safety interlock switches prevent
the microwave oven from operating when the door
is open.
• Do not tamper with them, or attempt to operate
the oven with the door open as open door
operation can result in exposure to microwave
energy.
• Do not allow food spills or cleaner residue to
accumulate on door sealing surfaces. See the
Cleaning and Care section for cleaning
instructions.
• It is particularly important that the oven door
closes properly and that there is no damage to the:
(1) door (warped), (2) hinges and latches (broken
or insecure), (3) door seals and sealing surface.
If the door, hinges/latches or door seals
are damaged, the microwave must not
be operated until it has been repaired
by a authorized service person.
It is hazardous for anyone except factory
trained service personnel to service or make
adjustments to this oven. Contact your
nearest authorised service agent if service
should be required.
• Do not remove the outer case, door or control
panel at any time. Doing so may cause exposure
to extremely high voltage.
• Install or locate this oven only in accordance with
‘installation instructions’ found in this manual.
• Use the appliance for its intended use as described
in this manual. Do not use corrosive chemicals in
this appliance. This type of oven is specifically
designed to heat, cook, or defrost food. It is not
designed for industrial or laboratory use neither
for commercial use as this will invalidate the
guarantee.
• Do not operate the oven empty. If food or water is
not present to absorb the microwave energy, the
magnetron tube can be damaged.
• Do not store this appliance outdoors. Do not use
this product near water.
• Do not attempt to dry clothing or newspapers in
the microwave oven. These items can ignite.
• Do not use the cavity for storage purposes. Do not
leave paper products, cooking utensils, or food in
the cavity when not in use.
If smoke is observed, switch off or unplug
the appliance and keep the door closed in
order to stifle any flames. Never use water.
Only allow children to use the microwave
without supervision when adequate
instructions have been given so that the child
is able to use the microwave in a safe way
and understand the hazards of improper use.
Utensil safety
• Most glass, glass ceramic and heat-resistant glassware utensils are excellent for use in the microwave oven. Although microwave energy will not
heat most glass and ceramic items, these utensils
can become hot as heat transfers from the food to
the container. The use of oven gloves to remove
dishes is recommended.
Testing suitability of cookware
• Place the cookware in the microwave along with
a glass half full of water. Heat on Hi W(900W)
(100%) for one minute. If the cookware feels hot,
you should not use it. If it is just slightly warm,
you can use it for reheating but not for cooking. If
the dish is room temperature, it is suitable for
microwave cooking.
• Paper napkins, wax paper, paper towels, plates,
cups, cartons, freezer wrap and cardboard are
great convenience utensils. Always be sure
containers are filled with food to absorb energy
and thus avoid the possibility of overheating.
• Many plastic dishes, cups, freezer containers and
plastic wraps may be used in the microwave oven.
Follow manufacturer’s instructions when using
plastics in the oven. Avoid using plastic utensils
with foods that have high fat or sugar content
since these foods reach high temperatures and
could melt some plastics.
• Do not leave oven unattended, and look at it from
time to time when heating or cooking food in
plastic, paper or other combustible containers. If
smoke is observed, keep door closed, switch the
oven off or disconnect oven until smoke stops.
!!!
!
Safety instructions

6
EMS 2390 English
• Metal utensils and utensils with metallic trim
should not be used in the microwave oven, unless
specifically recommended for microwave use.
• Containers with restricted openings, such as
bottles, should not be used for microwave
cooking.
• Use caution when removing a lid or cover from a
dish to avoid steam burns.
Foil containers
Shallow foil containers may safely be used to reheat
foods in your microwave oven providing the
following rules are observed:
1. Foil containers should not be more than 3 cms
(1 1/4”) deep.
2. Foil lids must not be used.
3. The foil containers must be at least two-thirds full
of food. Empty containers must never be used.
4. Foil containers should be used singly in the
microwave oven and should not be allowed to
touch the sides. If your oven has a metal turntable
or cooking rack, the foil container should be
placed on an upturned oven-proof plate.
5. Foil containers should never be re-used in the
microwave oven.
6. If the microwave oven has been in use for
15 minutes or more, allow it to cool before using
it again.
7. The container and turntable may become hot
during use, take great care when removing either
from the oven. It is advisable to use an oven cloth
or glove when doing so.
8. Remember when using an aluminium foil
container that the reheating or cooking times may
be longer than you are used to, always ensure that
the food is piping hot before serving.
Food safety
• Do not heat food in a can in the microwave oven.
Always remove the food to a suitable container.
• Deep fat frying should not be done in the
microwave oven, because the fat temperature
cannot be controlled, hazardous situations can
result.
• Popcorn may be prepared in the microwave oven,
but only in special packages or utensils designed
specifically for this purpose. This cooking
operation should never be unattended.
• Pierce foods with non-porous skins or
membranes to prevent steam build-up and
bursting. Apples, potatoes, chicken livers, and
egg yolks are examples of items that should be
pierced.
• The contents of feeding bottles and baby food
jars are to be stirred or shaken and the
temperature is to be checked before consumption,
in order to avoid burns.
When heating liquids, e.g. soups, sauces
and beverages in your microwave oven,
overheating the liquid beyond boiling point
can occur without evidence of bubbling.
This could result in a sudden boil over of
the hot liquid. To prevent this possibility
the following steps should be taken:
1. Avoid using straight-sided containers with
narrow necks.
2. Do not overheat.
3. Stir the liquid before placing the container in the
oven and again halfway through the heating time.
4. After heating, allow to stand in the oven for a
short time, stirring again before carefully
removing the container.
Some products such as whole eggs and
sealed containers – for example, closed glass
jars – may explode and should not be heated
in this oven. Occasionally, poached eggs may
explode during cooking. Always pierce the
yolk, then cover and allow the standing time
of one minute before removing cover.
Keep these instructions!
!
!

EMS 2390 English
7
Safety instructions when
cooking with grill
1. The glass viewing window may break if water is
spilled on it during grilling.
2. Be sure to use an oven glove when loading and
unloading the oven. Containers get very hot in the
oven, so be careful not to burn yourself. The turntable and metal rack also get very hot so be sure
to use an oven glove when handling them.
3. Do not touch the inner or outer viewing window
with metal components when loading or
unloading the oven. The inside of the door and
oven get very hot so take care when attending
food in the oven.
4. Do not put the turntable or containers in cold
water or try to cool them quickly after use.
5. Do not place items on top of the cabinet. The top
of the cabinet gets very hot, so anything placed on
it may be damaged by the heat.
It is quite normal for steam to be emitted
around the door, or for misting to occur on
the door, or even for water droplets to appear
below the door during the cooking cycle.
This is merely condensation from the heat
of the food and does not affect the safety of
your oven. The door is not intended to seal
the oven cavity completely.
• Do not force the turntable to rotate by
hand. This may cause malfunctioning.
• Arcing in the oven during microwave operation
usually occurs from use of metallic utensils.
Continuous arcing, however, can damage the unit.
Stop the programme and check the utensil.
• Care should be taken not to obstruct any air vents
located on the top, rear, side and bottom of the
oven.
Do not use this oven for commercial purposes.
This oven is made for domestic use only.
i
i
N.B. When you unpack the oven, check that the
product is free from damage. Damage or any missing parts
must be reported immediately to the retailer. The oven,
parts of the oven or the accessories may be wrapped by a
protection foil. If so, you must remove this foil before
using the oven. Do not leave packing material so that
small children can play with it. This can be hazardous.
Unpacking
Building in kit MF23
Hanging kit HK2
Overall dimension Width 497 mm
Depth 345 mm
Height 322 mm
Cavity Width 304 mm
Depth 304 mm
Height 247 mm
Volume 23 litre
Power source 230–240 V, 50 Hz
Fuse 10A
Power consumption 2600W
Power Output 900W
Browner/Grill 1200W
Weight 17.2 kg
Technical data
!

EMS 2390 English
8
1. Remove any promotion label from the door.
2. This oven can be used as a free standing oven or
built-in, into a kitchen cabinet using kit number
MF23 or HK2. To install the oven in a kitchen
cabinet follow the instructions supplied with the
building-in kit.
The oven should be installed on a flat, level surface.
The surface must be strong enough to safely bear
the weight (17.2 kg) of the oven, and the
contents. To avoid the possibility of causing
vibration or noise the oven must be in a stable
position.
3. Keep the oven away from heat and water.
Exposure to heat and water can lower oven
efficiency and lead to malfunctioning, so be sure
to install the oven away from heat and water
sources.
4. Do not block air vents on the top and the sides of
the cabinet and also do not place any articles on the
top of the oven. If air vents are blocked during
operation, the oven may overheat, and this may
lead to malfunctioning. Hot air escapes from the
vents, so be sure not to obstruct it or let curtains
come between the oven and the rear wall.
5. Place the oven as far away from radios and TV’s
as possible. This oven does conform to EEC
requirements of radio interference suppression,
but some interference may occur if it is placed
too close to a radio or TV, so keep them as far
apart as possible.
6. If positioned in a corner, leave a gap of at least
5 cm from the walls and 5 cm above the
microwave.
IMPORTANT! The oven can be placed almost
anywhere in the kitchen. Make sure the oven is
placed on a flat, level surface and that vents as
well as the surface underneath the oven are not
blocked (for sufficient ventilation).
Connecting to the mains
The oven is delivered with the power cord and a plug
for 230–240 V, 50Hz, earthed socket outlet.
Earth protection minimizes the risks should a short
circuit occur. Check to ensure the voltage of the
oven matches the supply.
N.B. If the oven is connected to the socket via an
extension cord, make sure the cord is earthed.
This appliance must not be used on a nonearth protected power supply. Contact an
electrician if you are uncertain regarding
electrical connection of the oven or
provision of earth protection of the
supply.
This appliance must be earthed. If this
appliance is fitted with a non-rewireable
plug for which your socket is unsuitable, the
plug should be cut off and the appropriate
plug fitted. If it is necessary to change the
fuse in a non-rewireable plug, the fuse
cover must be refitted. If the fuse cover is
lost or damaged, the plug must not be
used until a replacement is obtained.
!
Installation
9
EMS 2390 Draft for approval - DO NOT USE FOR PRODUCTION English
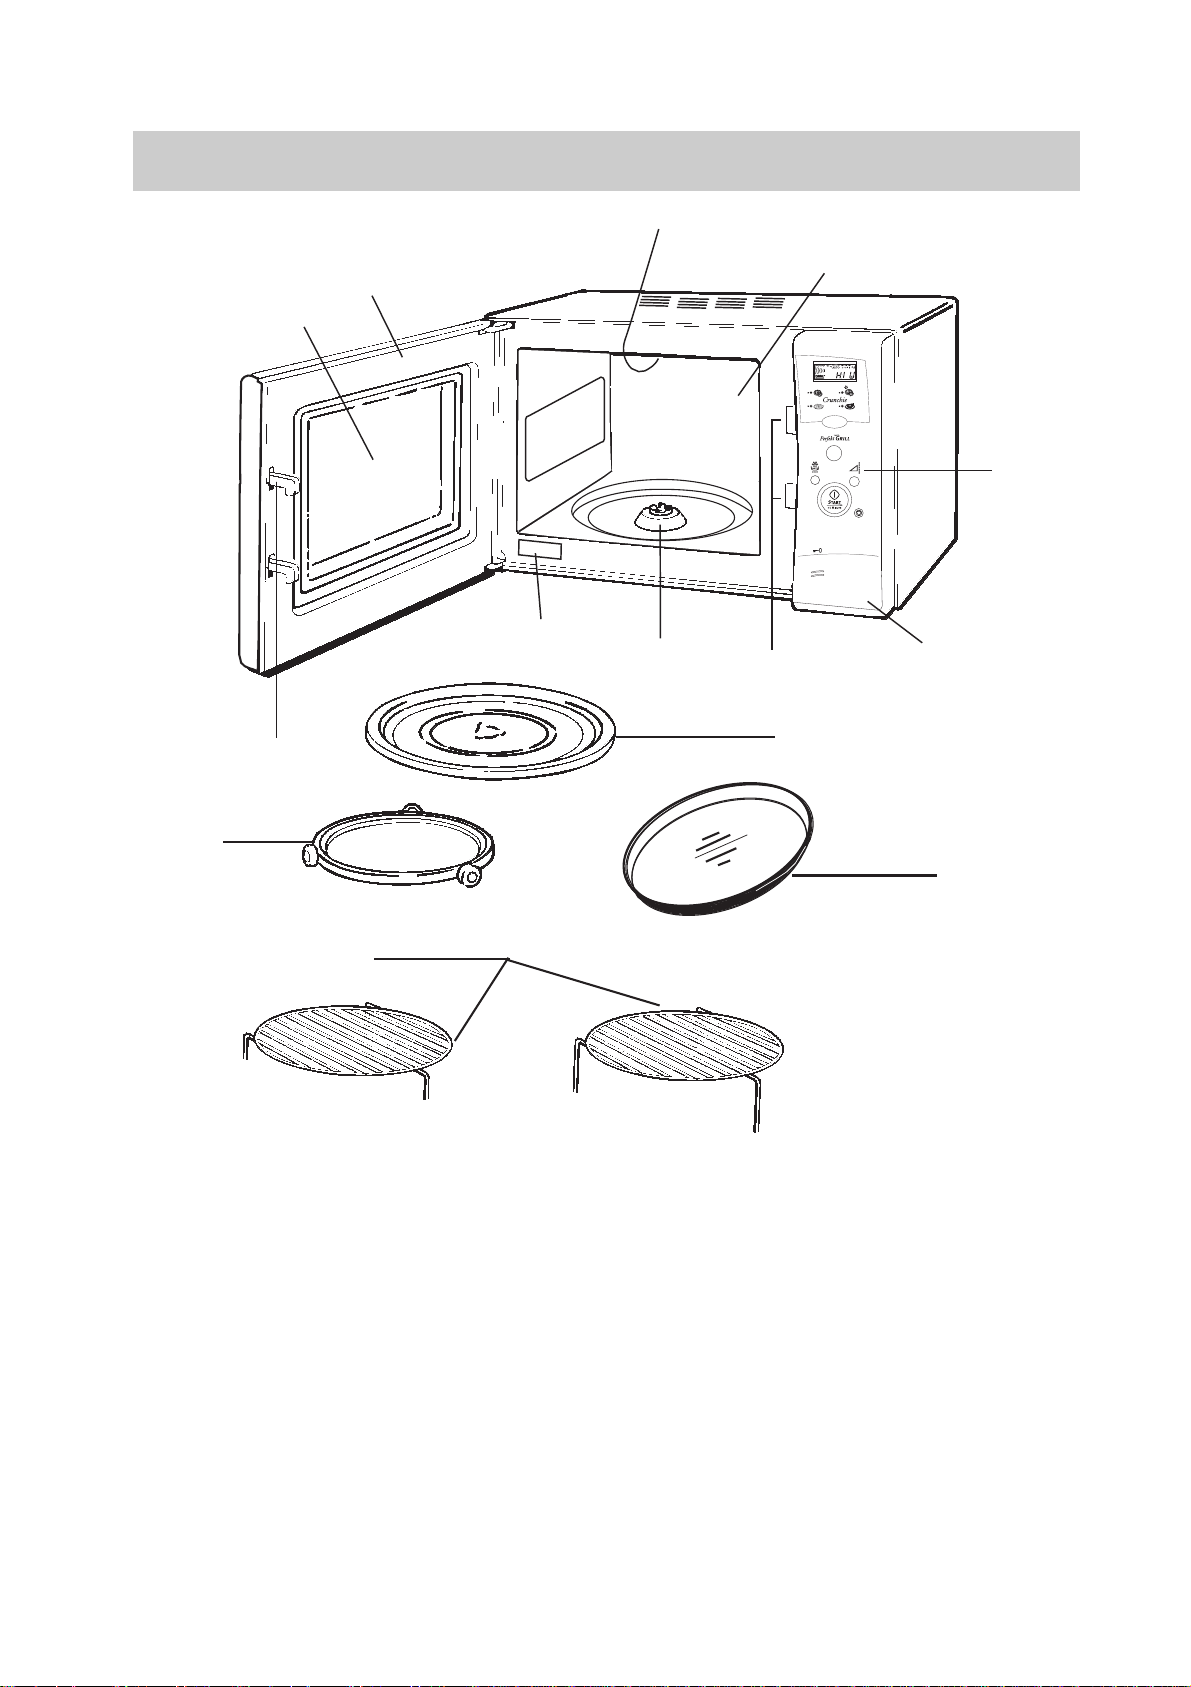
Name and function of parts
1 Latch hook and safety interlock system.
2 Viewing window. Food can be checked while the
microwave oven is in operation.
3 Cooking compartment. Wipe the compartment clean
after using the oven.
4 Oven door. The door must always be firmly
closed while cooking.
5 Control panel.
6 Door open.
7 Drive shaft for turntable.
8 Rating plate
9 Grill.
Accessories
A Turntable support. Place the support on the floor of
the cooking chamber to support the turntable.
B Grilling racks, one high and one low, used for most
cooking and browning/grilling.
IMPORTANT - Use either high or low grill rack
only. Do not use both grill racks at the same time.
C Turntable. Made of special heat-resistant glass. Food
in a suitable container is placed on this tray for
cooking. Do not use the oven without the turntable.
D. Crunch Dish for use with Crunch Dish programmes
The microwave oven and accessories
1
2
5
9
1
6
7
8
4
3
C
B
A
D
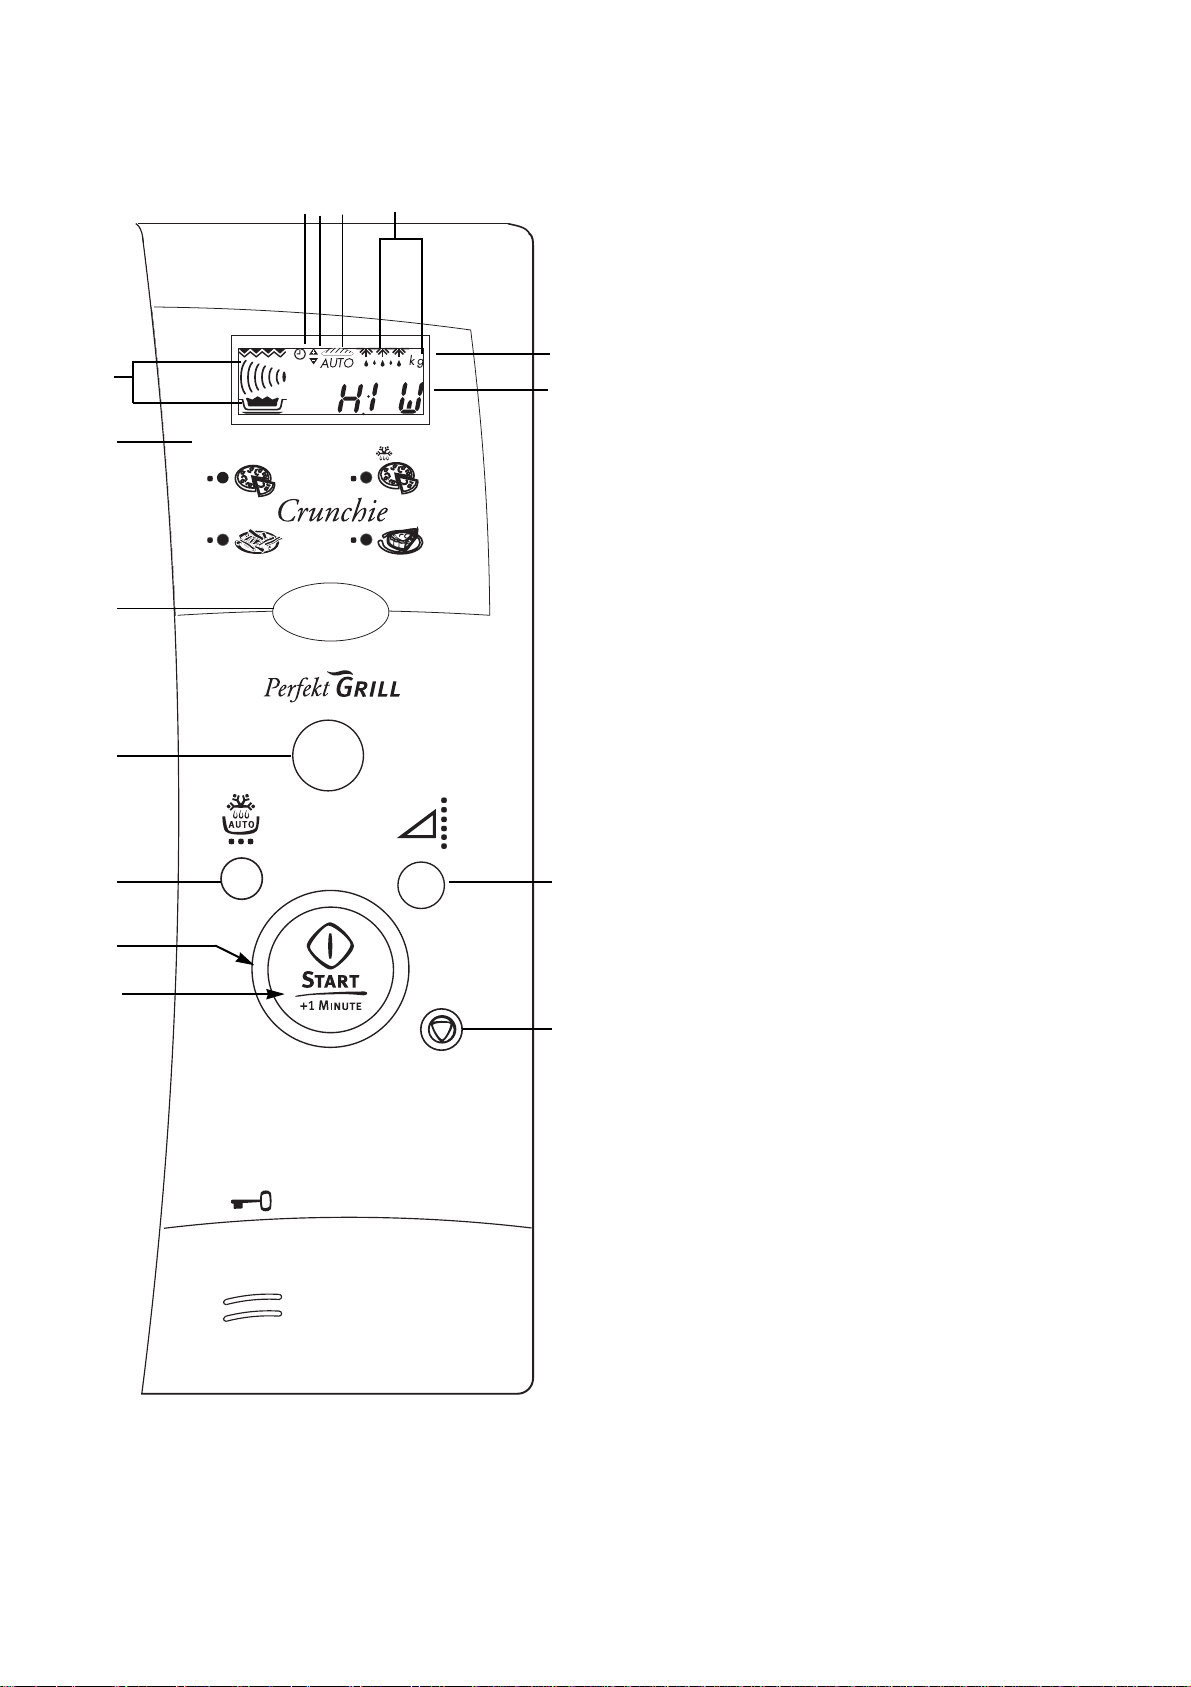
Control panel
1 Display window - showing time of day,
operating mode and cooking time
2 Crunch Dish, programmes and status neon
indicator display for:
Frozen Pizza
Fresh Pizza
Frozen Oven Chips/Frozen (oven cooked)
potato products
Reheating pastry (Pies, Quiche, etc.)
3 Grill
4 Auto Defrost - by weight
5 Power - for desired microwave power level
6 Setting Control Knob - to enter time and
weight or quantity
7 Start - to start a desired programme or to
enter a Start + 1 Minute programme
8 Clear/Stop - for interrupting or cancelling
a programme and for setting the child lock
Display window
A Flashing indicator that prompts you to enter
the time of day
B Flashing indicators for Crunch Dish
programmes, Grill, Microwave and Auto Defrost
which prompt you to enter the food quantity,
weight (Kg) or cooking time
C Blue indicators for Auto Defrost and Bread
Programmes. Red indicators for the grill
programmes
D Power level indicator - Hi W/900, 750, 650,
400, 150 (defrost) and 100W respectively.
E Plus and minus arrows to enable more or less
time to be set for the Crunch Dish programmes
and Defrost programmes
F Flashing grill, microwave and auto defrost
symbols to indicate the operational mode
10
EMS 2390 English
1
3
7
2
4 5
6
8
B
D
B,C,F
AE C
B,F
11
EMS 2390 English
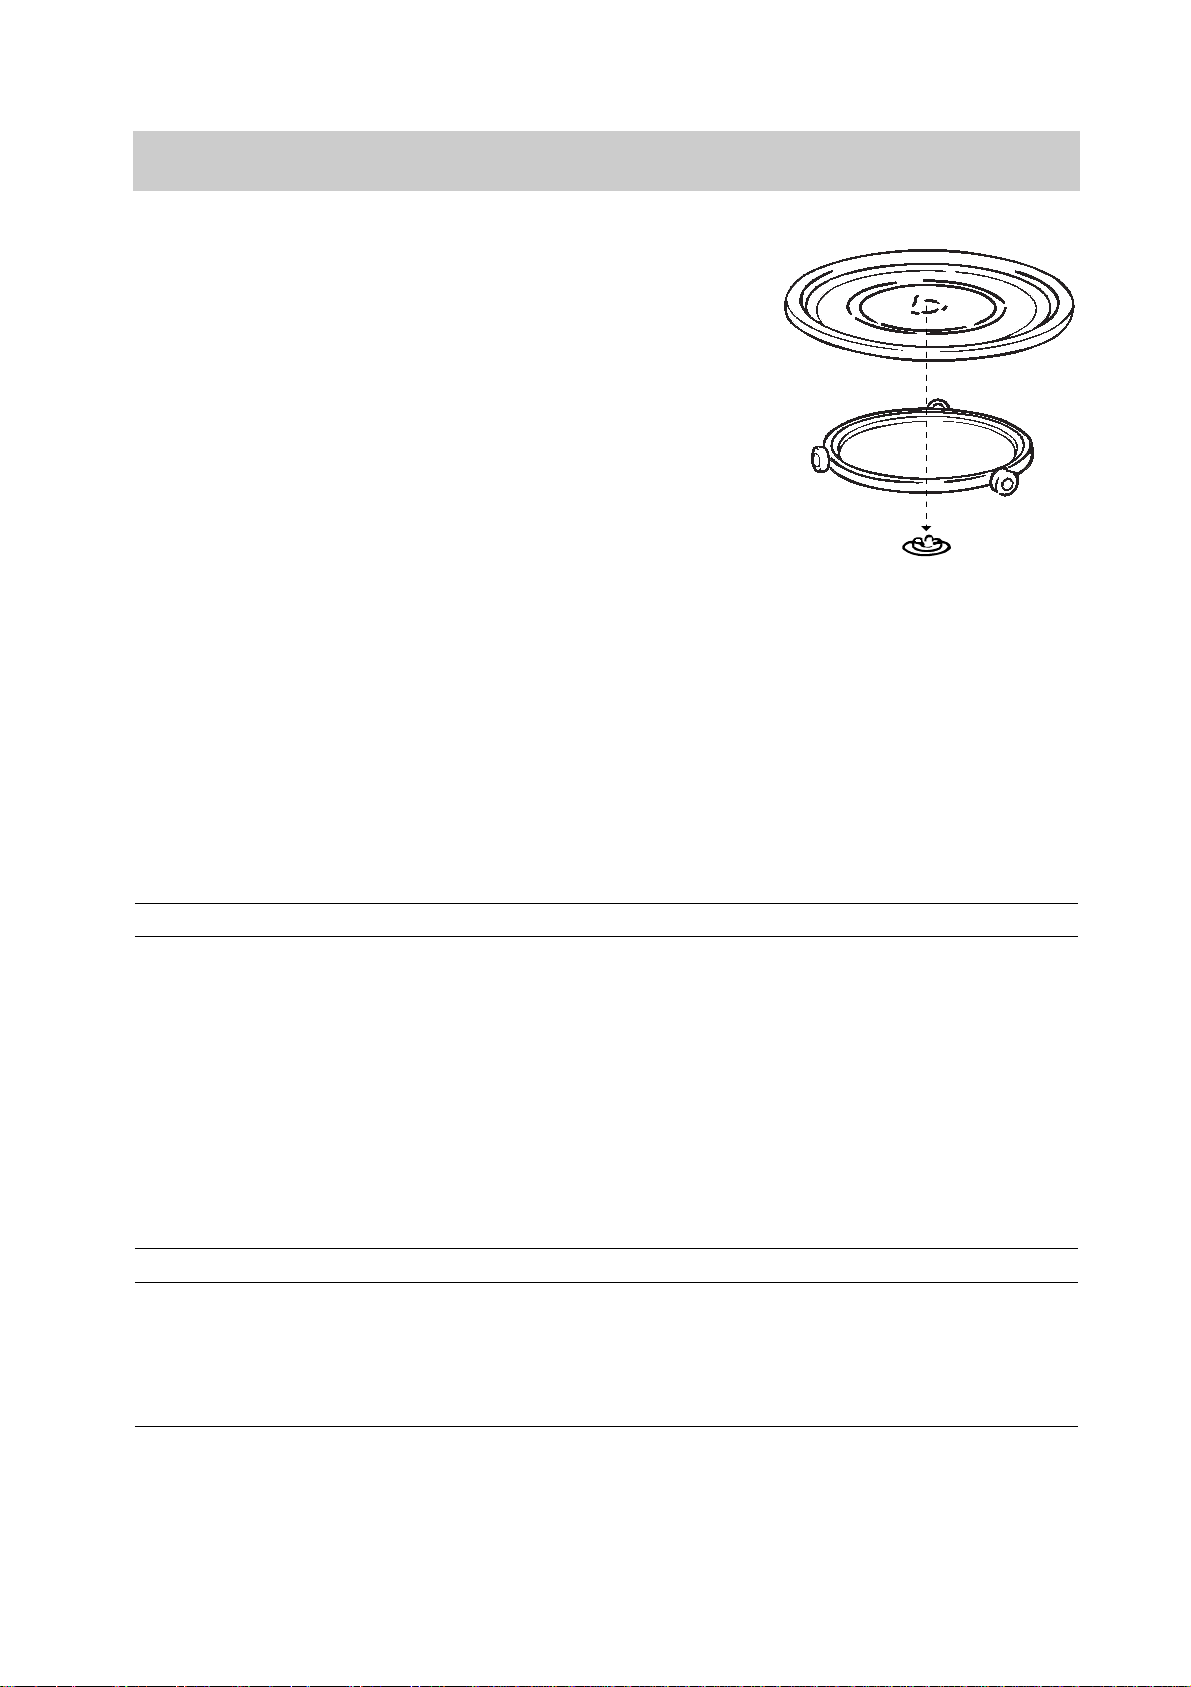
Turntable installation
1. Place the turntable support on the cavity bottom.
2. Place the turntable on top of the turntable support
as shown in the diagram. Make sure that turntable
hub is securely locked in the turntable shaft.
Never place the turntable upside down.
• Both turntable and turntable support must always
be used during cooking.
• All food and containers of food are always placed
on this turntable for cooking.
• This turntable rotates clockwise and anticlockwise;
this is normal.
Turntable
Roller rest
Turntable shaft
Before using your microwave oven for the first time
Setting the clock
When your oven is plugged in for the first time or
when power resumes after a power interruption, the
clock symbol and numbers in the display window
flash and the time is reset to 12:00.
Example: To set 4.30
1 Turn the Setting Control Knob anti-clockwise until the time of 4.30 is indicated in the display window.
2 Touch Start to lock in the time and start the clock running. The flashing clock symbol will disappear from
the display.
If you need to change the time of day after setting, open the microwave oven door and press in the start
button for 5 seconds. A single beep will be heard, the clock symbol and numbers in the display window
flash and the time is reset to 12.00.
Example: To set to 15.45
1 Turn the Setting Control Knob clockwise until the time of 15.45 is indicated in the display window.
2 Touch Start to lock in the time and start the clock running. The flashing clock symbol will disappear from
the display.
 Loading...