


DK11
EN
FR
DE
NL
IT
ES
PT
DA
NO
SV
FI

RU
EL
TR
PL
MOUNTING INSTRUCTIONS INSTRUCTIONS DE MONTAGE MONTAGEANLEITUNG INSTRUCTIES VOOR MONTAGE INSTRUZIONI PER IL MONTAGGIO INSTRUCCIONES DE INSTALACIÓN INSTRUÇÕES DE MONTAGEM MONTERINGSANVISNINGER MONTERINGSINSTRUKSJONER MONTERINGSANVISNING
ASENNUSOHJEET
Инструкция по монтажу
ΟΔΗΓΙΕΣ ΣΥΝΑΡΜΟΛΟΓΗΣΗΣ
MONTAJ BILGILERI
INSTRUKCJA MONTAŻU
V 1
|
|
2. |
1. |
3. |
4. |
1 |
5. |
6.** |
|
||
4 |
5 |
|
2 |
3 |
6 |
6* |
8 |
7 |
9 |

V 2
|
|
2. |
1. |
3. |
4. |
1 |
5. |
6.** |
|
||
4 |
5 |
|
2 |
3 |
6
7 |
|
8 |
9 |

EN
Dear customer,
this discharging kit will allow your tumble dryer to discharge the condensation water produced during each drying cycle directly into the nearest drain, without your having to empty out the tank at the end of the cycle.
Important!
The operation described below must be carried out before completing the stages of the entire installation of the tumble dryer.
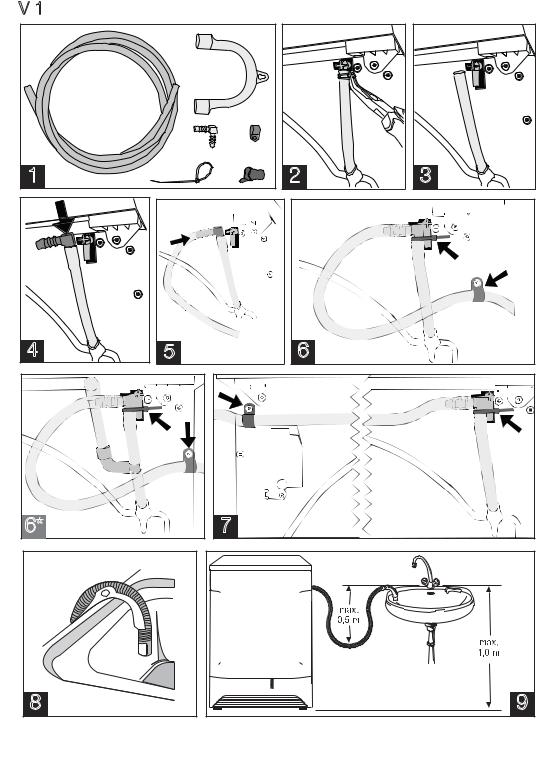
1Open the door of your tumble dryer, and extract from the drum the bag that contains the following items of the discharging kit:
●a nylon band;(5)
●a 90° fitting for connecting the draining hose;(3)
●a plastic curved part to be used for discharging into a sink;(2)
●a plastic anchoring support for fastening the draining hose to the back of the machine;(4)
●2,5 metres of semi-transparent hose;(1)
●a gasket.(6**)
2Position the tumble dryer so its back is towards you.
At the top right you can see a red hose which comes out of the back and is fastened to
3a plastic fitting.
Using a pair of pliers, loosen the metal band and push it down, in order to be able to extract the red hose from the plastic fitting.
4Take the 90° fitting that has been supplied and insert it into the red hose.
Insert the plastic anchoring support that fastens the draining hose to the back, then
5connect the other end of the draining hose to the 90° fitting.
6Using the nylon band, fasten the red hose to the fixed fitting on the back.
6* By means of a 7-mm socket spanner, unscrew the screw shown in the figure from the back. Insert the screw you have removed into the relevant seat on the plastic anchoring
7support, and tighten the screw, positioning the draining hose as shown in the figure.
8If necessary, shorten the draining hose. If you wish to discharge the condensation water into a sink, you will have to apply the plastic curved part to the draining hose, in order to be able to hang it on the edge of the sink.
9Important!
Do not hang the curved part at a height exceeding 1 metre, and suitably shorten the draining hose so as not to create a bend higher than 0.5 metres, as shown in the figure.
* Dryers with Steam Technology
**only with kit 12512251/
FR
Cher client,
Ce kit d'évacuation permettra à votre sèche-linge d'évacuer l'eau de condensation, qui se crée lors de chaque cycle de séchage, directement dans le dispositif d'évacuation le plus proche, vous évitant donc d'avoir à vider le récipient d'évacuation à la fin du cycle.
Important!
Cette opération doit être effectuée avant de terminer toutes les phases de sa mise en place.
1Ouvrir le hublot de votre sèche-linge et retirer de l'intérieur du panier le sachet contenant les pièces suivantes du kit d'évacuation:
●un collier en Nylon;(5)
●un raccord coudé à 90° pour le branchement du tuyau d'évacuation(3);
●une courbe en matière plastique à utiliser pour l'évacuation au niveau du lavabo(2);
●un support d'ancrage en matière plastique pour fixer le tuyau d'évacuation au dos de la machine(4);
●2,5 mètres de tuyau semi-transparent(1).
●un joint d’étanchéité.(6**)
2Positionner le sèche-linge afin que sa partie arrière se trouve devant vous.
Sur le côté, en haut à droite, on aperçoit un tuyau rouge qui sort de la partie arrière et
3qui est fixée avec un raccord en matière plastique.
A l'aide d'une pince, desserrer le collier métallique et le repousser vers le bas pour pouvoir extraire facilement le tuyau rouge du raccord en matière plastique.
4Prendre le raccord à 90° en dotation et l'enfiler dans le tuyau rouge, puis, enfiler le support d'ancrage en matière plastique, qui fixe le tuyau d'évacuation à la partie arrière,
5avant de brancher son autre extrémité au raccord à 90°.
6Avec le collier en Nylon, fixer le tuyau rouge sur le raccord fixe placé sur l'arrière de la machine.
6* A l'aide d'une clef à tube de 7 mm dévisser la vis indiquée sur la figure représentant la partie arrière de la machine et l'enfiler dans le logement prévu pour cela sur le support
7d'ancrage en matière plastique et la revisser comme il est indiqué sur la figure.
8ISi nécessaire, on peut raccourcir le tuyau d'évacuation, tandis que si on souhaite évacuer l'eau de condensation dans un lavabo il faudra appliquer une courbe spéciale en matière plastique sur le tube d'évacuation, qui permettra de suspendre et de maintenir celui-ci sur le rebord du lavabo.
9Attention!
Ne jamais suspendre la courbe à une hauteur supérieure à 1 m, et raccourcir correctement le tuyau d'évacuation de manière à éviter la formation d'anses supérieures à 0.5 m, comme indiqué sur la figure.
* Sèche-linges dotés de la technologie vapeur ** uniquement avec le kit 12512251/

DE
Sehr geehrter Kunde,
mit diesem Abflusssystem kann das Kondenswasser, das Ihr Wäschetrockner bei jedem Trocknungszyklus erzeugt, direkt in den nächsten Abfluss abgeleitet werden, ohne den Behälter bei jedem Zyklusende entleeren zu müssen.
Wichtig!
Die Montage dieses Systems muss vor der kompletten Geräteinstallation erfolgen.
1Die Tür des Wäschetrockners öffnen und den Beutel mit folgenden Bestandteilen des Abflusssystems herausnehmen:
●Ein Nylonband(5);
●Ein 90°-Winkelstück für den Abflussschlauch(3);
●Eine Kunststoffkrümmung für den Abfluss ins Waschbecken(2);
●Eine Kunststoff-Halterung zur Befestigung des Abflussschlauchs an der Geräterückseite(4);
●2,5 Meter halbtransparenter Schlauch(1).
●Eine Dichtung.(6**)
2Den Wäschetrockner mit der Rückseite zu sich hin aufstellen.
Rechts oben ist der rote Schlauch ersichtlich, der aus der Rückwand austritt und mit
3einem Kunststoffverbindungsstück fixiert ist.
Die Metallschelle mit einer Zange lockern und nach unten verschieben, damit der rote Schlauch leicht aus dem Kunststoffverbindungsstück gezogen werden kann.
4Das mitgelieferte 90°-Winkelstück in den roten Schlauch stecken und danach die Kunststoff-Halterung, mit der der Abflussschlauch an der Rückwand fixiert wird,
5aufstecken, bevor das andere Ende auf das 90°-Winkelstück gesteckt wird.
6Den roten Schlauch mit dem Nylonband am fixen Verbindungsstück an der Geräterückseite fixieren.
6*
7
Die abgebildete Schraube die abgebildete Schraube aus der Rückwand ausschrauben, durch die Kunststoffhalterung führen und wieder einschrauben, indem der Abflussschlauch laut Abbildung angeordnet wird.
8Wenn nötig, den Abflussschlauch kürzen; sollte das Kondenswasser in ein Waschbecken abfließen, ist der Kunststoffkrümmer zum Einhängen am Beckenrand
aufzusetzen.
9Achtung!
Die Krümmung nicht über 1 m Höhe einhängen und den Schlauch korrekt kürzen, damit er nicht um mehr als 0,5 m durchhängt (siehe Abbildung).
* Trockner mit Dampf-Technologie
**nur mit Installationssatz 12512251/
 Loading...