


User’s Manual
FAVORIT F89078VI-M 24” Stainless Steel Dishwasher -
User’s Manual

|
CONTENTS |
EN |
Contents |
|
|
1 |
INTRODUCTION ....................................................................................................................... |
5 |
2 |
SAFETY INFORMATION .......................................................................................................... |
7 |
3 |
INSTALLATION MATERIAL.................................................................................................... |
10 |
3.1 |
Kit supplied with dishwasher (models F65478VI-S / F89078VI-S) ......................... |
11 |
4 |
DIMENSIONS OF DISHWASHER ........................................................................................ |
12 |
5 |
INSTALLATION AND HOOK-UP.......................................................................................... |
13 |
5.1 |
Leveling....................................................................................................................................... |
14 |
5.1.1 |
Mounting the feet (only for some models).................................................................... |
14 |
5.1.2 |
Levelling the appliance......................................................................................................... |
15 |
5.2 |
Connections .............................................................................................................................. |
16 |
5.2.1 |
Connecting to the water supply ........................................................................................ |
17 |
5.2.1.1 |
Connecting to the water tap............................................................................................... |
18 |
5.2.1.2 |
Connecting the drain hose .................................................................................................. |
20 |
5.2.2 |
Electrical connections and warnings ............................................................................... |
25 |
5.3 |
Commissioning ........................................................................................................................ |
26 |
5.3.1 |
Installation procedure (all models)................................................................................... |
26 |
5.3.2 |
Procedure for mounting the door panel ............................................................................ |
28 |
5.3.3 |
Completion of installation........................................................................................................ |
32 |
5.4 |
Testing......................................................................................................................................... |
35 |
Rev 0.0 |
3 |

INTRODUCTION |
EN |
1INTRODUCTION
Thank you for choosing one of our products. To install this dishwasher correctly and safely, please read this manual carefully. The manual is divided into sections giving you a step-by-step guide to installation of the appliance. The texts are easy to understand and are complete with detailed illustrations. This user-friendly manual will provide answers to all your questions about installation of the dishwasher.
This manual comprises the following sections:
INTRODUCTION: general information about the manual.
WARNINGS: a list of warnings concerning safety during installation.
INSTALLATION INSTRUCTIONS: for the qualified technician who must carry out the installation, hook-up and testing of the appliance.
Nomenclature of figures and tables:
The progressive number of each figure is shown in the bottom right-hand corner of the relative box. An example of a progressive number is “Fig.
4-01”, where the first number (4) indicates the section to which the figure belongs, while the second number (01) indicates the progressive number of the figure in section 4 (Fig. 4-01 is the first figure in section 4). The tables are numbered in the same way, bearing in mind that “Tab.” is used instead of “Fig.” (e.g.: Tab. 4-01 is the first table in section 4). If a table occupies more than one page, a letter is added after the progressive number (e.g.:
“Tab. 4-01a”, Tab. 4-01b”).
Rev 0.0 |
5 |
EN |
INTRODUCTION |
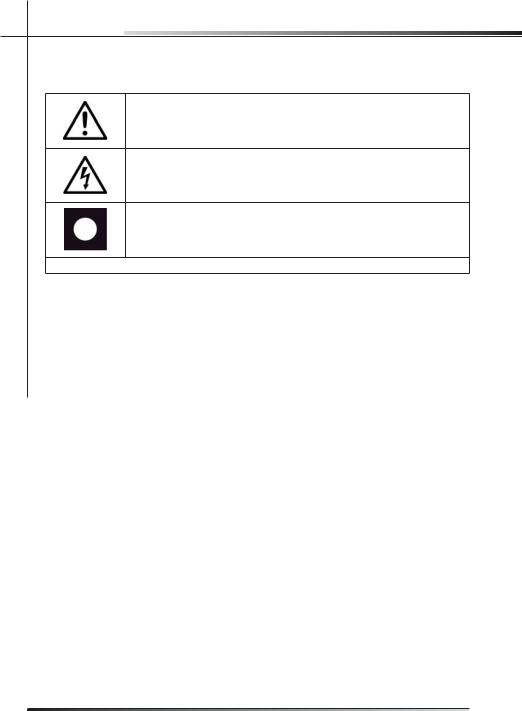
Symbols used in this manual (see tab. 1-01)
DANGER. This symbol highlights information and warnings which, if not observed, may compromise personal safety or damage the appliance.
DANGER OF ELECTROCUTION. This symbol highlights information and warnings of an electrical nature which, if not observed, may compromise personal safety or damage the appliance.
This symbol highlights general information and warnings.
Tab. 1-01
6 |
Rev 0.0 |
WARNINGS |
EN |
2SAFETY INFORMATION
THIS MANUAL FORMS AN INTEGRAL PART OF THE APPLIANCE AND MUST THEREFORE BE KEPT INTACT TOGETHER WITH THE MACHINE. BEFORE USING THE APPLIANCE, CAREFULLY READ ALL THE INSTRUCTIONS CONTAINED IN THIS MANUAL. INSTALLATION MUST BE PERFORMED BY
A QUALIFIED TECHNICIAN, IN COMPLIANCE WITH THE REGULATIONS IN
FORCE. THIS APPLIANCE IS INTENDED FOR DOMESTIC USE, AND COMPLIES WITH THE DIRECTIVES CURRENTLY IN FORCE, INCLUDING THE PREVENTION AND ELIMINATION OF RADIO FREQUENCY INTERFERENCE. THE APPLIANCE IS DESIGNED FOR THE FOLLOWING PURPOSE: WASHING AND DRYING OF DISHES; ANY OTHER USE SHALL BE CONSIDERED
IMPROPER. THE MANUFACTURER DECLINES ALL RESPONSIBILITY
FOR USES OTHER THAN THOSE DESCRIBED ABOVE.
INSTALLATION, REPAIRS AND SERVICING MUST BE PERFORMED BY QUALIFIED AND AUTHORIZED TECHNICIANS. AS WELL AS INVALIDATING THE WARRANTY, WORK CARRIED OUT BY UNAUTHORIZED PER-
SONS MAY GENERATE HAZARDS. INSTALLATION MUST BE PERFORMED
IN COMPLIANCE WITH ALL THE DIRECTIVES IN FORCE IN THE COUNTRY OF INSTALLATION AND, IF THESE DO NOT EXIST: IN THE UNITED STATES THE NATIONAL ELECTRIC CODE; IN CANADA THE CANADIAN ELECTRIC CODE C22.1 - LATEST EDITION/PROVINCIAL AND MUNICIPAL CODES
AND/OR LOCAL CODES.
THE NAME PLATE FEATURING THE TECHNICAL DATA, SERIAL NUMBER
AND MARKINGS IS VISIBLY POSITIONED ON THE INNER EDGE OF THE
DOOR. THE NAMEPLATE ON THE INNER EDGE OF THE DOOR MUST
NEVER BE REMOVED.
THIS APPLIANCE IS NOT SUITABLE FOR USE ON BOATS, CARAVANS OR
THE LIKE. DISHWASHERS CERTIFIED FOR DOMESTIC USE ARE NOT SUITABLE FOR AUTHORISED FOOD FACTORIES.
CHECK THAT THE VOLTAGE, FREQUENCY AND PROTECTION OF THE
DOMESTIC MAINS POWER SUPPLY MATCH THE RATINGS ON THE NAME
PLATE OF THE APPLIANCE.
Rev 0.0 |
7 |
EN |
WARNINGS |
TWO PEOPLE WEARING SAFETY GLOVES ARE REQUIRED TO LIFT THE DISHWASHER.
DO NOT LEAVING DISCARDED PACKAGING MATERIALS UNSUPERVISED WITHIN THE HOME. SEPARATE THE VARIOUS PACKAGING MATERI-
ALS AND TAKE THEM TO THE NEAREST SORTED WASTE COLLECTION
CENTRE. KEEP CHILDREN, PHYSICALLY AND/OR MENTALLY IMPAIRED ADULTS, AND ANIMALS AWAY FROM PACKAGING WASTE; DANGER OF SUFFOCATION.
BEFORE PROCEEDING WITH INSTALLATION, DISCONNECT THE MAINS
POWER SUPPLY FROM THE WORK AREA.
DURING INSTALLATION, TAKE CARE NOT TO INJURE YOURSELF ON THE
SHARP EDGES OF THE APPLIANCE; WEAR SAFETY GLOVES.
THE APPLIANCE MUST BE PROVIDED WITH A GROUND CONNECTION IN ACCORDANCE WITH THE ELECTRICAL SAFETY REGULATIONS IN FORCE.
IF IN DOUBT, HAVE THE SYSTEM CHECKED BY A QUALIFIED ELECTRI-
CIAN.
THE MANUFACTURER DECLINES ALL RESPONSIBILITY FOR DAMAGE TO PERSONS OR PROPERTY RESULTING FROM THE FAILURE TO GROUND THE APPLIANCE OR FROM A DEFECTIVE GROUND CONNECTION.
DO NOT USE APPLIANCES WHICH HAVE BEEN DAMAGED DURING TRAN-
SIT! IF IN DOUBT, CONSULT YOUR DEALER. THE APPLIANCE MUST BE IN-
STALLED AND CONNECTED IN ACCORDANCE WITH THE INSTRUCTIONS
PROVIDED BY THE MANUFACTURER OR BY A QUALIFIED TECHNICIAN.
DO NOT OPERATE THE DISHWASHER UNLESS ALL THE OUTER PANELS
HAVE BEEN POSITIONED CORRECTLY.
IMMEDIATELY AFTER INSTALLATION, BRIEFLY TEST THE APPLIANCE FOL-
LOWING THE INSTRUCTIONS INDICATED BELOW. IF THE DISHWASHER
FAILS TO OPERATE CORRECTLY, DISCONNECT IT FROM THE ELECTRICAL
POWER SUPPLY AND CALL THE NEAREST TECHNICAL SERVICE CENTRE.
DO NOT ATTEMPT TO REPAIR THE APPLIANCE.
8 |
Rev 0.0 |

WARNINGS |
EN |
DO NOT USE EXTENSION CORDS, ADAPTORS OR SHUNT CONNECTIONS
IN ORDER TO AVOID THE POSSIBILITY OF OVERHEATING OR BURNING,
WITH CONSEQUENT FIRE HAZARD.
THE MANUFACTURER DECLINES ALL RESPONSIBILITY FOR DAMAGE TO PERSONS, ANIMALS OR PROPERTY RESULTING FROM FAILURE TO OBSERVE THE ABOVE PRECAUTIONS, FROM TAMPERING WITH EVEN A SINGLE COMPONENT OF THE APPLIANCE, OR FROM THE USE OF UNORIGINAL SPARE PARTS.
IF IN DOUBT ABOUT THE CONTENTS OF THIS MANUAL, CONTACT THE TECHNICAL ASSISTANCE SERVICE.
Rev 0.0 |
9 |

EN |
INSTALLATION INSTRUCTIONS |
3INSTALLATION MATERIAL
To install the dishwasher correctly, the following materials are required:
•Phillips screwdriver (ref. A fig. 3-01);
•spirit level (ref. B fig. 3-01);
•tape measure (ref. C fig. 3-01);
•compass saw (ref. D fig. 3-01);
•pencil (ref. E fig. 3-01);
•file (ref. F fig. 3-01);
•13 mm open-ended wrench (ref. G fig. 3-01);
•plumbing pliers (ref. H fig. 3-01);
•drill (ref. I fig. 3-01);
•safety gloves (ref. L fig. 3-01).
B
A
D
C
F
E |
H |
G
I L
Fig. 3-01
10 |
Rev 0.0 |
INSTALLATION INSTRUCTIONS |
EN |
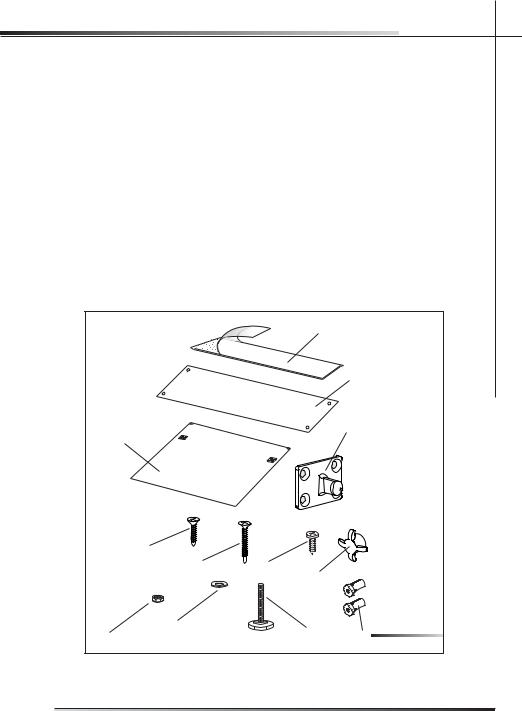
3.1Kit supplied with dishwasher
(models F65478VI-S / F89078VI-S)
The kit supplied with the dishwasher comprises:
•adhesive steam guard (ref. A fig. 3-02);
•1 steel steam guard (ref. B fig. 3-02);*
•1 template for door panel (ref. C fig. 3-02);
•2 hooks for door panel (ref. D fig. 3-02);
•8 screws for securing the door panel hooks (ref. E fig. 3-02);
•2 screws for securing the door (ref. F fig. 3-02);
•2 screws for fixing the dishwasher to the adjacent walls (ref. G fig. 3-02);
•2 screw caps (ref. H fig. 3-02).
•2 nuts (only for some models) (ref. I fig. 3-02);
•2 washers (only for some models) (ref. L fig. 3-02);
•2 adjustment feet (only for some models) (ref. M fig. 3-02).
•2 door spacers (only for certain models) (ref. N fig. 3-02)
A
B
D
C
E
F G
G
|
H |
|
|
|
L |
|
|
I |
M |
N |
Fig. 3-02 |
|
|
|
* The adhesive protection is suitable for kitchens with worktops that do not allow the steel protection to be fixed with screws (e.g.:+ marble or masonry), but it can be also used with other materials.
Rev 0.0 |
11 |
EN |
INSTALLATION INSTRUCTIONS |
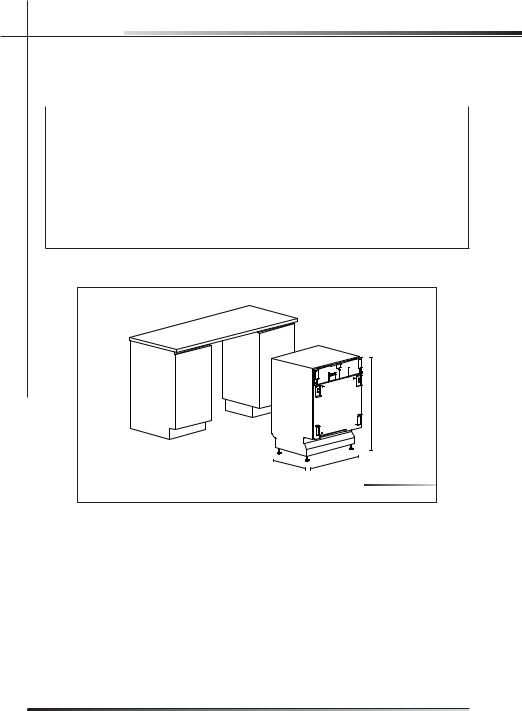
4DIMENSIONS OF DISHWASHER (See fig. 4-01)
Model |
A (height) |
B (width) |
C (depth) |
|
|
|
|
|
|
F89078VI-M |
86 cm ÷ 91 cm |
59.7 cm ÷ 59,9 cm |
57 cm |
|
33-55/64” ÷ 35-55/64” |
23-1/2” ÷ 23-37/64” |
22-7/16” |
||
|
||||
F89078VI-S |
86 cm ÷ 91 cm |
59.7 cm ÷ 59.9 cm |
55 cm |
|
33-55/64” ÷ 35-55/64” |
23-1/2” ÷ 23-37/64” |
21-21/32” |
||
|
||||
F65478VI-S |
82 cm ÷ 87 cm |
44.7 cm ÷ 44.9 cm |
55 cm |
|
32-9/32” ÷ 34-1/4” |
17-19/32” ÷ 17-43/64” |
21-21/32” |
||
|
||||
F45078I-M |
86 cm ÷ 91 cm |
59.7 cm ÷ 59.9 cm |
60 cm |
|
33-55/64” ÷ 35-55/64” |
23-1/2” ÷ 23-37/64” |
23-5/8” |
||
|
Tab. 4-01
A
C |
B |
Fig. 4-01
12 |
Rev 0.0 |
INSTALLATION INSTRUCTIONS |
EN |
5INSTALLATION AND HOOK-UP
DURING INSTALLATION, TAKE CARE NOT TO INJURE YOURSELF ON THE SHARP EDGES OF THE APPLIANCE.
Remove the polystyrene rack blocks. Position the appliance in the chosen installation position. The sides and rear of the appliance can lie against kitchen units or walls. If the dishwasher is installed next to a heat source, separate it with a heat insulating panel in order to prevent overheating and malfunctions. To assure stability, only install built-in appliances under continuous worktops, securing them to the adjacent kitchen units or worktop with screws.
BUILDING-IN A DISHWASHER UNDERNEATH A CERAMIC HOB IS ABSOLUTELY FORBIDDEN. A DISHWASHER CAN BE BUILT-IN UNDERNEATH
A CONVENTIONAL HOB PROVIDED THERE IS NO BREAK IN THE KITCH-
EN WORKTOP, AND THE DISHWASHER AND HOB ARE INSTALLED AND SECURED CORRECTLY, SO THAT NO HAZARDS ARE GENERATED.
MAKE SURE THE DISHWASHER HAS BEEN CORRECTLY INSTALLED AND GROUNDED BY A QUALIFIED FITTER. THIS SAFETY REQUIREMENT MUST BE MET. IN CASE OF DOUBT, CALL IN A QUALIFIED FITTER. THE MANUFACTURER DECLINES ALL RESPONSIBILITY FOR DAMAGE TO PERSONS OR PROPERTY RESULTING FROM THE FAILURE TO GROUND THE APPLIANCE OR FROM A DEFECTIVE GROUND CONNECTION.
BEFORE PROCEEDING WITH INSTALLATION, DISCONNECT THE MAINS POWER SUPPLY FROM THE WORK AREA.
Only for free-standing models
•It is strictly forbidden to mount a hob over a free-standing dishwasher.
•If the appliance is not in a niche and can therefore be accessed on one side, cover the door hinge area for safety reasons (cutting hazard). Covers are available as accessories from specialized retailers or from the Technical Service Centre.
•To build in the dishwasher, purchase the relative kit from specialized retailers or from the Technical Service Centre.
Rev 0.0 |
13 |
 Loading...