


User’s Manual
3007VNM-M 30” Free Standing Electric Range -
User’s Manual

Congratulations on the purchase of your AEG appliance.
We are sure it will provide many years of great cooking experience.
You may find that it has different features and characteristics to your last appliance.
It is essential you read this operation manual thoroughly to fully understand all of the various functions and operations. Experiment with your cooking and take advantage of the features your new appliance offers.
This manual should be retained for future reference. Should ownership of the appliance be transferred, please ensure that the manual is also passed onto the new owner.
Contents
A - |
Installation check and warnings |
Page 3 |
B - |
Accessories |
Page 4 |
C - |
Using the appliance for the first time |
Page 4 |
D- |
Electronic Programmer Operation |
Page 5 - 7 |
E- |
Ceramic Cooktop Control Panel |
Page 8 |
F- |
Ceramic Cooktop Functions |
Page 9 |
G- |
Oven Functions & Control Panel |
Page 10 – 17 |
H- |
Cleaning and maintenance |
Page 18-19 |
I- |
Trouble shooting guide |
Page 20 |
J- |
Installation instructions and measurements |
Page 20-21 |
K- |
Electrical wiring diagrams and instructions |
Page 22 - 24 |
L- |
Warranty |
Page 25 |

A - Installation check and warnings
 IMPORTANT:
Please ensure that the oven cavity, venting and wiring is as specified in the relevant section G of this manual.
A licensed electrician with relevant qualifications must perform electrical work when installing or servicing the appliance. The supply cable and fuse rating must be suitable for the appliance. You must never repair or replace any part of the appliance unless specifically recommended in the operation manual.
Ventilation opening must not be covered or obstructed in any way.
DO NOT use aluminum foil on the base of ovens
The use of foil on the base of the oven to avoid spillage and improve cleaning is not recommended. The bottom element is concealed under the base of the oven liner (not exposed). Foil or dishes with reflective qualities must never be placed on the base of the oven during cooking as the concentration of direct and reflected heat will damage the enamel surface.
Damage resulting from such use is not covered under the provisions of the warranty.
Initial heat up
Some smoke and smell may be noticed during the initial heat up cycle. This should quickly dissipate.
If abnormal levels of smoke are observed (i.e.: it is not food that is burning), have the appliance thoroughly checked.
Don’t use the appliance as a space heater
The appliance must never be used for warming or heating the surrounding room. Combustible materials must never be placed on or near the appliance.
Do not leave children alone
Children must not be left unsupervised in the area where the appliance is in use. Children must never be allowed to sit or stand on any part of the appliance.
Wear proper apparel when using the appliance
Loose fitting, hanging or highly flammable garments (such as synthetics) should never be worn while using the appliance.
Use only dry pot holders
Moist or damp pot holders on hot surfaces may result in burns from steam. Do not allow pot holder to touch hot heating elements. Do not use a towel or bulky cloth when handling hot cooking utensils in the appliance.
Oven compartments must never be used for storage
Items, particularly flammable materials, must never be stored in an oven or near surface units.
Do not use water on grease fires
Fires or flame should be smothered using flameproof material or extinguished using a dry chemical or other suitable fire retardant.

B - Accessories
Your appliance should come equipped with the following items.
1 x pair of Retractable Slide Runners fitted to upper position and capable of being moved to any selected position as required
1 x Deep Enameled Roasting Pan with dual height reversible Grill Rack insert – ready for sliding into side rack positions or fitting onto Retractable Slide Runners
2 x Wire Oven Shelves that can be fitted into Retractable Slide Runners or for sliding into side rack positions
1 x Pyrex Dish on retention rack with handles, with dual height reversible Grill Rack insert
– fitted onto wire oven shelf
Note: Additional Retractable Slide Runners are available as an optional extra and can be fitted at any time
Note: Additional oven shelves and pans are available as optional extras. Also, the Pyrex dish provided is an excellent water vessel for the Steam Clean function.
C - Using the appliance for the first time
After installation remove all notification labels (not identification or warning labels) and packaging materials. After cleaning make sure cleaned surfaces are thoroughly rinsed and wiped dry using a clean, soft cloth.
Power on
 NOTE: oven will not operate unless the clock is set.
When power is first applied the display will flash and shows 00:00.
The time of day is displayed in digital 24 hours format (e.g.: 18:00 is 6:00 pm). Press the reset button to select manual mode and set clock as describe in section C.
Burning in
Before cooking in the appliance an initial pre-heating is required to burn off the fine oil film used to protect the elements for shipping. The first time you heat up the oven (or grill) the oil will be given off as smoke, which is perfectly normal.
Select a cooking mode and set the oven temperature to 180°C. With the oven door closed, leave for approximately 5 minutes.
Repeat the above step for each cooking mode.
After completing the above make sure all controls are turned off. The oven is now ready for cooking and grilling.

D - Electronic Programmer Operation
The 24 hour clock allows the setting of automatic cooking options up to 24 hours in advance.
1- Minus Time Button
2Mode (Countdown Timer with Alarm, Cooking duration, Finish Cooking)
3+ Plus Time Button
Setting the time on the 24 hour clock
 IMPORTANT – NOTE FOR NEW INSTALLATION AND FIRST OPERATION
1- The clock will require setting when you first turn on the power (or following a power failure).
2- At power on, the relay contact is opened. The display and AUTO symbol flashes and time of day starts from 0:00.
3- Press PLUS and MINUS button simultaneously for minimum 3 seconds. The AUTO symbol goes out, POT symbol goes on the DOT is flashing. With the PLUS button the time will advance slowly, and then speed up. If you over-shoot the desired time , use the MINUS button)
4- Press the MODE button to select the time of day setting mode. The DOT will be Conventional Oven
5- The oven is now ready for use and to accept the selected cooking functions
6- The timer can be set for countdown up to 24 hours and for automatic cooking modes up to 10 hours and will countdown to zero. When zero is reached the alarm will sound.
7- To set the countdown timer
8- Press the MODE button for minimum 3 seconds. The BELL symbol is flashing and the display shows 0:00. Using the PLUS button advance the timer to the desired time.
9- Once the countdown timer is set, the normal time of day will return to the display within 7 seconds. If you wish to check how much time remains on the countdown, press the
10MODE button for 3 seconds. The remaining time will be displayed. After 7 seconds the normal time will return to the display.
11To silence the alarm press the MODE button for minimum 4 seconds
Adjusting the tone of the electronic timer alarm.
The tone is adjusted simply by pressing the minus button. Each time it is pressed the tone will change.
There are 3 different tones from which you can select.
The electronic timer will store in its memory the last tone activated
Manual cooking
Once the time of day is set the POT symbol will be displayed. The oven is now in manual operation mode ready for you to select the desired cooking function and temperature
Automatic cooking modes (Based on setting the duration “DUR”)
Set function and temperature to the desired position
For example: if you wish to cook for 45 minutes. Press the MODE button minimum for 4 seconds. Press the MODE button again. The AUTO symbol is flashing and the display shows “dur”. The display automatically switches over between "dur" display and 0:00. During this time you can set the duration time of 45 minutes by pressing the PLUS button (use MINUS button should you overshoot the required time). Release and the display will return to the normal time of day after 7 seconds. The AUTO symbol will also appear indicating that you have set the automatic cooking function.
The oven will operate for 45 minutes only, turn off automatically and the alarm will sound. The AUTO symbol is flashing and the POT symbol will disappear. The alarm will turn off after pressing the MODE button.
If you hold the MODE button down longer than 4 seconds the oven will return to the normal cooking mode.
If further cooking is required, either leave on manual or repeat the above setting sequence.
Note: If you have not turned the function and thermostat setting off, your oven will now continue to operate manually. The AUTO symbol will disappear and the POT symbol will reappear.
Based on setting a cook stop time
1Set the function and thermostat control to the desired position
2For example: if you commence cooking and decide you would like the oven to turn off at 6.00pm. Press the MODE button minimum for 4 seconds. Press the MODE button two times again. The AUTO symbol is flashing and the display shows “End”. The display automatically switches over between "End" and time of day. During this time you can set the cooking stop time to 6.00pm, i.e.18:00 on the 24 hour clock, by pressing the PLUS button (use MINUS button should you over-shoot the required time). Release and the display will return to the normal time of day after 7 seconds. The AUTO symbol will also appear indicating that you have set the automatic cooking function.
3The oven will continue to cook until 18:00 (6.00pm) and then switch off and the alarm will sound. The AUTO symbol is flashing and the POT symbol will disappear. The alarm will turn off after pressing the MODE button.
4If you hold the MODE button pressed longer then 4 seconds the oven will return to the normal cooking mode.
If further cooking is required, either leave on manual or repeat the above setting sequence.
Note: If you have not turned the function and thermostat setting off, your oven will now continue to operate manually. The AUTO symbol will disappear and the POT symbol will reappear.
Fully automatic – (Start Later – Stop Later)
Your oven may be programmed to start, cook for the desired time and turn off automatically. This function is particularly useful in the preparation of the evening meal, should you be out during the day, it will be ready on your return home. For example if your cooking time is 45 minutes and you want the cooking to finish at 6.00 p.m.
Press the MODE button minimum for 4 seconds. Press the MODE button again. Set the cooking duration time for say 45 minutes using the PLUS or MINUS button.
Press the MODE button again. Set the stop cooking time to 6.00pm (18:00). Release and the display will return to the normal time of day after 7 seconds. The AUTO symbol will be displayed.
Using the above settings, the oven is now programmed automatically to commence cooking 45 minutes prior to 6.00 pm. Then automatically turn off.
When cooking is complete the AUTO symbol is flashing and the POT symbol will disappear and the alarm will sound. The alarm will turn off after pressing the MODE button.
If you hold the MODE button pressed longer then 4 seconds the oven will return to the normal cooking mode.
Canceling automatic settings
To cancel a program:
Press plus and minus button simultaneously for minimum 3 seconds.
 NOTE:
NOTE:
On oven start up or possibly at other times, due to electricity supply deviations – the programmer may freeze on a function – if this occurs we recommend that, after checking other solutions without success, it is recommended that power supply be disconnected to the appliance and allow it to be in this position for some minutes before reconnecting. This may have a result of clearing the frozen position allowing you to reset the programmer for normal operation.
Cooling Fan
The Single and Double Ovens are provided with a cooling fan motor to reduce the heat around the oven. The fan motor is controlled by a sensor, which will start when the temperature achieves the level pre-fixed and stop working when the temperature is reduced accordingly.
This safeguards both the oven and the adjoining cupboards from the possibility of temperature damage.
Safety Thermostat
Your oven is fitted with an over temperature sensor that will automatically shut down your oven for a period if it is deemed to be overheatingthis sensor is fitted to the rear wall of the oven, inside the outer case – it will only activate in extreme circumstances and is provided as protection to the appliance and the adjoining furnishings. If activated it will shut down the appliance for a short time and will automatically reset allowing normal operations – you should consult your service technician if the problem re-occurs.
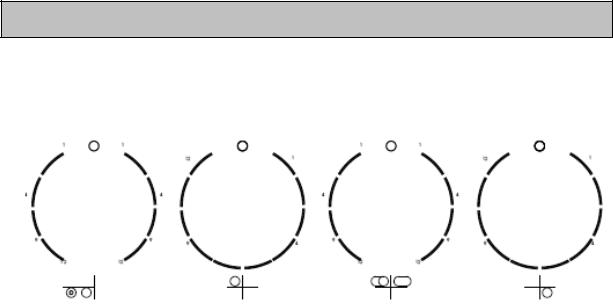
E - Ceramic Cooktop Control Panel
Ceramic Cooktop Controls:
Switch controlling |
Switch controlling |
Switch controlling |
Switch controlling |
the left, front hot |
the left, back hot |
the right, back hot |
the right, front hot |
plate. |
plate. |
plate. |
plate. |
Turning the knob |
Turning the knob |
Turning the knob |
Turning the knob |
anticlockwise |
clockwise activates |
anticlockwise |
clockwise activates |
activates only the |
the full hot plate. |
activates only the |
the full hot plate. |
center area of the |
|
small round area of |
|
hot plate. |
|
the hot plate. |
|
Turning the knob |
|
Turning the knob |
|
clockwise activates |
|
clockwise activates |
|
the full hot plate. |
|
the full oval hot |
|
|
|
plate. |
|

F - Ceramic Cooktop Functions
WARNING
All operations relative to installation and electric connection should be carried out by qualified personnel in conformity with the regulations in force in your country.
The specific instructions are described in the booklet section for the installer
NOTICE
Use only flat pans with a sufficiently thick base, equal to or not much larger than the hot plate selected (fig.1)
The containers should not have rough bottoms in order to avoid scratching the heat surface of the top.
Do not switch the electric plate on without the pan over the plate.
Do not cook any food directly on the hot area. Avoid overflows of liquid and should they occur clean away promptly.
Turn off the plate few minutes before the cooking end.
Switching on
Set the power by rotating the knob, taking into consideration that the highest number corresponds with the maximum power.
The pilot light is switched ON when at least one element is on. The residual heat indicator will light up when the temperature in any area is higher than 50OC.
Cleaning
Remove leftover and grease or spillage from the cooking surface with the special scraper (fig.3) (optional).
Then clean the heating area thoroughly with a paper towel and ceramic cleaning products for the correct care of your appliance. Never use abrasive sponge or irritating chemical detergents such as over spray or spot removers.
 Loading...