


MANUAL miniBar
RH 136D
RH 137D
RH 330LD
RH 340LD
RH 341LD
RH 355LD
RH 356LD
RH 360LD
RH 361LD
English |
|
Type H20 / 60 |
T.D. 05/98 |
821 2675 -11 |
|

TABLE OF CONTENTS
1.0 |
INTRODUCTION |
3 |
|
2.0 |
FOR YOUR SAFETY |
3 |
|
|
2.1 |
Warnings and Safety Advice 3 |
|
|
2.2 |
Coolants |
3 |
3.0 |
WARRANTY AND |
3 |
|
|
CUSTOMER SERVICE |
|
|
4.0 |
INSTALLATION |
4 |
|
|
4.1 |
The Purpose of this Manual |
4 |
|
4.2 |
Tools/Materials Required |
4 |
|
4.3 |
Unpacking |
4 |
|
4.4 |
Cleaning |
4 |
|
4.5 |
Installation |
5 |
|
4.6 |
Securing |
6 |
|
4.7 |
Connecting the Device to the |
7 |
|
|
Electricity Supply |
|
|
4.8 |
Changing the Sliding Hinge |
8 |
|
4.9 |
Changing the Doorhang |
9 |
5.0 |
INSTRUCTION FOR USE |
10 |
|
|
5.1 |
Initial Operation |
10 |
|
5.2 |
Temperature Control |
10 |
|
5.3 |
Automatic Defrost Function |
10 |
|
5.4 |
Ice-Making |
10 |
|
5.5 |
Automatic Door Control (ADC) |
11 |
|
5.6 |
Interior Light |
12 |
|
5.7 |
Environmental Advice |
13 |
|
5.8 |
Disposal |
13 |
|
5.9 |
Energy saving Tips |
13 |
|
5.10 |
Declaration |
13 |
|
5.11 |
Check List |
14 |
|
5.12 |
Technical Data |
15 |
|
|
|
|
2

1.0INTRODUCTION
You have made an excellent choice by choosing the Electrolux miniBar. We are convinced that you will be satisfied with your new appliance in every way.
Silent in operation, the miniBar fulfils high quality standards and guarantees an efficient use of resources and energy during its entire working life, i.e. during manufacturing, use and disposal.
Please study the installation and operating instructions carefully before attempting to operate the miniBar.
2.0FOR YOUR SAFETY
2.1 Warnings and Safety Advice
In the interests of children's safety:
When disposing of the refrigerator, remove all doors and leave the shelves inside. This prevents children from being accidentally trapped or suffocated in the refrigerator.
Never open the cooling unit - it is under high pressure.
Never store explosive substances, such as lighter fuel, petrol, ether or similar products in the miniBar.
The miniBar must be installed in such a way that accidental contact with the cooling unit (which heats up when in use) is impossible.
The appliance has to be connected to a properly earthed socket in line with the relevant valid country regulations.
Servicing must only be carried out by authorised service personnel.
2.2Coolants
Ammonia is used as the coolant. This is a natural compound which is also present in common household cleaners (1 litre of salmiac cleaner contains up to 200g of ammonia - this is roughly double the amount contained in the cooling unit).
If a leak occurs (which can be easily detected due to the unpleasant smell):
Switch the device off (pull mains plug, if applicable);
Ventilate room thoroughly.
Inform hotel personnel.
For the safety of hotel guests and personnel, it has been established by inspectors that the coolant poses no threat to health.
3.0WARRANTY AND CUSTOMER SERVICE
Warranty claims are dealt with in line with the relevant country specific conditions. For warranty or service, please contact our customer services section.
Spares can be obtained all over Europe from our relevant customer service points.
When contacting customer service, please always state model, product and serial number! You can find this information on the model label inside the device.
e.g.
3

4.0INSTALLATION
4.1The Purpose of this Manual
The manual shows you how to:
install the miniBar correctly.
operate the miniBar correctly.
guarantee the miniBar´s correct maintenance and functioning.
deal with faults by yourself.
4.2Tools / Materials Required
You will need the following tools for initial operation:
mild detergent
4.3Unpacking
Check during unpacking that the device is defect-free.
Report transport damage to the transport company within 48 hours.
Check that the voltage noted on the model label corresponds to the
mains voltage.
Depending on the model, the following parts can be found in the miniBar :
4.4 Cleaning
Before operating the miniBar, we recommend you clean it both inside and outside.
Use a soft cloth, lukewarm water and a mild detergent.
Following this, wash out the miniBar using clean water and dry thoroughly.
At annual intervals, remove dust from fridge aggregate using a brush or soft cloth.
WARNING:
To prevent material damage:
Do not use soap or detergents which are harsh, coarse or which contain soda.
Keep the door seal free from oil and grease.
The cylinder locks have been lubricated in the factory to be long-lasting.
4
4.5Installation
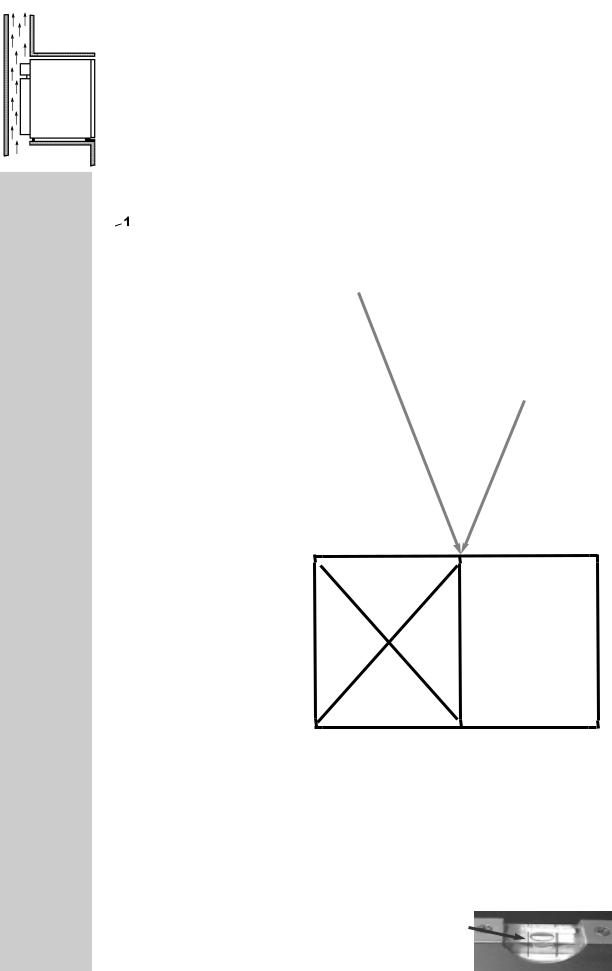
The following illustrations (A,B,C,D) show four different ways for installing the miniBar.
1 = ventilation grid
2 = air going in
3 = air coming out
Note: The ventilation grids (1) must have a clear cross section of at least 200cm2.
A.) |
|
B.) |
|
|
|
|
|
|
|
|
|
|
C.) |
|
|||
|
|
|
|
|
|
|
|
|
|
|
|
|
|
|
|
|
|
|
|
|
|
|
|
|
|
|
|
|
|
|
|
|
|
|
|
D.)
 Warning:
Please take great care to observe the following points in order to guarantee an optimal cooling performance and low energy consumption:
Do not place the miniBar directly beside a heat source and do not expose it to direct sunlight.
An unobstructed air circulation through the cooling aggregate must be ensured.
The ventilation grid must not be covered, for example, by ornaments or items of clothing.
The miniBar must always be mounted horizontally.
5
 Loading...