


FAVORIT 52860
User manual |
Dishwasher |

2 Contents
Thank you for choosing one of our high-quality products.
To ensure optimal and regular performance of your appliance please read this instruction manual carefully. It will enable you to navigate all processes perfectly and most efficiently. To refer to this manual any time you need to, we recommend you to keep it in a safe place. And please pass it to any future owner of the appliance.
We wish you much joy with your new appliance.
Contents
Operating instructions |
3 |
Safety information |
3 |
Correct use |
3 |
General safety |
3 |
Child safety |
3 |
Installation |
4 |
Product description |
4 |
Control panel |
5 |
Delay start button |
6 |
Digital display |
6 |
Function buttons |
6 |
Setting mode |
6 |
Use of the appliance |
7 |
Setting the water softener |
7 |
Electronic adjustment |
7 |
Use of dishwasher salt |
8 |
Use of rinse aid |
9 |
Loading cutlery and dishes |
10 |
Helpful hints and tips |
10 |
Primary basket |
10 |
Cutlery basket |
10 |
Use of detergent |
11 |
Fill with detergent |
11 |
Use of detergent tablets |
11 |
Do these steps when the drying results are |
|
not satisfactory: |
12 |
Washing programmes |
12 |
Select and start a washing programme |
13 |
Cancelling a washing programme |
14 |
Interrupting a washing programme |
14 |
Setting and starting a washing programme |
|
with delay start |
14 |
End of the washing programme |
15 |
Standby mode |
15 |
Care and cleaning |
15 |
Clean the filters |
15 |
Clean the spray arm |
15 |
External cleaning |
16 |
Frost precautions |
16 |
What to do if… |
16 |
Technical data |
18 |
Installation instructions |
18 |
Installation |
18 |
Fitting the appliance |
18 |
Positioning |
18 |
Adjusting the level of the appliance |
19 |
Water connection |
19 |
Inlet hose |
19 |
Drain hose |
20 |
Electrical connection |
21 |
Environment concerns |
21 |
Subject to change without notice

Safety information |
3 |
|
|
Operating instructions
Safety information
For your safety and correct operation of the appliance, read this manual carefully before installation and use. Always keep these instructions with the appliance even if you move or sell it. Users must fully know the operation and safety features of the appliance.
Correct use
•The appliance is designed exclusively for domestic use.
•Only use the appliance to clean household utensils that are applicable for dishwashers.
•Do not put solvents in the appliance. Risk of explosion.
•Put the knives and all items with sharp points in the cutlery basket with their points down. If not, put in a horizontal position in the main basket.
•Use only branded products for dishwashers (detergent, salt, rinse aid).
•If you open the door while the appliance is in operation, hot steam can escape. Risk of skin burns.
•Do not remove dishes from the dishwasher before the end of the washing programme.
•When the washing programme is completed, disconnect the mains plug from the mains socket and close the water tap.
•Only an authorised service engineer can repair this appliance. Use only original spare parts.
•Do not do repairs yourself to prevent injury and damage to the appliance. Always contact your local Service Force Centre.
General safety
•Persons (including children) with reduced physical sensory, mental capabilities or lack of experience and knowledge must not use the appliance. They must have supervision or instruction for the operation of the appliance by a person responsible for their safety.
•Obey the safety instructions from the manufacturer of the dishwasher detergent to prevent burns to eyes, mouth and throat.
•Do not drink the water from the dishwasher. Detergent residues can stay in your appliance.
•Always close the door when you do not use the appliance to prevent injury and not to stumble over the open door.
•Do not sit or stand on the open door.
Child safety
•Only adults can use this appliance. Children must get supervision to make sure that they do not play with the appliance.
•Keep all the packaging away from children. There is a risk of suffocation.
•Keep all detergents in a safe area. Do not let children touch the detergents.
•Keep children away from the appliance when the door is open.

4 Product description
Installation
•Make sure that the appliance is not damaged because of transport. Do not connect a damaged appliance. If necessary, contact the supplier.
•Remove all packaging before first use.
•A qualified and competent person must do the electrical installation.
•A qualified and competent person must do the plumbing installation.
•Do not change the specifications or modify this product. Risk of injury and damage to the appliance.
•Do not use the appliance:
–if the mains cable or water hoses are damaged,
–if the control panel, worktop or plinth area are damaged, that you can get access to
the inner side of the appliance. Contact your local Service Force Centre.
•Do not drill into the sides of the appliance to prevent damage to hydraulic and electrical components.
WARNING!
Carefully obey the instructions for electrical and water connections.
Product description
Control panel |
5 |
|
|
1Spray arm
2Microfilter
3Detergent dispenser
4Rinse aid dispenser
5Flat filter
6Salt container
The rating label is on the back of appliance.
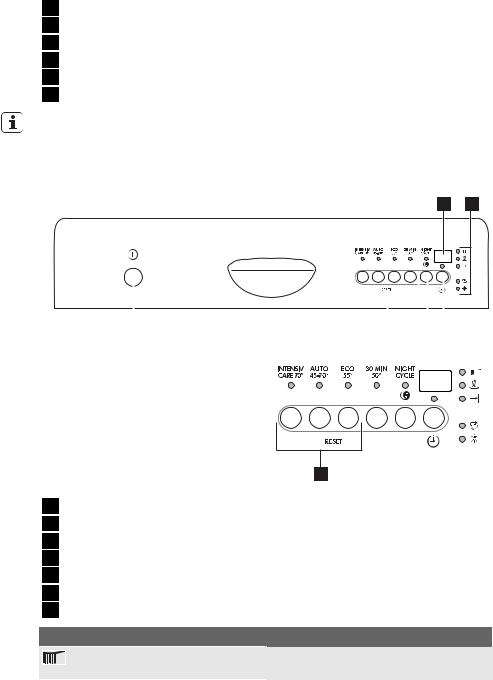
Control panel
6 5
|
|
|
|
|
|
|
|
|
|
|
|
|
|
|
|
|
|
|
|
|
|
|
|
|
|
|
|
|
|
|
|
|
|
|
|
1 |
|
|
2 |
|
3 |
|
4 |
||||
A B C
7
1On/off button
2Programme selection buttons
3Night cycle button /(NIGHT CYCLE)
4Delay start button
5Indicator lights
6Digital display
7Function buttons
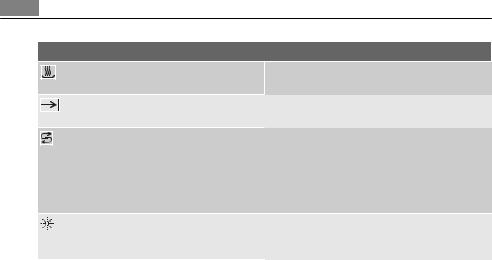
Indicator lights
The indicator light comes on when the washing phase or the rinsing phase operates.
6 Control panel
Indicator lights
1) |
1)
The indicator light comes on when the drying phase operates.
The indicator light comes on when the washing programme is completed.
The indicator light comes on when it is necessary to fill the salt container. Refer to the chapter 'Use of dishwasher salt'.
The salt indicator light can stay on for some hours, but it does not have an unwanted effect on the operation of the appliance.
The indicator light comes on when it is necessary to fill the rinse aid. Refer to the chapter 'Use of rinse aid'.
1) The indicator light is off when a washing programme operates.
Delay start button
Use the delay start button to delay the start of the washing programme with an interval between 1 and 19 hours. Refer to the chapter 'Setting and starting a washing programme'.
Digital display
The display shows:
•Adjusted level of the water softener.
•Programme duration.
•Remaining time to the end of the programme.
•End of a washing programme.
•Number of hours in delay start.
•Fault codes.
NIGHT CYCLE button
Night Cycle is a silent washing programme that will not disturb you, even when you sleep. You can set it:
•at night
•or in times with a more economical power rate.
During the Night Cycle the pump runs at a very low speed to reach a noise level reduction of 25% compared to the declaration programme. As a consequence, it has a very long running time.
Function buttons
Use the function buttons for these operations:
•To set the water softener. Refer to the chapter 'Setting the water softener'.
•To cancel the washing programme in progress or a delay start in progress. Refer to the chapter 'Setting and starting a washing programme'.
Setting mode
The appliance is in setting mode when all programme indicator lights are on. The appliance must be in setting mode for these operations:
Use of the appliance |
7 |
|
|
–To set a washing programme.
–To set the water softener level.
If a programme indicator light is on, cancel the programme to go back to the setting mode. Refer to the chapter "Setting and starting a washing programme".
Use of the appliance
Refer to the following instructions for each step of procedure:
1.Make a check if the water softener level is correct for the water hardness in your area. If necessary set the water softener.
2.Fill the salt container with dishwasher salt.
3.Fill the rinse aid dispenser with rinse aid.
4.Load cutlery and dishes into the dishwasher.
5.Set the correct washing programme for the type of load and soil.
6.Fill the detergent dispenser with the correct quantity of detergent.
7.Start the washing programme.
If you use detergent tablets, refer to the chapter 'Use of detergent'.
Setting the water softener
The water softener removes minerals and salts from the water supply. Minerals and salts can have bad effect on the operation of the appliance.
Water hardness is measured in equivalent scales:
•German degrees (dH°).
•French degrees (°TH).
•mmol/l (millimol per litre - international unit for the hardness of water).
•Clarke.
Adjust the water softener in to the water hardness in your area. If necessary, contact your local water authority.
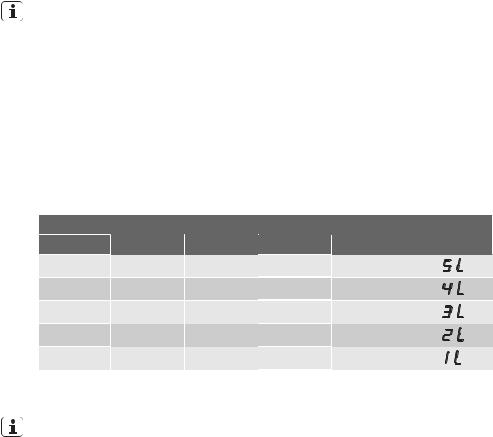
|
Water hardness |
|
Water hardness |
Digital display |
|
°dH |
mmol/l |
°TH |
Clarke |
setting |
level |
>24 |
>4.2 |
>40 |
> 28 |
5 |
|
1824 |
3.2- 4.2 |
3240 |
2228 |
4 |
|
1218 |
2.1- 3.2 |
1932 |
1322 |
3 |
|
4- 12 |
0.7- 2.1 |
7- 19 |
5 -13 |
2 |
|
< 4 |
< 0.7 |
< 7 |
< 5 |
11) |
|
1) No use of salt required.
Electronic adjustment
The water softener is set at the factory at level 3.
8Use of dishwasher salt
1.Switch on the appliance.
2.Make sure that the appliance is in setting mode.
3.Press and hold function buttons B and C until the indicator lights of function buttons A, B and C start to flash.
4.Release function buttons B and C.
5.Press function button A.
–The indicator lights for function buttons B and C go off.
–The indicator light for function button A continues to flash.
–The digital display shows the current level.
Example: digital display shows 
 = level 3.
6.Press the function button A one time to increase the water softener level by one step.
7.Press the on/off button to save the operation.
Use of dishwasher salt
CAUTION!
Only use dishwashers salt. Types of salt that are not applicable for dishwashers cause damage to the water softener.
CAUTION!
Grains of salt and salty water on the bottom of the appliance can cause corrosion. Fill the appliance with salt before you start a washing programme to prevent corrosion.
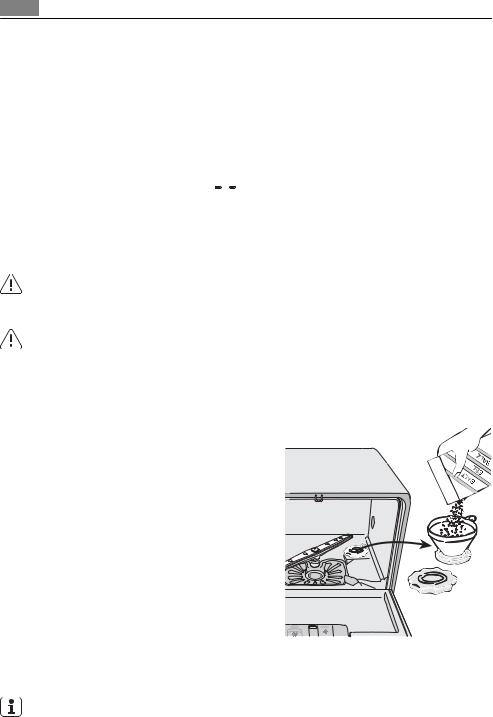
Do these steps to fill the salt container:
1.Turn the cap anticlockwise to open the salt container.
2.Fill the salt container with 1 litre of water (only the first operation).
3.Use the funnel to fill the salt container
with salt.
4.Remove the salt around the opening of the salt container.
5.Turn the cap clockwise to close the salt container.
It is normal that water overflows from the salt container when you fill it with salt.
 Loading...