


ÖKO_FAVORIT 40660 i
Dishwasher
User Instructions

Dear customer,
Please read these user instructions carefully.
Above all please observe the safety instructions on the first few pages ofthese user instructions! Please keep these user instructions for later reference. Pass them on to any subsequent owner of the appliance.
1 The warning triangle and/or specific words (Warning!, Caution!, Important!) are used to highlight instructions that are important for your safety or for the function of the appliance. It is imperative that these instructions are observed.
0This symbol or numbered instruction steps lead you step for step through the operation of the appliance.
3 |
Next to this symbol you receive additional information and practical |
|
tips on using the appliance. |
2 |
Tips and instructions for the economical and environmentally conscious |
|
use of the appliance are marked with a clover leaf. |
In the event of a malfunction, these operating instructions contain information on how to rectify faults yourself, see the "What to do, if..." section.
If these instructions are insufficient, please contact your nearest customer service centre.
In the case of technical problems, our customer service organisation is available to provide you with assistance at any time (you will find addresses and telephone numbers in the "Customer Service Centres" section).
In this respect please read the "Service" note on the rear of these user instructions.
3 |
Your dishwasher is fitted with the new "PULSE WASH" wash system. |
|
With this wash system, the motor speed and spray pressure are |
varied during the wash programme to improve the cleaning of the dishes. It is for this reason that the noise level changes during the wash programme.
Printed on paper manufactured with environmentally sound processes.
He who thinks ecologically acts accordingly ...
2

Contents |
|
CONTENTS |
|
Operating Instructions . . . . . . . . . . . . . . . . . . . . . . . . . . . . . . . . . . . . |
5 |
Safety Instructions . . . . . . . . . . . . . . . . . . . . . . . . . . . . . . . . . . . . . . . . . . . . |
5 |
Disposal . . . . . . . . . . . . . . . . . . . . . . . . . . . . . . . . . . . . . . . . . . . . . . . . . . . . . . |
7 |
Economical and Ecological Dishwashing . . . . . . . . . . . . . . . . . . . . . . . . . . |
7 |
Appliance Features and Control Panel . . . . . . . . . . . . . . . . . . . . . . . . . . . |
8 |
Control panel . . . . . . . . . . . . . . . . . . . . . . . . . . . . . . . . . . . . . . . . . . . . . . . |
9 |
Prior to using for the first time . . . . . . . . . . . . . . . . . . . . . . . . . . . . . . . . . |
10 |
Adjusting the Water Softener . . . . . . . . . . . . . . . . . . . . . . . . . . . . . . . . . . . . |
10 |
Filling with Special Salt for the Water Softener . . . . . . . . . . . . . . . . . . . . . |
12 |
Filling with Rinse Aid . . . . . . . . . . . . . . . . . . . . . . . . . . . . . . . . . . . . . . . . . . . . |
13 |
Adjusting Rinse Aid Dosing . . . . . . . . . . . . . . . . . . . . . . . . . . . . . . . . . . . . |
14 |
In Daily Use . . . . . . . . . . . . . . . . . . . . . . . . . . . . . . . . . . . . . . . . . . . . . . . . . . . |
15 |
Loading cutlery and dishes . . . . . . . . . . . . . . . . . . . . . . . . . . . . . . . . . . . . . . . |
15 |
Loading Cutlery . . . . . . . . . . . . . . . . . . . . . . . . . . . . . . . . . . . . . . . . . . . . . |
16 |
Loading Pans, Frying Pans and Large Plates . . . . . . . . . . . . . . . . . . . . . . |
16 |
Loading Cups, Glasses and Coffee Services . . . . . . . . . . . . . . . . . . . . . . . |
17 |
Adjusting the Height of the Upper Basket . . . . . . . . . . . . . . . . . . . . . . . |
18 |
Filling with Detergent . . . . . . . . . . . . . . . . . . . . . . . . . . . . . . . . . . . . . . . . . . . |
19 |
Bio Wash Programmes and Concentrated Detergents . . . . . . . . . . . . . . |
20 |
Selecting the Wash Programme (Programme Table) . . . . . . . . . . . . . . . . . . |
21 |
Start the wash pogram . . . . . . . . . . . . . . . . . . . . . . . . . . . . . . . . . . . . . . . . . . |
22 |
Interrupting or ending the wash programme . . . . . . . . . . . . . . . . . . . . . |
22 |
Pause function . . . . . . . . . . . . . . . . . . . . . . . . . . . . . . . . . . . . . . . . . . . . . . |
23 |
Setting or changing the delay start timer . . . . . . . . . . . . . . . . . . . . . . . . |
23 |
Switching Off the Dishwasher . . . . . . . . . . . . . . . . . . . . . . . . . . . . . . . . . . . . |
24 |
Emptying the Dishwasher . . . . . . . . . . . . . . . . . . . . . . . . . . . . . . . . . . . . . |
24 |
Care and Cleaning . . . . . . . . . . . . . . . . . . . . . . . . . . . . . . . . . . . . . . . . . . . . . |
24 |
Cleaning the Filter . . . . . . . . . . . . . . . . . . . . . . . . . . . . . . . . . . . . . . . . . . . |
25 |
What to do, when ... . . . . . . . . . . . . . . . . . . . . . . . . . . . . . . . . . . . . . . . . . . . |
26 |
...Fault warnings are displayed. . . . . . . . . . . . . . . . . . . . . . . . . . . . . . . . . . . . |
26 |
...there are problems operating the dishwasher. . . . . . . . . . . . . . . . . . . . . . |
27 |
...the wash results are unsatisfactory. . . . . . . . . . . . . . . . . . . . . . . . . . . . . . . |
27 |
Technical Data . . . . . . . . . . . . . . . . . . . . . . . . . . . . . . . . . . . . . . . . . . . . . . . . |
28 |
Notes for Test Institutes . . . . . . . . . . . . . . . . . . . . . . . . . . . . . . . . . . . . . . . . |
29 |
3

Contents
Installation and Connection Instructions . . . . . . . . . . . . . . . . |
30 |
Installing the Dishwasher . . . . . . . . . . . . . . . . . . . . . . . . . . . . . . . . . . . . . . . |
30 |
Dishwashers That Can Be Integrated . . . . . . . . . . . . . . . . . . . . . . . . . . . . |
31 |
Connecting the Dishwasher . . . . . . . . . . . . . . . . . . . . . . . . . . . . . . . . . . . . . |
32 |
Water Connection . . . . . . . . . . . . . . . . . . . . . . . . . . . . . . . . . . . . . . . . . . . . . . |
32 |
Permitted water pressure . . . . . . . . . . . . . . . . . . . . . . . . . . . . . . . . . . . . . |
32 |
Connect the inlet hose . . . . . . . . . . . . . . . . . . . . . . . . . . . . . . . . . . . . . . . |
32 |
Water drain . . . . . . . . . . . . . . . . . . . . . . . . . . . . . . . . . . . . . . . . . . . . . . . . . |
34 |
Leak Prevention System . . . . . . . . . . . . . . . . . . . . . . . . . . . . . . . . . . . . . . . |
35 |
Electrical connection . . . . . . . . . . . . . . . . . . . . . . . . . . . . . . . . . . . . . . . . . . . . |
35 |
Connections . . . . . . . . . . . . . . . . . . . . . . . . . . . . . . . . . . . . . . . . . . . . . . . . . . . |
36 |
Service Departments . . . . . . . . . . . . . . . . . . . . . . . . . . . . . . . . . . . . . . |
37 |
Belgium . . . . . . . . . . . . . . . . . . . . . . . . . . . . . . . . . . . . . . . . . . . . . . . . . . . . . . . |
37 |
Other Countries . . . . . . . . . . . . . . . . . . . . . . . . . . . . . . . . . . . . . . . . . . . . . . . . |
37 |
Guarantee Conditions . . . . . . . . . . . . . . . . . . . . . . . . . . . . . . . . . . . . . |
40 |
Belgium . . . . . . . . . . . . . . . . . . . . . . . . . . . . . . . . . . . . . . . . . . . . . . . . . . . . . . . |
40 |
Other Countries . . . . . . . . . . . . . . . . . . . . . . . . . . . . . . . . . . . . . . . . . . . . . . . . |
42 |
Service . . . . . . . . . . . . . . . . . . . . . . . . . . . . . . . . . . . . . . . . . . . . . . . . . . . . . . |
43 |
4

Operating Instructions
OPERATING INSTRUCTIONS
1 Safety Instructions
The safety aspects of AEG electrical appliances comply with accepted technical standards and the German Appliance Safety Law. Nevertheless, as a manufacturer we consider it our obligation to make you aware of the following safety information:
Installation, Connection and Placing into Operation
•The dishwasher may only be transported upright.
•Check the dishwasher for transport damage. Do not in any circumstances connect an appliance that is damaged. In the case of damage, please contact your supplier.
•Prior to placing the appliance in operation, ensure that the nominal voltage and type of supply on the rating plate match that of the supply where the appliance is to be installed. The fuse rating is also to be found on the rating plate.
•For information on how to correctly install and connect up your dishwasher, please read the „Installation“ section. Multiway plugs / connectors and extension cables must not be used. This could constitute a safety hazard.
Child Safety
•Children often do not recognise the hazards associated with the use of electrical appliances. It is therefore important that you ensure children are adequately supervised and that you do not allow children to play with the dishwasher – there is a risk that children can shut themselves inside the appliance (risk of suffocation!).
•Packaging materials (e.g. films, styrofoam) can be dangerous for children. Risk of suffocation! Keep packaging away from children.
•Detergents can cause burns to the eyes, mouth, and throat, or even cause choking! Please observe the manufacturer's safety instructions for cleaners and detergents.
•The water in your dishwasher is not suitable for drinking. If there are still remnants of detergent in the appliance, there is a risk of burns!
•When disposing of the dishwasher: unplug from the mains, cut off and dispose of the mains cable. Break the door lock so that the door no longer shuts.
5

Operating Instructions
General Safety
•Repairs to the dishwasher are only to be carried out by qualified service engineers. Improper repairs can give rise to significant hazards for the user. If your appliance needs repairing, please contact customer service or your dealer.
•Never place the dishwasher in operation if the mains cable, water inlet or drain hose is damaged; or the control panel, work top or plinth area is damaged such that the inside of the appliance is freely accessible.
•If the mains lead is damaged, or is to be replaced for a longer lead, the cable (obtainable from AEG customer service) must be replaced by a service engineer authorised by AEG.
•Never unplug the appliance by pulling on the cable, always pull the plug.
•Additions or modifications to the dishwasher are not permitted for safety reasons.
•Ensure that the door of the dishwasher is always closed when it is not being loaded or unloaded. In this way you will avoid anybody tripping over the open door and hurting themselves.
•Sharp knives and other item of cutlery with sharp edges must be laid in the upper rack or placed in the cutlery rack with the point facing downwards.
Correct Use
•Only wash household dishes using the dishwasher. If the appliance is used for other purposes, or is used incorrectly, the manufacturer cannot accept any liability for any damage caused.
•Prior to use, ensure that the manufacturers of the special salt, detergent, and rinse aid employed specifically permit the usage of their products in household dishwashers.
•Do not put any solvents in the dishwasher. There is a risk of an explosion!
•The anti-flood system provides dependable protection against damage due to leaks. For this system to function correctly, the following preconditions must be met:
–The appliance must remain connected to the mains even when it is switched off.
–The dishwasher must be correctly installed.
–Always shut off the water supply at the tap when the dishwasher is not to be used for longer periods, e.g. when you are away on holiday.
6

Operating Instructions
•Do not sit or stand on the open door, the appliance may tip over.
•In the event of a fault, first close the tap, then switch off the appliance and unplug it from the mains. If the appliance is permanently wired to the mains: switch off the fuse(s) or unscrew them.
2 Disposal
Disposing of the Packaging Material
Dispose of the dishwasher packaging material correctly. All the packaging materials used are harmless to the environment and can be recycled.
• Plastic parts are marked with standard international abbreviations:
– >PE< |
for polyethylene, e.g. sheet wrapping material |
– >PS< |
for polystyrene, e.g. padding material (always CFC-free) |
– >POM< |
for polyoxymethylene, e.g. plastic clips |
•Cardboard packaging is manufactured from recycled paper and should be deposited in the waste paper collection for recycling.
Disposal of old appliances
As and when you cease to use your dishwasher, please take it to a recycling centre or to your dealer who will, for a small contribution to the costs, dispose of it for you.
2Economical and Ecological Dishwashing
•Only connect the dishwasher to the hot water supply if your hot water is not electrically heated.
•Ensure that the water softener is correctly adjusted.
•Do not pre-rinse dishes under running water.
•Select the wash programme to suit the nature and degree of the soiling on the dishes.
•Do not use more detergent, special salt or rinse aid than is recommended in these operating instructions and by the manufacturer of the respective product.
7

Operating Instructions
Appliance Features and Control Panel |
|
Top Spray |
|
Nozzle |
|
Rubber Seal for |
|
Connecting the |
|
Water Feed to |
|
the Upper Spray |
|
Arm |
|
Spray Arms |
|
Container for |
|
Special Salt |
|
Container |
|
for Rinse Aid |
|
Detergent |
|
Dispenser |
|
Rating |
Filters |
plate |
|
8 |
|
Operating Instructions
Control panel
Water sof- |
Function |
|
To set delay |
Display for delay |
|
||||||||||||||||
tener button |
button |
|
start |
start set |
Multidisplay |
||||||||||||||||
|
|
|
|
|
|
|
|
|
|
|
|
|
|
|
|
|
|
|
|
|
|
|
|
|
|
|
|
|
|
|
|
|
|
|
|
|
|
|
|
|
|
|
|
|
|
|
|
|
|
|
|
|
|
|
|
|
|
|
|
|
|
|
|
|
|
|
|
|
|
|
|
|
|
|
|
|
|
|
|
|
|
|
|
|
|
|
|
|
|
|
|
|
|
|
|
|
|
|
|
|
|
|
|
|
|
|
|
|
|
|
|
|
|
|
|
|
|
|
|
|
|
|
|
|
|
|
|
|
|
|
|
|
|
|
|
|
|
|
|
|
|
|
|
|
|
|
|
|
|
|
|
|
|
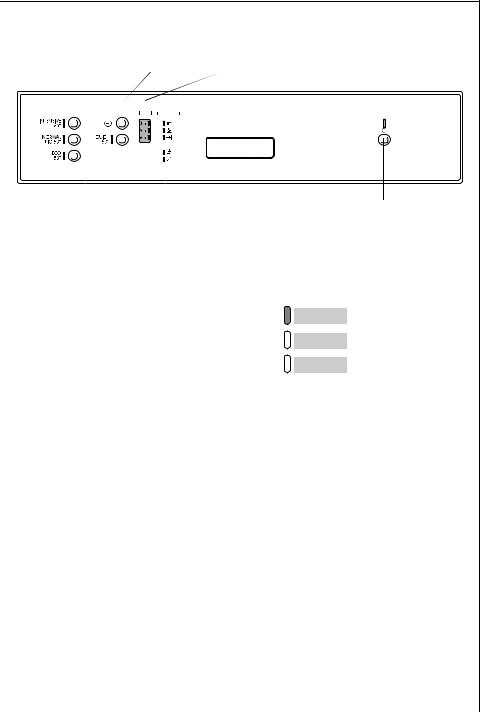
Wash programme buttons Control indicators Door handle |
ON / OFF button |
Water softener and function button: In addition to the wash programme marked, it is also possible to adjust the dishwasher's water softener using a combination of these buttons.
The 3 lights of the multidisplay can indicate:
– the current stage of the selected wash programme.
–which fault has occurred in the dishwasher.
Control indicators indicate the following:
:Upper light
:Middle light
:Lower light
|
J |
Refill with salt |
|
H |
Refill with rinse aid |
|
|
|
3 |
The control indicators never light up while a wash programme is run- |
|
|
ning. |
|
9

Operating Instructions
Prior to using for the first time
Prior to using for the first time, remove all the clips with which the dish racks are secured for transport.
Then perform the following steps: 0 1. Adjust the water softener
2.Filling with Special Salt for the Water Softener
3.Filling with Rinse Aid
Adjusting the Water Softener
|
To prevent the build up of scale on dishes and in the dishwasher, the |
|
dishes must be washed with soft, i.e. low lime content water. For this |
|
reason the dishwasher is fitted with a water softener in which tap |
|
water from a hardness of 4 °d (German degree) is softened with the aid |
|
of special salt. |
3 |
Your local water authority can advise you on the hardness of the water |
|
in the area where you live. |
The water softener can be set to any of 5 settings:
|
Water Hardness |
|
Adjust |
Number of |
in °d1) |
in PPM2) |
Range |
to Hardness Setting |
Flashes |
41 - 50 |
730 - 900 |
IV |
5 |
5 |
30 - 40 |
530 - 720 |
IV |
4 |
4 |
19 - 29 |
330 - 520 |
III/IV |
3 * |
3 |
4 - 18 |
70 - 320 |
I/II/III |
2 |
2 |
|
|
|
1 |
|
less than 4 |
less than 70 |
I |
no salt |
1 |
|
|
|
necessary |
|
|
|
|
|
|
1)(°d) German degree, measure of the hardness of water 2)(PPM), Parts Per Million, international units of water hardness *factory setting
Adjust the water softener to the setting given in the table that corresponds to the hardness of the water in the area where you live.
10
Operating Instructions
1 It is only possible to adjust the water hardness setting when there is no programme running. If you have inadvertently started a programme (an LED indicator is constantly illuminated), then the programme must be cancelled by pressing the appropriate button.
1.The appliance must be switched off.
2.Press the water-softener and function buttons simultaneously and keep them pressed.
3.In addition press the ON/OFF button.
4.The LED indicator for the water-softener button flashes.
5.Press the water-softener button again.
–The LED indicator for the water-softener button will be continuously illuminated for an initial 5 seconds and then begin to flash.
–The number of flashes corresponds to the hardness setting.
–The sequence of flashes is repeated several times after a 5 second pause.
6.Each time you press the water-softener button the hardness setting will go up by 1.
(Exception: Hardness setting 1 follows hardness setting 5).
–If the hardness setting is changed, the LED indicator for the watersoftener button will confirm the change by remaining illuminated continuously for 5 seconds and then flashing again.
–The number of flashes corresponds to the new hardness setting.
–The sequence of flashes is repeated several times after a 5 second pause.
7.Once the hardness setting is correct, press the ON/OFF switch. The hardness setting is then saved.
11
Operating Instructions
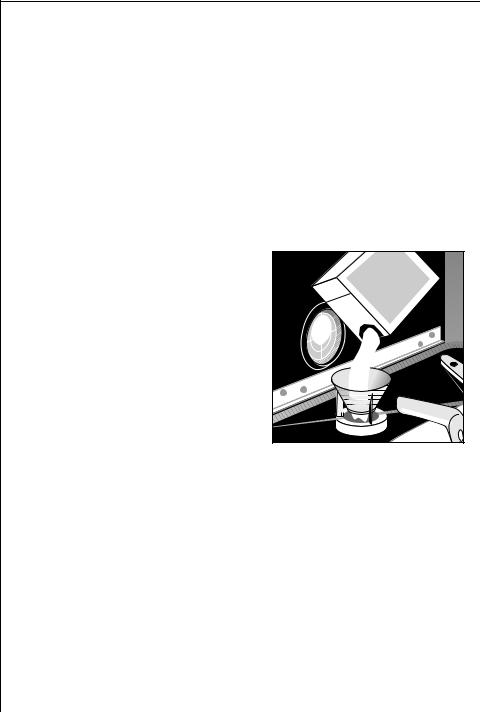
Filling with Special Salt for the Water Softener
1 Use only special salt for dishwashers. Never fill the salt container with any another type of salt (e.g. culinary salt) or dishwasher detergent. This would irreparably damage the water softener.
Prior to filling with salt, please check each time that you really do have a packet of special salt in your hand.
Fill with special salt:
–Prior to using the dishwasher for the first time
–When the SALT indicator Jon the control panel is illuminated.
3 |
If the water hardness in your area is less than 4 °d, you do not need to |
|
use special salt. |
0 1. Open the door, remove the lower rack.
2.Undo the lid on the salt container by turning it anticlockwise.
3.Only when using for the first time: fill the salt container with water.
4.Place the funnel supplied on the con-
tainer opening.
Fill the container with special salt through the funnel; the capacity of
the container is approx. 1.0-1.5 kg depending on the grain size. Do not
overfill the salt container with special salt.
SALE SALT SALZ SEL
3 |
The water expelled by filling the salt container with special salt runs |
|
out of the salt container onto the base of the washing compartment. |
This is not a cause for concern, the water will be pumped out at the start of the next wash programme.
5.Clean any salt remnants on the container opening.
6.Turn the lid clockwise to the stop, otherwise special salt will leak into the wash water, this could lead to poor wash results. To avoid this run a rinse programme after filling the salt container with special salt. This will wash away salt water and any salt crystals that have been spilt.
3 |
Depending on the size of the salt grains, it can take several hours for |
|
the salt to dissolve in the water and the special salt indicator Jto |
extinguish. The setting of the water softener and thus the consumption of salt are dependent on the hardness of the local water.
12
Operating Instructions
Filling with Rinse Aid
|
Rinse aid ensures that your dishes gleam and are free from spots, and |
|
that you glasses are clear. |
1 |
Use only branded rinse aid for dishwashers. Never fill the rinse aid con- |
|
tainer with any another substance (e.g. concentrated vinegar). This |
would damage the appliance.
Fill with rinse aid:
–Prior to using the dishwasher for the first time
–When the RINSE AID indicator Hon the control panel is illuminated.
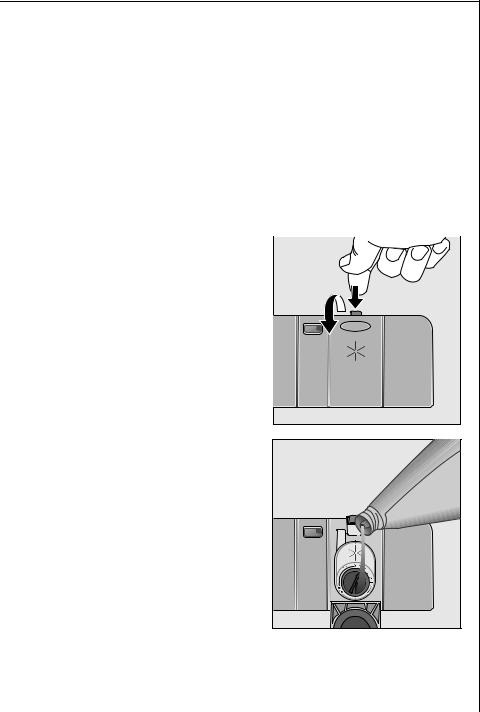
The rinse aid compartment is on the inside of the dishwasher door. 0 1. Open the door. 
2. Press the rinse aid compartment release button with your finger.
3. Fully open the rinse aid compartment lid.
4.Fill with rinse aid exactly up to the level marked “max”; this corresponds to a quantity of approx. 140 ml.
5.Close the lid and press until it locks
into place.
6. Wipe up any spilt rinse aid with a cloth. Otherwise too much foam will be formed during the wash.
13
Operating Instructions
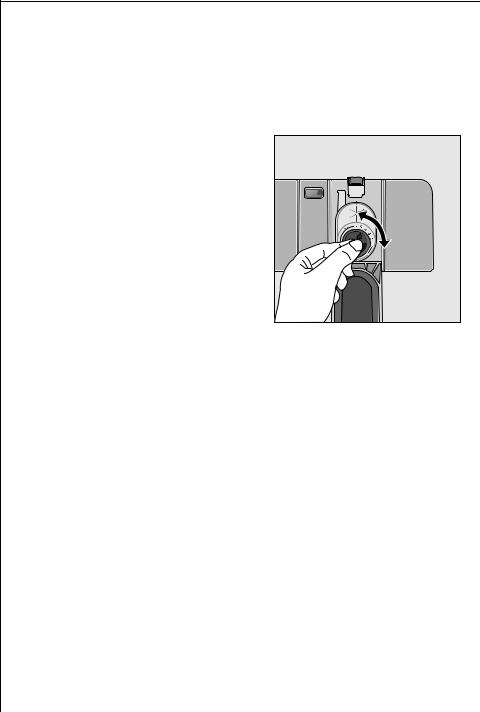
Adjusting Rinse Aid Dosing
3 As the dishes are washed rinse aid is released from the dispenser into the wash water. The dose is factory set at 4, and can be adjusted from 1 to 6. Only change the setting if streaks, milky spots or dried on water marks are visible on glasses or crockery.
0 1. Open the door of the dishwasher.
2.Press the rinse aid compartment release button with your finger.
3. Fully open the rinse aid compartment lid.
4. Set the dose level.
5. Close the lid and press until it locks into place.
6.If rinse aid has run out, wipe up with a cloth.
14
 Loading...