


 Loading...
Veriton Desktop Computer
User’s Manual
2 -
© 2013. All Rights Reserved. Veriton Desktop Computer Covers: Tower models
This revision: October 2013
Sign up for an Acer ID and enable Acer Remote Files
1.Ensure you are connected to the Internet.
2.Open www.acer.com and select your country.
3.Click REGISTER A PRODUCT.
4.Sign up for an Acer ID or sign in if you already have an Acer ID.
Register your Acer product
After we receive your product registration, you will be sent a confirmation email with important data. Keep this email in a safe place.
Manage your registered products
Once you have completed the registration process, you can log onto account.acer.com using your Acer ID and password to see and manage all your registered products.
Note: It may take a few days for your information to be updated to the database.
Model number: _________________________________
Serial number: _________________________________
Date of purchase: ______________________________
Place of purchase: ______________________________

Table of contents - 3
TABLE OF CONTENTS
Register your Acer product ......................... |
2 |
Manage your registered products ............... |
2 |
First things first |
5 |
Your guides ............................................. |
5 |
Basic care and tips for using your |
|
computer.................................................. |
5 |
Turning your computer on and off............... |
5 |
Taking care of your computer ..................... |
6 |
Power cord information ............................... |
6 |
Cleaning and servicing................................ |
7 |
Recovery |
8 |
Creating a recovery backup..................... |
8 |
Creating a drivers and applications |
|
backup ................................................... |
10 |
Recovering your system ........................ |
12 |
Reinstalling drivers and applications......... |
13 |
Returning to an earlier system snapshot .. |
15 |
Returning your system to its factory |
|
condition.................................................... |
16 |
Recovering from Windows ........................ |
16 |
Recovering from a recovery backup ......... |
19 |
Connecting to the Internet |
23 |
Connecting with a cable ........................ |
23 |
Built-in network feature ............................. |
23 |
Acer ProShield |
25 |
Overview................................................ |
25 |
Setting up Acer ProShield ..................... |
25 |
Personal Secure Drive .............................. |
27 |
Credential Manager ............................... |
28 |
Data Protection...................................... |
28 |
Data Removal........................................ |
29 |
BIOS utility |
30 |
Boot sequence....................................... |
30 |
Setting passwords ................................. |
30 |
Securing your computer |
31 |
Using passwords ................................... |
31 |
Entering passwords .................................. |
31 |
Power management |
33 |
Saving power ......................................... |
33 |
Ports and connectors |
36 |
Information on USB 3.0............................. |
37 |
Rear panel audio ports.............................. |
37 |
Memory card reader |
38 |
Connectivity options............................... |
38 |
Video and audio connectors |
40 |
HDMI |
41 |
Universal Serial Bus (USB) |
42 |
Frequently asked questions |
44 |
Requesting service ................................ |
46 |
Tips and hints for using Windows 8.1 .... |
48 |
How do I get to Start? ............................... |
48 |
What are "Charms?" ................................. |
48 |
Can I boot directly to the desktop? ........... |
49 |
How do I jump between apps?.................. |
49 |
How do I turn off my computer?................ |
49 |
How do I unlock my computer?................. |
49 |
How do I personalize my computer?......... |
50 |
Where are my apps?................................. |
52 |
What is a Microsoft ID (account)?............. |
53 |
How do I add a favorite to Internet |
|
Explorer?................................................... |
54 |
How do I check for Windows updates?..... |
54 |
Where can I get more information?........... |
54 |
Troubleshooting ..................................... |
55 |
Troubleshooting tips.................................. |
55 |
Error messages......................................... |
55 |
Internet and online security |
57 |
First steps on the net ............................. |
57 |
Protecting your computer.......................... |
57 |
Choose an Internet Service Provider ........ |
57 |
Network connections................................. |
58 |
Surf the Net!.............................................. |
60 |
Security ..................................................... |
61 |
Playing Blu-Ray or DVD movies |
68 |

Getting started...
In this section you will find:
•Useful information on caring for your computer and your health
•How to create recovery backups
•Guidelines for connecting to a network
•Information on using Acer’s bundled software

First things first - 5
FIRST THINGS FIRST
We would like to thank you for making this Acer desktop computer your choice for meeting your computing needs.
Your guides
To help you use your Acer desktop computer, we have designed a set of guides:
First off, the Setup Guide helps you get started with setting up your computer.
The Quick Guide introduces you to the basic features and functions of your new computer. For more on how your computer can help you to be more productive, please refer to the User’s Manual. This guide contains detailed information on such subjects as system utilities, data recovery, expansion options and troubleshooting. In addition it contains general regulations and safety notices for your desktop computer. It is available from the desktop; double-click the Help icon and click User’s Manual in the menu that opens.
Basic care and tips for using your computer
Turning your computer on and off
To turn the power off, do any of the following:
•Use the Windows shutdown command: Press the Windows key + <C>, click Settings > Power then click Shut Down.
If you need to power down the computer for a short while, but don’t want to completely shut it down, you can put it into Hibernate by pressing the power button.

6 - First things first
You can also put the computer in sleep mode by pressing the sleep hotkey <Fn> + <F4>.
Note
If you cannot power off the computer normally, press and hold the power button for more than four seconds to shut down the computer. If you turn off the computer and want to turn it on again, wait at least two seconds before powering up.
Taking care of your computer
Your computer will serve you well if you take care of it.
•Do not expose the computer to direct sunlight. Do not place it near sources of heat, such as a radiator.
•Do not expose the computer to temperatures below 0º C (32º F) or above 50º C (122º F).
•Do not subject the computer to magnetic fields.
•Do not expose the computer to rain or moisture.
•Do not spill water or any liquid on the computer.
•Do not subject the computer to heavy shock or vibration.
•Do not expose the computer to dust or dirt.
•Never place objects on top of the computer.
•Do not slam the computer display when you close it.
•Never place the computer on uneven surfaces.
Power cord information
Here are some ways to take care of your power cord:
•Do not step on the power cord or place heavy objects on top of it. Carefully route the power cord and any cables away from foot traffic.
•When unplugging the power cord, do not pull on the cord itself but pull on the plug.
•The total ampere ratings of the equipment plugged in should not exceed the ampere rating of the cord if you are using an extension cord. Also, the total current rating of all equipment plugged into a single wall outlet should not exceed the fuse rating.
First things first - 7
Cleaning and servicing
When cleaning the computer, follow these steps:
1.Turn off the computer.
2.Use a soft, moist cloth. Do not use liquid or aerosol cleaners. If either of the following occurs:
• The computer has been dropped or the body has been damaged;
• The computer does not operate normally
See Frequently asked questions on page 62.

8 - Recovery
RECOVERY
If you are having trouble with your computer, and the frequently asked questions (see Frequently asked questions on page 62) do not help, you can 'recover' your computer - i.e. return it to an earlier state.
This section describes the recovery tools available on your computer. Acer provides Acer Recovery Management, which allows you to create a recovery backup, a drivers and applications backup, and to start recovery options, either using Windows tools, or the recovery backup.
Note
Acer Recovery Management is only available with a pre-installed Windows operating system.
Important
We recommend that you create a Recovery Backup and Drivers and Applications Backup and as soon as possible.
In certain situations a full recovery will require a USB recovery backup.
Creating a recovery backup
To reinstall from a USB storage drive, you must first create a recovery backup. The recovery backup includes the entire original contents of your computer’s hard drive, including Windows and all factory-loaded software and drivers. Using this backup will restore your computer to the same state as when you purchased it, while giving you an option to retain all settings and personal data.
Note
Since the recovery backup requires at least 16 GB of storage after formatting, it is recommended to use a USB drive with a capacity of 32 GB or larger.
Recovery - 9
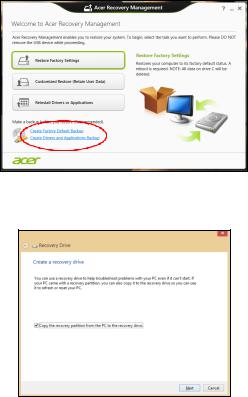
1.From Start, type 'Recovery' and then click Acer Recovery Management in the list of apps.
2.Click Create Factory Default Backup. The Recovery Drive window opens.
Make sure Copy contents from the recovery partition to the recovery drive is selected. This provides the most complete and safest recovery backup.
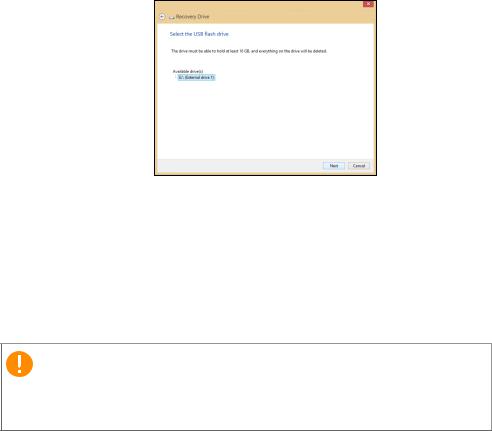
3. Plug in the USB drive then click Next.
10 - Recovery
•Since the recovery backup requires at least 16 GB of storage after formatting, it is recommended to use a USB drive with a capacity of 32 GB or larger.
4.You will be shown the backup progress on the screen.
5.Follow the process until it completes.
6.After creating the recovery backup, you can choose to delete the recovery information on your computer. If you delete this information, you can only use the USB recovery backup to restore your computer, if you lose or erase the USB drive, you cannot restore your computer.
7.Unplug the USB drive and label it clearly.
Important
Write a unique, descriptive label on the backup, such as 'Windows Recovery Backup'. Make sure you keep the backup in a safe place that you will remember.
Creating a drivers and applications backup
To create a Drivers and Applications Backup, that contains the factory-loaded software and drivers needed by your computer, you
Recovery - 11
may use either a USB storage drive or, if your computer features a DVD recorder, one or more blank recordable DVDs.
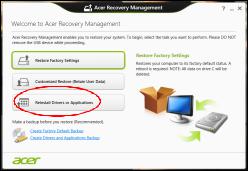
1.From Start, type 'Recovery' and then click Acer Recovery Management in the list of apps.
2.Click Create Drivers and Applications Backup.
Plug in the USB drive or insert a blank DVD into the optical drive, then click Next.
•If you are using a USB drive, make sure your USB drive has enough capacity before continuing.
•If using DVDs, it will also show the number of blank, recordable discs you will need to complete the recovery discs. Make sure that you have the required number of identical, blank discs.
3.Click Start to copy files.You will be shown the backup progress on the screen.
4.Follow the process until it completes:
•If you are using optical discs, the drive ejects each disc as it completes burning it. Remove the disc from the drive and mark it

12 - Recovery
with a permanent marker.
If multiple discs are required, insert a new disc when prompted, then click OK. Continue until the process is complete.
• If you are using a USB drive, unplug the drive and label it clearly.
Important
Write a unique, descriptive label on each backup, such as 'Drivers and Applications Backup'. Make sure you keep the backup in a safe place that you will remember.
Recovering your system
To recover your system:
1.Perform minor fixes.
If only one or two items of software or hardware have stopped working correctly, the problem may be solved by reinstalling the software or the device drivers.
To reinstall software and drivers that were pre-installed at the factory, see Reinstalling drivers and applications on page 13. For instructions on reinstalling software and drivers that were not pre-installed, see that product’s documentation or support Web site.
2.Revert to a previous system condition.
If reinstalling software or drivers does not help, then the problem may be solved by returning your system to a previous state when everything was working correctly.
For instructions, see Returning to an earlier system snapshot on page 15.
3.Reset your operating system.
If nothing else has solved the problem and you want to reset your system, but keep your user information, see Returning your system to its factory condition on page 16.
4.Reset your system to its factory condition.
If nothing else has solved the problem and you want to reset your system to factory condition, see Returning your system to its factory condition on page 16.
Recovery - 13
Reinstalling drivers and applications
As a troubleshooting step, you may need to reinstall the applications and device drivers that came pre-installed on your computer from the factory. You can reinstall using either your hard drive or the backup you have created.
•Other applications - If you need to reinstall software that did not come pre-installed on your computer, you need to follow that software’s installation instructions.
•New device drivers - If you need to reinstall device drivers that did not come pre-installed on your computer, follow the instructions provided with the device.
If you are reinstalling using Windows and the recovery information stored on your computer:
1.From Start, type 'Recovery' and then click Acer Recovery Management in the list of apps.
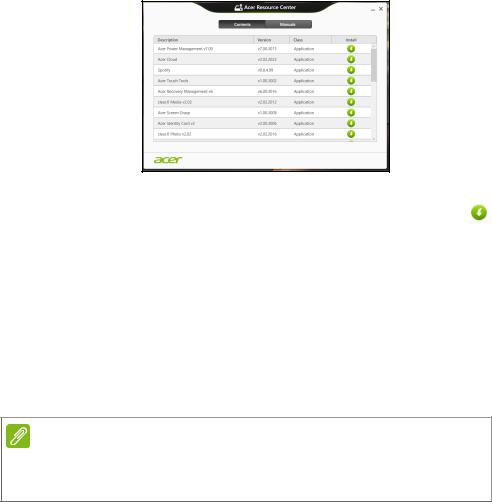
2. Click Reinstall Drivers or Applications.
14 - Recovery
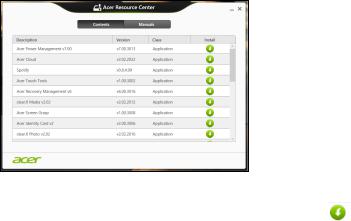
3.You should see the Contents section of the Acer Resource Center.
Images for reference only.
4.Click the install icon for the item you want to install, then follow the onscreen instructions to complete the installation. Repeat this step for each item you want to reinstall.
If you are reinstalling from a Drivers and Applications Backup on a DVD or USB drive:
1.Insert the Drivers and Applications Backup into the disc drive or connect it to a free USB port.
•If you inserted a DVD wait for Acer Resource Center to start.
•If Acer Resource Center does not start automatically, press the Windows key + <E>, then double-click on the optical drive icon.
•If you are using a USB drive, press the Windows key + <E>, then double-click on the drive that contains the backup. Double-click on ResourceCenter.
Recovery - 15
2.You should see the Contents section of the Acer Resource Center.
Images for reference only.
3.Click the install icon for the item you want to install, then follow the onscreen prompts to complete the installation. Repeat this step for each item you want to reinstall.
Returning to an earlier system snapshot
Microsoft System Restore periodically takes a 'snapshot' of your system settings and saves them as restore points. In most cases of hard-to-resolve software problems, you can return to one of these restore points to get your system running again.
Windows automatically creates an additional restore point each day, and also each time you install software or device drivers.
Note
For more information about using Microsoft System Restore, from Start, type ’Help’ and then click Help and Support in the list of apps. Type ’Windows system restore’ in the Search Help box, then press Enter.
Returning to a restore point
1.From Start, type ’Control Panel’ and then click Control Panel in the list of apps.
2.Click System and Security > Action Center, then click Recovery at the bottom of the window.
3.Click Open System Restore, then Next.
16 - Recovery
4.Click the latest restore point (at a time when your system worked correctly), click Next, then Finish.
5.A confirmation window appears; click Yes. Your system is restored using the restore point you specified. This process may take several minutes, and may restart your computer.
Returning your system to its factory condition
If your computer experiences problems that are not recoverable by other methods, you may need to reinstall everything to return your system to its factory condition. You can recover from either your hard drive or the recovery backup you have created.
•If you can still run Windows and have not deleted the recovery partition, see Recovering from Windows on page 16.
•If you cannot run Windows, your original hard drive has been completely re-formatted or you have installed a replacement hard drive, see Recovering from a recovery backup on page 19.
Recovering from Windows
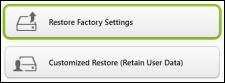
Start Acer Recovery Management:
•From Start, type ’Recovery’ and then click Acer Recovery Management in the list of apps.
Two options are available, Restore Factory Settings (Reset my PC) or Customized Restore (Refresh my PC).
Restore Factory Settings deletes everything on your hard drive, then reinstalls Windows and all software and drivers that were pre-installed on your system. If you can access important files on your hard drive, back them up now. See Restore Factory Settings with Acer Recovery Management on page 17.
Customized Restore will attempt to retain your files (user data) but will reinstall all software and drivers. Software installed since you purchased your PC will be removed (except software installed from

Recovery - 17
the Windows Store). See Customized Restore with Acer Recovery Management on page 19.
Restore Factory Settings with Acer Recovery Management
1. Click Restore Factory Settings.
Important
’Restore Factory Settings’ will erase all files on your hard drive.
2. The Reset your PC window opens.
Images for reference only.
3.Click Next, then choose how to erase your files:
a.Just remove my files quickly erases all files before restoring your computer and takes about 30 minutes.
b.Fully clean the drive completely cleans the drive after each file is erased, so no files can be viewed after the recovery. Cleaning the drive takes much longer, up to 5 hours, but is much more secure as old files are completely removed.
4.Click Reset.

18 - Recovery
5.The recovery process begins by restarting your computer, then continues by copying files to your hard drive.
6.After the recovery has finished, you can start using your computer by repeating the first-start process.
Recovering from the hard drive during startup
1.Turn on your computer and press <Alt> + <F10> during startup. A screen appears asking you to choose the keyboard layout.
2.Several options are now presented. Click Troubleshoot.
3.Click either Refresh your PC or Reset your PC.
Note
"Refresh your PC" enables you to restore your computer to the default factory condition with files intact. "Reset your PC" completely removes all your files and resets your computer to factory settings.
4. Click Next. The process will take several minutes.
Recovery - 19
Customized Restore with Acer Recovery Management
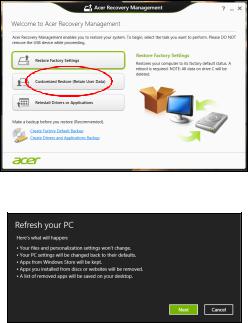
1. Click Customized Restore (Retain User Data).
2. The Refresh your PC window opens.
Images for reference only.
3.Click Next, then Refresh.
4.The recovery process begins by restarting your computer, then continues by copying files to your hard drive. This process takes about 30 minutes.
Recovering from a recovery backup
To recover from a recovery backup on a USB drive:
1.Find your recovery backup.
2.If your computer does not have a built-in keyboard, make sure a keyboard is attached to your computer.
3.Plug in the USB drive and turn on your computer.
4.If it is not already enabled, you must enable the F12 Boot Menu: a. Press <F2> when starting your computer.
20 - Recovery
b.Use the left or right arrow keys to select the Main menu.
c.Press the down key until F12 Boot Menu is selected, press <F5> to change this setting to Enabled.
d.Use the left or right arrow keys to select the Exit menu.
e.Depending on the type of BIOS your computer uses, select Save Changes and Exit or Exit Saving Changes and press Enter. Select OK or Yes to confirm.
f.Your computer will restart.
5.During startup, press <F12> to open the boot menu. The boot menu allows you to select which device to start from, select the USB drive.
a.Use your arrow keys to select USB Device, then press Enter.
b.Windows starts from the recovery backup instead of the normal startup process.
6.Select your keyboard type.
7.Select Troubleshoot and then choose the type of recovery to use:
a.Click Advanced then System Restore to start Microsoft System Restore:
Microsoft System Restore periodically takes a ’snapshot’ of your system settings and saves them as restore points. In most cases of hard-to-resolve software problems, you can return to one of these restore points to get your system running again.
b.Click Reset your PC to start the reset process:
Reset your PC deletes everything on your hard drive, then reinstalls Windows and all software and drivers that were preinstalled on your system. If you can access important files on your hard drive, back them up now. See Reset your PC from the recovery backup on page 21.
c.Click Refresh your PC to start the refresh process:
Refresh your PC will attempt to retain your files (user data) but will reinstall all software and drivers. Software installed since you purchased your PC will be removed (except software installed from the Windows Store). See Refresh your PC from the recovery backup on page 22.
Recovery - 21
Reset your PC from the recovery backup
Important
Reset your PC will erase all files on your hard drive.
1. The Reset your PC window opens.
Images for reference only.
2.Click Next.
3.Select the operating system to recover (normally only one option is available).
4.Choose to keep any changes to the hard drive:
a.If you have deleted the recovery partition or otherwise changed the partitions on the hard drive and want to keep these changes, select No.
b.To completely restore your computer to Factory Settings, select
Yes.
5.Choose how to erase your files:
a.Just remove my files quickly erases all files before restoring your computer and takes about 30 minutes.
b.Fully clean the drive completely cleans the drive after each file is erased, so no files can be viewed after the recovery. Cleaning the drive takes much longer, up to 5 hours, but is much more secure as old files are completely removed.
6.Click Reset.
7.After the recovery has finished, you can start using your computer by repeating the first-start process.
Loading...