


 Loading...
Acer Projector
K330/L225/LK-W14 Series
User's Guide
Copyright © 2011. Acer Incorporated.
All Rights Reserved.
Acer Projector K330/L225/LK-W14 Series User's Guide
Original Issue: 06/2011
Changes may be made periodically to the information in this publication without obligation to notify any person of such revisions or changes. Such changes will be incorporated in new editions of this manual or supplementary documents and publications. This company makes no representations or warranties, either expressed or implied, with respect to the contents hereof and specifically disclaims the implied warranties of merchantability or fitness for a particular purpose.
Record the model number, serial number, purchase date and place of purchase information in the space provided below. The serial number and model number are recorded on the label affixed to your projector. All correspondence concerning your unit should include the serial number, model number and purchase information.
No part of this publication may be reproduced, stored in a retrieval system, or transmitted, in any form or by any means, electronically, mechanically, by photocopy, recording or otherwise, without the prior written permission of Acer Incorporated.
Acer Projector K330/L225/LK-W14 Series
Model number: __________________________________
Serial number: ___________________________________
Date of purchase: ________________________________
Place of purchase: ________________________________
Acer and the Acer logo are registered trademarks of Acer Incorporated. Other companies' product names or trademarks are used herein for identification purposes only and belong to their respective companies.
"HDMITM, the HDMI logo and High-Definition Multimedia Interface are trademarks or registered trademarks of HDMI Licensing LLC."

iii
Information for your safety and comfort
Read these instructions carefully. Keep this document for future reference. Follow all warnings and instructions marked on the product.
Turning the product off before cleaning
Unplug this product from the wall outlet before cleaning. Do not use liquid cleaners or aerosol cleaners. Use a damp cloth for cleaning.
Caution for plug as disconnecting device
Observe the following guidelines when connecting and disconnecting power to the external power supply unit:
•Install the power supply unit before connecting the power cord to the AC power outlet.
•Unplug the power cord before removing the power supply unit from the projector.
•If the system has multiple sources of power, disconnect power from the system by unplugging all power cords from the power supplies.
Caution for Accessibility
Be sure that the power outlet you plug the power cord into is easily accessible and located as close to the equipment operator as possible. When you need to disconnect power to the equipment, be sure to unplug the power cord from the electrical outlet.
Warnings!
•Do not use this product near water.
•Do not place this product on an unstable cart, stand or table. If the product falls, it could be seriously damaged.
•Slots and openings are provided for ventilation to ensure reliable operation of the product and to protect it from overheating. These openings must not be blocked or covered. The openings should never be blocked by placing the product on a bed, sofa, rug or other similar surface.
This product should never be placed near or over a radiator or heat register, or in a built-in installation unless proper ventilation is provided.
•Never push objects of any kind into this product through cabinet slots as they may touch dangerous voltage points or short-out parts that could result in a fire or electric shock. Never spill liquid of any kind onto or into the product.

iv
•To avoid damage of internal components and to prevent battery leakage, do not place the product on a vibrating surface.
•Never use it under sporting, exercising, or any vibrating environment which will probably cause unexpected short current or damage rotor devices.
Using electrical power
•This product should be operated from the type of power indicated on the marking label. If you are not sure of the type of power available, consult your dealer or local power company.
•Do not allow anything to rest on the power cord. Do not locate this product where people will walk on the cord.
•If an extension cord is used with this product, make sure that the total ampere rating of the equipment plugged into the extension cord does not exceed the extension cord ampere rating. Also, make sure that the total rating of all products plugged into the wall outlet does not exceed the fuse rating.
•Do not overload a power outlet, strip or receptacle by plugging in too many devices. The overall system load must not exceed 80% of the branch circuit rating. If power strips are used, the load should not exceed 80% of the power strip's input rating.
•This product's AC adapter is equipped with a three-wire grounded plug. The plug only fits in a grounded power outlet. Make sure the power outlet is properly grounded before inserting the AC adapter plug. Do not insert the plug into a non-grounded power outlet. Contact your electrician for details.
Warning! The grounding pin is a safety feature. Using a power outlet that is not properly grounded may result in electric shock and/or injury.
Note: The grounding pin also provides good protection from unexpected noise produced by other nearby electrical devices that may interfere with the performance of this product.
•Use the product only with the supplied power supply cord set. If you need to replace the power cord set, make sure that the new power cord meets the following requirements: detachable type, UL listed/CSA certified, VDE approved or its equivalent, 4.6 meters (15 feet) maximum length.

v
Product servicing
Do not attempt to service this product yourself, as opening or removing covers may expose you to dangerous voltage points or other risks. Refer all servicing to qualified service personnel.
Unplug this product from the wall outlet and refer servicing to qualified service personnel when:
•the power cord or plug is damaged, cut or frayed
•liquid was spilled into the product
•the product was exposed to rain or water
•the product has been dropped or the case has been damaged
•the product exhibits a distinct change in performance, indicating a need for service
•the product does not operate normally after following the operating instructions
Note: Adjust only those controls that are covered by the operating instructions, since improper adjustment of other controls may result in damage and will often require extensive work by a qualified technician to restore the product to normal condition.
Warning! For safety reasons, do not use non-compliant parts when adding or changing components. Consult your reseller for purchase options.
Your device and its enhancements may contain small parts. Keep them out of the reach of small children.
Additional safety information
•Do not look into the projector's lens when the light is on. The bright may hurt your eyes.
•Turn on the projector first and then signal sources
•Do not place the product in following environments:
•Space that is poorly ventilated or confined. At least 50cm clearance from walls and free flow of air around the projector is necessary.
•Locations where temperatures may become excessively high, such as inside of a car with all windows rolled up.
•Locations where excessive humidity, dust, or cigarette smoke may contaminate optical components, shortening the life span and darkening the image.
•Locations near fire alarms.
•Locations with an ambient temperature above 40 ºC/104 ºF.
•Locations where the altitudes are higher than 10000 feet.
•Unplug immediately if there is something wrong with your projector. Do not operate if smoke, strange noise or odor comes out of your projector. It
vi
might cause fire or electric shock. In this case, unplug immediately and contact your dealer.
•Do not keep using this product to break or drop it. In this case contact your dealer for inspection.
•Do not face the projector lens to the sun. It can lead to fire.
•When switching the projector off, suggest to ensure the projector completes its cooling cycle before disconnecting power.
•Do not frequently turn off the main power abruptly or unplug the projector during operation. The best way is to wait for the fan to turn off before turning main power off.
•Do not touch air outlet grille and bottom plate which becomes hot.
•Clean the air filter frequently if have. The temperature inside may rise and cause damage when the filter/ventilation slots clogged with dirt or dust.
•Do not look into the air outlet grille when projector is operating. It may hurt your eyes.
•Always open the lens shutter or remove the lens cap when the projector is on.
•Do not block the projector lens with any object when the projector is under operation as this could cause the object to become heated and deformed or even cause a fire.
•Do not attempt to disassemble this projector. There are dangerous high voltages inside which may hurt you. Refer servicing only to suitable qualified professional service personnel.
•Do not stand the projector on end vertically. It may cause the projector to fall over, causing injury or damage.
Caution for Listening
To protect your hearing, follow these instructions.
•Increase the volume gradually until you can hear clearly and comfortably.
•Do not increase the volume level after your ears have adjusted.
•Do not listen to music at high volumes for extended periods.
•Do not increase the volume to block out noisy surroundings.
•Decrease the volume if you can't hear people speaking near you.

vii
Disposal instructions
Do not throw this electronic device into the trash when discarding. To minimize pollution and ensure utmost protection of the global environment, please recycle. For more information on the Waste from Electrical and Electronics Equipment (WEEE) regulations, visit http://www.acer-group.com/public/Sustainability/sustainability01.htm

viii
First things first
Usage Notes
Do:
•Turn off the product before cleaning.
•Use a soft cloth moistened with mild detergent to clean the display housing.
•Disconnect the power plug from AC outlet if the product is not being used for a long period of time.
Don't:
•Block the slots and openings on the unit provided for ventilation.
•Use abrasive cleaners, waxes or solvents to clean the unit.
•Use under the following conditions:
•In extremely hot, cold or humid environments.
•In areas susceptible to excessive dust and dirt.
•Near any appliance that generates a strong magnetic field.
•Place In direct sunlight.
Precautions
Follow all warnings, precautions and maintenance as recommended in this user's guide to maximize the life of your unit.
Warning:
•Do not look into the projector's lens when the light is on. The bright may hurt your eyes.
•To reduce the risk of fire or electric shock, do not expose this product to rain or moisture.
•Please do not open or disassemble the product as this may cause electric shock.
•When switching the projector off, please ensure the projector completes its cooling cycle before disconnecting power.
•Turn on the projector first and then the signal sources.
•Do not use lens cap when projector is in operation.
Information for your safety and comfort First things first
Usage Notes
Precautions
Introduction
Product Features
Package Overview
Projector Overview Projector Outlook Control Panel
Remote Control Layout
Getting Started
Connecting the Projector Turning the Projector On/Off
Turning on the Projector Turning the projector off Adjusting the Projected Image
Adjusting the Height of Projected Image How to optimize image size and distance
User Controls
Installation menu
Acer Empowering Technology
Onscreen Display (OSD) Menus Color
Image
Setting Management Audio
3D Language
How to Play iPhone/iPod/iPad Media via K330/L225/LK-W14
How to play photos
iii |
Contents |
|
viii |
||
|
viii viii
1
1
2
3
3
4
5
7
7
8
8
9
10
10
11
13
13
14
15
16
17
19
19
20
21
22
23
23
How to play videos |
25 |
Appendices |
26 |
Troubleshooting |
26 |
LED & Alarm Definition Listing |
30 |
Ceiling Mount Installation |
31 |
Specifications |
34 |
Compatibility modes |
36 |
Regulations and safety notices |
40 |
1
Introduction
Product Features
This product is a single-chip DLP® projector. Outstanding features include:
•DLP® technology
•1280 x 800 WXGA resolution 4:3/16:9/Full/L.Box aspect ratio supported
•Versatile display modes (Bright, Presentation, Standard,Video, Picture, Game, User) enable optimum performance in any situation
•NTSC/PAL/SECAM compatible and HDTV (480i/p, 576i/p, 720p, 1080i/p) supported
•Compact size projector facilitates business purposes and home entertainment.
•Acer EcoProjeciton Technology delivers Intelligent power management approach and physical efficiency improvement
•Empowering Key reveals Acer Empowering Technology utilities (Acer eView, eTimer, e3D, ePower Management) for easy adjustment of settings
•Equipped with HDMITM connection supporting HDCP
•Advanced digital keystone correction delivers optimum presentations
•Multi-language on screen display (OSD) menus
•1.7x digital zoom and pan move function
•Environmental light source and longer life by LED solution.
•Enjoy media playback via USB, RAM and SD card reader.
•Microsoft® Windows® 2000, XP, Vista® Windows® 7, Macintosh® OS compliant
English
English
2
Package Overview
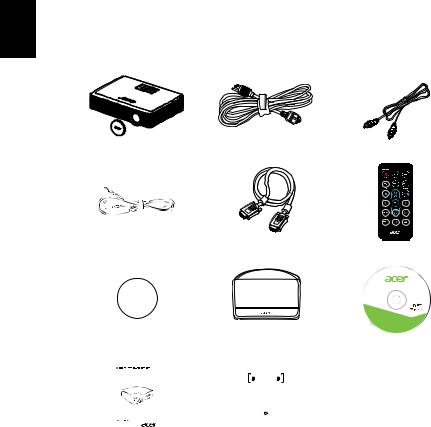
This projector comes with all the items shown below. Check to make sure your unit is complete. Contact your dealer immediately if any thing is missing.
Projector with lens cap |
Power cord |
Composite video cable |
3.5 mm jack A/V cable |
VGA cable |
Remote control |
|||||||||||
|
|
|
|
|
|
|
|
|
|
Acer Projector |
t 6TFS T NBOVBM |
||
|
|
|
|
|
|
|
|
|
|
K330/L225/LK-W14 Series |
This CD contains |
||
|
|
|
|
|
|
|
|
|
|
t "DSPCBU 3FBEFS |
|||
|
|
|
|
|
|
|
|
|
|
|
t 2VJDL 4UBSU (VJEF |
||
|
|
|
|
|
|
|
|
|
|
|
XXX BDFS DPN |
||
|
|
XXXXXX |
|
|
|
|
|
|
|
|
|||
|
|
3V |
|
|
|
|
|
|
|
|
|||
|
|
|
|
|
|
|
|
|
|
|
©2011, Ace |
||
|
Battery |
Carrying case |
User's Guide x2 |
||||||||||
|
|
|
|
|
|
|
|
|
|
|
|
|
|
|
|
|
|
|
|
|
|
|
|
|
|
|
|
|
|
|
|
|
|
|
|
|
|
|
|
|
|
|
|
|
|
|
|
|
|
|
|
|
|
|
|
|
|
|
|
|
|
|
|
|
|
|
|
|
|
Quick start guide |
Adapter for iPod/iPhone/ |
|
iPad (Optional) |
3
Projector Overview
Projector Outlook
Front / upper side
|
|
|
|
5 |
6 |
|
|
|
|
|
|
|
7 |
|
|
|
|
|
|
|
|
|
|
|
|
|
|
|
|
|
4 |
5 |
|
|
|
|
|
|
|
|
|
|
|
|
|
2 |
|
|
|
|
|
|
|
|
1 |
|
|
|
3 |
|
|
|
|
|
|
|
|
|
|
|
|
# |
Description |
|
|
# |
Description |
|
||
1 |
Lens cap |
|
|
5 |
Remote control receivers |
|
||
2 |
Tilt adjusting wheel |
|
|
6 |
Control panel |
|
|
|
3 |
Zoom Lens |
|
|
7 |
Power button |
|
|
|
4 |
Focus ring |
|
|
|
|
|
|
|
Rear side |
|
|
|
|
|
|
|
|
|
1 |
2 |
3 |
4 |
5 |
6 |
7 |
8 |
English
10 9
# |
Description |
# |
Description |
|
1 |
SD Card reader |
6 |
Composite video input connector |
|
|
|
|
|
|
|
|
|
Audio/Video In (3.5mm Mini Jack, for |
|
2 |
USB A connector (for multimedia) |
7 |
audio/ composite source, iphone/ipod |
|
|
|
|
support) |
|
|
|
|
|
|
3 |
Mini USB |
8 |
Audio output connector |
|
|
|
|
|
|
4 |
HDMI connector |
9 |
Power socket |
|
|
|
|
|
|
5 |
PC analog signal/HDTV/component |
10 |
Kensington™ lock port |
|
video input connector |
||||
|
|
|
||
|
|
|
|
English
4
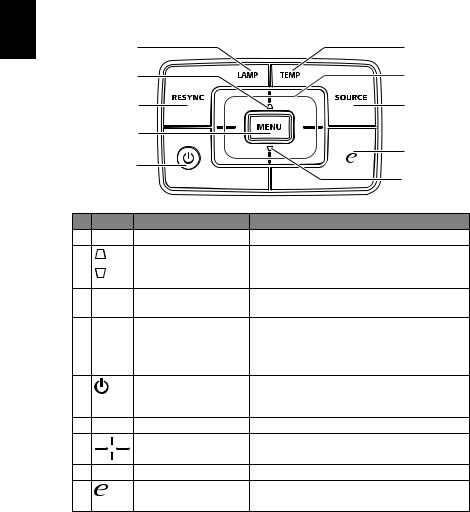
Control Panel
|
1 |
6 |
|
2 |
7 |
|
3 |
8 |
|
4 |
|
|
5 |
9 |
|
2 |
|
|
|
|
# Icon |
Function |
Description |
1 |
LAMP |
Lamp Indicator LED |
2 |
Keystone |
Adjusts the image to compensate for |
|
|
distortion caused by tilting the projector (± |
|
|
40 degrees). |
3 |
RESYNC |
Automatically synchronizes the projector |
|
|
to the input source. |
4 |
MENU |
• Press "MENU" to launch the Onscreen |
|
|
display (OSD) menu, back to the |
|
|
previous step for the OSD menu |
|
|
operation or exit the OSD menu. |
5 |
POWER |
Power button and Power Indicator LED. |
|
|
See the contents in "Turning the Projector |
|
|
On/Off" section. |
6 |
TEMP |
Temp Indicator LED |
7 |
Four directional select |
Use the keys to select items or make |
|
keys |
adjustments to your selection. |
8 |
SOURCE |
Changes the active source. |
9 |
Empowering key |
Unique Acer functions: eView, eTimer, e3D |
|
|
and ePower Management. |

5
Remote Control Layout
|
1 |
2 |
|
3 |
4 |
|
|
|
6 |
5 |
7 |
8 |
9 |
10 |
11 |
|
12 |
13 |
14 |
|
|
15 |
|
16 |
17 |
|
# |
Icon |
Function |
|
Description |
1 |
|
Infrared |
Sends signals to the projector. |
|
|
|
transmitter |
|
|
2 |
|
FREEZE |
To pause the screen image. |
|
3 |
|
POWER |
Refer to the "Turning the Projector On/Off" section. |
|
4 |
|
HIDE |
Momentarily turns off the video. Press "HIDE" to hide the |
|
|
|
|
image, press again to display the image. |
|
5 |
|
ASPECT RATIO |
To pause the screen image. |
|
6 |
|
RESYNC |
Automatically synchronizes the projector to the input source. |
|
7 |
|
SOURCE |
Press "SOURCE" to choose from RGB, Component, S-Video, |
|
|
|
|
Composite, Video and HDTV sources. |
|
8 |
|
BACK/STOP |
Press "Back/Stop" to stop playing media file or go back to |
|
|
|
|
upper data folder. |
|
9 |
|
Enter/Play/Pause |
Press "Enter/Play/Pause" to play/pause media file. |
|
10 |
|
VOLUME |
Decreases/increases the volume. |
|
11 |
|
MENU |
• |
Press "MENU" to launch the Onscreen display (OSD) |
|
|
|
|
menu, back to the previous step for the OSD menu |
|
|
|
|
operation or exit the OSD menu. |
12 |
|
Four directional |
Use up, down, left, right buttons to select items or make |
|
|
|
select keys |
adjustments to your selection. |
|
13 |
|
MEDIA |
Press "MEDIA" to toggle between USB A, SD and RAM |
|
|
|
|
sources. This projector supports various file formats of photo/ |
|
|
|
|
audio/ video. |
|
English

English
6
# |
Icon |
Function |
Description |
14 |
|
Empowering key Unique Acer functions: eView, eTimer, e3D and ePower |
|
|
|
|
Management. |
|
|
|
Press " " key under SD/USB A/RAM source, the setting page |
|
|
|
will be shown for user's adjustment. |
15 |
|
HDMI/VGA |
Press "HDMITM/VGA" to change source to HDMITM/VGA. |
16 |
|
USB B |
Press "USB B" to change source to USB B. |
17 |
|
AV |
Press "AV" to change source to Composite or AV. |

7
Getting Started
Connecting the Projector
iPod/iPhone/iPad battery charging
iPod/iPhone/iPad
USB 
9 14
SD CARD
USB
|
|
|
|
|
|
|
|
HDMI |
|||
|
|
|
|
|
|
1 |
10 |
5 |
|
|
|
|
|
|
|
|
|
HDMI
DVD player
|
|
|
|
|
|
7 |
11 |
|
|
|
|||||||
|
|
|
|
|
|
|
|
|
|||||||||
|
|
|
|
|
|
|
|
|
|||||||||
|
|
|
|
|
|
|
|
|
|||||||||
|
|
|
|
|
|
|
|
|
|
|
|
||||||
|
|
|
|
|
|
|
|
|
|
|
|
||||||
D-Sub |
|
|
|
|
|
|
|
||||||||||
|
|
|
|
|
|
|
|
|
|
|
|
||||||
|
|
|
|
|
|
|
|
|
|
|
|
|
|
|
|
|
|
2 |
|
|
|
|
|
|
6 |
|
|
|
|
|
|
|
|
||
|
|
|
|
|
|
|
|
|
|
|
|
|
|
|
|
|
|
D-Sub |
|
|
|
|
|
|
|
|
|
|
|
|
|
||||
|
|
|
|
|
|
|
|
|
13 |
||||||||
|
|
|
|
|
|
|
|
|
|||||||||
|
|
|
|
|
|
|
|
|
|||||||||
|
|
|
|
|
|
|
|
|
|
|
|
|
|
|
|
R |
W |
|
|
|
|
|
|
|
|
|
|
|
|
|
|
|
|
||
|
|
|
|
|
|
|
|
Y |
|
|
|
|
|
|
|
|
|
HDTV adapter |
|
|
|
|
|
|
|
|
|
|
|
|
|||||
3 |
|
|
12 |
8 |
|
|
|
|
|
||||||||
|
|
|
|
|
|
|
|||||||||||
|
|
|
|
|
|
|
|
|
|
||||||||
R B G |
|
|
|
Y |
|
|
|
|
|
|
|
|
|
||||
|
|
|
|
|
|
|
|
|
|
|
|
||||||
|
|
|
|
|
|
R B G |
|
||||||||||
|
|
|
|
|
|
|
|
|
|
|
|
||||||
|
|
|
|
|
Video Output DVD player, |
|
|||||||||||
|
|
|
|
|
|
||||||||||||
4 |
|
|
|
|
|
|
|
|
Set-top Box, |
|
|||||||
|
|
|
|
|
|
|
|
|
|||||||||
|
|
|
|
|
|
|
|
|
|
|
|
HDTV receiver |
|||||
|
|
|
|
|
|
|
|
|
|
|
|
|
|
|
|
|
|
|
|
|
|
|
|
|
|
|
|
|
|
|
|
|
|
|
|
|
|
|
|
|
|
|
|
|
R B G |
|
|||||||
# |
Description |
# |
Description |
1 |
Power cord |
8 |
3.5 mm jack A/V to RCA cable |
|
|
|
|
2 |
VGA cable |
9 |
SD card |
|
|
|
|
3 |
VGA to component/HDTV adapter |
10 |
USB disk/stick |
|
|
|
|
4 |
3 RCA component cable |
11 |
USB charging cable for iPod/iPhone/iPad |
|
|
|
|
5 |
HDMI cable |
12 |
Composite video cable |
|
|
|
|
6 |
3.5 mm jack A/V |
13 |
Audio cable Jack/RCA |
|
|
|
|
7 |
Adapter for iPod/iPhone/iPad |
14 |
USB cable |
|
|
|
|
English
Note: To ensure the projector works well with your computer, please make sure the timing of the display mode is compatible with the projector.
Loading...