


English
Français
Deutsch
Italiano
Español
Film Scanner

English
Film Scanner
English
Copyright
Copyright © 1999 by this company. All rights reserved. No part of this publication may be reproduced, transmitted, transcribed, stored in a retrieval system or translated into any language or computer language, in any form or by any means, electronic, mechanical, magnetic, optical, chemical, manual or otherwise, without the prior written permission of this company.
Disclaimer
This company makes no representations or warranties, either expressed or implied, with respect to the contents hereof and specifically disclaims any warranties, merchantability or fitness for any particular purpose. Further, this company reserves the right to revise this publication and to make changes from time to time in the contents hereof without obligation of this company to notify any person of such revision or changes.
Brands and product names are trademarks or registered trademarks of their respective companies.
IMPORTANT SAFETY INSTRUCTIONS
1.Read these instructions carefully. Save these instructions for future reference.
2.Follow all warnings and instructions marked on the product.
3.Unplug this product from the wall outlet before cleaning. Do not use liquid cleaners or aerosol cleaners. Use a damp cloth for cleaning.
4.Do not use this product near water.
5.Do not place this product on an unstable cart, stand, or table. The product may fall, causing serious damage to the product.
6.Openings in the cabinet and the bottom are provided for ventilation; to ensure reliable operation of the product and to protect it from overheating, these openings must not be blocked or covered. The openings should never be blocked by placing the product on a bed, sofa, rug, or other similar surface. This product should never be placed near or over a radiator or heat register, or in a built-in installation unless proper ventilation is provided.
English
7.This product should be operated from the type of power indicated on the marking label. If you are not sure of the type of power available, consult your dealer or local power company.
8.Do not allow anything to rest on the power cord. Do not locate this product where persons will walk on the cord.
9.If an extension cord is used with this product, make sure that the total ampere rating of the equipment plugged into the extension cord does not exceed the extension cord ampere rating. Also, make sure that the total rating of all products plugged into the wall outlet does not exceed the fuse rating.
10.Never push objects of any kind into this product through cabinet openings as they may touch dangerous voltage points or short out parts that could result in a fire or electric shock. Never spill liquid of any kind on the product.
11.Do not attempt to service this product yourself, as opening or removing covers may expose you to dangerous voltage points or other risks. Refer all servicing to qualified service personnel.
12.Unplug this product from the wall outlet and refer servicing to qualified service personnel under the following conditions:
a.When the power cord or plug is damaged or frayed
b.If liquid has been spilled into the product
c.If the product has been exposed to rain or water
d.If the product does not operate normally when the operating instructions are followed. Adjust only those controls that are covered by the operating instructions since improper adjustment of other controls may result in damage and will often require extensive work by a qualified technician to restore the product to normal condition.
e.If the product has been dropped or the cabinet has been damaged
f.If the product exhibits a distinct change in performance, indicating a need for service.
13.Use only the power cord which is of the same type as the one originally included with the scanner.
English
FCC Information
The Federal Communication Commission Radio Frequency Interference Statement includes the following paragraph:
This equipment has been tested and found to comply with the limits for a Class B Digital Device, pursuant to Part 15 of the FCC Rules. These limits are designed to provide reasonable protection against harmful interference in a residential installation. This equipment generates, uses and can radiate radio frequency energy and, if not installed and used in accordance with the instruction, may cause harmful interference to radio communication. However, there is no guarantee that interference will not occur in a particular installation. If this equipment dose cause harmful interference to radio or television reception, which can be determined by turning the equipment off and on, the user is encouraged to try to correct the interference by one or more of the following measures:
1.Reorient or relocate the receiving antenna.
2.Increase the separation between the equipment and receiver.
3.Connect the equipment into an outlet on a circuit different from that to which the receiver is connected.
4.Consult the dealer or an experienced radio/TV technician for help.
The user should not modify or change this equipment without written approval from this company. Modification could void authority to use this equipment.

|
English |
|
|
Table of Contents |
|
CHAPTER 1. INTRODUCTION.................................................................... |
1 |
|
1.1 |
FEATURES ........................................................................................... |
1 |
1.2 |
HARDWARE INTRODUCTION ....................................................................... |
2 |
Front Panel .......................................................................................... |
2 |
|
Rear Panel ........................................................................................... |
4 |
|
1.3 SOFTWARE INTRODUCTION ......................................................................... |
6 |
|
CHAPTER 2. INSTALLATION ..................................................................... |
7 |
|
STEP 1. INSTALL THE SCSI INTERFACE CARD ........................................................ |
7 |
|
STEP 2. CONNECT THE SCANNER TO YOUR COMPUTER ............................................... |
7 |
|
STEP 3 TEST THE SCANNER ............................................................................. |
8 |
|
STEP 4. INSTALL SCANNER DRIVER SOFTWARE ...................................................... |
8 |
|
CHAPTER 3. MAKING YOUR FIRST SCAN.................................................. |
9 |
|
STEP 1. TEST THE SCANNER ............................................................................. |
9 |
|
STEP 2. PLACE ORIGINAL ON THE HOLDER ............................................................. |
9 |
|
STEP 3. SCAN........................................................................................... |
12 |
|
STEP 4. EDIT ........................................................................................... |
13 |
|
CHAPTER 4. USING MIRAPHOTO............................................................ |
15 |
|
MENU BAR............................................................................................... |
16 |
|
File submenu ..................................................................................... |
16 |
|
|
Load Config… ................................................................................. |
16 |
|
Save Config… ................................................................................. |
16 |
|
Save Config As… ............................................................................. |
16 |
|
Reset Config ................................................................................... |
16 |
|
Auto Save Config............................................................................. |
16 |
Settings submenu ............................................................................... |
17 |
|
|
Scan Size…..................................................................................... 17 |
|
|
Monitor Gamma .............................................................................. |
18 |
|
Film Type ....................................................................................... |
19 |
|
Auto Preview .................................................................................. |
19 |
Help submenu .................................................................................... |
19 |
|
|
Contents ........................................................................................ |
19 |
|
Scanner Info… ................................................................................ |
19 |
|
About MiraPhoto…........................................................................... 19 |
|
IMAGE THUMBNAIL AREA............................................................................... |
20 |
|
COMBO BOXES .......................................................................................... |
20 |
|
Image Type box ................................................................................. |
20 |
|
Resolution box.................................................................................... |
21 |
|
Scan Mode box................................................................................... |
22 |
|
FILM SELECTION AREA ................................................................................. |
22 |
|
CONTROL BUTTONS..................................................................................... |
23 |
|
i

English |
|
Eject button.................................................................................... |
23 |
Zoom button................................................................................... |
23 |
Preview button................................................................................ |
23 |
Scan button.................................................................................... |
23 |
Exit button ..................................................................................... |
23 |
TOOL BUTTONS ......................................................................................... |
24 |
Film Type button ............................................................................. |
24 |
Flip button...................................................................................... |
24 |
Rotate button ................................................................................. |
25 |
Mirror button .................................................................................. |
25 |
Crop button .................................................................................... |
25 |
Color Enhancement Tools button ....................................................... |
26 |
Invert button............................................................................... |
26 |
Brightness/Contrast button............................................................ |
27 |
Color Balance button .................................................................... |
28 |
Color Adjustment button ............................................................... |
29 |
Curve button ............................................................................... |
31 |
Level button................................................................................ |
33 |
Filter button ................................................................................ |
37 |
Color Wizard button ..................................................................... |
38 |
Apply all button ........................................................................... |
38 |
Switch button.............................................................................. |
38 |
PREVIEW AREA .......................................................................................... |
39 |
Info button..................................................................................... |
39 |
CHAPTER 5. PHOTO EXPRESS................................................................. |
41 |
INTRODUCTION.......................................................................................... |
41 |
GETTING STARTED...................................................................................... |
42 |
GETTING IMAGES ....................................................................................... |
44 |
Working with Album ............................................................................ |
44 |
WORKING ON IMAGES .................................................................................. |
46 |
Adjusting Images................................................................................ |
46 |
Sharing Images .................................................................................. |
48 |
Saving Images ................................................................................... |
49 |
Express Your Images........................................................................... |
50 |
WORKING IN PROJECT MODE.......................................................................... |
52 |
To Begin a New Project ....................................................................... |
52 |
Working with Templates ...................................................................... |
53 |
CHAPTER 6. TROUBLESHOOTING AND FAQ ............................................ |
57 |
6.1 TROUBLESHOOTING ............................................................................... |
57 |
6.2 FAQ ................................................................................................ |
58 |
CHAPTER 7. SERVICE INFORMATION..................................................... |
59 |
APPENDIX .............................................................................................. |
60 |
ii
|
English |
|
PRODUCT SPECIFICATION |
.............................................................................. |
60 |
MiraPhoto Quick Reference Map |
||
Menu Bar |
Image Thumbnail Area |
|
page 16 |
page 20 |
Tool Buttons |
|
|
page 23 |
Combo Boxes
page 20
Film Selection
Area
page 22
Control Buttons |
Preview Area |
page 23 |
page 39 |
iii

English
<Memo>
iv
English
Chapter 1. Introduction
1.1 Features
Congratulations on your purchase of the ScanWit film scanner! The ScanWit film scanner is the utmost cost-effective solution for film scanning. Its high capability is bound to boost your scan job efficiency significantly. It is equipped with the following unique features:
High Speed Scanning
With the capability of scanning each film frame within 40 seconds, ScanWit saves you precious time and allows you to arrange your scan job flexibly.
High Optical Resolution and Color Definition
While offering an astonishing high scanning speed, ScanWit film scanner maintains a high optical resolution at 2700dpi. This enables the finest details in the film to be captured accurately. ScanWit can differentiate between 4096 gradations of each color for faithful reproduction of details in the film.
Auto Positioning and Focusing Technology
With the auto positioning and focusing technology, you will no longer have to adjust the focus manually to get a sharp and clear image. ScanWit will do it all automatically.
Zero-Reflection Optical Design
While most film scanners are using multi-reflection mechanisms to do film scanning, ScanWit utilizes its break-through zero-reflection optical technology by letting light pass straight through to the tri-linear color CCD without any mirror reflection. This feature ensures that geometric distortion will not occur to the scanned image.
Auto-Loading Mechanism and Scan Button for Easy Scanning
ScanWit employs an auto-loading mechanism to let you load and preview films quickly and conveniently. In just one click, you can preview films together without inserting each film into the machine one by one. The scan button simplifies the scanning procedures: when the scan button is pushed, ScanWit will activate and the preview the preloaded film automatically.
1
English
Friendly and Smart Driver
MiraPhoto is the driver for your ScanWit film scanner. Its easy and instinctive interface design allows you to proceed with your scanning job quickly. You can also use it to adjust the scanning parameters efficiently. Its powerful functions can help you to optimize the scanned image for your specific purpose.
1.2 Hardware Introduction
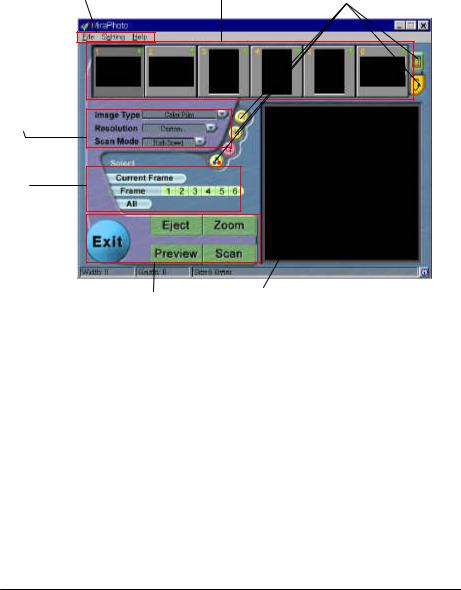
Please refer to the following illustration to familiarize yourself with each part of the ScanWit film scanner:
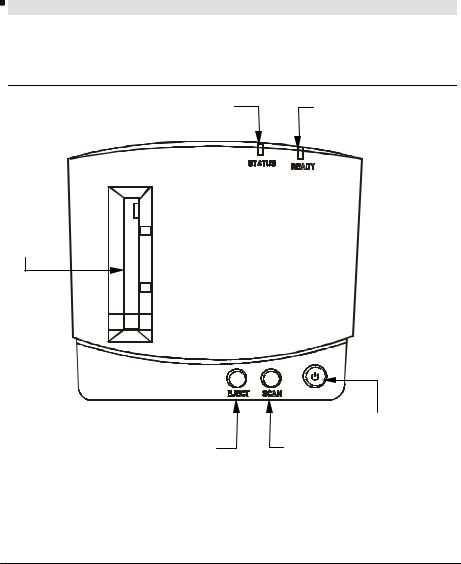
Front Panel
STATUS LED |
|
|
|
READY LED |
|
|
|
|
|
Holder insertion slot
Power button
EJECT button |
SCAN button |
2

English
LED indicators
STATUS: This LED indicator is used to display the status of the film scanner or to show error messages when errors occur within the film scanner.
READY: When the film scanner is powered on and ready to scan, this LED indicator will remain on, indicating that you can start to scan.
Holder insertion slot
You can insert the filmstrip/slide holder through this slot for scanning. When the filmstrip/slide holder is inserted into the slot, the mechanism inside the film scanner will automatically bring the holder inside.
Power button
You can turn the film scanner on or off by pushing this button.
EJECT button
Push this button to eject the filmstrip/slide holder.
SCAN button
Push this button to start the scan job immediately without having to acquire the driver manually. After you insert the filmsrtip/slide and push the SCAN button, the MiraPhoto driver will appear and start to preview the filmstrip/slide automatically.
3
English
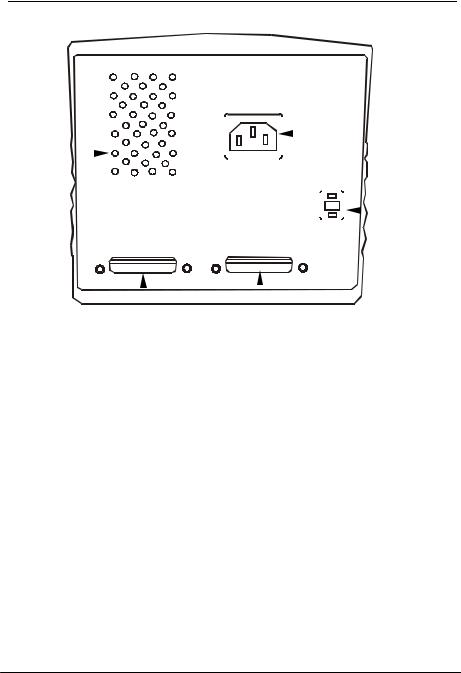
Rear Panel
Ventilation |
|
|
|
|
|
|
|
|
|
|
|
Power |
cord |
|||
|
|
|
|
|
|
|
|
|
|
|
||||||
holes |
|
|
|
|
|
|
|
|
|
|
|
|||||
|
|
|
|
|
|
|
|
|
|
|
||||||
|
|
|
|
|
|
|
|
|
|
|
|
|
|
|
receptacle |
|
|
|
|
|
|
|
|
|
|
|
|
ID |
|
||||
|
|
|
|
|
|
|
|
|
|
|
|
|||||
|
|
|
|
|
|
|
|
|
|
|
|
|||||
|
|
|
|
|
|
|
|
|
|
|
|
|
|
|
SCSI |
ID |
|
|
|
|
|
|
|
|
|
|
|
|
|
|
|
selector |
|
|
|
|
|
|
|
|
|
|
|
|
|
|||||
|
|
SCSI IN |
|
|
SCSI OUT |
|
||||||||||
|
|
|
|
|
|
|
||||||||||
|
|
SCSI IN connector |
SCSI OUT connector |
|
||||||||||||
Ventilation holes
These holes are used to ventilate the heat from inside of the film scanner. Do not block these holes when the film scanner is in use.
SCSI ID selector
You can use the SCSI ID selector to select the SCSI ID of your film scanner. Please refer to Chapter 5 for more guidelines on how to determine the SCSI ID number of your film scanner.
Power cord receptacle
Connect the power cord here. When you use the film scanner, make sure that the power cord is connected securely to the power cord receptacle.
SCSI IN connector
This is a 25-pin SCSI connector. Use this connector to connect to your host system with the SCSI cable supplied.
4
English
SCSI OUT connector
This is a 25-pin SCSI connector. Use this connector to connect other SCSI devices from the film scanner.
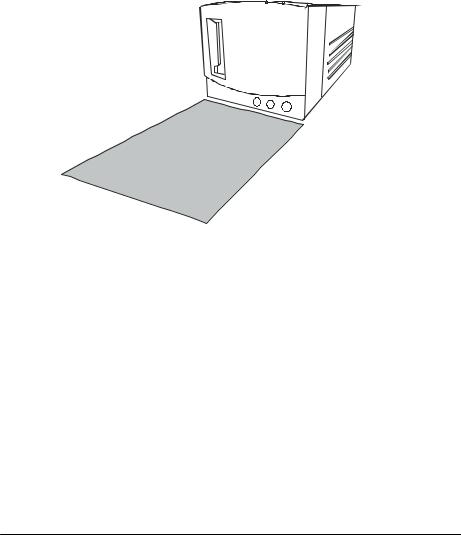
Note: when you position the ScanWit film scanner, be sure to leave the space illustrated below to ensure that the film/slide holder moves into/out of the film scanner without being blocked by any object.
300mm
200mm
5

English
1.3 Software Introduction
MiraPhoto is the driver program for your scanner. It is TWAIN compliant and designed to be user-friendly. With its iconlized userinterface and fully logical task-flow design, you can complete a satisfactory scanning job with only a few mouse clicks. With MiraPhoto, you can:
Preview, scan and import the scanned image into your image editing software.
Adjust image quality even before you actually start editing the image in your image editing software.
Using the batch scan function, you can acquire up to 6 preview or scanned images in one scan session.
Add special effects to the scanned image by applying special functions such as Invert and Mirror.
Use Color Wizard to adjust the color of the scanned image easily and quickly.
6
English
Chapter 2. Installation
Please follow the steps below to set up your ScanWit film scanner:
Step 1. Install the SCSI interface card
Power off your computer and disconnect the computer power from the power outlet. Open the computer cover and locate the PCI slot of your computer. Select an empty PCI slot and remove its bracket. Insert the SCSI interface card into the PCI slot and secure it by tightening the screw. Close the computer cover.
Step 2. Connect the scanner to your computer
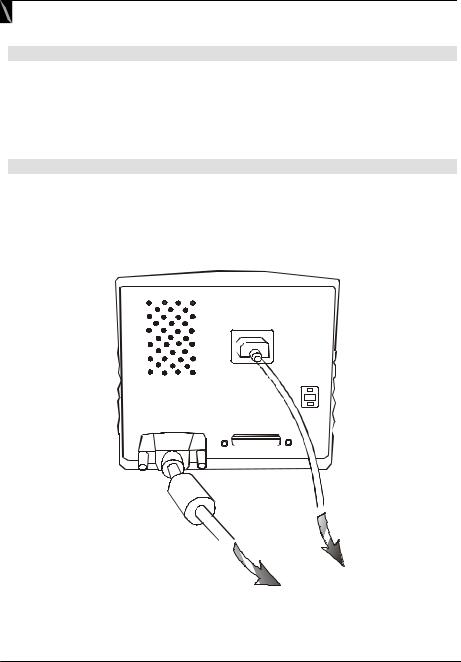
Connect one end of the SCSI cable to the SCSI interface card, and the other end to the "SCSI IN" connector on the rear panel of the scanner. Select the appropriate SCSI ID by pressing the buttons on the SCSI ID selector. Attach the power cord to the scanner and plug in the power outlet.
ID
SCSI OUT
To power outlet
To computer
Rear panel connection
7

English
Step 3 Test the scanner
Turn the scanner power on by depressing the power button on the front panel of the scanner. You may notice that the scanner will start to perform a self-test, and the LED indicators will blink for a few seconds. Wait until the scanner completes its self-test (this is indicated when the LED indicators stop blinking). You are now ready to install the software for your new scanner.
Step 4. Install Scanner Driver Software
Resume the power connection of your computer and turn on the power.
Install scanner driver and other applications
1.After you power on your computer, the “New hardware found” message box will appear on the screen, then the “Update Device Driver Wizard” dialogue box will pop up. Click “Cancel” to close the dialogue box.
2.Insert the scanner software CD-ROM Disc 1 into your CD-ROM drive. The software installation menu will appear on the screen automatically after a few seconds.
3.If the software installation menu does not appear, please do the following:
(1) Double-click "My Computer" icon on your desktop.
(2) In “My Computer” window,double-click your CD-ROM drive icon.
4.MiraPhoto is the driver program for your scanner. Select "MiraPhoto" and then follow the instructions on the screen to install. You can then choose to install other application programs. When you install, please follow the instructions of each software installer to proceed.
5.When installation is done, restart your computer. The scanner will be detected automatically.
8
English
Chapter 3. Making Your First Scan
Refer to the following steps to make your first scan using the ScanWit film scanner:
Step 1. Test the scanner
Turn on the power of your film scanner, then your computer. Wait until the scanner completes its self-test. You can judge the status of the film scanner from the LED indicators. Once the READY LED indicator stops flashing, the film scanner is ready to scan.
Step 2. Place original on the holder
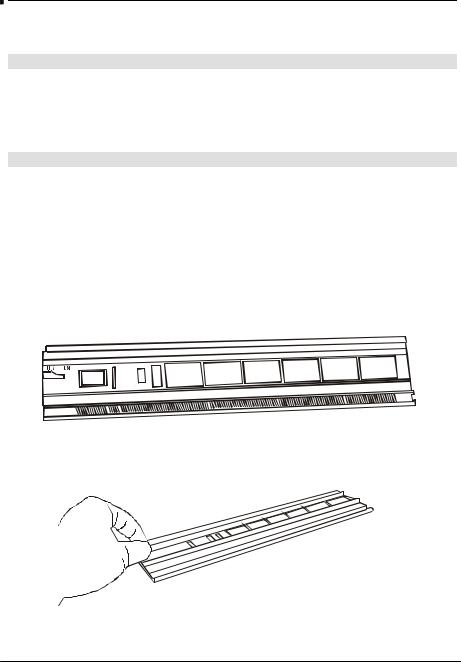
Place the film in the film holder. Two types of film holders are supplied with your film scanner. You can select the appropriate film holder that fits the type of your film:
Note: When you place the film/slide in the filmstrip/slide holder, make sure that the film/slide is free from dust. You may also want to check that the film/slide is cleaned properly.
If you want to scan a filmstrip:
You can use the filmstrip holder (the holder with 6 rectangular lattices and a FILM mark) to place your filmstrip.
FILM
PUSH C LOSE
Filmstrip holder
Pull the handle on the cover to open the cover.
9
English
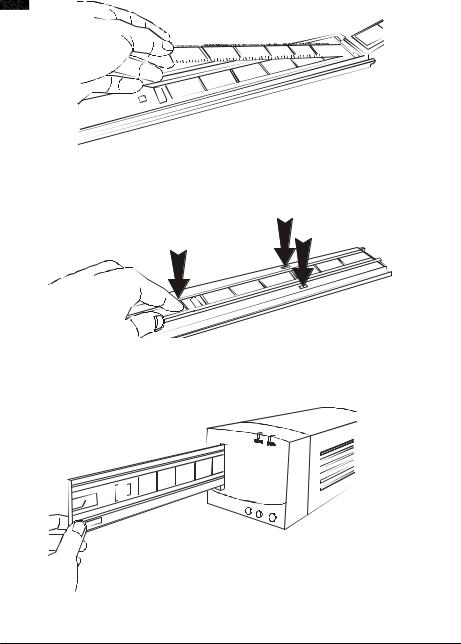
Place the filmstrip on the filmstrip holder with the emulsion side facing up.
Close the cover and push the “PUSH CLOSE” mark tathe middle of the cover. You will hear a click when the cover is secured.
PUSH |
PUSH |
PUSH |
Insert the filmstrip holder into the holder insertion slot.
10
English
If you want to scan slides:
You can use the slide holder (the holder with 4 rectangular lattices and a SLIDE mark) to place your slide.
Slide holder
Pull the handle on the cover to open the cover.
Then place the slide on the slide holder with the emulsion side face up. When you place the slide in the lattice, insert the lower left corner of the slide into the plastic stopper, then push the slide into the lattice until it is firmly fixed. You can place up to 4 slides in the slide holder.
11
 Loading...