


3968
Operator Manual
Version 2.0
Model #3960 – Control Module
Model #3968 – Test Module

3M is a trademark of 3M
RAMP is a registered trademark of Response Biomedical Corporation.
Microsoft is a registered trademark of Microsoft Corp.
Microsoft Windows is a registered trademark of Microsoft Corp.
Microsoft Excel is a registered trademark of Microsoft Corp.
Zebra is a registered trademark of ZIH Corp.
Symbol is a registered trademark of Motorola, Inc.
© 3M 2009 All rights reserved
Made in Canada for:
3M Health Care
St. Paul, MN U.S.A.
55144 – 1000
www.3M.com
Technical Assistance:
3M Health Care Helpline 1-800-228-3957
Outside the U.S.A. and Canada, contact your local 3M Subsidiary
3M™ Rapid Detection Reader Operator Manual
34-8703-4755-5 (August 2009) Version 2.0 For use with Software Version 1.1
R0833 – AW, Manual, 3M Rapid Detection, v1_1 – 1r0
3M Health Care
D-41453 Neuss, Germany

3M™ Rapid Detection Reader Table of Contents
Table of Contents
Warnings and Precautions........................................................................................................1
Summary of Warnings and Precautions...................................................................................2
Introduction...............................................................................................................................3
Overview.................................................................................................................................3
Intended Use..........................................................................................................................3
Unpacking and Setup................................................................................................................4
3M Rapid Detection Reader Components................................................................................4
Optional Accessories (Available from 3M)...............................................................................4
3M Rapid Detection Reader Setup..........................................................................................5
3M RAPID DETECTION Control Module............................................................................7
3M RAPID DETECTION Test Module.................................................................................7
3M Rapid Detection Reader (MODULES)..................................................................................8
Turning on the 3M Rapid Detection Reader.............................................................................8
Display Icons..........................................................................................................................9
Port Identification Nomenclature..............................................................................................9
Performing an Assay...............................................................................................................10
Using Lot Cards.....................................................................................................................10
Starting an Assay...................................................................................................................10
Running Quality Control.........................................................................................................12
LQC Icons..............................................................................................................................13
Running IQC..........................................................................................................................14
Working with Results and Logs..............................................................................................15
Viewing Saved Results...........................................................................................................15
Viewing Saved Logs...............................................................................................................15
Searching Results..................................................................................................................16
Searching Logs......................................................................................................................16
Manually Transferring / Printing Results or Logs.....................................................................17
Managing Settings...................................................................................................................18
Accessing the Settings Menus................................................................................................18
Assay................................................................................................................................19
LQC..................................................................................................................................19
Timer................................................................................................................................20
Printer...............................................................................................................................21
i

3M™ Rapid Detection Reader Table of Contents
Login.................................................................................................................................21
File....................................................................................................................................22
About................................................................................................................................23
Edit Settings...........................................................................................................................24
Timers...............................................................................................................................24
Date/Time.........................................................................................................................25
Language..........................................................................................................................25
Misc..................................................................................................................................25
Restoring Defaults.................................................................................................................26
Managing Operators..............................................................................................................26
Adding/Modifying an Operator...........................................................................................27
Searching for an Individual Operator..................................................................................28
Editing Settings Using the Reader Configuration Utility (RCU)............................................29
Overview................................................................................................................................29
Installation.............................................................................................................................29
Getting Started.......................................................................................................................29
Emergency Password Reset Mechanism................................................................................30
Choosing a Configuration File Access Method........................................................................30
Setting Up a USB Flash Drive............................................................................................30
Setting Up Web Services Access:......................................................................................30
Accessing Configuration Files................................................................................................31
Setting Up Communications Between RCU and Readers.......................................................32
Files..................................................................................................................................32
Identifying Readers through the RCU.....................................................................................33
Non-networked Environment.............................................................................................33
Networked Environment....................................................................................................33
Importing Files.......................................................................................................................34
Exporting Files.......................................................................................................................34
Deleting Results.....................................................................................................................35
Maintenance.............................................................................................................................36
Exterior Cleaning...................................................................................................................36
Upgrading Device Software....................................................................................................37
Disposal of Equipment...........................................................................................................37
Troubleshooting......................................................................................................................38
Restoring the Supervisor Operator ID / Password...................................................................38
General..................................................................................................................................38
ii

3M™ Rapid Detection Reader Table of Contents
Power On Self Test Message / IQC Messages.......................................................................39
Test Run Messages...............................................................................................................39
Lot Card Messages................................................................................................................41
Settings Messages.................................................................................................................42
LQC Related Messages.........................................................................................................43
Warnings and Confirmation Requests....................................................................................44
Printer Errors.........................................................................................................................44
Communications Errors..........................................................................................................45
USB Device Errors.................................................................................................................45
Specifications..........................................................................................................................47
Index........................................................................................................................................49
iii
3M™ Rapid Detection Reader Warnings and Precautions
Warnings and Precautions
Read all contents of this manual prior to use.
The following symbols are used on the 3M Rapid Detection Reader, related components and
accessories, or in the text of this user manual:
WARNING!
Indicates a hazardous situation, which if not avoided, could result in death or injury,
e.g., fire, electrical shock or explosion.
WARNING! Hazardous Voltage
CAUTION. Indicates a situation, which if not avoided, could result in damage to the
device.
Consult Accompanying Documents
Consult Operator Manual
1
3M™ Rapid Detection Reader Warnings and Precautions
Summary of Warnings and Precautions
The 3M Rapid Detection Reader and its related devices and accessories are designed to provide
safe and reliable service when used according to the instructions provided in this Operator
Manual.
The following warnings and precautions should be followed in order to avoid unsafe actions with
the 3M Rapid Detection Reader that could potentially result in personal injury or device damage.
WARNING!
To reduce the risk associated with hazardous voltage:
• Unplug the 3M Rapid Detection Reader before cleaning.
• Do not disassemble the 3M Rapid Detection Reader or any of its related
components and accessories. The instrument contains no operator-serviceable
components.
• Do not immerse any of the 3M Rapid Detection Reader components in any liquid.
• Do not use the 3M Rapid Detection Reader if there is apparent damage to a power
cord or power supply.
To reduce the risk associated with potentially infectious patient samples:
• Do not spill specimen or sample fluids on any of the 3M Rapid Detection Reader
components or on the outside of the Test Cartridge.
• If a spill occurs, disinfect external surfaces only, using a soft cloth containing a
solution of 0.5% bleach, 70% isopropyl alcohol or 70% ethanol.
CAUTION.
To reduce the risk associated with incorrect results:
• 3M Rapid Detection Reader should only be used by trained professionals and
operated in accordance with facility policies and procedures.
• 3M Rapid Detection Reader should only be operated in ambient temperature
conditions between 15-30°C (59-86°F) and out of direct sunlight.
To reduce the risk of instrument or accessory damage:
• 3M Rapid Detection Reader is not designed to withstand moisture, temperature
extremes, severe shock or vibration.
• 3M Rapid Detection Reader is intended for use indoors, located on a stable,
stationary surface such as a counter top.
• Do not open any 3M Rapid Detection Reader device enclosures, this will void the
warranty.
To reduce the risk associated with environmental contamination:
• Dispose of instrument and accessories in accordance with federal, state, and local
requirements.
2

3M™ Rapid Detection Reader Introduction
Introduction
Overview
The 3M Rapid Detection Reader is a rapid immunochromatographic system for performing in vitro
diagnostic analyses.
The 3M Rapid Detection Reader is comprised of the 3M Rapid Detection Control Module (CM)
and the 3M Rapid Detection Test Module (TM). Each Test Module has two ports. Up to three
Test Modules are connected to each Control Module providing the user the ability to test 1-6
samples simultaneously. The configuration software and USB flash provided drive allow the user
to customize the Reader and maintain the test data. The optional barcode scanner and printer
provide ease and accuracy for data entry and record keeping.
Calibration and expiration information for Test Cartridges are input to the 3M Rapid Detection
Control Module (CM) through Lot Cards enclosed with the Test Kits.
To perform an assay, the operator places a sample into the well of a Test Cartridge and inserts
the Test Cartridge into the 3M Rapid Detection Test Module (TM).
Once the Test Cartridge has been inserted, no further intervention is required. A barcode on the
bottom of the Test Cartridge is read to determine the Test Kit lot number. Information loaded with
the Lot Card identifies lot specific parameters and expiration date. This ensures that an expired
cartridge is not used.
Analysis time is analyte specific and typically less than 20 minutes per sample. Results may be
viewed on the 3M Rapid Detection Reader display screen and/or output to the USB flash drive, a
printer, or network.
The 3M Rapid Detection Reader only accepts Test Cartridges specified for use with 3M Rapid
Detection Test Kits.
The 3M Rapid Detection Reader can operate in either local or network mode. Operator input is
accepted from the touch screen or an optional barcode scanner. Stored data including results
can be transferred via USB flash drive or sent to a printer or network file.
Intended Use
The 3M Rapid Detection Reader is a general use fluorometer that analyzes results produced by
immunoassays specified by 3M.
Full operation requires the use of 3M RAPID DETECTION Test Kit. Optional accessories include
a printer and barcode scanner.
3

3M™ Rapid Detection Reader Unpacking and Setup
Unpacking and Setup
Inspect all components carefully. If any damage is visible, notify the carrier and your distributor or
3M to arrange for repair or replacement.
3M Rapid Detection Reader Components
Item Description
3M RAPID
DETECTION
Control Module
(CM)
Catalog # 3960
3M RAPID DETECTION Control Module
Operator Manual
Reader Configuration Utility CD
Power Supply*
USB Flash Drive**
3M RAPID
DETECTION
Test Module
(TM)
Catalog # 3968
*Only use the approved power cord provided with the 3M RAPID DETECTION CM. A power cord
approved for the North American market will be provided with each CM. Outside the North
American market, the CM will be supplied with an additional power cord approved for that market.
**Use manufacturer supplied USB Flash Drive. If a USB Flash drive is supplied by the operator,
ensure the drive folders match those folders listed in the Manually Transferring / Printing Results
or Logs section.
3M RAPID DETECTION Test Module
Interconnect Cable
Optional Accessories (Available from 3M)
Optional USB devices supported by the 3M Rapid Detection Reader include a printer and a
barcode scanner. Only use the approved USB cables supplied with these devices.
NOTE: Only one of each type of device can be connected to the CM at any given time.
Item Description
Printer
Catalog # 3965
Printer for self-adhesive roll labels, 2 - 2.5-inches
wide. Connects to the CM via USB. Zebra®
Technologies TLP 2824™.
Consumables:
Requires 2.25” W x 3” L Z-Select 4000T labels from
Zebra® Technologies (p/n: 800222-305).
Requires 57mm x 74m Wax/Resin Ribbon from
Zebra® Technologies (p/n: 800132-102).
Additional information available at www.zebra.com
or 1.847.634.6700.
4

3M™ Rapid Detection Reader Unpacking and Setup
Item Description
Barcode Scanner
Catalog # 3967
Omni-directional, hands-free barcode scanner with
cradle for entering Operator and Patient/Sample ID.
The barcode scanner is shipped in the correct
configuration and is ready for use after connecting to
the CM via USB. Symbol Technologies Inc. model
LS9208. Additional information available at
www.symbol.com, 1.800.653.5350 or
1.631.738.2400.
3M Rapid Detection Reader Setup
The 3M Rapid Detection Reader is comprised of:
§ 3M RAPID DETECTION Control Module (CM)
User interface and connectors for all peripherals. Stores and displays test results (view, print,
transfer, search, filter/sort)
§ 3M RAPID DETECTION Test Module (TM)
1 – 3 TMs per CM
Each TM has two test cartridge ports for performing simultaneous 3M RAPID DETECTION
Tests
§ 3M RAPID DETECTION Reader Configuration Utility Software (RCU)
CD allows customized settings for the 3M Rapid Detection Reader
§ Power supply and interconnect cable
§ USB flash drive
Pre-configured with 4 subdirectories (folders) named: patient, lqc, iqc and log, for use in bidirectional information transfer in a non-networked environment. Also contains “File
Converter 1_1.xls”. See Manually Transferring/Printing Results or Logs section.
To set-up 3M Rapid Detection Reader:
1. Place the 3M Rapid Detection Reader components on a stable work surface within reach of
an electrical outlet. Access to the back of each module is required to connect components.
2. Remove dust protection stickers from TM ports
3. Connect the TM and any optional devices to the CM using the supplied interconnect cable(s).
Refer to Figure 1 for connector locations.
Refer to manufacturer’s instructions for optional printer or barcode scanner for additional
information on set-up for these accessories.
4. Connect the supplied power cord to the CM. Plug the other end into a wall socket.
5
3M™ Rapid Detection Reader Unpacking and Setup
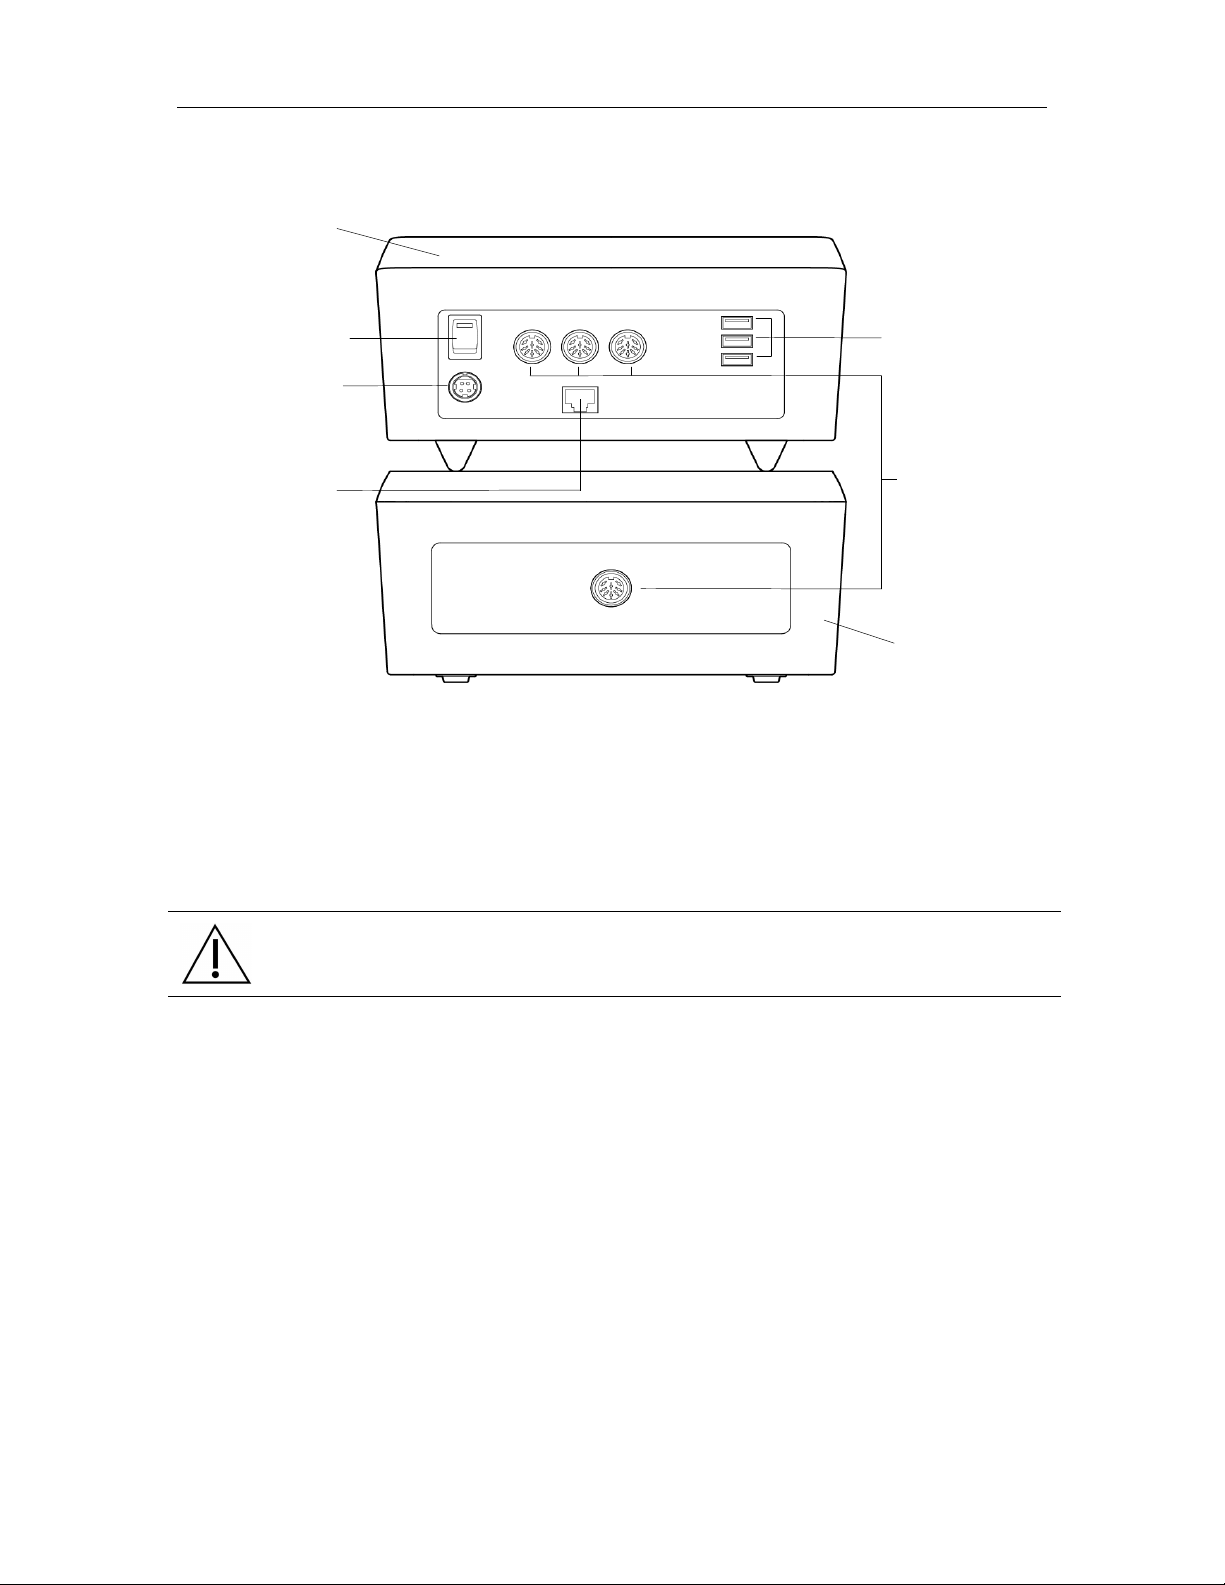
3M Rapid Detection
Control
Module
Power On/Off
Power cord
Ethernet
connector for
3M Rapid
Detection Reader Test
USB connectors for
Figure 1. 3M Rapid Detection Reader - Rear View Showing Connectors and Power Switch
Reader
optional printer,
optional barcode
scanner and Flash
Drive
port
3M Rapid Detection
Reader Control
connection
to a network
Module to 3M Rapid
Module port
Detection Reader
Test Module
NOTE:
• 1, 2, or 3 TMs can be connected to each CM
• TMs can be stacked
• CM can be placed on top of the TM
• Do not place anything on top of the CM.
CAUTION.
Do not stack CM on top of TM unless all four feet are in place.
6
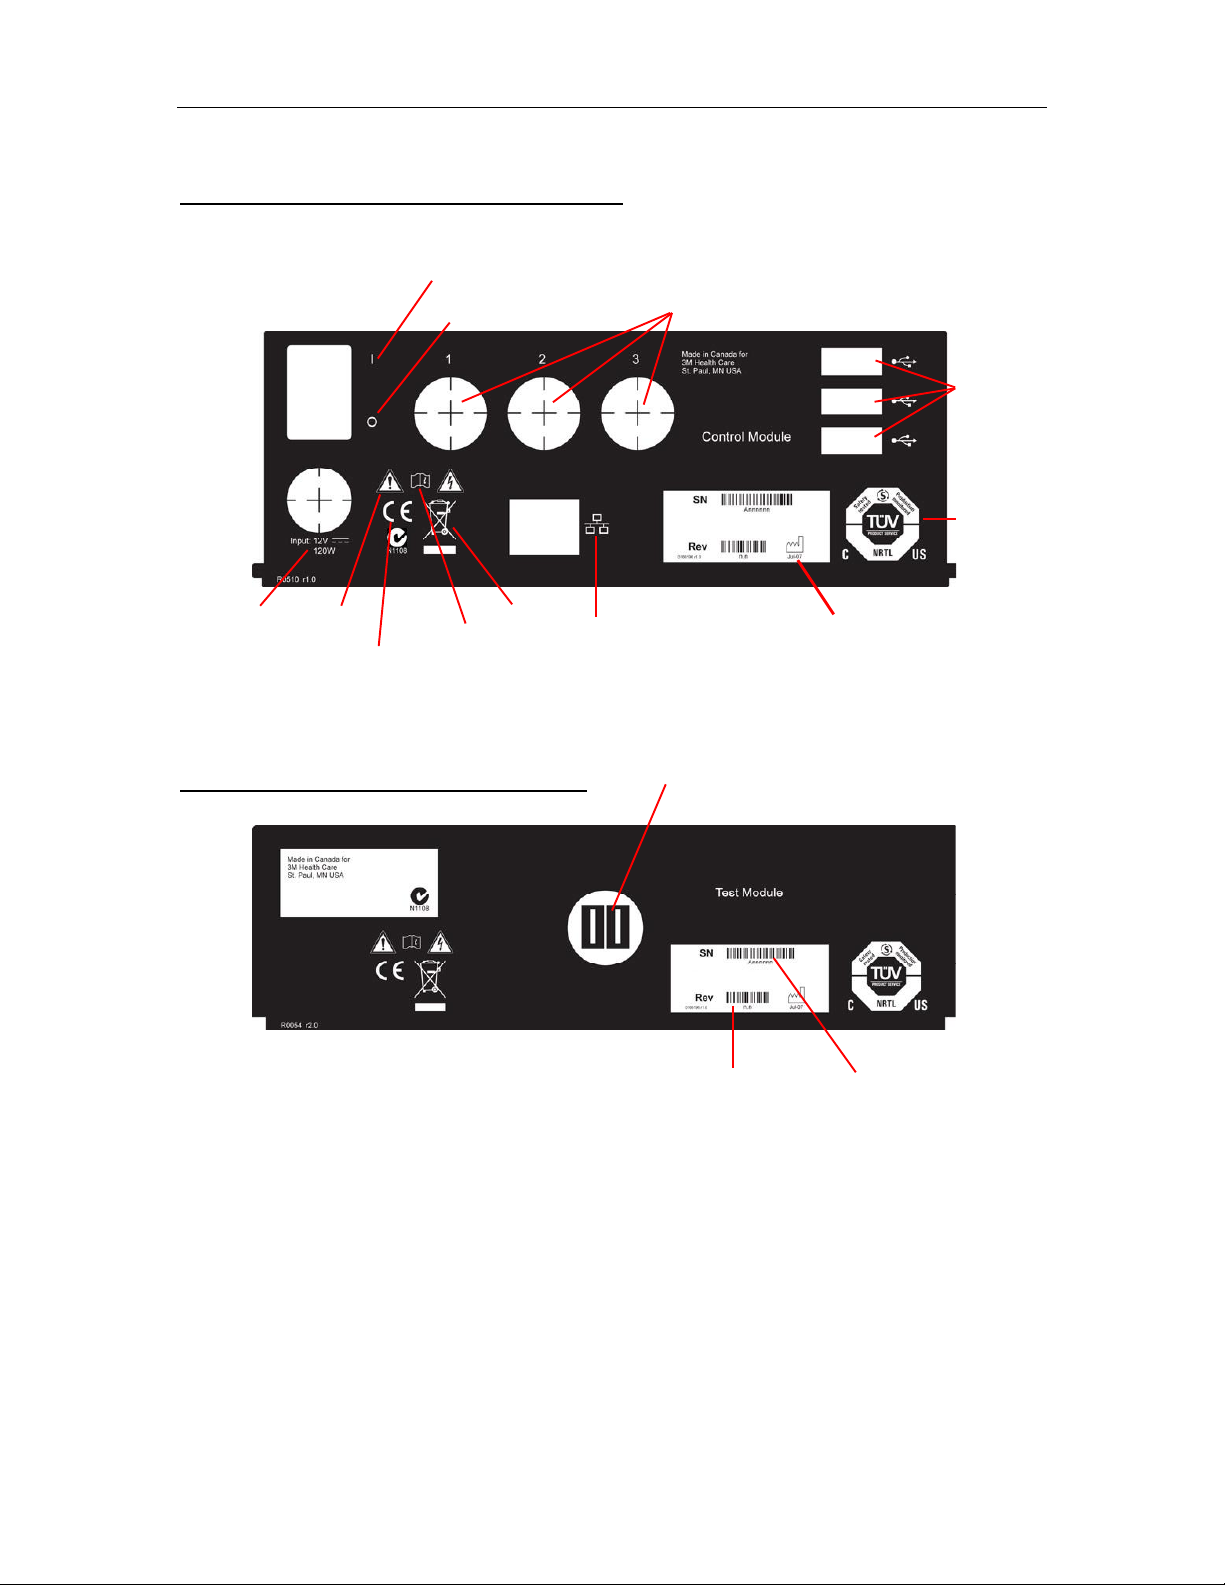
3M™ Rapid Detection Reader Unpacking and Setup
0 - OFF Switch
Safety
Date of
Ethernet
Electrical
Consult
manual
Hardware
Serial
Figure 1a. 3M Rapid Detection Reader – Rear view panel labels and description
3M RAPID DETECTION Control Module
I - ON Switch
TM Ports
USB Ports
certification
marking
Caution
rating
CE Marking
WEEE
connection
3M RAPID DETECTION Test Module
CM Port
revision
number
manufacture
number
7
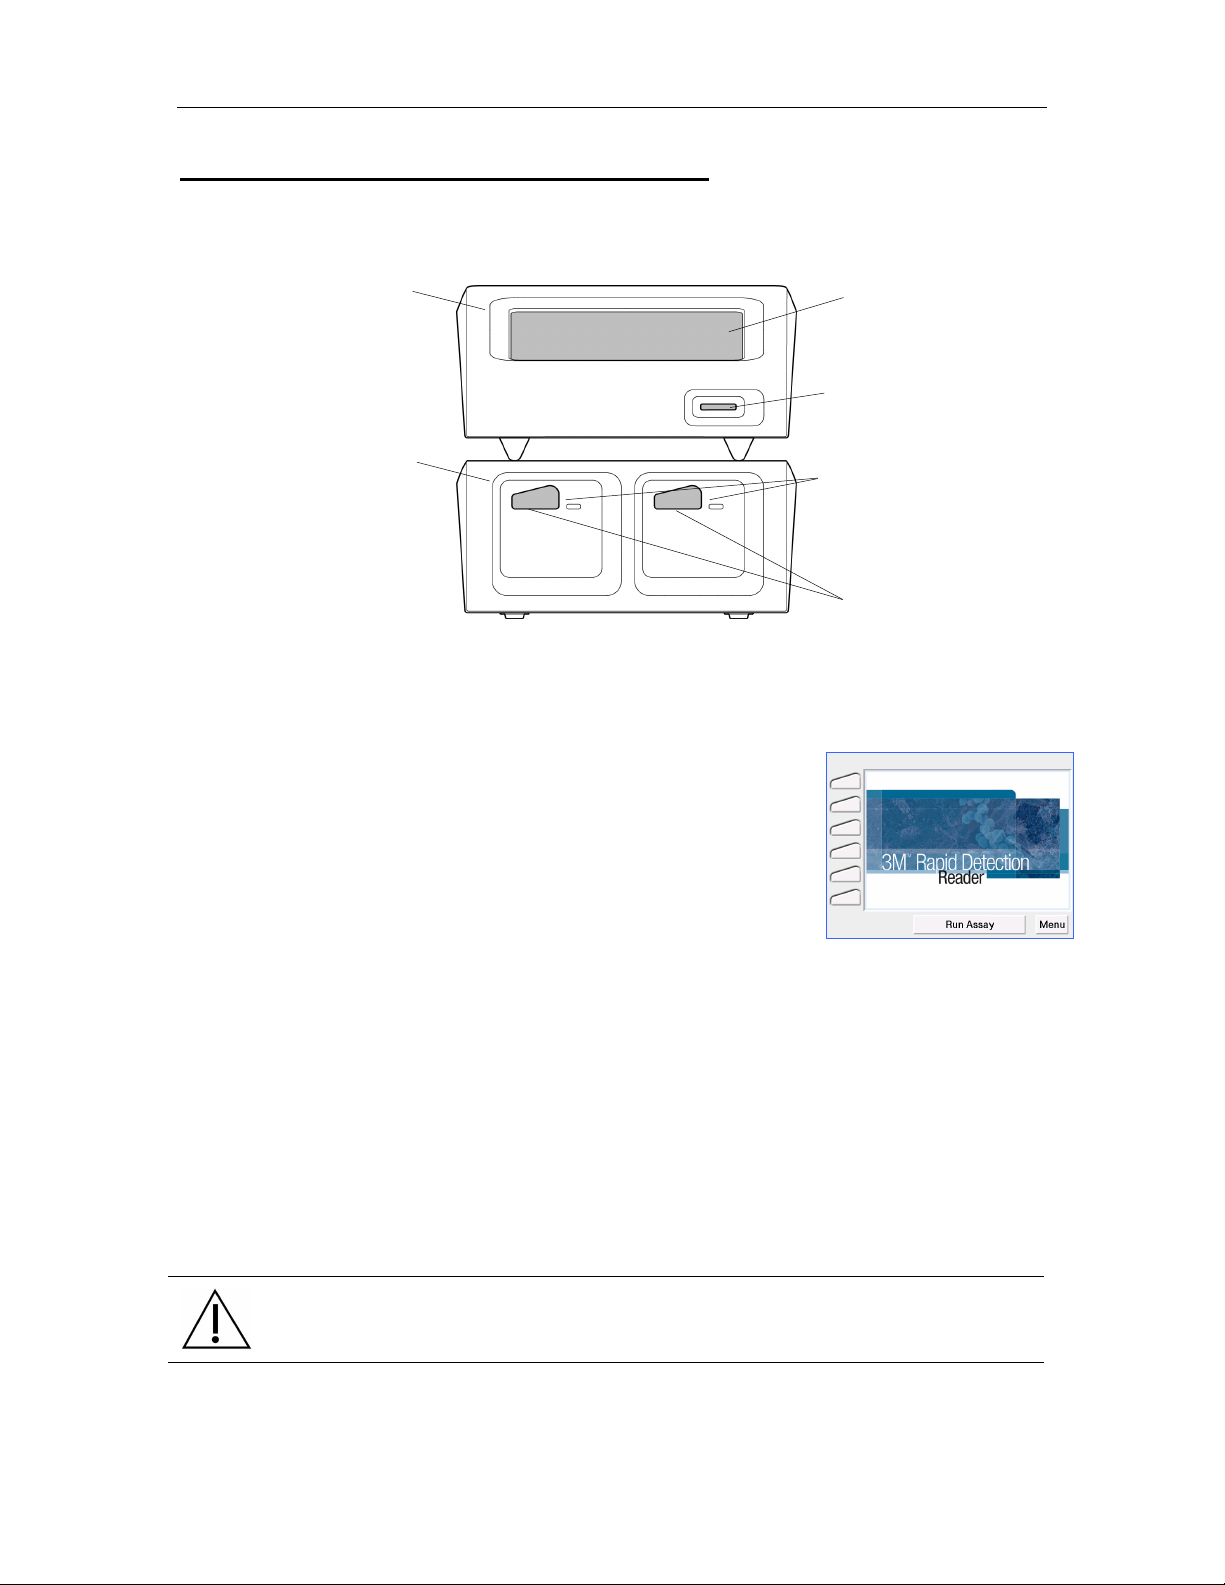
3M™ Rapid Detection Reader 3M Rapid Detection Reader (MODULES)
Touch
Lot Card
Test Cartridge
3M Rapid Detection Reader (MODULES)
Figure 2. 3M Rapid Detection Reader Features - Front View
Control Module
Screen
Display
Insertion Slot
Test Module (3 max)
Port LEDs
Ports
Turning on the 3M Rapid Detection Reader
The power On/Off switch is located on the rear panel of the CM
(Figure 1). When the power is switched on, the 3M Rapid Detection
Reader performs a number of internal self-tests, including IQC, to
ensure the system is operating within specifications. For additional
information, refer to Running Quality Control section.
When switched ON, the LEDs on the front of the TM illuminate blue.
When the power-on sequence is complete, the Home screen is
displayed (Figure 3). The power-on sequence takes approximately
1 minute.
Once the Home screen is displayed, selections can be made by
touching the appropriate prompt on the display (i.e., Run Assay to
initiate an assay, or Menu to go to the Main Menu screen (Figure 4)).
The display is touch-sensitive and can accept input from a bare/gloved
finger or a blunt stylus.
The 3M Rapid Detection Reader can be operated immediately after
set-up using the pre-programmed default settings. The date, local
time and some settings can be edited manually through the Settings
menu on the CM touch screen. Most settings can be edited using the
Reader Configuration Utility (RCU) supplied with the CM. For
additional information on editing user settings, refer to Managing
Settings and Editing Settings Using the Reader Configuration Utility
(RCU).
Figure 3. Home
CAUTION.
Pens or other sharp instruments will damage the touch screen.
8
3M™ Rapid Detection Reader 3M Rapid Detection Reader (MODULES)
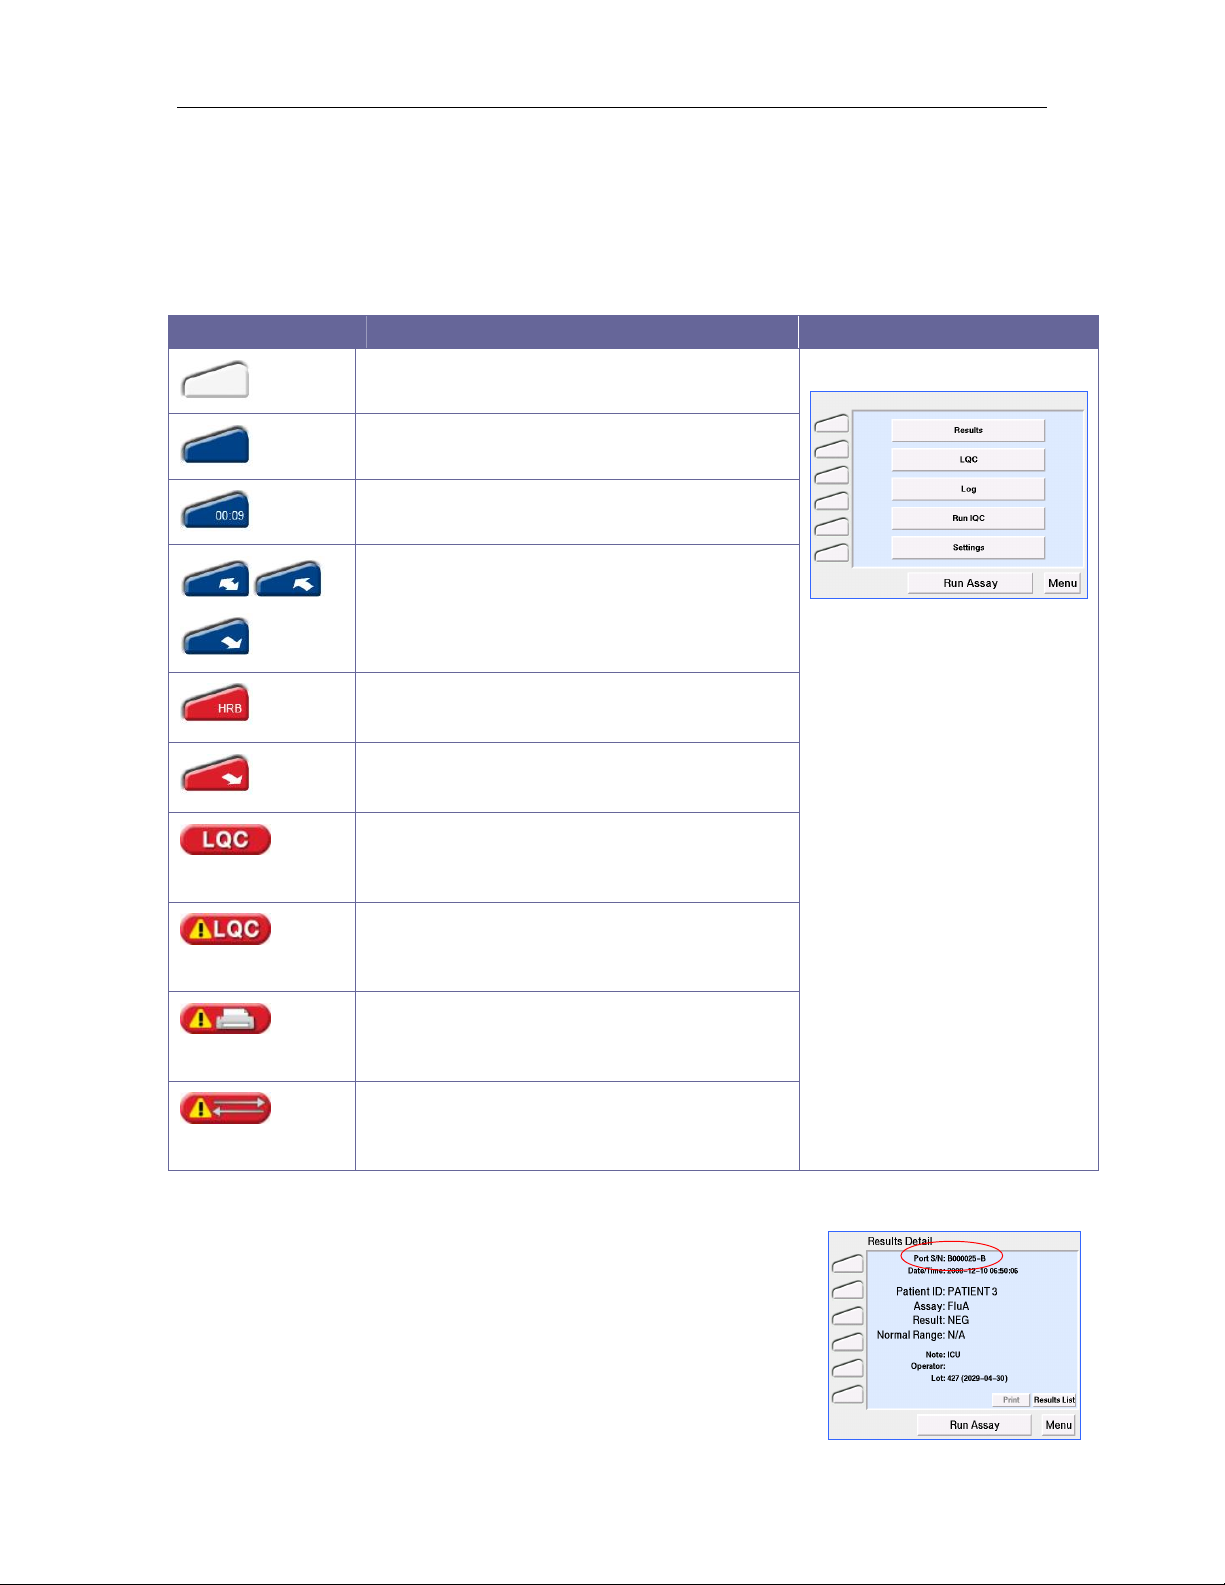
Display Icons
The left hand column of the screen displays an icon for each available port. Touching these icons
leads to a full screen display of the status of that port.
The lower left corner of the display screen, below the port icons, displays LQC, Printer and
Communication warning icons.
The meaning of the displayed icons is as follows:
Icon Meaning
(Non-selectable)
(Non-selectable)
Port Idle
Port Busy
Assay Timing
Sample processing and cartridge movement
Error – (HRB for example only). For detailed
information see Troubleshooting
Aborting assay, cartridge ejecting, error
message to follow
Liquid Quality Control Warning
See Running Quality Control
Liquid Quality Control Expired Warning
See Running Quality Control
Figure 4. Main Menu
(Non-selectable)
(Non-selectable)
Printer Error
See Troubleshooting
Data Transfer Error
See Transferring Results or Troubleshooting
Port Identification Nomenclature
Ports on the 3M Rapid Detection Reader are identified by a multicharacter nomenclature system. The first set of characters is the
serial number of the TM; the last character is a letter (A or B) referring
to the left (A) or right (B) port for a particular TM. This is displayed at
the top of the screen (Figure 5) when the port icon is touched or if
there is an IQC port error and in the IQC results log.
9
Figure 5. Port Identification
3M™ Rapid Detection Reader Performing an Assay
Performing an Assay
WARNING!
To reduce risk to the operator:
• Observe local protocols and appropriate precautions in the collection, handling,
and disposal of specimens.
CAUTION.
• When entering data via the CM touch screen (e.g., Sample/Patient/User ID), enter
characters one at a time as failure to do so may result in erroneous data entry.
• Be familiar with all of the instructions in the Test Kit Package Insert including
Warnings and Precautions prior to performing an assay.
Using Lot Cards
The Lot Card provides lot specific information and the expiration date for each Test Kit and is only
required to be read once for each Test Kit lot. Prior to performing any assay, insert the Lot Card
for that Test Kit lot into the Lot Card Insertion Slot (Figure 2). The CM can store information from
50 different Test Kit lots. If the maximum is exceeded, the oldest entry is overwritten.
CAUTION.
To avoid damaging the Lot Card:
• Do not touch the contact pads on the Lot Card.
• Store the Lot Card in the anti-static pouch provided.
To use the Lot Card:
1. Remove the Lot Card from the anti-static pouch.
2. Hold the Lot Card so that the arrow is on the top side and pointing away.
3. Insert the Lot Card, contact end first, into the slot located on the front of the CM.
4. The display provides status messages: Reading Lot Card, Complete, Lot ID: XXX,
Remove Lot Card.
5. Remove Lot Card and store in its original pouch.
6. If an error message is displayed, or if there is no response to insertion of a lot card, refer
to the Troubleshooting Section.
7. Keep the Lot Card for the life of the Test Kit.
Starting an Assay
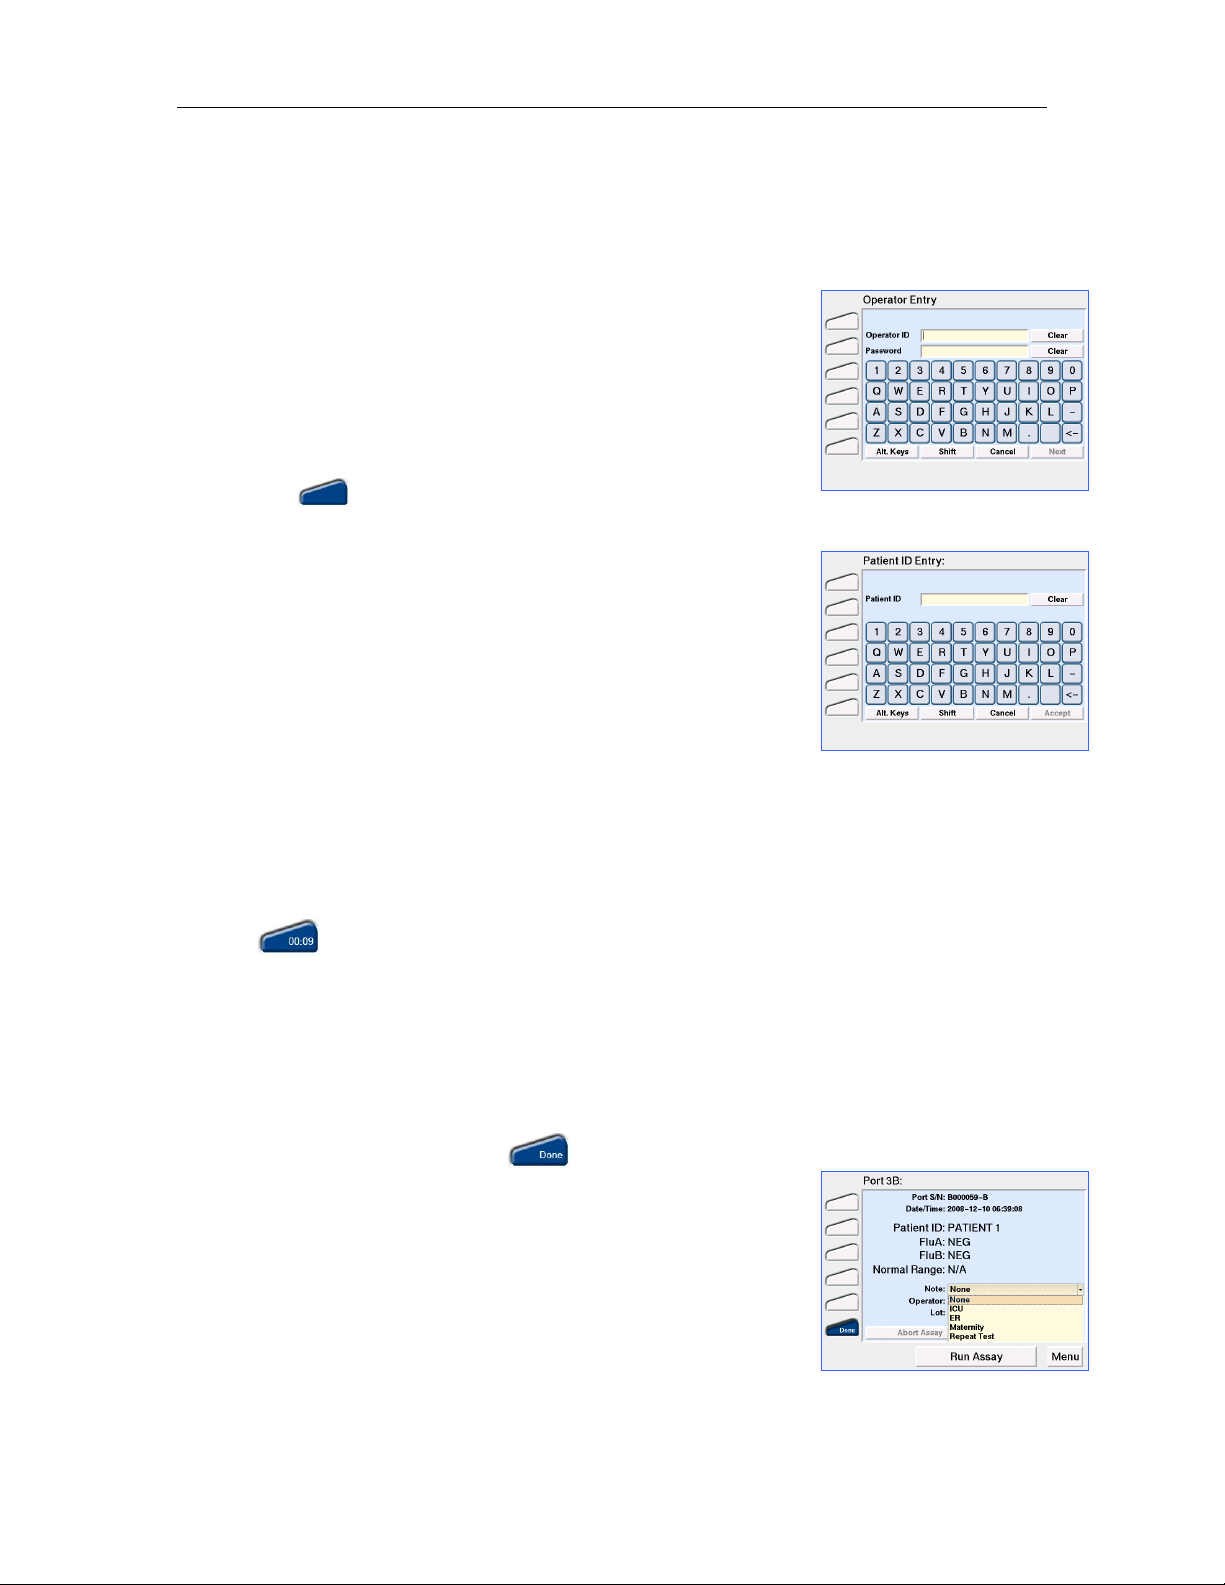
NOTE: The default setting of the 3M Rapid Detection Reader does not require an Operator ID or
password. These login requirements can be edited via the Edit Operator settings menu or RCU
(See Managing Settings). If using default settings, Figure 6 will not appear.
If the following Liquid Quality Control warnings or appear, refer to Running
Quality Control.
10
3M™ Rapid Detection Reader Performing an Assay
NOTE: The message Lot # XXX Not Found, Insert Lot Card or Cancel will be displayed if a
Test Cartridge is inserted and the Lot Card data is not stored in the CM. The Lot Card must be
inserted within 40 seconds or the assay will be aborted. Touch OK to return to the Home screen.
1. Touch Run Assay. If prompted, enter Operator ID and/or
Password (Figure 6) using either the touch screen or the barcode
scanner. To accept the displayed information, touch Accept.
Figure 6. Operator Entry
NOTE: The Operator ID and Password entries are casesensitive.
2. When prompted, enter the Patient ID/Sample ID using either the
touch screen or barcode scanner (Figure 7). Touch Accept.
3. When prompted to Add Sample & Insert the Test Cartridge, the
LED on a free port of the TM will flash blue and the corresponding
port icon on the display will illuminate blue (Refer to Test
Kit Package Insert for detailed instructions on sample handling).
4. Prepare Sample and Test Cartridge as stated in the Test Kit
Figure 7. Patient ID Entry
Package Insert and insert Test Cartridge into the flashing port.
If the cartridge is not inserted within 5 minutes of the Add
Sample & Insert prompt, the system will time-out. Touch OK to
return to the Main Menu.
NOTE: The Test Cartridge must be inserted into the TM within
~30 seconds of sample application. Otherwise, FAIL will be
displayed in the port icon and the assay will be aborted.
Do not use excessive force when inserting the Test Cartridge. The TM will guide the Cartridge
into place.
NOTE: If the cartridge won’t fit or won’t enter the cartridge port, clear the cartridge port of any
obstruction or blockage.
Once the Cartridge Inserted message clears, the previous screen is displayed and the active port
icon shows a timer that counts up until sample flow is detected, then counts down until the
assay is complete.
Another assay can be started once Assay Initialization is complete by touching Run Assay.
5. To check the assay progress, touch the port icon. The details of the assay will be displayed.
Touch Exit to return to the previous screen. Touching Abort Assay will cause the cartridge to be
ejected and a Failed Assay to be recorded in the Events Log.
6. When an assay is complete, the Test Cartridge is ejected and the
corresponding port icon displays . To view the test details
touch the icon.
Figure 8. Results, prior to
cartridge removal
7. Before removing the Test Cartridge from the TM, a predefined
note can be added to the result from the drop down menu on the
Result Details screen (Figure 8). Once the Test Cartridge is
removed, a note cannot be added or changed.
Up to 10 notes can be defined using the RCU (Refer to Editing
Settings Using the Reader Configuration Utility section).
8. Remove the Test Cartridge and discard according to local
hazardous waste policy.
11
3M™ Rapid Detection Reader Running Quality Control
Running Quality Control
Two types of quality control test records are stored by the 3M Rapid Detection Reader:
• LQC (Liquid Quality Control) - external surrogate sample test results.
• IQC (Internal Quality Control) - self-diagnostic test results including a check of the power
supply voltage, system memory, cartridge transport system, cartridge barcode sensor, LED
function, and incubator function for heated assays.
Running LQC
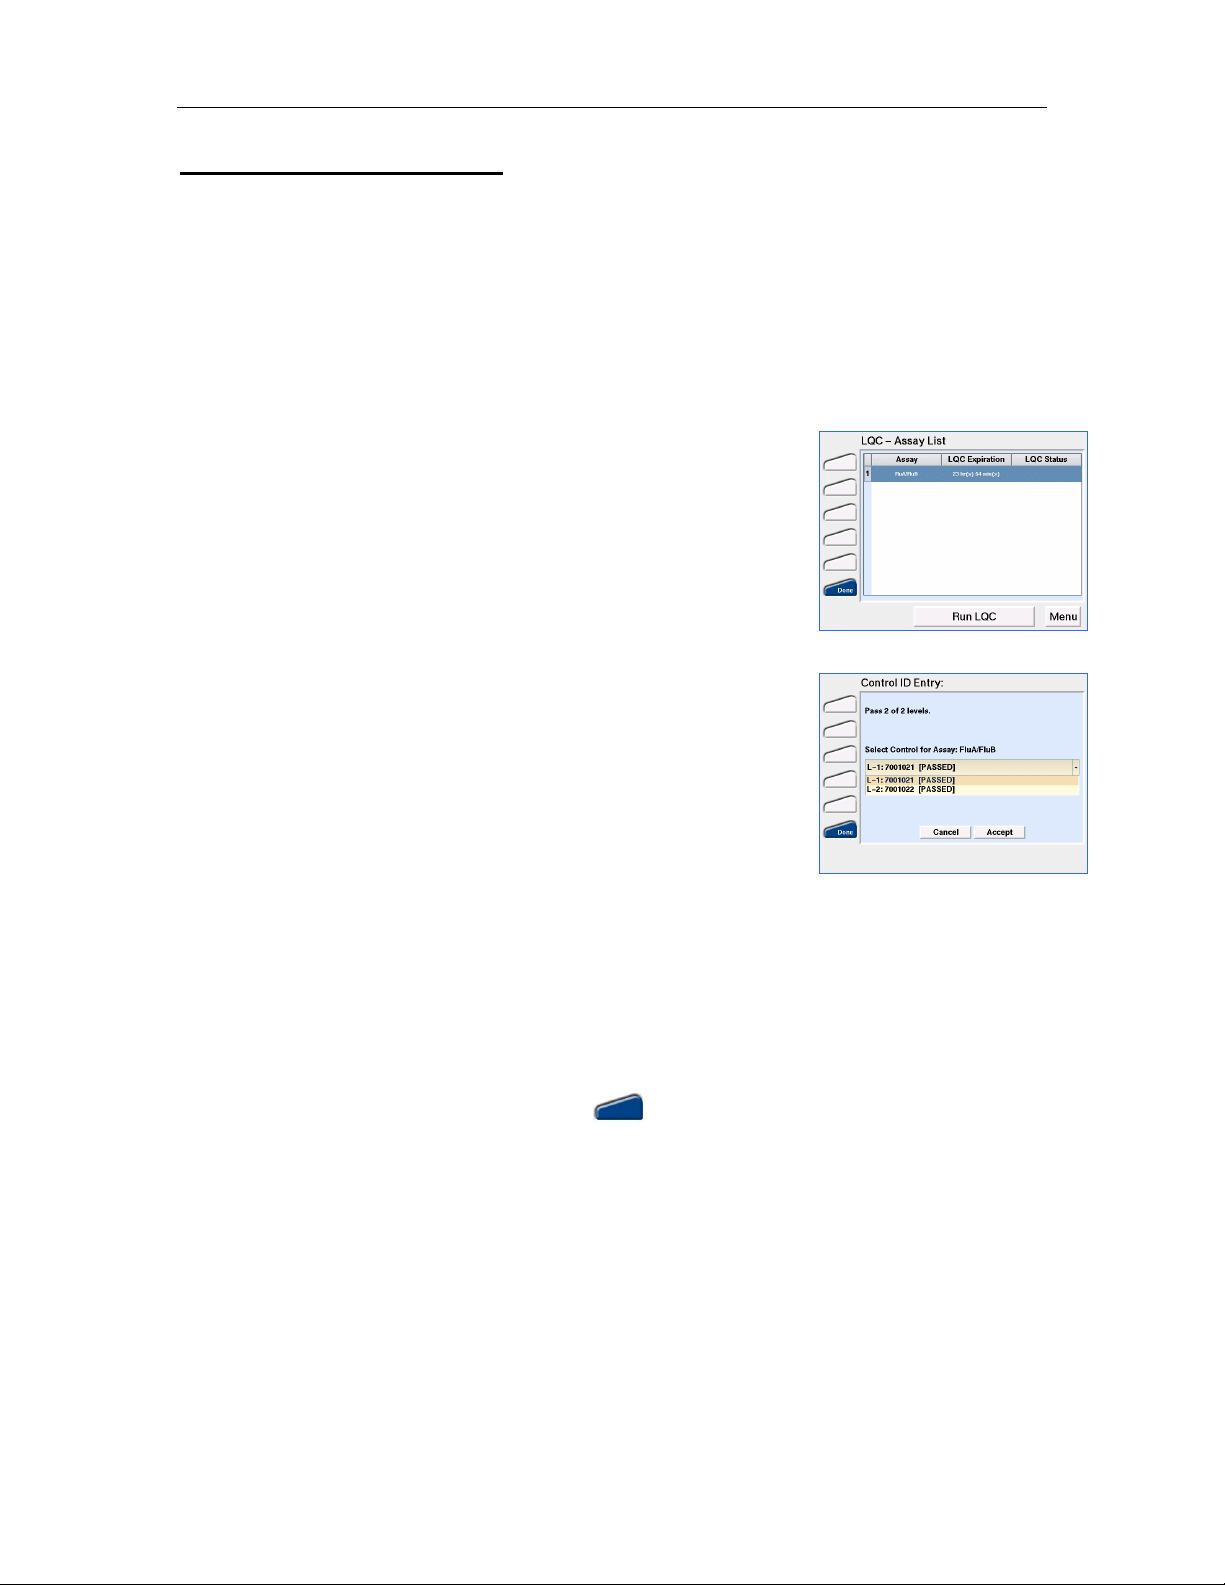
1. From the Main Menu screen (Figure 4) touch LQC. The LQC –
Assay List screen will open (Figure 9). This screen will display
the entire list of assays sorted in ascending order by the Time to
Figure 9. LQC - Assay List
Expiry before assay lockout as displayed in the LQC Expiration
column. If LQC is due, this column will display “Run x of y levels”
where x is the number of levels required and y is the number of
defined LQC levels for that assay. Both the number of levels
required and the available defined levels are set using the RCU.
The LQC status column shows the requirements for any LQC
levels that have failed. If any LQC fails, that specific control level
must be run successfully prior to proceeding with a patient’s test.
If the maximum number of Failures before LQC Lockout is
reached, this column will display “LQC Lockout”.
Figure 10. Control ID Entry
NOTE: The assay list is defined in RCU. Any new assays added
in the RCU or through the CM will default to LQC disabled and
will be listed with N/A in the LQC Expiration column. Refer to the
RCU Help Manual for further instruction.
2. Select the assay for which LQC will be performed. Touch Run
LQC. If prompted, enter Operator ID and/or Password using
either the touch screen or the barcode scanner. To accept the
displayed information touch Accept.
NOTE: Both the Operator ID and Password are case-sensitive.
3. When prompted (Figure 10), select the appropriate Control ID using the drop down menu. Touch
Accept.
NOTE: If LQC has failed for the assay selected, the number of LQC attempts allowed prior to
assay lockout is displayed.
4. When prompted to Add Control & Insert the Test Cartridge, the LED on a free port of the TM will
flash blue and the corresponding port icon on the display will illuminate blue (Refer to Test
Kit and Quality Control Package Inserts for detailed instructions).
5. Prepare Test Cartridge as per Test Kit Package Insert and insert Test Cartridge into the flashing
port.
If the cartridge is not inserted within 5 minutes of the Add Control & Insert prompt, the system
will time-out and return to the Main Menu.
NOTE: The Test Cartridge must be inserted into the TM within ~30 seconds of sample
application. Otherwise, FAIL will be displayed in the port icon and the assay will be aborted.
12

3M™ Rapid Detection Reader Running Quality Control
Do not use excessive force when inserting the Test Cartridge. The TM will guide the Cartridge
into place.
Once the Cartridge Inserted message clears, the previous screen is displayed and the active port
icon shows a timer that counts up until sample flow is detected, then counts down until the
assay is complete.
NOTE: Touching Run Assay or Run LQC will start another assay/LQC and the test sequence
will begin again using a different available port. The assay progress can be checked by touching
the port icon. Touch Exit to return to the previous screen.
6. When an assay is completed, the corresponding port icon displays and the Test Cartridge
is ejected. Touch the icon to view the test details.
7. Remove the Test Cartridge and discard according to local hazardous waste policy.
LQC Icons
Icon Meaning
LQC will be due shortly. Appears when the LQC timer for an assay has less than the
user defined % of time remaining until lockout.
LQC has expired for one or more assays. If icon is
displayed, the Assay Status Warnings screen
(Figure 11) will display upon touching the Run Assay
Figure 11. Assay Status Warnings
button. Touch Continue if the desired assay is not
listed.
A limited number of overrides can be configured via
the RCU. If overrides are available, touch Continue
to override lock out (i.e., perform a patient test after
LQC is due). The decision to use an Override will be
confirmed (Figure 12). Once all overrides have been
used, LQC must be performed prior to any further
patient testing. If an assay with no overrides is
inserted into the TM, an LQC Overdue, Assay
Figure 12. Override Confirmation
Locked warning will display and the assay will be
aborted.
NOTE: These warnings are display only and are not selectable. To determine the assay(s) for
which LQC is due, view the LQC – Assay List (Figure 9).
NOTE: If there is more than one level of LQC defined for an assay, and LQC has expired for this
assay, the LQC timer will be reset to the time at which the earliest LQC level passes in the set.
e.g.: Two levels of QC are required, Level 2 passes LQC but Level 1 fails; once Level 1 is
repeated and passes, the "Time to Expiry" column in the LQC menu will display the count down
from the time when Level 2 passed.
13
 Loading...