


GMX

The Oxygen
TM
GMX
Graphics Accelerator
User’s Guide
3Dlabs,® Inc.
480 Potrero Avenue
Sunnyvale, CA 94086
408 - 436 - 3455
www.3dlabs.com

Copyright 1998 by 3D la b s, In c.
3Dlabs, GLINT, and the 3Dlabs logo are registered trademarks, and Oxygen and Power Threads are
trademarks of 3Dlabs, Inc. Pentium is a registered trademark of Intel. OpenGL is a registered trademark of
Silicon Graphics, Inc. Softim age and So ftimage 3D are reg istered tradem arks of Softimag e, Inc. Micro soft and
Windows NT are registered trademarks of the Microsoft Corporation. All other trademarks and registered
trademarks are the property of their respective holders.
Caution: Changes or modifications to the Oxygen graphics accelerator card not expressly approved by 3Dlabs,
Inc. void the user’s warranty.
FCC Notice: This equipment has been tested and found to comply with the limits for a Class B digital device,
pursuant to Part 15 of the FCC Rules. The s e limits are designed to provide reasonable protection against
harmful interference in a residential installation. This equipment generates, uses, and can radiate radio
frequency energy. If product is not installed and used in accordance with the instruction manual, it may cause
harmful interference to radio communications; however, there is no guarantee that interference will not occur
in a particular installation. If this equipme nt does cau s e harm ful int erfere n ce to radio or telev isio n recept ion ,
which can be determined by turning the equipment off and on, the user is encouraged to try to correct the
interference by one or more of the following measures:
1. Re-orient or relocate the receiv in g antenna.
2. Increase the separation between the equipment and receiver.
3. Connect the equipment to an outlet on a circuit different from that to which the receiver is
connected.
4. Consult 3Dlabs or an experienced radio/TV technician for assistance.
Compliance with FCC Rules requ ire s th at a shie lde d cab le be u sed to co nn ect to o th er eq ui pm ent. This device
complies with Part 15 of the FCC Rules. Operation is subject to the following two conditions: 1) this device
may not cause harmful interference, and 2) this device must accept any interference received, including
interference that may cause undesired operation.
This Class B digital apparatus meets all the requirements of the canadian Interference-Causing Equipment
Regulations. Cet appareil numérique de la classe B respecte toutes les exigences du Règlement sur le matérial
brouilleur du Canada.
3Dlabs, Inc. makes no representation that the use of its products in the manner described in this publication
will not infringe on existing or future patent rights, nor do descriptions contained in this publication imply the
granting of licenses to make, use, or sell equipment or software in accordance with the description.
There are no warranties impl ied b y this o wn er’s guide. Any warranties granted by 3Dlabs, Inc. with respe ct to
the product described herein were granted th rou g h a separa te OEM or reseller ag ree men t. No respon sib ility is
assumed for the use or reliability of sof t ware o n equipm e nt that is no t sup pli ed by 3Dla b s, Inc . or its af filiated
companies.

Contents
Introduction . . . . . . . . . . . . . . . . . . . . . . . . . . . . . . . . . . . . . . . . . . v
Welcome to 3Dlabs! . . . . . . . . . . . . . . . . . . . . . . . . . . . . . . . . .vi
Overview. . . . . . . . . . . . . . . . . . . . . . . . . . . . . . . . . . . . . . . . . .vi
System Requirements . . . . . . . . . . . . . . . . . . . . . . . . . . . . . . . vii
Software Partners . . . . . . . . . . . . . . . . . . . . . . . . . . . . . . . . . . viii
Chapter 1 - Installation. . . . . . . . . . . . . . . . . . . . . . . . . . . . . . . . . . 1
Getting Ready. . . . . . . . . . . . . . . . . . . . . . . . . . . . . . . . . . . . . . 2
Before You Start. . . . . . . . . . . . . . . . . . . . . . . . . . . . . . . . . . 2
Installing Hardware . . . . . . . . . . . . . . . . . . . . . . . . . . . . . . . . . . 2
To remove an old card from your system . . . . . . . . . . . . . . . . 2
To install your Oxygen GMX card. . . . . . . . . . . . . . . . . . . . . . 3
Installing Software . . . . . . . . . . . . . . . . . . . . . . . . . . . . . . . . . . 5
To install your Oxygen software . . . . . . . . . . . . . . . . . . . . . . 5
Registering Oxygen GMX. . . . . . . . . . . . . . . . . . . . . . . . . . . . . . 5
To register on-line. . . . . . . . . . . . . . . . . . . . . . . . . . . . . . . . . 5
Chapter 2 - Software Configuration . . . . . . . . . . . . . . . . . . . . . . . . . 7
The Oxygen GMX Driver. . . . . . . . . . . . . . . . . . . . . . . . . . . . . . . 8
Setup Screen . . . . . . . . . . . . . . . . . . . . . . . . . . . . . . . . . . . . 9
OpenGL Screen. . . . . . . . . . . . . . . . . . . . . . . . . . . . . . . . . . 10
Chapter 3 - Troubleshooting & Technical Support. . . . . . . . . . . . . . 11
Troubleshooting. . . . . . . . . . . . . . . . . . . . . . . . . . . . . . . . . . . . 12
Monitors and Display Resolutions . . . . . . . . . . . . . . . . . . . . . . 12
Systems and Networks . . . . . . . . . . . . . . . . . . . . . . . . . . . . . . 13
Reaching Technical Support. . . . . . . . . . . . . . . . . . . . . . . . . . . 14

Chapter 4 - Glossary. . . . . . . . . . . . . . . . . . . . . . . . . . . . . . . . . . . 15
Terms and Definitions . . . . . . . . . . . . . . . . . . . . . . . . . . . . . . . 16
Appendix A - Oxygen GMX Specifications . . . . . . . . . . . . . . . . . . . 21
General Specifications. . . . . . . . . . . . . . . . . . . . . . . . . . . . . . . 21
Supported Resolutions. . . . . . . . . . . . . . . . . . . . . . . . . . . . . . . 21
Appendix B - Warranty and Licenses . . . . . . . . . . . . . . . . . . . . . . . 23
Three (3) Year Parts and Labor Limited Warranty . . . . . . . . . . . 23
Limits and Exclusions. . . . . . . . . . . . . . . . . . . . . . . . . . . . . 23
Software License Agreement . . . . . . . . . . . . . . . . . . . . . . . . . . 24
Software License and Restrictions . . . . . . . . . . . . . . . . . . . 24
Limited Warranty . . . . . . . . . . . . . . . . . . . . . . . . . . . . . . . . 24
Limited Liability . . . . . . . . . . . . . . . . . . . . . . . . . . . . . . . . . 25
Confidentiality . . . . . . . . . . . . . . . . . . . . . . . . . . . . . . . . . . 25
Restricted Rights Notice . . . . . . . . . . . . . . . . . . . . . . . . . . 25
Appendix C - Declaration of Conformity . . . . . . . . . . . . . . . . . . . . . 27
Index . . . . . . . . . . . . . . . . . . . . . . . . . . . . . . . . . . . . . . . . . . . . . . 29
iv 3Dlabs Oxygen GMX User’s Guide

Introduction
Welcome to 3Dlabs!
Welcome to 3Dlabs!
Thank you for selecting a 3Dlabs® Oxygen™ GMX 3D graphics accelerator card!
Oxygen delivers a high-performance power boost to 3D graphics applications
running on Windows NT systems. The huge design files – with millions of
triangles, created with these applications can challenge even multiple-processor
systems. Oxygen GMX off-loads the geometry-related calculations needed to
display these triangles from the system processor to an integrated hardware
solution on the card itself, dramatically increasing the performance of your 3D
applications. Optimized software drivers support the OpenGL 1.1 specification in
order to accelerate animation, MCAD and visualization applications based on the
OpenGL standard.
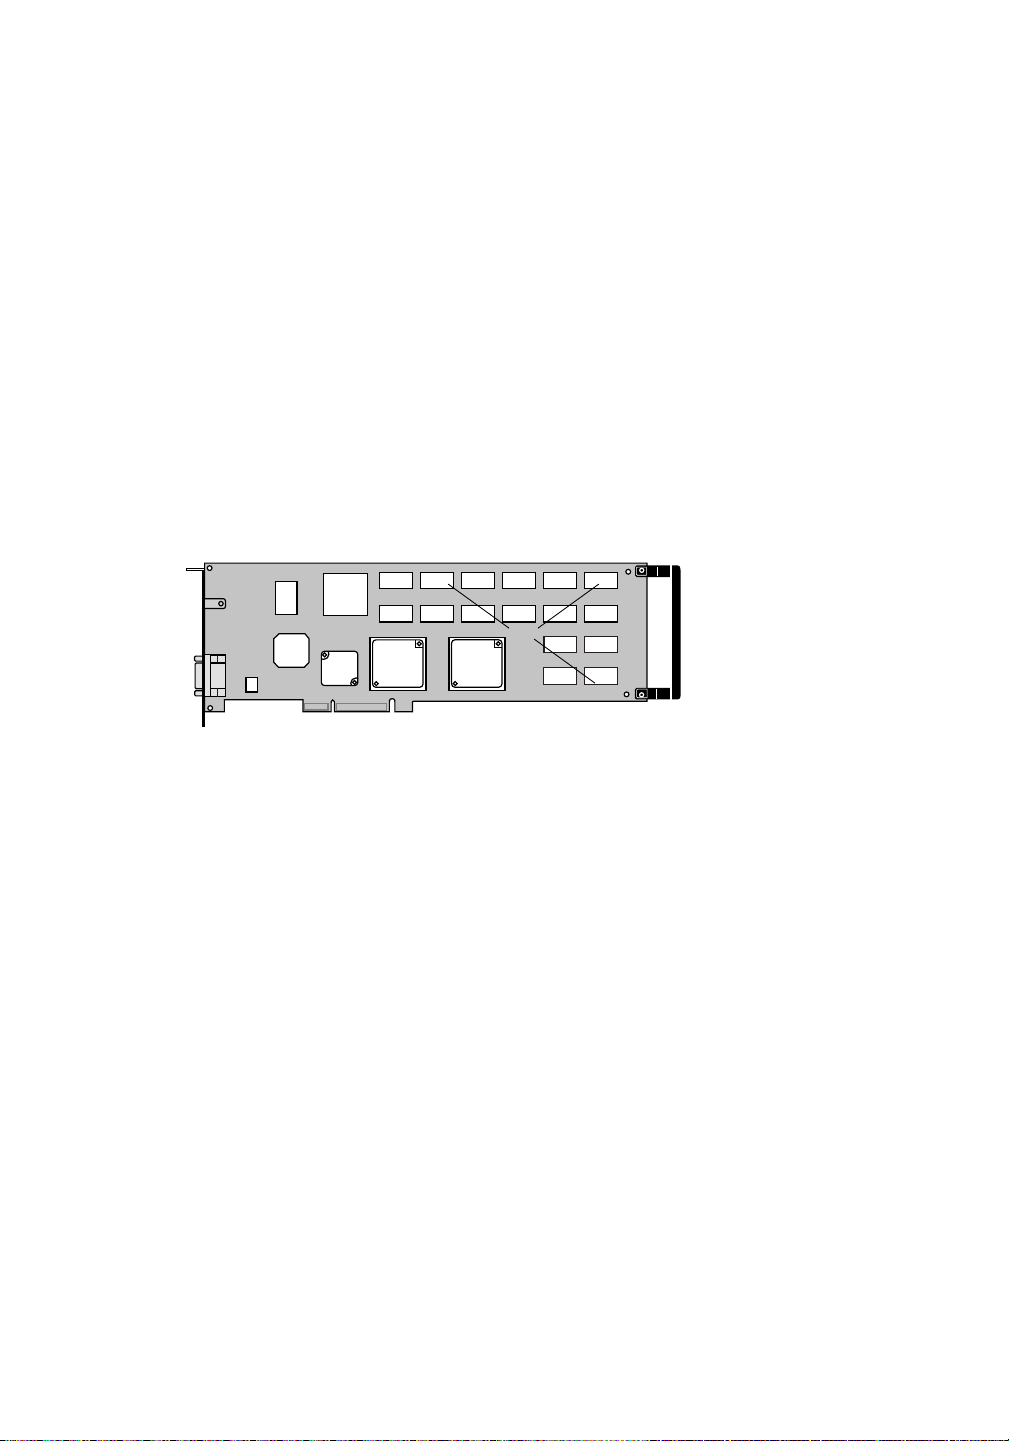
Overview
1. Monitor connector
4
2
1
55
3
7
6
2. GLINT VGA
3. GLINT Gamma
4. RAMDAC
5. GLINT MX
6. Memory
7. AGP connector
Oxygen GMX is the fastest Oxygen card yet, featuring the GLINT® Gamma
hardwired geometry engine and dual MX rasterization engines. Oxygen GMX
delivers 32-bit professional, high-precision, 2D and 3D graphics through your
AGP system, including:
• GLINT Gamma geomet ry pr oc es s i ng
The 2GFlop GLINT Gamma chip makes Oxygen GMX the first 3Dlabs
card to accelerate the 3D geometry pipeline fully in hardware, performing
all vertex transformation and lighting calculations required by OpenGL
applications.
• Dual GLINT MX rasterization engines
Two GLINT MX rasterization engines accelerate tasks — like true-color
shading, texture mapping, anti-aliasing, and transparency — in parallel.
• GLINT VGA chip
3Dlabs’ GLINT VGA chip provides on-board VGA support.
vi 3Dlabs Oxygen
GMX User’s Guide

System Requirements
• 96 MB memory
96 MB of on-board memory drives super-high resolution, true-color
displays, with over 24 MB of available texture memory.
• 1920 x 1080 True-color maximum resolution
Oxygen GMX supports resolutions from 640 x 480 to 1920 x 1080 at a
variety of refresh rates and color depths.
• Full precision 32-bit Z-buffer
The Oxygen GMX Z-buffer provides the highest level of depth-precision,
even at the highest resolutions.
• 16 light sources
Sixteen light sources increase your viewing flexibility, letting you see
models the way you imagine them.
• Full AGP sideband addressing
Sideband addressing ensures high-performance 3D acceleration through
the advanced features of the AGP bus.
System Requirements
Your system must have the following features in order to support your card:
•Pentium II® (or later) based system
®
•Windows
• 128 MB RAM (Random Access Memory)
• 512 K level 2 cache minimum
• 3 MB minimum available hard drive space
•AGP slot
• VGA multisync monitor
NT 4.0 (or later) operating system
Introduction vii

Software Part ne rs
Software Partners
Your Oxygen GMX card has been tested with a variety of graphics software
packages, several of which are listed below. As testing continues and performance
optimizations are made, the results and techniques are posted on the 3Dlabs, as
well as the appropriate software partner’s, web site.
Software Application Web Site Address
3D Studio MAX http://www.ktx.com
Lightscape http://www.lightscape.com
LightWave 3D http://www.newtek.com
Maya http://www.aw.sgi.com
MicroStation http://www.bentley.com
Pro/ENGINEER http://www.ptc.com
SDRC I-DEAS http://www.sdrc.com
Softimage | 3D http://www.softimage.com
SolidWorks http://www.solidworks.com
Unigraphics http://www.ug.eds.com/ug/
viii 3Dlabs Oxygen
GMX User’s Guide

Chapter 1 - Installation

Getting Ready
Getting Ready
Whether you install your new card or driver software first depends on whether a
video card is already present in your system.
If there is a video card in your system: Install the drivers first. Once the drivers
are loaded, remove the old card and install the Oxygen GMX card. The driver
installation instructions begin on page 5.
If not: Install your new card as described in the Installing Hardware section,
below, then install the drivers.
➤
Before You Start
• Tak e every possible precaution against static electricity as you prepare
to install the card: static can damage components. We have included an
anti-static wrist strap for you to wear while installing the hard ware: you
should also try to work in a static free area (such as on a tile floor rather
than carpet) . You might even consider wearin g special ESD, or at least
rubber-soled, shoes.
• Save any work in progres s and exit any open applicati ons . Always back
up your system before you install new hardware or software.
• Have your anti-static strap and a Philips-head screwdriver ready.
Installing Hardware
Oxygen GMX cards have AGP connectors and must be installed in your system’s
AGP slot. Since the location of expansion slots varies, please see your system
documentation for the AGP slot location in your machine.
➤
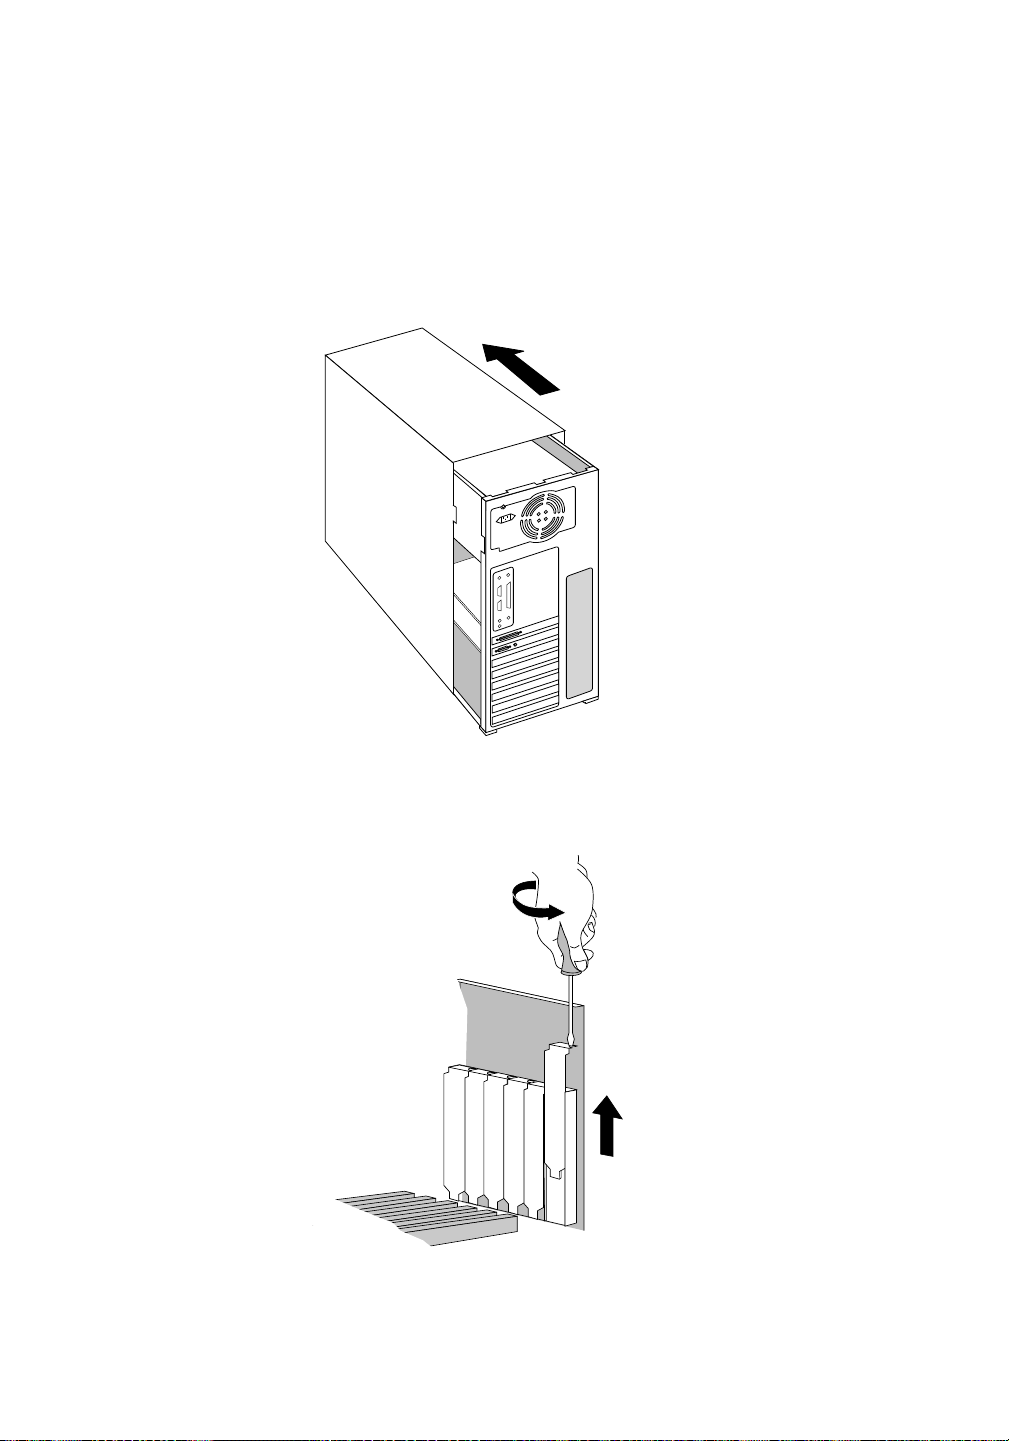
To remove an old card from your system
1. Turn off and unplug the power source for your system and each of
its peripherals.
2. Unplug the monitor cable from the old card.
3. Remove any screws securing the card to the chassis.
4. Lift the card out of the slot.
2 3Dlabs Oxygen
GMX User’s Guide
Installing Hardware
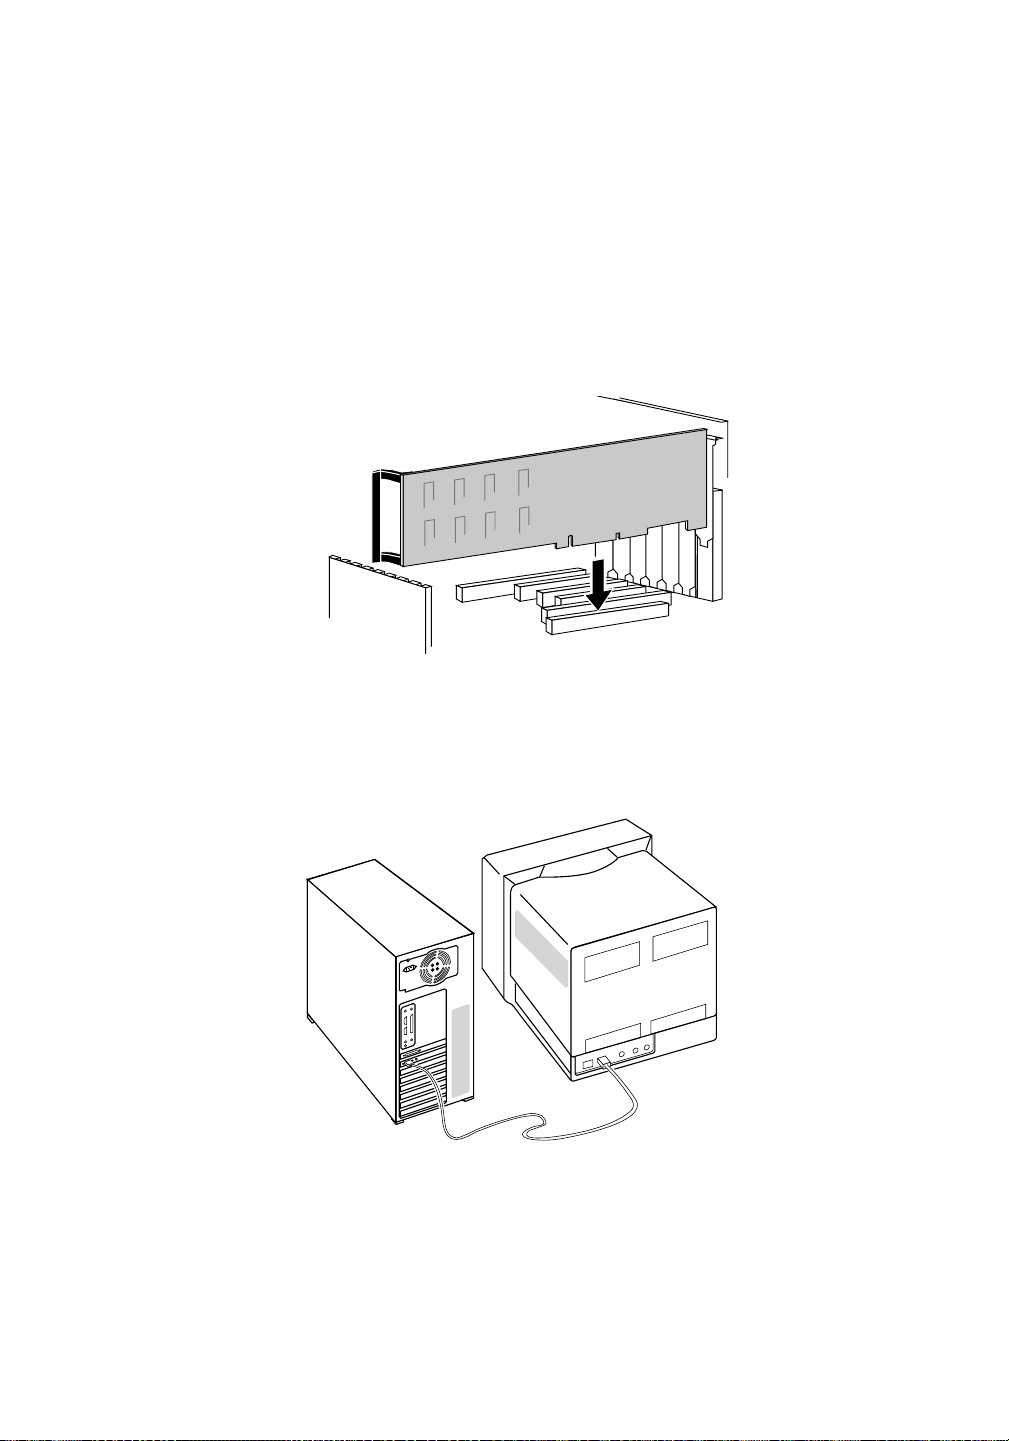
➤
To install your Oxygen GMX ca rd
1. Turn off and unplug the power source for your system and each of its
peripherals, if you have not already done so.
2. Remove the cover from your system so you can access the AGP expansion
slot. (See your system documentation for details.)
3. Determine which slot you are going to use and remove its back panel
cover. You must use the AGP slot: AGP cards will not fit in PCI slots.
Chapter 1 - Installation 3
Installing Hardware
4. Attach the anti-static strap to your wrist, and attach the other end to a bare,
conductive (as opposed to painted or sticker-covered) area of your
system’s chassis.
5. Remove the card from its anti-static packaging. Write down the serial
number for registration and future use.
6. Place the card into the AGP slot, and seat it firmly. See your system
documentation for instructions on securing the card to the chassis. Loose
cards and connections can cause grounding and operating problems.
7. Remove the anti-static strap and replace the cover on your system.
8. Connect the video cable from your monitor to the video connector on the
card.
9. Plug in and start up your system, including peripherals, and log in to
Windows NT.
4 3Dlabs Oxygen
GMX User’s Guide
 Loading...