


Oxygen 3D Family
Installation and User’s Guide
5225 Betsy Ross Drive
Santa Clara, California 95054
www.dynamicpictures.com

Copyright 1996, 1997, 1998 by Dynamic Pictures, Inc. All rights reserved.
Dynamic Pictures and the Dynamic Pictures logo are registered trademarks, and Oxygen and PowerThreads are trademarks of Dynamic Pictures, Inc. Pentium is a registered trademark and PCI is a trademark of Intel. Alpha is a trademark of Digital Equipment Corporation. OpenGL is a registered trademark of Silicon Graphics. Softimage and Softimage|3D are registered trademarks of Softimage, Inc., a wholly owned subsidiary of Microsoft Corporation. Microsoft, Windows, Windows NT, and/or other Microsoft products referenced herein are either trademarks or registered trademarks of Microsoft. CrystalEyes is a trademark of StereoGraphics. SolidWorks is a trademark of SolidWorks, Inc. Heidi and 3D Studio MAX are trademarks of Autodesk. LightWave is a trademark of NewTek. Pro/ENGINEER is a registered trademark of Parametric Technology Corporation. Unigraphics is a registered trademark of Electronic Data Systems. SDRC is a registered trademark and I-DEAS is a trademark of Structural Dynamics Research Corporation. Lightscape and the Lightscape Visualization System are trademarks of Lightscape Technologies, Inc. MicroStation and the MicroStation Stylized “M” logo are registered trademarks and Bentley and the “B” Bentley logo are trademarks of Bentley Systems, Incorporated. All other trademarks and registered trademarks are the property of their respective holders. Portions of the product described in this documentation incorporate technology licensed from Digital Equipment Corporation. The software described in this document is furnished under a license and may be used or copied only in accordance with the terms of such license.
Caution: Changes or modifications to the Oxygen 3D graphics accelerator card not expressly approved by Dynamic Pictures, Inc. void the user’s warranty.
FCC NOTICE: This equipment has been tested and found to comply with the limits for a Class B digital device, pursuant to Part 15 of the FCC Rules. These limits are designed to provide reasonable protection against harmful interference in a residential installation. This equipment generates, uses, and can radiate radio frequency energy. If product is not installed and used in accordance with the instruction manual, it may cause harmful interference to radio communications; however, there is no guarantee that interference will not occur in a particular installation. If this equipment does cause harmful interference to radio or television reception, which can be determined by turning the equipment off and on, the user is encouraged to try to correct the interference by one or more of the following measures:
1)Re-orient or relocate the receiving antenna;
2)increase the separation between the equipment and receiver;
3)connect the equipment into an outlet on a circuit different from that to which the receiver is connected; or
4)consult Dynamic Pictures or an experienced radio/TV technician for assistance.
Compliance with FCC rules requires that a shielded cable be used to connect to other equipment. This device complies with Part 15 of FCC Rules. Operation is subject to the following two conditions:
(1) this device may not cause harmful interference, and (2) this device must accept any interference received, including interference that may cause undesired operation.
This Class B digital apparatus meets all the requirements of the Canadian Interference-Causing Equipment Regulations. Cet appareil numérique de la classe B respecte toutes les exigences du Règlement sur le matérial brouilleur du Canada.
Dynamic Pictures, Inc. makes no representation that the use of its products in the manner described in this publication will not infringe on existing or future patent rights, nor do descriptions contained n this publication imply the granting of licenses to make, use, or sell equipment or software in accordance with the description.
There are no warranties implied by this owner’s guide. Any warranties granted by Dynamic Pictures, Inc. with respect to the product described in this owner’s guide were granted through a separate OEM or reseller agreement. No responsibility is assumed for the use or reliability of software on equipment that is not supplied by Dynamic Pictures, Inc. or its affiliated companies.

Table of Contents
Welcome to Oxygen..................................................................................... |
1 |
System Requirements................................................................................ |
4 |
Installation Instructions ............................................................................ |
5 |
Installing Your Software .................................................................. |
5 |
Installing Oxygen on Windows NT 4.0 ................................. |
6 |
Installing Oxygen on Windows 95...................................... |
13 |
Installing Your Oxygen Card ............................................................ |
18 |
Start Menu ................................................................................................ |
21 |
Performance Tuning................................................................................. |
23 |
Oxygen Control Panel ..................................................................... |
24 |
Tuning Your Applications for Optimal Performance ........................ |
33 |
Display Resolutions and Settings................................................... |
37 |
Troubleshooting....................................................................................... |
40 |
Technical Support.................................................................................... |
45 |
Technology Overview............................................................................... |
46 |
Appendix A: Installing Oxygen on Windows NT 3.51 .................................. |
56 |
Appendix B: Installing Your Heidi Driver .................................................. |
57 |
Appendix C: Using Dual Oxygen Cards...................................................... |
60 |
Appendix D: Warranty Information........................................................... |
65 |
Appendix E: Mechanical and Electrical Specifications ............................ |
66 |
Appendix F: Declaration of Conformity..................................................... |
67 |
Appendix G: Software License Agreement ............................................... |
68 |
Index ....................................................................................................... |
70 |
Installation and User’s Guide 3

Table of Figures
Figure 1: My Computer Window ............................................................................................... |
6 |
Figure2: Drivers Folder ............................................................................................................ |
7 |
Figure 3: Setup Icon................................................................................................................. |
8 |
Figure 4: Oxygen 3D Family Setup.......................................................................................... |
9 |
Figure 5: Installation Directory Window ............................................................................... |
10 |
Figure 6: Finish Setup ............................................................................................................. |
12 |
Figure 7: Display Properties - Settings ................................................................................ |
13 |
Figure 8: Change Display Type............................................................................................... |
14 |
Figure 9: Select Device Window ............................................................................................ |
15 |
Figure 10: Open Window.......................................................................................................... |
16 |
Figure 11: System Settings Change ....................................................................................... |
17 |
Figure 12: Monitor Video Connector....................................................................................... |
19 |
Figure 13: Stereoscopic Viewing Connector......................................................................... |
19 |
Figure 14: Oxygen 3D Submenu.............................................................................................. |
21 |
Figure 15: Oxygen Control Panel - Oxygen Status .............................................................. |
25 |
Figure 16: Oxygen Control Panel - Memory Options............................................................ |
27 |
Figure 17: Oxygen Control Panel - Advanced Options ........................................................ |
29 |
Figure 18: Oxygen Control Panel - Support Information..................................................... |
32 |
Figure 19: Oxygen Chip Block Diagram................................................................................. |
47 |
Figure 20: Oxygen 102 3D Graphics Accelerator................................................................. |
49 |
Figure 21: Oxygen 202 3D Graphics Accelerator.................................................................. |
51 |
Figure 22: Oxygen without PowerThreads Technology...................................................... |
53 |
Figure 23: Oxygen with PowerThreads Technology ........................................................... |
53 |
Figure 24: Oxygen 402 3D Graphics Accelerator ................................................................ |
55 |
Figure 25: VGA Jumper (VGA Enabled) ................................................................................. |
62 |
Figure 26: VGA Jumper (VGA Disabled) ................................................................................ |
63 |

Dynamic Picturesâ OxygenÔ 3D Family
Has Won the Following Awards
V 3.0
Installation and User’s Guide 5


Welcome to Oxygen
Congratulations on selecting a 3D graphics accelerator card from the industry leader, Dynamic Picturesâ! Your award-winning Oxygenä card provides fast, interactive 3D graphics for Intelâ and Alphaä computers.
About This User’s Guide
This guide details the installation, software configuration, and capabilities of your new Oxygen graphics accelerator card.
Once you have installed your Oxygen card and driver software, use the Performance Tuning section on page 23 to enhance the performance of the 3D graphics applications you use.
Electronic User’s Guide
There is an electronic version of the Oxygen documentation that is stored as an Adobe Acrobat file on your Oxygen CD-ROM. The Oxygen.pdf file may be read using the Adobe Acrobat Reader software provided in the Software Gallery on the Oxygen CD-ROM and is found in the following directory on the Oxygen CD-ROM:
<CDROMDrive>:\DOC
where CDROMDrive is the letter of your computer’s CD-ROM drive.
The Oxygen.pdf file is updated periodically. Please visit the Documentation page on our web site at:
http://www.dynamicpictures.com/oxygendoc.html
where you can download the latest version of the Oxygen.pdf.
Installation and User’s Guide 1

About Dynamic Pictures
Dynamic Pictures is the industry leader in computer graphics acceleration technology. We design, manufacture, market, and support graphics acceleration hardware and software products for personal computers and desktop workstations. Dynamic Pictures’ awardwinning 2D and 3D graphics accelerator cards are setting industry standards for uncompromising performance, competitive prices, and outstanding customer support.
Dynamic Pictures also develops premier software technology for OpenGLâ, dramatically accelerating applications built on this standard. The integrated technology solutions offered by Dynamic Pictures serve animation, visual computing and CAD/CAM professionals running Intel and Alpha systems. Dynamic Pictures is committed to delivering the fastest, most fully featured 3D graphics technology to the Windows NTâ market.
Dynamic Pictures is the industry’s only 3D graphics card company that designs and produces graphics chips, cards, and software drivers. Consequently, Dynamic Pictures delivers higher performance and greater compatibility than any other company. To learn more about Dynamic Pictures, get the latest news on the Oxygen product line, register your new Oxygen 3D graphics accelerator card or download software driver updates, visit us on the World Wide Web at:
http://www.dynamicpictures.com
Remember to complete your user registration card. Registration activates your warranty and ensures that you will be advised of future product updates and releases.
NOTE: You can register electronically by selecting “Register Online” on the Oxygen 3D pop-up menu once you have installed your software. For more information, see the Register Online section on page 22.
2 Dynamic Pictures Oxygen 3D Family

Oxygen 3.0 Release
The Oxygen 3.0 release brings exciting changes and new additions to the Oxygen 3D Family.
PowerThreadsä Technology for Multi-threaded OpenGL
The Oxygen 3.0 release is the fastest Oxygen software technology ever introduced. The addition of PowerThreads technology for multithreaded OpenGL adds a new boost of power to the unrivaled Oxygen 3D acceleration. For more information, refer to the PowerThreads Technical Overview section on page 52.
CD-ROM Media
Dynamic Pictures is pleased to offer Oxygen software on CD-ROM. This new format enables us to provide you with improved installation capabilities. To facilitate periodic updates, drivers can still be downloaded from the Dynamic Pictures web site at:
http://www.dynamicpictures.com/drivers.cgi
Software Gallery
You now have the opportunity to install and review the latest samples, demos or releases from leading 3D software vendors. The SOFTWARE GALLERY directory found on your Oxygen CD-ROM highlights the latest achievements in 3D graphics software.
If you are interested in a particular vendor or their products, please visit the Dynamic Pictures web site at:
http://www.dynamicpictures.com/swgallery.html
We know that you will enjoy this valuable bonus. If you have suggestions for the Software Gallery, please let us know in the comments section of your registration card or send us an email to:
marketing@dynamicpictures.com
Installation and User’s Guide 3

System Requirements
In order to use your Oxygen card, your computer system must meet certain hardware and software system requirements.
Hardware
∙One or more Intel or Alpha processors
∙32 Megabytes (MB) of RAM
∙2 MB of available hard disk space
∙PCI bus with at least one bus-master capable slot available. If you want to use dual displays, two PCI slots and two
identical Oxygen cards are required. (See Appendix C: Using Dual Oxygen Cards for more details.)
∙One or more VGA multisync monitor(s)
Software
∙Windows NTâ version 4.0 or later installed on your computer;
∙Or Windows 95 installed on your computer
NOTE: Oxygen drivers running under Windows 95 display 2D graphics only.
4 Dynamic Pictures Oxygen 3D Family
Installation Instructions
This chapter details how to install your Oxygen software drivers and Oxygen card. You must install both the software and the card to experience accelerated graphics.
NOTE: Dynamic Pictures recommends running Windows NT 4.0 or later. This guide assumes that Windows NT is already installed on your computer. If not, you must install Windows NT before you install your Oxygen software. For more information about installing Windows NT, please consult your Windows documentation.
If your computer already has a video card installed:
∙First, install your software from the Oxygen CD-ROM;
∙remove your old card; and
∙install your new Oxygen card.
If your system has no other video card:
∙First, install your Oxygen card; then
∙follow the software installation instructions in the next section.
Dynamic Pictures supports the Oxygen card on multiple system platforms. Platforms may differ in their installation instructions for PCIä option cards. Consult the hardware installation guide for your workstation or PC if you require additional assistance.
Installing Your Software
Your Oxygen graphics accelerator card includes special software you need to install and configure. These video drivers allow your computer to harness the acceleration potential of your Oxygen card. The following section describes the installation process for Windows NT 4.0. If you are running Windows NT 3.51, please refer to Appendix A: Installing Oxygen on Windows NT 3.51 for installation instructions.
Installation and User’s Guide 5
Installing your Oxygen software on Windows NT 4.0
This section describes the installation of the Oxygen software drivers for Windows NT 4.0. If you are running Windows NT version 3.51, refer to page 56. Please ensure that you have closed all Windows applications programs before beginning the Oxygen software installation process.
NOTE: All figures are examples of what you should see on your screen. Slight differences between the figures and your display are common and should not cause concern.
1.Log in to Windows NT 4.0 using any account that has administrator privileges.
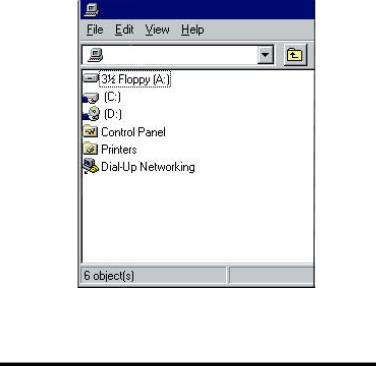
2.Insert the Oxygen CD-ROM into the CD-ROM drive on your computer. Double-click on the My Computer icon found in the upper left corner of your desktop. The My Computer window appears and should look similar to Figure 1.
Figure 1: My Computer Window
6 Dynamic Pictures Oxygen 3D Family
3.Now select your CD-ROM drive by double clicking on the appropriate icon, usually D:\. The contents of the CD-ROM are displayed.
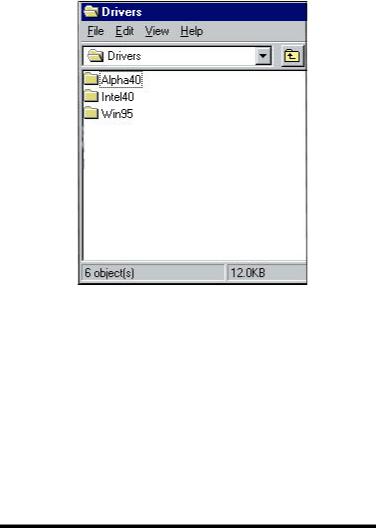
4.Double-click on the DRIVERS folder. This will display the operating systems and platforms that the drivers support (Figure 2).
Figure 2: Drivers Folder
5.Choose the correct driver for installation. If you are using a DEC Alpha machine, then double-click on the ALPHA40 folder. If you are using an Intel system, double-click on the INTEL40 folder.
Installation and User’s Guide 7
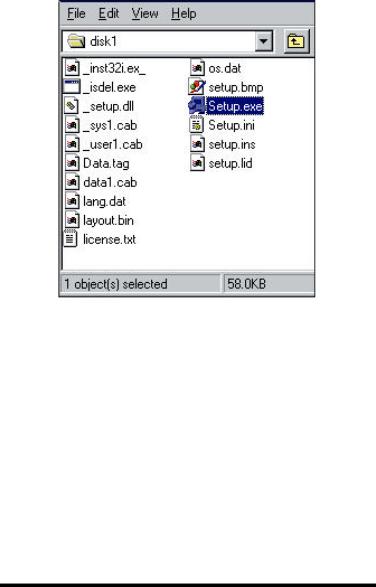
6.Double-click on the DISK1 folder.
7.Now simply double-click the Setup icon (Figure 3) to launch the Oxygen 3D Family software installer.
Figure 3: Setup Icon
8 Dynamic Pictures Oxygen 3D Family
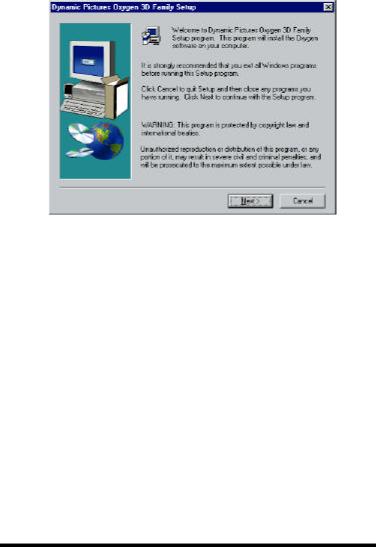
8.The Setup program will take you through the actions required to install your Oxygen software. If you have exited all other Windows applications, then click the “Next” button in the Welcome window (Figure 4). Otherwise, click the “Cancel” button to exit the Oxygen 3D Family Setup program; close all other Windows applications and resume your Oxygen software installation by repeating steps 1 through 8.
Figure 4: Oxygen 3D Family Setup
9.The Electronic License Agreement should be displayed. Please take a moment to review the Oxygen software use, distribution, and restriction guidelines. You may examine the printed copy of the license agreement found in Appendix G: Software License Agreement on page 68 of this manual. In addition, you are bound by license agreements associated with any third-party software products included for distribution on the Oxygen CD-ROM. To accept the terms of the license agreement, click the “Yes” button.
NOTE: If you are unwilling to agree to the terms set forth in the license agreement, then click the “No” button to exit the Setup program. Return the card, CD-ROM and all package contents along with your receipt to the place of purchase for a full refund.
Installation and User’s Guide 9
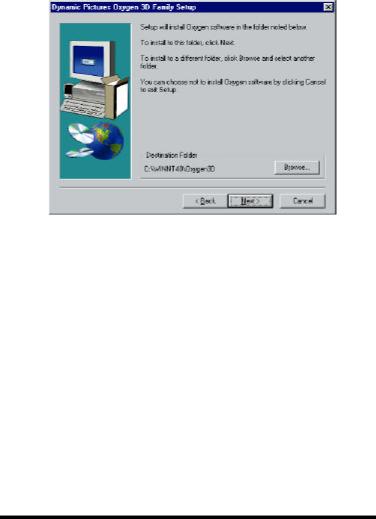
10.You must now choose the destination location for your Oxygen software (Figure 5). You may click “Next” to install the software to the default directory which is:
<SystemDrive>:\WINNT40\OXYGEN3D
where SystemDrive is the letter (e.g., C, D, F, etc.) of the drive where Windows NT is installed.
Figure 5: Installation Directory Window
If you installed Windows NT to a directory other than the default or you want to choose another destination directory for the Oxygen software, then click the “Browse” button and the Choose Folder window will appear. Navigate to the appropriate installation directory, then click the “OK” button. Upon returning to the Destination window, click the “Next” button.
10 Dynamic Pictures Oxygen 3D Family

11.The Program Folder is where the Oxygen 3D Family Setup will add the program icons required for your Oxygen card. You may create a new folder such as the default provided, OXYGEN3D, or you can choose an existing folder from the scrolling listbox by clicking on the folder to highlight your choice. Once you have identified the Program Folder, click the “Next” button.
12.Setup is now installing the required Oxygen software files onto your Windows NT system.
NOTE: 3D Studio MAX R1 users must also install the Oxygen Heidi driver. Refer to Appendix B: Installing Your Heidi Driver on page 57. 3D Studio MAX R2 users need not install the Heidi driver since 3D Studio MAX R2 supports the OpenGL Oxygen driver that the setup program is currently installing.
13.Once complete, you must restart your computer to activate your new Oxygen software.
If you have not yet installed your Oxygen card:
∙Select the “No...” radio button (Figure 6);
∙Click “Finish” and shutdown your system.
∙Once you turn your computer’s power off, install your Oxygen card and reboot your system.
Installation and User’s Guide 11
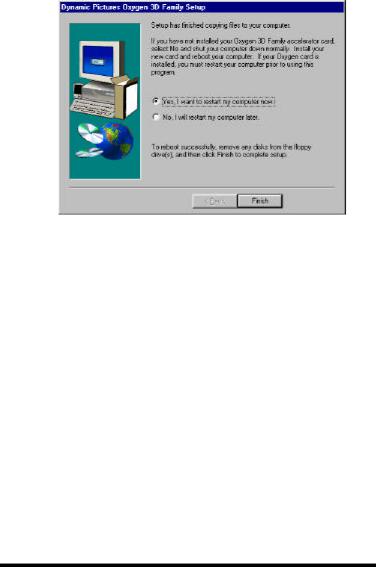
If you have already installed your new Oxygen card:
∙Select the “Yes...” radio button (Figure 6); and
∙Click “Finish”. Your computer will be restarted and you can begin using your new Oxygen 3D graphics accelerator!
Figure 6: Finish Setup
14.Once your Oxygen hardware and software are installed, refer to the Performance Tuning section on page 23 for tips about how to optimize your Oxygen card performance while running your application. It is important to note that not all resolution settings offer accelerated 3D performance. For a list of supported Oxygen resolutions, refer to the Monitor Resolution Tables on page 38.
12 Dynamic Pictures Oxygen 3D Family
Installing your Oxygen software on Windows 95
Your Oxygen graphics accelerator card also includes video drivers supported under Windows 95.
NOTE: The Windows 95 Oxygen drivers support 2D graphics acceleration only. They are not intended nor should they be used for 3D graphics acceleration.
1.Log in to your network under Windows 95 using any account that has administrator privileges.
2.Access the Start menu by clicking the “Start” button located in the lower left corner of your desktop. Click the “Control Panel” selection from Settings pop-up menu. The Control Panel window is now displayed.
3.To activate the Display Properties applet, double-click the Display icon on the Control Panel.
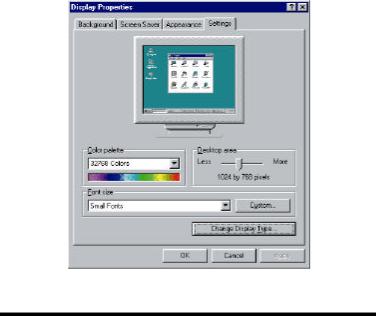
4.The Display Properties applet contains tabbed dialog boxes that allow you to change the visual properties of your computer display. Click the “Settings” page (Figure 7).
Figure 7: Display Properties - Settings
Installation and User’s Guide 13
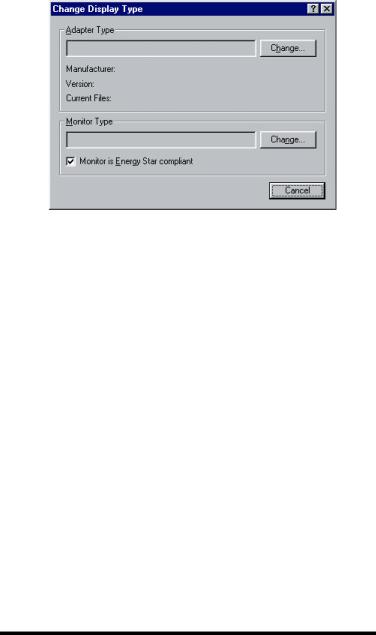
5.Click the “Change Display Type…” button in the lower right corner of the “Settings” page. The Change Display Type window appears (Figure 8).
Figure 8: Change Display Type
6.The Change Display Type window shows the graphics adapter and display drivers currently installed in your system. To replace the installed drivers with your new Oxygen drivers, click the “Change…” button under adapter type. The Select Device window appears.
14 Dynamic Pictures Oxygen 3D Family
7.The Select Device window allows you to select new display drivers (Figure 9). A standard list of available drivers is displayed here. These standard drivers do not support your Oxygen card. To install your Dynamic Pictures Oxygen driver software from your CD, click the “Have Disk…” button.
Figure 9: Select Device Window
8.The Install From Disk window appears and allows you to specify the drive from which you wish to install your software. Insert your Oxygen CD-ROM in the drive. Click the “Browse…” button to display the Open window.
Installation and User’s Guide 15

Figure 10: Open Window
9.In the Open window (Figure 10), choose your CD-ROM drive, usually “D:\”, from the “Drives” listbox at the bottom of the window. Double-click on the DRIVERS folder and you will see a list of folders named for the corresponding operating systems that Oxygen supports. Double-click on the WIN95 folder.
10.Choose the oxygen.inf file and click the “OK” button. The Install From Disk window reappears. In the “Copy manufacturer’s files from” box, you should see:
<CDROMDrive>:\DRIVERS\WIN95
where CDROMDrive is the drive letter (e.g., C, D, F, etc.) of your computer’s CD-ROM drive.
11.Click the “OK” button and a new Select Device window should appear with the “Show compatible devices” radio button selected and “Dynamic Pictures Oxygen Rendering Controller” listed. Click the “OK” button.
12.Once your new Oxygen software has been copied to your system, close the Change Display Type window by clicking the “Close” button in the lower right corner.
16 Dynamic Pictures Oxygen 3D Family

13.Now accept your changes and activate your new driver by clicking the “Apply” button in the lower right corner of the Display Properties applet.
14.The System Settings Change window appears (Figure 11), instructing you that you must restart your computer for your new driver to take effect.
Figure 11: System Settings Change
If you have already installed your new Oxygen card:
∙Remove the Oxygen CD-ROM from the drive; and
∙Click the “Yes” button to reboot your computer and start using your new Oxygen card.
If you have not installed your new Oxygen card:
∙Click the “No” button and close any open applications.
∙Remove the Oxygen CD-ROM from the drive; and
∙Shutdown your system.
∙Once you turn your computer’s power off, install your Oxygen card and reboot your system.
NOTE: Please be advised that you have only installed the Oxygen software drivers for Windows 95. If you are running Windows NT and Windows 95 in a dual-boot configuration, you must also install the Oxygen software drivers that support OpenGL under Windows NT. Refer to the Installing your Oxygen software on Windows NT 4.0 section on page 6 or Appendix A: Installing Oxygen on Windows NT 3.51 on page 56 for instructions and additional information.
Installation and User’s Guide 17

Installing Your Oxygen Card
To install your Oxygen card, you will need a philips-head screwdriver and the anti-static wrist strap included with your Oxygen card. Refer to the Oxygen card layout diagram (Figures 20, 21 & 24) in the Technology Overview section on page 46 to identify the parts of your Oxygen card discussed in this section.
It is also recommended that you refer to the printed instructions from your computer manufacturer for specific details on opening the computer and installing cards.
Caution: Static Electricity
To avoid damage to your Oxygen card from static electricity discharge, leave the card in the anti-static bag until you are properly grounded. To be grounded during the hardware installation procedures, use the antistatic wrist strap provided.
To install your Oxygen card:
1.Power off your computer. Make sure you save any work in progress first and properly exit any open applications. It is recommended that you back up your system before installing any new hardware or software.
2.Unplug the power cords from the computer and its peripherals.
3.Remove the computer’s cover, following the instructions provided by the computer manufacturer.
4.Attach the anti-static strap to your wrist and clip the other end to a part of conductive metal on your computer’s chassis.
5.If you already have a video card in your computer, you will need to remove it before installing your Oxygen card. Unplug the monitor cable from the old card, and then unscrew the card from the chassis. You can now remove the old card from your computer.
18 Dynamic Pictures Oxygen 3D Family
 Loading...