


TokenLink VelocityTM XL PCI

TokenLink® Velocity™ XL
PCI Network
Interface Card
User Guide
A member of the high-performance
TokenLink Velocity family
http://www.3com.com/
Part No. 09-1116-000
Published November 1997

3Com Corporation ■ 5400 Bayfront Plaza ■ Santa Clara, California ■ 95052-8145
Copyright © 1997, 3Com Corporation. All rights reserved. No part of this documentation may be
reproduced in any form or by any means or used to make any derivative work (such as translation,
transformation, or adaptation) without written permission from 3Com Corporation.
3Com Corporation reserves the right to revise this documentation and to make changes in content
from time to time without obligation on the part of 3Com Corporation to provide notification of such
revision or change.
3Com Corporation provides this documentation without warranty of any kind, either implied or
expressed, including, but not limited to, the implied warranties of merchantability and fitness for a
particular purpose. 3Com may make improvements or changes in the product(s) and/or the program(s)
described in this documentation at any time.
UNITED STATES GOVERNMENT LEGENDS:
If you are a United States government agency, then this documentation and the software described
herein are provided to you subject to the following:
United States Government Legend:
and developed solely at private expense. Software is delivered as Commercial Computer Software as
defined in DFARS 252.227-7014 (June 1995) or as a commercial item as defined in FAR 2.101(a) and as
such is provided with only such rights as are provided in 3Com’s standard commercial license for the
Software. Technical data is provided with limited rights only as provided in DFAR 252.227-7015 (Nov 1995)
or FAR 52.227-14 (June 1987), whichever is applicable. You agree not to remove or deface any portion of
any legend provided on any licensed program or documentation contained in, or delivered to you in
conjunction with, this User Guide.
Unless otherwise indicated, 3Com registered trademarks are registered in the United States and may or
may not be registered in other countries.
3Com, the 3Com logo, Net Age, Parallel Tasking, TokenDisk, TokenLink, and Transcend are registered
trademarks of 3Com Corporation. AutoLink, DynamicAccess, and Velocity are trademarks of
3Com Corporation. 3ComFacts is a service mark of 3Com Corporation.
Artisoft and LANtastic are registered trademarks of Artisoft, Inc. Banyan and VINES are registered
trademarks of Banyan Systems Incorporated. Compaq is a trademark of Compaq Computer
Corporation. CompuServe is a registered trademark of CompuServe, Inc. DEC and PATHWORKS are
registered trademarks of Digital Equipment Corporation. Intel and Pentium are registered trademarks
of Intel Corporation. IBM, NetView, and OS/2 are registered trademarks and Warp is a trademark of
International Business Machines Corporation. BootWare is a registered trademark of LANWorks, Inc.
Microsoft, MS-DOS, Windows, and Windows NT are registered trademarks of Microsoft Corporation.
TROPIC is a trademark of National Semiconductor Corporation. Novell and NetWare are registered
trademarks of Novell, Inc.
Other brand and product names may be registered trademarks or trademarks of their respective holders.
Guide written by Phillip Schlueter. Edited by Nancy Kurahashi. Illustrated by Mary Inden. Produced by
Georgi Felix.
All technical data and computer software is commercial in nature
ii

Lifetime Limited
Warranty
3Com’s EtherLink®, Fast EtherLink, TokenLink®,
TokenLink Velocity™, ATMLink™ PCI, and
FDDILink™ network interface cards have a Lifetime
Limited Warranty. For further details, please see
3Com’s Limited Warranty statement in this guide.
To ensure the very best 3Com service and
support, take the time to complete the product
registration card.

Customers in the countries or regions shown below should send the
completed registration card to the appropriate address. Customers in
other non-U.S. locations should send the registration card to the U.S.
address on the front of the card.
■
Asia
3Com Asia Ltd., Marketing Department
Room 2506-07, 25/F.
Citibank Tower
Citibank Plaza, Central
Hong Kong
■
Australia, New Zealand
3Com Australia, Marketing Department
99 Walker Street
Level 7
North Sydney
New South Wales 2060
Australia
■
Belgium, Netherlands, Luxembourg
3Com Benelux B.V.,
Marketing Department
Nevelgaarde 8-9
3436 ZZ
Nieuwegein
Netherlands
■
France, Israel
3Com France, Marketing Department
Immeuble McKinley
BP 965
1, Avenue de l’Atlantique
91976 Les Ulis Courtaboeuf Cedex
France
■
Italy, Greece, Spain, Portugal, Malta
3Com Mediterraneo Srl,
Marketing Department
Via Michelangelo Buonarroti, 1
20093 Cologno Monzese MI
Italy
■
Japan
3Com Japan, Marketing Department
Shinjuku Sumitomo Building 23F
2-6-1 Nishi Shinjuku, Shinjuku-ku
Tokyo 163-02
Japan
■
Sweden, Finland, Norway,
Denmark
3Com Nordic, Marketing Department
Torshamsgatan 39
Box 1110
164 22 KISTA
Sweden
■
United Kingdom, Eire
3Com UK Ltd., Marketing Department
Pacific House
Third Avenue
Globe Park Marlow-on-Thames
Buckinghamshire, SL7 1YL
England
■
Germany, Austria, Switzerland
3Com GmbH, Marketing Department
Gustav-Heinemann-Ring 123
D-81739 Muenchen
Munich
West Germany

C
ONTENTS
A
BOUT THIS GUIDE
Finding Specific Information in This Guide 1
Conventions 2
1
I
NTRODUCTION
High-Performance Features of the 3C359 NIC 1-2
Parallel Tasking II Performance 1-2
DynamicAccess Class of Service 1-2
Support for Full-Duplex/Dedicated Token Ring 1-3
Wake-up On LAN Capability 1-3
Other Features of the 3C359 NIC 1-3
Installation Overview 1-4
2
I
NSTALLING THE
Installation Requirements 2-1
Safety Precautions 2-1
Unpacking and Inspecting the 3C359 NIC 2-2
Inserting the 3C359 NIC 2-3
3C359 NIC
3
N
OVELL NETWARE ENVIRONMENTS
Installing a DOS 16-Bit Client Driver 3-1
Installing a DOS 16-Bit Client Automatically 3-1
AutoLink Software Functions 3-1
Before Using the AutoLink Configuration Utility 3-2
Modifying AutoLink Default Settings 3-2
Running the AutoLink Program 3-2
AutoLink Troubleshooting 3-4
Installing a DOS 16-Bit Client Manually 3-4
Configuring the DOS 16-Bit client Driver 3-5
iii

Installing DOS Client32 3-6
Installing an OS/2 Client Driver for NetWare 3-7
Selecting the Appropriate NIC Address 3-8
Displaying the Universal Address 3-8
Installing the Novell OS/2 Requester 3-9
Configuring the Novell OS/2 Requester 3-11
Installing a NetWare Server Driver 3-12
Driver Support 3-12
Installation Instructions 3-13
Installing the Driver in an Existing
NetWare Environment 3-13
Installing the Driver as Part of a New Server Installation or
Upgrade to NetWare 4.1x 3-20
4
M
ICROSOFT WINDOWS ENVIRONMENT
Drivers Available for Windows 4-1
NDIS 4 Miniport Driver 4-1
NDIS 3 Miniport Driver 4-2
Installing a 3C359 NIC Driver for Windows Environments 4-2
Before Installing a Windows Driver 4-2
Installing a Driver for Windows 95 4-3
About Microsoft Windows 95 Versions 4-3
Installing a Driver for Windows 95 Version 950 4-4
Installing a Driver for Windows 95 Version 950b,
OSR2 4-5
Installing a Driver for Windows NT 4.0 4-6
Installing a Driver for Windows NT 3.51 4-7
Selecting Ring Speed 4-8
Setting Ring Speed for Windows 95 4-8
Setting Ring Speed for Windows NT 4.0 4-12
Defining a Locally Administered Network Address 4-14
Defining the LAA Address for Windows 95 4-14
Displaying the Current Network Address for
Windows 95 4-14
Setting the LAA Address for Windows 95 4-15
Defining the LAA Address for Windows NT 4-18
iv

Configuring Class of Service 4-19
Before Starting Class of Service Configuration 4-20
Enabling Class of Service 4-20
Adding Class of Service Ranges and Protocols 4-23
Using Class of Service Advanced Options 4-25
Class of Service Advanced Options Settings 4-26
5
IBM E
Installing a Driver for Various IBM Environments 5-1
Configuring IBM Host Connectivity 5-5
6
T
3C359 NIC LEDs 6-1
Using the Diagnostic Program 6-2
NVIRONMENTS
Installing the IBM LAN Support Program (DXMAID) and the
DOS NDIS 2.01 Driver 5-1
Installing a Driver for IBM DOS LAN Services 5-2
Using IBM MPTS to Install a Driver for OS/2 5-3
Adding the MS-DLC Network Protocol for
Windows for Workgroups 5-6
Adding the 32-Bit DLC Network Protocol for
Windows 95 5-7
Adding the 32-Bit DLC Network Protocol for
Windows NT 5-9
ROUBLESHOOTING
DOS Diagnostic Tests 6-2
Register Write/Read Test 6-2
Local RAM Write/Read Test 6-2
Timer Test 6-2
Open NIC for Ring Operation Test 6-3
Ring Operations Test 6-3
Close NIC Test 6-3
Running the DOS Diagnostic Tests 6-3
Changing the DOS Test Setup 6-5
v

A
S
PECIFICATIONS
3C359 NIC Specifications A-1
Connector Pin Assignments A-3
DB-9 Connector Pin Assignments A-3
RJ-45 Connector Pin Assignments A-3
Cable Requirements A-4
B
C
HANGING CONFIGURATION SETTINGS
Using the Configuration Program B-1
Adjusting Configuration Settings B-4
Ring Speed B-4
Boot ROM B-5
Memory Limit of 1 Megabyte B-5
Changing Configuration for Multiple NICs B-5
C
T
ECHNICAL SUPPORT
Online Technical Services C-1
World Wide Web Site C-1
3Com Bulletin Board Service C-1
Access by Analog Modem C-2
Access by Digital Modem C-2
3ComFacts Automated Fax Service C-2
3ComForum on CompuServe Online Service C-3
Support from Your Network Supplier C-3
Support from 3Com C-4
Returning Products for Repair C-6
G
LOSSARY
I
NDEX
3COM C
vi
ORPORATION LIMITED WARRANTY

FCC C
LASS
B S
TATEMENT
FCC D
ECLARATION OF CONFORMITY
3COM END U
SER SOFTWARE LICENSE AGREEMENT
vii


F
IGURES
1-1
TokenLink Velocity XL PCI 3C359 NIC 1-1
2-1
Removing the Expansion Slot Cover 2-3
2-2
Inserting the 3C359 NIC 2-4
3-1
Diagnostic and Manual Configuration Program Window 3-9
4-1
Network Window 4-9
4-2
PCI Token Ring Adapter Properties Window: Driver Tab 4-10
4-3
Displaying Ring Speed Setting 4-10
4-4
Manually Setting Ring Speed 4-11
4-5
3Com TokenLink Velocity XL PCI Adapter Dialog Box 4-13
4-6
Configuration and Diagnostic Program Window 4-15
4-7
Network Window 4-16
4-8
PCI Token Ring Adapter Properties Window: Driver Tab 4-17
4-9
Entering Current Network Address 4-17
4-10
3Com TokenLink Velocity XL PCI Adapter Dialog Box 4-19
4-11
DynamicAccess: Select Adapter Window 4-21
4-12
3Com Class of Service Setup Window 4-22
4-13
Class of Service Additional Ranges Window 4-24
4-14
Additional Ranges Window Showing Data 4-25
4-15
Class of Service Advanced Options Window 4-26
6-1
NIC LEDs 6-1
6-2
Test Menu 6-4
6-3
DOS Diagnostic Program Run Tests Dialog Box 6-4
6-4
DOS Diagnostic Program Test Setup Dialog Box 6-5
A-1
DB-9 Connector Pin Assignments A-3
A-2
RJ-45 Connector Pin Assignments A-4
ix

B-1 Configuration and Diagnostic Program Screen B-2
B-2 Install Menu B-2
B-3 NIC Configuration Screen B-3
B-4 Configuration Option Setting Dialog Box B-3
x

TABLES
1 Notice Icons 2
2 Text Conventions 2
3-1 Location of NetWare Support Modules 3-13
3-2 TLNKPODI.LAN Load Parameters 3-16
B-1 Initial Settings of 3C359 NIC Configuration Options B-4
xi


ABOUT THIS GUIDE
About This Guide provides an overview of this guide,
describes guide conventions, and tells you where to look
for specific information.
This guide describes how to install, configure, and
troubleshoot the 3C359 TokenLink® Velocity™ XL PCI
network interface card (NIC). This NIC is referred to as
the 3C359 NIC in this guide.
The HELP directory on TokenDisk® diskette #1 contains the
latest technical information.
This guide is intended for network installers who are
familiar with local area networking (LAN) technology, token
ring technology, and network interface card installation.
If the information in the release notes shipped with your
product differs from the information in this guide, follow
the instructions in the release notes.
Finding Specific Information in This Guide
This table shows the location of specific information in
this guide.
If you are looking for Turn to
3C359 NIC features and product overview Chapter 1
3C359 NIC installation overview Chapter 1
3C359 NIC installation and cabling procedures Chapter 2
Driver installation procedures for Novell NetWare environments Chapter 3
Driver installation procedures for Microsoft Windows environments Chapter 4
Class of Service (also known as Traffic Prioritization)
configuration procedures
Auto ring speed detection information Chapter 4
Driver installation procedures for IBM environments Chapter 5
(continued)
Chapter 4

2 ABOUT THIS GUIDE
If you are looking for Turn to
Host connectivity configuration procedures for IBM environments Chapter 5
Troubleshooting tips and procedures Chapter 6
Specifications for cabling and connector pin assignments Appendix A
Instructions about changing configuration settings for the 3C359 NIC
through the DOS Configuration and Diagnostic Program
Technical support information Appendix C
Appendix B
Conventions
Table 1 and Table 2 list conventions that are used
throughout this guide.
Table 1 Notice Icons
Icon Notice Type Description
Information note Important features or instructions
Caution Information to alert you to potential damage to a
Warning Information to alert you to potential personal injury
Table 2 Text Conventions
Convention Description
Syntax The word “syntax” means you must evaluate the syntax
Screen displays This typeface represents information as it appears on
(continued)
program, system, or device
provided and supply the appropriate values. Placeholders
for values you must supply appear in angle brackets.
Example:
Enable RIPIP by using the following syntax:
SETDefault !<port> -RIPIP CONTrol =
Listen
In this example, you must supply a port number for
<port>.
the screen.

Table 2 Text Conventions (continued)
Convention Description
The words “enter”
and “type”
Menu commands
and buttons
Words in
italicized type
When you see the word “enter” in this guide, you must
type something, and then press the Return or Enter key.
Do not press the Return or Enter key when an instruction
simply says “type.”
Menu commands or button names appear in italics.
Example:
From the Help menu, select Contents.
Italics emphasize a point or denote new terms at the place
where they are defined in the text.
Conventions 3

1
INTRODUCTION
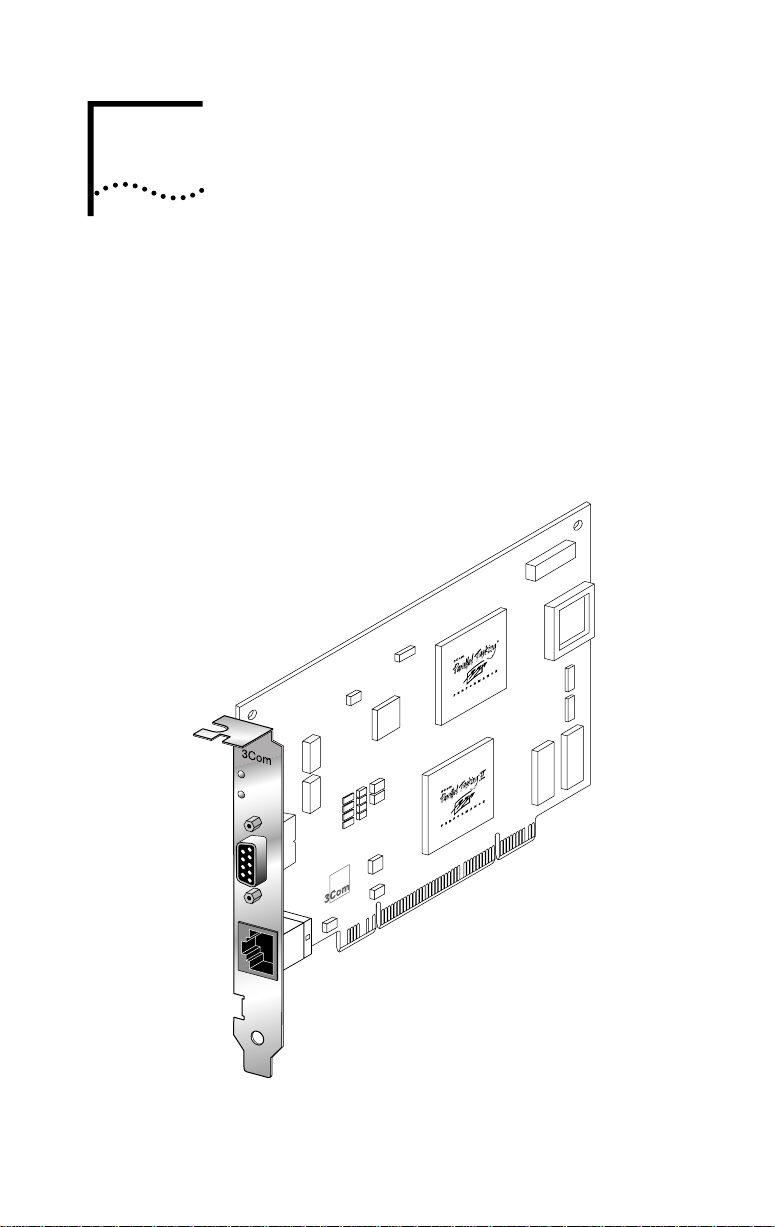
The 3Com TokenLink® Velocity™ XL PCI network interface
card (NIC) is a high-performance token ring network
adapter for personal computers (PCs) with a Peripheral
Component Interconnect (PCI) bus.
The 3C359 NIC provides a high-performance 32-bit PCI
local bus interface with bus mastering that runs at a clock
speed of 33 MHz.
4
16
Data
Figure 1-1 TokenLink Velocity XL PCI 3C359 NIC

1-2 CHAPTER 1: INTRODUCTION
High-Performance Features of the 3C359 NIC
The 3C359 NIC delivers the token ring industry’s highest
performance for the lowest cost, and is designed to provide
years of trouble-free operation. This section describes the
NIC’s high-performance features.
Parallel Tasking II Performance
The 3C359 NIC’s design incorporates new Parallel Tasking® II
performance, which takes advantage of the latest
developments in PCI bus design to deliver the fastest data
throughput and lowest CPU utilization of any token ring NIC.
Parallel Tasking II performance is built upon a solid
foundation of proven Parallel Tasking architecture, which
introduced data pipelining and overlapping task processing
to improve throughput and achieve the industry’s fastest
data transmission and reception speeds.
DynamicAccess Class of Service
™
3Com’s DynamicAccess
3C359 NIC for optimized performance and control. With
DynamicAccess Class of Service (Traffic Prioritization),
you can select time-critical applications that require the
highest-priority access to your network—such as multimedia
sessions. Based on your selection, the network device driver
recognizes high-priority applications, prioritizes their data
transmissions, and accelerates their data transmissions in the
following ways:
■ The NIC implements dual queues, allowing high-priority
traffic to be queued for transmission before
normal-priority traffic.
■ High-priority traffic is allowed to request and use
high-priority tokens (as specified in the IEEE 802.5
standard). This tends to reduce the latency experienced
in acquiring a suitable token for transmission onto
the network.
Class of Service (Traffic Prioritization) is available only with
the NDIS 4.0 miniport driver supporting the following
operating systems: Windows NT 4.0 and Windows 98.
software adds intelligence to the

Wake-up On LAN Capability 1-3
Support for Full-Duplex/Dedicated Token Ring
Full-duplex/Dedicated Token Ring (DTR) is an enhancement
to the IEEE 802.5 standard that allows a token ring switch
port to be dedicated to a station.
In full-duplex mode, a station can simultaneously transmit
and receive independent data streams for potential data
throughput of 32 Mbps. The 3C359 NIC can operate in
full-duplex mode when attached to a DTR switch.
Wake-up On LAN Capability
The 3C359 NIC provides Wake-up On LAN (WOL) capability,
which, with the appropriate applications, lets you remotely
perform installations, software upgrades, and other
management tasks from a central location, even if the
PCs in your network have been turned off.
The 3C359 NIC’s WOL support conforms to the Advanced
Configuration and Power Interface OnNow/(ACPI)
specification, and applies only to PCs conforming to PCI
Bus Power Management Interface Specification 1.0 that
have power management capabilities running under
Microsoft Windows 98 or Windows NT 5.0.
Other Features of the 3C359 NIC
The 3C359 NIC supports the following features:
■ Completely automatic hardware configuration through
PCI registration.
■ Auto ring speed detection option that permits the
3C359 NIC drivers for all supported environments to
detect and operate at the current ring data rate.
■ LED ring speed indicators.
■ Boot ROM socket that supports the 3C359-TRIROM,
an optional token ring boot ROM with BootWare for
TCP/IP, NetWare, and RPL environments. The TriROM
allows you to boot PCs (with or without hard drives)
remotely from a LAN server. (The TriROM is sold and
documented separately. Contact your local reseller for
further details.)

1-4 CHAPTER 1: INTRODUCTION
■ AutoLink
™
16-bit client drivers.
■ Plug and Play for worry-free installation.
■ Promiscuous mode support for Windows 95,
Windows NT, and Novell NetWare drivers. While
operating in this mode, the NIC receives and forwards
all network packets that arrive (regardless of the node
to which they are addressed), allowing you to easily
identify and resolve problems on the network.
■ DOS diagnostic programs to aid problem solving.
■ Full connectivity with IBM AS/400 and mainframe
computers, and compatibility with legacy IBM
applications.
■ Multicast filtering.
■ CISPR B and FCC B certification for reduced
electromagnetic interference when using either
STP or UTP cables.
■ On-board RJ-45 and DB-9 ports for connecting UTP or
STP cables without using an external media filter.
Installation Overview
This section outlines the major steps for completing a
3C359 NIC installation. It also indicates the sections in
this guide that can help you at each stage.
Follow these steps to successfully install and configure the
3C359 NIC.
1 Insert the 3C359 NIC in a PCI bus master slot in
your PC. Connect the NIC to a compatible network
component using the appropriate cables.
See Chapter 2, “Installing the 3C359 NIC,” for detailed
instructions.
2 Install the network driver that is appropriate for
your PC’s operating system environment from the
TokenDisk diskettes or from the TokenDisk CD.
Driver installation instructions in this guide are organized by
operating system environment. See the table of contents to
locate the chapter containing the installation instructions
appropriate for your environment.
software for easy installation of NetWare

Installation Overview 1-5
3 Configure features that are appropriate for your
installation, if necessary. For example:
■ Auto Ring Speed Detection:
Automatically enabled for all drivers, this feature can
be disabled (recommended for servers) if necessary.
■ Class of Service:
Automatically disabled, this feature can be enabled
for the NDIS 4 driver running under Windows NT or
Windows 98.
■ Locally Administered Address (LAA):
You can manually define an LAA that overrides the
NIC’s universal address encoded during manufacturing.
See feature configuration instructions in the chapter for
your operating system environment.
4 Run diagnostics, if necessary.
If you experience problems during the installation process,
you can check the configuration setup and test for physical
NIC problems by running the DOS Configuration and
Diagnostic Program, located on TokenDisk diskette #1
or on the TokenDisk CD.
See Chapter 6, “Troubleshooting,” for instructions on using
the Configuration and Diagnostic Program. This chapter also
describes how to isolate and solve various hardware and
network cabling problems.


INSTALLING THE
2
3C359 NIC
This chapter describes inserting the 3C359 NIC in a PC and
connecting the PC to a network.
Installation Requirements
Installing the 3C359 NIC requires the following:
■ A PCI-bus personal computer with an 80486, Pentium,
or other Intel-compatible processor
■ A 32-bit or 64-bit PCI expansion slot that supports
bus mastering
■ A high-density 3.5-inch disk drive or CD-ROM drive
■ Category 3, 4, or 5 UTP cables, or type 1 or 6 STP cables
■ TokenDisk diskettes #1 and #2 (or TokenDisk CD)
containing the AutoLink installation program, network
driver software, the DOS Configuration and Diagnostic
Program, and online user documentation (CD only)
Safety Precautions
WARNING: PCs operate with voltages that can be lethal.
Before removing the cover, follow these steps to protect
yourself and the PC.
1 Remove any diskettes and CDs from the computer’s
disk drives.
2 Turn off the PC and unplug it.
CAUTION: To avoid permanent damage to the NIC or
other computer circuitry, always turn off the computer’s
power when inserting or removing the NIC.
3 Disconnect all cables that are connected to
the computer.
4 Remove jewelry from your hands and wrists.

2-2 CHAPTER 2: INSTALLING THE 3C359 NIC
5 Reduce any static electricity on your body.
Each NIC is packed in an antistatic container to protect it
during shipment. To avoid damaging any static-sensitive
components after removal from the container, be sure to
reduce any static electricity on your body.
One way to reduce static electricity is to touch an unpainted
part of the computer’s metal chassis. You can maintain
grounding by wearing an antistatic wrist strap attached to
the chassis.
6 Verify that your tools are nonconducting or insulated.
Your tools should include a flat-head screwdriver and a
Phillips-head screwdriver. To avoid permanent damage to
the NIC or other computer circuitry, use only insulated or
nonconducting tools.
Unpacking and Inspecting the 3C359 NIC
The contents of the 3C359 NIC package follow. If items
are missing, contact your authorized network supplier
immediately.
■ TokenLink Velocity XL PCI 3C359 NIC
■ TokenDisk diskettes #1 and #2
■ TokenDisk CD
■ TokenLink Velocity XL PCI Network Interface Card User
Guide and Quick Start Guide
1 Unpack the 3C359 NIC and remove it from its
antistatic container.
2 Lay the NIC on its antistatic container.
3 Inspect the NIC for visible signs of damage.
If you find damage, immediately notify your authorized
network supplier and the carrier that delivered the NIC.
4 If you have purchased the separate TriROM accessory,
install it in the 3C359 NIC’s boot ROM socket
according to instructions supplied with the TriROM.
Complete the Product Registration Card and return it to
3Com, or call 1-800-NET-3Com for immediate registration.
Inserting the 3C359 NIC
32-bit PCI
slots
ISA/EISA
slots
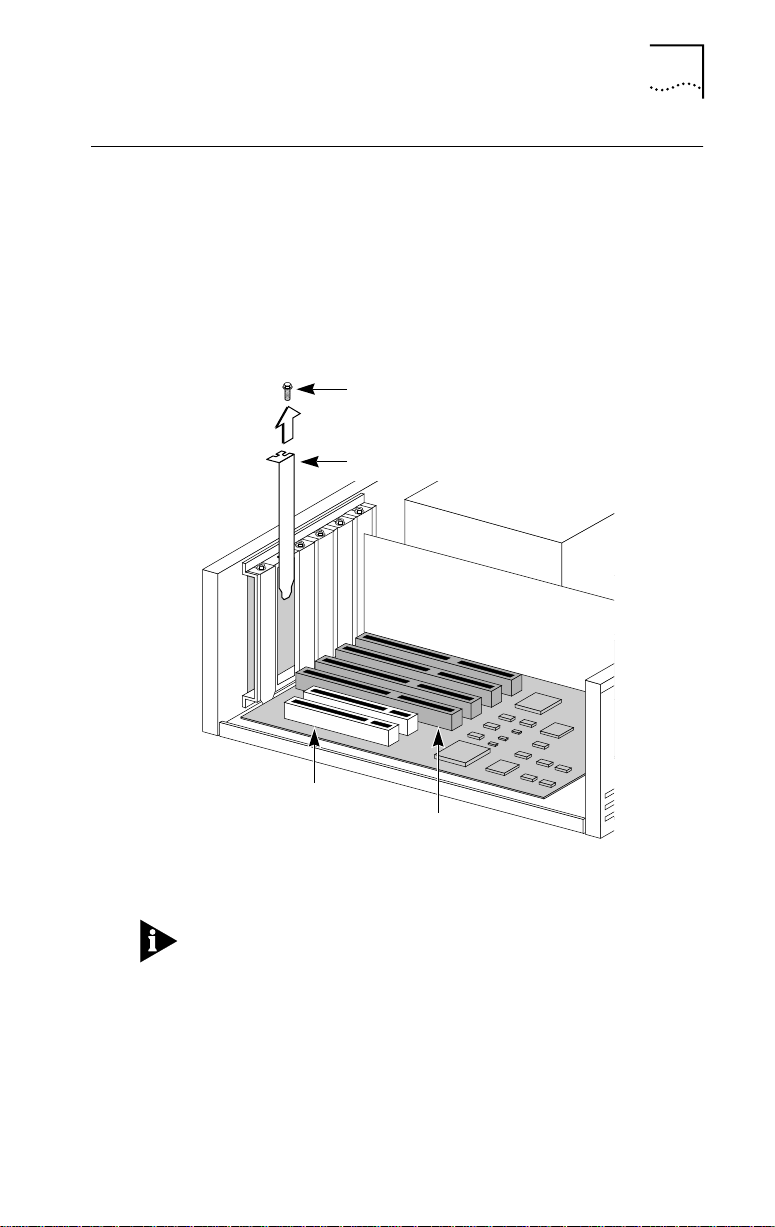
Follow these steps to insert the 3C359 NIC:
1 Remove the computer’s cover and select a PCI
expansion slot that supports bus mastering.
You can install the 3C359 NIC in either a standard bus
master 32-bit slot, as shown in Figure 2-1, or a newer bus
master 64-bit slot. If both slot types are available in your
PC, place the NIC in the 32-bit slot.
Inserting the 3C359 NIC 2-3
Mounting screw
Expansion slot cover
Figure 2-1 Removing the Expansion Slot Cover
Verify that the selected slot is a PCI bus master slot by
consulting your computer documentation, manufacturer,
or vendor.
2 Unfasten and remove the expansion slot cover
(Figure 2-1) from the selected bus master PCI slot.
Store the expansion slot cover for future use, but retain the
mounting screw for securing the NIC.
2-4 CHAPTER 2: INSTALLING THE 3C359 NIC
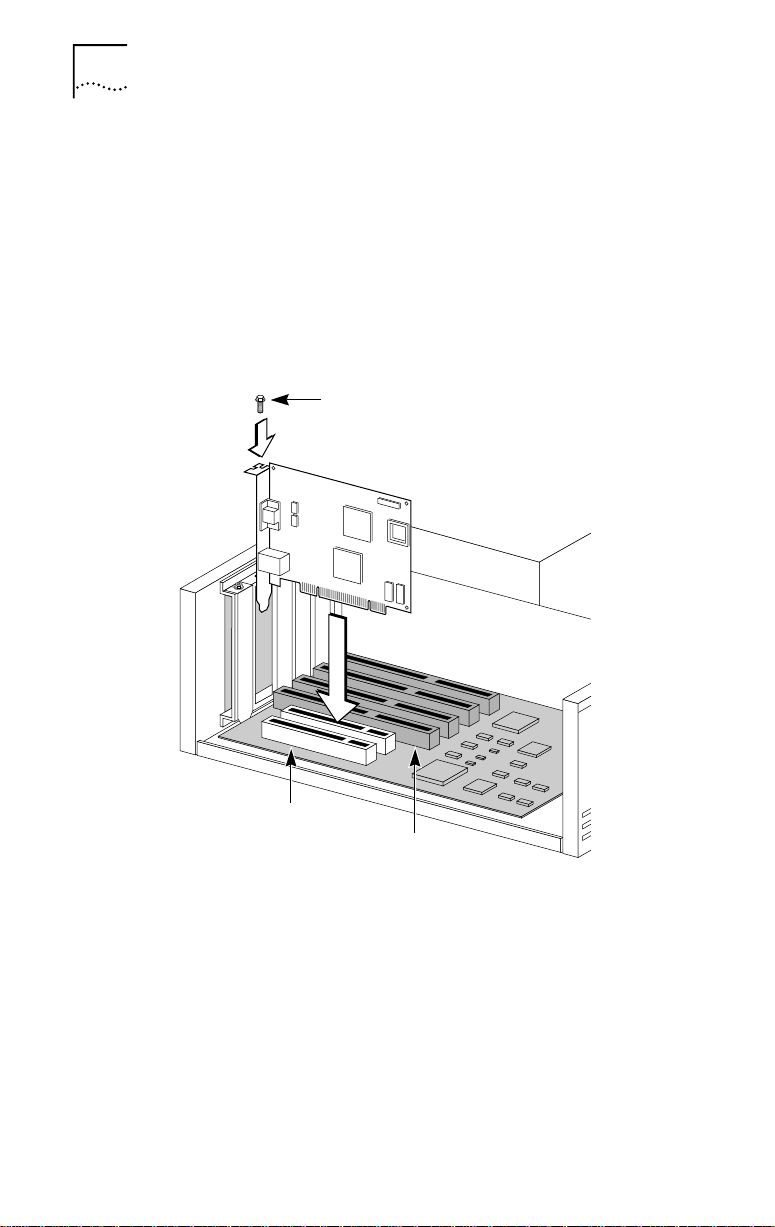
3 Insert the 3C359 NIC in an empty PCI bus master slot
and secure the mounting screw, as shown in
Figure 2-2.
Make sure the NIC is completely seated in the slot by
pushing down firmly on both ends of the NIC. When the
NIC is correctly seated, the gold connecting fingers inserted
in the slot do not show.
Note the slot number of the NIC. You may need it during
driver installation.
Mounting screw
32-bit PCI
slots
Figure 2-2 Inserting the 3C359 NIC
ISA/EISA
slots
4 Replace the unit’s cover and reconnect any cables that
you may have disconnected from other devices (see
“Safety Precautions”).
5 Turn the power on.
When power is turned on, the PCI system automatically
configures the NIC.

Inserting the 3C359 NIC 2-5
6 Connect one of the following network cable types to
the 3C359 NIC:
■ Shielded twisted-pair (STP) cable with a DB-9 connector
■ Unshielded twisted-pair (UTP) cable with an RJ-45
connector
TokenLink Velocity NICs support industry-standard
token ring Category 3, 4 or 5 UTP or types 1 or 6 STP
cabling. These cables meet IEEE 802.5 specifications. (See
Appendix A, “Specifications,” for detailed information
regarding cable requirements and connector pin
assignments for the 3C359 NIC.)
7 Connect the other end of the cable to a network dual
access unit (DAU), a multistation access unit (MAU),
controlled access unit (CAU), or a token ring switch.
The 3C359 NIC can operate in full-duplex mode when
attached to a Dedicated Token Ring (DTR)-enabled switch.
Full-duplex mode is enabled automatically.
8 Return all packing materials to the shipping container.
If it is necessary to return the 3C359 NIC to 3Com, pack it
in the original (or equivalent) packing material to maintain
the warranty.

 Loading...