


 Loading...
|
SuperStack® II Switch 3900 |
® |
Getting Started Guide |
|
http://www.3com.com/
Part No. 10005622
Published April 1998
3Com Corporation ■ 5400 Bayfront Plaza ■ |
Santa Clara, California ■ 95052-8145 |
|
Copyright © 1998, 3Com Corporation. All rights reserved. No part of this |
EMISSIONS COMPLIANCE STATEMENTS FOR CLASS A PRODUCTS |
|
documentation may be reproduced in any form or by any means or used to |
United States — Federal Communications Commission Notice |
|
make any derivative work (such as translation, transformation, or adaptation) |
||
This equipment has been tested and found to comply with the limits for a |
||
without written permission from 3Com Corporation. |
||
Class A digital device, pursuant to Part 15 of the FCC Rules. These limits |
||
|
||
3Com Corporation reserves the right to revise this documentation and to make |
are designed to provide responsible protection against harmful |
|
changes in content from time to time without obligation on the part of 3Com |
interference when the equipment is operated in a commercial environment. |
|
Corporation to provide notification of such revision or change. |
This equipment generates, uses, and can radiate radio frequency energy |
|
3Com Corporation provides this documentation without warranty of any kind, |
and, if not installed and used in accordance with the instruction manual, |
|
may cause harmful interference to radio communications. Operation of this |
||
either implied or expressed, including, but not limited to, the implied |
||
equipment in a residential area is likely to cause harmful interference, in |
||
warranties of merchantability and fitness for a particular purpose. 3Com may |
||
which case the user will be required to correct the interference at his or her |
||
make improvements or changes in the product(s) and/or the program(s) |
||
own expense. |
||
described in this documentation at any time. |
||
|
||
UNITED STATES GOVERNMENT LEGENDS |
Canada — Emissions Requirements |
|
This Class A digital apparatus meets all requirements of the Canadian |
||
|
||
If you are a United States government agency, then this documentation and |
Interference-Causing Equipment Regulations. |
|
the software described herein are provided to you subject to the following: |
Cet appareil numérique de la classe A respecte toutes les exigences du |
|
|
||
All technical data and computer software are commercial in nature and |
Règlement sur le matériel brouilleur du Canada. |
|
developed solely at private expense. Software is delivered as “Commercial |
Japan — VCCI Class A Compliance |
|
Computer Software” as defined in DFARS 252.227-7014 (June 1995) or as a |
||
|
||
“commercial item” as defined in FAR 2.101(a) and as such is provided with only |
|
|
such rights as are provided in 3Com’s standard commercial license for the |
|
|
Software. Technical data is provided with limited rights only as provided in DFAR |
|
|
252.227-7015 (Nov 1995) or FAR 52.227-14 (June 1987), whichever is |
|
|
applicable. You agree not to remove or deface any portion of any legend |
|
|
provided on any licensed program or documentation contained in, or delivered |
|
|
to you in conjunction with, this User Guide. |
|
|
|
This is a Class A product based on the standard of the Voluntary Control |
|
|
Council for Interference by Information Technology Equipment (VCCI). If |
|
|
this equipment is used in a domestic environment, radio disturbance may |
|
|
arise. When such trouble occurs, the user may be required to take |
|
|
corrective actions. |
EMC DIRECTIVE COMPLIANCE
This equipment was tested and found to conform to the Council Directive 89/336/EEC for electromagnetic compatibility. Conformity with this Directive is based upon compliance with the following harmonized standards:
EN 55022 Limits and Methods of Measurement of Radio Interference
EN 50082-1 Electromagnetic Compatibility Generic Immunity Standard: Residential, Commercial, and Light Industry
Warning: This is a Class A product. In a domestic environment, this product may cause radio interference, in which case you may be required to take adequate measures.
LOW VOLTAGE DIRECTIVE COMPLIANCE
This equipment was tested and found to conform to the Council Directive 72/23/EEC for safety of electrical equipment. Conformity with this Directive is based upon compliance with the following harmonized standard:
EN 60950 Safety of Information Technology Equipment
UK GENERAL APPROVAL STATEMENT
This equipment is manufactured to the international Safety Standard EN60950 and is approved in the UK under the General Approval Number NS/G/12345/J/100003 for indirect connection to the public telecommunication network.
AUSTRALIAN EMC FRAMEWORKS COMPLIANCE
This product conforms to the EMC Frameworks and meets the Class A limits of AS3548.
TRADEMARKS
Unless otherwise indicated, 3Com registered trademarks are registered in the United States and may or may not be registered in other countries.
3Com, the 3Com logo, SuperStack, and Transcend are registered trademarks of 3Com Corporation. 3ComFacts is a service mark of 3Com Corporation.
IBM and NetView AIX are registered trademarks of International Business Machines Corporation. Apple, AppleTalk, and Macintosh are trademarks of Apple Computer, Inc. Ultrajet is a trademark of Chemtronics. CompuServe is a registered trademark of CompuServe, Inc. MS-DOS and Windows are registered trademarks of Microsoft Corporation. HP and OpenView are registered trademarks of Hewlett-Packard Co. SunNet Manager, SunOS, and OpenWindows are trademarks of Sun Microsystems, Inc. Microswabs and Texwipe are registered trademarks of Texwipe. Liqui-Tool is a trademark of Triangle Tool Group. UNIX is a registered trademark in the United States and other countries, licensed exclusively through X/Open Company.
All other company and product names may be trademarks of the respective companies with which they are associated.

CONTENTS
ABOUT THIS GUIDE
Introduction |
1 |
|
|
|
Finding Specific Information in This Guide |
1 |
|||
Conventions |
2 |
|
|
|
SuperStack II Switch 3900 Documentation |
3 |
|||
Paper Documents |
3 |
|
|
|
Documents on CD-ROM |
4 |
|
||
Related Publications |
4 |
|
|
|
Documentation Comments |
4 |
|
||
Year 2000 Compliance |
5 |
|
|
|
1 SWITCH 3900 SYSTEM AND SETUP OVERVIEW
Switch 3900 Intelligent Switch |
1-1 |
|
|
System Overview — 24-Port Front Panel |
1-2 |
|
|
System Overview — 36-Port Front Panel |
1-3 |
|
|
System Overview — Back Panel of Both Models |
1-4 |
||
System Features and Benefits |
1-5 |
|
|
System Management 1-5 |
|
|
|
Optional Gigabit Ethernet Modules 1-6 |
|
|
|
Network Configuration Example |
1-6 |
|
|
Providing Dedicated Links for Fast Ethernet |
1-6 |
||
Network Configuration Sample |
1-7 |
|
|
2 |
INSTALLING THE SYSTEM |
|
|
|
||
|
Before You Begin |
2-1 |
|
|
|
|
|
Installing the System on a Table Top or in a Free-Standing |
|||||
|
Stack 2-2 |
|
|
|
|
|
|
Installing the System in a Distribution Rack |
2-3 |
|
|||
|
Preparing the System and Rack |
2-3 |
|
|
||
|
Mounting the System into a Distribution Rack |
2-5 |
||||
3 |
|
|
|
|
||
CABLING SWITCH 3900 PORTS |
|
|
|
|||
|
Overview of Cabling |
3-1 |
|
|
|
|
|
Fiber Safety Precautions |
3-1 |
|
|
|
|
|
Fast Ethernet Ports |
3-2 |
|
|
|
|
|
Cabling 10/100BASE-TX (RJ-45) Ports |
3-2 |
|
|||
|
10/100BASE-TX (RJ-45) Connector Pin Assignments 3-3 |
|||||
|
Gigabit Ethernet Ports |
3-4 |
|
|
|
|
|
Cabling Gigabit Ethernet Ports |
3-4 |
|
|
||
|
Cabling the Console Port |
3-5 |
|
|
|
|
|
Console Port Pin Assignments |
3-7 |
|
|
||
4 |
|
|
|
|
|
|
SYSTEM POWER UP |
|
|
|
|
||
|
Power Options 4-1 |
|
|
|
|
|
|
AC Power Cord |
4-1 |
|
|
|
|
|
Optional Advanced Redundant Power System |
4-1 |
||||
|
Optional Uninterruptible Power System |
4-1 |
|
|||

Power Up 4-2
To Power the Switch 3900 with the RPS 4-2 To Power the Switch 3900 from the Wall
Receptacle |
4-2 |
|
|
Power-up Diagnostics |
4-2 |
|
|
System Diagnostics |
4-3 |
||
Power LED Activity |
4-3 |
||
Fault LED Activity |
4-3 |
||
Ethernet Port Diagnostics |
4-3 |
||
Packet LED Activity |
4-3 |
||
Status LED Activity |
4-3 |
||
System and Port Status LEDs |
4-4 |
||
System Checks |
4-5 |
|
|
Next Step: Software Configuration 4-5
5QUICK SETUP FOR MANAGEMENT ACCESS
About Switch 3900 System Management |
5-1 |
||
How Do You Want to Manage the System? |
5-1 |
||
Terminal Connection |
5-2 |
|
|
Modem Connection |
5-2 |
|
|
IP Management Interface |
5-2 |
|
|
Initial Management Access |
|
5-2 |
|
Setting the Console Port Baud 5-3 |
|
||
Configuring the IP Interface |
5-3 |
|
|
6 TROUBLESHOOTING THE SYSTEM
Getting Additional Help |
6-1 |
|
Diagnosing Problems |
6-1 |
|
Power Failures |
6-1 |
|
Abnormal LED Activity |
6-1 |
|
Cleaning Dirty Fiber Optic Ports and Connectors 6-4
ASYSTEM SPECIFICATIONS
BSITE REQUIREMENTS AND SAFETY CODES
|
General Safety Requirements |
B-1 |
|
|||
|
Wiring Closet Recommendations |
B-1 |
|
|||
|
Distribution Rack Requirements |
|
B-2 |
|
||
|
Protective Grounding for the Rack |
B-2 |
||||
|
Space Requirements for the Rack |
B-2 |
||||
|
Mechanical Requirements for the Rack B-3 |
|||||
|
Building and Electrical Codes |
B-4 |
|
|||
|
Building Codes |
B-4 |
|
|
|
|
|
Electrical Codes |
B-5 |
|
|
|
|
C |
|
|
|
|
|
|
TECHNICAL SUPPORT |
|
|
|
|
||
|
Online Technical Services |
C-1 |
|
|
|
|
|
World Wide Web Site |
C-1 |
|
|
||
|
3Com FTP Site |
C-1 |
|
|
|
|
|
3Com Bulletin Board Service |
|
C-1 |
|
||
|
Access by Analog Modem |
C-2 |
||||
|
Access by Digital Modem |
C-2 |
|
|||
|
3ComFacts Automated Fax Service |
C-2 |
||||
|
Support from Your Network Supplier |
C-2 |
||||
|
Support from 3Com |
C-3 |
|
|
|
|
|
Returning Products for Repair |
C-4 |
|
|||
INDEX
3COM CORPORATION LIMITED WARRANTY

ABOUT THIS GUIDE
Introduction
Your SuperStack II Switch 3900 Getting Started Guide provides all the information that you need to set up your SuperStack® II Switch 3900 system and get it operating in your network. This guide provides an overview of your system and step-by-step procedures for planning your configuration, installing your system, cabling, powering up, configuring, and troubleshooting. When you are ready to configure your SuperStack II Switch 3900 system, see the Administration Guide on the Documentation CD.
If the information in the Software Installation and Release Notes that are shipped with your Switch 3900 system differs from the information in this guide, follow the instructions in the Release Notes.
This guide is intended for the system or network administrator who is responsible for installing and managing network hardware. It assumes that you have a working knowledge of local area network (LAN) operations, but it does not assume prior knowledge of 3Com’s Switch 3900 high-performance networking equipment.
Most user guides and release notes are available in Adobe Acrobat Reader Portable Document Format (PDF) or HTML on the 3Com World Wide Web site:
http://www.3com.com
Finding Specific Information in This Guide
This table shows where to find specific information.
For information on |
Turn to |
|
|
Best ways to use the Switch |
“System Features and Benefits” |
3900 system |
on page 1-5 |
The front and back panels |
“System Overview — 24-Port |
|
Front Panel” starting on page 1-2 |
Site requirements and other |
“General Safety Requirements” on |
issues to consider before |
page B-1 |
installing your Switch 3900 |
|
system |
|
Installing the system on a table or in a distribution rack
Cabling rules and pin assignments:
■Fast Ethernet ports
■Gigabit Ethernet ports
■Console port
“Installing the System on a Table Top or in a Free-Standing Stack” starting on page 2-2 and “Installing the System in a Distribution Rack” on page 2-3
“Fast Ethernet Ports” on page 3-2
“Gigabit Ethernet Ports” on page 3-4
“Cabling the Console Port” on page 3-5 and “Console Port Pin Assignments” on page 3-7
Checking system power-up |
“Power Up” on page 4-2 |
diagnostics and LEDs |
|
|
|
(continued) |
|
2 ABOUT THIS GUIDE
For information on |
Turn to |
Deciding how to manage your system
Setting the Console port baud
Configuring the IP management interface
Troubleshooting hardware and software problems
Complying with environmental and compliance specifications
Checking your site for environmental and safety considerations
Getting help from your network supplier or 3Com
“How Do You Want to Manage the System?” on page 5-1
“Setting the Console Port Baud” on page 5-3
“Configuring the IP Interface” on page 5-3
“Diagnosing Problems” on page 6-1
Appendix A: System Specifications
Appendix B: Site Requirements
and Safety Codes
Appendix C: Technical Support
Conventions
Table 1 and Table 2 list conventions that are used throughout this guide.
Table 1 Notice Icons
Icon |
Type |
Description |
|
|
|
|
Information |
Information that describes important |
|
Note |
features or instructions |
|
Caution |
Information that alerts you to potential loss |
|
|
of data or damage to an application, |
|
|
system, or device |
|
Warning |
Information that alerts you to potential |
|
|
personal injury |
|
|
|
Table 2 Text Conventions
Convention |
Description |
|
|
Screen |
This typeface represents information as it |
displays |
appears on the screen. |
|
|
Commands |
The word “command” means that you must |
|
enter the command exactly as shown and then |
|
press Return or Enter. Commands appear in |
|
bold. Example: |
|
To update the system software, enter the |
|
following command: |
system softwareUpdate
|
This guide always gives the full form of a |
|
|
command in uppercase and lowercase letters. |
|
|
However, you can abbreviate commands by |
|
|
entering the fewest letters in each command |
|
|
that identify a unique command. Commands |
|
|
are not case sensitive. |
|
|
|
|
The words |
When you see the word “enter” in this guide, |
|
“enter” |
you must type something, and then press Return |
|
and “type” |
or Enter. Do not press Return or Enter when an |
|
|
instruction simply says “type.” |
|
|
|
|
Keyboard key |
If you must press two or more keys |
|
names |
simultaneously, the key names are linked with a |
|
|
plus sign (+). Example: |
|
|
|
Press Ctrl+Alt+Del |
|
|
|
Words in italics |
Italics are used to: |
|
|
■ |
Emphasize a point. |
|
■ |
Denote a new term at the place where it is |
|
|
defined in the text. |
|
■ |
Identify menu names, menu commands, and |
|
|
software button names. Examples: |
From the Help menu, select Contents.
Click OK.

SuperStack II Switch 3900 Documentation
The following documents comprise the SuperStack II Switch 3900 documentation set. Documents are shipped with your system in one of two forms:
■Paper documents that are shipped with your system or with optional components. They are listed in the next section.
■SuperStack II 3900 and 9300 Documentation CD with online versions of the paper documents
To order a paper copy of a document that you see on the compact disc, or to order additional compact discs, contact your sales representative.
Paper Documents
These documents are shipped with your SuperStack II Switch 3900 system:
■SuperStack II Switch 3900 and 9300 Unpacking Instructions
How to unpack your Switch 3900 system. Also, an inventory list of items that are shipped with your system.
■SuperStack II Switch 3900 and 9300 Software Installation and Release Notes
All of the new features, system issues, known problems, and software corrections for the software release. It also describes any changes to the Switch 3900 system’s documentation.
SuperStack II Switch 3900 Documentation |
3 |
■SuperStack II Switch 3900 and 9300 Quick Installation Guide
How to perform a quick installation of your system. For more details on installation, see the
SuperStack II Switch 3900 Getting Started Guide.
■SuperStack II Switch 3900 Getting Started Guide
All the procedures necessary for getting your system up and running, including information on installing, cabling, powering up, configuring, and troubleshooting the system.
■SuperStack II Switch 3900 and 9300 Command Quick Reference Card
All of the Administration Console switching commands for the Switch 3900. For complete descriptions, see the Administration Guide.
These documents are shipped with optional devices:
■1000BASE-SX/1000BASE-LX Gigabit Ethernet
Module Installation Guide
How to install the optional Gigabit Ethernet module.
■SuperStack II Switch Advanced RPS User Guide
How to install the Advanced Redundant Power Supply (RPS) and how to use it to provide redundant and resilient power supplies for the Switch 3900.
■SuperStack II Switch Advanced RPS ‘Y’ Cable Type 2 User Guide
How to install the Y cable with the Advanced Redundant Power Supply (RPS) to provide fully redundant capabilities.

4 ABOUT THIS GUIDE
Documents on CD-ROM
The compact disc that comes with your system contains these documents:
■Online versions of the paper documents that are shipped with your system and its components
■SuperStack II Switch 3900 and 9300 Administration Guide
How to use the Administration Console and the management tasks that you can perform using it.
Related Publications
Depending on how you install and manage your system, several related documents can provide helpful information:
■SNMP Network Manager documents
The Switch 3900 uses SNMP (Simple Network Management Protocol), which can be accessed by a remote network management application. 3Com has network management applications for a variety of platforms. Contact your supplier for current product information. Each network management application includes a guide that explains how to manage your system.
If you are using network management software from another vendor, refer to the sections of the product’s documentation that describe how to manage SNMP devices.
■SNMP documents
3Com recommends these books for easy-to-read descriptions of SNMP:
■Marshall T. Rose. The Simple Book: An Introduction to Networking Management. Englewood Cliffs, NJ: Prentice-Hall; 1996.
■“Introduction to SNMP” Self-Study Guide. Order from 3Com: Part Number 3CS-350A.
■Telnet documents
To manage the Switch 3900 system over a TCP/IP network using telnet, see the documentation that is supplied with your telnet application.
Documentation Comments
Your suggestions are very important to us. They help us make our documentation more useful to you.
Please send e-mail comments about this guide to:
sdtechpubs_comments@3Com.com
Please include the following information when commenting:
■Document title
■Document part number (found on front or back page of document)
■Page number (if appropriate)
Example:
SuperStack II Switch 3900 Getting Started Guide
Part Number 10005622
Page 2-5 (chapter 2, page 5)
Year 2000 Compliance |
5 |
Year 2000 Compliance
For information on Year 2000 compliance and 3Com products, visit the 3Com Year 2000 Web page:
http://www.3com.com/products/yr2000.html

1 |
SWITCH 3900 SYSTEM AND SETUP OVERVIEW |
|
This chapter contains:
■An overview of 3Com’s SuperStack® II Switch 3900 and how it provides solutions for your network
■A description of the major features and components of the system
■A network configuration example
Switch 3900 Intelligent Switch
The Switch 3900 is the ideal product for network managers who want to migrate from existing switched 10 Mb networks to switched 100 Mb or who need to deliver faster access to servers.
The Switch 3900 provides superior workgroup and departmental switching performance with the added flexibility of multiple Gigabit Ethernet links and server connections.
The SuperStack II Switch 3900 family delivers full line rate, nonblocking switching between 10/100 Mb links and 1000 Mb Gigabit Ethernet links.
The Switch 3900 family consists of two models:
■3C39024 — The 24-port 10/100BASE-TX switch, with up to three Gigabit Ethernet links. See Figure 1-1.
■3C39036 — The 36-port 10/100BASE-TX switch, with up to three Gigabit Ethernet links. See Figure 1-2.
Both versions of the Switch 3900 provide:
■One built-in Gigabit Ethernet multimode fiber (MMF) link (1000BASE-SX)
■Expansion slots on the back panel (see Figure 1-3) that can hold one or two of these optional Gigabit Ethernet modules:
■Model 3C39001 — 1000BASE-SX for multimode fiber (MMF)
■Model 3C39002 — 1000BASE-LX for single-mode fiber (SMF)
The cables for all Gigabit Ethernet ports use laser transmission and have SC connectors.
See “Optional Gigabit Ethernet Modules” on page 1-6 for more information.
1-2 CHAPTER 1: SWITCH 3900 SYSTEM AND SETUP OVERVIEW
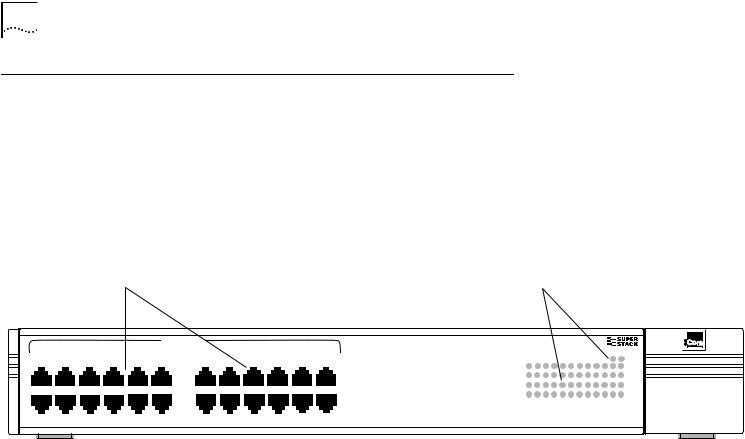
System Overview — 24-Port Front Panel
Ethernet Ports |
System and Port LEDs |
Provide 24 10/100BASE-TX |
Provide information about |
(RJ-45) Ethernet ports |
the system and each port |
|
10/100 BASE - TX |
|
|
1x |
6x |
13x |
18x |
Status
green |
= enabled, link OK |
|
flashing green |
= disabled, link OK |
Power Fault |
off |
= link fail |
|
|
|
|
|
|
|
|
|
|
|
|
|
|
|
|
1 |
2 |
3 |
4 |
5 |
6 |
7 |
8 |
9 |
10 |
11 |
12 |
Pckt |
|
|
|
|
|
|
|
|
|
|
|
|
|
|
|
1 |
2 |
3 |
4 |
5 |
6 |
7 |
8 |
9 |
10 |
11 |
12 |
Stat |
|
|
|
|
|
|
|
|
|
|
|
|
|
|
|
|
|
|
|
|
|
|
|
|
20 |
|
|
|
|
|
|
|
|
|
|
|
|
|
|
|
|
|
|
|
|
|
|
|
|
|
|
|
|
|
|
|
|
||
|
|
|
|
|
|
|
|
|
|
|
|
|
|
|
13 |
14 |
15 |
16 |
17 |
18 |
19 |
21 |
22 |
23 |
24 |
Pckt |
||
|
|
|
|
|
|
|
|
|
|
|
|
|
|
|
13 |
14 |
15 |
16 |
17 |
18 |
19 |
20 |
21 |
22 |
23 |
24 |
Stat |
|
|
|
|
|
|
|
|
|
|
|
|
|
|
|
|
|
|
|
|
|
|
|
|
|
|
|
|
|
|
|
|
|
|
|
|
|
|
|
|
|
|
|
|
|
|
|
|
|
|
|
|
|
|
|
|
|
|
|
|
|
|
|
|
|
|
|
|
|
|
|
|
|
|
|
|
|
|
|
|
|
|
|
|
|
|
|
|
7x 12x 19x 24x Super Stack II Switch 3900
Figure 1-1 Front Panel of the 24-Port SuperStack II Switch 3900

System Overview — 36-Port Front Panel |
1-3 |
System Overview — 36-Port Front Panel
v
Ethernet Ports |
System and Port LEDs |
Provide 36 10/100BASE-TX |
Provide information about |
(RJ-45) Ethernet ports |
the system and each port |
|
|
|
10/100 BASE - TX |
|
|
1x |
6x |
13x |
18x |
25x |
30x |
Status
green |
= enabled, link OK |
|
flashing green |
= disabled, link OK |
Power Fault |
off |
= link fail |
|
|
|
|
|
|
|
|
|
|
|
|
|
|
|
|
|
|
|
|
|
|
|
|
|
1 |
2 |
3 |
4 |
5 |
6 |
7 |
8 |
9 |
10 |
11 |
12 |
Pckt |
|
|
|
|
|
|
|
|
|
|
|
|
|
|
|
|
|
|
|
|
|
|
|
|
|
1 |
2 |
3 |
4 |
5 |
6 |
7 |
8 |
9 |
10 |
11 |
12 |
Stat |
||
|
|
|
|
|
|
|
|
|
|
|
|
|
|
|
|
|
|
|
|
|
|
|
|
|
|
|
|
|
|
|
|
20 |
|
|
|
|
|
|
|
|
|
|
|
|
|
|
|
|
|
|
|
|
|
|
|
|
|
|
|
|
|
|
13 |
14 |
15 |
16 |
17 |
18 |
19 |
21 |
22 |
23 |
24 |
Pckt |
|||
|
|
|
|
|
|
|
|
|
|
|
|
|
|
|
|
|
|
|
|
|
|
|
|
13 |
14 |
15 |
16 |
17 |
18 |
19 |
20 |
21 |
22 |
23 |
24 |
Stat |
||
|
|
|
|
|
|
|
|
|
|
|
|
|
|
|
|
|
|
|
|
|
|
|
|
|
|
26 |
27 |
28 |
29 |
30 |
31 |
32 |
33 |
34 |
35 |
36 |
Pckt |
|
|
|
|
|
|
|
|
|
|
|
|
|
|
|
|
|
|
|
|
|
|
|
|
|
|
25 |
|||||||||||||
|
|
|
|
|
|
|
|
|
|
|
|
|
|
|
|
|
|
|
|
|
|
|
|
25 |
26 |
27 |
28 |
29 |
30 |
31 |
32 |
33 |
34 |
35 |
36 |
Stat |
||
|
|
|
|
|
|
|
|
|
|
|
|
|
|
24x |
|
31x |
|
|
|
|
|
|
|
|
|
|
|
|
|
|
|
|
|
|
|
|||
7x |
|
|
12x |
|
19x |
|
|
|
|
|
36x |
|
Super Stack II Switch 3900 |
|
|
|
||||||||||||||||||||||
Figure 1-2 Front Panel of the 36-Port SuperStack II Switch 3900
1-4 CHAPTER 1: SWITCH 3900 SYSTEM AND SETUP OVERVIEW
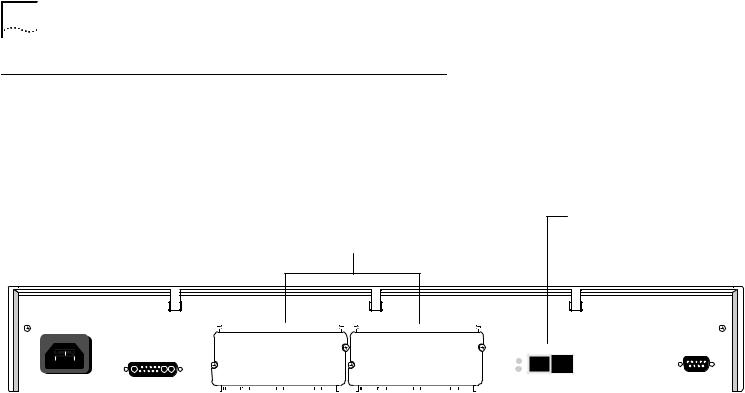
System Overview — Back Panel of Both Models
Optional Gigabit Ethernet Slots
Allow you to add additional
Gigabit Ethernet modules
Fixed Gigabit Ethernet Port
Provides a 1000BASE-SX link
|
|
|
|
|
|
|
|
|
|
|
|
|
|
|
|
|
|
|
|
|
1000 Base SX |
|
|
Console |
|
|
|
|
|
|
|
|
|
|
|
|
|
|
|
|
|
|
|
|
|
|
|
|
|
||
|
|
|
|
|
|
|
|
|
|
|
|
|
|
|
|
|
|
|
|
|
|
|
|
||
|
|
|
|
|
|
|
|
|
|
|
|
|
|
|
|
|
|
|
|
|
|
|
|
||
|
|
|
|
|
|
|
|
|
|
|
|
|
|
|
|
|
|
|
|
|
|
|
|
||
|
|
|
|
|
|
|
|
|
|
|
|
|
|
|
|
|
|
|
|
|
|
|
|
||
|
|
|
|
|
|
|
|
|
|
|
|
|
|
|
|
|
|
|
|
|
|
|
|
Pckt |
Stat |
|
|
|
|
|
|
|
|
|
|
|
|
|
|
|
|
|
|
|
|
|
|
|
|
|
|
|
|
|
|
|
|
|
|
RPS Connector |
|
|
|
|
|
|
|
|
Gigabit Ethernet Port LEDs |
|
|
|
|||||
|
|
|
|
|
|
|
|
|
|
|
|
|
|
|
|
|
|
||||||||
|
|
|
|
|
|
|
|
Connects to the Optional |
|
|
|
|
|
|
|
|
Provide information on the |
|
|
|
|||||
|
|
|
|
|
|
|
|
Redundant Power System |
|
|
|
|
|
|
|
|
port status and activity |
|
|
|
|||||
|
|
|
|
|
|
Power Receptacle |
|
|
|
|
|
|
|
|
Console Port |
|
|
|
|
||||||
|
|
|
|
|
|
|
|
|
|
|
|
|
|
|
|
|
|
||||||||
|
|
|
|
|
|
|
|
|
|
|
|
|
|
|
Allows you to connect a workstation or modem to |
|
|
|
|||||||
|
|
|
|
|
|
|
|
|
|
|
|
|
|
|
the Switch 3900 system for management access |
|
|
|
|||||||
Figure 1-3 Back Panel of the 24-Port and 36-Port SuperStack II Switch 3900

System Features and Benefits
The Switch 3900 is part of 3Com’s SuperStack family. To combine diverse technologies as your network grows, install the Switch 3900 in a SuperStack network.
Some key features of the SuperStack II Switch 3900 system:
■High-density Gigabit Ethernet and Fast Ethernet configurations
The Switch 3900 has 24 or 36 Fast Ethernet ports and up to three Gigabit Ethernet links.
■Autonegotiation support
The Switch 3900 supports 10BASE-T/100BASE-TX and full-duplex and half-duplex autonegotiation on all front panel ports.
■Multiple-link trunking for Gigabit Ethernet and Fast Ethernet links
You can choose the performance level of links between switches, even scaling beyond one Gigabit.
■IGMP Snooping
The Switch 3900 conserves the network bandwidth that is consumed by audio and video applications by keeping IP multicast traffic isolated to specific ports.
System Features and Benefits |
1-5 |
■Trunking links, Spanning Tree, and Advanced Redundant Power Supply (RPS) support
The Switch 3900 protects against cable and equipment failures with Spanning Tree Protocol and trunking links. The optional RPS protects against power interruptions for fault-tolerant networks.
■Manageability
The Switch 3900 provides full support for VLANs, Fast IP, and RMON Version 1, as well as a roving analysis port through SNMP management.
System Management
Switch 3900 systems include integrated management to provide fault tolerance and maximum network availability. This management is accessible in two ways:
■Switch 3900 Administration Console
■Standard network managers based on SNMP, such as 3Com’s Transcendware, Sun’s SunNet Manager, HP OpenView, and IBM’s NetView AIX applications

1-6 CHAPTER 1: SWITCH 3900 SYSTEM AND SETUP OVERVIEW
Optional Gigabit Ethernet Modules
The Switch 3900 back panel has two expansion slots that can hold optional Gigabit Ethernet modules. These modules are available in the following configurations:
■1000BASE-SX Module — Multimode fiber with paired SC connectors. It supports links of up to 260 meters (852 feet) over 62.5-micron multimode fiber or up to 525 meters (1722 feet) over 50-micron multimode fiber.
■1000BASE-LX Module — Single-mode fiber with paired SC connectors. It supports links of up to 3.0 kilometers (1.86 miles) over 8-micron to 10-micron single-mode fiber.
The modules have the same physical configuration and are installed in the same way.
For more information about installing and using the optional Gigabit Ethernet modules, see the
1000BASE-SX/1000BASE-LX Gigabit Ethernet Module Installation Guide that is on the Documentation CD and shipped with either module.
Network Configuration Example
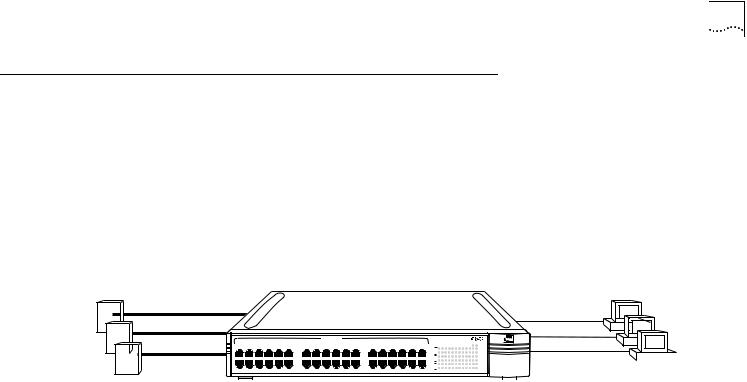
This section describes one way to place the Switch 3900 in your network to alleviate traffic congestion.
Providing Dedicated Links for Fast Ethernet
The rapid deployment of Fast Ethernet has increased bandwidth demand many times over, not only by supporting 100 Mb connections on the network but also by placing demands on the servers to manage the traffic coming through those connections.
Figure 1-4 shows how the Switch 3900 provides direct 100 Mb links to devices on the network through its Fast Ethernet ports and up to three dedicated Gigabit links to your network’s servers.
In this sample configuration, the Switch 3900 can provide up to 36 clients on your network with a dedicated 100 Mb link and can multiplex the client traffic for Gigabit-speed access to the servers. (You can use one port on the Switch 3900 for in-band management as well as for network traffic.)
Network Configuration Sample |
1-7 |
Network Configuration Sample
Switched Gigabit |
Switched 100 Mb |
|||||||||||||
server farm |
desktop systems |
|||||||||||||
|
|
|
|
|
|
|
|
|
|
|
|
|
|
|
|
|
|
|
|
|
|
|
|
|
|
|
|
|
|
|
|
|
|
|
|
|
|
|
|
|
|
|
|
|
|
|
|
|
|
|
|
|
|
|
|
|
|
|
|
|
|
|
|
|
|
|
|
|
|
|
|
|
|
|
|
|
|
|
|
|
|
|
|
|
|
|
|
|
|
|
|
|
|
|
|
|
|
|
|
|
|
|
|
|
|
|
|
|
|
|
|
|
|
|
|
|
|
|
|
|
|
|
|
|
|
|
|
|
|
|
|
|
|
|
|
|
|
|
|
|
|
|
|
|
|
|
|
|
|
|
|
|
|
|
|
|
|
|
|
|
|
|
|
|
|
|
|
|
|
|
|
|
|
|
|
|
|
|
|
|
|
|
|
|
|
|
|
|
|
|
|
|
|
|
|
|
|
|
|
|
|
|
|
|
|
|
|
10/100 BASE - TX |
|
|
|
|
|
|
|
|
green |
Status |
= enabled, link OK |
|
|
|
|
|
|
|
|
|
|
|
|
|
||||||||
|
|
|
|
|
|
|
|
|
|
|
|
|
|
|
|
|
|
|
|
|
|
|
|
|
flashing green |
= disabled, link OK |
Power |
Fault |
|
|
|
|
|
|
|||||||||||
|
|
|
|
|
|
|
|
|
|
|
|
|
|
|
|
|
|
|
|
|
|
|
|
|
off |
|
|
= link fail |
|
|
|
|
|
|
|
|
|
||||||||
|
|
|
|
1x |
|
|
6x |
|
13x |
|
|
|
18x |
|
25x |
|
|
30x |
2 |
3 |
4 |
5 |
6 |
7 |
8 |
9 |
10 |
11 |
12 |
Pckt |
|
|
|
|
|
|
|||||||||
|
|
|
|
|
|
|
|
|
|
|
|
|
|
|
|
|
|
|
|||||||||||||||||||||||||||
|
|
|
|
|
|
|
|
|
|
|
|
|
|
|
|
|
|
|
|
|
|
|
|
|
1 |
|
|
|
|
|
|
||||||||||||||
|
|
|
|
|
|
|
|
|
|
|
|
|
|
|
|
|
|
|
|
|
|
|
|
|
1 |
2 |
3 |
4 |
5 |
6 |
7 |
8 |
9 |
10 |
11 |
12 |
Stat |
|
|
|
|
|
|
||
|
|
|
|
|
|
|
|
|
|
|
|
|
|
|
|
|
|
|
|
|
|
|
|
|
13 |
14 |
15 |
16 |
17 |
18 |
19 |
20 |
21 |
22 |
23 |
24 |
Pckt |
|
|
|
|
|
|
||
|
|
|
|
|
|
|
|
|
|
|
|
|
|
|
|
|
|
|
|
|
|
|
|
|
13 |
14 |
15 |
16 |
17 |
18 |
19 |
20 |
21 |
22 |
23 |
24 |
Stat |
|
|
|
|
|
|
||
|
|
|
|
|
|
|
|
|
|
|
|
|
|
|
|
|
|
|
|
|
|
|
|
|
25 |
26 |
27 |
28 |
29 |
30 |
31 |
32 |
33 |
34 |
35 |
36 |
Pckt |
|
|
|
|
|
|
||
|
|
|
|
|
|
|
|
|
|
|
|
|
|
|
|
|
|
|
|
|
|
|
|
|
25 |
26 |
27 |
28 |
29 |
30 |
31 |
32 |
33 |
34 |
35 |
36 |
Stat |
|
|
|
|
|
|
||
|
|
|
7x |
|
|
12x |
|
19x |
|
|
|
24x |
|
31x |
|
|
36x |
|
Super Stack II Switch 3900 |
|
|
|
|
|
|
|
|
|
|
|
|||||||||||||||
|
|
|
|
|
|
|
|
|
|
|
|
|
|
|
|
|
|
|
|
|
|
|
|
|
|
|
|
|
|
|
|
|
|
|
|
|
|
|
|
|
|
|
|
|
|
36-Port SuperStack® II Switch 3900
Figure 1-4 SuperStack II Switch 3900 Provides Dedicated Fast Ethernet Links
Loading...