


 Loading...
NSR-ORA V3.2
Database Adapter Module for NetWorker
Edition October 2001
Copyright and Trademarks
Copyright © Fujitsu Siemens Computers GmbH 2001.
All rights reserved.
Delivery subject to availability; right of technical modifications reserved.
All hardware and software names used are trademarks of their respective manufacturers.
This manual was produced by
cognitas. Gesellschaft für Technik-Dokumentation mbH www.cognitas.de

1 Preface
This guide provides information about how to install, configure and operate the “NetWorker Save and Restore for ORAcle (NSR-ORA)” V3.2 NetWorker component.
1.1Audience
The information in this guide is intended for system and database administrators.
1.2Conventions
This manual uses the following typographical conventions and symbols to make information easier to access and understand.
boldface
fixed-width
fixed width, boldface
italic
!
i
Indicates emphasized words, e.g.:
Using Oracle 8 be always careful for every instance being offline or online!
Examples and information displayed on the screen, window titles, names of buttons, menues, fields for input or output, scroll lists. For example:
Click on the Cancel button to close the Help window.
Commands, text and other input you type exactly as shown, e.g.:
sh> start_amon.sh start ora
Directory pathnames, names of files, parameters, commands and machines, or new terms defined in the glossary or within the chapter, e.g.:
The SQLDBA parameter contains the pathname of sqldba, svrmgrl or sqlplus.
This Symbol is used to indicate and cautionary notes that e.g. prevent you form making a mistake
This Symbol indicates important information.
System Administrator’s Guide |
U42252-J-Z915-1-76 |

Preface |
What is New in Release 3.2 |
1.3What is New in Release 3.2
With release V3.2 a number of changes have been made to NSR-ORA, influencing this guide:
●NSR-ORA V3.2 does now support Oracle 8.x or 9i
●Version 9 of the Oracle database does not include the SVRMGRL command any more. So NSR-ORA now uses the command stored in the SQLDBA variable to communicate with the database. However, functionality of NSR-ORA has not been changed.
●NSR-ORA V3.2 now supports the backup on Network Attached Storage filers (NAS filers) by NetworkAppliance® (NetApp). Furthermore NetWorker supports backups performed directly onto a NetApp filer by using snapshots (for further information see chapter “Using NSR-ORA with NetApp Filers”).
●The configure_nsrora configuration skript provides some new parameters, described in section “Configuration” .
●The NetWorker V6.0 software provided by Fujitsu Siemens Computers now comes with two new algorithms for compression. Using these new compression modes causes in part a considerable improvement of compression rates and simultaneously reduces CPU load. This feature is only supported bei Fujitsu Siemens Computers NetWorker for Solaris and LINUX.
1.4Update from Previous Releases
If you want to update NSR-ORA from a previous release you will find the necessary information in section “How to Proceed for an Update from an Earlier Version” .
System Administrator’s Guide |
U42252-J-Z915-1-76 |

2 Introduction
This guide to Backing up and Restoring a Database describes the functionality, installation, configuration and adminstration of the NetWorker component “NetWorker Save and Restore for ORAcle (NSR-ORA)” V3.2. This software component allows to integrate ORACLE databases into the Networker data backup concept.
NetWorker is intended for automatic data backup in heterogeneous networks. Among its advantages are the large number of supported backup media and simple user prompting in spite of the wide range of functions. However, the backup of database files with NetWorker is only possible offline. Where a database needs to be recovered, NetWorker can restore the faulty files and return the database to a consistent, updated status, although additional steps need to be performed with ORACLE tools.
NSR-ORA closes the gap between NetWorker and ORACLE as it can communicate with both of them. It can be used to back up ORACLE databases online or offline. Backup is possible in normal and compressed modes. Whether the database is located in a Unix file system or on raw devices is immaterial. When using NetApp NAS filers the database can be backed up on tapes and also as a snapshot on the NAS filer directly. The database (thus also NSR-ORA) and the NetWorker server need not be installed on the same computer; database backup is also possible from NetWorker clients.
NSR-ORA enables you to initiate the recovery of an inconsistent database to a specific second automatically. NSR-ORA automatically checks the status of the database and commences the required restore and recovery measures to restore the current status. This means that you can perform a database recovery at any time even without any knowledge of ORACLE (you will find further information about recovery in the chapter “Recovery”).
For a better understanding of the database interface, the fundamental ORACLE database terms are described briefly below:
●The physical database structure
●The logical database structure
●The database backup
●Archive mode of the database.
System Administrator’s Guide |
U42252-J-Z915-1-76 |
Introduction |
The Physical Database Structure |
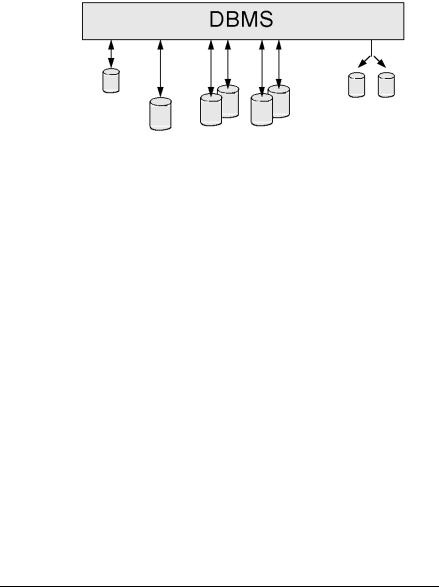
2.1The Physical Database Structure
The physical database (see figure 1) consists of at least one control file, one parameter file, at least two redolog files and at least one database file.
control file
redolog files
database file
configuration file
Figure 1: The physical database structure
●The database file(s) contain the data dictionary as well as the actual user data (tables, indices, views etc.).
●The redolog files contain information on database recovery. They instantly record any change made regarding the database. A database always possesses at least two redolog files which are written cyclically.
●The control file(s) contain structural and management information.
●In the configuration file specifies the configuration of a database.
A database also possesses suitable programs (executables), which ensure its functionality and form the Database Management System (DBMS).
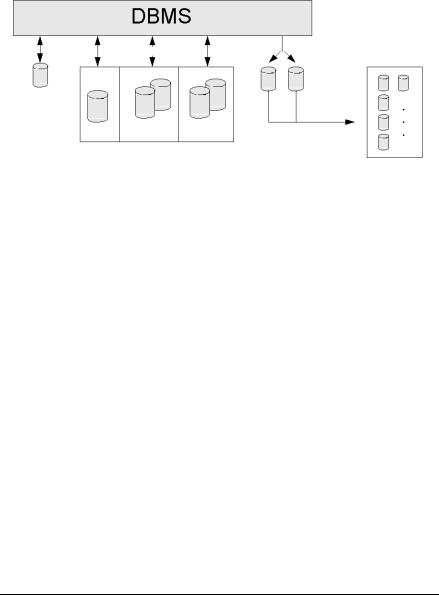
2.2The Logical Database Structure
At the logical level (see figure 2), ORACLE only recognizes tablespaces (data- base-specific, user-defined and temporary) consisting of at least one physical database file. This tablespace structure also constitutes a backup unit for NSRORA. The allocation between tablespaces and the corresponding files is performed by NSR-ORA.
System Administrator’s Guide |
U42252-J-Z915-1-76 |

Introduction |
The Database Backup |
||
|
|
|
|
database files
control file |
redolog files |
|
|
SYSTEM USER |
TEMP |
Tablespaces |
|
Figure 2: Logical database structure |
|
2.3The Database Backup
Every recovery procedure depends on a correctly performed database backup, which consists of copies of the database files being made at operating system level and transferred to an external storage medium or created as a NAS snapshot. These copies depict a state that is not identical to the current one.
In the case of one or more database files being lost, the backup copies serve as the starting time for a required recovery. During any recovery, all redolog files accruing since the backup are reapplied, thus updating from the backup to the current status.
2.4Archive Mode of the Database
To ensure that all the redolog files accruing since the backup are available, the database must be operated in ARCHIVELOG mode, which makes sure that redolog files are not overwritten unless they have first been archived on a separate disk area (archive directory) by ORACLE’s archiving function (see figure 3).
System Administrator’s Guide |
U42252-J-Z915-1-76 |
Introduction |
Archive Mode of the Database |
NSR-ORA checks that the database is in ARCHIVELOG mode, and will abort the backup of the database if this is not the case if an online backup is to be carried out. An offline backup can be performed even if the database is not in ARCHIVELOG mode.
archive directory
database files |
Oracles |
|
|
|
archiving |
control file |
process |
|
|
|
redolog files |
SYSTEM USER |
TEMP |
Tablespaces
Figure 3: Database running in ARCHIVELOG mode
The database system deals only with archiving, it does not provide for the subsequent management of the redolog files. The database will come to a halt as soon as the archive directory is full. NSR-ORA therefore contains a module which monitors the archiving process, the archiving monitor amon. At regular time intervals, the daemon of the archiving monitor transfers the redolog files archived by ORACLE to external backup media.
To make a full database backup, all file types must be included in the saving procedure.
Both the control file and the database programs (executables) can be backed up using standard NetWorker functions (i.e. without NSR-ORA).
For securing the database files, NSR-ORA supports full backup as well as restoration and recovery of the database by reapplying the redolog files.
For a backup, a correlation is first made between tablespaces and database files. In this manner, the logical tablespace concept of the database is mapped onto a physical structure, and the database files are then backed up. In the case of an online backup, the ORACLE-specific commands begin backup and end backup are included.
When a recovery is required, shutdown of the database is followed by a crash analysis. If a database file has been lost, the required backup files are first restored from the backup medium. The recovery of the database is subsequently commenced; this involves reapplying the appropriate redolog files. If
System Administrator’s Guide |
U42252-J-Z915-1-76 |

Introduction |
Function Scope |
these redolog files had already been saved on the backup medium by the archiving monitor and then automatically deleted, they will be read in again and reapplied until the database is up to date. The database is then opened and is again ready for normal operation. The recovery is triggered by the ora_recut and nsrora_rec commands and proceeds automatically; a knowledge of ORACLE is not necessarily required for this (see also chapter “Recovery”).
2.5Function Scope
Physical faults that bring normal database operation to a halt basically fall into the following four categories:
●loss of a (all) control file(s)
●loss of a current online redolog file
●loss of files containing system data
●loss of files containing user data.
As a rule, the loss of a control file does not pose major problems because the control file can be mirrored at the software level using the control_files parameter in the ORACLE parameter file init<ORACLE_SID>.ora. ORACLE strongly recommends saving at least two copies of the control file on different disks. We agree with this recommendation.
The loss of a current online redolog file is also precluded almost completely by mirroring (at the software level by ORACLE or at the hardware level by mirror disks).
!and loss of current online redolog files) is taken into account during an automatic recovery of the database. Only in recovery until time with ora_recut is the relevant control file also recovered. Nor is NSR-ORA in a
position to recognize or correct logical database errors (for instance, if incorrect files are loaded into the database).For this reason, neither of these fault categories (loss of the control file
The ORACLE Administrator Guide explains what you can do if you should lose the control file and/or a number of redolog files. You can also refer to the chapter “Recovery” of this manual, which describes the restrictions that apply to automatic recovery for ORACLE Parallel Server (OPS) systems.
In the other two cases (loss of files containing system or user data), NSR-ORA offers various ways of recovering the data: fully automatic or manual recovery or restore of a specific database level (recovery until time).
System Administrator’s Guide |
U42252-J-Z915-1-76 |

3 The individual Components
The individual components for backing up and recovering an ORACLE database in a NetWorker environment are described in the following section. Four different areas are dealt with:
●The archiving monitor
●The backup component
●The recovery component
●The overall configuration
Each section starts with a functional description. This is followed by an explanation of the required configuration steps, after which the procedure and operations are illustrated with the help of practical examples. Two configuration tools are provided for your convenience: configure_nsrora and configure_networker.
The installation and configuration of NSR-ORA and the two configuration tools are dealt with in chapter “Installation and Configuration”. We recommend you to read through chapter “Introduction” before you start carrying out the installation and configuration described in chapter “Installation and Configuration”.
3.1The Archiving Monitor
During the operation of an ORACLE database, the online redolog files are archived by the database system in an archive directory to protect the database from data losses. For this, the database must be in ARCHIVELOG mode (“Automatic archival ENABLED”). However, the database system is not responsible for the subsequent management of the offline redolog files created in this manner. If the archive directory becomes full, your database will come to a halt. This administrative gap is bridged by the archiving monitor (amon) (see figure 4).
System Administrator’s Guide |
U42252-J-Z915-1-76 |
The individual Components |
The Archiving Monitor |
|
DBMS |
|
|
|
database files |
|
Oracle’s |
|
|
|
|
|
|
|
|
|
|
archiving |
|
control file |
|
|
process |
|
|
|
|
|
|
SYSTEM |
USER |
TEMP |
redolog files |
Treshold |
|
Tablespaces |
|
|
value |
|
|
|
|
archive |
|
|
|
|
directory |
Database interface NSR-ORA |
|
|
||
|
Archiving |
|
|
|
|
monitor |
|
|
|
Volume management |
|
|
|
|
Volume pool management |
|
|
||
Multiplexing |
|
|
|
|
Jukebox support |
|
|
|
|
Tape library |
|
|
|
|
Figure 4: The archiving monitor
The archiving monitor amon has the task of permanently and regularly monitoring and backing up the offline redolog files, which accrue in the archive directory. Once the configurable number of archived redolog files has been reached (the threshold value is specified by AMON_MAX_LOGS), the archiving monitor daemon initiates a backup and then deletes the accrued files. It retains a number of the newest redolog files, specifically the number given by the value of AMON_MIN_LOGS. The daemon checks at predefined intervals (specified by the parameter AMON_INTERVALL) whether the specified threshold value has been exceeded, and checks this again at the end of each backup.
i |
On OPS systems the archiving monitor amon is used on every OPS node, |
|
so we recommend to use the same pathnames to the redolog files on |
|
|
|
every node. |
System Administrator’s Guide |
U42252-J-Z915-1-76 |

The individual Components |
The Archiving Monitor |
3.1.1Starting and Ending the Archiving Monitor
A control program start_amon.sh is provided in the directory ${NSR_INST}/oracle/bin for coordinating the activities of the archiving monitor. This program can be invoked at operating system level with the relevant parameters (start, status, stop).
start_amon.sh [-t {nsr|emc}] <command> [<ORACLE_SID> ...]
The -t option is required if NSR-ORA (nsr) and NSR-ORA-EMC (emc) are installed on one machine, so that it is possible to distinguish which archiving monitor is to be started.
If ORACLE_SID is not specified, the environment variable $ORACLE_SID is evaluated. If this variable is not set, amon is started for all configured ORACLE instances; otherwise only for the specified ORACLE_SIDs.
The following commands are available:
start |
Starts the archiving monitor |
stop |
Stops the archiving monitor |
status |
Status inquiry |
The start command is used to start the archiving monitor. This requires the database to be in ARCHIVELOG mode.
The configuration file dbo${ORACLE_SID}.init is then read out and the archiving monitor (amon daemon) is started. All important events are recorded in a protocol file located in the directory ${DBO_CONFIG_DIRECTORY}/prot.
The stop command deactivates the archiving monitor.
The status check status shows, among other things, the following information:
●the time the archiving monitor is activated
●the database to be monitored
●the archive directory
●the maximum number of offline redolog files
●the current number of offline redolog files
Example:
The following entries are assumed in the configuration file in this example:
NSR_SERVER=psi
DBO_CONFIG_DIRECTORY=/nsr/oracle/ora
System Administrator’s Guide |
U42252-J-Z915-1-76 |

The individual Components |
The Archiving Monitor |
AMON_GROUP=amon_ora_psi
AMON_MAX_LOGS=4
AMON_INTERVALL=1800
AMON_MIRROR_GROUP=amon2_ora_psi
AMON_MIRROR_SERVER=psi
With these prerequisites fulfilled, the user can start the archiving monitor:
sh> start_amon.sh start ora
ORACLE_SIDs : ora
start amon for oracle instance ora ...
A subsequent status enquiry generates the following output:
# start_amon.sh status ora
ORACLE_SIDs : ora
Configuration and Status summary of amon at 15.09.00 (11:30:41):
System |
: psi |
Database |
: ora |
Networker Server |
: psi |
Save Group |
: amon_ora_psi |
Mirror Server |
: psi |
Mirror Group |
: amon2_ora_psi |
User |
: root |
Protocol File |
: /nsr/oracle/ora/prot/amon.prot |
Networker Directory |
: /opt/nsr |
Archive Directory |
: /home/oracle/dbs |
Archive Format |
: arch |
Interval (seconds) |
: 1800 |
Maximum # of Logs |
: 4 |
Actual # of Logs |
: 2 |
daemon is up since |
: 13.09.00 (15:15:00) |
If the archiving monitor is inactive, the following display appears:
sh> start_amon.sh status ora
amon is down at 14:46:54 on 13.09.00
If the functions of the archiving monitor are temporarily not required (e.g. if the database is shut down, a recovery is carried out, or a change is made to the archive directory), it can be deactivated:
sh> start_amon.sh stop ora
ORACLE_SIDs : ora
stop amon for oracle instance ora ...
System Administrator’s Guide |
U42252-J-Z915-1-76 |

The individual Components |
The Archiving Monitor |
3.1.2Logging
While the archiving monitor is active, the occupancy level of the archive directory and other important events are logged at regular intervals (AMON_INTERVALL) in the protocol file ${DBO_CONFIG_DIRECTORY}/prot/redologs/amon.prot.
Protocol file
There are four generations of the protocol file. The current protocol file is appended to the file amon<sid>.old with each restart. If this file exceeds a size of 5 Mbytes, it is renamed from amon<sid>.002 to amon<sid>.003 and amon<sid>.old is changed to amon<sid>.002.
Archiving log file
All of the files backed up by the archiving monitor are logged in the /nsr/oracle/<ORACLE_SID>/prot/save_logfiles file. There are four generations of this file. With each restart, the file is appended to save_logfiles.old, if it does not exceed 1 Mbyte as a result. Were this size to be exceeded, save_logfiles.old is renamed save_logfiles.002 and the current file is renamed save_logfiles.old.
The following is a representative sample from the log file:
00-05-08:16:51:59: Amon Instanz /opt/networker/oracle/bin/amon
(26293) startet ============================
00-05-08:16:51:59: INFO: NSR_SERVER <psi> 00-05-08:16:51:59: INFO: Variable CONTR_SERVER set to <psi> 00-05-08:16:51:59: INFO: Amon Group name set to <amonorapsi> 00-05-08:16:51:59: INFO: AMON_MAX_LOGS <5> 00-05-08:16:51:59: INFO: AMON_MIN_LOGS <1> 00-05-08:16:51:59: INFO: AMON_INTERVAL <1800> 00-05-08:16:51:59: INFO: mail user <root>
00-05-08:16:51:59: INFO: amon_watch_dog_cmd </usr/bin/mailx -s ’Redologs not saved in 900 seconds’ root>
00-05-08:16:51:59: INFO: AMON_WATCH_DELAY <900>
00-05-08:16:51:59: INFO: AMON_SAVE_ARG_NR <50>
00-05-08:16:51:59: INFO: AMON_PS_FILE </nsr/oracle/ora/tmp/amon.ps> 00-05-08:16:51:59: INFO: AMON_RM_WITHOUT_MIRROR_DELAY <0> 00-05-08:16:52:00: INFO: forked expect proc <26301>
00-05-08:16:52:00: ARCHIVE_DIR=/oradb/db734/ora/saparch 00-05-08:16:52:01: ARCHIVE_FORMAT=oraarch%t_%s.dbf 00-05-08:16:52:01: AMON_EXP_TIME=
00-05-08:16:52:01: forked got process nr 26309
00-05-08:16:52:01: INFO: PS_FILE </nsr/oracle/ora/tmp/amon.ps> 00-05-08:16:52:01: INFO: checking Nr of Redologs 00-05-08:16:52:01: /oradb/db734/ora/saparch
00-05-08:16:52:01: DEBUG:oraarch1_42.dbf 01/11/00 14:55:59 s: 0 m: 0
System Administrator’s Guide |
U42252-J-Z915-1-76 |

The individual Components The Backup Component
......
00-05-08:16:52:01: DEBUG:oraarch1_54.dbf 01/21/00 13:13:15 s: 0 m: 0
00-05-08:16:52:01: DEBUG: Print |
of a save_cmd: |
|
/opt/networker/bin/save |
-i -l full -g amonorapsi -s psi |
|
00-05-08:16:52:01: |
oraarch1_42.dbf oraarch1_43.dbf |
|
oraarch1_45.dbf oraarch1_44.dbf |
oraarch1_46.dbf oraarch1_47.dbf |
|
oraarch1_48.dbf oraarch1_49.dbf |
oraarch1_50.dbf oraarch1_51.dbf |
|
oraarch1_52.dbf oraarch1_53.dbf |
oraarch1_54.dbf. |
|
3.2The Backup Component
The backup component of NSR-ORA allows the online as well as offline full or partial backup of an ORACLE database within an archiving process. (see figure 5). In case of an online backup, the database must be in the ARCHIVELOG mode. The extent of an archiving process is defined by means of a configurable file structure in the directory $DBO_CONFIG_DIRECTORY of the NSR-ORA administrator (refer to the section “Configuration and management”).
i |
In the case of Oracle 8.0 backups, the Oracle shared libraries ibclm.so, |
|
libclntsh.so and libmipc.so must be linked to /usr/lib. Where Oracle is used |
|
|
|
with 64-bit support, these libraries must be linked accordingly to |
|
/usr/lib64s. |
|
When backing up Oracle 8.1 under Linux, the Oracle shared libraries |
|
libjox8.so, libskgxp8.so and libclntsh.so.8.0 must be linked to /usr/lib. This is |
|
the only way that data backup is possible with NSR-ORA. |
System Administrator’s Guide |
U42252-J-Z915-1-76 |

The individual Components |
The Backup Component |
|
DBMS |
|
|
|
database files |
|
Oracle’s |
|
|
|
|
|
|
|
|
|
|
archiving |
|
control file |
|
|
process |
|
|
|
|
|
|
SYSTEM |
USER |
TEMP |
redolog files |
Treshold |
|
Tablespaces |
|
|
value |
|
|
|
|
archive |
|
|
|
|
directory |
Database interface NSR-ORA |
|
|
||
Backup |
Archiving |
|
|
|
component |
monitor |
|
|
|
NetWorker user interface |
|
|
||
Volume management |
|
|
|
|
Volume pool management |
|
|
||
Multiplexing |
|
|
|
|
Jukebox support |
|
|
|
|
Tape library |
|
|
|
|
Figure 5: The backup component
3.2.1Offline Backup of the Database
configure_nsrora and configure_networker can be used, if required, to create a new client and a new group called OFFLINE<oracle_sid><client>. If this client is backed up, an offline backup is performed, i.e. the database is shut down before the backup and then rebooted after the backup.
Furthermore, an offline backup of the database is performed whenever the database is closed at the time of the backup. This procedure consists of the following phases:
System Administrator’s Guide |
U42252-J-Z915-1-76 |

The individual Components |
The Backup Component |
1.The database is started up briefly to determine the database files allocated to a tablespace. Normally, several tablespaces are backed up during an archiving process.
2.The database is closed.
3.All the database files of a tablespace are backed up, irrespective of whether system files or raw devices are involved.
!receive an error message at the end of the backup if the database was started up in the meantime.
If you want to back up a database that is currently online under OPS, and
!the instance that is to be used for the backup is offline, that instance can only be started automatically under Oracle 7 and an online backup will be carried out instead. You may get an inconsistent backup under Oracle
8. You should therefore always note under Oracle 8 before the backup that all instances are either offline or online!The database must not be started up during an offline backup! You will
If you use the default configuration described in Chapter 4, a copy of the control file is also made every day, and - when you carry out an offline backup - the online redolog files are also backed up.
Please note that the database is started up briefly once in the course of an offline backup, in order to request the paths to the database files and the raw devices. This alters the time-stamps on the database files and the control file. It follows that the state of the database after an offline backup will not be identical to its state before the backup.
If you want to make a snapshot of your database so that you can exactly recreate its current state at some later time, we recommend you use one of the following two procedures, which are carried out while the database is stopped:
1.Back up all the tablespaces, the online redolog files and the control file directly, using NetWorker (i.e. without using NSR-ORA). You will need to know all the necessary pathnames in order to do this.
2.Then carry out the backup using NSR-ORA and the save set
/nsr/oracle/$ORACLE_SID/${ORACLE_SID}_full_save. This ensures that the control file and redolog files are only backed up after the tablespaces, so that the time-stamps of the control file will be as expected by ORACLE.
System Administrator’s Guide |
U42252-J-Z915-1-76 |

The individual Components |
The Backup Component |
3.2.2Online Backup of the Database
An online backup of the database is performed whenever the database is open at the time of the backup. In contrast to offline backups, the following phases are carried out:
1.All database files allocated to a tablespace are determined.
2.Backup is commenced with the ORACLE-specific command alter tablespace <tablespacename> begin backup.
3.All database files of this tablespace are backed up, irrespective of whether they are system files or raw devices.
4.Completion of the backup is indicated to the database system with the command alter tablespace <tablespacename> end backup.
3.2.3Configuration and management
The configuration file dbo${ORACLE_SID}.init, which must be located in the directory ${DBO_CONFIG_DIRECTORY}/config, can be used to determine certain characteristics of the backup component. The following representation shows the parameters which are relevant to the backup component and located in the dbo${ORACLE_SID}.init configuration file (a model file named dbo.init is stored in the directory $NSR_INST/oracle/config). This configuration file is created automatically using the program configure_nsrora (see also the chapter “Installation and Configuration”).
The backup_TS_on_different_clients configuration file allows to split a backup among different NetWorker servers; when using ORACLE Parallel Server (OPS) also among different NetWorker clients.
To enable this feature, the file backup_TS_on_different_clients must be created in the /nsr/oracle/$ORACLE_SID/config direcory. If the file does not exist, NSR-ORA behaves as usual. You can find an example of such a configuration file in the
/opt/nsr/oracle/config directory (for HP-UX: /opt/networker/oracle/config). The entries also are described there in detail.
!If you split a backup, Recover until Time is not possible any more.
System Administrator’s Guide |
U42252-J-Z915-1-76 |

The individual Components |
The Backup Component |
3.2.4Checking backups (troubleshooting)
If an error occurs when backing up the database or if one of the backup processes does not end cleanly, the entire database backup is aborted and all tablespaces are reset to the status NoSave.
You can check whether a backup has been completed successfully by examining the protocol files (*.prot) which are located in the directory
/nrs/oracle/${ORACLE_SID}/prot and its subdirectories.
Log files from local backups (not for NAS filers)
This file directory contains two protocol files:
●In the file save_history you will find an overview of the backups that have been carried out. For each backup of a tablespace or redolog file, it contains a record of the date and time, the name of the backed up tablespace or redolog, whether the backup was online or offline and the result of the backup. You should examine this file regularly to check that backing up the redolog files is being performed correctly.
●The file actual_saves_of_tablespaces contains the output of the shell script saveinfo.sh from the most recent tablespace backup (see below). When you evaluate this file, note the date of the backup. It always shows the most recently completed backup, even if this was some time ago.
! If there are error messages in this file (or in the output from saveinfo.sh) you should first check the individual protocol files, which are described below; this will often give you more information about the encountered error.
In the NetWorker windows you will find information about any problem which NetWorker encountered while backing up the tablespaces or redolog files, e.g. problem regarding access to tapes or devices.
If you encounter an error that is related to ORACLE you should also check your database.
The subdirectory tablespaces contains a protocol file for each backed up tablespace. These files have names of the form save_${ORACLE_SID}_${TS}.prot, where ${TS} stands for the name of the tablespace. There is also the file save_${ORACLE_SID}_overview.prot, which contains any information regarding the backups that does not relate to a particular tablespace. The protocol files in this subdirectory are overwritten by each new backup.
System Administrator’s Guide |
U42252-J-Z915-1-76 |

The individual Components |
The Backup Component |
The shell script saveinfo.sh in the directory $NSR_INST/oracle/bin evaluates the protocol files save*.prot in the subdirectory tablespaces and tells you the status, the start and end of a backup, the type of backup (online|offline) and the names and sizes of the backed up tablespaces.
You can call saveinfo.sh at any time, even while there is a backup in progress. It is called automatically when a tablespace backup has been completed and writes its output to the file actual_saves_of_tablespaces. This information is also sent to you by mail.
!saveinfo.sh tool provide you with complete information on the status and success of a backup process.Please note that only the above-mentioned protocol files and the
AMON Recordings
The file /nrs/oracle/${ORACLE_SID}/prot/save_logfiles contains a log of all redolog files backed up by the archiving monitor (see the section “Logging”). The subdirectory /nrs/oracle/${ORACLE_SID}/prot/dbg contains debug information, which can be evaluated by Fujitsu Siemens Computers if errors are encountered.
If you want to observe a backup in progress on the screen, you can do so using the command nsrwatch or from the main NetWorker window.
Please note that only the above-mentioned protocol files and the saveinfo.sh tool provide you with complete information on the status and success of a backup process.
If you call ora_recut, additional debugging information, which can be evaluated by Fujitsu Siemens Computers specialists if an error occurs, is entered in the directory /nsr/${ORACLE_SID}/tmp/RUT.
!to ensure that all tablespaces occur in at least one backup cycle. If a tablespace does not occur in at least one partial backup interval, it is never saved! Consequently, a configuration tool has been supplied (see the section “Establishing tablespace names”) for supporting this task.
At least one backup process is started for each backup if the attribute Backup Command was set to nsrora_save_cmd for the relevant client in the Clients window. Otherwise, at least two backup processes are started
for each backup - one by NetWorker and one by NSR-ORA. Please keep this in mind when setting the concurrency of the NetWorker server. TheThe global consistency of the backup schedules must always be checked
System Administrator’s Guide |
U42252-J-Z915-1-76 |
The individual Components |
The Backup Component |
concurrency used by NSR-ORA when backing up tablespaces is one less than the concurrency of NetWorker when nsrora_save_cmd is not used, because NSR-ORA always uses one backup for internal purposes.
!progress. Under ORACLE Parallel Server (OPS), the instance which is carrying out the backup is given exclusive access to the database; this also prevents the database from being started up by any other instance. In other cases you will receive an error message at the end of the backup if the database was started up in the meantime.
If you want to back up a database which is currently online under OPS,
while the instance that is to be used for the backup is offline, that instance will be started and an online backup will be carried out instead.The database must not be started up while an offline backup is in
System Administrator’s Guide |
U42252-J-Z915-1-76 |

4 Installation and Configuration
The following chapter describes the installation and configuration of NSR-ORA.
4.1Quick Start
This section gives experienced users an short overview of all steps required to install and configure NSR-ORA. It is a synopsis of the information presented in this chapter and the rest of the manual and is intended to help you to get NSRORA “up and running” quickly and easily.
In order to install NSR-ORA and prepare it for use you need to carry out the following steps:
1.Install NSR-ORA on the database computer (Enabler and NSR-ORA package) using the relevant command for the respective platform. Refer to the sections “Licensing NSR-ORA” and “Installing NSR-ORA from CD”.
2.Now start the database (with startup or, in the case of OPS, with startup parallel) so that configure_nsrora can determine the tablespace names.
3.Call up the configure_networker tool and fill in the informations described in section “Parameters for configure_nsrora”.
4.Make sure that you have NSR administrator rights.
5.Call up the configure_networker tool (refer also to the section “Configuring NetWorker”).
When using a NetApp filer in order to perform NDMP-backups, you may have to define some NetWorker ressources manually (see “Configuring NetWorker”).
6.Specify the Start time for the database group in NetWorker and set the attribute Autostart to Enabled (for further information, please refer to your NetWorker documentation).
7.Highlight the required data carriers for the database and the archiving monitor amon (see the manual NetWorker - Installing, Configuring and Operating).
8.Make sure that the database is in the archive mode using the command archive log list.
System Administrator’s Guide |
U42252-J-Z915-1-76 |

Installation and Configuration |
Installation |
9.Start the archiving monitor amon using the following command: start_amon.sh start $ORACLE_SID
(refer also to section “Starting and Ending the Archiving Monitor“)
10.Check the results of your first backup (see “Checking backups (troubleshooting)” for this).
4.2Installation
NSR-ORA is supplied together with NetWorker on CD-ROM. The installation is carried out (analogous to the installation of NetWorker) on the NetWorker client on which the ORACLE database is located.
In addition to NSR-ORA, you also have to install an enabler for NSR-ORA itself on the NetWorker server.
4.2.1Licensing NSR-ORA
Before you can use NSR-ORA, you first have to install the enabler for NSR-ORA on the NetWorker server. This is how you install the enabler:
For NetWorker servers from Fujitsu Siemens Computers from NetWorker Version V5.5A21
1.Insert the license diskette into the drive of your NetWorker server.
2.Log in as root.
3.Enter the following command:
# keylic
The installation then continues interactively.
For different NetWorker servers (prior to Version V5.5A21 or third party)
1.Insert the license diskette into the drive of your Database server.
2.Log in as root.
3.Enter the following command:
●For NetWorker clients from Fujitsu Siemens Computers (Solaris or LINUX):
System Administrator’s Guide |
U42252-J-Z915-1-76 |

Installation and Configuration |
Installation |
# /opt/nsr/keylic -s <server>
<server> is the name of the NetWorker server.
●For NetWorker servers from Fujitsu Siemens Computers prior to NetWorker Version V5.5A21 and Reliant UNIX clients or third-party clients for Solaris:
# /opt/nsr/oracle/bin/keylic -s <server>
<server> is the name of the NetWorker server.
●For clients under HP-UX:
#doscp /dev/floppy/<devicename>:/NSR-ORA <file>
#/opt/networker/oracle/bin/keylic -f <file> -s <server>
<file> is any file name and <server> is the name of the NetWorker server.
Example (for a NetWorker server backup01):
#doscp /dev/floppy/c0t1d0:/NSR-ORA nsrorakey
#keylic -f nsrorakey -s backup01
The installation then continues interactively.
i |
In order to backup a database on a local volume using NSR-ORA the key |
|
diskette NSR-ORA V3.2 (NetWorker license NetWorker Module for Oracle, |
|
|
|
UNIX Client) is required. |
|
For using the NDMP functionality additionally the new license NetWorker |
|
Oracle Module for NDMP is required. For this the key diskette NSRONDM |
|
is to be installed. |
|
Both of the licenses may be installed on the NetWorker server by using |
|
the keylic command. |
NetApp Licences
On the NetApp filer the snaprestore license is to be installed. To check this you can start the NetApp command license using a telnet connection. If this license is not available, please contact your NetApp filer administrator.
4.2.2Installing NSR-ORA from CD
This section describes how to install NSR-ORA from CD for the different platforms.
System Administrator’s Guide |
U42252-J-Z915-1-76 |
Loading...