


AccessBuilder 4000
Table of contents
 Loading...
®
http://www.3com.com/
AccessBuilder
®
4000
Installation Guide
Part No. 09-0753-001
Published April 1997

ii
3Com Corporation
5400 Bayfront Plaza
Santa Clara, California
95052-8145
Copyright ©
3Com Corporation, 1997.
All rights reserved. No part of this documentation may be
reproduced in any form or by any means or used to make any derivative work (such as translation,
transformation, or adaptation) without permission from 3Com Corporation.
3Com Corporation reserves the right to revise this documentation and to make changes in content from
time to time without obligation on the part of 3Com Corporation to provide notification of such revision or
change.
3Com Corporation provides this documentation without warranty of any kind, either implied or expressed,
including, but not limited to, the implied warranties of merchantability and fitness for a particular purpose.
3Com may make improvements or changes in the product(s) and/or the program(s) described in this
documentation at any time.
UNITED STATES GOVERNMENT LEGENDS:
If you are a United States government agency, then this documentation and the software described herein
are provided to you subject to the following restricted rights:
For units of the Department of Defense:
Restricted Rights Legend:
Use, duplication, or disclosure by the Government is subject to restrictions as set
forth in subparagraph (c) (1) (ii) for Restricted Rights in Technical Data and Computer Software Clause at 48
C.F.R. 52.227-7013. 3Com Corporation, 5400 Bayfront Plaza, Santa Clara, California 95052-8145.
For civilian agencies:
Restricted Rights Legend:
Use, reproduction, or disclosure is subject to restrictions set forth in subparagraph
(a) through (d) of the Commercial Computer Software - Restricted Rights Clause at 48 C.F.R. 52.227-19 and
the limitations set forth in 3Com Corporation’s standard commercial agreement for the software.
Unpublished rights reserved under the copyright laws of the United States.
If there is any software on removable media described in this documentation, it is furnished under a license
agreement included with the product as a separate document, in the hard copy documentation, or on the
removable media in a directory file named LICENSE.TXT. If you are unable to locate a copy, please contact
3Com and a copy will be provided to you.
Unless otherwise indicated, 3Com registered trademarks are registered in the United States and may or may
not be registered in other countries.
3Com, Boundary Routing, CardFacts, LANplex, LinkBuilder, NETBuilder, NETBuilder II, NetFacts, Parallel
Tasking, EtherLink, SmartAgent, Star-Tek, TokenLink, TokenDisk, Transcend, and ViewBuilder are registered
trademarks of 3Com Corporation. 3TECH, EtherDisk, EthernLink Plus, EtherLink II, FDDILink, FMS, NetProbe,
and SuperStack are trademarks of 3Com Corporation. 3ComFacts is a service mark of 3Com Corporation.
Other brand and product names may be registered trademarks or trademarks of their respective holders.
Guide written and produced by Gary Halverson. Technical illustration by Chris Beatrice.

A
BOUT
T
HIS
G
UIDE
Introduction
This guide describes how to install the AccessBuilder 4000. It will also
tell you what information you need to obtain in order to prepare for
installation, how to perform the hardware installation, and how to
install the Transcend AccessBuilder Manager (TABM) configuration
utility. Once you have installed TABM, you will then configure your
AccessBuilder using the on-line help information available within TABM.
If the information in the Release Notes shipped with your product
differs from the information in this guide, follow the Release Notes.
How to Use This
Guide
The following table shows where to find specific information.
If you are looking for:
Turn to:
An overview of the AccessBuilder 4000
Chapter 1
Unpacking the AccessBuilder 4000 Chapter 2
An overview of the installation process Chapter 2
Electrical installation Chapter 2
Installing Transcend AccessBuilder Manager Chapter 3
An overview of Transcend AccessBuilder Manager Chapter 3
Troubleshooting the installation Chapter 4
AccessBuilder 4000 specifications Appendix A
Software updating procedures Appendix B
Installing I/O Cards Appendix C
Configuration Worksheets Appendix D
Technical support information Appendix E
iv
A
BOUT
T
HIS
G
UIDE
Conventions
The following tables list conventions that are used throughout this
guide.
Related
Documentation
The following additional AccessBuilder documentation may be of value
to the system administrator and is available through your normal 3Com
ordering channel:
■
AccessBuilder Remote Client Quick Installation Guide (09-0752-000)
■
AccessBuilder Server Configuration Guide (09-0751-000, optional)
contains information about configuring the server using the
command line interface.
■
AccessBuilder Server Administrator’s Guide ((09-0750-000, optional)
provides detailed information about all AccessBuilder command line
menus, individual commands, parameters, and examples of specific
configurations.
Table 1
Text Conventions
Convention Description
“Enter” vs. “Type”
When the word “enter” is used, it means type your input,
then press the Return or Enter key. Do not press the Return
or Enter key when an instruction simply says “type.”
Keys When specific keys are referred
to in the text, they are called
out by their labels, such as “the Return key” or “the Escape
key,” or they may be shown as [Return] or [Esc].
If two or more keys are to be pressed simultaneously, the
keys are linked with a plus sign (+), for example:
Press [Ctrl]+[Alt]+[Del].
Italics
Italics
are used to denote
new terms
or
emphasis
.
Table 2
Notice Icons
Icon
Type Description
Information
Note
Information notes call attention to important features
or instructions.
Caution Cautions contain directions that you must follow to
avoid immediate system damage or loss of data.
Warning Warnings contain directions that you must follow for
your personal safety. Follow all instructions carefully.

v
C
ONTENTS
A
BOUT
T
HIS
G
UIDE
Introduction iii
How to Use This Guide iii
Conventions iv
Related Documentation iv
1
I
NTRODUCTION
General 1-1
Configuration 1-2
System Description 1-3
Hardware Description 1-4
Front Panel 1-4
Rear Panel 1-4
2
G
ETTING
S
TARTED
AccessBuilder Configuration: Windows or Command Line UI 2-1
Preparation 2-2
Modems/ISDN TAs 2-3
User List 2-4
Network Basics 2-4
AccessBuilder Management 2-5
Unpacking the System 2-5
Hardware Installation 2-7
Stand Alone 2-7
Rack Mounting 2-7
LAN Connection (Mandatory) 2-8
Ethernet 2-8
Token Ring 2-9
Power Up 2-9

vi
Console/Modem Configuration (Optional) 2-10
For Terminal Connection 2-10
For Modem Connection 2-11
Telnet Users 2-11
SNMP Management 2-11
3
C
ONFIGURATION
U
SING
T
RANSCEND
A
CCESS
B
UILDER
M
ANAGER
(TABM)
General 3-1
System Requirements 3-2
Hardware 3-2
Software 3-2
TABM Software Installation 3-3
About the TABM Application 3-9
Autodiscovery 3-9
IP Networks 3-9
IPX Networks 3-9
Main Window (All Servers List View) 3-9
AccessBuilder Server External View 3-10
Tool Bar Icons 3-11
Conventions 3-12
Port Color Conventions 3-12
@ Symbol 3-13
Starting the TABM Application 3-13
Starting Up a New AccessBuilder Server 3-14
IP Networks 3-14
IPX Networks 3-14
What’s Next? 3-15
Basic Configuration 3-15
Configuring an AccessBuilder Using Guided Configuration 3-16
Remote Client Configuration 3-16
AppleTalk Clients 3-16
PPP/SLIP Clients 3-17
PC Clients 3-17

vii
4
T
ROUBLESHOOTING
System Does Not Power On 4-1
TABM Not Communicating with an AccessBuilder 4-1
IP Networks 4-2
IPX Networks 4-2
Attached Terminal or Modem Does Not Operate 4-3
System Does Not Respond to Terminal Commands 4-3
LED Functions 4-4
Error Messages 4-4
A
S
PECIFICATIONS
Hardware Specifications A-1
NOS Support A-2
Internet Protocol Support A-3
B
R
EMOTE
S
OFTWARE
U
P
/D
OWNLOADING
P
ROCEDURES
Getting Started B-1
TABM B-2
TABM Procedures B-2
What To Do If An Image Download Fails B-3
Telnet B-4
Telnet Procedures B-4
Console Port B-5
Initial Setup B-6
General B-6
PC Terminal Emulator Setup B-7
Console Port Procedures B-8
AccessBuilder 4000 Software Image Download Procedure B-8
C
I
NSTALLING
I/O C
ARDS
Descriptions of I/O Cards C-1
Asynchronous I/O Cards C-1
Synchronous I/O Card C-2
ISDN Cards C-3
Installation Overview C-4
Installation Procedure C-4

viii
Attaching I/O Cables C-6
Asynchronous Cards C-6
Synchronous Card C-7
ISDN Card C-8
D
C
ONFIGURATION
W
ORKSHEETS
Instructions D-1
TABM Workstation Worksheets D-1
AccessBuilder Server Worksheets D-1
AccessBuilder Client Worksheets D-1
TABM Workstation on IP Network D-2
TABM Workstation on IPX Network D-3
AccessBuilder Server D-4
General Information D-4
Asynchronous Port Setup D-4
ISDN Information D-5
IP Network Information D-6
IPX Network Information D-6
AppleTalk Network Information D-6
User Table D-7
Remote Client D-8
E
T
ECHNICAL
S
UPPORT
Online Technical Services E-1
World Wide Web Site E-1
3Com Bulletin Board Service E-1
Access by Analog Modem E-1
Access by Digital Modem E-2
3ComFactsSM Automated Fax Service E-2
3ComForum on CompuServe
®
Online Service E-3
Support from Your Network Supplier E-3
Support from 3Com E-4
Returning Products for Repair E-5
3C
OM
C
ORPORATION
L
IMITED
W
ARRANTY
1
I
NTRODUCTION
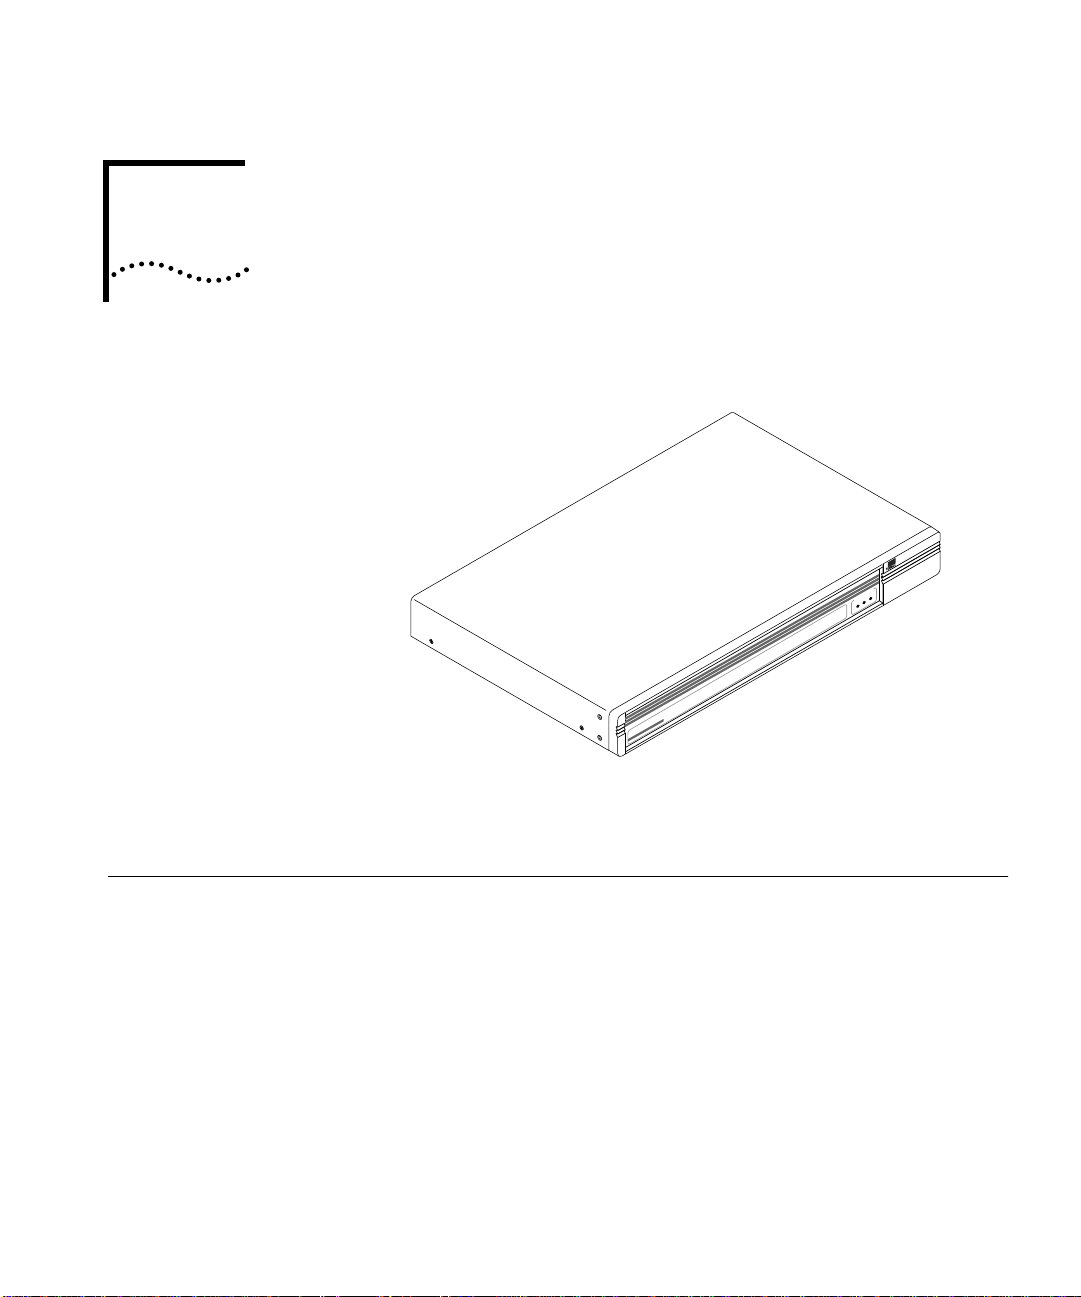
This chapter provides a brief introduction to the AccessBuilder 4000
system. Unpacking instructions are also provided.
General
The AccessBuilder 4000 series family are RISC-based multiprotocol,
multiport networking devices offering a simple and cost-effective
solution for remote users to access the corporate network for data
transmission or retrieval using the Public Switched Telephone Network
(PSTN), or the Integrated Services Digital Network (ISDN).
The system is designed for individual-to-LAN operation, which supports
situations where Macintosh, PC, and workstation users need to access
their corporate network from home or another remote location. The
AccessBuilder 4000 can also be used to connect two distant/remote
LANs over the PSTN, ISDN, or leased line facilities.
AccessBuilder
4000
PowerPower
StatusStatus
ActivityActivity
SYSTEM STATUSSYSTEM STATUS

1-2
C
HAPTER
1: I
NTRODUCTION
The AccessBuilder 4000 is designed for enterprise organizations having
remote LAN access requirements. It is well-suited for situations where
up to sixteen analog phone lines or up to eight ISDN lines (one line
supports two B channels providing up to 16 concurrent ISDN
connections) are required to support remote users who may include
business travellers or telecommuters.
The AccessBuilder 4000 is capable of routing IP and IPX protocols,
while protocols supported in the bridging mode include:
■
TCP/IP
■
IPX
■
AppleTalk Remote Access
■
NetBeui
■
DECNet
■
Banyan Vines
■
DECNet
■ XNS
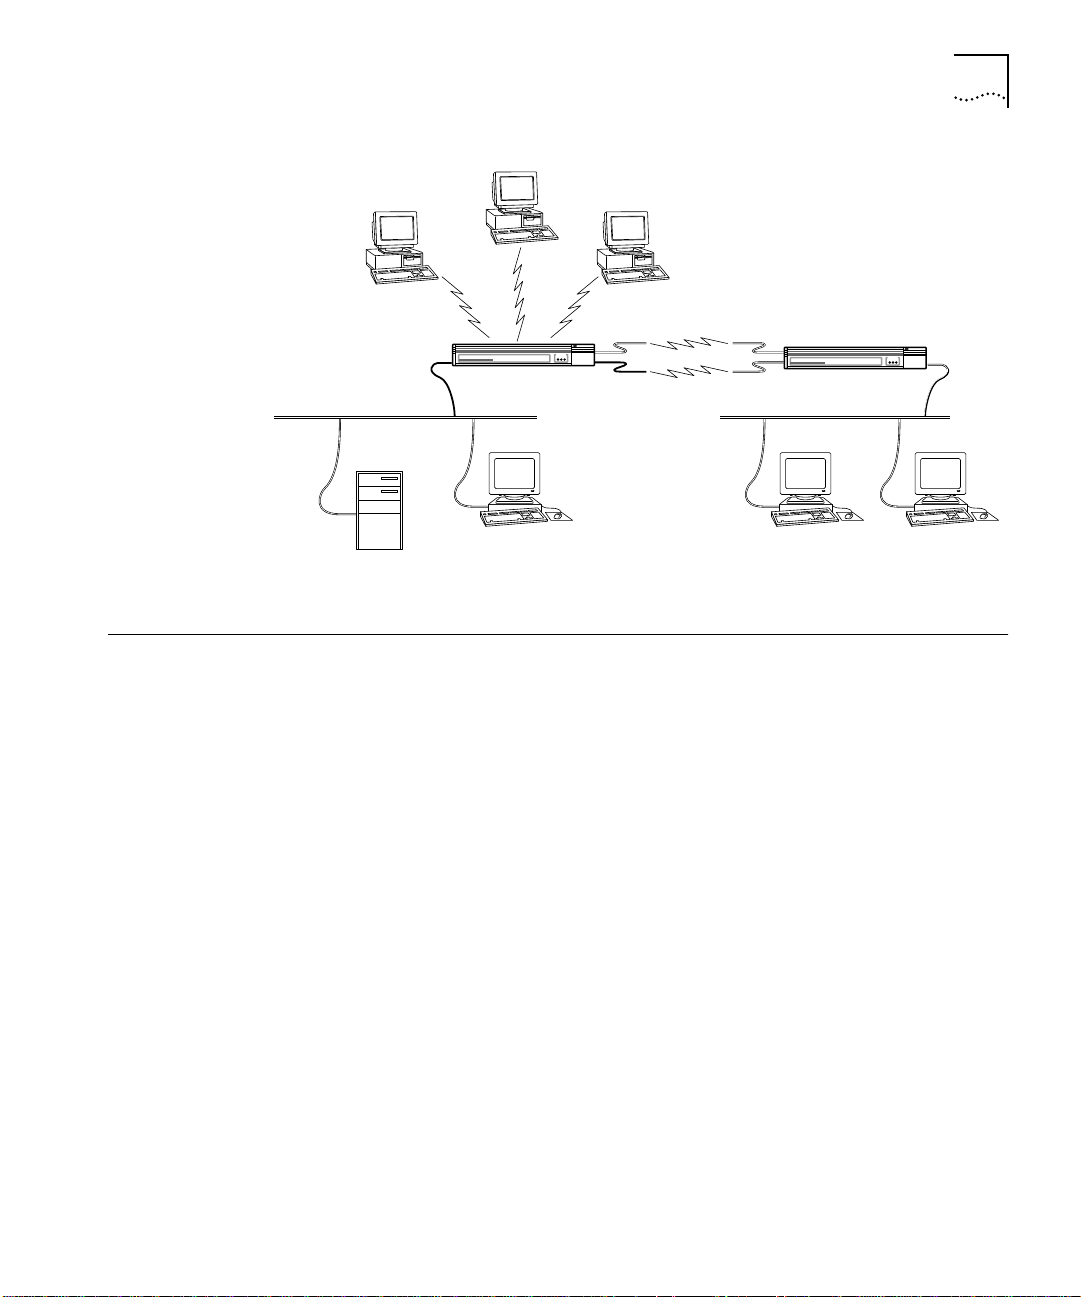
The AccessBuilder 4000 can be configured for individual-to-LAN,
LAN-to-LAN operation, or both depending on your needs. Figure 1-1
shows the two different configuration options.
Configuration Specific configurations are easily accomplished using 3Com’s easy to
use Transcend AccessBuilder Manager (TABM), a Windows-based
graphical user interface configuration utility. TABM features a detailed
graphic depiction of the hardware configuration of your selected
AccessBuilder, which serves as a navigational roadmap of AccessBuilder
functions. Built into TABM is a comprehensive on-line help system
providing in-depth context-sensitive help on demand. A convenient
“cue card” facility is also provided to display procedural information in
a separate window. TABM also includes a tool that automatically
discovers AccessBuilders on your network.
Configuration can also be performed using the AccessBuilder 4000’s
command line interface from either a locally connected terminal or over
the network via telnet for those more comfortable with a
DOS/UNIX-like command structure (requires optional support
documentation).
System Description 1-3
Figure 1-1 AccessBuilder 4000 Configuration Options
System Description The AccessBuilder 4000 series servers consists of hardware and
software that provides a cost-effective solution to your remote access
networking needs. Both the Ethernet and Token Ring versions offer the
same high performance RISC-based engine. Optional plug-in line
interface modules may be installed to provide connections to a variety
of WAN types. These interface modules include 4-port, 8-port, and
8-port high speed serial cards for connection to analog modems, a
4-port ISDN Basic Rate Interface (BRI) interface (U or S/T), and a high
speed synchronous interface for leased lines.
Connection to the LAN supports three Ethernet media types, 10BaseT,
BNC (thin), and AUI. A three-position switch selects the desired
interface connection. The Token Ring version supports 4 or 16 Mbps
ring speeds.
A console port preconfigured for 9600 bps is provided as a
convenience when:
■ local configuration (using a dumb terminal or computer
communications emulation program) is desired, or
■ remote software downloading is desired.
PC
PC
PC
net 1
Work StationWork Station
net 2
File Server
Work Station
LAN–to–LAN
LAN–to–LAN
Individual
to
LAN
Individual
to
LAN
StatusActivity Power
SYSTEM STATUSSYSTEM STATUS
AccessBuilderAccessBuilder
40004000
Remote Access Server
StatusActivity Power
SYSTEM STATUSSYSTEM STATUS
AccessBuilderAccessBuilder
40004000
Remote Access Server
1-4 CHAPTER 1: INTRODUCTION
Hardware
Description
The following sections describe the system hardware components.
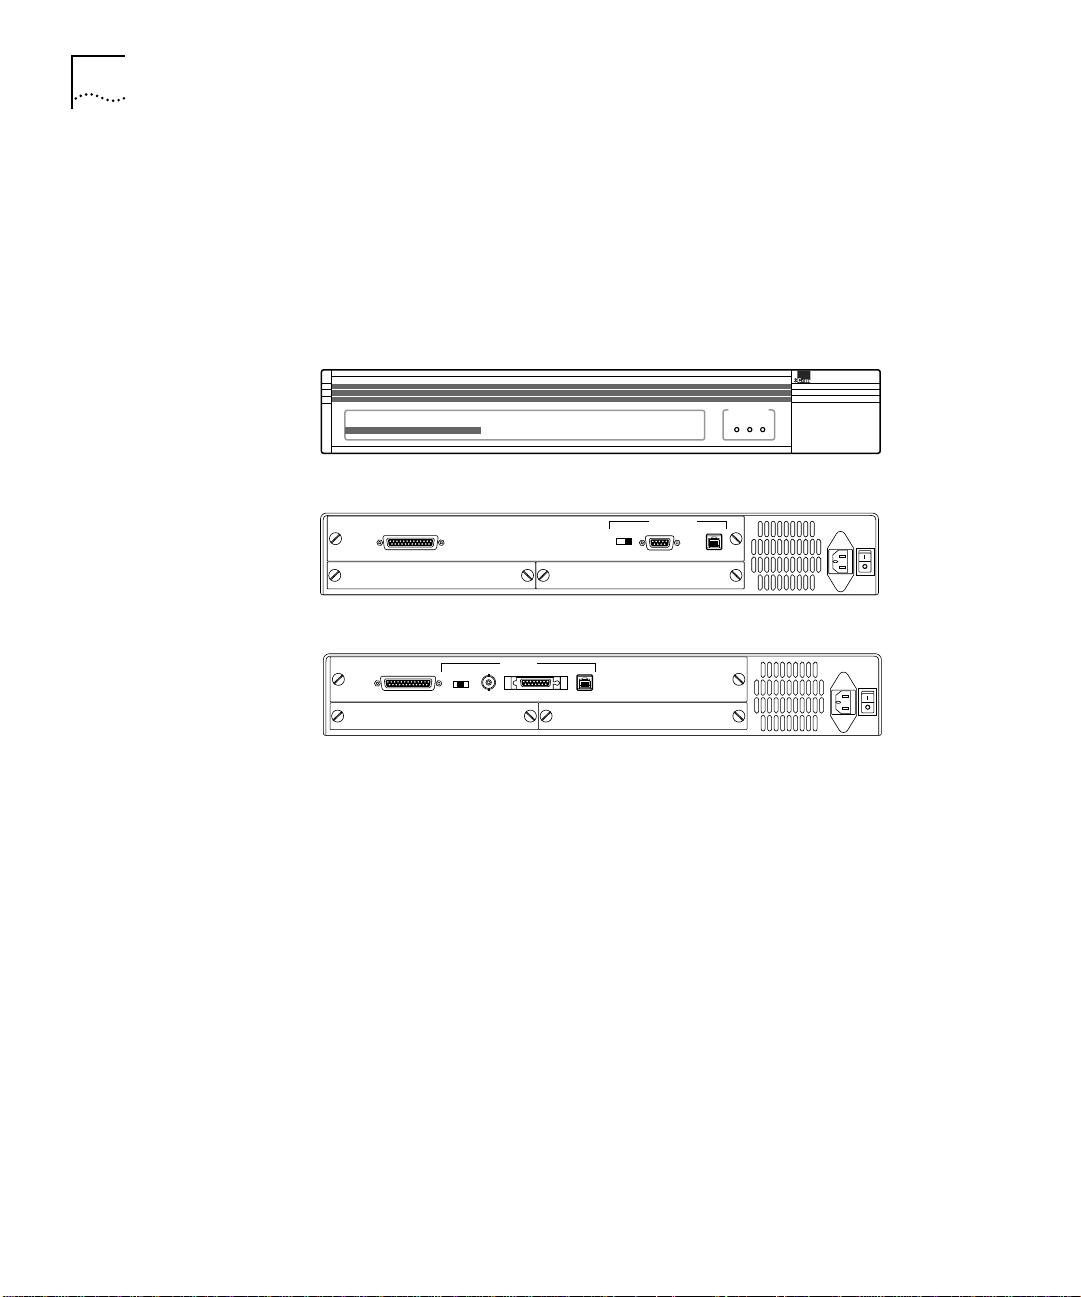
The AccessBuilder 4000 system consists of a chassis assembly which
contains one of two available main processor boards, power supply,
indicator lights, and two slots for I/O cards of your choice. The main
processor board is available with either an Ethernet, or a Token Ring
LAN interface. Figure 1-2 shows the front and back of the system.
Figure 1-2 The AccessBuilder 4000 Front and Rear Panels
Front Panel The front panel of the AccessBuilder chassis has three LEDs, which
indicate Power, Status, and Activity, as shown in Figure 1-2.
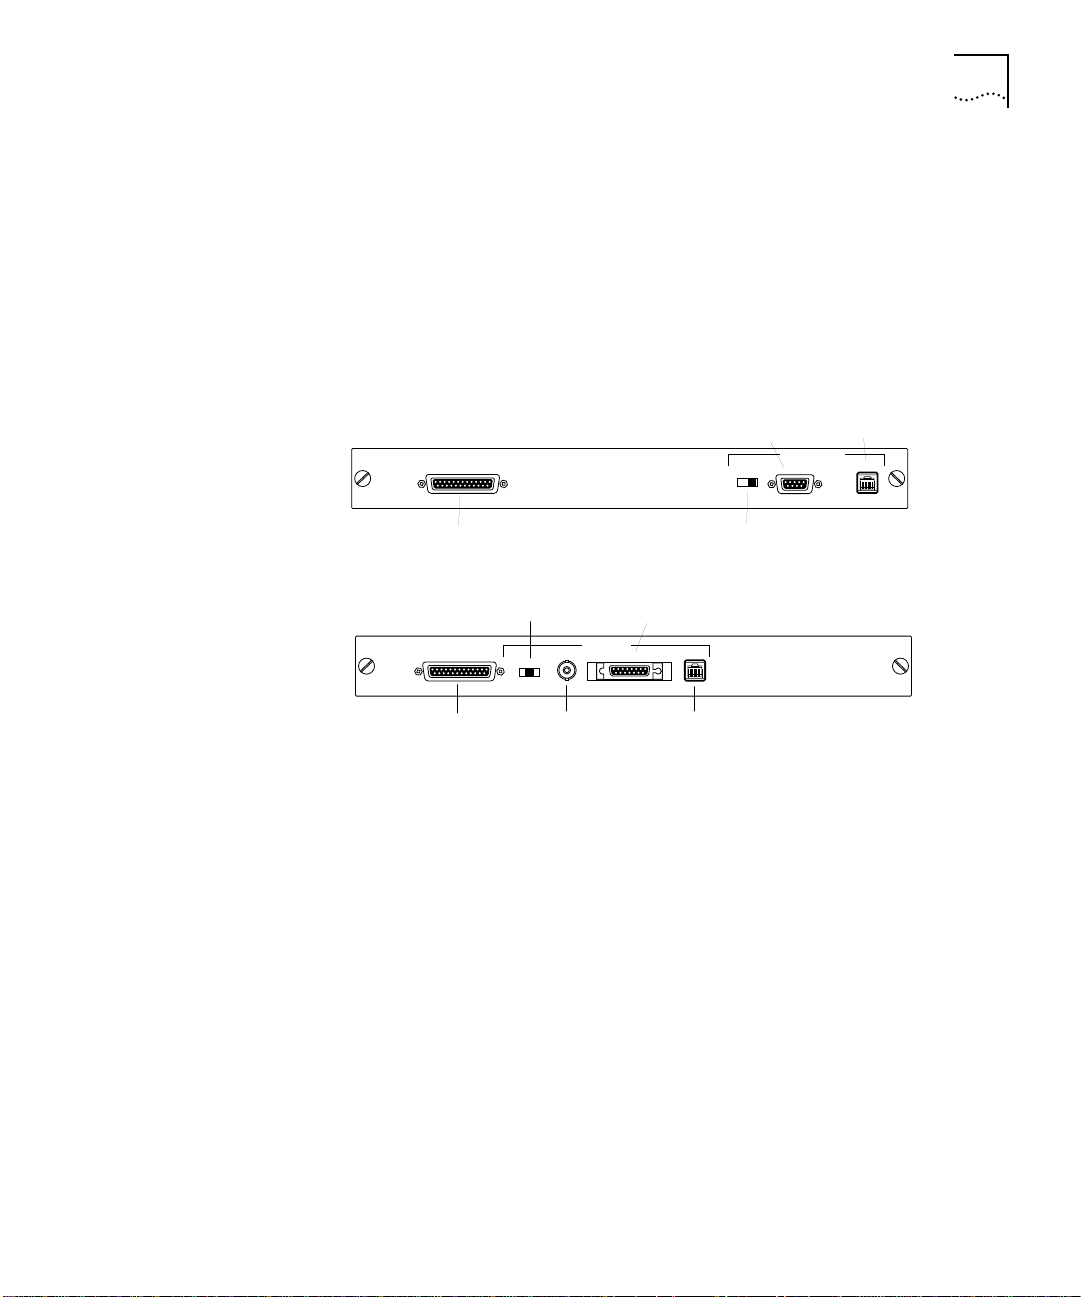
Rear Panel Main Processor and I/O Card Slots. AccessBuilder has three slots in
the rear. The top slot contains the main processor board (Ethernet or
Token Ring) and the two smaller slots below are for the I/O cards. The
position of the slots and their numbering scheme are also shown in
Figure 1-2.
The main processor board has Flash ROM for program storage, DRAM
for software operation, NVRAM (non-volatile RAM) for configuration
storage, and built-in Ethernet or Token Ring capability. The Ethernet
version provides AUI, BNC, and 10BaseT connectors (switch selectable),
as shown in Figure 1-3 to connect to the on-board Ethernet port. The
Token Ring version provides connectors for shielded twisted pair (STP),
SLOT 2 SLOT 1
CONSOLE
110-240 VAC
50-60 Hz 1A
STP
4M/16M
UTP
TOKEN RING
110-240 VAC
50-60 Hz 1A
CONSOLE
AUI
BNC
TPE
BNC/AUI/TPE
ETHERNET
SLOT 2 SLOT 1
StatusActivity Power
SYSTEM STATUSSYSTEM STATUS
AccessBuilder
4000
Remote Access Server
Front Panel
Rear Panel Token Ring
Rear Panel Ethernet
System Description 1-5
and unshielded twisted pair (UTP) media connections. Ring speeds of
4Mbps or 16Mbps can also be selected.
A built-in RS-232 console port (DCE) is also provided on the main
processor boards (pinout information is provided in Appendix A). A
terminal or workstation running a terminal emulation program can be
connected to the console port for installing, configuring, and
monitoring your server.
Figure 1-3 Main Processor Boards
The I/O card slots shown in Figure 1-2 are shipped from the factory
with cover plates which must be removed before installing I/O cards.
For instructions on installing I/O cards, refer to Appendix C, “Installing
I/O Cards.”
The chassis assembly contains a bus that rests vertically against the
backplane of the card cage. DIN connectors secured on the backplane
mate with DIN connectors secured to the main processor and I/O cards.
Power Supply. The power supply module consists of the power
supply itself which adjusts (autoranges) the supply voltage to the
AccessBuilder chassis automatically. No operator intervention is
required for switching between 90 and 240-VAC operation.
SLOT 2 SLOT 1
CONSOLE
STP
4M/16M
UTP
TOKEN RING
CONSOLE
AUI
BNC
TPE
BNC/AUI/TPE
ETHERNET
SLOT 2 SLOT 1
TOKEN RING
ETHERNET
Console Connector
(DCE)
Ring Speed
Switch
STP
Port
UTP
Port
Media Type
Switch
Console Connector
(DCE)
BNC
Connector
AUI
Connector
10BaseT
Connector

1-6 CHAPTER 1: INTRODUCTION
Power Switch and Receptacle. The AC power switch is marked
according to international 1/0 convention; when the 1 side is pressed,
the switch is on; when the 0 side is pressed, the switch is off. The
switch and power receptacle are accessible from the right rear of the
chassis.
The international CEE-22 AC power receptacle is approved for 6-amp
operation. The chassis ground is on the middle prong of the connector.
All systems are shipped with power cords; if your power cord does not
match your local requirements, contact your AccessBuilder supplier for
assistance.
Flash Memory. Flash memory on the processor board is used to
permanently store the AccessBuilder operating software. There are no
installation disks involved (unless upgrading to a newer version of the
operating software). Each system arrives from the factory with all of its
server software already loaded into flash memory.
Console Port. A built-in RS-232 console port (DCE) is also provided
on the chassis rear panel. Should you wish to use the command line
user interface for installing, configuring, and monitoring your server, a
terminal or workstation running a terminal emulation program can be
connected to the console port (using a straight through cable). The
console port is DB-25.
Error messages and remote user connection information are output to
the console port as these events occur. Attachment of this port to a
line printer or PC running a terminal emulator with a screen save utility
can be used to capture these messages for diagnostic use.
A modem may also be attached to this port (using a null modem cable)
to enable software updating from a remote server.
2
GETTING STARTED
This section is designed to help you to quickly perform the installation
of an AccessBuilder 4000 network remote access server. Once you have
planned your installation and set up the hardware, you are then ready
to install and launch the Transcend AccessBuilder Manager (TABM)
configuration utility. From there, you’ll configure your AccessBuilder
using TABM’s on-line help information as required to perform specific
configuration items.
Before the Transcend
AccessBuilder Manager configuration utility can
be used, the following condition must be true:
IP Networks: Your third-party TCP/IP stack must be installed and you
can ping a known host on the network.
IPX Networks: Your NetWare Windows client software must be
installed and you can attach to a NetWare server. A NetWare server
must also reside on the network to which the AccessBuilder is
attached.
AccessBuilder
Configuration:
Windows or
Command Line UI
Nearly all AccessBuilder configuration can be performed using the
Transcend AccessBuilder Manager (TABM) configuration utility in a
Windows environment. There are, however, situations where it is
necessary to use the AccessBuilder’s command line interface to perform
specialized configurations. These situations include:
■ When a Windows platform with a third-party TCP/IP stack (IP
networks) or NetWare Client is not available on the network to
which the AccessBuilder is attached
■ When it is more convenient to use a local console on the
AccessBuilder’s asynchronous port
■ When using telnet (IP networks) to configure the AccessBuilder
■ When configuring bridging filters (refer to the Release Notes for any
other special circumstances)

2-2 CHAPTER 2: GETTING STARTED
Should any of these special circumstances apply to your situation,
information about performing the software configuration using the
command-line interface is provided in the AccessBuilder Command Line
Interface Quick Reference, part number 09-0208-000, and the optional
AccessBuilder Configuration Guide, part number 09-0962-000, and
the AccessBuilder Administrator’s Guide, part number 09-0963-000.
You can obtain a copy of these guides through your normal 3Com
ordering channel.
Preparation Be sure to read the Release Notes included in this package. They
contain important late-breaking information about this software
release of which you should be aware.
Briefly, the basic categories of information you will need to obtain
before actually performing an installation are:
1 Modem/TA compatibility. Verify that the modems/terminal
adapters you intend to use with the AccessBuilder 4000’s WAN ports
are compatible with the unit. In the case of an ISDN application, be
sure to your phone company has furnished you will all necessary line
provisioning information.
2 User list. Determine all required information for each of the remote
users who will be calling into the AccessBuilder 4000.
3 Network basics. You will need to know your network protocol (IP or
IPX), the address that will be assigned to the AccessBuilder 4000 and
your Transcend management workstation, and the address of your
SNMP management station (if used).
4 AccessBuilder 4000 management method. Methods include:
■ using Transcend AccessBuilder Manager on a Windows PC
over the network (recommended method),
■ using Transcend AccessBuilder Manager on a Windows PC
running the AccessBuilder Remote Client software over a modem
into one of the AccessBuilder’s asynchronous ports,
■ using a third-party network management application,
such as HP OpenView, IBM’s NetView, etc., in conjunction with the
AccessBuilder MIB (supplied),
■ using the AccessBuilder’s command line user interface
through the local console port, remotely through a modem on the
console port, or by using telnet over the network.
Preparation 2-3
Configuration worksheets are provided in Appendix D as a convenient
means of collecting and organizing this information.
Modems/ISDN TAs
1 Check to be sure the modems or terminal adapters you intend to use
are on the built-in modem list (or check the modem list in the Release
Notes). This list contains all modems or terminal adapters that have
been tested by 3Com and are supported for use with the AccessBuilder.
If your modems/terminal adapters are not on the list, you may need to
contact the manufacturer for assistance if script information is not provided
in the modem documentation.
For ISDN installations, refer to the AccessBuilder 4000 ISDN Basic Rate
Interface (BRI) Module Installation Guide for ISDN installation procedures.
All modems have unique AT command sets, even those claiming to be
“AT-compatible.” Use of an improper modem script may result in
transmission disruption, loss of carrier, failure of modems to answer,
slow response time and other serious problems that will hamper overall
performance. 3Com highly recommends using modems on the
AccessBuilder’s built-in modem list.
Table 2-1 AccessBuilder Management Environments and Options
Manager Environment AccessBuilder 4000 Management Options
Workgroup Management ■ Transcend AccessBuilder Manager for Windows
(bundled with product)
Enterprise Management ■ Transcend Enterprise Manager for Windows
Console Management
(VT-100 character mode)
■ Console port access (RS-232/DCE)
■ Dial-in access
■ Telnet access (default port = 3000)
Third Party SNMP
Manager with MIB
Browser, such as:
■ SunNet Manager
■ HP OpenView
■ IBM NetView/6000
■ GET - SET supported
■ Traps defined
■ MIB II and private MIB extensions (AccessBuilder
MIB included with product)

2-4 CHAPTER 2: GETTING STARTED
For ARA and non-AppleTalk users to share the same ports, the use of
AppleTalk Remote Access version 2.0 or later is recommended. If,
however, you plan to support ARA 1.0, you will need to determine
which asynchronous serial ports to use, since these ports will be
dedicated to ARA 1.0 only.
2 You will need a list of telephone numbers for each modem or ISDN line
(or hunt group) connected to the AccessBuilder’s ports (these are the
numbers your remote users will use to dial into the AccessBuilder). If
you plan to use a modem on the AccessBuilder’s console port for
remote management, you will also need the telephone number
associated with this modem.
User List If you plan to use the AccessBuilder for individual-to-LAN service, it’s a
good idea to have a list of your remote access users including:
■ user name and password
■ callback number (if used), or modem line/phone number you wish
to assign to each user (note that callback only works when the
client is using the AccessBuilder Remote Client software or ARA).
■ type of access required (restricted, third-party security device used,
etc.)
For AppleTalk ARA users, be sure to install Apple’s ARA client software
on each user’s Macintosh computer.
For PC users, please refer to the AccessBuilder Remote Client Quick
Installation Guide for client software installation procedures.
If your remote users will be using the AccessBuilder Remote Access
Client software on their PCs to access the network, a convenient
fill-in-the-blank form (an exact screen shot of what they will see) is
provided in Appendix D of this Guide. This form may be photocopied
and customized for each user to include all the information they will
need to configure their AccessBuilder Remote Client software. The form
may then be sent or faxed to the user and filed for future reference.
Network Basics You will need to know the network address (IP networks) which will be
assigned to each AccessBuilder being configured, the protocols used on
the network, and whether any automated network functions are used,
such as RIP or ARP in the case of IP.
Unpacking the System 2-5
If you plan to use SNMP functions, such as trap reporting or remote
device management, you will also need to know the community names
and IP addresses of the management station(s).
You may also wish to define the greeting message the remote users
will see when they log onto the AccessBuilder.
If the AccessBuilder greeting message will be more than one line, use
the vertical bar character (|) as a carriage return. Refer to the Transcend
AccessBuilder Manager System Dialog box on-line help for details.
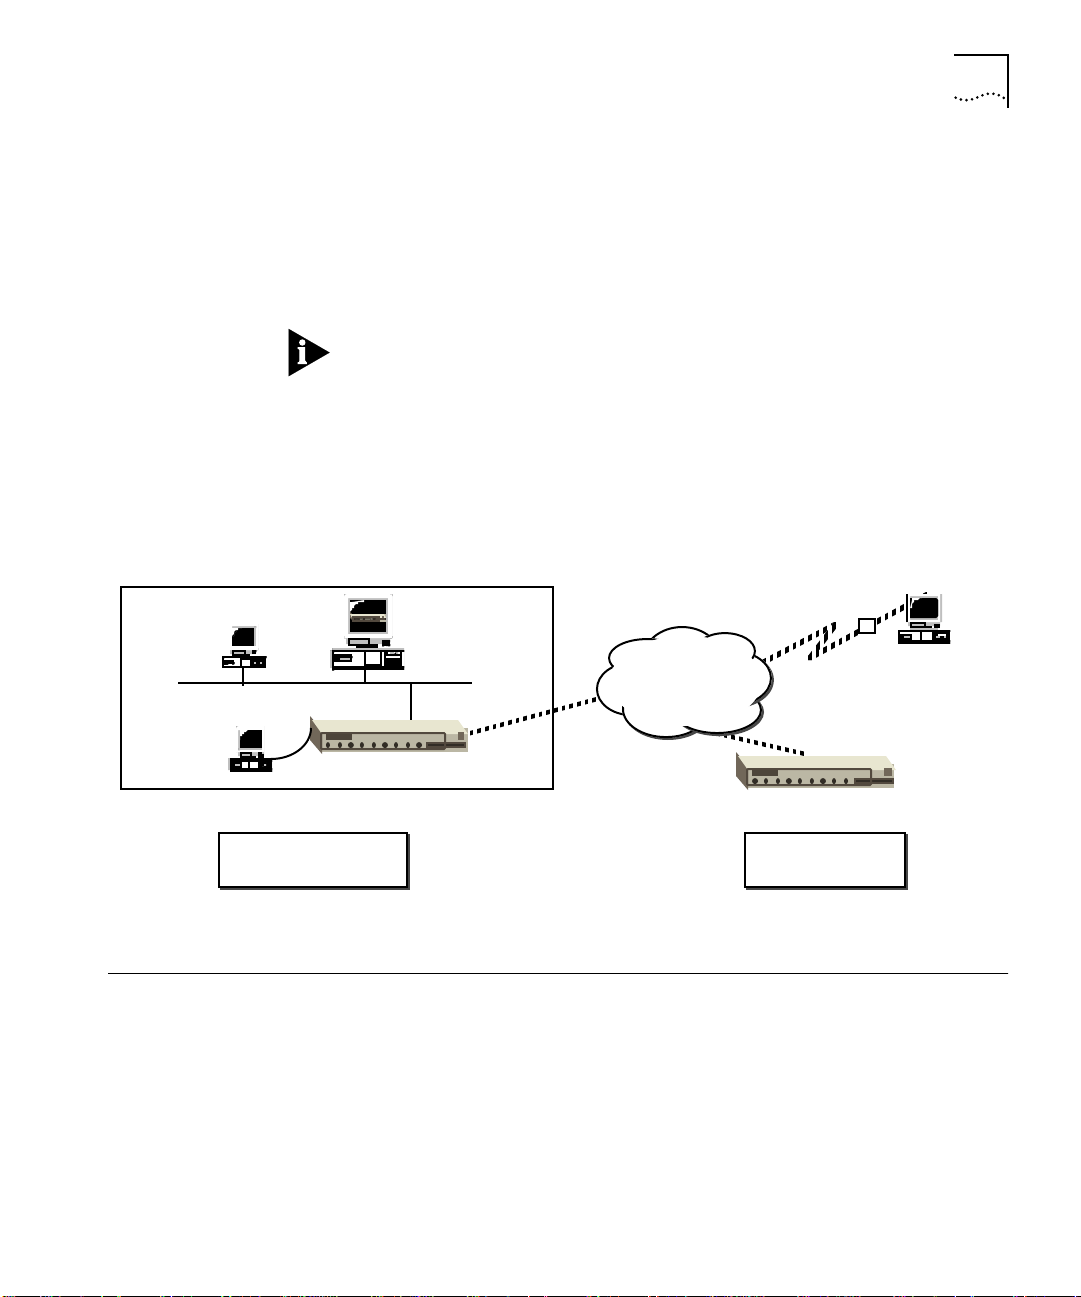
AccessBuilder
Management
You will want to consider how the AccessBuilder 4000 will be
managed. Figure 2-1 illustrates the methods of managing the
AccessBuilder family.
Figure 2-1 Managing the AccessBuilder
Unpacking the
System
To unpack the system:
1 Remove the unit from the original shipping carton.
2 Inspect the chassis for shipping damage.
If you find any damage, contact the shipping company to file a report.
If the chassis must be returned to the factory, repack and ship it in the
original shipping cartons.
Analog or
ISDN Telco
Network
Console, accessed
remotely via
dial-up connection
M
AccessBuilder 4000 or 2000
AccessBuilder 4000 or 2000
Console, accessed
via console port
Console, accessed
via telnet
Transcend AccessBuilder
Manager for Windows
(SNMP w/GUI)
Central Site
AccessBuilder(s)
Remote Site
AccessBuilder

2-6 CHAPTER 2: GETTING STARTED
If the original carton was damaged in shipment, repack the system in a
carton that provides equivalent protection before returning it to 3Com.
3 Verify that you have received all items included with the unit.
If you have not received all items on the packing list, first check the
Release Notes for any late changes, then contact your AccessBuilder
supplier for assistance.
4 Verify that the AccessBuilder 4000 system's power specifications listed
in Appendix A corresponds to your facility's available power source.
If the available power source does not correspond to the acceptable
range, contact your AccessBuilder supplier for assistance.
5 Write down the serial number of the chassis and the MAC address.
The serial number and MAC address are listed on labels on the bottom
of the unit. The label contains the UL listing, FCC numbers, and the
serial number with a bar code.
WARNING: Before powering on the system, make sure that the cover is
properly secured in place. Powering on the system without the cover in
place can result in overheating the system and the potential for electric
shock.
Hardware AccessBuilder 4000 Chassis
Rack Adapter Kit
Power Cable
BNC Connector
Software 1 CD-ROM
Documentation Information Roadmap
AccessBuilder 4000 Installation Guide
Remote Client Installation Guide
AccessBuilder Server Release Notes
Remote Client Release Notes
Hardware Installation 2-7
Hardware
Installation
The following is a step-by-step procedure for performing the
AccessBuilder 4000 hardware installation.
Stand Alone Pick a suitable location for the AccessBuilder 4000. Either a desktop or
similar level surface may be used. You may also want to locate the
modems near the unit. Be sure there are no obstructions on the sides
of the AccessBuilder to permit adequate airflow for cooling.
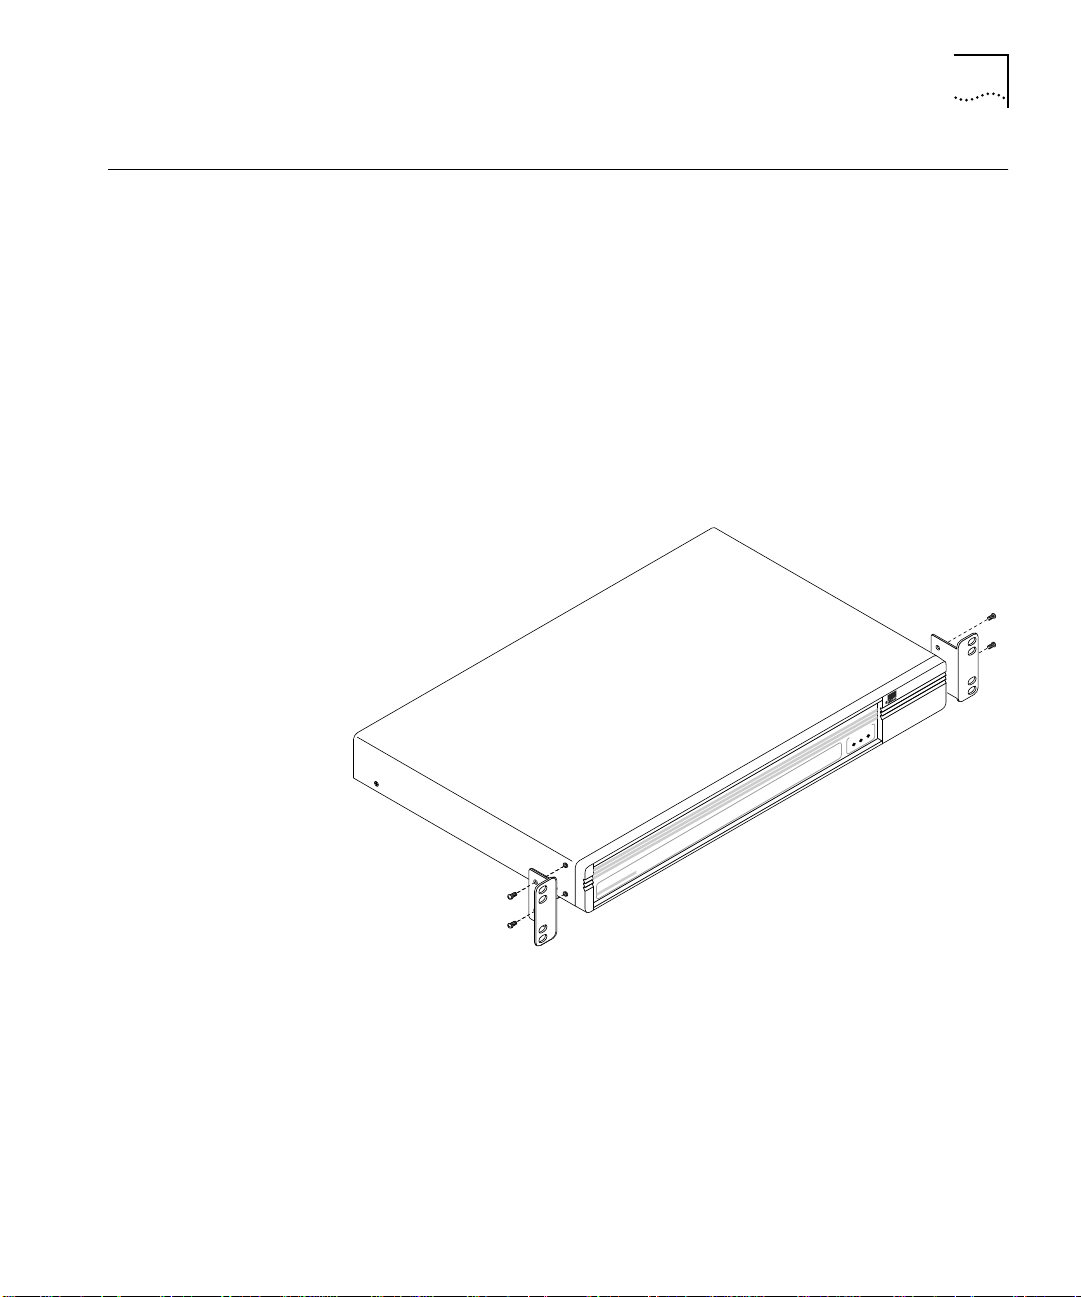
Rack Mounting If rack mounting is desired, attach the rack adapter ears (included) as
show in Figure 2-2. The AccessBuilder 4000 requires 1.5 RU (rack unit)
of height in the rack. Be sure there are no obstructions on the sides to
permit adequate airflow for cooling.
Figure 2-2 Rack Ears Installation
AccessBuilder
4000
PowerPower
StatusStatus
ActivityActivity
SYSTEM STATUSSYSTEM STATUS
2-8 CHAPTER 2: GETTING STARTED
LAN Connection
(Mandatory)
This connection is required in either Ethernet or Token Ring
environments.
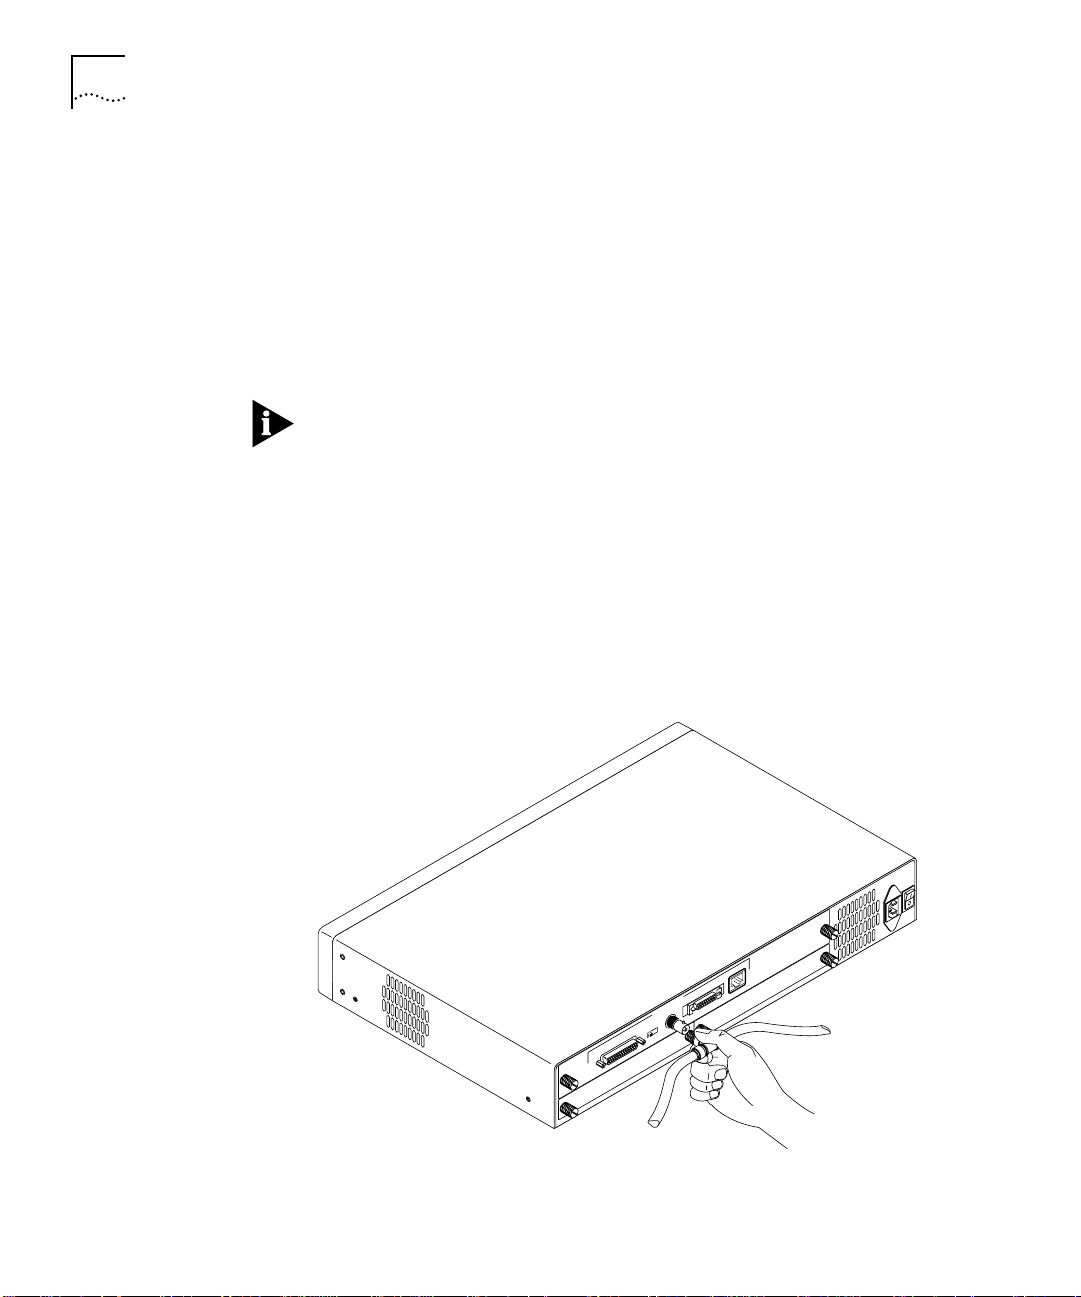
Ethernet
1 Connect your Ethernet LAN to the appropriate interface connector for
your media type (10BaseT, BNC, or AUI). These connectors are located
on the rear panel. If a 10Base5 (thick Ethernet) connection is required,
use a third-party AUI to coax transceiver. Move the media selector
switch to the appropriate position.
When using an external 10Base5 (thick Ethernet) transceiver, the
AccessBuilder’s LAN controller test will fail if the BNC interface is NOT
terminated. If this happens, be sure that a 50-ohm BNC termination
resistor is installed on each end of your cable run and reboot the
system.
2 Install and connect your I/O card (or cards) to your modems, CSU/DSU,
ISDN line, etc. Refer to Appendix C for details.
3 (Console connection -- optional step) Connect a terminal or a PC
running terminal emulation (DTE) with a straight-through cable to the
AccessBuilder’s console port (DCE). Default settings are 9600 Baudrate,
8 bits, 1 stop bit and no parity.
Figure 2-3 AccessBuilder Ethernet Thin LAN Connection
110-240 VAC
50-60 Hz 1A
UTP
CONSOLE
BNC
BNC/AUI/TPE
ETHERNET
AUI
SLOT 2
SLOT 1
Thin Ethernet
Connection
Hardware Installation 2-9
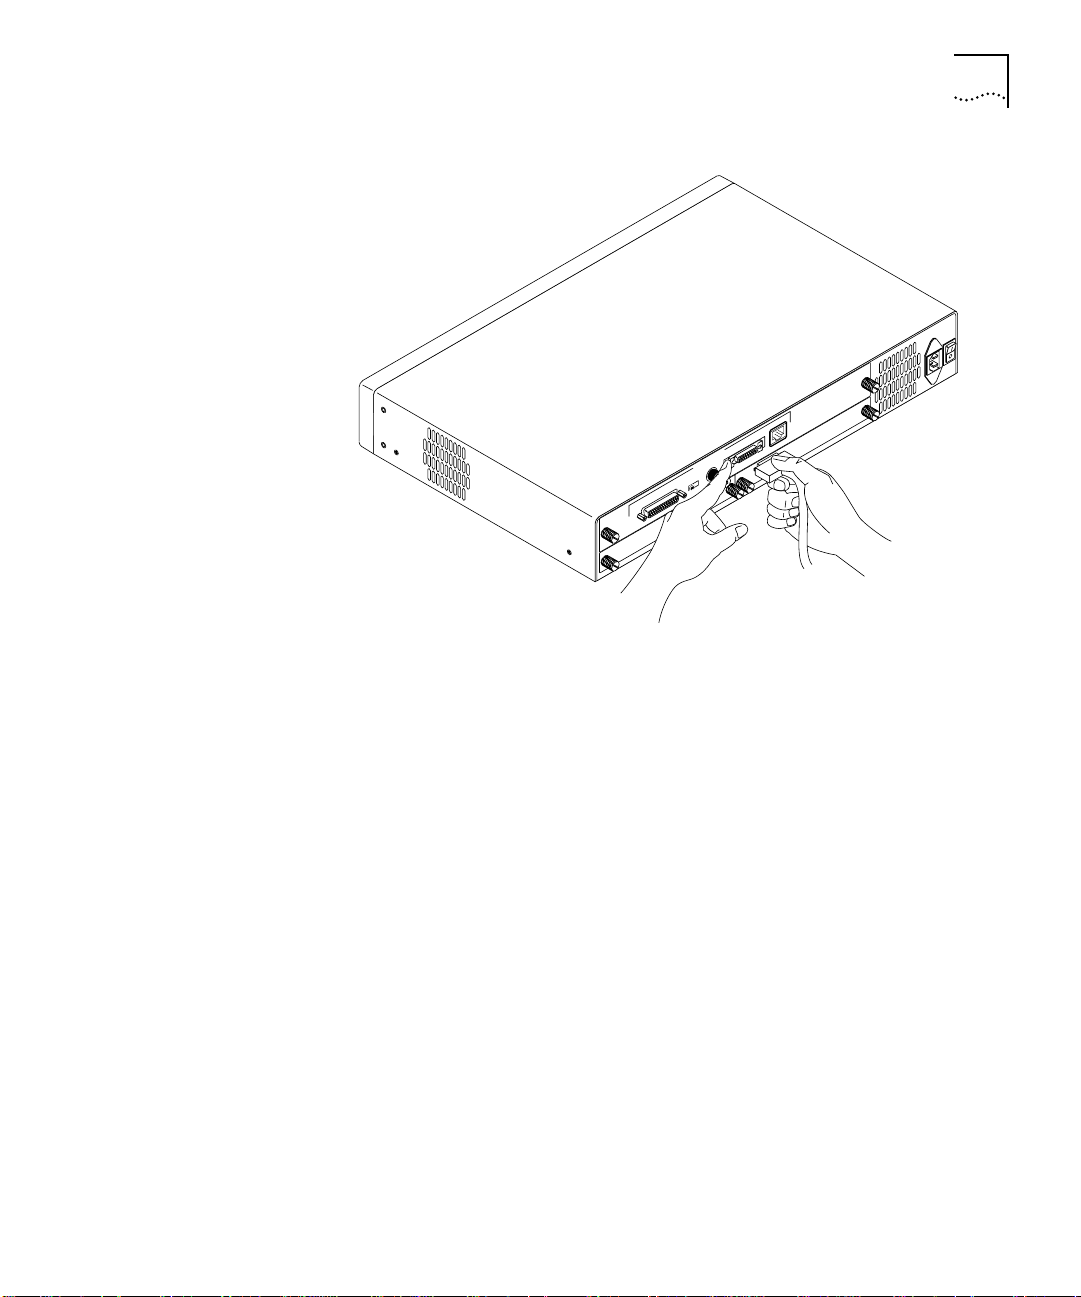
Figure 2-4 AccessBuilder Ethernet AUI LAN Connection
Token Ring
1 Set the Token Ring 4M/16M speed switch to the appropriate ring speed
and attach the AccessBuilder to your ring.
2 Install and connect your serial card (or cards) to your modems,
CSU/DSU, ISDN line, etc. Refer to Appendix C for details.
Power Up If you plan to use TABM to manage the AccessBuilder over an IP
network, be sure the TABM software has been installed and launched
on your management workstation before you power up the
AccessBuilder 4000. Otherwise the BootP requests (for assigning an IP
address) issued by the newly installed AccessBuilder will not be “heard”
by TABM.
Proceed to Chapter 3 to install the TABM software on your Windows
workstation. Once TABM has been installed and launched, newly
installed AccessBuilders on the network will be identified by the
TABMTOOL utility (IP only).
110-240 VAC
50-60 Hz 1A
UTP
CONSOLE
BNC
BNC/AUI/TPE
ETHERNET
AUI
SLOT 2
SLOT 1
AUI Connection
2-10 CHAPTER 2: GETTING STARTED
When more than one AccessBuilder is installed on the network (IP or
IPX), record the MAC address of each unit (located on the rear panel)
so you will know which one you are configuring from TABM.
The Power indicator on the front panel will glow when the
AccessBuilder has been powered on.
Console/Modem
Configuration
(Optional)
If you have decided to configure the AccessBuilder locally using a
console, or wish to perform remote downloading of configuration or
system software, or wish to monitor the AccessBuilder, perform the
following:
For Terminal Connection
Connect a terminal or a PC running terminal emulation (DTE) with a
(user supplied) straight through cable to the AccessBuilder’s console
port (DCE). Default settings are 9600 Baudrate, 8 bits, 1 stop bit and
no parity.
After powering up the AccessBuilder, power-up tests and the 3Com
copyright notice should appear on the screen.
If you are not attached to a NetWare LAN right now (i.e., you are on
an IP network), you may see the following message "The IPX Network
for LocalPath ethernet couldn't be learned", this is due to
AccessBuilder's autoconfiguration function in a NetWare environment:
you can ignore this message.
Press the <CR> key once or twice to produce the login prompt. If the
login prompt fails to display, check the following:
■ Proper power service by confirming that the power light on the
front of the AccessBuilder unit is on.
■ Proper cabling configurations.
■ Proper terminal parameters.
If you still cannot obtain the login prompt, call your AccessBuilder
supplier or 3Com for technical assistance.
Console/Modem Configuration (Optional) 2-11
For Modem Connection
(Remote AccessBuilder Management Only). Connect the modem
(a DCE device) to a null modem cable conforming to the VT-100
specification to the AccessBuilder’s console port (also DCE) on the rear
panel. The modem should be set to power up with default settings of:
9600 Baudrate, 8 bits, 1 stop bit and no parity.
It may be necessary to first connect the modem to a terminal in order
to reconfigure the modems’ default settings to autoanswer, etc. (refer
to your modem documentation for this procedure). Once this is
accomplished, the modem connection can be moved to the
AccessBuilder 4000’s console port.
Telnet Users (IP Only) If you wish to use Telnet to perform configuration, the \must
first have an IP address. This can be accomplished two ways:
1 Using TABMTOOL to detect the AccessBuilder’s BootP request, then
assigning the IP address through TABM’s AccessBuilder Configuration
Parameters dialog box. Note the TABM management station and the
AccessBuilder must on the same subnet.
2 Using the AccessBuilder’s command line user interface via a modem or
local console. Refer to the section “Setting the AccessBuilder’s IP
Address” in the Procedures section of TABM’s on-line help or Chapter 2
of the AccessBuilder Configuration Guide.
The Telnet default port in TABM and the AccessBuilder is 3000. If you
need to change the default, use the System dialog box in TABM to
change the selected AccessBuilder. To change the default on your
workstation, refer to your Telnet third-party documentation for
procedures.
SNMP Management If you wish to manage or obtain operational statistics for the
AccessBuilder via an SNMP based network management station, such
as HP OpenView or SunNet Manager, an AccessBuilder Enterprise
MIB is included on the backup diskette for this purpose. Refer to the
documentation provided with your network management MIB
compiler/parser software for instructions on how to integrate the
AccessBuilder MIB.
Note that in the case of an IP network, you must have previously
assigned an IP address to the AccessBuilder(s) you wish to manage.

2-12 CHAPTER 2: GETTING STARTED
3
CONFIGURATION USING
T
RANSCEND ACCESSBUILDER
M
ANAGER (TABM)
General The Transcend AccessBuilder Manager (TABM) application is a Microsoft
Windows-based tool for configuring and managing AccessBuilder
remote access servers. Features include:
■ Automatic discovery of all AccessBuilder servers that respond on
the network
■ At-a-glance list of all servers known to the application
■ External view of an AccessBuilder server showing status of any
installed ports
■ Menu-driven quick installation of new AccessBuilder servers
■ Password protection
■ Detailed on-line help
This section contains the following:
■ System Requirements
■ Installing the TABM Application
■ About the TABM Application and its on-line help
■ Starting the TABM Application
■ Starting Up a New Server
■ Configuring a Server Using Guided Configuration or Basic
Configuration
Basically, the purpose of this chapter is to help you get TABM installed
and launched, then pass you to TABM’s on-line help for configuration
procedures. If you plan to perform the AccessBuilder configuration
through the AccessBuilder’s command line interface, refer to the
optional AccessBuilder Server Configuration Guide for detailed
information about the various parameters and procedures involved in
setup.
Loading...