


This manual covers installation and operating instructions for the following 3Com® modems:
U.S. Robotics® Cable Modem CMX 3CR292-DE56 (model 2940)
U.S. Robotics® Cable Modem CMX 3CR292-DE40 (model 2941)
3Com, the 3Com logo, U.S. Robotics, the U.S. Robotics logo, EtherLink, and OfficeConnect are registered trademarks and Connections is a trademark of 3Com Corporation. Windows is a registered trademark of Microsoft Corp. Macintosh is a registered trademark of Apple Computer, Inc. Any other trademarks, trade names, or service marks used in this manual are the property of their respective owners.
Copyright © 1999 3Com Corporation
3800 Golf Road
Rolling Meadows, IL 60008
All Rights Reserved

TABLE OF CONTENTS
Introduction |
1 |
Cable Modem Features |
1 |
Before You Begin |
3 |
Contacting Your Local Cable Company |
3 |
Preparing Your Workspace |
5 |
You Will Need These Items |
5 |
Configuring the TCP/IP Protocol on a Windows PC |
6 |
Configuring the TCP/IP Protocol on a Macintosh PC |
8 |
Hardware and Software Installation |
11 |
Wall-Mount Installation |
11 |
Desktop Installation |
13 |
OfficeConnectâ Stacking Installation |
13 |
Connecting the Cable Modem to Your Computer |
15 |
Installing the Cable Connectionsä CD-ROM |
18 |
Cable Modem Operation |
19 |
Troubleshooting and Support Resources |
23 |
Support Resources |
25 |
If You Are Still Having Problems |
26 |
If You Need to Return the Modem to Us |
26 |
Regulatory Information and Limited Warranty |
29 |
Manufacturer’s Declaration of Conformity |
29 |
3Com Corporation Limited Warranty |
32 |

INTRODUCTION
Congratulations! You have just purchased a modem that features a pioneering new technology. 3Com, a leader in networking and data access, is proud to offer you this technology that makes Internet access possible at speeds previously only imagined!
This external cable modem is one part of a comprehensive communications system that utilizes the cable television network to deliver high-speed data to your computer. Data is requested and sent over the cable television network at burst rates of up to 38 megabits per second (Mbps).
Cable Modem Features
∙User data rates of up to 3000K,* faster than 56K analog modems, ISDN, or ADSL
∙Two-way design means that the CMX sends and receives data over the cable line (unlike one-way modems, which require an analog modem for upstream data)
∙Plug and play operation ensures easy setup and installation
∙DOCSIS-compliant for interoperability with cable operators
∙3Com’s extensive user support organizations and our 5-year limited warranty
*Please note that the following factors affect the speeds you may experience:
∙Your computer equipment and configuration, including the speed of your processor, the amount of RAM on
1
INTRODUCTION
your system, and your available hard disk space.
∙The Internet browsing, e-mail, or other programs you run at the same time, which use your computer’s resources.
∙The capacity of the Internet service you order from your provider.
∙Changing network traffic levels depending when you go online.
2

BEFORE YOU BEGIN
This chapter explains how to prepare your computer system for cable modem installation.
Contacting Your Local Cable
Company
In order to use your cable modem, you need to establish an Internet access account with your local cable company. Before contacting your cable company to establish an account, have the following information handy:
∙
MAC address is 00104B377410. Write the MAC address in the blank provided below.
∙The modem’s model number (located on a sticker on the bottom of the modem). Your modem’s model number will be 2940 or 2941.
MAC address: EA = __________________
Model number (circle one): 2940 or 2941
3
BEFORE YOU BEGIN
You should now contact your local cable company and verify the following:
∙You have cable service to your home that supports two-way cable modem access. If your cable company does not provide two-way service, the
U.S. Robotics Cable Modem CMX will not be able to communicate with your cable company’s Internet access service. You should immediately consult your cable company and place of purchase to determine the proper U.S. Robotics cable modem that will work with your cable company. You can also visit the following URL for additional information:
http://www.3com.com/cablemodem
∙Your cable company has set up your cable Internet access account. Your cable company will establish an Internet
4
access account that will allow you to send and receive e-mail, access the World Wide Web, and receive other Internet services. This account must be established before you can use your cable modem.
∙You have a cable line near your PC and it has been prepared for cable modem service. If you do not have a cable line in your home that supports two-way cable modem access or if your current cable connection is not conveniently located near your computer, your cable company can install one. If you use your cable line for cable television access, your cable company can also install an additional line for use with your cable modem.

BEFORE YOU BEGIN
Preparing Your Workspace
∙Position your computer so that it is located near your cable outlet.
∙The cable modem should be located near your computer and the cable outlet. There should be plenty of room to guide the cables away from the modem without crimping the cables.
∙The modem should be located where it has ample space to allow constant airflow around the unit.
∙Do not stack anything on top of the cable modem. (See the instructions on page 13 concerning stacking this modem with 3Com OfficeConnect products.)
∙The temperature in the room where the
cable modem will be operating should be between 0 and 40°C (32 and 104°F).
Relative humidity should be between 5 and 95%, non-condensing.
∙Familiarize yourself with all of the materials in this box. Please read these installation instructions thoroughly before installing your cable modem.
 CAUTION: Your cable company will provide a cable connection. Do not attempt any rewiring without first contacting your cable company.
You Will Need These Items
Included:
∙Cable modem
∙Cable modem power supply
∙RJ-45 network cable
∙Rubber feet and stacking clips kit
∙Cable Connections™ CD-ROM
5
BEFORE YOU BEGIN
∙Fold-out Quick Installation Guide
∙This User’s Guide & Reference
Not Included:
∙A PC running Windowsâ 95 (or later) or a Macintoshâ running System 7.5 (or later) with TCP/IP protocol installed (see the following two sections for more information on installing TCP/IP)
∙An active two-way cable line
∙An active Ethernet port or network interface card (NIC) installed in your computer
∙A 7/16 inch (or adjustable) wrench for securing the cable line to the modem
∙A screwdriver, pushpins, and screws (for optional wall-mounting) The screw heads should be at least 0.2” (5mm) in diameter for them to be properly captured in the slot. If you are using
wood screws, use #6 pan heads or equivalent.
Configuring the TCP/IP Protocol on a Windows PC
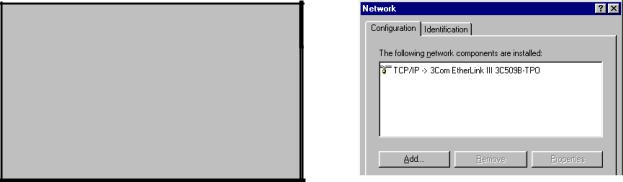
If you have a PC running Windows 95 or later, you need to make sure the TCP/IP communications protocol is installed on your system before you install your cable modem. The listing of actual components installed on your PC depends on the hardware installed in your computer. The installation example in this guide assumes a 3Com EtherLinkâ III 3C509B-TPO NIC has been installed and the screen images shown below reflect this hardware configuration. Other networking cards will work but the screen images will look somewhat different.
6
BEFORE YOU BEGIN
 NOTE: If you need to install a network interface card to give your computer Ethernet capability but have not yet done so, perform this operation first by consulting your NIC installation manual and then return here to complete installation of the TCP/IP software.
1.Click Start, point to Settings, and then click Control Panel.
2.Double-click the Network icon.
3.A list of installed network components appears. Look for an entry that includes TCP/IP -> followed by the NIC hardware device installed in your computer. (The entry for the 3C509BTPO example is shown in the following screen image).
If an entry similar to this is present, go to step 9 on the next page.
4.If a similar entry is not present, click
Add...
5.Click Protocol, and then click Add...
6.Click Microsoft in the “Manufacturers:” list and then click TCP/IP in the “Network Protocols:” list. Click OK.
7

BEFORE YOU BEGIN
7.“TCP/ IP” will appear in the list of installed network components. Click
OK.
8.Windows will now ask you if you would like to restart your computer. Click No.
9.Your cable company may provide you with additional TCP/IP setup instructions. Consult those instructions, if provided, to complete configuration of
your PC to work with your cable modem. When you are finished, turn to “Hardware and Software Installation” (page 11).
Configuring the TCP/IP Protocol on a Macintosh PC
You will need to configure TCP/IP to work with your cable modem if you are using a Macintosh.
1.Double-click your System folder.
2.Double-click Control Panels.
3.Look for the TCP/IP Control Panel icon.
8
BEFORE YOU BEGIN
If you do not see this icon, you must reinstall your Macintosh system software and add networking support. Consult your Macintosh User Manual for more information on how to do this.
4.Exit out of all open windows.
5.Your cable company may provide you with additional TCP/IP setup instructions. Consult those instructions, if provided, to complete configuration of your Mac to work with your cable modem. When you are finished, turn to “Hardware and Software Installation” (page 11).
9
 Loading...