


NPS-520
MFP Print Server
Quick Start Guide
Version 1.00
Edition 1
11/2006
Table of Contents ENGLISH 1 DEUTSCH 17 ESPAÑOL 33 FRANÇAIS 49 ITALIANO 65
РУССКИЙ 81 SVENSKA 99
Copyright © 2006. All rights reserved.
ENGLISH
Overview
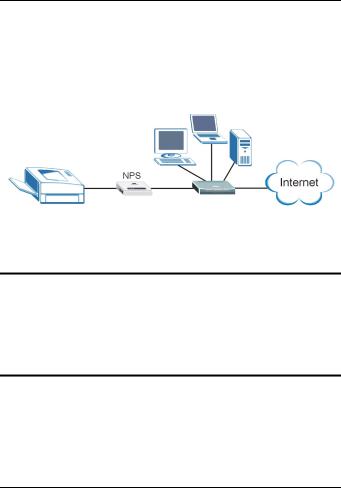
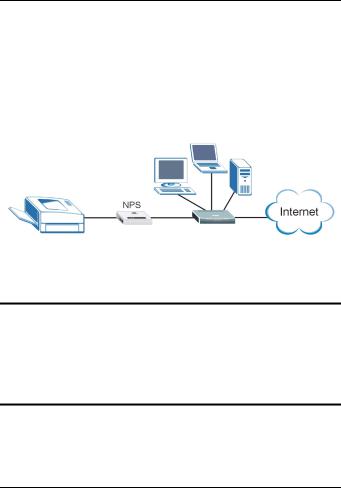
The NPS-520 is a print server and comes with one Ethernet port and one USB (v2.0) port. You can use the USB port to share a printer with the computers in the network to which the NPS-520 (labeled NPS in the following graphic) is connected.
Through the NPS-520, the printer works as if it is connected directly to your computer.
"You should have already installed the driver (and utility if there is one) for the printer (connected to the NPS-520) on your computer. Refer to your printer documentation for more information.
This guide shows you how to:
1 Install the hardware.
2 Install and use the ZyXEL utility to manage the NPS-520.
1
ENGLISH
See page 14 for a list of system requirements.
"If your computer operating system version is older than Windows 2000 SP4, you can only print on a printer even if the printer provides print, copy, fax and/or scan functions.
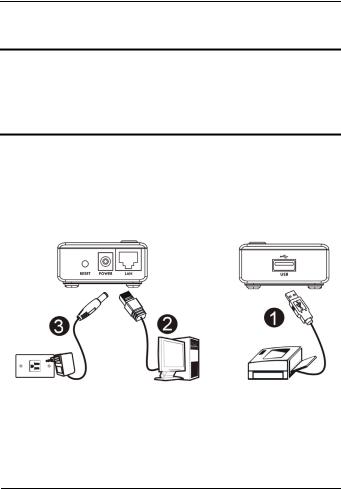
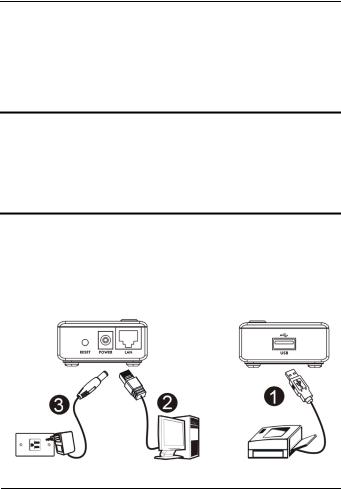
1 Hardware Connection
Follow the steps below to connect the NPS-520 to your network.
1 Connect the USB port to a USB v2.0 compliant printer using a USB cable.
2 Connect the LAN port to your local network using an Ethernet cable.
2
ENGLISH
3 Use the included power adaptor to connect the power socket on the NPS-520 to an appropriate power source.
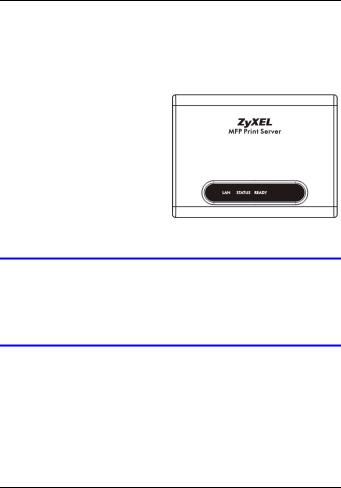
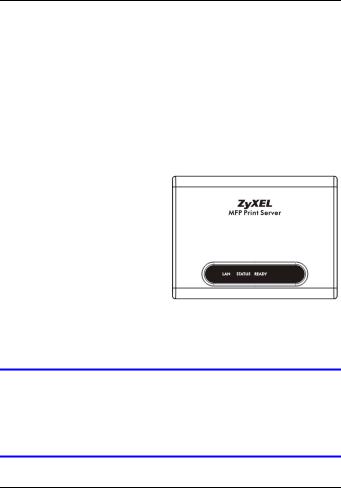
1.1 LEDs
Look at the LEDs (lights) on the top panel.
The READY LED stays on when the system is ready.
The LAN LED stays on if the LAN port is properly connected and blinks when there is traffic.
If none of the LEDs are on, check your connections, and inspect your cables for damage. If the LEDs are still off, contact your local vendor.
2 ZyXEL Utility
Use the utility to install and associate your printer driver as well as manage the NPS-520.
3
ENGLISH
2.1Utility Installation on Windows
"The NPS-520’s default IP address is 192.168.1.6.
The installation procedures are similar for all supported Windows versions.
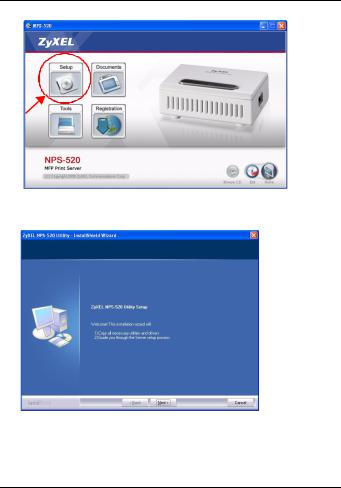
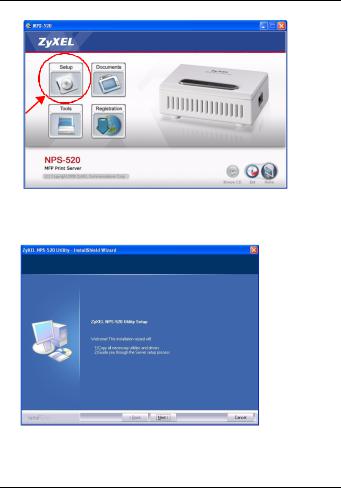
1Insert the included CD into the CD-ROM drive on your computer (that is connected to the NPS-520 directly or connected to your network). When the following screen displays, click Setup.
If the screen does not display, locate and double-click autorun.exe on the CD.
4
ENGLISH
2 Select your preferred language and click OK.
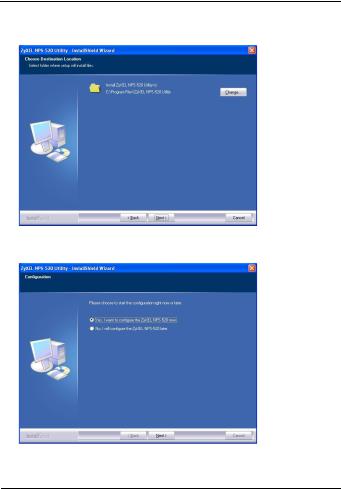
3 The following screen displays. Click Next.
5
ENGLISH
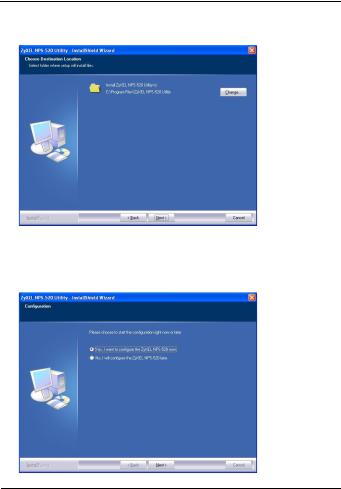
4 Click Next to accept the default file location or click Change to select an alternate folder.
5Select Yes, I want to configure the ZyXEL NPS-520 now and click Next to configure the NPS-520 now.
6

ENGLISH
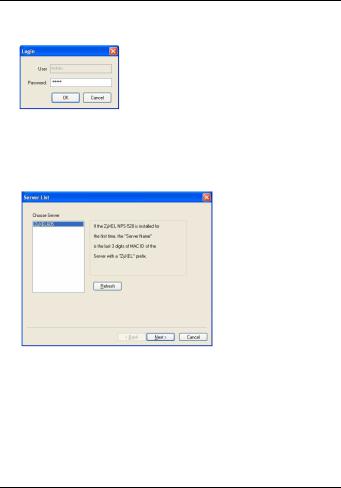
6 Enter the default password (1234) and click OK.
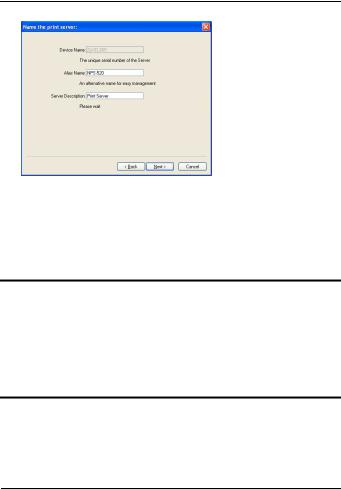
7Your unique NPS-520’s device name automatically displays in the text box. If it does not show up, click Refresh to update this screen. Click Next.
8 Replace the unique generated device name with a more friendly recognizable name with additional descriptive text if you want. Alternatively, leave the fields at the default settings. Click Next.
7
ENGLISH
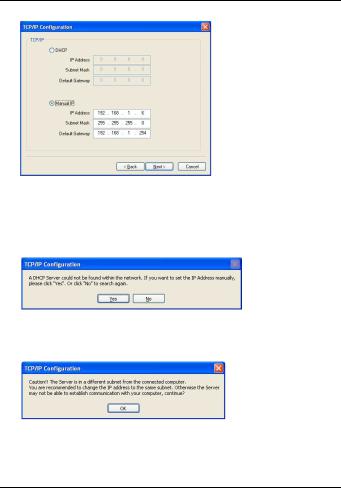
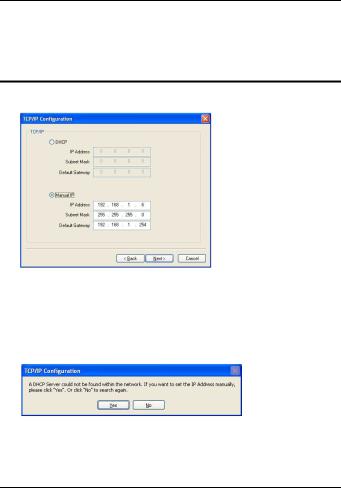
9If the NPS-520 is connected to a network that has a DHCP server, select DHCP to have the DHCP server assign TCP/IP information (such as IP address and subnet mask) to your NPS-520. Otherwise, select Manual IP and enter an IP address (in the same subnet as your network), subnet mask and the gateway’s IP address. Click Next.
"We recommend you give the NPS-520 a static IP address or configure your DHCP server to always give it the same IP address (static DHCP). If the NPS-520’s IP address changes, you need to uninstall and reinstall the ZyXEL utility on each computer that uses it.
8
ENGLISH
If you selected DHCP in the previous screen but there was no DHCP server found in your network, the following screen displays. Click Yes to go back to the TCP/IP configuration screen or click No to have the NPS-520 search for the DHCP server again.
If your computer and the NPS-520 are not in the same subnet, the following screen pops up. Click OK (or Yes) to continue.
10This read-only screen shows the current settings. Check whether what you have configured is correct and click
9
ENGLISH
Finish. Otherwise, click Back to re-configure the information.
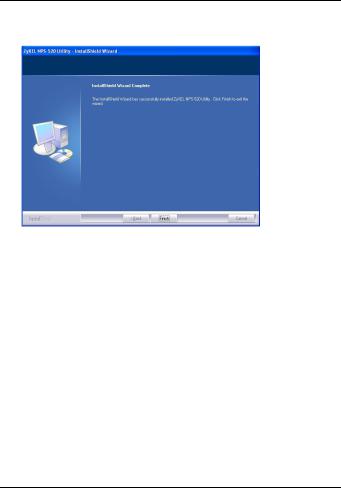
11Click Finish to complete the installation.
12Repeat these steps on each Windows computer in your network that will use the NPS-520.
10
ENGLISH
2.2 Using the Utility on Windows
If you already installed a printer driver, you still need to associate it with the NPS-520.
2.2.1 Printer Driver Installation and Association
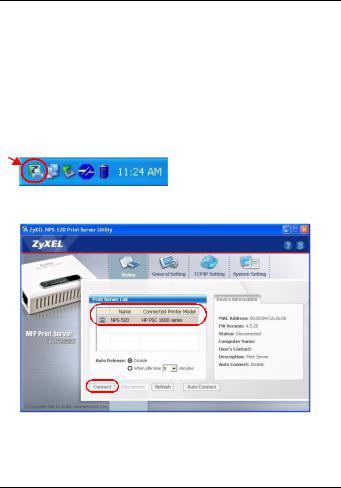
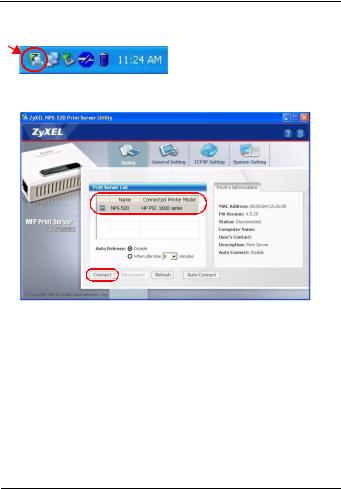
1Start the ZyXEL utility by either double-clicking the utility icon in the system tray or clicking Start > (All) Programs > ZyXEL NPS-520 Utility > NPS-520 Utility.
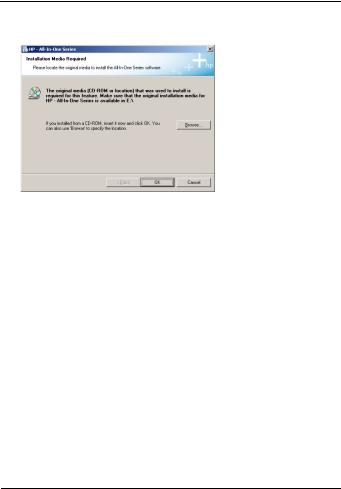
2The Status screen displays. Select the name of your NPS520 and click Connect.
3 Windows automatically detects the printer and prompts you to install the printer driver. Follow the on-screen
11
ENGLISH
instructions to install a new driver and/or have the driver associate with the NPS-520.
2.2.2 Managing the NPS-520
To have computers in the network take turns to use the printer, you need to enable Auto Connect in the utility Status screen and select a default printer. Auto connect allows the NPS-520 to communicate with the printer when you want to use it. The NPS-520 drops the connection after the job is finished.
Alternatively, click Connect and set the Auto Release idle timeout.
12

ENGLISH
"If you disable Auto Release, only that computer can use the printer. Click Disconnect to manually drop the connection.
"The Auto Release and Auto Connect features are not configurable if your computer operating system version is older then Windows 2000 SP4.
13
ENGLISH
"If the printer is not connected or not available when you send out a request, the request will be put in your computer’s print queue untill the printer is available.
If you cannot use the printer, make sure you enable Auto Release and/or Auto Connect on all Windows computers.
3 System Requirements
Before installation, make sure you have a computer with the following:
•Pentium II 300 MHz or above
•A minimum of 20 MB available hard disk space
•A minimum of 32 MB RAM
•A CD-ROM drive
•Windows 98 Second Edition (SE), Windows Me, Windows 2000, Windows 2003, Windows XP
•Windows 98 SE users may need the Windows 98 SE CD
14

ENGLISH
Procedure to View a Product’s Certification(s)
1 Go to www.zyxel.com.
2Select your product from the drop-down list box on the ZyXEL home page to go to that product's page.
3Select the certification you wish to view from this page.
15

ENGLISH
16
DEUTSCH
Übersicht
Der NPS-520 ist ein Druckserver mit einem Ethernetund einem USB-Anschluss (v2.0). An den USB-Anschluss kann ein Drucker angeschlossen werden, der von allen Computern des Netzwerks, an den der NPS-520 (in der folgenden Abbildung als NPS bezeichnet) angeschlossen ist, verwendet werden kann.
Über den NPS-520 arbeitet der Drucker, als wäre er direkt an den Computer angeschlossen.
"Der Treiber (und wenn vorhanden das UtilityProgramm) des Druckers (der an den NPS-520 angeschlossen ist) muss auf dem Computer installiert sein. Weitere Informationen finden Sie im Benutzerhandbuch des Druckers.
In dieser Anleitung wird beschrieben,
17
DEUTSCH
1 wie die Hardware installiert wird und
2wie das ZyXEL-Utility-Programm zum Bedienen des NPS520 installiert wird.
Eine Liste der Systemanforderungen finden Sie auf Seite 31.
"Wenn Ihr Computer mit einem älteren Betriebssystem als Windows 2000 SP4 arbeitet, können Sie mit einem Drucker nur dann drucken, wenn er auch Kopier-, Faxoder Scanfunktion hat.
1 Anschließen der Hardware
Führen Sie die nachfolgend beschriebenen Schritte aus, um den NPS-520 mit dem Netzwerk zu verbinden.
18
DEUTSCH
1Schließen Sie einen USB-2.0-kompatiblen Drucker mit einem USB-Kabel an den Anschluss USB an.
2Schließen Sie das lokale Netzwerk mit einem Ethernetkabel an den Anschluss LAN an.
3Verbinden Sie den Netzanschluss des NPS-520 mit dem mitgelieferten Netzadapter mit einer geeigneten Stromquelle.
1.1 LEDs
Die LEDs (Anzeigeleuchten) auf dem Gerät zeigen den Betriebsstatus des Geräts an.
Die READY-LED leuchtet, wenn das System betriebsbereit ist.
Die LAN-LED leuchtet, wenn
der LAN-Anschluss richtig verbunden ist, und sie blinkt, wenn Daten empfangen oder gesendet werden.
Wenn keine der LEDs leuchtet, prüfen Sie, ob alle Kabel unbeschädigt und richtig verbunden sind. Wenn die LEDs weiterhin nicht leuchten, wenden Sie sich an Ihren Fachhändler.
19
DEUTSCH
2 Das ZyXEL Utility-Programm
Mit dem Ultiliy-Programm wird sowohl der Druckertreiber installiert und mit eventuell bereits installierten Druckertreibern verknüpft als auch der NPS-520 bedient.
2.1 Installieren des Utility-Programms bei Windows
"Die standard IP-Adresse des NPS-520 ist 192.168.1.6.
Die Schritte für die Installation sind bei allen unterstützten Versionen von Windows sehr ähnlich.
1Legen Sie die mitgelieferte in das CD-ROM-Laufwerk des Computers (der direkt mit dem NPS-520 oder mit dem Netzwerk verbunden ist). Wenn das folgende Fenster erscheint, klicken Sie auf Setup (Installieren).
Wenn dieses Fenster nicht erscheint, navigieren Sie auf der CD zur Datei autorun.exe und klicken Sie doppelt darauf.
20
DEUTSCH
2 Wählen Sie eine Sprache aus, und klicken Sie auf OK.
3Das folgende Fenster wird angezeigt. Klicken Sie auf Next (Weiter).
4 Klicken Sie auf Next (Weiter), um den vorgegebenen Standardordner als Speicherort für die Datei zu
21
DEUTSCH
verwenden, oder klicken Sie auf Change (Ändern), um einen anderen Ordner auszuwählen.
5Wählen Sie Yes, I want to configure the ZyXEL NPS-520 now (Ja, ich möchte den ZyXEL NPS-520 jetzt konfigurieren), und klicken Sie auf Next (Weiter), um den NPS-520 zu konfigurieren.
22
DEUTSCH
6 Geben Sie das Standardkennwort (1234) ein, und klicken Sie auf OK.
7 Im Textfeld wird automatisch der einmalige Gerätename des NPS-520 angezeigt. Sollte er nicht angezeigt werden, klicken Sie auf Refresh (Aktualisieren), um die Anzeige dieses Fensters zu aktualisieren. Klicken Sie auf Next (Weiter).
8 Ersetzen Sie den Gerätenamen durch einen Namen, den Sie sich leichter merken können. Sie können aber auch die Standardeinstellungen beibehalten. Klicken Sie auf Next (Weiter).
23

DEUTSCH
9Wenn der NPS-520 mit einem Netzwerk verbunden ist, das über einen DHCP-Server verfügt, wählen Sie die Option DHCP, damit der DHCP-Server Ihrem NPS-520 die TCP/IP-Daten (wie IP-Adresse und Subnetz-Maske) zuweist. Anderenfalls wählen Sie Manual IP (Manuelle IP), und geben Sie eine IP-Adresse (im selben Subnetz wie das Netzwerk), eine Subnetz-Maske und die IPAdresse des Gateways ein. Klicken Sie auf Next (Weiter).
"Es wird empfohlen, dem NPS-520 eine statische IP-Adresse zu geben oder den DHCP-Server so zu konfigurieren, dass er dem NPS-520 immer dieselbe IP-Adresse vergibt (statisches DHCP).
24
DEUTSCH
Wenn sich die IP-Adresse des NPS-520 ändert, muss das ZyXEL Utility-Programm auf jedem Computer, der mit dem Gerät arbeitet, neu installiert werden.
Wenn Sie im vorhergehenden Fenster die Option DHCP gewählt haben, aber im Netzwerk kein DHCP-Server gefunden wurde, erscheint das folgende Fenster. Klicken Sie auf Yes (Ja), um zum Fenster TCP/IP configuration (TCP/ IP-Konfiguration) zurückzukehren, oder auf No (Nein), damit der NPS-520 noch einmal nach dem DHCP-Server sucht.
25

DEUTSCH
Wenn sich der Computer und der NPS-520 nicht im selben Subnetz befinden, erscheint das folgende Fenster. Klicken Sie zum Fortfahren auf OK (oder Yes (Ja)).
10In diesem schreibgeschützten Fenster werden die aktuellen Einstellungen angezeigt. Prüfen Sie die Einstellungen, und klicken Sie auf Finish (Fertig stellen). Um die Einstellungen zu ändern, klicken Sie auf Back (Zurück).
26
DEUTSCH
11Klicken Sie auf Finish (Fertig stellen), um die Installation abzuschließen.
12Führen Sie diese Schritte auf allen Windows-Computern aus, die den NPS-520 benutzen werden.
2.2 Benutzen des Utility-Programms bei Windows
Wenn Sie bereits einen Druckertreiber installiert haben, muss dieser mit dem NPS-520 verknüpft werden.
2.2.1 Installieren und Verknüpfen des Druckertreibers
1Starten Sie das ZyXEL Utility-Programm, indem Sie entweder doppelt auf das entsprechende Symbol in der Taskleiste klicken oder indem Sie es über Start (start) >
27
DEUTSCH
(All) Programs ((Alle) Programme) > ZyXEL NPS-520 Utility > NPS-520 Utility aufrufen.
2Das Fenster Status erscheint. Wählen Sie den Namen des NPS-520, und klicken Sie auf Connect (Verbinden).
3Windows erkennt automatisch den Drucker und fordert Sie auf, den Druckertreiber zu installieren. Führen Sie die Anweisungen auf dem Bildschirm aus, um einen neuen
28

DEUTSCH
Treiber zu installieren und/oder den Treiber mit dem NPS520 zu verknüpfen.
2.2.2 Bedienen des NPS-520
Damit alle Computer im Netzwerk Zugriff auf den Drucker haben, müssen Sie im Fenster Status die Option Auto Connect (Automatisch verbinden) wählen und dort einen Standarddrucker einstellen. Mit der Funktion Auto connect kann der NPS-520 mit dem Drucker kommunizieren, wenn Sie ihn benutzen möchten. Nach abschließen der Druckaufgabe beendet der NPS-520 die Verbindung.
Sie können auch auf Connect (Verbinden) klicken und bei Auto Release (Automatisch freigeben) die Leerlaufzeit einstellen.
29
 Loading...