


848H6393A3 (009)
OWNER’S MANUAL
MODEL: G800BPU
G800BPU-1
WARNING |
|
|
|
|
|
• Do not modify any parts of the engine. |
|
● |
• This engine is designed to be used to Radio |
|
|
controlled products. |
|
● |
• In case any modification by customer, |
|
|
ZENOAH shall not bear any responsibility from |
|
|
the damage caused by such modification. |
|
● |
• Keep ignition system well maintained. |
|
|
|
|
|
September 2010

1.Safety Precautions
•This manual describes the engine. For its mounting and control, see the instruction manual for a radio controlled airplane.
•This engine is designed for use on the radio controlled airplane. If it is used for any other purpose, we cannot be responsible for its reliability or safety.
•Use genuine parts for replacement.
•Check the propeller every time. If it is damaged replace it with a new one.
•If the propeller hits something while the engine is in operation, immediately stop the engine and check it.
•Start the engine on flat surface that is free of loose material or serious injury can occur.
•Never modify the engine, specially ignition system, and rotor.
•Check the flywheel. If it is damaged, replace it with a new one.
•When mixing the fuel, or operating the engine, carry it out in a well-ventilated place.
2.Mounting
Make sure that the engine is mounted on the aircraft grade plywood with more than 9mm of thickness or a mount of equivalent strength and is firmly fixed with 4 bolts.
[ NOTE ]
1.Be sure to set flat washers or metal plate on the reverse side of the mount to prevent bolts from sinking into the mount. Before flying the aircraft, be sure to check for loose bolts.
2.Since this engine is equipped with a float-less carburetor with a diaphragm pump, the position of fuel tank can be freely selected.
3.Propeller
1.Recommended propeller size.
The recommended propeller sizes are as shown in the table bellow.
Diameter x Pitch (in.)
26 x 8~10, 24 x 10~12, 22 x 12~14
This engine produces the maximum output when the engine is running at about 10,000rpm. Be sure to use a propeller which produces approximately 7,000 ~ 10,000rpm while the aircraft is flying. When using a propeller of small diameter, a light weight propeller is not suitable.
2.There are two types of propeller mounting bolts; L=45 and L=50. Select the proper type of bolt depending on the thickness of propeller used and the use of the spinner.
[ NOTE ]
1.When mounting a thin propeller, cut off the end of bolt or add a flat washer.
2.When mounting the spinner, set a pin on the hub with more than 3 mm of diameter, thus preventing slipping.
3.Propeller bolt tightening torque: 250~300kg-cm
4. Fuel
Mix gasoline and high grade 2-stroke oil at a mixing ratio of 25 ~ 40 :1.
2
[ NOTE ]
1.Be sure to use a gasoline-resistant fuel piping. (Do not use any silicon rubber tube).
2.Never use any alcohol fuel or alcohol added fuel, or the rubber part in the carburetor will be damaged.
5.Operation
1.Avoid starting engine by hand flipping propeller as it may cause injury. Make sure to start by using built-in spring starter or large size electric starter with reduction gear (available on the market) .
2.Make sure to put on thick glove when starting engine.
How to Start the Engine
1.Fill the fuel tank with the fuel.
2.Close the choke valve and open the throttle valve approximately 1/3 ~ 1/2 of the full open position.
3.Rotate the propeller counterclockwise until the piston passes over its top dead point. Then rotate it clockwise for 1/2 ~ 3/4 revolution to wind up the spring, and release the propeller. Repeat this several times until the initial firing sound is heard.
4.Upon hearing the initial firing open the choke valve and set the throttle to the idle or slightly open position. Take the same procedure as mentioned above step 3, and the engine will start.
[ NOTE ]
•Be sure to keep holding propeller firmly by other hand while winding up the spring for starter.
•Be sure to open the choke when the engine first fires.
•When the choke is opened, be sure to close the throttle valve to a position near the idle position before starting the engine (If the engine is started while the throttle wide open it will develop a high level of power and thrust which can be very dangerous).
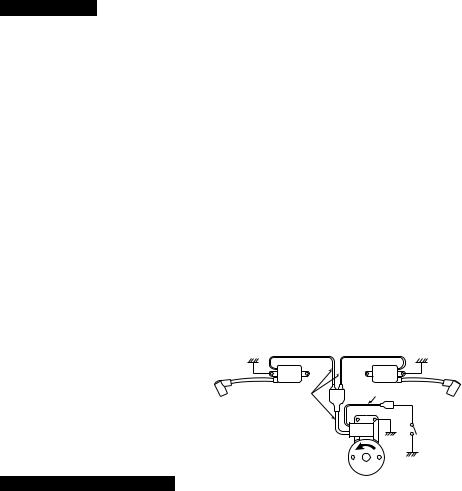
How to Stop the Engine |
|
|
For stopping the engine, the black lead |
|
|
wire from the coil should be grounded to |
RED LEAD |
BLACK LEAD |
the engine body, or the throttle valve |
|
|
|
|
|
should be closed completely. |
|
|
KILL
SWITCH
ENGINE BODY
EARTH
6. Carburetor Adjustment
The carburetor is provided with 3 adjust screws which are set to the best (approximately) positions by our company, but they may need a little adjustment depending on the temperature, atmospheric pressure (altitude), etc. of the area where the engine is used. Start the engine without making any adjustments. Make readjustments only when the engine shows any mal-functioning.
[ NOTE ]
Be sure to stop the engine before starting the adjustment, thus ensuring safety.
Idle Screw: Turning this screw clockwise increases the idling R.P.M. Turning it
3
 Loading...