


LP 2844
Table of contents
 Loading...
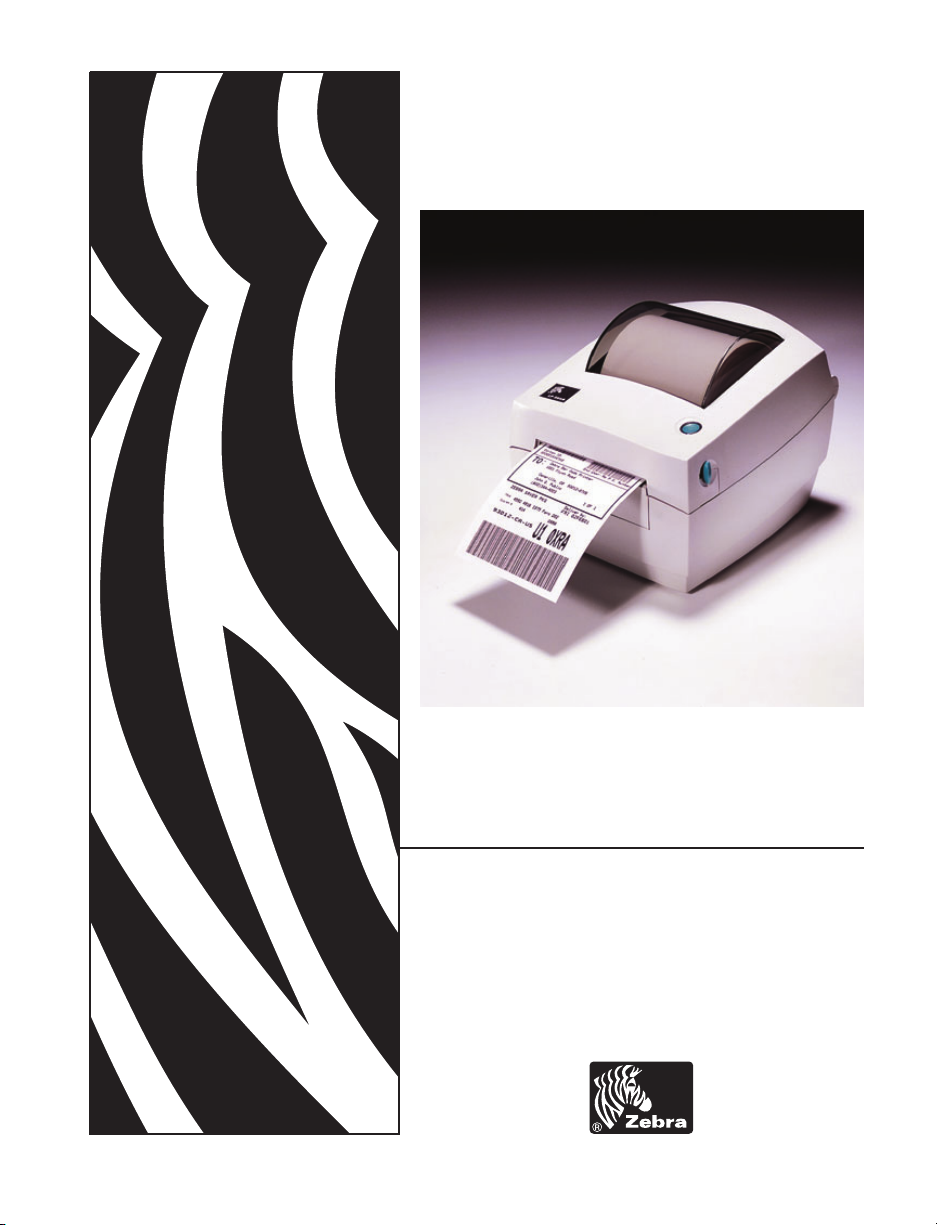
Part #980483-001 | Rev. A
®
Zebra
LP 2844
Desktop Printer
User Guide
TM

ii 980483-001A

Proprietary Statement
This manual contains proprietary information of Zebra Technologies Corporation. It is intended solely for the information and use of parties operating and
maintaining the equipment described herein. Such proprietary information may not be used, reproduced, or disclosed to any other parties for any other purpose
without the expressed written permission of Zebra Technologies Corporation.
Product Improvements
Continuous improvement of products is a policy of Zebra Technologies Corporation. All specifications and signs are subject to change without notice.
FCC Compliance Statement
NOTE: This equipment has been tested and found to comply with the limits for a Class B digital device, pursuant to Part 15 of the FCC Rules. These limits are
designed to provide reasonable protection against harmful interference in a residential installation. This equipment generates, uses, and can radiate radio
frequency energy and, if not installed and used in accordance with the instructions, may cause harmful interference to radio communications. However, there is
no guarantee that the interference will not occur in a particular installation. If this equipment does cause harmful interference to radio or television reception,
which can be determined by turning the equipment off and on, the user is encouraged to try to correct the interference by one or more of the following measures:
■
Reorient or relocate the receiving antenna.
■
Increase the separation between the equipment and the receiver.
■
Connect the equipment into an outlet on a circuit different than that to which the receiver is connected.
■
Consult the dealer or an experienced Radio/TV technician for help.
NOTE: This unit was tested with shielded cables on the peripheral devices. Shielded cables must be used with the unit to insure compliance.
“The user is cautioned that any changes or modifications not expressly approved by Zebra Technologies Corporation could void the user’s authority to operate
the equipment.”
Liability Disclaimer
Zebra Technologies Corporation takes steps to assure that its published Engineering specifications and Manuals are correct; however, errors do occur. Zebra
Technologies Corporation reserves the right to correct any such errors and disclaims liability resulting therefrom.
No Liability for Consequential Damage
In no event shall Zebra Technologies Corporation or anyone else involved in the creation, production, or delivery of the accompanying product (including
hardware and software) be liable for any damages whatsoever (including, without limitation, damages for loss of business profits, business interruption, loss of
business information, or other pecuniary loss) arising out of the use of or the results of use of or inability to use such product, even ifZebra Technologies
Corporation has been advised of the possibility of such damages. Because some states do not allow the exclusion or limitation of liability for consequential or
incidental damages, the above limitation may not apply to you.
Trademarks
The Zebra logo and the zebra head design are both registered trademarks and LP 2844 is a service mark of ZIH Corp. Windows and MS-DOS are registered
trademarks of Microsoft Corp. All marks are trademarks or registered trademarks of their respective holders.
Copyrights
This copyrighted manual and the label printer described herein are owned by Zebra Technologies Corporation. All rights are reserved. Unauthorized
reproduction of this manual or the software in the label printer may result in imprisonment of up to one year and fines of up to $10,000 (17 U.S.C.506).
Copyright violators may be subject to civil liability.
©2004 ZIH Corp. All rights reserved.
980483-001A iii
Shock Hazard
The printer and power supply should never be operated in a location where
either one can get wet. Personal injury could result.
Media
Always use high-quality, approved labels and tags. If adhesive backed
labels are used that DO NOT lay flat on the backing liner, the exposed
edges may stick to the label guides and rollers inside the printer, causing the
label to peel off from the liner and jam the printer. Approved supplies can
be ordered from your dealer.
If media run out while printing, DO NOT turn the power switch OFF (0)
while reloading or data loss may result. After loading new supplies, press
the feed button to resume printing.
Static Discharge
The discharge of electrostatic energy that accumulates on the surface of the
human body or other surfaces can damage or destroy the print head or
electronic components used in this device. DO NOT TOUCH the print
head or the electronic components under the top cover.
Thermal Printing
The print head becomes hot while printing. To protect from damaging the
print head and risk of personal injury, avoid touching the print head. Use
only the cleaning pen to perform maintenance.
iv 980483-001A

Introduction
Hello!. . . . . . . . . . . . . . . . . . . . . . . . . . . . . . . . . . . . . . . . . . . . . . . . . . . . . 1
What's in the Box?. . . . . . . . . . . . . . . . . . . . . . . . . . . . . . . . . . . . . . . . . . . 2
Inspecting the Printer. . . . . . . . . . . . . . . . . . . . . . . . . . . . . . . . . . . . . . . . . 3
Opening the printer . . . . . . . . . . . . . . . . . . . . . . . . . . . . . . . . . . . . . . . 3
Closing the printer. . . . . . . . . . . . . . . . . . . . . . . . . . . . . . . . . . . . . . . . 5
Reporting Damage . . . . . . . . . . . . . . . . . . . . . . . . . . . . . . . . . . . . . . . 6
Related Documentation . . . . . . . . . . . . . . . . . . . . . . . . . . . . . . . . . . . . . . . 6
Getting Started
Modes of Printing . . . . . . . . . . . . . . . . . . . . . . . . . . . . . . . . . . . . . . . . . . . 7
Attaching Power Supply . . . . . . . . . . . . . . . . . . . . . . . . . . . . . . . . . . . . . . 8
Loading Roll Media. . . . . . . . . . . . . . . . . . . . . . . . . . . . . . . . . . . . . . . . . . 9
Placing the Roll in the Media Compartment. . . . . . . . . . . . . . . . . . . . 9
Adjusting the Guides. . . . . . . . . . . . . . . . . . . . . . . . . . . . . . . . . . . . . 10
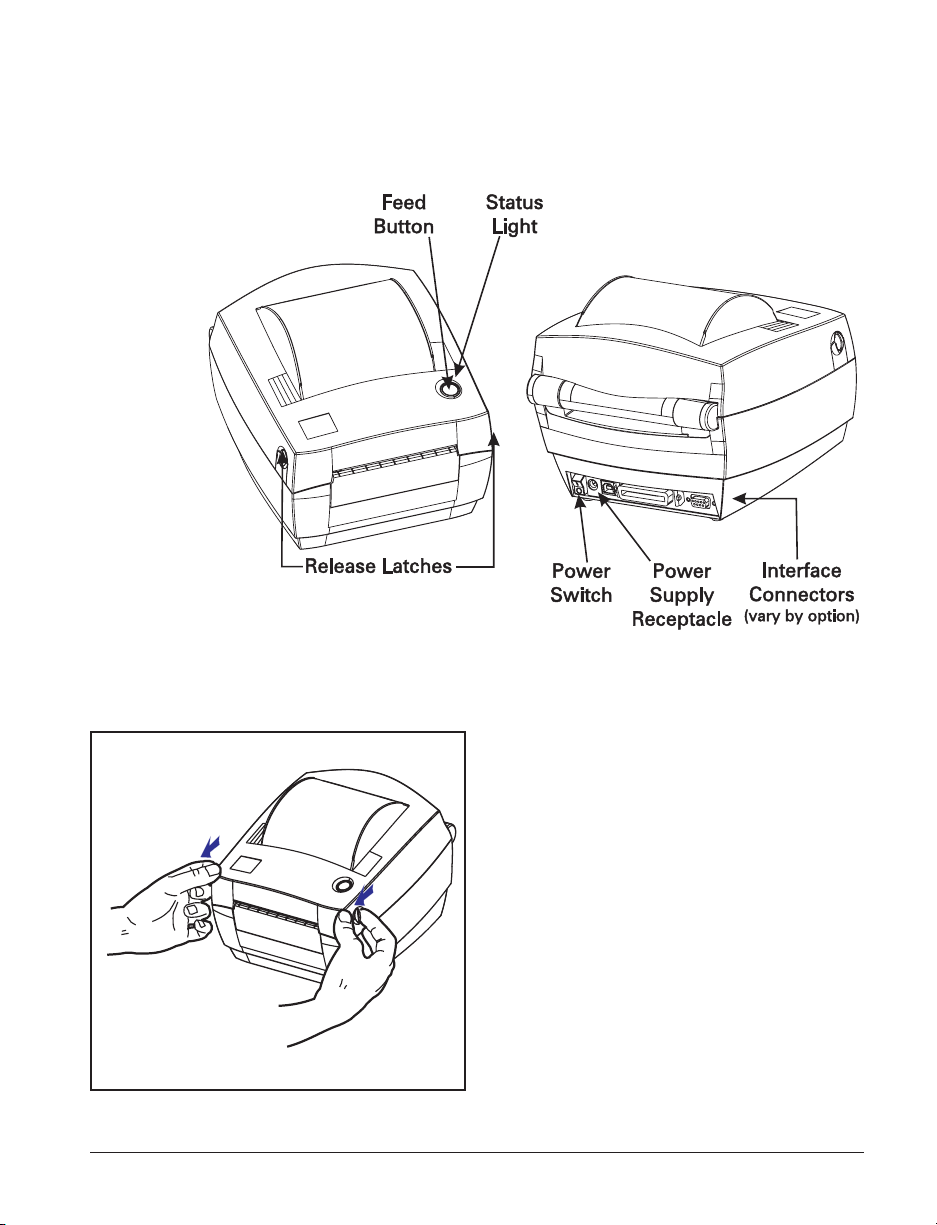
Operator Controls . . . . . . . . . . . . . . . . . . . . . . . . . . . . . . . . . . . . . . . . . . 11
Power Switch . . . . . . . . . . . . . . . . . . . . . . . . . . . . . . . . . . . . . . . . . . 11
Feed Button . . . . . . . . . . . . . . . . . . . . . . . . . . . . . . . . . . . . . . . . . . . 11
Status Light. . . . . . . . . . . . . . . . . . . . . . . . . . . . . . . . . . . . . . . . . . . . 11
Media Length Sensing. . . . . . . . . . . . . . . . . . . . . . . . . . . . . . . . . . . . . . . 12
Hooking Up the Printer and Computer . . . . . . . . . . . . . . . . . . . . . . . . . . 13
Interface Cable Requirements. . . . . . . . . . . . . . . . . . . . . . . . . . . . . . 13
USB Interface Requirements . . . . . . . . . . . . . . . . . . . . . . . . . . . . . . 14
Parallel Interface Requirements . . . . . . . . . . . . . . . . . . . . . . . . . . . . 14
Ethernet Interface Requirements. . . . . . . . . . . . . . . . . . . . . . . . . . . . 14
Serial Interface Requirements. . . . . . . . . . . . . . . . . . . . . . . . . . . . . . 14
Communicating with the Printer . . . . . . . . . . . . . . . . . . . . . . . . . . . . . . . 15
Universal Serial Bus (USB) Communications . . . . . . . . . . . . . . . . . 15
Parallel Communications . . . . . . . . . . . . . . . . . . . . . . . . . . . . . . . . . 15
Internal ZebraNet® PrintServer II™ Communications . . . . . . . . . . 15
Serial Communications. . . . . . . . . . . . . . . . . . . . . . . . . . . . . . . . . . . 16
Adjusting the Print Width . . . . . . . . . . . . . . . . . . . . . . . . . . . . . . . . . . . 17
Adjusting the Print Quality . . . . . . . . . . . . . . . . . . . . . . . . . . . . . . . . . . . 17
Contents
980483-001A v

Operation & Options
Thermal Printing . . . . . . . . . . . . . . . . . . . . . . . . . . . . . . . . . . . . . . . . . . . 19
Replacing Supplies . . . . . . . . . . . . . . . . . . . . . . . . . . . . . . . . . . . . . . . . . 20
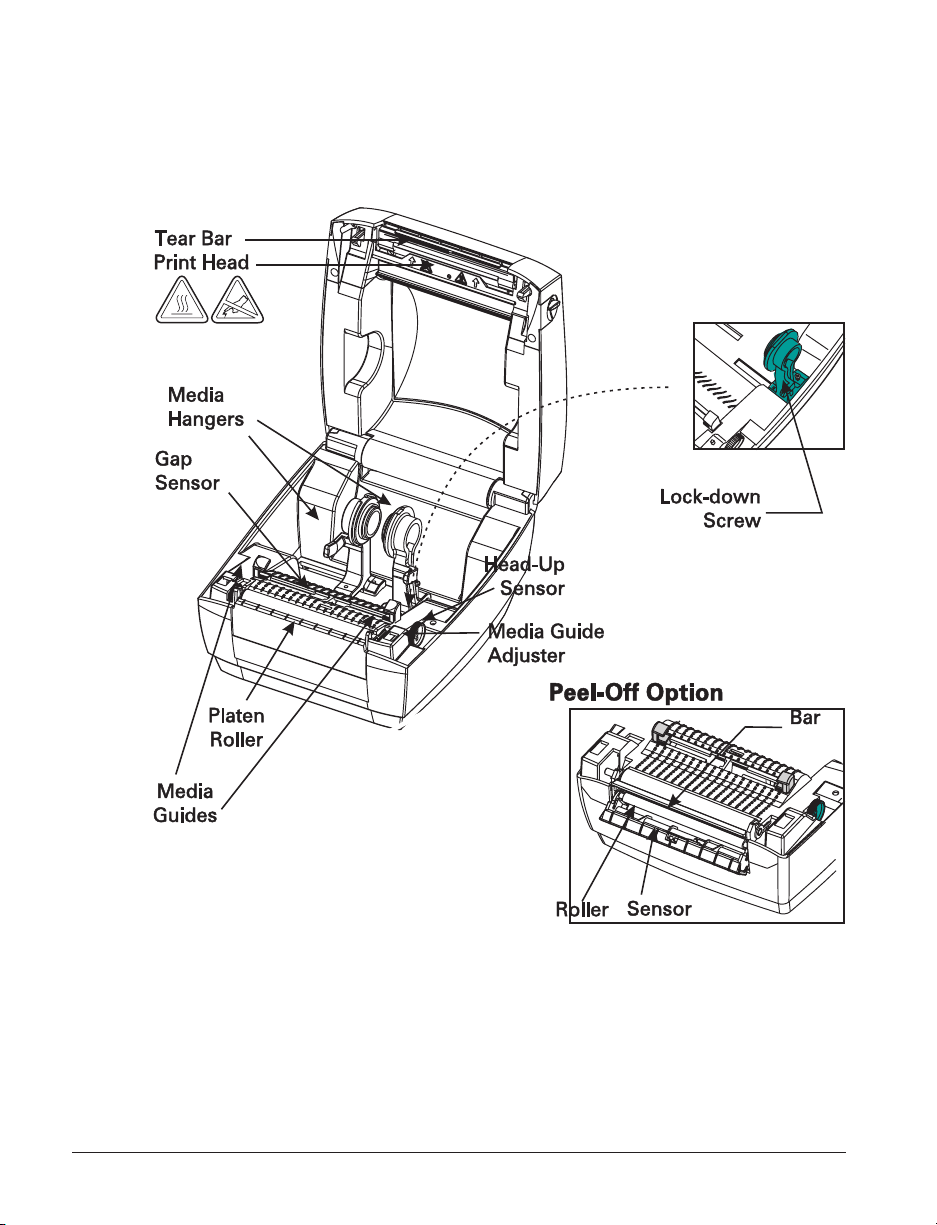
Printing in Peel-Mode . . . . . . . . . . . . . . . . . . . . . . . . . . . . . . . . . . . . . . . 21
Printing on Fan-Fold Media . . . . . . . . . . . . . . . . . . . . . . . . . . . . . . . . . . 22
Using the Cutter Option. . . . . . . . . . . . . . . . . . . . . . . . . . . . . . . . . . . . . . 23
Maintenance
Cleaning. . . . . . . . . . . . . . . . . . . . . . . . . . . . . . . . . . . . . . . . . . . . . . . . . . 25
Print Head Considerations . . . . . . . . . . . . . . . . . . . . . . . . . . . . . . . . 26
Media Path Considerations . . . . . . . . . . . . . . . . . . . . . . . . . . . . . . . . 26
Cleaning Card Considerations . . . . . . . . . . . . . . . . . . . . . . . . . . . . . 26
Platen Considerations . . . . . . . . . . . . . . . . . . . . . . . . . . . . . . . . . . . . 27
Lubrication . . . . . . . . . . . . . . . . . . . . . . . . . . . . . . . . . . . . . . . . . . . . . . . 27
Replacing the Platen . . . . . . . . . . . . . . . . . . . . . . . . . . . . . . . . . . . . . . . . 28
Replacing the Print Head. . . . . . . . . . . . . . . . . . . . . . . . . . . . . . . . . . . . . 29
Direct-Thermal LP Model. . . . . . . . . . . . . . . . . . . . . . . . . . . . . . . . . 30
Troubleshooting
Print Quality Problems . . . . . . . . . . . . . . . . . . . . . . . . . . . . . . . . . . . . . . 36
Manual Calibration . . . . . . . . . . . . . . . . . . . . . . . . . . . . . . . . . . . . . . . . . 38
Resetting the Factory Default Values . . . . . . . . . . . . . . . . . . . . . . . . . . . 39
Communications Diagnostics . . . . . . . . . . . . . . . . . . . . . . . . . . . . . . . . . 39
Feed Button Modes . . . . . . . . . . . . . . . . . . . . . . . . . . . . . . . . . . . . . . . . . 40
Appendix
Interfaces . . . . . . . . . . . . . . . . . . . . . . . . . . . . . . . . . . . . . . . . . . . . . . . . . 41
Universal Serial Bus (USB) Connector. . . . . . . . . . . . . . . . . . . . . . . 41
Parallel Interface. . . . . . . . . . . . . . . . . . . . . . . . . . . . . . . . . . . . . . . . 42
ZebraNet® PrintServer II™ Internal Ethernet PrintServer. . . . . . . . 43
Serial (RS-232) Connector . . . . . . . . . . . . . . . . . . . . . . . . . . . . . . . . 44
vi 980483-001A

980483-001A vii
980483-001A

Hello!
Introduction
This section describes what you get in your shipping box and provides an
overview of printer parts. This section also has procedures that describe
how to open and close the printer and report any problems.
Thank you for choosing a Zebra®LP 2844™ printer, a high-quality
on-demand printer manufactured by the industry leader in quality, service,
and value—Zebra Technologies Corporation. For over 25 years, Zebra
Technologies Corporation has provided customers with the highest caliber
of products and support.
Your printer is a high-quality, on-demand printer. The printer provides
direct-thermal printing.
This manual provides all of the information you will need to operate your
printer on a daily basis. To create label formats, refer to your programming
guide. This guide is available by contacting your distributor or dealer.
NOTE: Many printer settings may also be controlled by your printer’s
driver or label preparation software. Refer to the driver or
software documentation for more information.
Your printer, when connected to a host computer, functions as a complete
system for printing labels and tags.
980483-001A 1
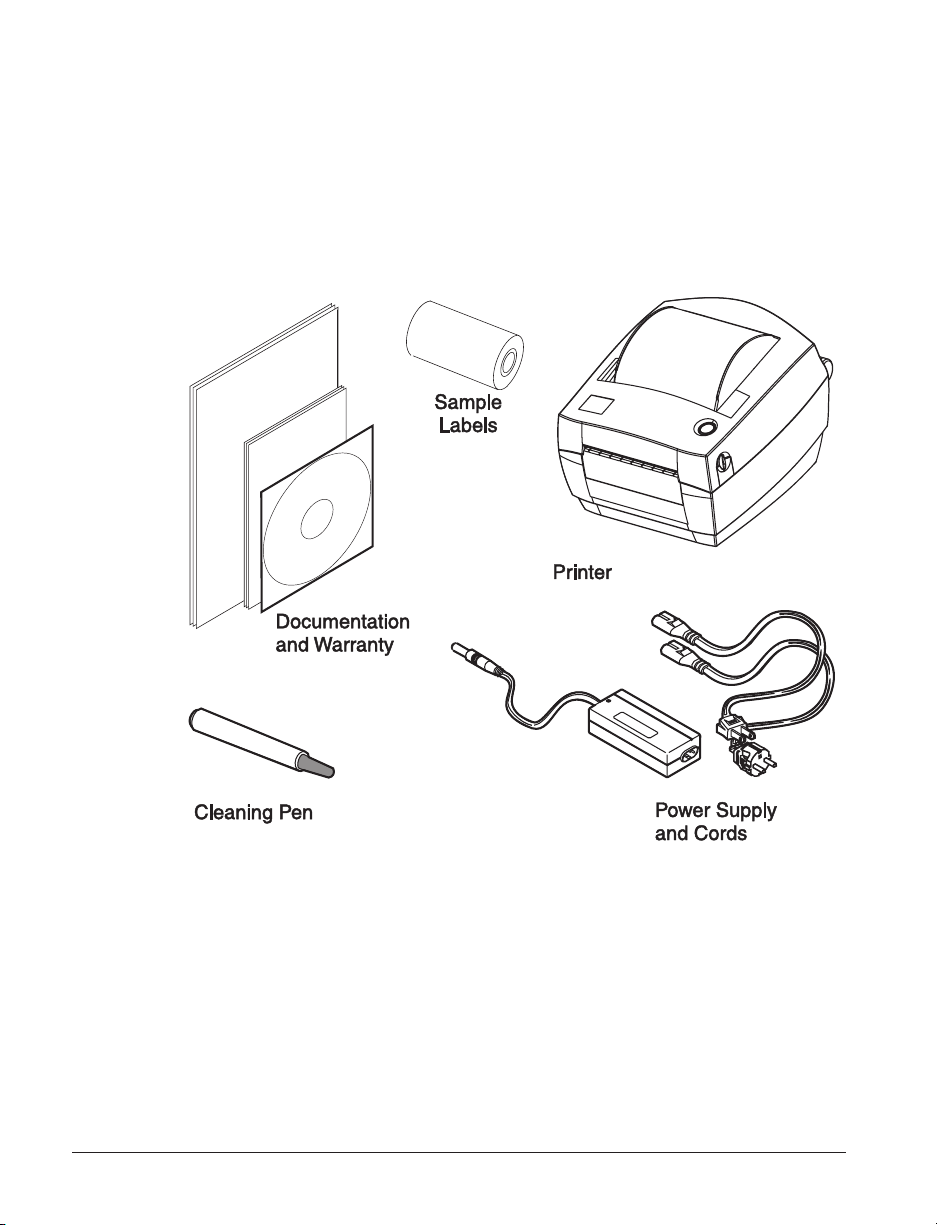
What's in the Box?
Save the carton and all packing materials in case you need to ship or store
the printer later. After unpacking, make sure you have all parts. Follow the
procedures for inspecting the printer to familiarize yourself with printer
parts so you can follow the instructions in this book.
2 980483-001A
Inspecting the Printer
Look at the outside of the printer and make sure that all parts are present.
Opening the printer
To access the media compartment, you
must open the printer.
Pull the release levers towards you and lift
the cover.
980483-001A 3
INSPECTING THE PRINTER (continued)
After opening the printer, check the media compartment.
4 980483-001A
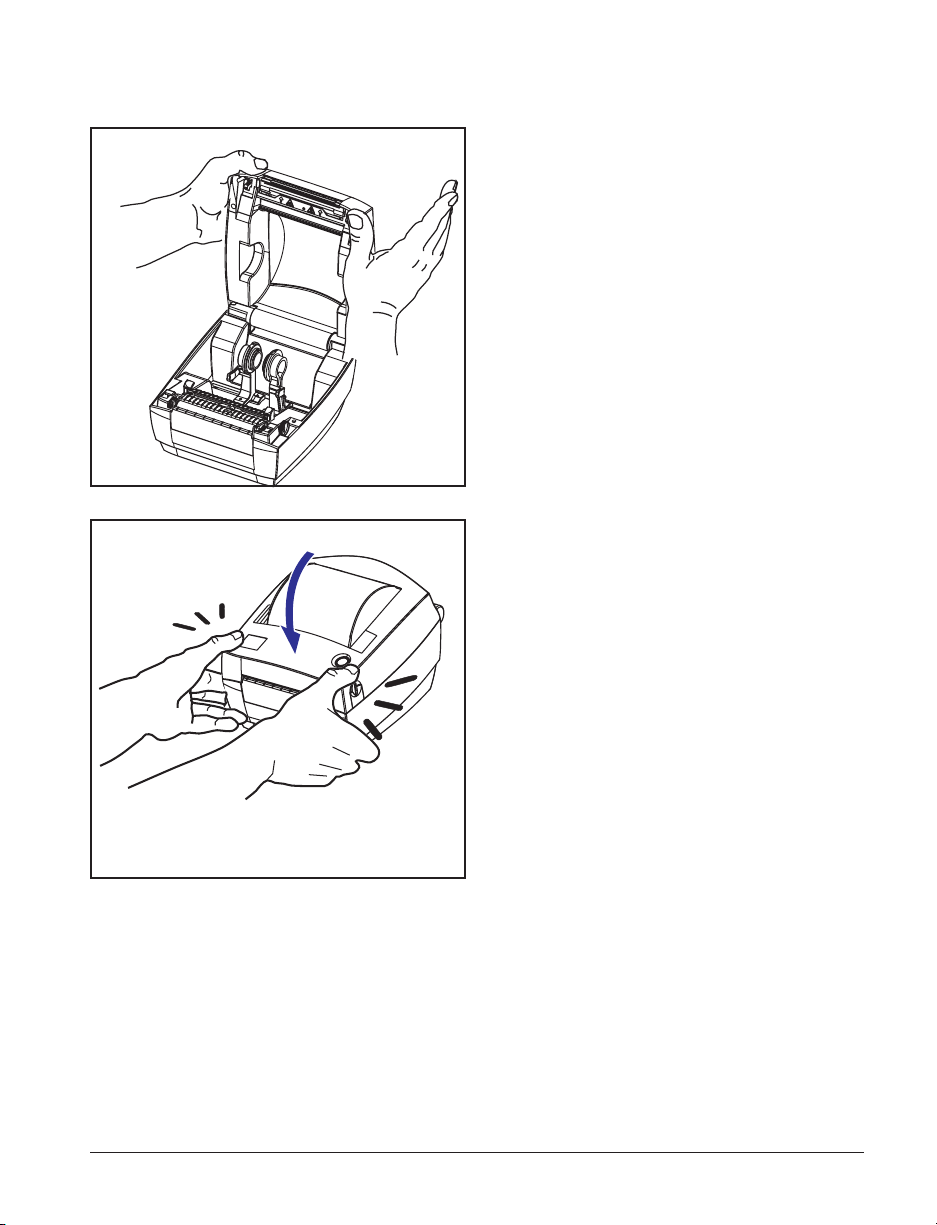
Closing the printer
Lower the top cover.
Press down until the cover snaps closed.
980483-001A 5

Reporting Damage
If you discover damage or missing parts:
■
Immediately notify and file a damage report with the shipping company.
The manufacturer is not responsible for any damage incurred during
shipment of the printer and will not cover the repair of this damage
under its warranty policy.
■
Keep the carton and all packing material for inspection.
■
Notify the authorized reseller
Related Documentation
Depending on the options you have ordered or choose to use with your new
printer, you will find the following documents helpful:
■
EPL2® Programmer's Manual—Programming for Page Mode Printing
■
Line Mode Programmer's Manual and the notice YOUR NEW PRINTER
and Its Printing Modes describing the line mode (EPL1) capability of
your printer's firmware.
■
ZebraNet® PrintServer IITMfor Ethernet Networks Installation and
Operation Guide
■
Universal Serial Bus Specification available from the USB
Implementation Forum
6 980483-001A

This section describes how to set up your printer for the first time and use
the most common operating procedures for loading media in tear-off mode.
Modes of Printing
You can operate this printer in different modes:
■
Standard tear-off mode allows you to tear off each label (or a strip of
labels) after it is printed.
■
In optional peel-off mode, the backing material is peeled away from the
label as it is printed. After this label is removed, the next one is printed.
■
In optional liner-free mode, labels have no backing. This option is only
available with a special platen.
■
In optional cutter mode, an attached unit cuts through the media.
The printer typically uses roll media, but you can use fan-fold or other
continuous media as well.
Getting Started
For procedures to use optional modes and features, refer to the Operation
and Options section.
980483-001A 7
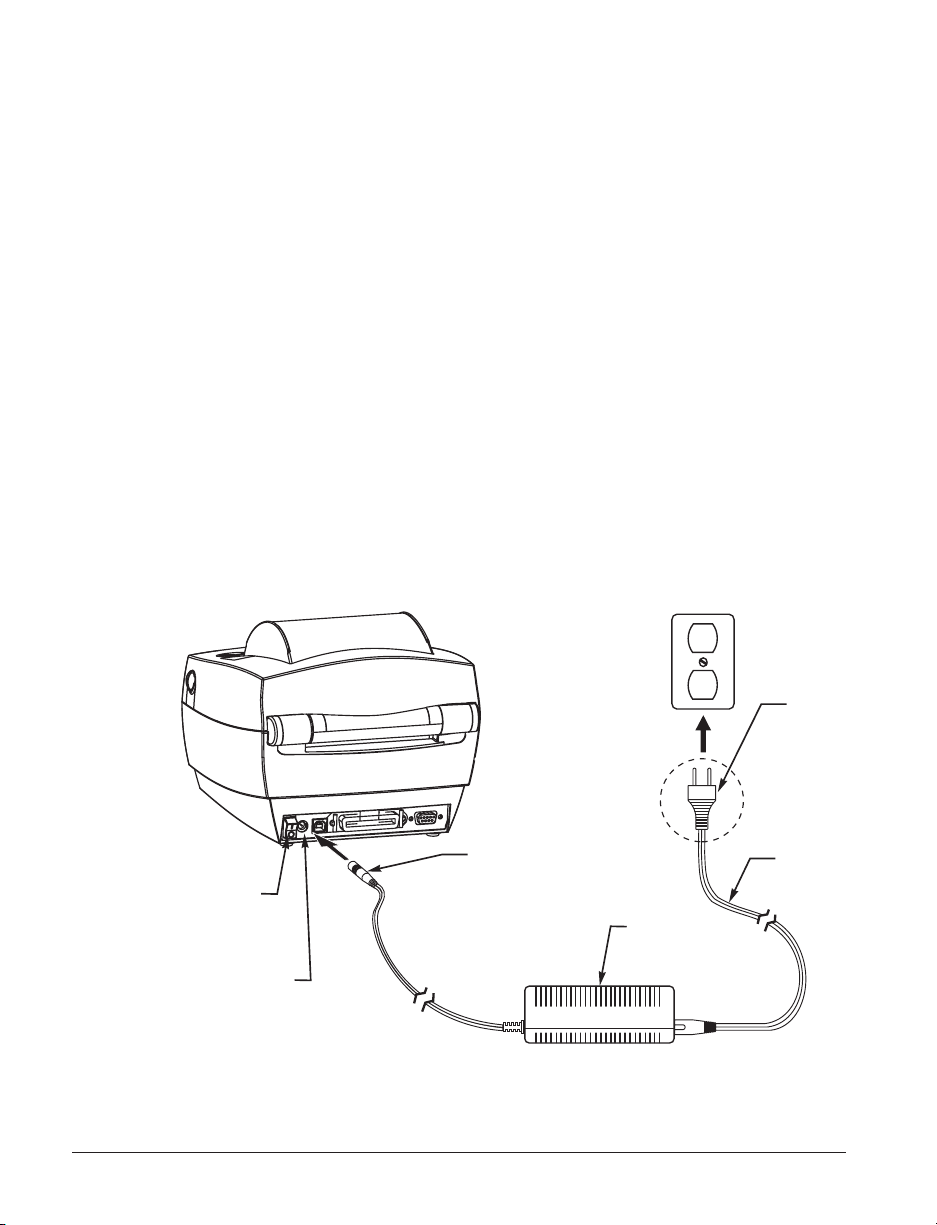
Attaching Power Supply
y
Check the power supply to make certain it is appropriate for your input
voltage.
Warning: Use the power supply that came with your
printer.
Never operate the printer and power supply in an
area where they can get wet. Serious personal
injury could result!
1. Make sure the power switch is in the off position (down).
2. The DC power supply has a barrel connector on one end that must be
inserted into the power supply receptacle on the back of the printer.
3. Insert the separate AC power cord into the power supply.
4. Plug the other end of the cord into an appropriate AC electrical outlet.
Plug
Varies b
Country
Barrel
Connector
Power
Switch
Power
Supply
Receptacle
8 980483-001A
Power
Supply
AC
Power
Cord
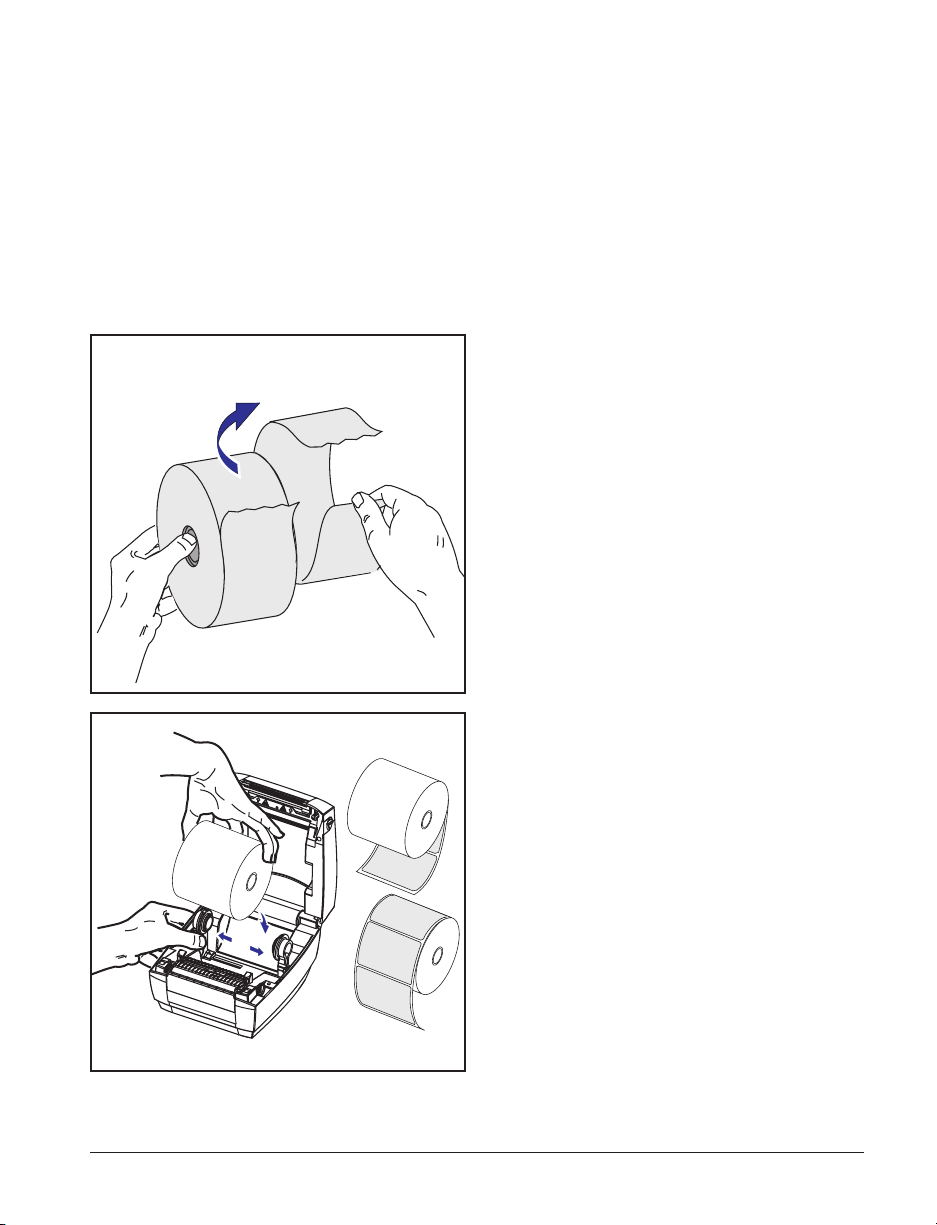
Loading Roll Media
When you load media, you must place the roll on the media hangers and
then adjust the media guides.
You must use the correct media for the type of printing you require. You
must use direct thermal media.
Placing the Roll in the Media Compartment
Whether your roll media is inside or
outside wound you load it into the printer
the same way.
1. Open the printer. Remember that you
need to pull the release levers toward
the front of the printer.
2. Remove the outside length of media.
During shipment, the roll may become
dirty when handled or dusty when
stored. Removing the outside length
avoids dragging adhesive or dirty
media between the print head and
platen.
3. Separate and hold open the media
hangers.
4. Orient the media roll so that its
printing surface will be up as it passes
over the platen.
5. Lower the roll between the hangers
and close them onto the core.
980483-001A 9
Loading...