


INSTRUCTION BOOKLET
?@@@@@@@@@@@?@@@@@@@@@?@@@@@@?@@@@@@@@@@e@@@@@??O2@@@@6X?eO2@@@@6Ke@@@@@?
?@@@@@@@@@@@?@@@@@@@@@?@@@@@@?@@@@@@@@@@e@@@@@W2@@@@@@@)X?@@@@@@@@@@?@@@@@?
?@@@@@@@@@@@?@@@@@@@@@?@@@@@@?@@@@@@@@@@e@@@@@@@@@@@@@@@)X@@@@@@@@@@?@@@@@?
?@@@@@@@@@@@?@@@@@@@@@?@@@@@@?@@@@@@@@@@e@@@@@@@@@@@@@@@@@@@@@@@@@@@?@@@@@?
@@@@@@?@@@@@@@@@?@@@@@@@@@@@@@@@@@e@@@@@@@@@@?@@@@@@@@@@@@@@@@@@@@@@?
?J@@@@@5?@@@@@@@@@?@@@@@@@@@@@@@@@@@e@@@@@@@@@@@@@@@@@@@@@@@@@@@@@@@@@?
?7@@@@@H?@@@@@@@@@?@@@@@@@@@@@@@@@@@e@@@@@@@@@@@@@@@@@@@@@@@@@@@@@@@@@?
J@@@@@5??@@@@@@@@@?@@@@@@@@@@@@@@@@@e@@@@@@@@@@@@@X?I'@@@@@@@X?e@@@@@?
7@@@@@H??@@@@@@@@@?@@@@@@@@@@@@@@@@@e@@@@@@@@@@@@@)X?N@@@@@@@)Xe@@@@@?
?J@@@@@5e?@@@@@@@@@@@@@@@@@@@@@@@@@@@e@@@@@V'@@@@@@@)X?3@@@@@@@)X?@@@@@?
?7@@@@@He?@@@@@@@@@@@@@@@@@@@@@@@@@@@e@@@@@?V'@@@@@@@1?V'@@@@@@@1?@@@@@?
J@@@@@@?eJ@@@@@@@@@@@@@@@@@@@@@@@@@@@e@@@@@??V'@@@@@@@eV4@@@@@@@?@@@@@?
7@@@@@5?e7@@@@?@@@@@@@@@@@@@@@@@@@@@@e@@@@@?eV@@@@@@@fW@@@@@@@@@@@@?
@@@@@@H?e@@@@@?@@@@@@@@@@@@@@@@@@@@@@e@@@@@@@@@@@@@@@@@@@@@Y@@@@@@@@@@@?
?J@@@@@5f@@@@@@@@@@@@@@@@@@@@@@@@@@@@e@@@@@@@@@@?@@@@@@@@@@?@@@@@@@@@@@?
?7@@@@@Yf@@@@@@@@@@@@@@@@@@@@@@@@@@@@@@@@@@@@@@@@@@@@@@@@@@@@@@@@@@@@@@@?
?@@@@@@@@@@@@@@@@@@@@@@@@@@@@@@@@@@@@@@@@@@@@@@@@@@@@@@@@@?@@@@@@@@@@?@@@@@?
?@@@@@@@@@@@@@@@@@@@@@@@@@@@@@@@@@@?@@@@@@@@@@e@@@@@@@@@5?@@@@@@@@@@?@@@@@?
?@@@@@@@@@@@@@@@@?@@@@@@@@@@@@@@@@@?@@@@@@@@@@e@@@@@@@@0Y?@@@@@@@@@@?@@@@@?
?@@@@@@@@@@@@@@@@?@@@@@@@@@@0?4@@@@??I4@@@@0M?e?I4@@@0MfI4@@@@0Me@@@@@?
TUMBLE DRYER
TC470

CONTENTS
Warnings . . . . . . . . . . . . . . . . .
Your appliance . . . . . . . . . . . . . . .
Installation . . . . . . . . . . . . . . . .
Positioning. . . . . . . . . . . . . . . . .
Door reversal instructions . . . . . . . . . . . .
Levelling . . . . . . . . . . . . . . . . .
Electrical connections . . . . . . . . . . . . .
Getting to know your machine . . . . . . . . . .
Control panel . . . . . . . . . . . . . . . .
Drying times . . . . . . . . . . . . . . . .
Drying . . . . . . . . . . . . . . . . . .
Useful hints . . . . . . . . . . . . . . . .
Maintenance and cleaning . . . . . . . . . . .
External cleaning |
. . . . . . . . . . . . . . |
Cleaning the filter |
. . . . . . . . . . . . . . |
Cleaning the air condenser . . . . . . . . . . . .
Emptying the water reservoir . . . . . . . . . . .
Servicing . . . . . . . . . . . . . . . . .
Peace of mind for twelve months . . . . . . . . .
. |
. . . |
. . . |
. |
. |
Page |
3 |
. |
. . . |
. . . |
. |
. |
Page |
4 |
. |
. . . |
. . . |
. |
. |
Page |
5 |
. |
. . . |
. . . |
. |
. |
Page |
5 |
. |
. . . |
. . . |
. |
. |
Page |
5 |
. |
. . . |
. . . |
. |
. |
Page |
6 |
. |
. . . |
. . . |
. |
. |
Page |
7 |
. |
. . . |
. . . |
. |
. |
Page |
8 |
. |
. . . |
. . . |
. |
. |
Page |
8 |
. |
. . . |
. . . |
. |
. |
Page |
9 |
. |
. . . |
. . . |
. |
. |
Page |
10 |
. |
. . . |
. . . |
. |
. |
Page |
10 |
. |
. . . |
. . . |
. |
. |
Page |
11 |
. |
. . . |
. . . |
. |
. |
Page |
11 |
. |
. . . |
. . . |
. |
. |
Page |
11 |
. |
. . . |
. . . |
. |
. |
Page |
11 |
. |
. . . |
. . . |
. |
. |
Page |
11 |
. |
. . . |
. . . |
. |
. |
Page |
12 |
. |
. . . |
. . . |
. |
. |
Page |
13 |
TECHNICAL SPECIFICATIONS
|
|
with worktop |
without worktop |
|
|
|
|
DIMENSIONS |
Height |
85 cm |
82 cm |
|
Width |
60 cm |
60 cm |
|
Depth |
60 cm |
57 cm |
|
|
|
|
WEIGHT |
|
45 kg |
|
|
|
|
|
ELECTRICAL CONNECTION |
Voltage |
220-240 V/50 Hz |
|
|
Max. power absorbed |
2700 W |
|
|
|
|
|
DRYING CAPACITY |
Cotton, linen |
5 kg (11 lb) |
|
|
Synthetics |
2 kg (4.5 lb) |
|
|
|
|
|
Stacking kit
A special stacking kit is available through your nearest ZANUSSI Centre, to enable the dryer to be mounted on top of a front-loading washing machine.
2

WARNINGS
It is most important that this instruction book should be retained with the appliance for future reference. Should the appliance be sold or transferred to another owner, or should you move house and leave the appliance, always ensure that the book is supplied with the appliance in order that the new owner can get to know the functioning of the appliance and the relevant warnings.
These warnings have been provided in the interest of safety. You MUST read them carefully before installing or using the appliance.
INSTALLATION
■Any electrical work required to install this appliance should be carried out by a qualified electrician or competent person.
■Make sure that the appliance does not stand on its electrical supply cable.
■If the machine is situated on a carpeted floor, please adjust the feet in order to allow air to circulate freely.
USE
■Always unplug the appliance after use.
■Clothes which are dripping wet should not be placed in the dryer.
Always load well spun laundry. The higher the spin speed, the lower the electricity consumption and the shorter the drying times.
■Never tumble dry items that have been in contact with chemicals such as dry cleaning fluid. These are of a volatile nature and could cause an explosion.
■As some bulky items such as duvets and eiderdowns should be dried in large commercial machines because of their bulk, check with the manufacturer of the item if it is suitable for drying in a domestic machine, even if the dry weight of the item is within the limit advised.
■Always check that no cigarette lighters have been left in pockets.
■Leave the door slightly ajar when not in use to preserve the door seal.
■The fluff filter must be cleaned after every use.
■Do not operate the appliance with a damaged filter or with no filter at all, as this may cause a fire.
■Do not overload the appliance.
■Do not allow fluff to accumulate around the dryer.
SERVICE/REPAIR
■Under no circumstances should you attempt to repair the machine yourself. Repairs carried out by inexperienced persons may cause injury or serious malfunctioning. Refer to your local Zanussi Service Centre. Always insist on genuine Zanussi spare parts.
GENERAL SAFETY
■It is dangerous to modify or try to modify the specifications of this appliance in any way.
■This appliance is designed to be used by adults. Children should not be allowed to touch the controls or play with the product.
■Pets and small children may climb into tumble dryers. Check your appliance each time before use.
ENVIRONMENT PROTECTION
■The materials used on this appliance marked with the symbol 
 are recyclable.
This means that they can be recycled by disposing of them properly in appropriate collection containers.
■If you take your appliance to a refuse disposal site, cut off the power cable flush with the appliance to avoid the danger of the appliance being re-used, and disable the door catch to prevent children becoming trapped inside.
3

YOUR APPLIANCE
1 |
2 3 |
4 |
5 |
6
7
8
13
9 |
10 |
11 12 |
1Worktop
2Reservoir Full Indicator Light
3Door Open Button
4Mains On Light
5On/Off Dial - Time Selector Dial
6Programme Chart
7Fluff Filter
8Door Catch
9Rating Plate
10Ventilation Grille
11Condenser Unit
12Water Reservoir
13Height - Adjustable Feet
4
INSTALLATION
Positioning
The appliance may be placed on any type of flat floor. It must be perfectly level (use a spirit level if necessary). Adjust the feet to compensate for any unevenness in the floor.
To ensure correct operation, the surrounding area must be kept clean, free of dust and fluff.
Air must be able to circulate freely all round the appliance. Do not obstruct the front ventilation grille or the air intake grilles in the back of the machine.
Do not remove the feet.
Do not reduce the clearance between the appliance and the floor by placing it on deep pile carpet or rugs, as this could lead to a build-up of heat which would adversely affect operation of the machine.
Important:
The hot air emitted by the tumble dryer can reach temperatures of up to 60°C. The appliance must therefore not be installed on floors which are not resistant to high temperatures.
The ambient temperature must not exceed 35°C, even when the appliance is working. If it does, open the door or window.
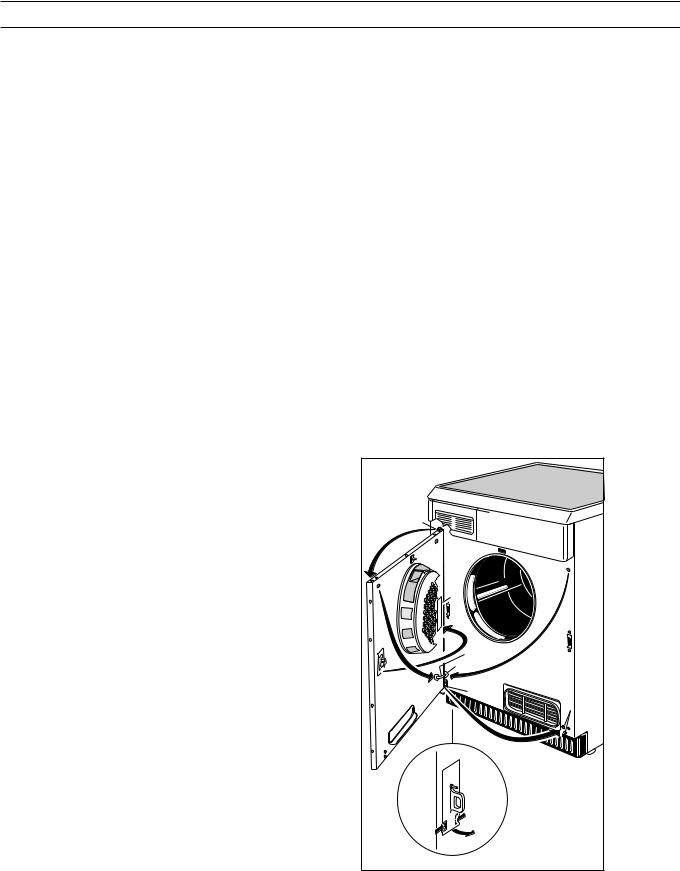
Door Reversal Instructions
The appliance is supplied with the door opening from right to left. If you wish to change the opening direction, proceed as follows (see picture A):
1.Unhook door stopper «A» from its seat «a» and loosen from hole «b» by a 90° rotation.
2.Remove the plastic plug from hole «c» by a 90° rotation and re-fix in hole «b».
3.Unscrew hinge «B» (loosen the 2 screws, holding the door securely) and lower the door from the top pivot.
4.Re-insert pin «F» from the door above and below on opposite sides respectively.
5.Loosen door catch «C» by pressing both lugs together (see small illustration).
6.Loosen opposite plastic part «D» as in step 5 (you may need to use a screwdriver to assist in both steps
5and 6 ).
7.Interchange and insert parts «C» and «D».
8.Remove screws «E» and refit on the opposite side. Fix hinge «B» on the right handside.
Do not fully tighten the screws.
F |
|
|
|
|
c |
d |
D |
|
|
|
|
C |
A |
|
|
b |
|
a |
B |
|
|
E |
|
|
|
|
|
|
C |
|
1 |
|
1 |
2 |
A |
P0866 |
|
|
|
|
5
 Loading...