


WX7

®
YAMAHA
AUTHORIZED
PRODUCT MANUAL
WIND MIDI CONTROLLER

YAMAHA
WIND MIDI CONTROLLER
OWNER’S MANUAL

INTRODUCTION
Congratulations and thank you for purchasing the Yamaha WX7 Wind MIDI Controller.
Since 1887, Yamaha has been producing quality musical instruments, both acoustic and electronic. Now in its 100th
year, Yamaha is proud to present an extraordinarily expressive
and technically sophisticated MIDI musical instrument, the
WX7 Wind MIDI Processor. The WX7 combines Yamaha
state-of-the-art technology with its traditional craftsmanship
to bring the professional saxophone player into the expressive
world of electronic music.
With its light, sleek design and its advanced features, the
WX7 is destined to be one of the most used and influential
MIDI controllers for many years to come. MIDI (Musical Instrument Digital Interface) is a computer “language” adapted
for music, to allow electronic instruments to “talk” to each
other. Through the power of MIDI, the WX7 can play synthesizers and tone generators, enter music directly onto
computers and sequencers for noise-free multitrack recording, change programmed settings on MIDI-compatible
equalizers, digital delay devices, and reverb units, and perform a host of other modern musical feats.
Yet, the WX7 is extremely easy to operate, even for the
saxophone player with a limited experience of electronic
music devices. It uses the standard Bohm fingering and, in
normal operation, can be played in two octaves. A special
Octave Transpose key lets you extend the total range of the
instrument to over 7 octaves. The WX7 allows you to bend
pitch by lip pressure as well as by a conveniently located Pitch
Bend Wheel. And you can control the volume, vibrato, and
tone of the connected MIDI sound source by the way you
blow (breath pressure).
The WX7’s Key Hold and Dual Play capabilities are highly
impressive and useful features. With Key Hold, you can hold
a selected note while playing other notes. The held note can
remain at one pitch, or follow the melody at a selected interval. The Dual Play feature improves upon the Key Hold
by sending the lead line and held note on independent MIDI
channels, giving your playing an unprecedented fullness by
letting you play two separate MIDI devices, producing two
different digital instrument sounds.
The more your expertise at the use of MIDI grows (in particular,
the more you become familiar with the use of the MIDI devices that you will control with your WX7), the more powerful
and versatile the WX7 becomes. Its possibilities are endless!
CONTENTS
HOW TO USE THIS MANUAL
PRECAUTIONS
GUIDE TO THE CONTROLS
ACCESSORIES AND
QUICK GUIDE.....................................................
SETTING UP.......................................................
PLAYINGTHEWX7
THE
DIPSWITCHES
...................................................
MAINTENANCE.................
.............................................
.........................................
............................
................................
11
2
3
3
5
7
8
9
ADJUSTING THE PLAYING
RESPONSE
MIDI AND APPLICATIONS
GLOSSARY
SPECIFICATIONS
MIDI DATA FORMAT
FCCINFORMATION
MIDI IMPLEMENTATION
FINGERING CHARTS (the last page of this manual)
....................................................... 13
...............................
....................................................... 17
..............................................
.......................................
......................................... 20
..................................
15
19
20
21
1

HOW TO USE THIS MANUAL
We recommend that you read this manual carefully in order
to get the most out of your WX7.
l Read the PRECAUTIONS (p.3) first, to familiarize
yourself with ways in which the WX7 can be damaged
or misused. A thorough knowledge of this section will
enable you to get the optimum performance out of your
WX7 for many years to come.
l
The
GUIDE TO THE CONTROLS
clear, easy-to-follow introduction the the controls built
in to the WX7. Although sophisticated, the WX7’s controls are laid out in a neat, orderly manner allowing you
to make full use of its features with a minimum of effort.
l
The
ACCESSORIES AND MAINTENANCE
tion describes the complete range of accessories supplied
with the WX7, and gives tips on how to keep the WX7
in perfect working order, for years of trouble-free playing.
l The QUICK GUIDE (p.7) gives you an opportunity to
start playing the WX7, without having to read the rest
of the manual. It gives a very brief and concise guide to
connecting and playing the WX7. You should then go
on to succeeding sections of the manual, for full explanations on the use of the WX7.
(p.3) section gives a
(p.5) sec-
l
A special section on
MIDI AND APPLICATIONS
(p. 15)
is provided as a simplified crash course in MIDI technology. This will give you a brief introduction to MIDI
plus some system examples, to suggest just a few of the
virtually unlimited number of ways to use the WX7 with
a MIDI digital music system. For further reference on
MIDI, consult the manual of your MIDI synthesizer or
tone generator, as well as the variety of publications and
magazines now available on the subject of this fast-growing
technology.
l A GLOSSARY (p.17) has been included, which clearly
explains the terminology used in this manual, partcularly
for the benefit of the WX7 owner with a limited knowledge
of digital music and MIDI.
l Following the technical SPECIFICATIONS (p.19), the
MIDI IMPLEMENTATION
(p.23) section gives full details of the MIDI technology used in the WX7, for users
seriously interested in MIDI and computer applications
of this advanced unit.
l The all-important FINGERING CHARTS (the last page
of this manual) indicates in musical score form the
available fingerings on the WX7. All the standard fingering
positions are provided, plus additional fingering positions
for fast, easy octave transposing.
l SETTING UP (p.8), as the title indicates, describes the
simple connection procedure of the WX7 plus its
MIDI/Power pack. Once you understand this procedure,
you’ll be able to set up your WX7 and be ready to play
in minutes.
l PLAYING THE WX7 (p.9) gets you right into playing,
and in a remarkably concise and easy-to-understand section, tells you all you need to know about its performance
features.
l THE DIP SWITCHES (p.11) details the setting of the
concealed switches on the WX7, which are used to select
a variety of impressive functions.
l ADJUSTING THE PLAYING RESPONSE (p.13) tells
you how to alter the WX7’s response to both lip pressure
and breath pressure, so you can “customize” the WX7 to
suit your individual playing style.
2
PRECAUTIONS
l Avoid placing your WX7 in direct sunlight or close to a
source of heat. Also, avoid locations where the instrument
is likely to be subjected to vibration, excessive dust, cold
or moisture. All of these conditions could have a detrimental effect on both the mechanisms and the circuitry
incorporated into the WX7.
l Avoid applying excessive force to the switches and keys.
Use the mouthpiece and keys with as much care as you
would with any other top quality wind instrument. Also
avoid dropping the instrument or otherwise subjecting it
to impact. While the internal circuitry is of reliable integrated circuit design, the WX7 should be treated with
care.
l When not in use, even for short periods of time, always
keep the WX7 in the supplied carrying case.
l When unplugging cords (MIDI, audio, power, etc.) from
the WX7, never unplug by pulling on the cords; this can
result in damage to the WX7 or the cords.
All computer circuitry, including that of the WX7, is
sensitive to power surges or voltage spikes, such as those
caused by lightning. For this reason, the MIDI/Power
Pack of the WX7 should be turned off and unplugged from
the wall socket (if using it with AC power rather than the
internal batteries) in the event of an electrical storm.
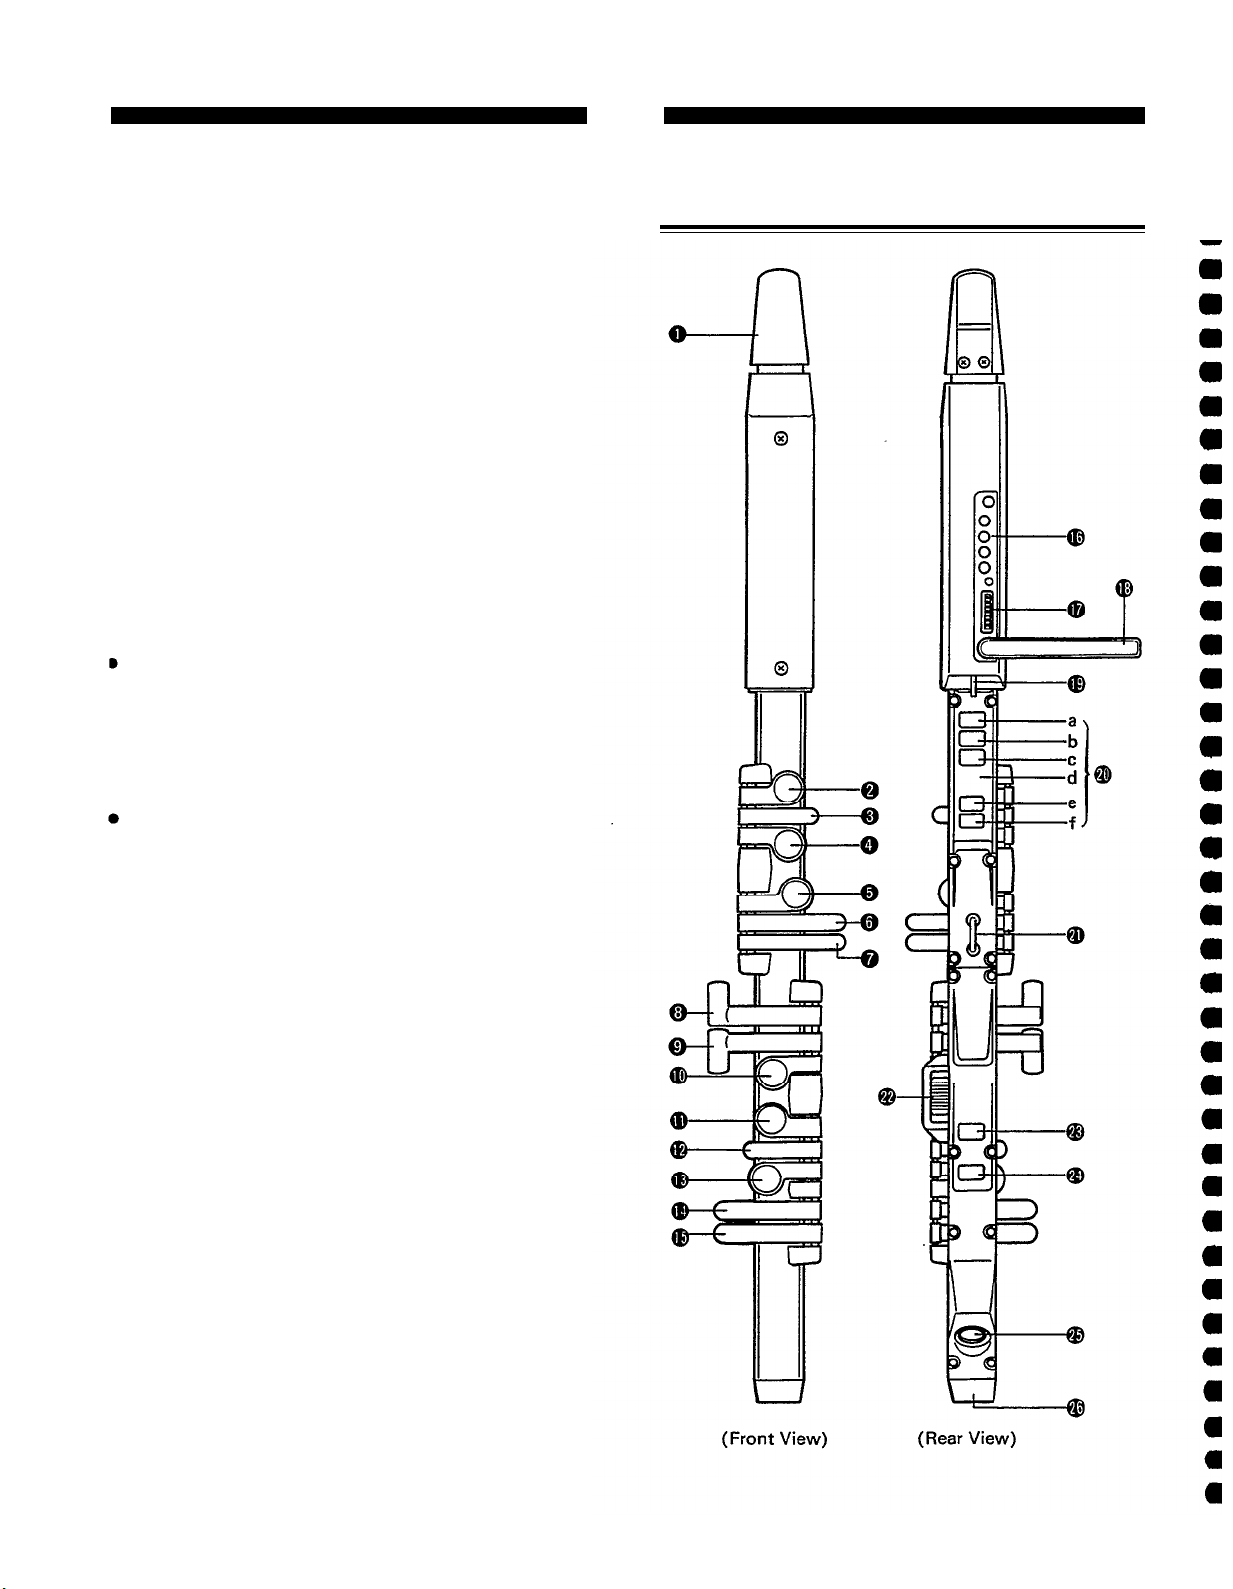
GUIDE TO THE CONTROLS
Front View/Rear View
Computer circuitry is also sensitive to electromagnetic
radiation, such as is generated by television sets.
Use your
WX7 at a suitable distance from such equipment to avoid
malfunctions in the WX7 or any other connected equipment.
l
When making connections, carefully follow the in-
structions detailed in the SETTING UP section (both in
the WX7 manual and that of the MIDI device which it
is controlling) so as to avoid damage to any of your
equipment.
l When cleaning the WX7, use a slightly damp cloth, with
a mild detergent if necessary, and dry with the soft cloth
provided. Never use solvents (such as benzine or thinner)
since they can melt or discolor the finish. Also, never use
aerosol sprays near the WX7 as they can get into the
circuitry and prevent accurate transmission of data
l Your WX7 and the MIDI/Power Pack contain no user
serviceable parts. Opening them or tampering with them
can lead to electrical shock as well as damage.
Refer all
servicing to qualified Yamaha personnel.
3

Mouthpiece (detachable).
Bkey
key
A
A
key
Gkey
key
G
Playing strap ring
Attach the playing strap to this ring to hang the WX7
from your body while playing.
Pitch Bend Wheel.
Operated by the right thumb, this allows you to bend
the pitch of notes, by an amount corresponding to the
pitch bend range setting on the connected MIDI sound
source.
Low B key
Whole tone up key
Semitone up key
Fkey
Ekey
key
F
Dkey
key
D
Ckey
Lip/Wind controls (four rotary pots, under cover).
Refer to the ADJUSTING THE PLAYING RE-
SPONSE section for details.
DIP switches (eight, under cover).
Refer to THE DIP SWITCHES section for details.
Lip and Wind Sensors/Dip Switches Cover
A soft rubber cover protects the adjustment controls and
switches from damage or accidental changes. To get
at the controls, pull the top part of the cover away from
the instrument, but do not take it completely off. A small
knob at the bottom allows you to pivot the cover and
use the controls, yet still keeps it safely attached to the
WX7.
Hold Key.
Allows one note to be held while other notes are played.
Refer to the PLAYING THE WX7 section for details.
Program Change key.
Permits selection of programs (on the connected MIDI
sound source) from the WX7. To change programs, hold
down the Program Change key and press an Octave
Transpose key. The top Octave Transpose key (a) corresponds to program number 1 on your tone generator,
the next Octave Transpose key (b) corresponds to pro-
gram 2, and so on down to the bottom Octave Transpose
key (0, which corresponds to program 5.
MIDI/DC connector.
For connection of the WX7 to its MIDI/Power Pack.
This connector has two functions: to supply DC power
to the WX7, and to transmit MIDI data from the WX7.
Drain Hole.
For drainage of condensation from the WX7.
WX7/Power Pack ring
Connect this ring to the hook on the MIDI/Power Pack
to keep it and the WX7 together when not playmg.
Octave Transpose keys.
Normally played with the left thumb, these keys allow
transpositon of the played note, in the following order
(reading from top to bottom): three octaves up (a); two
octaves up (b); one octave up (c); a zero notch (d) in
which to rest the thumb for playing in concert pitch; one
octave down (e); two octaves down (f).
4
ACCESSORIES AND
MAINTENANCE
The WX7 comes fully equipped with everything you need
to connect it to your MIDI synthesizer or tone generator
and begin playing. This section lists all the supplied accessories, explains their usage, and gives tips on how to maintain
your WX7, for years of trouble-free use.
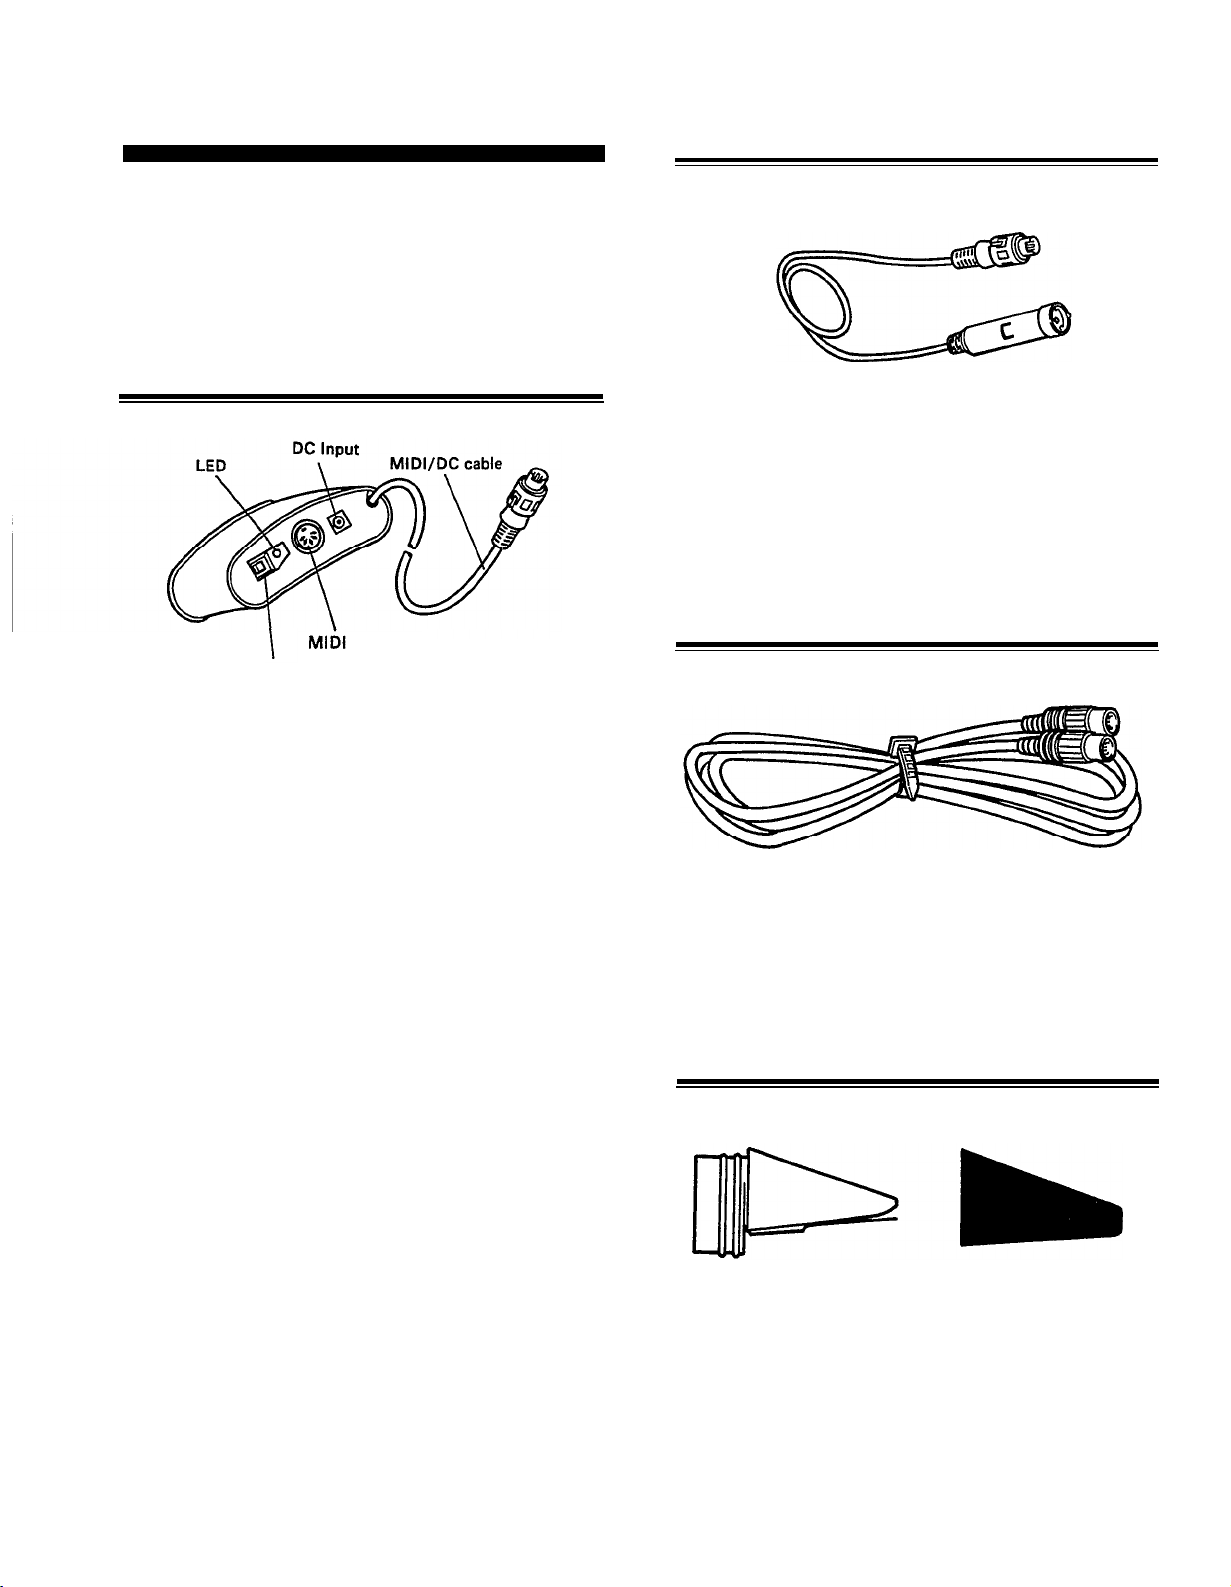
MIDI/POWER PACK
OUT Jack
On/Off Switch
MIDI/DC EXTENSION CORD
This cord allows you to increase the length of the MIDI/DC
cord connecting the MIDI/Power pack to the WX7. Like the
MIDI/DC cord, it has the dual function of supplying the
WX7 with power and transmitting its MIDI data to the
MIDI/Power pack. This cord has a length of 5 meters (15
feet). Extra cords can be purchased and used (up to a suggested maximum of three.
MIDI CABLE
The MIDI/Power Pack supplies the required power (9 volts
DC) to the WX7 and sends the WX7’s MIDI data out to
your MIDI synthesizer or tone generator. The MIDI/Power
Pack normally runs on 6 “AA”-size batteries. You can also
use an optional 12-volt AC adaptor (Yamaha PA-1).
possibility is to use rechargeable batteries. In this case we
suggest that you always keep a spare set of fully-recharged
batteries handy.
When battery voltage becomes low, the LED on the
MIDI/Power Pack will flash, signalling that replacement of
the batteries is necessary.
The MIDI/Power Pack is connected to the WX7 by means
of a 1.5 meter (4 l/2 feet) MIDI/DC cable, which attaches
to the compact, specially-constructed MIDI/DC terminal on
both units.
The MIDI/Power pack has an on/off switch with an accompanying LED to indicate when the power is on, a DC
input jack for the PA-l adaptor, and a MIDI OUT terminal
to which you connect a standard MIDI cable (the other end
of which is connected to the MIDI IN terminal of your MIDI
synthesizer or tone generator).
Also included is a soft case which has slots in the back for
attaching the MIDI/Power Pack to your belt.
Six “AA”-size batteries are supplied. Insert the batteries into
the MIDI/Power Pack in the configuration printed on the
inside case of the battery compartment. During regular use,
keep a spare set of batteries in the carrying case. When not
using the WX7 for long periods, remove the batteries and
store them in the carrying case.
A third
The MIDI cable supplied with your WX7 is a standard 3meter (9 feet) cable. To avoid any degradation of the MIDI
signal use only this cable, or a similar high-quality MIDI
cable, to connect the WX7 to your MIDI synthesizer or tone
generator.
MOUTHPIECE AND MOUTHPIECE COVER
Mouthpiece
Made of durable, scratch-resistant plastic, the WX7’s
mouthpiece has a permanently attached plastic reed and a
special cover to protect the mouthpiece when not in use.
Two mouthpieces are supplied; the second can be kept as a
spare, or used by a second player. Keep the mouthpiece
attached to the WX7 when not in use or when storing in the
hard case.
damage.
The mouthpiece protects the lip sensor from
Cover
5
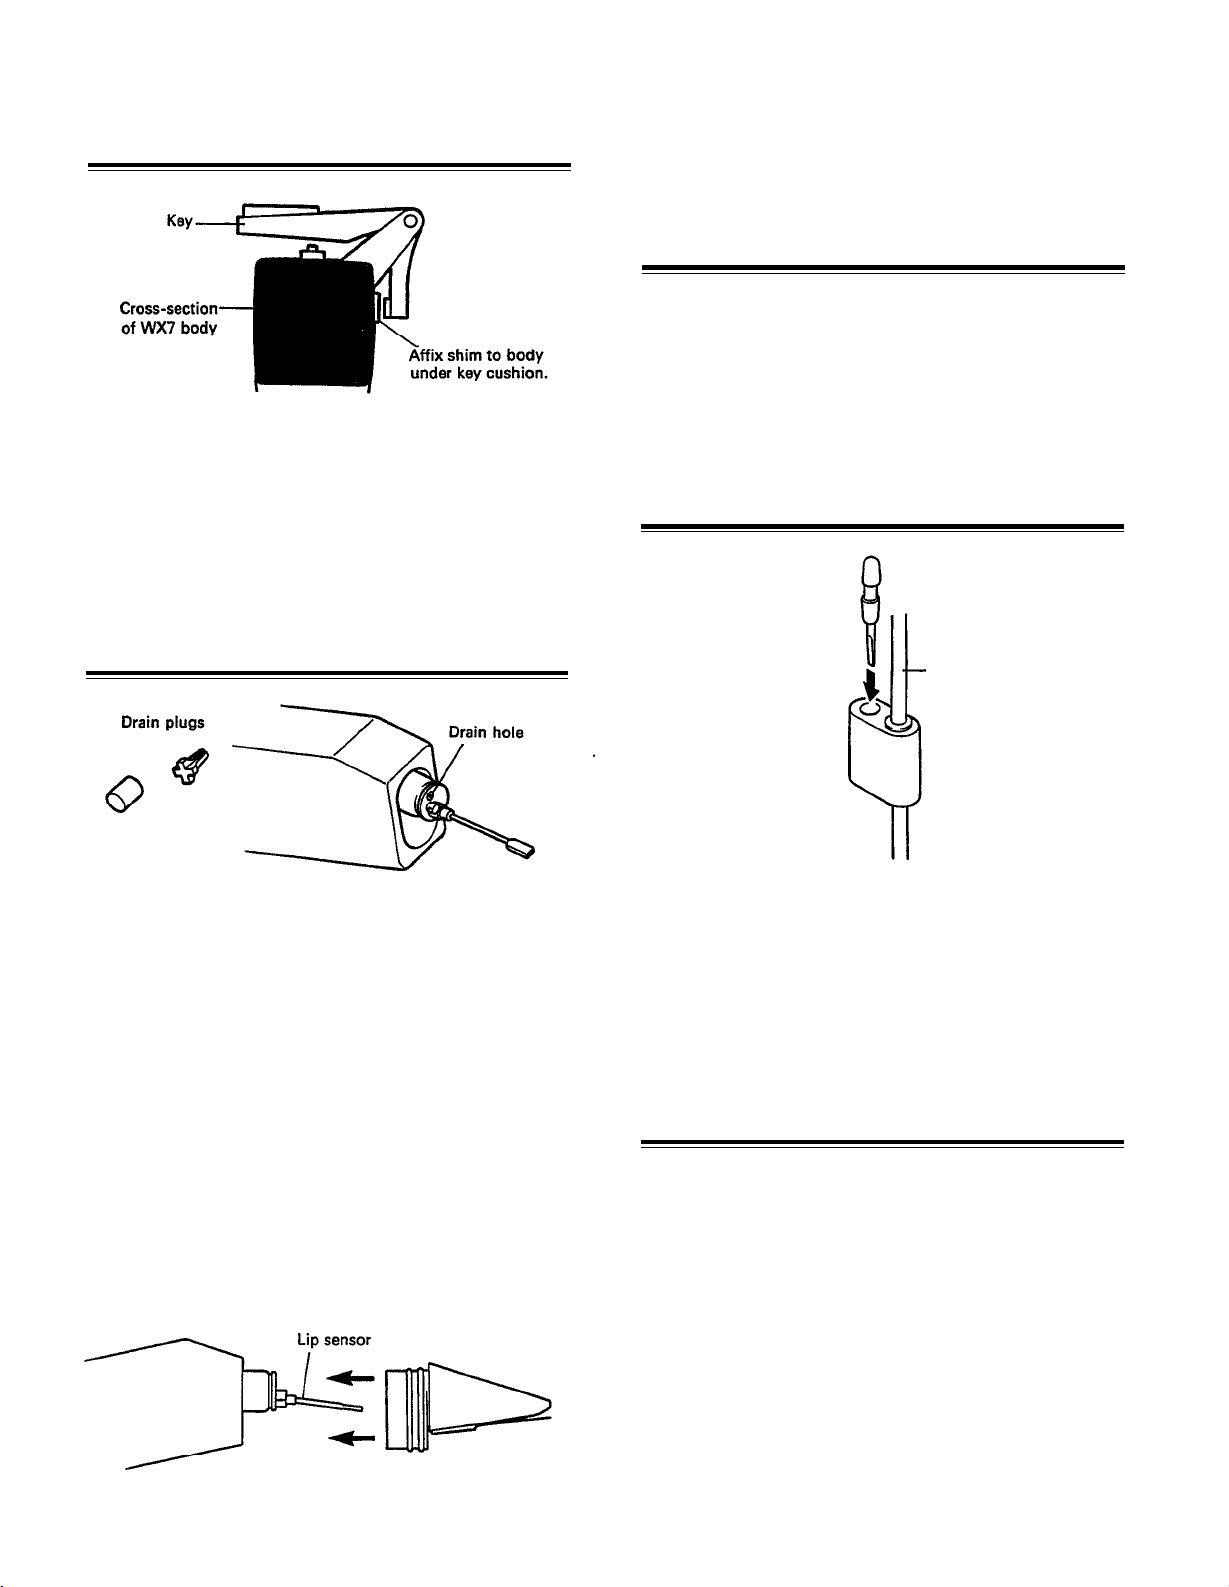
KEY ADJUSTMENT SHIMS
Two sets of 14 key adjustment shims allow you to make minute
adjustments of each key’s playing height. 0.2 mm and 0.5
mm thick shims are provided, enabling you to set each key
to one of three playing heights, to exactly suit your playing
style. The shims are self-adhesive. Simply remove the plastic
covering from the shim, and stick it firmly on the body of
the WX7 just under the pad opposite the key you want to
adjust, as shown in the above diagram.
Make sure to push the plug as far in as it will comfortably
go without forcing. Keep the drain plugs in their compartment
in the carrying case when not in use.
INFORMATION BOOKLET AND CASSETTE TAPE
An informative booklet, Expressive FM Applications, and
an accompanying cassette tape have been included. The
booklet provides important playing and editing tips for most
effectively using your tone generator with the WX7, and the
cassette tape includes recorded performances of the WX7
as well as specially programmed TX8lZ and DX7II voice
data.
SCREWDRIVER
DRAIN PLUGS
Two types of Drain Plugs are included: one that fully blocks
the Drain Hole (with a circular cross-section), and one that
partially blocks it (with a cross-shaped cross-section). In
normal use (without plugs) the WX7 behaves like a regular
saxophone: the air passes down the body of the instrument
and out of the lower drain hole. Partially closing the upper
drain hole creates a tighter blowing feel. Completely closing
the drain hole creates an even tighter feel, suitable for saxophone players who tend to blow hard. Experiment with these
options and select the one that suits you.
The plugs are inserted into the drain hole while the mouthpiece is detached. The mouthpiece is detached by gently and
firmly sliding it out from the top of the WX7.
TAKE CARE NOT TO TOUCH THE THIN LIP SENSOR
EXTENDING FROM THE INSTRUMENT. This device
(which measures subtle variations in lip pressure) is delicate
and can easily be bent or damaged.
MIDI/DC
Extension Cord
The screwdriver is located on a plastic holder attached to the
MIDI/DC extension cord.
The screwdriver is used to adjust the four rotary pots (which
control the lip pressure and breath pressure: refer to the
ADJUSTING THE PLAYING RESPONSE section) and to
change the positions of the DIP switches (see THE DIP
SWITCHES section). Always keep the screwdriver in the
plastic holder on the MIDI/DC extension cord.
PLAYING STRAP
A playing strap is included to hold the WX7 while playing.
Connect the strap to the ring on the back of the instrument
as shown in the rear view illustration in the GUIDE TO THE
CONTROLS section.
6
 Loading...