


SPECIAL MESSAGE SECTION
This product utilizes batteries or an external power supply (adapter). DO NOT connect this product to any power supply or adapter other than one described in the manual, on the name plate, or specifically recommended by Yamaha.
WARNING: Do not place this product in a position where anyone could walk on, trip over ,or roll anything over power or connecting cords of any kind. The use of an extension cord is not recommended! IF you must use an extension cord, the minimum wire size for a 25' cord (or less ) is 18 AWG. NOTE: The smaller the AWG number ,the larger the current handling capacity. For longer extension cords, consult a local electrician.
This product should be used only with the components supplied or; a cart, rack, or stand that is recommended by Yamaha. If a cart, etc., is used, please observe all safety markings and instructions that accompany the accessory product.
SPECIFICATIONS SUBJECT TO CHANGE:
The information contained in this manual is believed to be correct at the time of printing. However, Yamaha reserves the right to change or modify any of the specifications without notice or obligation to update existing units.
This product, either alone or in combination with an amplifier and headphones or speaker/s, may be capable of producing sound levels that could cause permanent hearing loss. DO NOT operate for long periods of time at a high volume level or at a level that is uncomfortable. If you experience any hearing loss or ringing in the ears, you should consult an audiologist. IMPORTANT: The louder the sound, the shorter the time period before damage occurs.
Some Yamaha products may have benches and / or accessory mounting fixtures that are either supplied with the product or as optional accessories. Some of these items are designed to be dealer assembled or installed. Please make sure that benches are stable and any optional fixtures (where applicable) are well secured BEFORE using.
Benches supplied by Yamaha are designed for seating only. No other uses are recommended.
NOTICE:
Service charges incurred due to a lack of knowledge relating to how a function or effect works (when the unit is operating as designed) are not covered by the manufacturer’s warranty, and are therefore the owners responsibility. Please study this manual carefully and consult your dealer before requesting service.
ENVIRONMENTAL ISSUES:
Yamaha strives to produce products that are both user safe and environmentally friendly. We sincerely believe that our products and the production methods
used to produce them, meet these goals. In keeping with both the letter and the spirit of the law, we want you to be aware of the following:
Battery Notice:
This product MAY contain a small non-rechargeable battery which (if applicable) is soldered in place. The average life span of this type of battery is approximately five years. When replacement becomes necessary, contact a qualified service representative to perform the replacement.
This product may also use “household” type batteries. Some of these may be rechargeable. Make sure that the battery being charged is a rechargeable type and that the charger is intended for the battery being charged.
When installing batteries, do not mix batteries with new, or with batteries of a different type. Batteries MUST be installed correctly. Mismatches or incorrect installation may result in overheating and battery case rupture.
Warning:
Do not attempt to disassemble, or incinerate any battery. Keep all batteries away from children. Dispose of used batteries promptly and as regulated by the laws in your area. Note: Check with any retailer of household type batteries in your area for battery disposal information.
Disposal Notice:
Should this product become damaged beyond repair, or for some reason its useful life is considered to be at an end, please observe all local, state, and federal regulations that relate to the disposal of products that contain lead, batteries, plastics, etc. If your dealer is unable to assist you, please contact Yamaha directly.
NAME PLATE LOCATION:
The name plate is located on the instrument body inside the battery cover. The name plate lists the product’s model number, power requirements, and other information. The serial number is located on the instrument body inside the battery cover. Please record the model number, serial number, and date of purchase in the spaces provided below, and keep this manual as a permanent record of your purchase.
Model
Serial No.
Purchase Date
92-BP
PLEASE KEEP THIS MANUAL
FCC INFORMATION (U.S.A.)
1. IMPORTANT NOTICE: DO NOT MODIFY THIS UNIT! |
Relocate either this product or the device that is being affected by the |
|
This product, when installed as indicated in the instructions contained |
interference. |
|
in this manual, meets FCC requirements. Modifications not expressly |
Utilize power outlets that are on different branch (circuit breaker or |
|
approved by Yamaha may void your authority, granted by the FCC, to |
fuse) circuits or install AC line filter/s. |
|
use the product. |
In the case of radio or TV interference, relocate/reorient the antenna. |
|
2. IMPORTANT: When connecting this product to accessories and/or |
If the antenna lead-in is 300 ohm ribbon lead, change the lead-in to |
|
another product use only high quality shielded cables. Cable/s sup- |
co-axial type cable. |
|
plied with this product MUST be used. Follow all installation instruc- |
If these corrective measures do not produce satisfactory results, please |
|
tions. Failure to follow instructions could void your FCC authorization |
contact the local retailer authorized to distribute this type of product. If |
|
to use this product in the USA. |
you can not locate the appropriate retailer, please contact Yamaha |
|
3. NOTE: This product has been tested and found to comply with the |
Corporation of America, Electronic Service Division, 6600 Orangethorpe |
|
requirements listed in FCC Regulations, Part 15 for Class “B” digital |
Ave, Buena Park, CA90620 |
|
The above statements apply ONLY to those products distributed by |
||
devices. Compliance with these requirements provides a reasonable |
||
level of assurance that your use of this product in a residential envi- |
Yamaha Corporation of America or its subsidiaries. |
|
ronment will not result in harmful interference with other electronic |
This device complies with Part 15 of the FCC Rules. Operation is subject |
|
devices. This equipment generates/uses radio frequencies and, if not |
||
installed and used according to the instructions found in the users |
to the following two conditions: |
|
manual, may cause interference harmful to the operation of other electronic |
(1) This device may not cause harmful interference, and (2) this device |
|
devices. Compliance with FCC regulations does not guarantee that |
must accept any interference received, including interference that may |
|
interference will not occur in all installations. If this product is found to |
cause undesired operation. |
|
be the source of interference, which can be determined by turning the |
|
|
unit “OFF” and “ON”, please try to eliminate the problem by using one |
|
|
of the following measures: |
|
|
* This applies only to products distributed by YAMAHA CORPORATION OF AMERICA. |
|
CANADA
This Class B digital apparatus meets all requirements of the Canadian Interference-Causing Equipment Regulations.
Cet appareil numérique de la classe B respecte toutes les exigences du Règlement sur le matériel brouilleur du Canada.
• This applies only to products distributed by Yamaha Canada Music Ltd.
• Ceci ne s’applique qu’aux produits distribués par Yamaha Canada Musique Ltée.
2

PRECAUTIONS
PLEASE READ CAREFULLY BEFORE PROCEEDING
* Please keep these precautions in a safe place for future reference.
 WARNING
Always follow the basic precautions listed below to avoid the possibility of serious injury or even death from electrical shock, shortcircuiting, damages, fire or other hazards. These precautions include, but are not limited to, the following:
•Do not open the instrument or attempt to disassemble the internal parts or modify them in any way. The instrument contains no user-serviceable parts. If it should appear to be malfunctioning, discontinue use immediately and have it inspected by qualified Yamaha service personnel.
•Do not expose the instrument to rain, use it near water or in damp or wet conditions, or place containers on it containing liquids which might spill into any openings.
•If the AC adaptor cord or plug becomes frayed or damaged, or if there is a sudden loss of sound during use of the instrument, or if any unusual smells or smoke
should appear to be caused by it, immediately turn off the power switch, disconnect the adaptor plug from the outlet, and have the instrument inspected by qualified Yamaha service personnel.
•Use the specified adaptor (PA-3B or an equivalent recommended by Yamaha) only. Using the wrong adaptor can result in damage to the instrument or overheating.
•Before cleaning the instrument, always remove the electric plug from the outlet. Never insert or remove an electric plug with wet hands.
•Check the electric plug periodically and remove any dirt or dust which may have accumulated on it.
 CAUTION
Always follow the basic precautions listed below to avoid the possibility of physical injury to you or others, or damage to the instrument or other property. These precautions include, but are not limited to, the following:
•Do not place the AC adaptor cord near heat sources such as heaters or radiators, and do not excessively bend or otherwise damage the cord, place heavy objects on it, or place it in a position where anyone could walk on, trip over, or roll anything over it.
•When removing the electric plug from the instrument or an outlet, always hold the plug itself and not the cord.
•Do not connect the instrument to an electrical outlet using a multiple-connector. Doing so can result in lower sound quality, or possibly cause overheating in the outlet.
•Unplug the AC power adaptor when not using the instrument, or during electrical storms.
•Always make sure all batteries are inserted in conformity with the +/- polarity markings. Failure to do so might result in overheating, fire, or battery fluid leakage.
•Always replace all batteries at the same time. Do not use new batteries together with old ones. Also, do not mix battery types, such as alkaline batteries with manganese batteries, or batteries from different makers, or different types of batteries from the same maker, since this can cause overheating, fire, or battery fluid leakage.
•Do not dispose of batteries in fire.
•Do not attempt to recharge batteries that are not intended to be charged.
•If the instrument is not to be in use for a long time, remove the batteries from it, in order to prevent possible fluid leakage from the battery.
•Keep batteries away from children.
•Before connecting the instrument to other electronic components, turn off the power for all components. Before turning the power on or off for all components, set all volume levels to minimum.
•Do not expose the instrument to excessive dust or vibrations, or extreme cold or heat (such as in direct sunlight, near a heater, or in a car during the day) to prevent the possibility of panel disfiguration or damage to the internal components.
•Do not use the instrument near other electrical products such as televisions, radios, or speakers, since this might cause interference which can affect proper operation of the other products.
•Do not place the instrument in an unstable position where it might accidentally fall over.
•Before moving the instrument, remove all connected adaptor and other cables.
•When cleaning the instrument, use a soft, dry cloth. Do not use paint thinners, solvents, cleaning fluids, or chemical-impregnated wiping cloths. Also, do not place vinyl or plastic objects on the instrument, since this might discolor the panel or keyboard.
•Do not rest your weight on, or place heavy objects on the instrument, and do not use excessive force on the buttons, switches or connectors.
•Do not operate the instrument for a long period of time at a high or uncomfortable volume level, since this can cause permanent hearing loss. If you experience any hearing loss or ringing in the ears, consult a physician.
Yamaha cannot be held responsible for damage caused by improper use or modifications to the instrument, or data that is lost or destroyed.
Always turn the power off when the instrument is not in use.
Make sure to discard used batteries according to local regulations.
(4)
3
Congratulations!
Your Yamaha WX5 is a state-of-the-art Wind MIDI Controller which takes wind MIDI control to new levels of performance and playability. With precise, responsive wind and lip sensors, a choice of single-reed or recorder type mouthpieces, and a range of fingering modes, the WX5 makes expressive wind control more accessible than ever before. While it gives experienced wind players a new medium and vastly expanded sonic possibilities in a familiar format, it is playable enough that beginners can become proficient in a relatively short time. The WX5 also provides expressive control and nuances that are simply not available with keyboards or other MIDI controllers. Although it is ideal for use with just about any MIDI tone generator or synthesizer, combined with a state-of-the-art tone generator such as the Yamaha VL70-m Virtual Acoustic Tone Generator, the WX5 is capable of expressive depth and tonal subtlety that rival the finest acoustic instruments.
Refer to this owner’s manual while becoming familiar with the many functions and features provided by the WX5, and keep it in a safe place for later reference.
Contents
The WX5 Controls & Connectors ...................................... |
6 |
Setting Up ............................................................................... |
8 |
Power Supply ...................................................................... |
8 |
AC Adaptor ..................................................................... |
8 |
Batteries.......................................................................... |
8 |
Connecting to a Tone Generator ................................... |
9 |
Connecting to a Tone Generator with a WX Connector .. |
9 |
Connecting to a Standard MIDI Tone Generator ............. |
9 |
Preparing to Play ................................................................ |
10 |
Turning the Power On ................................................... |
10 |
Selecting a Mouthpiece ................................................ |
10 |
Selecting a Lip Mode: Tight Lip or Loose Lip ................ |
10 |
About the Wind and Lip Sensors .................................. |
11 |
Basic Playing Techniques................................................. |
12 |
Fingering Modes ........................................................... |
12 |
Octave Shift .................................................................. |
13 |
Pitch Bend Wheel ......................................................... |
13 |
Key Hold ....................................................................... |
14 |
Program Change Control .................................................. |
16 |
Changing Voices ........................................................... |
16 |
Bank Number Transmission .......................................... |
17 |
Changing the MIDI Transmit Channel ........................... |
18 |
Parameter Reset ........................................................... |
18 |
Mono/Poly & Portamento Switching .............................. |
19 |
Using the Setup Button ..................................................... |
20 |
Sensitivity (Software Wind Gain) .................................. |
20 |
Octave Transpose ......................................................... |
21 |
Audition Function On/Off .............................................. |
21 |
Setup Switch Settings ....................................................... |
22 |
Wind and Lip Sensor Adjustment ................................... |
25 |
Wind Zero & Wind Gain Ajustment ............................... |
25 |
Lip Zero & Lip Gain Adjustment .................................... |
26 |
Tuning .................................................................................... |
27 |
● Tone Generator Setting ........................................................ |
27 |
Maintenance ........................................................................ |
28 |
MIDI System Setup Examples........................................... |
29 |
Foot Control .................................................................. |
29 |
Sequencer Recording & Playback ................................ |
29 |
Troubleshooting .................................................................. |
30 |
Index ....................................................................................... |
31 |
WX5 Fingering .......................................................................... |
32 |
MIDI Data Format ...................................................................... |
38 |
WX5 Specifications.................................................................. |
40 |
Key Operation Chart / MIDI Message Assignments ................. |
41 |
4
Main WX5 Features
 Realistic wind-instrument type response and playability offers unprecedented expressive control.
 A 16-key layout similar to the standard saxophone layout, and a choice of four fingering modes, make the WX5 easily accessible to most wind players. Beginners can select the fingering mode that they find easiest to play.
 With a WX5, a tone generator, and a pair of headphones, you can play anytime, anywhere, without worrying about disturbing neighbors.
 Dedicated connector and cable provides direct connection to Yamaha WX-series tone generators such as the VL70-m Virtual Acoustic Tone Generator.
 Built-in MIDI output connector means the WX5 can be directly connected to any standard MIDI tone generator or synthesizer without the need for an external MIDI interface.
 High-resolution wind sensor achieves precise breath response for smooth, natural velocity/volume control. 5 sensitivity settings provide optimum response for all players.
 Responsive lip sensor allows lip control of pitch and other parameters when used with the reed (saxophone type) mouthpiece.
 Thumb-controlled pitch-bend wheel allows convenient pitch bend control when either the reed (saxophone type) or recorder type mouthpiece is used.
 Octave keys allow pitch to be shifted over a ±3-octave range.
 MIDI program change transmission means that voices can be switched directly from the WX5.
 Four key-hold button modes - normal, follow, portamento, and sustain - provide a range of expressive control options.
 Built-in LED display facilitates lip-zero adjustment.
 Stable, precise response eliminates false triggering and transient tones.
The illustrations in this owner’s manual are for instructional purposes only, and may be different from the ones on your instrument.
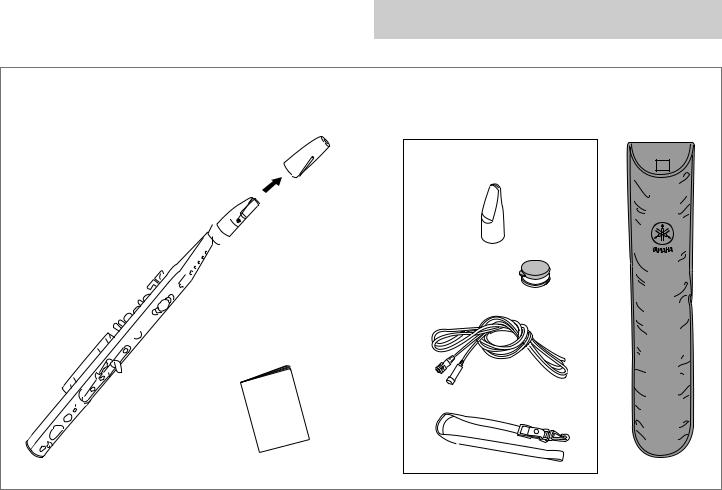
Packing List
After opening the WX5 package, make sure that it includes all of the items listed below.
Mouthpiece Cap (attached)
*Remove the mouthpiece cap before playing the WX5.
Soft Case
Mouthpiece
No reed (recorder) type.
Mouthpiece (attached)
Reed (saxophone) type.
WX5 |
Recorder Cream |
WX Cable
Owner’s Manual
Strap
5

The WX5 Controls & Connectors
1
|
WIND GAIN |
|
|||
|
WIND ZERO |
6 |
|||
3 |
2 |
LIP GAIN |
|
||
LIP ZERO |
|
|
|||
|
Vel |
|
|
Trns |
|
|
Win |
|
|
Fing |
|
|
Win |
|
|
7 |
|
|
LIP |
|
|
Fast |
|
|
LIP |
|
|
Hi ct |
|
|
LIP |
|
|
Whl |
|
|
LIP+ |
|
|
||
|
nrm |
fix |
|
|
|
|
B/C EXP |
|
|
|
|
|
|
VOL |
A |
C |
|
|
nrm |
hrd |
B |
Fl |
|
|
tht |
loos |
off |
on |
|
|
nrm wide |
off |
on |
|
|
|
P/B M/W |
PB |
gen |
|
|
|
off |
on |
MW |
filt |
|
8
|
|
9 |
4 |
|
0 |
|
|
|
|
|
! |
@ |
|
|
|
|
# |
|
|
$ |
|
POWER |
% |
OFF |
ON |
|
+ |
DC |
^ |
– |
12V IN |
|
|
|
& |
|
MIDI OUT |
|
|
WX OUT |
|
|
|
* |
5
 ( )
( )
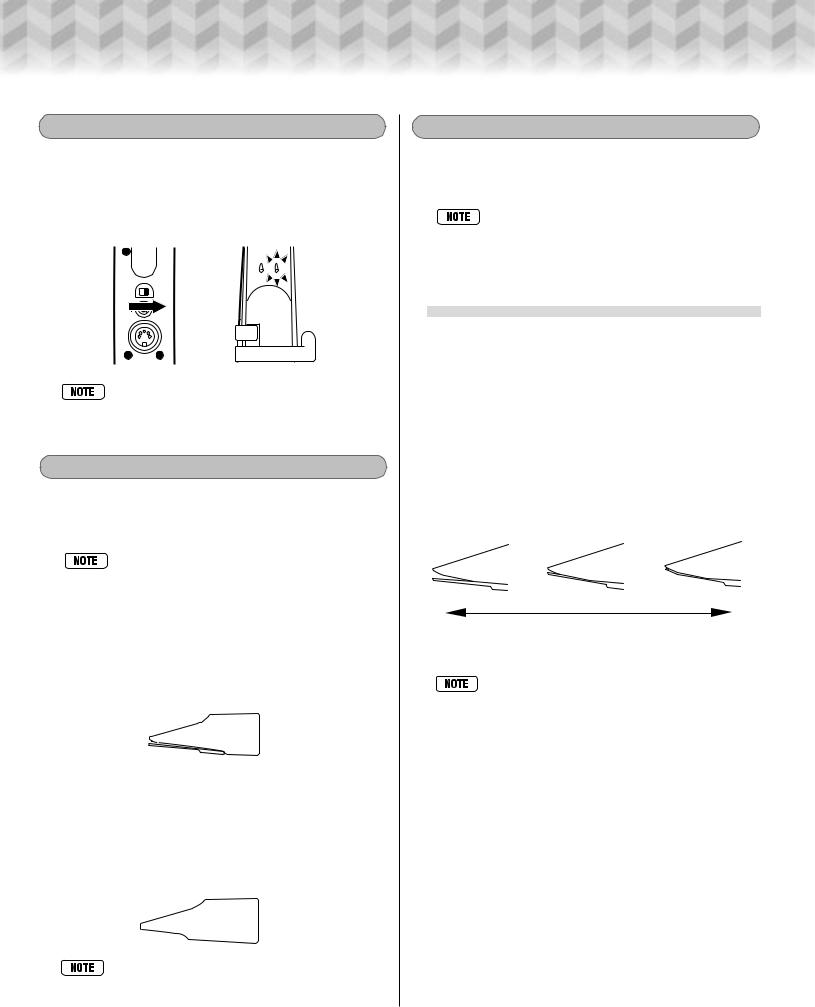
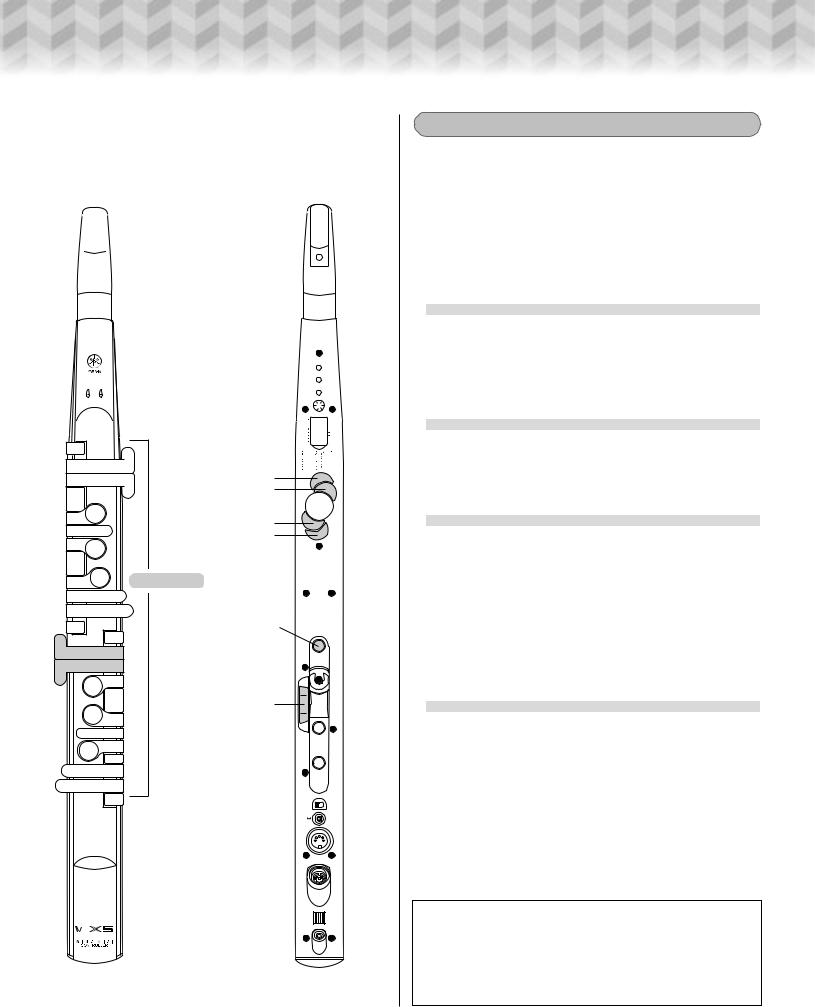
1 Mouthpiece
The WX5 is supplied with two mouthpieces: a saxophone-type mouthpiece with a reed, and a recorder-type mouthpiece with no reed. The WX5 is initially shipped with the saxophone-type mouthpiece attached. To remove and replace the mouthpiece see the “Maintenance” section on page 28.
2 LED 1 Indicators
3 LED 2 Indicators
Viewed from the key side of the instrument (as in the illustration), the LED indicator on the right shows lip sensor status, and the LED indicator on the left shows wind sensor status. Details on page 11.
4 Keys
These are the keys used to play the WX5. The actual fingering used will depend on the fingering type selected via the setup switches (page 12, 30).
5 Battery Cover
Batteries can be installed or removed after removing this cover (page 8).
6 Sensor Gain Controls
These four controls adjust the gain and zero point of the wind and lip sensors. The upper three controls can be adjusted using a small “minus” screwdriver, while the LIP ZERO control can be adjusted using a finger. Adjustment details on page 25.
7 Setup Switches
The DIP switches below the switch cover determine many of the WX5’s basic functions - e.g. fingering, breath and lip response, the instrument’s base key, and more. Details on page 22.
8 Octave Keys
These keys allow you to shift the pitch of the instrument up or down by one, two, or three octaves while playing. Details on page 13.
9 Strap Ring
The supplied neck strap attaches to this ring. See “Attaching the Strap”, below.
0 Setup Button
Used in conjunction with other WX5 control buttons, the Setup Button allows software wind gain, octave transpose, and other settings to be changed while playing. Details on page 20.
!Thumb Hook
This hook allows the instrument to be supported by the righthand thumb while playing. See “Positioning the Thumb Hook”, below.
6
The WX5 Controls & Connectors
@ Pitch Bend Wheel
Like the pitch bend wheel on keyboard synthesizers, the WX5 pitch bend wheel can be used to produce smooth upward or downward pitch bends. Details on page 13.
# Key Hold Button
The Key Hold button controls any of four assignable key hold functions including sustain. Details on page 14.
$ Program Change Button
Used in conjunction with the instrument’s keys, the Program Change button can be used to transmit MIDI program change numbers to the connected tone generator in order to change voices directly from the WX5. Details on page 16.
% Power Switch
Turns the WX5 power on or off.
^ DC IN 12V Connector
When using a Yamaha PA-3B AC Adaptor to power the WX5, the adaptor’s output cable should be connected here. Details on page 8.
& MIDI OUT Connector
When not using the WX cable (below), use this connector to connect the WX5 to a MIDI tone generator or synthesizer via a standard MIDI cable. Details on page 9.
*WX OUT Connector
This connector allows the WX5 to be directly connected to compatible Yamaha tone generators (such as the VL70-m) which have a WX IN connector via the supplied WX cable. Details on page 9.
( Cable Holder
Supports the AC adaptor output cable and the MIDI or WX cable connected to the WX5, preventing accidental disconnection.
)Water Drain
Breath and built-up water escape from this aperture - do not block this aperture.
Attaching the Strap
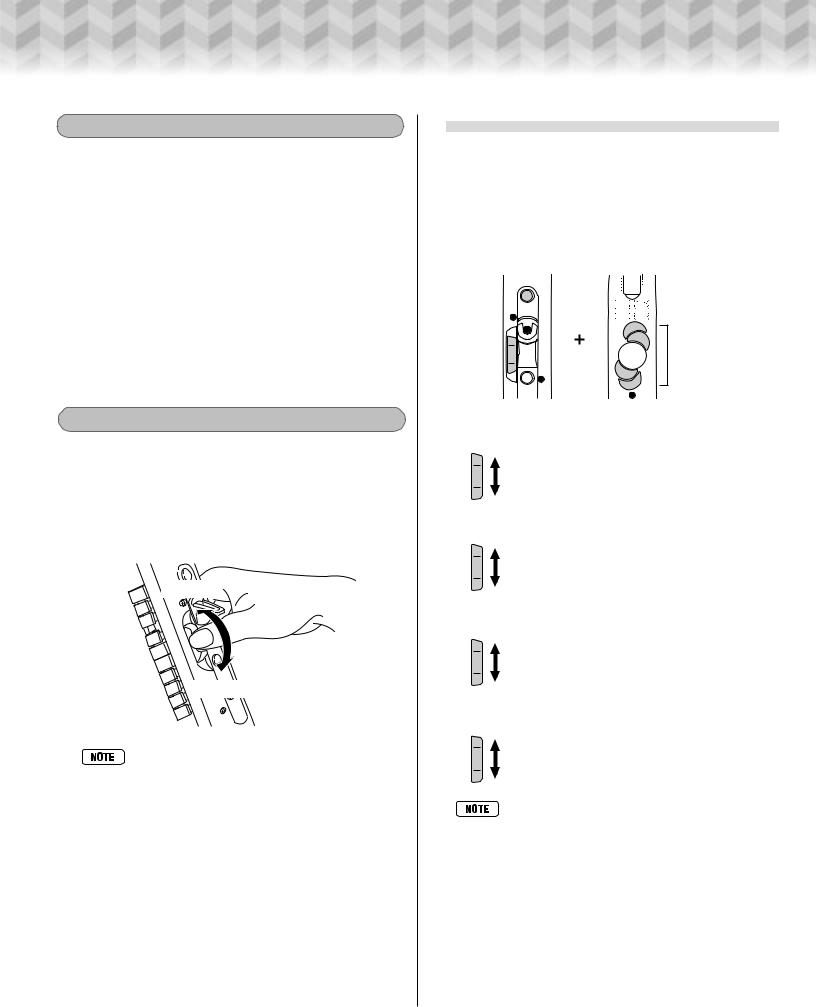
When using the supplied neck strap with the WX5, attack the strap hook to the strap ring as shown in the illustration.
Positioning the Thumb Hook
The thumb hook rests on the right-hand thumb while playing, supporting and steadying the instrument. For maximum comfort and playability, the thumb hook can be positioned as required by loosening the screw using a small “plus” screwdriver, as shown in the illustration, positioning the thumb hook as required, and then tightening the screw. Do not use excessive force when tightening the thumb-hook screw.
7
Setting Up
Since the WX5 is a MIDI controller, it must be used with a MIDI tone generator to produce sound. Yamaha recommends the VL70-m or an MU-series XG tone generator, but just about any MIDI tone generator can be used.
WX-Compatible Tone Generators
When the WX5 is connected to a WX-compatible tone generator such as the VL70-m via the supplied WX cable (the tone generator must have a WX IN connector) power is supplied to the WX5 via the WX cable and no other power supply is required. This means that you don’t have an extra cable connected to the instrument, or the extra weight of batteries inside the instrument.
Standard MIDI Tone Generators
When using the WX5 with a standard MIDI tone generator or synthesizer, connection must be made via an optional MIDI cable (see your music instrument dealer). In this case power must be supplied to the WX5 either from an optional Yamaha PA-3B AC Adaptor, or a set of six SUM-4 batteries installed in the instrument. See “Power Supply”, below.
 Power Supply
The power supply connection or battery installation described in this section is only necessary if you will be connecting the WX5 to a standard MIDI tone generator via a MIDI cable.
AC Adaptor
Use only a Yamaha PA-3B AC Adaptor to power the WX5 from a household AC outlet.
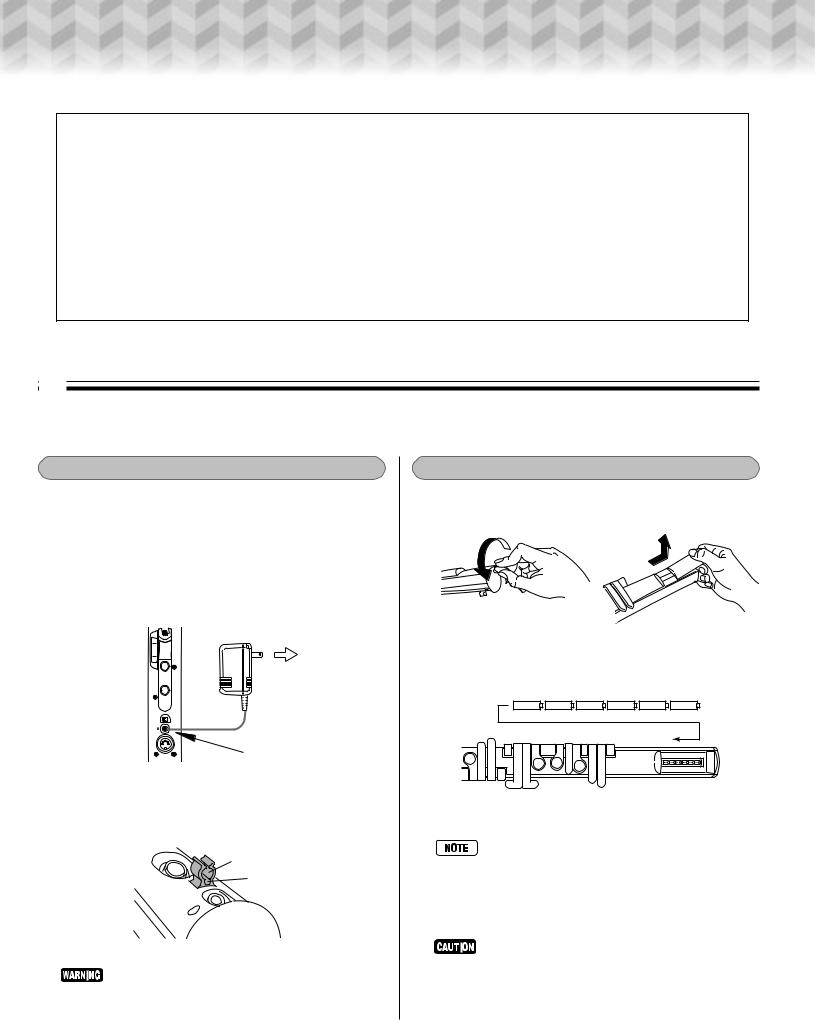
1 Connect the DC output cable from the PA-3B to the DC IN 12V connector on the WX5.
2 Plug the PA-3B into a convenient AC wall outlet.
POWER
OFF |
ON |
+ |
DC |
– |
12V IN |
WX OUT |
DC IN 12V |
MIDI OUT |
|
3 Clip the AC adaptor’s output cable into the cable holder on the WX5 before clipping a MIDI cable in to the cable holder.
MIDI cable
AC adaptor’s cable
•Use only a Yamaha PA-3B AC Adaptor to power the WX5 from a household AC outlet.The use of other AC adaptors will void the warranty, and possibly damage
the WX5.
Batteries
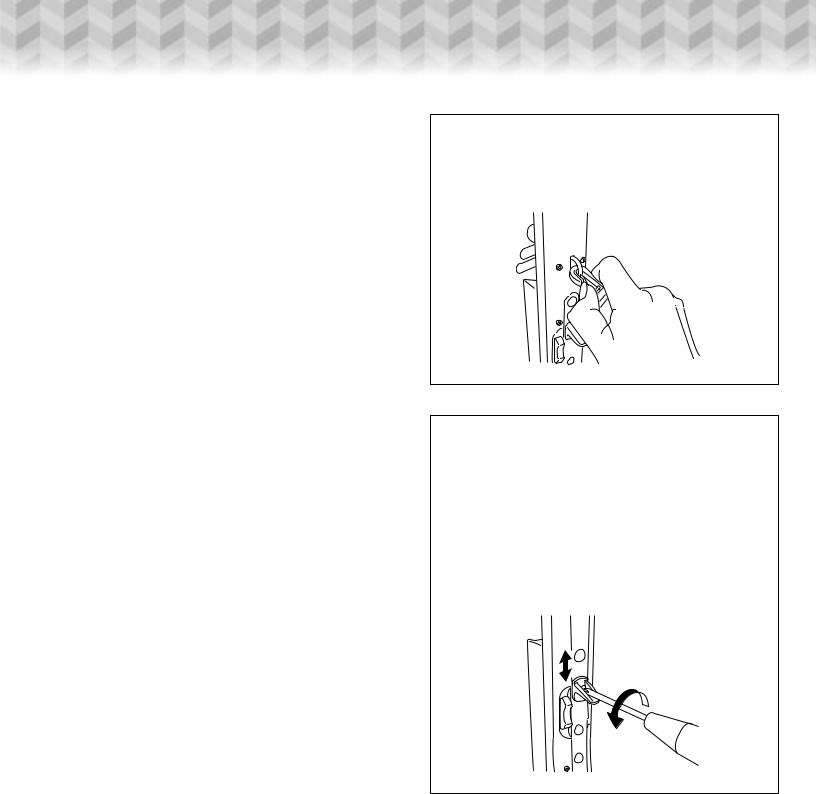
1 Use a coin to unlock the battery cover, then remove the cover as shown in the illustration.
2 Install a complete set of six new SUM-4 batteries, being sure to orient the polarity of the batteries properly as in the illustration.
3 Replace and lock the battery cover.
• When the batteries are almost depleted the LED indicators will flash and the sound may become distorted or reduced in volume. Be sure to replace the batteries early to minimize sound quality degradation.
•When an AC adaptor is plugged into the WX5 the internal batteries are automatically disconnected.
• Always replace all six batteries with new ones at the same time. Never mix new batteries with old ones, and don’t mix different types of batteries (i.e. standard and alkaline), or different brands of batteries.
8
Setting Up
 Connecting to a Tone Generator
Connecting to a Tone Generator with a WX Connector
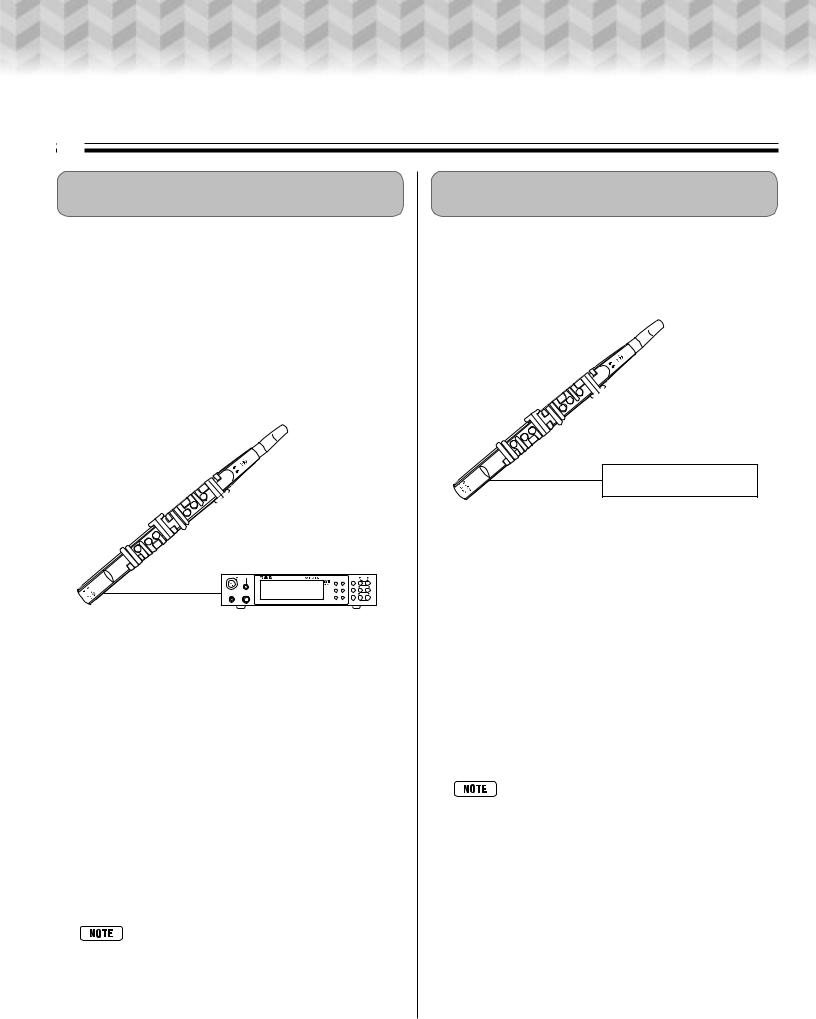
The Yamaha VL70-m Virtual Acoustic Tone Generator was designed for optimum matching with Yamaha WX-series Wind MIDI Controllers, and is recommended for use with the WX5 to make the most of the WX5’s expressive capabilities.
To connect the WX5 to the VL70-m, simply connect the supplied WX cable to the WX5’s WX OUT connector, and to the WX IN connector on the VL70-m. No other connections are required (the VL70-m supplies power to the WX5 via the WX cable).
WX5
VL70-m WX IN connector
WX IN |
BREATH |
|
MIDI/ |
PART |
WX cable |
|
PLAY EDIT |
WX |
ALL |
|
VELOCITY |
ENTER |
SELECT |
|
|
|
UTIL EFFECT |
||
|
|
BC/WX |
|
|
PHONES |
POWER/VOL |
TOUCH EG MODE BREATH |
EXIT |
VALUE |
WX OUT |
|
VOICE |
|
|
|
VL-XG |
|
|
|
PART |
MIDI BANK/PGM# VOL EXP PAN REV CHO VAR KEY |
|
|
|
|
PUSH ON/OFF |
|
|
|
HOST SLECT switch “MIDI”
WX5 Connection
Connect the end of the WX cable with the screw ring to the WX5. Insert the connector with the arrow on the cable connector facing upward, then tighten the screw ring to ensure a solid connection. Finally, clip the cable into the cable holder for extra security.
VL70-m Connection
Align the protrusion on the VL70-m end of the cable with the groove in the VL70-m WX IN connector, and plug in firmly. Also be sure to set the HOST SELECT switch on the VL70-m rear panel to “MIDI”, and set the VL70-m breath mode to BC/WX (refer to the VL70-m owner’s manual for details).
• The WX5 can also be directly connected to theYamaha WT11 Wind Tone Generator via the WX cable.
Connecting to a Standard MIDI Tone Generator
In addition to connecting an AC adaptor or installing batteries as described on page 8, connect the MIDI OUT connector of the WX5 to the MIDI IN connector of the tone generator or synthesizer to be used via a standard MIDI cable (sold separately).
WX5
MIDI cable
MIDI tone generator
MIDI OUT
Before using the WX5 to control a standard MIDI tone generator, it may be necessary to make several settings on the tone generator side. Refer to your tone generator’s owner’s manual for details, as well as the “Tone Generator Settings” section of this manual (page 27).
Also be sure to set the SW1-1(Vel), SW1-2(Win), and SW1-3(Win) DIP switches (page 22) as shown below to ensure smooth breath volume and timbre control.
Switch |
Setting |
|
|
SW1-1(Vel) |
ON |
SW1-2(Win) |
ON |
|
|
SW1-3(Win) |
OFF |
|
|
•In order to make the most of the WX5’s expressive capabilities, it is recommended that you use a tone generator which is capable of receiving MIDI Breath Controller control change data (control change number 2). Breath control is ideally suited to controlling volume and timbre via breath pressure, as well as applying a range of other effects.
•When using an XG tone generator, the tone generator’s Assignable Controller parameter is set to allow reception of breath controller data, but setting the WX5’s
“Wind Controller to MIDI Data” setup switches to “Expression” (page 22) can produce better results for volume control in some cases.
•The WX5 can also be connected to a MIDI tone generator via the WX cable and an optional Yamaha BT7 Power Box.
9
Preparing to Play
Turning the Power On
Whether you are powering the WX5 via the WX cable connected to a VL70-m tone generator, or via an AC adaptor or batteries, the WX5 power is switched on by sliding the POWER switch to the “ON” position. Turn the power off by sliding the POWER switch to the “OFF” position.
|
POWER |
OFF |
ON |
+ |
DC |
– |
12V IN |
MIDI OUT
WX OUT
•Depending on the setup switch settings (page 10) and sensor adjustment (page 25), the LED indicators may not light when the power is turned on.
Selecting a Mouthpiece
The WX5 is supplied with two different mouthpieces. Select the type that best suits your playing style and/or the type of music you intend to play.
•When changing mouthpieces, be careful not to bend or otherwise damage the cantilever inside the mouthpiece cavity.
Reed Mouthpiece (Saxophone Type)
This mouthpiece features a reed which can be used to control pitch according to your “bite”. This mouthpiece provides playability and expressive control essentially equivalent to a saxophone or clarinet.
Reedless Mouthpiece (Recorder Type)
This mouthpiece has no reed and thus does not allow lip control. Playing the reedless mouthpiece is similar to playing a recorder.
When using the reedless mouthpiece, set the lip mode to “Loose Lip” via the setup switches, as described on page 22.
• The WX5 is initially shipped with the Reed Mouthpiece attached.
Selecting a Lip Mode: Tight Lip or Loose Lip
The WX5 has two basic playing modes: Tight Lip and Loose Lip, described below. Select the mode which best suits your playing style.
• The Tight Lip or Loose Lip mode is set via the setup switches, as described on page 22.
•The WX5 is initially shipped with the Tight Lip mode selected.
■Tight Lip
The tight lip mode, which is the way most acoustic singlereed instruments are played, simply means that a certain amount of bite (lip pressure) is applied to the reed when playing at normal pitch. Increased pressure on the reed raises pitch, and decreased pressure on the reed (and/or moving the bite towards the tip of the mouthpiece) lowers pitch. The Tight Lip mode means that accurate pitch must be determined by the player’s ear, but is probably the best choice for players who have experience with single-reed instruments.
Bend Down |
Normal Pitch |
Bend Up |
Downward Pitch Bend |
Upward Pitch Bend |
• The lip range (the amount of variation caused by a given change in lippressure), and the type of effect produced by lip pressure (pitch or modulation) can be adjusted via the Lip Range and Lip Data setup switches, as described on page 22, 23.
10
Preparing to Play
■ Loose Lip
In the loose lip mode no pressure (or very slight pressure) is applied to the reed when playing normally. Pressure applied to the reed causes an increase in pitch. Thus, in the loose lip mode only upward pitch bend can be applied, but the amount of upward pitch bend that can be applied is greater than that available in the tight lip mode.
Normal Pitch |
Bend Up |
Upward Pitch Bend
• Always select the Loose Lip mode when using the reedless mouthpiece.
•The lip range (the amount of variation caused by a given change in lippressure), and the type of effect produced by lip pressure (pitch or modulation) can be adjusted via the Lip Range and Lip Data setup switches, as described on page 22,23.
About the Wind and Lip Sensors
The WX5 has two sensors - wind and lip - which may have to be adjusted for optimum playability (page 25).
• When the WX5 is initially shipped, the Tight Lip mode is selected, and both sensors are adjusted for “average” playing conditions.
■ The LED Indicators
The WX5 has two LED indicators which indicate the status of the wind and lip sensors. Viewing the instrument from the front (the key side) the indicator on the right is “LED 1”, and the indicator on the left is “LED 2”.
LED 2 |
LED 1 |
● LED1 (Lip Sensor Data)
LED 1 responds as follows in the Tight Lip mode, and with the initially factory settings:
LED On |
: Reed open (bend down). |
LED Off |
: Reed at center (no bend). |
LED On |
: Reed closed (bend up). |
In the Loose Lip mode LED 1 responds as follows:
LED Off |
: Reed completely open (pitch bend data “0”). |
LED On |
: Reed closed (bend up). |
When flute fingering is selected (page 12), LED 1 responds as follows (in this mode the Tight/Loose Lip setting is ignored):
LED Off |
: Reed completely open (pitch as fingered). |
LED On |
: Reed closed (pitch one octave above fingered |
|
pitch). |
● LED 2 (Wind Sensor Data)
LED On |
: Breath applied (sound will be produced if the |
|
WX5 is connected to a tone generator). |
LED Off |
: No breath pressure (no sound will be produced |
|
by the tone generator connected to the WX5) |
• Both LED indicators will flash when the batteries (if used) are almost depleted. If this happens, replace all six batteries with new ones as soon as possible.
About Tonguing
“Tonguing” is a technique which is used to add attack to notes, and to rapidly repeat notes. Rather than simply blowing into the mouthpiece, the tip of the tongue is used as if saying “tu” at the beginning of a note. A little practice is required, but the extra expressive capability is well worth the effort. Refer to a recorder or flute or saxophone method book for details on tonguing technique.
All other playing techniques which can be used with the WX5 -breath and lip control - are essentially the same as those used with acoustic wind instruments, so referring to appropriate wind instrument method books can be of great value.
11
Basic Playing Techniques
High D# Key
High D Key [Up 2] Octave key [Up 1] Octave key
B |
[Down 1] Octave key |
|
A# |
||
[Down 2] Octave key |
||
A |
|
|
G |
Playing Keys |
|
G# |
|
|
LOW B |
|
|
|
Setup Button |
Whole-tone Trill
Semitone Trill
F
Pitch Bend Wheel
E
F#
D
D#
C
WIND GAIN
WIND ZERO
LIP GAIN
LIP ZERO
Vel |
|
|
|
Trns |
|
Win |
|
|
|
Fing |
|
Win |
|
|
|
||
LIP |
|
|
|
Fast |
|
LIP |
|
|
|
Hi ct |
|
LIP |
|
|
|
Whl |
|
LIP+ |
|
|
|
||
|
|
|
|
|
|
nrm |
fix |
|
|
|
|
B/C EXP |
|
|
|
|
|
|
VOL |
|
A |
C |
|
nrm |
hrd |
|
B |
Fl |
|
tht |
loos |
|
off |
on |
|
nrm wide |
|
off |
on |
|
|
P/B M/W |
|
PB |
gen |
|
|
off |
on |
|
MW |
filt |
|
|
|
|
|
|
|
|
|
|
|
|
|
|
POWER |
OFF |
ON |
+ |
DC |
– |
12V IN |
|
MIDI OUT |
|
WX OUT |
Fingering Modes
The WX5 offers a choice of four fingering modes. Refer to the explanations of each mode, below, and the fingering charts on page 32, to determine which fingering mode is best for you.
*The fingering mode is set via the setup switches, as described on page 23.
*The WX5 is initially shipped with the Saxophone(a) fingering mode selected.
■Saxophone(a)
Basically the same as saxophone fingering, except that the fingering remains the same in all octaves (you only need to use the octave keys to change octaves), and thus is easy to learn.
■ Saxophone(b)
This mode is similar to Saxophone(a), but with additional trill key functions to facilitate rapid passages. This mode is ideal for players who are experienced with the WX11.
■ Saxophone(c)
A variation of the Saxophone(a) fingering mode, this mode allows saxophone-type alternate fingerings. Although alternate fingerings produce the same note, they produce slight variations in pitch and timbre which can be used for musical effect. The Saxophone(c) fingering mode simulates these effects.
*When using the Saxophone(c) mode, set the tone generator pitch bend range to “2” (±200 cents).
■ Flute
Similar to flute fingering, this mode is ideal for players who are familiar with flute fingering. Rather than continuous pitch bend in response to lip pressure, the pitch jumps up one octave when lip pressure is applied. The Lip Mode setting (page 11) is ignored when Flute fingering is selected.
The Whole-tone and Semitone Trill Keys
Pressing the whole-tone trill key raises the pitch a whole tone above the current fingering.
Pressing the semitone trill key raises the pitch a semitone above the current fingering.
12
Basic Playing Techniques
Octave Shift
The octave keys can be used to shift the pitch up or down by one, two, or three octaves while playing, as follows:
[Up 2] Octave Key |
3 octaves up |
[Up 1] + [Up 2] Octave Keys |
2 octaves up |
[Up 1] Octave Key |
1 octave up |
[Down 1] Octave Key |
1 octave down |
[Down 1] + [Down 2] Octave Keys |
2 octaves down |
[Down 2] Octave Key |
3 octaves down |
Pitch Bend Wheel
The WX5 pitch bend wheel makes it possible to produce smooth upward and downward bends over a greater range than is possible via lip control. Rolling the wheel upward (towards the mouthpiece end of the instrument) produces an upward pitch bend, and rolling the wheel downward produces a downward pitch bend.
Bend Up
Bend Down
• Using the neck strap and thumb hook provides maximum instrument stability, making it easier to produce accurate pitch bends using the pitch bend wheel.
•Set the required pitch bend range via the corresponding parameter on your tone generator.
•Don’t turn the WX5 power on while moving the pitch bend wheel. Doing so will cause the center wheel position to shift, thereby causing the instrument to play out of tune.
•Be careful not to accidentally press the Key Hold button while operating the Pitch Bend Wheel.
■ Changing the Pitch Bend Wheel Function
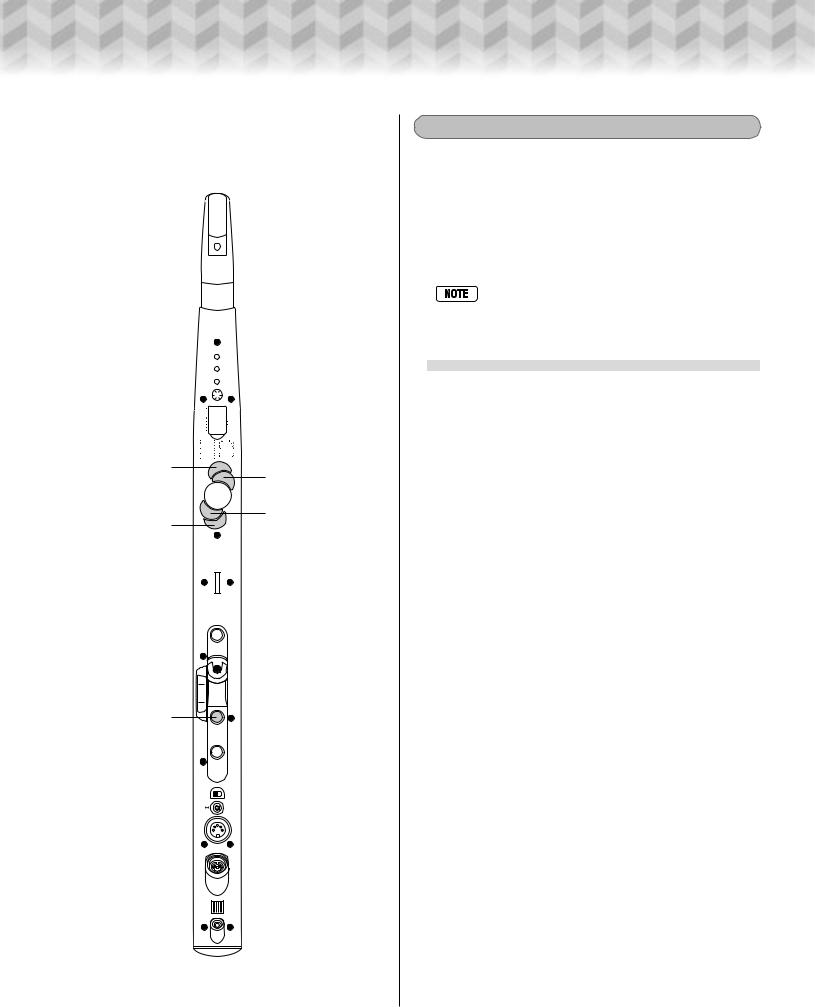
The function of the pitch bend in the upward and downward directions (i.e. the MIDI data it generates when rolled upward or downward) can be changed by using the Setup and Octave buttons while the pitch bend wheel is rolled all the way up or down, as listed below:
Pitch bend wheel + Setup Button + Octave Key
Win |
Fing |
LIP |
|
|
|
Fast |
|
LIP |
|
|
|
Hi ct |
|
LIP |
|
|
|
Whl |
|
LIP+ |
|
|
|
||
|
|
|
|
|
|
nrm |
fix |
|
|
|
|
B/C EXP |
|
|
|
|
|
|
VOL |
|
A |
C |
|
nrm |
hrd |
|
B |
Fl |
|
tht |
loos |
|
off |
on |
|
nrm wide |
|
off |
on |
|
|
P/B M/W |
|
PB |
gen |
|
|
off |
on |
|
MW |
filt |
|
Octave key [Up 2], [Up 1],
[Down 1], [Down 2]
Pitch Bend Wheel + Setup Button + [Up 2] Octave Key
Pitch bend up data
Pitch bend down data
Pitch Bend Wheel + Setup Button + [Up 1] Octave Key
Modulation wheel data
Pitch bend down data
Pitch Bend Wheel + Setup Button + [Down 1] Octave Key
Control change #16 (0 … 127) data
Control change #17 (0 … 127) data
Pitch Bend Wheel + Setup Button + [Down 2] Octave Key
Brightness up (control change #74) data
Brightness down (control change #74) data
• When brightness control is selected, the wheel transmits control change #74 value 64 at its center position, value 127 in the maximum upward position, and value 0 in the maximum downward position.
•According to GM (General MIDI) specifications, control change numbers #16 and #17 are non-reserved and available for general use. If your tone generator allows parameters to be assigned to MIDI control numbers, you can use the pitch bend wheel to control any available parameter. With the VL70-m, for example, you might want to assign the scream, growl, or other expressive parameters to control change numbers #16 and #17, so that they can be controlled via the WX5 pitch control wheel.
13
Basic Playing Techniques
WIND GAIN
WIND ZERO
LIP GAIN
LIP ZERO
Vel |
|
|
|
Trns |
|
Win |
|
|
|
Fing |
|
Win |
|
|
|
||
LIP |
|
|
|
Fast |
|
LIP |
|
|
|
Hi ct |
|
LIP |
|
|
|
Whl |
|
LIP+ |
|
|
|
||
|
|
|
|
|
|
nrm |
fix |
|
|
|
|
B/C EXP |
|
|
|
|
|
|
VOL |
|
A |
C |
|
nrm |
hrd |
|
B |
Fl |
|
tht |
loos |
|
off |
on |
|
nrm wide |
|
off |
on |
|
|
P/B M/W |
|
PB |
gen |
|
|
off |
on |
|
MW |
filt |
|
[Up 2] Octave key
[Up 1] Octave key
[Down 1] Octave key
[Down 2] Octave key
Key Hold button
|
POWER |
OFF |
ON |
+ |
DC |
– |
12V IN |
|
MIDI OUT |
|
WX OUT |
Key Hold
The Key Hold function can be used to hold a specified note while playing other notes, thus allowing more than one note to be played at the same time. You actually have a choice of four different Key Hold functions - Normal Hold, Follow Hold, Sustain, and Portamento - selected by holding the Key Hold button and pressing one of the Octave keys.
• When using a monophonic tone generator such as the
VL70-m, the Normal Hold and Follow Hold functions cannot be used.
■ Normal Hold
Select the Normal Hold mode by pressing the [Down 1] Octave key while holding the Key Hold button.
Normal Hold allows a specified note to be held while other notes are played.
Applying Normal Hold
1 Play a note on the WX5.
2 While playing the note, rapidly press and release the Key Hold button. The note will be held.
3 Any subsequently played notes will sound simultaneously with the held note.
Changing the Held Note
1 Play a different note than the held note.
2 While playing the new note, rapidly press and release the Key Hold button. The note will be held in place of the previous held note.
3 Any subsequently played notes will sound simultaneously with the held note.
14
 Loading...