


OWNER'S MANUAL BEDIENUNGSANLEITUNG MODE D'EMPLOI
SPECIAL MESSAGE SECTION
This product utilizes batteries or an external power supply (adapter). DO NOT connect this product to any power supply or adapter other than one described in the manual, on the name plate, or specifically recommended by Yamaha.
WARNING: Do not place this product in a position where anyone could walk on, trip over ,or roll anything over power or connecting cords of any kind. The use of an extension cord is not recommended! IF you must use an extension cord, the minimum wire size for a 25' cord (or less ) is 18 AWG. NOTE: The smaller the AWG number ,the larger the current handling capacity. For longer extension cords, consult a local electrician.
This product should be used only with the components supplied or; a cart, rack, or stand that is recommended by Yamaha. If a cart, etc., is used, please observe all safety markings and instructions that accompany the accessory product.
SPECIFICATIONS SUBJECT TO CHANGE:
The information contained in this manual is believed to be correct at the time of printing. However, Yamaha reserves the right to change or modify any of the specifications without notice or obligation to update existing units.
This product, either alone or in combination with an amplifier and headphones or speaker/s, may be capable of producing sound levels that could cause permanent hearing loss. DO NOT operate for long periods of time at a high volume level or at a level that is uncomfortable. If you experience any hearing loss or ringing in the ears, you should consult an audiologist.
IMPORTANT: The louder the sound, the shorter the time period before damage occurs.
Some Yamaha products may have benches and / or accessory mounting fixtures that are either supplied with the product or as optional accessories. Some of these items are designed to be dealer assembled or installed. Please make sure that benches are stable and any optional fixtures (where applicable) are well secured BEFORE using.
Benches supplied by Yamaha are designed for seating only. No other uses are recommended.
NOTICE:
Service charges incurred due to a lack of knowledge relating to how a function or effect works (when the unit is operating as designed) are not covered by the manufacturer’s warranty, and are therefore the owners responsibility. Please study this manual carefully and consult your dealer before requesting service.
ENVIRONMENTAL ISSUES:
Battery Notice:
This product MAY contain a small non-rechargeable battery which (if applicable) is soldered in place. The average life span of this type of battery is approximately five years. When replacement becomes necessary, contact a qualified service representative to perform the replacement.
This product may also use “household” type batteries. Some of these may be rechargeable. Make sure that the battery being charged is a rechargeable type and that the charger is intended for the battery being charged.
When installing batteries, do not mix batteries with new, or with batteries of a different type. Batteries MUST be installed correctly. Mismatches or incorrect installation may result in overheating and battery case rupture.
Warning:
Do not attempt to disassemble, or incinerate any battery. Keep all batteries away from children. Dispose of used batteries promptly and as regulated by the laws in your area. Note: Check with any retailer of household type batteries in your area for battery disposal information.
Disposal Notice:
Should this product become damaged beyond repair, or for some reason its useful life is considered to be at an end, please observe all local, state, and federal regulations that relate to the disposal of products that contain lead, batteries, plastics, etc. If your dealer is unable to assist you, please contact Yamaha directly.
NAME PLATE LOCATION:
The name plate is located on the bottom of the product. The model number, serial number, power requirements, etc., are located on this plate. You should record the model number, serial number, and the date of purchase in the spaces provided below and retain this manual as a permanent record of your purchase.
Model
Serial No.
Purchase Date
Yamaha strives to produce products that are both user safe and environmentally friendly. We sincerely believe that our products and the production methods used to produce them, meet these goals. In keeping with both the letter and the spirit of the law, we want you to be aware of the following:
PLEASE KEEP THIS MANUAL
92-BP (bottom)
2
PRECAUTIONS
PLEASE READ CAREFULLY BEFORE PROCEEDING
* Please keep these precautions in a safe place for future reference.
WARNING
Always follow the basic precautions listed below to avoid the possibility of serious injury or even death from electrical shock, short-circuiting, damages, fire or other hazards. These precautions include, but are not limited to, the following:
•Do not open the instrument or attempt to disassemble the internal parts or modify them in any way. The instrument contains no user-serviceable parts. If it should appear to be malfunctioning, discontinue use immediately and have it inspected by qualified Yamaha service personnel.
•Do not expose the instrument to rain, use it near water or in damp or wet conditions, or place containers on it containing liquids which might spill into any openings.
•If the AC adaptor cord or plug becomes frayed or damaged, or if there is a sudden loss of sound during use of the instrument, or if any unusual smells or smoke should appear to be caused by it, immediately turn off the power switch, disconnect the adaptor plug
from the outlet, and have the instrument inspected by qualified Yamaha service personnel.
•Use the specified adaptor (PA-3B or an equivalent recommended by Yamaha) only. Using the wrong adaptor can result in damage to the instrument or overheating.
•Before cleaning the instrument, always remove the electric plug from the outlet. Never insert or remove an electric plug with wet hands.
•Check the electric plug periodically and remove any dirt or dust which may have accumulated on it.
CAUTION
Always follow the basic precautions listed below to avoid the possibility of physical injury to you or others, or damage to the instrument or other property. These precautions include, but are not limited to, the following:
•Do not place the AC adaptor cord near heat sources such as heaters or radiators, and do not excessively bend or otherwise damage the cord, place heavy objects on it, or place it in a position where anyone could walk on, trip over, or roll anything over it.
•When removing the electric plug from the instrument or an outlet, always hold the plug itself and not the cord.
•Do not connect the instrument to an electrical outlet using a multiple-connector. Doing so can result in lower sound quality, or possibly cause overheating in the outlet.
•Unplug the AC power adaptor when not using the instrument, or during electrical storms.
•Always make sure all batteries are inserted in conformity with the +/- polarity markings. Failure to do so might result in overheating, fire, or battery fluid leakage.
•Always replace all batteries at the same time. Do not use new batteries together with old ones. Also, do not mix battery types, such as alkaline batteries with manganese batteries, or batteries from different makers, or different types of batteries from the same maker, since this can cause overheating, fire, or battery fluid leakage.
•Do not dispose of batteries in fire.
•Do not attempt to recharge batteries that are not intended to be charged.
•When the batteries run out, or if the instrument is not to be used for a long time, remove the batteries from the instrument to prevent possible leakage of the battery fluid.
•Keep batteries away from children.
•If the batteries do leak, avoid contact with the leaked fluid. If the battery fluid should come in contact with your eyes, mouth, or skin, wash immediately with water and consult a doctor. Battery fluid is corrosive and may possibly cause loss of sight or chemical burns.
•Before connecting the instrument to other electronic components, turn off the power for all components. Before turning the power on or off for all components, set all volume levels to minimum. Also, be sure to set the volumes of all components at their minimum levels and gradually raise the volume controls while playing the instrument to set the desired listening level.
•Do not expose the instrument to excessive dust or vibrations, or extreme cold or heat (such as in direct sunlight, near a heater, or in a car during the day) to prevent the possibility of panel disfiguration or damage to the internal components.
•Do not use the instrument near other electrical products such as televisions, radios, or speakers, since this might cause interference which can affect proper operation of the other products.
•Do not place the instrument in an unstable position where it might accidentally fall over.
•Before moving the instrument, remove all connected adaptor and other cables.
•When cleaning the instrument, use a soft, dry cloth. Do not use paint thinners, solvents, cleaning fluids, or chemical-impregnated wiping cloths. Also, do not place vinyl, plastic or rubber objects on the instrument, since this might discolor the panel or keyboard.
(4)-7 • Do not rest your weight on, or place heavy objects on the instrument, and do not use excessive force on the buttons, switches or connectors.
•Do not operate the instrument for a long period of time at a high or uncomfortable volume level, since this can cause permanent hearing loss. If you experience any hearing loss or ringing in the ears, consult a physician.
■DATA BACK-UP AND STORAGE
•Yamaha recommends that you regularly save data using a Memory Card (SmartMedia), and storing the Memory Cards in a safe, cool, dry place. YAMAHA CANNOT BE HELD RESPONSIBLE FOR THE ACCIDENTAL LOSS OF IMPORTANT MUSIC DATA!
Yamaha cannot be held responsible for damage caused by improper use or modifications to the instrument, or data that is lost or destroyed.
Always turn the power off when the instrument is not in use.
Make sure to discard used batteries according to local regulations.
3

Introduction
Thank you for your purchase of the SU200 Sampling Unit. The SU200 offers CD-quality sample recording and easy pad-controlled replay of recorded samples. Its effect control knobs and ribbon controller allow you to apply scratch, filtering, and other impressive effects both to samples and to realtime audio input. The SU200 is compact and easy to use, and is great for capturing and using familiar and interesting sounds.
Reading this manually carefully will help you take full advantage of the SU200’s many excellent features. After reading through the manual, please store it in a safe place (together with the warranty) so that you can refer back to it again as needed.
Package Contents (Make sure all items are included.)
●SU200 |
●Sampling CD |
●Owner’s manual (this manual) |
|
Using The Manual
●SU200 Features ........................................................................................................................................ |
Page 6 |
Introduces the various SU200 features. |
|
●Contents...................................................................................................................................................... |
Page 7 |
●Supplying Power ...................................................................................................................................... |
Page 12 |
Explains how to connect up the power adaptor and how to install batteries. |
|
●SU200 Design .......................................................................................................................................... |
Page 14 |
Explains the SU200’s configuration and controls. |
|
●Quick Start ..................................................................................................................................... |
Pages 16 to 21 |
A short tutorial that shows you what the SU200 can do. |
|
●Chapters 1 to 7.............................................................................................................................. |
Pages 22 to 51 |
Detailed explanations and procedures for each of the SU200 features. |
|
●Troubleshooting........................................................................................................................................ |
Page 54 |
Solutions to common problems. Check here before requesting service. |
|
*Screen images and other illustrations in this manual are for explanatory purposes only, and may differ from actual screen displays and machine states.
4
What is Sampling?
The SU200 records sound from a microphone or from input from a CD player or similar audio device. This recording process is called sampling, and the recorded sounds are called samples. You can record a sample into each pad, and play the sample back by pressing the pad. The SU200 can store up to 24 samples (3 banks × 8 pads) in its internal memory.
Samples are stored in digital form, just like recordings on an audio CD. The SU200 is capable of CD-quality recording.
CD MD
“ABCDE”
 Record samples.
PHONES MIC INPUT |
LINE INPUT |
STEREO OUTPUT |
CARD |
MIDI IN |
DC IN |
STANDBY |
|||
|
L |
R |
L |
R |
|
|
|
ON |
|
|
|
|
|
|
LOOP REMIX |
TYPE |
VARI |
|
|
|
|
|
|
|
SLICE |
TYPE |
GAT E TIME |
|
|
|
|
|
|
|
TECHMOD |
LFO |
MOD SPEED |
|
|
|
|
|
|
|
DIST/LO-FI |
LO-FI |
DRIVE |
|
|
|
|
|
|
|
DELAY |
DELAY LEVEL |
TIME |
|
|
|
|
|
|
|
FILTER |
RESONANCE |
CUTOFF |
|
|
|
|
|
|
|
|
DATA |
REC TRGLVL |
|
|
|
|
|
|
|
|
|
|
|
|
|
|
|
|
|
|
|
|
|
|
|
|
|
|
|
|
|
|
|
|
~~~~~~
~~~~~ 8888888 |
1 |
EFFECT |
2 |
|
VOLUME |
|
|||
SAMPLING UNIT |
|
CONTROL |
|
|
+ |
|
|
|
|
SCALE TIME STRETCH COPY PAD VOL SAVE |
LOAD |
D E L E T E |
M I D I |
Press pads to play samples back. |
PAD |
C A R D |
|
|
|
●Various playback features
In addition to playing samples back exactly as recorded, the SU200 also offers various types of special playback.
• Play part or all of a sample repeatedly. (Loop play)............................................................................. |
Page 29 |
• Play a sample backwards. (Reverse play)............................................................................................. |
Page 29 |
• Select the part of the sample that plays back. (Start point/end point)............................................... |
Page 30 |
The following illustration shows how playback works when you have set up start and end points and selected loop play.
Sample
ENGLISH
A |
B |
C |
D |
E |
|
Start Point |
|
|
End Point |
●Sample editing
The SU200 can delete the unplayed parts of your sample.
Sample
Extract
A |
B |
C |
D |
E |
|
Start Point |
|
|
End point |
C D C D C D C D......
Sample
C D
5

SU200 Features
The SU200 provides more than just standard sampling. This page introduces you to some of the special features included on the SU200.
■Loop-Track Play: Play loop samples in unison, all at the same tempo (BPM) (→ Pages 18, 32)
Although each sample has its own tempo setting, you can use this feature to play out multiple samples all at the same tempo. (You can also use an external MIDI clock to synchronize the playback.)
■Powerful Effects and Filter (→ Pages 17, 36)
Use the Loop Remix effect to rearrange break beats in real time. Or select from other dynamic effects, or apply a filter. You can control the characteristics of each effect using the ribbon controller and Effect Control knobs.
■Clear User Interface
•The backlit display makes it easy to view your panel settings.
•Pads light up when pressed, so that you can easily see which pads are playing.
•Effect buttons ([DIST] to [FILTER]) and the [SCRATCH] button light up when pressed, so that you can easily identify the effect that is currently selected.
●Apply effects and filtering to realtime audio input →( Page 19)
Apply filtering or an effects (TECH MOD, DIST/LO-FI, or DELAY) to input from an external audio source.
●Includes resampling capability (→ Page 26)
Mix multiple samples (together with effects, scratch, and filter) and record the result as a single new sample.
●Includes a memory-card slot (→ Page 40)
Use a memory card (SmartMedia card) to save and load sample data or WAV files.
●Allows simultaneous playback of samples recorded at different grades
You can record a sample in any of four grades (quality levels). This allows you to economize on memory: use low grades for sounds that are not affected by the quality level, and use high grades for sounds that require high resolution (cymbal sounds, etc.). You can play all of these samples back at the same time.
●Can operate on battery power
You can use the SU200 outdoors and in other locations where power connections are not available.
6

Contents |
|
Controls, Connectors, and the LCD .................................................................................................................... |
8 |
Power connections ............................................................................................................................................ |
12 |
The SU200 Design ............................................................................................................................................. |
14 |
Quick Start ........................................................................................................................... |
16 |
Playing Samples ................................................................................................................................................ |
16 |
Using the Effects and Filter .............................................................................................................................. |
17 |
Using Loop-Track Play ...................................................................................................................................... |
18 |
Applying Effects or Filter to Realtime Audio Input ......................................................................................... |
19 |
Recording a Sample .......................................................................................................................................... |
20 |
Chapter 1 Recording Samples ............................................................................................. |
22 |
Recording a Sample (AUTO start) .................................................................................................................... |
22 |
Recording a Sample (MANUAL start) ............................................................................................................... |
24 |
Resampling ........................................................................................................................................................ |
26 |
Chapter 2 Playing the Pads ................................................................................................. |
28 |
Gate/Trigger Setting ......................................................................................................................................... |
28 |
One-shot/Loop Setting...................................................................................................................................... |
29 |
Normal/Reverse Setting .................................................................................................................................... |
29 |
Setting the Start Point and End Point ............................................................................................................. |
30 |
Using the [HOLD] Feature ................................................................................................................................ |
32 |
Loop-Track Play ................................................................................................................................................. |
32 |
Chapter 3 Sample Editing .................................................................................................... |
34 |
DELETE (Deleting an Entire Sample) ............................................................................................................. |
34 |
EXTRACT (Deleting The Unused Ends of a Sample) ....................................................................................... |
35 |
Chapter 4 Effects ................................................................................................................. |
36 |
Selecting the Pad that Receives the Effect or Filter ........................................................................................ |
36 |
Effects, Filter, and Scratch ............................................................................................................................... |
36 |
Chapter 5 MIDI Features ..................................................................................................... |
38 |
About MIDI......................................................................................................................................................... |
38 |
Setting the MIDI Clock and MIDI Channel ...................................................................................................... |
39 |
Chapter 6 Using Memory Cards .......................................................................................... |
40 |
Saving Data into a Memory Card...................................................................................................................... |
42 |
Loading Data from a Memory Card .................................................................................................................. |
44 |
Deleting Data from a Memory Card ................................................................................................................. |
46 |
Formatting a Memory Card .............................................................................................................................. |
47 |
Chapter 7 Other Useful Features ......................................................................................... |
48 |
Scale Play .......................................................................................................................................................... |
48 |
Time Stretch (Changing a Sample’s Length) ................................................................................................... |
49 |
Copying a Sample into Another Pad ................................................................................................................ |
50 |
Adjusting the Playback Volume for Each Pad .................................................................................................. |
50 |
Using Memory Protection to Prevent Accidental Deletion .............................................................................. |
51 |
Reference ............................................................................................................................ |
52 |
Displayed Messages ........................................................................................................................................... |
52 |
Troubleshooting ................................................................................................................................................ |
54 |
Specifications .................................................................................................................................................... |
55 |
Index .................................................................................................................................................................. |
56 |
MIDI Implementation Chart ............................................................................................................................. |
60 |
ENGLISH
7


 Controls,
 Connectors,
 and
and the
the LCD
LCD 


Front Panel
PHONES MIC INPUT |
LINE INPUT |
STEREO OUTPUT |
3.3V CARD |
MIDI IN |
DC IN |
STANDBY |
|
L |
R |
L |
R |
|
|
|
ON |
|
|
|
EFFECT TYPE |
TYPE |
VARI |
|
|
|
|
|
LOOP REMIX |
|
|
||
|
|
|
SLICE |
TYPE |
GAT E TIME |
|
|
|
|
|
TECHMOD |
LFO |
MOD SPEED |
|
|
|
|
|
DIST/LO-FI |
LO-FI |
DRIVE |
|
|
|
|
|
DELAY |
DELAY LEVEL |
TIME |
|
|
|
|
|
FILTER |
RESONANCE |
CUTOFF |
|
|
q |
DATA |
REC TRGLVL |
e |
|
w |
||||
|
|
|
r |
|
~~~~~~ |
|
|
|
|
~~~~~ 8888888 |
1 |
EFFECT |
2 |
|
VOLUME |
||||
CONTROL |
||||
SAMPLING UNIT |
|
|
||
|
|
|
|
|
|
|
|
|
|
t |
y |
|
|
|
|
|
|
|
LOOP |
SLICE |
|
|
|
|
|
|
|
REMIX |
|
|
|
|
|
|
|
|
|
|
|
!2 |
!3 |
|
!4 |
|
|
DIST/ |
o |
|
|
|
|
|
|
|
|
|
|
JOB |
EXIT |
–1/NO |
+1/YES |
|
|
iLO-FI |
DELAY |
|
|
|
|
BPM |
!6 |
!7 !8 !9 |
||
|
BANK |
BANK |
BANK |
|
||||
!5 |
LOOP TR |
|
RESMPL |
REC |
START |
|||
|
|
|
PLAY |
|
STOP |
|||
|
|
|
|
|
|
|
||
@0 |
GATE |
ONE SHOT |
NORMAL |
START |
END |
POINT |
TRIGGER |
LOOP |
REVERSE |
POINT |
POINT |
CLEAR |
STERE@1O/MONO G@2RADE @3 @4 @5 @6
u
TECH MOD
FILTER !0 |
SCRATCH |
!1
@7 |
@8 |
@9 |
DELETE |
TIME |
|
EXTRACT |
|
|
|
|
#1
SCALE TIME STRETCH COPY |
PAD VOL |
SAVE |
LOAD |
D E L E T E |
M I D I |
PAD |
|
#0 |
C A R D |
|
|
|
|
|
|
|
8 Controls, Connectors, and the LCD

q Liquid Crystal Display (LCD) ...................................................................................................................... |
Page11 |
w VOLUME Control Knob ................................................................................................................... |
Page 13 |
e EFFECT CONTROL Knobs 1 and 2 ............................................................................................. |
Page 17 |
r Ribbon Controller ............................................................................................................................. |
Page 17 |
t [LOOP REMIX] Button.............................................................................................................. |
Pages 17, 36 |
y [SLICE] Button ........................................................................................................................... |
Pages 17, 36 |
u [TECH MOD] Button ................................................................................................................. |
Pages 17, 36 |
i [DIST/LO-FI] Button .................................................................................................................. |
Pages 17, 36 |
o [DELAY] Button .......................................................................................................................... |
Pages 17, 36 |
!0[FILTER] Button ......................................................................................................................... |
Pages 17, 36 |
!1[SCRATCH] Button.................................................................................................................... |
Pages 17, 36 |
!2[JOB] Button ................................................................................................................... |
Pages 15, 39, 42, 48 |
!3[EXIT] Button..................................................................................................................................... |
Page 15 |
!4[-1/NO], [+1/YES] Buttons........................................................................................................ |
Pages 18, 22 |
!5Bank buttons (Banks A, B, C)......................................................................................................... |
Page 16 |
!6[LOOP TR PLAY] Button .......................................................................................................... |
Pages 18, 32 |
!7[RSMPLE] Button ............................................................................................................................. |
Page 26 |
!8[REC] Button ........................................................................................................................ |
Pages 20, 22, 24 |
!9[START/STOP] Button .................................................................................................. |
Pages 21, 23, 25, 26 |
@0[HOLD] Button................................................................................................................................... |
Page 32 |
@1[GATE/TRIGGER] Button................................................................................................................ |
Page 28 |
@2[ONE SHOT/LOOP] Button............................................................................................................. |
Page 29 |
@3[NORMAL/REVERSE] Button ........................................................................................................ |
Page 29 |
@4[START POINT] Button............................................................................................................. |
Pages 30, 31 |
@5[END POINT] Button................................................................................................................. |
Pages 30, 31 |
@6[POINT CLEAR] Button ................................................................................................................... |
Page 31 |
@7[DELETE/EXTRACT] Button ................................................................................................... |
Pages 34, 35 |
@8[TIME] Button ............................................................................................................................. |
Pages 17, 37 |
@9[TAP] button ....................................................................................................................................... |
Page 37 |
#0Pads 1 to 8......................................................................................................................................... |
Page 16 |
#1[AUDIO IN] Button ............................................................................................................................ |
Page 19 |
ENGLISH
Controls, Connectors, and the LCD 9
Rear Panel and Connections
STANDBY |
DC IN |
MIDI IN |
|
STEREO OUTPUT |
|
LINE INPUT |
MIC INPUT PHONES |
ON |
|
|
R |
L |
R |
L |
u i |
|
|
3.3V CARD |
|
t |
|
y |
|
q |
|
|
|
|
|||
|
|
|
|
|
|
|
w e r
External Sequencer (RM1x, etc.)
CD |
MD |
q STANDBY/ON Switch................................................................................................................................. |
Page 13 |
Press to toggle the power on or off. (Power is on when the switch is pressed in.)
w DC IN Power Input
Connects to the optional PA-3B power adaptor.
e MIDI IN Connector ...................................................................................................................................... Page 38 Connects to external MIDI device (electronic instrument or computer). Allows you to control SU200 operation from the external device.
r Card Slot....................................................................................................................................................... |
Page 40 |
Accepts insertion of a memory card. You use memory cards to save and load samples. |
|
t STEREO OUTPUT Jacks (R, L) |
|
The SU200’s audio outputs. As the SU200 does not include an internal amp or speakers, you need to connect these outputs to an external audio device in order to play out the sound.
y LINE INPUT Jacks (R, L)
Inputs an audio signal for sampling or for AUDIO IN throughput. Connects to output cables from an external device such as a CD player or mixer.
u MIC INPUT Jack
Connects to a dynamic microphone or a battery-powered condenser microphone.
i PHONES Jack
Connects to a headphone set. (Use the VOLUME knob to control the volume to the headphones.)
 CAUTION
•Don’t leave the headphone volume set too high. Prolonged listening at high volume may cause ear damage.
10 Controls, Connectors, and the LCD
Display
tw
q |
|
|
|
|
|
|
|
|
|
|
|
|
|
|
|
|
|
|
|
|
|
|
|
|
|
|
|
|
|
|
|
|
|
|
|
|
|
|
|
|
|
|
|
|
|
|
|
|
|
|
|
|
|
e |
||
|
|
|
|
|
|
|
|
|
|
|
|
|
|
|
|
|
|
|
|
|
|
|
|
|
|
|
|
|
|
|
|
|
|
|
|
|
|
|
|
|
|
|
|
|
|
|
|
|
|
|
||||||
|
|
|
|
|
|
|
|
|
|
|
|
|
|
|
|
|
|
|
|
|
|
|
|
|
|
|
|
|
|
|
|
|
|
|
|
|
|
|
|
|
|
|
|
|
|
|
|
|
|
|||||||
r |
|
|
|
|
|
|
|
|
|
|
|
|
|
|
|
|
|
|
|
|
|
|
|
|
|
|
|
|
|
|
|
|
|
|
|
|
|
|
|
|
|
|
|
|
|
|
|
|
|
|
|
|
|
|
|
y |
|
|
|
|
|
|
|
|
|
|
|
|
|
|
|
|
|
|
|
|
|
|
|
|
|
|
|
|
|
|
|
|
|
|
|
|
|
|
|
|
|
|
|
|
|
|
|
|
|
|
|
|
|
|
i |
||
|
|
|
|
|
|
|
|
|
|
|
|
|
|
|
|
|
|
|
|
|
|
|
|
|
|
|
|
|
|
|
|
|
|
|
|
|
|
|
|
|
|
|
|
|
|
|
|
|
|
|
o |
|||||
u |
|
|
|
|
|
|
|
|
|
|
|
|
|
|
|
|
|
|
|
|
|
|
|
|
|
|
|
|
|
|
|
|
|
|
|
|
|
|
|
|
|
|
|
|
|
|
|
|
|
|
|
|
||||
|
|
|
|
|
|
|
|
|
|
|
|
|
|
|
|
|
|
|
|
|
|
|
|
|
|
|
|
|
|
|
|
|
|
|
|
|
|
|
|
|
|
|
|
|
|
|
|
|
|
|
||||||
|
|
|
|
|
|
|
|
|
|
|
|
|
|
|
|
|
|
|
|
|
|
|
|
|
|
|
|
|
|
|
|
|
|
|
|
|
|
|
|
|
|
|
|
|
|
|
|
|
|
|
||||||
|
|
|
|
|
|
|
|
|
|
|
|
|
|
|
|
|
|
|
|
|
|
|
|
|
|
|
|
|
|
|
|
|
|
|
|
|
|
|
|
|
|
|
|
|
|
|
|
|
|
|
|
|
||||
!1 |
~~~~~~ |
|
|
|
|
|
|
|
|
|
|
|
|
|
|
|
|
|
|
|
|
|
|
|
|
|
|
|
!0 |
|||||||||||||||||||||||||||
|
|
|
|
|
|
|
|
|
|
|
|
|
|
|
|
|
|
|
|
|
|
|
|
|
|
|
||||||||||||||||||||||||||||||
|
|
|
|
|
|
|
|
|
|
|
|
|
|
|
|
|
|
|
|
|
|
|
|
|
|
|
|
|
|
|||||||||||||||||||||||||||
q STEREO/MONO |
~~~~~ 8888888 |
|
|
|
!2 |
|||||||||||||||||||||||||||||||||||||||||||||||||||
|
|
|
||||||||||||||||||||||||||||||||||||||||||||||||||||||
|
|
|
|
|
|
|
|
|
|
|
|
|
|
|
|
|
|
|
|
|
|
|
|
|
|
|
|
|
|
|
|
|
|
|
|
|
|
|
|
|
|
|
|
|
|
|
|
|
|
|
Pages 22, 24, 26 |
|||||
w HI/STD/LONG/EXLG .................................................................................................................................. |
|
|
|
|
|
|
|
|
|
|
|
|
|
|
|
|
|
|
|
|
|
|
|
|
|
|
|
|
|
|
|
|
|
|
|
|
|
|
|
|
|
|
|
|
|
|
|
|
|
|
|
Pages 22, 24 |
||||
Indicates the currently selected sampling grade. You can change the selection using the [GRADE] button. Higher grades offer better quality but require more memory. Total available sampling time for each grade (with the SU200 set to MONO) are as follows.
• HI.............................................. |
Up to 42 seconds. Offers high-quality sampling, roughly equivalent to that of a |
|
standard CD. |
• STD (standard)......................... |
Up to 83 seconds. |
• LONG........................................ |
Up to 166 seconds. |
• EXLG (extra long) .................... |
Up to 333 seconds. |
e MIC/LINE...................................................................................................................................................... Page 22 Indicates the source from which the SU200 receives audio input for recording or throughput. The display changes automatically depending on whether a microphone or LINE input is connected.
• MIC ........................................... |
The SU200 takes audio input from the microphone connected to the MIC INPUT |
|
jack. Automatically selected if a microphone is connected. (The SU200 does not |
|
recognize LINE input while a microphone is connected.) |
• LINE ......................................... |
The SU200 takes input from the audio device (CD player, etc.) connected to one or |
|
both of the LINE INPUT jacks. |
r GATE/TRG ................................................................................................................................................... |
Page 28 |
t ONESHOT/LOOP ....................................................................................................................................... |
Page 29 |
y NORMAL/REVERSE.................................................................................................................................. |
Page 29 |
u Beat display
During loop-track play (see page 18), the display flashes to indicate the current beat (1→2→3→4→1...). The beat advances according to the tempo (BPM).
i REC TRGLVL (Recording Trigger Level) |
................................................................................................... Page 23 |
|
o INPUT .................................................................................................................................................... |
|
Pages 22, 24 |
!0MANUAL/AUTO/RESMPL/MIDI, REC |
|
|
• MANUAL................................... |
Page 24 |
|
• AUTO........................................ |
Page 22 |
|
• RESMPL (Resample) ............... |
Page 26 |
|
• MIDI ......................................... |
Page 33 |
|
!1Menu/Message Display
!2Numerical Display
ENGLISH
Controls, Connectors, and the LCD 11


 Power
Power connections


While the SU200 can run from either an optional AC adaptor or batteries, Yamaha recommends use of the more environmentally safe AC adaptor. Follow the instructions below according to the power source you intend to use.
Using an Optional AC Power Adaptor
Z Make sure that the SU200’s STANDBY/ON switch is set to STANDBY.
XConnect the optional AC adaptor (PA-3B or other adaptor specifically recommended by Yamaha) to the power supply jack.
C Plug the AC adaptor into an AC outlet.
STANDBY |
DC IN |
ON |
|
X
 AC outlet
PA-3B C
To disconnect the adaptor: Set the STANDBY/ON switch to STANDBY, then unplug the adaptor from the AC outlet, and then disconnect it from the SU200 power supply jack.
 WARNING
•Use ONLY a Yamaha PA-3B AC Power Adaptor (or other adaptor specifically recommended by Yamaha) to power your instrument from a standard electrical outlet. The use of other adaptors may result in irreparable damage to both the adaptor and the SU200.
•Unplug the AC Power Adaptor when not using the SU200, or during electrical storms.
Using Batteries
Z Open the battery compartment cover located on the instrumentís bottom panel.
XInsert six new batteries, being careful to follow the polarity markings on the inside of the compartment.
C Replace the compartment cover, making sure that it locks firmly in place.
12 Power connections
NOTE • When the batteries need to be replaced, “Battry Low” may appear on the display, the volume may be reduced, the sound may be distorted, and other problems may occur. When this happens, turn the power off and replace the batteries.
•Even if batteries are installed, the SU200 will automatically switch to AC power when the AC adaptor is connected.
•To conserve battery life, the display’s backlight remains off when the SU200 is running on batteries.
 CAUTION
•When the batteries run down, replace them with a complete set of six new batteries. NEVER mix old and new batteries.
•Do not use different kinds of batteries (e.g. alkaline and manganese) at the same time.
•If the instrument is not to be in use for a long time, remove the batteries from it, in order to prevent possible leakage of battery fluid.
Switching On the Power
ZMake the necessary connections.
Connect up headphones or an output audio device. (See page 10.)
X Lower the volume settings on the SU200 and the audio device.
CPress the STANDBY/ON switch to set the power ON.
The SU200 displays YAMAHA SU200 and then enters Pad-Play mode (see page 15).
 STANDBY
 ON
ON
ENGLISH
 CAUTION
•Note that a samll amout of current continues to flow even while the switch is in the STANDBY position. If you are going to leave the SU200 unused for a prolonged period, be sure to disconnect the adaptor and (if batteries are installed) remove the batteries.
VAdjust the volume by turning the VOLUME knob.
Also adjust the volume at the external audio device.
VOLUME
BWhen you are ready to turn off the SU200: Switch off the power to the output audio device (or lower its volume) before switching off the SU200.
Power connections 13


 The SU200 Design


Internal Configuration
The SU200 consists of three internal blocks.
●Sampler Block
Records samples from sound input from a microphone, CD player, or other audio device, and allows editing and processing of the recorded samples.
●Effector/Filter Block
Applies an effect or filter to the sound output from the sampler block. The SU200 provides six effect types: some of them standard effects, and others newly designed specifically for use with sample playback.
●Controller Section
Provides the various controls used for realtime playback. Includes pads for playing samples, and the ribbon controller and Effect Control knobs for applying effects.
CD MD
Sample Recording
|
|
|
|
|
|
|
|
|
|
|
|
|
|
|
|
|
|
|
|
|
|
|
|
|
|
|
|
|
|
|
|
|
|
|
|
|
|
|
|
|
|
|
|
|
|
|
|
|
|
|
|
|
|
|
|
|
|
|
|
|
|
|
|
|
|
|
|
|
|
|
|
|
|
|
|
|
|
|
|
|
|
|
|
|
|
|
|
|
|
|
|
|
|
|
|
|
|
|
|
Loop-Track |
|
|
|
Sampler Block |
|
|
|
|
|
Effector/Filter |
|
||||||||
Play |
|
|
|
|
|
|
|
|
Block |
|
|||||||||
|
|
|
|
|
|
|
|
|
|
|
|
|
|
||||||
|
|
|
|
|
|
|
|
|
|
|
|
|
|
|
|
|
|
|
|
BANK |
BANK |
BANK |
LOOP TR
PLAY
Controller Block
1 EFFECT 2
CONTROL
14 The SU200 Design

Memory Configuration
The SU200 can store a maximum of 24 samples (8 pads × 3 banks) in its internal memory. You can also save your SU200 samples into memory cards (see page 42).
Bank C
Bank B
Bank A
Memory Card
• |
Sample |
|
• |
Gate/Trigger..................................................... |
Page 28 |
• |
Oneshot/Loop.................................................. |
Page 29 |
• |
Normal/Reverse............................................... |
Page 29 |
• |
Start and end points ........................................ |
Page 30 |
Modes
The SU200 has three main operating modes.
●Pad-Play Mode
The SU200 enters this mode immediately following power-on. This is the mode you use to play and edit your samples. All operating procedures presented in this manual assume that you are starting from Pad-Play mode.
●Sampling Mode
This is the mode you use to record samples. You enter this mode by pressing the [REC] button, so that the REC indication appears in the display.
●Job Mode
You use this mode to make various settings: pad settings, memory-card settings, and so on. You enter this mode by pressing the [JOB] button.
NOTE • If you lose track of the current mode when working at the panel, you can return to Pad-Play mode by pressing the [EXIT] button one or more times (depending on the mode you are currently in).
ENGLISH
The SU200 Design 15


 Quick Start


Playing Samples
The SU200 comes with samples recorded for all pads. You are now ready to start using the pads to play these prerecorded samples.
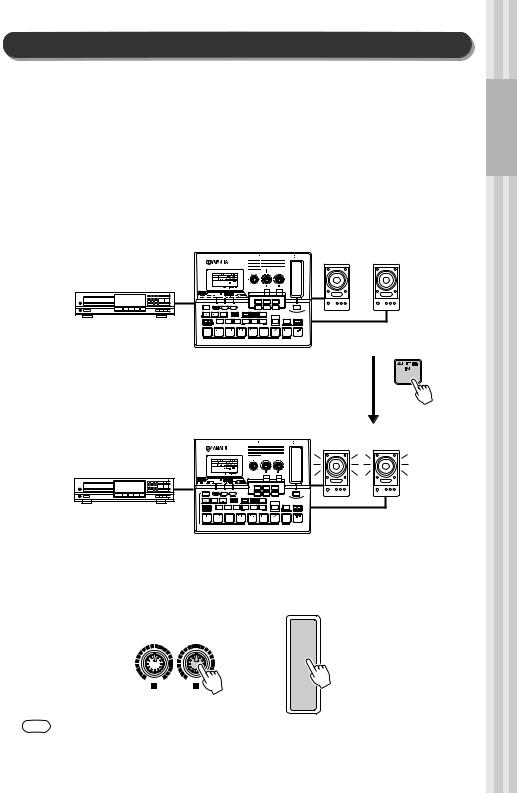
ZMake the necessary connections.
Connect up headphones or an output audio device. (See page 10.)
XPress the [STANDBY/ON] switch on the SU200’s rear panel.
The SU200 displays YAMAHA SU200 and then enters Pad-play mode. You can turn the power off by pressing the switch a second time.
STANDBY
 ON
ON
 CAUTION
•Even when the switch is in the “STANDBY” position, electricity is still flowing to the instrument at the minimum level. When you are not using the SU200 for a long time, make sure you unplug the AC power adaptor from the wall AC outlet, and/or remove the batteries from the instrument.
CPressing each pad plays a different sample.
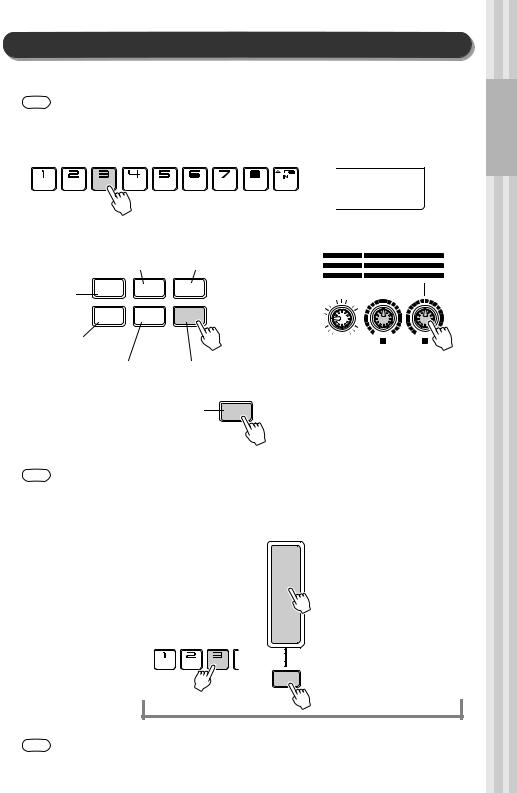
●For example, try pressing and holding pad 1.
Notice that the pad lights up and that a drum rhythm pattern repeats (loops) as long as the pad is held down. The playback stops when the pad is released.
●Next, try pressing pad 8.
The pad lights up and you hear a cymbals sample, which plays once through and then stops.
Notice that pad 1 is set for loop play: it continues to play the sample repeatedly as long as it is held down. Pad 8 is set for one-shot play: it plays the sample once through only. You are free to set each pad to play either loop or one-shot, and you can change the setting any time you wish. (See page 29.)
NOTE • The SU200 provides eight pads and three banks, allowing you to store and play up to 24 samples. (Switching the bank changes you to a whole different set of samples.) In the examples given here we are using bank A.
•The SU200 can play a maximum of 6 standard (or lower) grade monaural samples at one time, or up to 2 high-grade samples at one time. The maximum number may decline, however, when using the scratch or time stretch.
BANK |
BANK |
BANK |
16 Quick Start
Using the Effects and Filter
The SU200 lets you to apply a variety of impressive effects to your samples. Now let's try using the EFFECT CONTROL knobs and the ribbon controller on the SU200's front panel.
NOTE • Effects and scratch to not operate during playback of high-grade samples.
EFFECT |
Control the effect by turning the EFFECT CONTROL knobs. |
z Press a pad.
|
A-3 |
x Switch on the effect you wish to apply. |
c Turn the EFFECT CONTROL knobs to |
|
adjust the effect's parameters. |
Cuts the sound into discrete, Applies distinctive modulation
intermittent slices. |
|
and metallic tonality. |
||
|
|
|
|
|
Breaks the sample |
LOOP |
SLICE |
TECH |
|
REMIX |
MOD |
|
||
into pieces and |
|
|
||
|
|
|
|
|
rearranges these to |
DIST/ |
|
|
|
build a new phrase. |
DELAY |
FILTER |
|
|
LO-FI |
|
|||
|
|
|
||
Applies distortion and |
|
|
|
|
reduces the fidelity. |
|
|
|
|
|
|
|
|
|
Applies a delay accord- |
Strong filtering with |
|||
ing to the sample’s |
|
resonance. |
||
tempo (BPM). |
|
|
|
|
Allows you to change the
TIME
tempo in real time. → Page 37
EFFECT TYPE |
TYPE |
VARI |
LOOP REMIX |
||
SLICE |
TYPE |
GAT E TIME |
TECHMOD |
LFO |
MOD SPEED |
DIST/LO-FI |
LO-FI |
DRIVE |
DELAY |
DELAY LEVEL |
TIME |
FILTER |
RESONANCE |
CUTOFF |
|
DATA |
REC TRGLVL |
VOLUME |
1 |
EFFECT |
2 |
|
CONTROL |
||||
|
|
|
Example: Press the [FILTER] button once to set the filter on. You can then use EFFECT CONTROL knob 1 to control the filter’s resonance, and knob
2 to control the filter’s cutoff frequency. You can switch the filter off by pressing the [FILTER] button a second time.
NOTE • The lower right of the display indicates the pad that was most recently pressed. The effect you choose will apply to the sample in this pad.
SCRATCH |
Use the ribbon controller to produce a scratch sound. |
You can use the ribbon controller to scratch out a selected sample. This gives you a sound similar to what a DJ gets by manually turning a vinyl disc.
z Play a pad.
cYou can now scratch out the sample you selected (in this case, the sample for pad 3) by rubbing your finger along the ribbon controller.
v You can switch off scratch operation by pressing the
[SCRATCH] button once again.
x Press the [SCRATCH] button.
SCRATCH
Assign a pad to the [SCRATCH] button.
NOTE • When the [SCRATCH] button is off, the ribbon controller operates in the same way as EFFECT CONTROL knob 2.
ENGLISH
Quick Start 17
Using Loop-Track Play
Use this feature to play loop samples from multiple pads simultaneously. The SU200 temporarily adjusts the tempo settings for each sample so that all of these samples play out at the same tempo (the same BPM setting).
NOTE • Some samples may produce noise when used with Loop Track Play.
ZPress the [LOOP TR PLAY] (“Loop Track Play”) button.
Pads currently set for loop playback all begin playing in an endless loop. This operation is referred to as
Loop-Track Play.
LOOP TR
PLAY
When you set this button on, all samples currently set for loop playback begin playing out continuously, and the corresponding pads light up. All samples currently set to one-shot play remain off, and their pads remain dark. (See page 29.)
LoopTr
132
XPress one of the pads that is currently playing (that is currently lit up).
The pad goes dark, and the sample goes off. (The sample is muted.)
Press the pad again, and sample’s playback resumes.
(During Loop-Track Play, the pads for your loop sample act in the same way as mixer MUTE buttons.)
CTap three or four times.
–1/NO +1/YES |
or |
|
LoopTr |
BPM |
|
Tap three or four times. |
120 |
|
|
|
VTry pressing a pad for a non-looping sample (a pad set for one-shot playback).
Pads set for one-shot playback are not affected by loop-track play. You can play these pads in the same way as usual: press the pad once to play the sample.
BPress the [LOOP TR PLAY] button again to stop sample playback.
LOOP TR
PLAY
Now that you have switched off loop-track play, try pressing pads 1, 2, 3, 4, and 5 one at a time. Notice that these pads are all set to different tempos. During loop-track play, the SU200 automatically synchronizes the playback so that they all play out at the same tempo.
Note that it is also possible to synchronize sample playback using an external MIDI clock. To use these feature, you need to set the SU200 for an external MIDI clock (using Job mode) and you need to connect a MIDI clock device to the SU200’s MIDI IN connector.
18 Quick Start
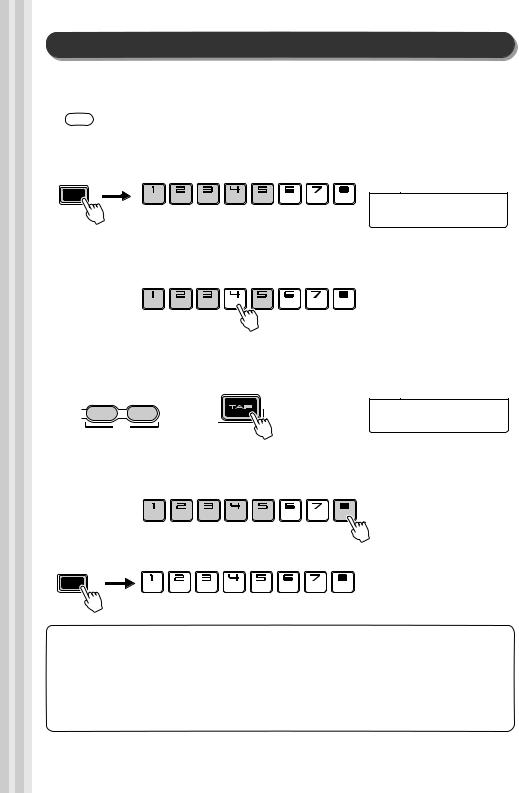
Applying Effects or Filter to Realtime Audio Input
The “Audio In” feature lets you pass sound from a CD player, MD player, or other audio device through the SU200. You can switch the sound throughput on and off, and mix it with playback from sample pads 1 to 8. You are also free to apply an effect or filter to the sound as it passes through the
SU200.
ZMake the necessary connections.
Switch off the SU200 and connect up a CD player or other audio source device. Also connect up an audio output device such as powered speakers or headphones. (See page 10.)
XSwitch on the power to the audio devices and to the SU200.
CStart playback from the audio input device, and the press the AUDIO IN pad on the SU200.
Audio Input |
|
|
|
|
|
(Source sound) |
~~~~~~ |
VOLUME |
1 |
CONTROL |
2 |
|
~~~~~ 8888888 |
|
|
EFFECT |
|
|
+ |
|
|
|
|
|
SCALE TIME STRETCH COPY PAD VOL |
SAVE |
LOAD |
D E L E T E |
M I D I |
|
PAD |
|
C A R D |
|
|
Sound from the audio source passes through the SU200 and out to the speakers.
You can stop the sound throughput by pressing the AUDIO IN pad once again. (Each press toggles throughput on or off.)
Audio Input |
|
|
|
|
|
(Source sound) |
~~~~~~ |
VOLUME |
1 |
CONTROL |
2 |
|
~~~~~ 8888888 |
|
|
EFFECT |
|
|
+ |
|
|
|
|
|
SCALE TIME STRETCH COPY PAD VOL |
SAVE |
LOAD |
D E L E T E |
M I D I |
|
PAD |
|
C A R D |
|
|
VTry using the EFFECT CONTROL knobs and ribbon controller to control the effect applied to the sound as it passes through the SU200.
Use the knobs and ribbon controller in the same way as described on page 17 (the same way you use them with pads 1 to 8).
DATA REC TRGLVL
1 EFFECT 2
CONTROL
NOTE • Loop Remix, Slice, scratch, and realtime tempo change ([TIME]) do not work on audio input.
• Remember that effects do not operate during playback of high-grade samples
ENGLISH
Quick Start 19
 Loading...