


Owner’s Manual
Reference
Introduction
Thank you for purchasing the Yamaha QY700 music sequencer.
The QY700 is a 20 song / 32 track sequencer with 1/480th quarter note resolution featuring a built-in XGand GM-compatible highquality AWM2 tone generator, all contained in a newly-designed package. The Style Sequencer functions that were so popular on the QY300 etc. have been enhanced and made easier to use. A large LCD display also makes operation easier and more intuitive.
In order to take full advantage of the QY700’s functionality, please make good use of this owner’s manual. Once you have read i t, keep it in a safe and convenient place for reference should any questions arise later.
3

Features of the QY700
Features of the QY700
Powerful sequencer functionality
The sequencer of the QY700 provides 32 sequence tracks and 16 pattern tracks, and up to 110,000 notes of storage capacity for professional-level sequencing power. Note timing resolution is 1/480th of a quarter note. Memory is backed up, so your data will not disappear when the power is turned off. Play Effect functions and a full complement of editing jobs allow you to edit and modify your data as desired. Play Effects provide a Groove Quantize function that lets you instantly produce a variety of different groove feelings. Also provided are jobs such as Chord Sort and Chord Separate, convenient for entering guitar strokes.
Functional music production environment with Songs, Patterns, and Phrases
The QY700’s Auto-Accompaniment functionality provides a highly practical music production environment that lets you use patterns and phrases to create your song.
Easy operation with large display, dials, function buttons, and direct buttons
The large 320 × 240 dot full-graphic display provides you with plenty of information for efficient music-making. For example, playback data can be viewed not only as an event list, but also graphically in a track-view or piano-roll display.
The jog dial provides an easy way to modify data, and the shuttle dial lets you rewind/fast-forward intuitively through data just as on a VTR.
Full assortment of preset phrases
The QY700 provides a vast 3,876 types of preset phrases from all musical genres. All preset phrases have been carefully selected for immediate musical usefulness. Simply by combining preset phrases into patterns, you can create backing data with infinite variety.
Undo/redo function
The QY700 provides an Undo/Redo job. Even if recording, editing, or job execution has caused your important data to disappear, you will always be able to recover it.
4
Features of the QY700
XG tone generator for rich expressiveness
The QY700 features an XG-compatible tone generator with 491 high-quality voices and 3 high-quality effect systems, providing the rich expressiveness that you expect from XG.
Wide range of compatibility
The QY700’s tone generator section is compatible with XG and with the GM system level 1 tone generator format. The sequencer section is compatible with ESEQ and SMF (Standard MIDI File) formats 0/1. Playback data that was created on the QS300 music synthesizer can also be played back on the QY700. You can also playback commercially available “XG-compatible song data” for additional enjoyment.
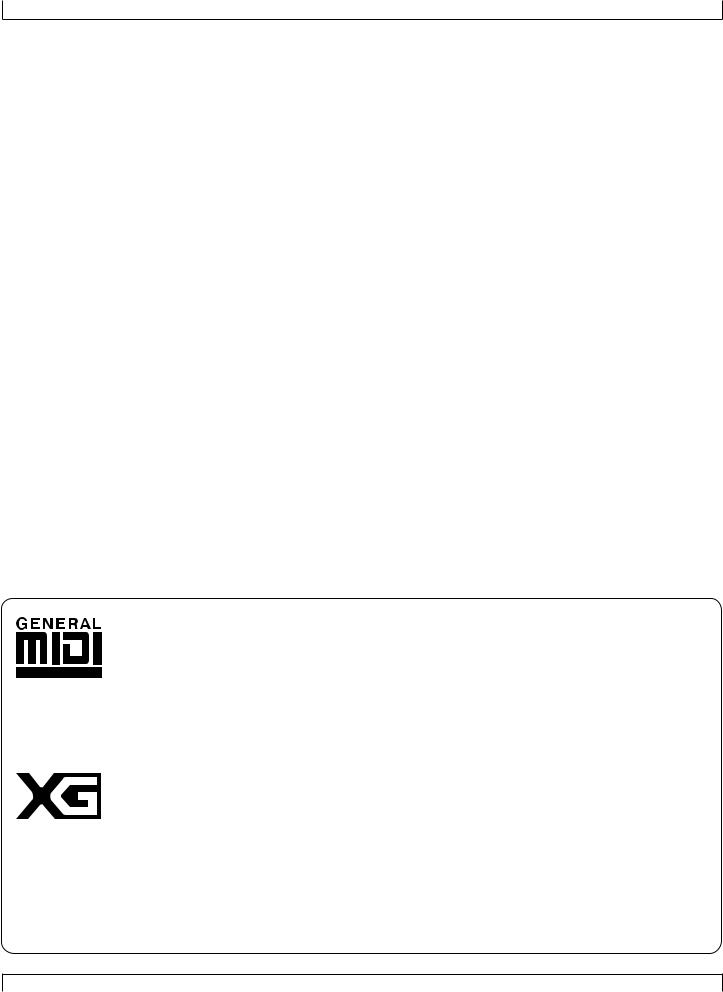
GM System Level 1
“GM System Level 1” is a standard specification that defines the arrangement of voices in a tone generator and its MIDI functionality, ensuring that data can be played back with substantially the same sounds on any GM-compatible tone generator, regardless of its manufacturer or model.
Tone generators and song data that meet the “GM System Level 1” bear this GM logo.
XG
“XG” is a tone generator format that expands the voice arrangement of the “GM System Level 1” specification to meet the ever-increasing demands of today’s computer peripheral environment, providing richer expressive power while maintaining upward compatibility of data. “XG” greatly expands “GM System Level 1” by defining the ways in which voices are expanded or edited and the structure and type of effects.
When commercially available song data bearing the XG logo is played back on a tone generator which bears the XG logo, you will enjoy a full musical experience that includes unlimited expansion voices and effect functions.
5

How to use the manuals
How to use the manuals
The documentation for the QY700 consists of the following two manuals. Understand the role of each manual, and refer to them as necessary.
Owner’s Manual: Reference (this manual)
This explains precautions for use, how to make connections, and all parameters and commands. Use this manual like a dictionary whenever you need to.
Chapter 1. BASIC CONCEPTS
Chapter 2. SONG MODE
Chapter 3. VOICE MODE
Chapter 4. EFFECT MODE
Chapter 5. PATTERN MODE
Chapter 6. UTILITY MODE
Chapter 7. DISK MODE
“Song mode” and “Pattern mode” have several functions in common.
In this manual, explanations for these common functions is given in greatest detail in chapter 2 “SONG MODE”. Some of the overl apping explanation in chapter 5 “PATTERN MODE” is omitted. In such cases, the appropriate page of chapter 2 “SONG MODE” is indicated s o that you can refer to it.
Owner’s Manual: QY700 Reference Listings
This is a booklet that contains various lists such as the Voice list, Preset Phrase list, Effect list, Chord Type list, MIDI data format, and MIDI implementation chart.
Printing conventions in this manual
This manual uses the following icons to indicate buttons and to distinguish different types of information.
sThis indicates a panel button. The characters in the box indicate the characters printed on the panel. Buttons for which there are no characters printed on the panel are indicated by the symbol printed on the panel, such as l. In the case of the function buttons 1
–6, the function corresponding to each button is also given; for example, 3 (Effect).
0101
1101
[Explanation]
This icon indicates an explanation of the function.
[Setting values]
This icon indicates the range of values that can be set for that function.
6
Printing conventions in this manual
[Procedure]
This icon indicates the actual procedure for using the function.
[Supplementary comments]
This icon indicates supplementary explanations related to the function, examples of use, and hints.
[Caution]
This icon indicates a caution. To avoid erasing or damaging important data, be sure to read such sections.
+This icon means that an operation needs to be performed while doing something else. For example, s + y means “hold down s and press y”.
/This icon means “or”. For example, n/ymeans that you should press either thenor theykey.
→This icon indicates the sequence in which buttons must be pressed. For example, numeric keys → e means that you must use the numeric keys to select a value and then press the e button.
▼This icon indicates the result of an operation.
→p.● ● This indicates the page on which a related function or item is explained. Refer to these pages as necessary.
7

Finding the information that you need
Finding the information that you need
In order to find the information that you need, you can make use of the following pages.
Table of contents (→ p.9)
Locate the desired information within the flow of the entire manual.
Front and rear panels (→ p.12)
Here you can read about the name and location of each button and control, and read about their function.
Function tree (→ p.34)
This lets you locate the desired information within the structure of the command hierarchy.
Glossary (→ p.324)
This section contains unfamiliar terms or phrases in alphabetical order with their explanations.
Index (→ p.328)
This lets you search alphabetically for unfamiliar terms to find pages on which they are discussed and pages on which related topics appear.
8

|
|
Table of contents |
Table of contents |
|
|
Introduction |
|
|
Features of the QY700 ........................................................................................................................................................................................ |
4 |
|
How to use the manuals ...................................................................................................................................................................................... |
6 |
|
Printing conventions in this manual ................................................................................................................................................................... |
6 |
|
Finding the information that you need ............................................................................................................................................................... |
8 |
|
SETUP |
|
|
1. |
Front and rear panels ................................................................................................................................................................................... |
12 |
|
Top panel ................................................................................................................................................................................ |
12 |
|
Rear panel .............................................................................................................................................................................. |
16 |
|
Floppy disk drive ................................................................................................................................................................... |
17 |
2. |
Connections ................................................................................................................................................................................................. |
18 |
|
Power supply connections ...................................................................................................................................................... |
18 |
|
Audio equipment connections ............................................................................................................................................... |
19 |
|
Connecting a foot switch ....................................................................................................................................................... |
20 |
|
Connecting external MIDI devices ........................................................................................................................................ |
20 |
|
Connecting an MTR (multi-track recorder) ........................................................................................................................... |
21 |
|
Connecting two or more devices ............................................................................................................................................ |
21 |
3. |
Using the Style and Demonstration disk ..................................................................................................................................................... |
22 |
|
Contents of the disk ............................................................................................................................................................... |
22 |
|
Listening to the demo playback ............................................................................................................................................. |
22 |
|
Restoring the factory settings ................................................................................................................................................ |
23 |
Chapter 1. BASIC CONCEPTS |
|
|
1. |
Mode structure ............................................................................................................................................................................................ |
26 |
2. |
Function tree ................................................................................................................................................................................................ |
34 |
3. |
How the QY700 is organized ...................................................................................................................................................................... |
36 |
4. |
Sequencer block .......................................................................................................................................................................................... |
37 |
5. |
The tone generator block ............................................................................................................................................................................. |
43 |
6. |
Controller block .......................................................................................................................................................................................... |
46 |
7. |
Effect block ................................................................................................................................................................................................. |
47 |
8. |
Basic operation ............................................................................................................................................................................................ |
51 |
9. |
Song creation procedure .............................................................................................................................................................................. |
56 |
|
Create pattrens ....................................................................................................................................................................... |
57 |
|
Editing a pattern ..................................................................................................................................................................... |
59 |
|
Pattern track recording ........................................................................................................................................................... |
60 |
|
Chord track recording ............................................................................................................................................................ |
61 |
|
Voice settings ......................................................................................................................................................................... |
62 |
|
Realtime record of track 2 ..................................................................................................................................................... |
62 |
|
Step recording of track 1 ........................................................................................................................................................ |
63 |
|
Editing tracks 1 and 2 ............................................................................................................................................................ |
65 |
|
Modifying the voice of track 1 .............................................................................................................................................. |
66 |
|
Save to floppy disk ................................................................................................................................................................. |
67 |
Chapter 2. SONG MODE |
|
|
SONG MODE Overview .................................................................................................................................................................................. |
70 |
|
1. |
SONG PLAY ............................................................................................................................................................................................... |
72 |
2. |
Play Effects .................................................................................................................................................................................................. |
80 |
|
Groove Quantizing ................................................................................................................................................................. |
82 |
|
Clock Shift, Gate Time, and Velocity .................................................................................................................................... |
90 |
|
Transposition .......................................................................................................................................................................... |
94 |
|
Drum Table Edit ..................................................................................................................................................................... |
97 |
3. |
Track View ................................................................................................................................................................................................ |
100 |
4. |
Output Channels ........................................................................................................................................................................................ |
103 |
9
Table of contents |
|
|
5. |
Song Recording ......................................................................................................................................................................................... |
106 |
|
Recording Standby ............................................................................................................................................................... |
108 |
|
Realtime Recording: Sequence Tracks (TR1,...,TR32) ....................................................................................................... |
112 |
|
Realtime Recording: PATTERN Track ................................................................................................................................ |
113 |
|
Realtime Recording: CHORD Track ................................................................................................................................... |
115 |
|
Realtime Recording: TEMPO Track .................................................................................................................................... |
117 |
|
Punch Recording .................................................................................................................................................................. |
118 |
|
Step Recording: Sequence Tracks (TR1,...,TR32) ............................................................................................................... |
120 |
|
Step Recording: PATTERN track ........................................................................................................................................ |
125 |
|
Step Recording: CHORD track ............................................................................................................................................ |
127 |
6. |
Song Editing .............................................................................................................................................................................................. |
129 |
|
1 (Graphic) Graphic screen ....................................................................................................................................... |
135 |
7. |
Song Jobs .................................................................................................................................................................................................. |
138 |
Chapter 3. VOICE MODE |
|
|
About voice mode ........................................................................................................................................................................................... |
168 |
|
1. |
Mixer ......................................................................................................................................................................................................... |
170 |
2. |
Tune ........................................................................................................................................................................................................... |
174 |
3. |
Voice edit ................................................................................................................................................................................................... |
176 |
4. |
Drum Setup Edit ........................................................................................................................................................................................ |
182 |
Chapter 4. EFFECT MODE |
|
|
About effect mode .......................................................................................................................................................................................... |
188 |
|
1. |
Connection ................................................................................................................................................................................................ |
190 |
2. |
Reverb edit, Chorus edit, Variation edit .................................................................................................................................................... |
193 |
Chapter 5. PATTERN MODE |
|
|
PATTERN MODE Overview .......................................................................................................................................................................... |
198 |
|
1. |
PATCH ...................................................................................................................................................................................................... |
200 |
|
Phrase Table ......................................................................................................................................................................... |
209 |
2. |
Play Effects ............................................................................................................................................................................................... |
212 |
|
Groove Quantizing ............................................................................................................................................................... |
214 |
|
Clock Shift, Gate Time, and Velocity .................................................................................................................................. |
217 |
|
Transposition ........................................................................................................................................................................ |
219 |
|
Drum Table Edit ................................................................................................................................................................... |
222 |
3. |
Pattern Voice submode .............................................................................................................................................................................. |
225 |
|
Mixer .................................................................................................................................................................................... |
227 |
|
Voice Edit ............................................................................................................................................................................. |
232 |
|
Drum-Setup Edit .................................................................................................................................................................. |
235 |
4. |
Pattern Effects ........................................................................................................................................................................................... |
239 |
|
Connection ........................................................................................................................................................................... |
241 |
|
Reverb Edit, Chorus Edit, and Variation Edit ...................................................................................................................... |
244 |
5. |
Phrase Recording ...................................................................................................................................................................................... |
247 |
|
Recording Standby ............................................................................................................................................................... |
248 |
|
Realtime Recording ............................................................................................................................................................. |
252 |
|
Step Recording ..................................................................................................................................................................... |
253 |
6. |
Phrase Editing ........................................................................................................................................................................................... |
254 |
7. |
Pattern Jobs ............................................................................................................................................................................................... |
256 |
Chapter 6. UTILITY MODE |
|
|
About Utility mode ......................................................................................................................................................................................... |
288 |
|
1. |
System ....................................................................................................................................................................................................... |
289 |
2. |
MIDI .......................................................................................................................................................................................................... |
291 |
3. |
MIDI filter ................................................................................................................................................................................................. |
293 |
4. |
Sequencer .................................................................................................................................................................................................. |
295 |
5. |
Click .......................................................................................................................................................................................................... |
297 |
6. |
Fingered chord zone .................................................................................................................................................................................. |
299 |
10

|
|
Table of contents |
Chapter 7. DISK MODE |
|
|
About floppy disks .......................................................................................................................................................................................... |
302 |
|
About Disk mode ............................................................................................................................................................................................ |
304 |
|
1. |
Save ........................................................................................................................................................................................................... |
307 |
2. |
Load ........................................................................................................................................................................................................... |
310 |
3. |
Rename ...................................................................................................................................................................................................... |
312 |
4. |
Delete ........................................................................................................................................................................................................ |
314 |
5. |
Format ....................................................................................................................................................................................................... |
316 |
APPENDIX |
|
|
1. |
Specifications ............................................................................................................................................................................................ |
318 |
2. |
Troubleshooting ........................................................................................................................................................................................ |
320 |
3. |
Error messages .......................................................................................................................................................................................... |
322 |
4. |
Glossary ..................................................................................................................................................................................................... |
324 |
5. |
Index .......................................................................................................................................................................................................... |
328 |
11
SETUP
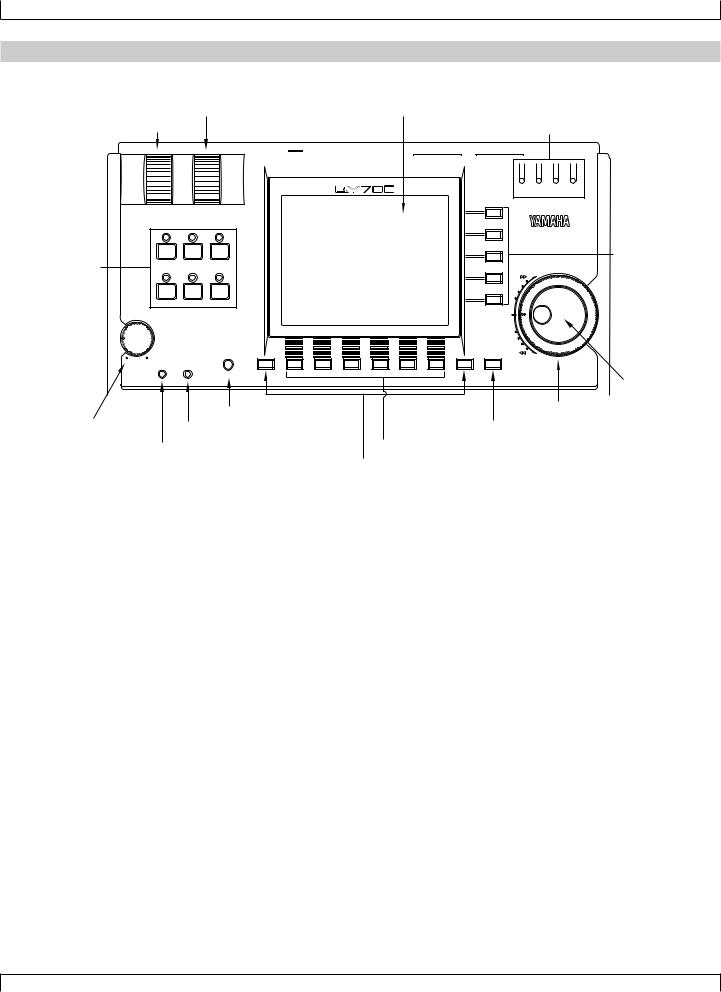
1. Front and rear panels
Top panel
2. ASSIGNABLE wheel |
8. LCD display |
|
|
|
||
1. PITCH wheel |
|
|
|
13. MIDI Data monitors |
||
|
|
L/MONO R FOOT SW |
IN A |
IN B |
OUT A |
OUT B |
|
|
OUTPUT |
|
|
MIDI |
|
|
|
MUSIC SEQUENCER |
|
|
|
IN A IN B OUT A OUT B |
|
|
|
|
|
MIDI |
|
PITCH |
ASSIGNABLE |
|
|
|
|
|
SONG |
PATTERN |
UTILITY |
|
|
|
12. Direct Cursor |
|
|
|
|
|
|
|
3. Mode keys |
|
|
|
|
|
keys |
VOICE |
EFFECT |
DISK |
|
|
|
|
|
MAX |
|
|
|
|
|
VOLUME |
SHIFT F1 |
F2 |
F3 |
F4 |
F5 |
F6 SHIFT EXIT |
|
REC PLAY CONTRAST |
|
|
|
|
|
|
|
|
|
|
|
15. Data dial |
|
5. CONTRAST control |
|
|
|
|
14. Shuttle dial |
4. VOLUME control |
7. PLAY indicator |
|
|
|
|
11. EXIT key |
6. REC (recording) indicator |
|
|
10. Function keys |
|||
|
|
|
9. SHIFT key |
|
|
|
1. PITCH wheel
This controller is used to continuously modify the pitch or tone etc. while you play. The controller will return to the center position when you release it. (→ p.290)
2. ASSIGNABLE wheel
This controller is used to continuously modify the tone etc. while you play. You can specify how this controller will affect the sound. (→ p.290)
3. Mode keys
Use these buttons to switch between modes.
s key
Switch to Song mode. (→ p.70)
p key
Switch to Pattern mode. (→ p.198)
u key
Switch to Utility mode. (→ p.288)
v key
Switch to Voice mode. (→ p.168)
e key
Switch to Effect mode. (→ p.188)
d key
Switch to Disk mode. (→ p.302)
12

SETUP
4. VOLUME control
Use this to adjust the volume of the output jacks and the headphone jack.
5. CONTRAST control
Use this to adjust the contrast of the display.
6. REC (recording) indicator
This indicator will light when the e key is pressed, indicating that you are in recording mode.
7. PLAY indicator
During playback, this indicator will blink in time with the tempo.
8. LCD display
Various types of information are displayed in this 320 x 240 pixel backlit liquid crystal display. The time after which the backlight will automatically turn off can be set in Utility mode. (→ p.289)
9. s key
This button works in conjunction with other keys to perform various functions.
10. 1–6 function keys
Use these keys to select from the menu that appears in the bottom line of the screen.
11. e key
This key moves from a sub mode or page display to the next higher level in the command hierarchy.
12. d [D1] –d [D5] direct keys
Use these keys to move the cursor to the setting items that are shown in the right side of the display.
13. MIDI Data monitors
The corresponding indicator will blink when MIDI data is transmitted or received at the four MIDI connectors (IN-A, IN-B, OUT-A, OUT-B). This provides a way to confirm MIDI communications.
(Note) Since MIDI Clock messages are normally being transmitted, the MIDI OUT-A/B indicators will be blinking lightly.
14. Shuttle dial
Use this to fast-forward or rewind songs or patterns. Depending on the angle to which you rotate the dial, the speed of fast-forward or rewind will change in four steps.
15. Data dial
Use this to select voices or to continuously increase/decrease a numerical value.
13
SETUP
|
|
22. Decrement key, Increment key |
|
|||
19. Locate keys |
20. Track keys |
|
|
|||
|
17. EDIT key |
|
|
|
|
|
|
|
|
|
|
|
|
16. Sequencer keys |
18. JOB key |
|
21. Cursor keys |
23. Numeric keypad |
||
|
|
|
|
|
|
|
|
|
|
|
EDIT |
|
|
JOB |
|
|
|
TRACK |
TRACK |
|
|
-1 |
|
|
|
+1 |
|
7 |
8 |
9 |
||
|
|
|
|
|
|
|
|
|
|
|
|
|
|
|
|
|
|
DOWN |
|
UP |
|
|
NO |
|
|
|
YES |
|
|
|
|
|
|
|
|
|
|
|
|
|
|
|
|
LOC 1 |
|
|
LOC 2 |
|
|
MUTE |
|
SOLO |
|
|
|
|
|
|
|
|
4 |
5 |
6 |
||
|
|
|
|
|
|
|
|
|
|
|
|
|
|
|
|
|
|
REST |
|
TIE |
|
|
|
|
|
|
|
|
1 |
2 |
3 |
|
CAPS |
SHIFT |
|
|
# |
|
|
# |
|
|
# |
( |
|
# |
) |
|
# |
|
|
|
|
7(#9) H |
|
a |
|
|
|
|
SPACE |
DEL |
|
- |
|
|
|
|
|
|
|
|
|
|
|
|
|
|
|
7( 13) |
|
|
|
|
|
|
0 |
|
||||||||||
OCT |
OCT |
A |
F |
B |
G |
C |
A |
D |
C |
E |
D |
F |
7( |
5) |
G |
I |
7sus4 |
J |
m7(11) |
|
OCT |
OCT |
|
|||||||||
DOWN |
UP |
|
|
|
|
|
|
|
|
|
|
|
# |
|
|
7( b9) |
b |
|
|
|
7(#11) |
3 |
DOWN |
UP |
3 |
|
|
|||||
ON |
ORG |
|
G b |
|
A |
b |
|
B b |
c |
D |
b |
|
E |
b |
|
7(b5) |
|
7(13) |
c |
sus4 |
|
|
|
|
|
|
|
|||||
BASS |
BASS |
|
|
|
|
|
|
|
|
|
|
|
|
|
|
|
|
|
|
|
|
|
|
|
|
|
|
|||||
|
_ |
|
! |
? |
# |
S |
% |
& |
|
|
_ |
/ |
|
|
|
|
|
|
K |
L |
|
M |
N |
O |
P |
Q |
R |
S |
T |
U |
V |
W |
|
X |
Y |
|
Z |
|
E |
F |
G |
A |
B |
C |
D |
add9 |
|
M7(9) |
6(9) |
7(9) |
add9 |
m7(9) |
mM7 |
|
dim |
|
|
|
|
M7 |
6 |
7 |
|
|
|
|
m7(b5) |
aug |
|||||||
|
|
|
|
|
|
|
|
M |
|
m |
m7 |
m6 |
|
|||||
|
|
|
|
|
|
|
|
|
|
|
||||||||
SECTION |
A |
B |
C |
D |
E |
F |
G |
H |
|
|
|
|
|
|
|
|
|
|
25. Octave keys |
26. Microkeyboard |
25. Octave keys |
24. Enter key |
16. Sequencer keys
Use these keys to playback or record songs, patterns, and phrases. The layout of the buttons is similar to that of a conventional tape recorder.
t (Top) |
Return to the first measure of a song or pattern. |
r (Rewind) |
Rewind the playback measure. |
f (Forward) |
Advance the playback measure. |
e (Recording) |
Enter recording standby mode. |
s (Stop) |
Stop playback/recording. |
p (Play) |
Begin playback/recording. |
17. e key
Switch to Song Edit (→ p.129) or Phrase Edit (→ p.254).
18. j key
Access the Song jobs (→ p.138) or Pattern jobs (→ p.256).
19. 1 (Locate 1) key
2 (Locate 2) key
In Song mode, these keys are used to move to a previously specified measure. Use s + 1/2 to store the current measure in the corresponding locate key.
14

SETUP
20. Track keys
Use these keys to change the currently selected track, or to mute or solo specific tracks.
d key |
These keys switch the currently selected track. |
u key |
|
m key |
This mutes the playback of the currently selected track. Press the key once again to un- |
|
mute the track. |
s key |
This mutes the playback of all tracks other than the selected track. Press the key once |
|
again to restore playback of the other tracks. Use this button when you want to hear only |
|
the selected track. |
21. Cursor keys
Use these keys to move the cursor location within the display.
22. n (Decrement) key y (Increment) key
In various setting displays you can use these buttons to increase (increment) / decrease (decrement) values, or switch settings on/off. These keys are also used to reply YES or NO to an “Are you sure?” prompt.
23. Numeric keypad
Use these to enter numerical values or note values.
24. e (Enter) key
Use this key to finalize a number entered by the numeric keypad, to enter the job selected by the cursor, or to execute a job etc.
25. Octave keys
These keys modify the pitch of the microkeyboard in steps of an octave.
In addition, the left octave button sets On Bass or Original Bass for a chord, and the right octave button sets chord Syncopation.
d[OCT DOWN] (Octave Down) key |
Lowers the pitch of the keyboard buttons in one-octave steps. |
u[OCT UP] (Octave Up) key |
Raises the pitch of the keyboard buttons in one-octave steps. |
26. Microkeyboard
These function as a keyboard for entering your performance. They are not sensitive to velocity or aftertouch. The microkeyboard are also used to specify chords and pattern sections, and to input characters.
15
SETUP
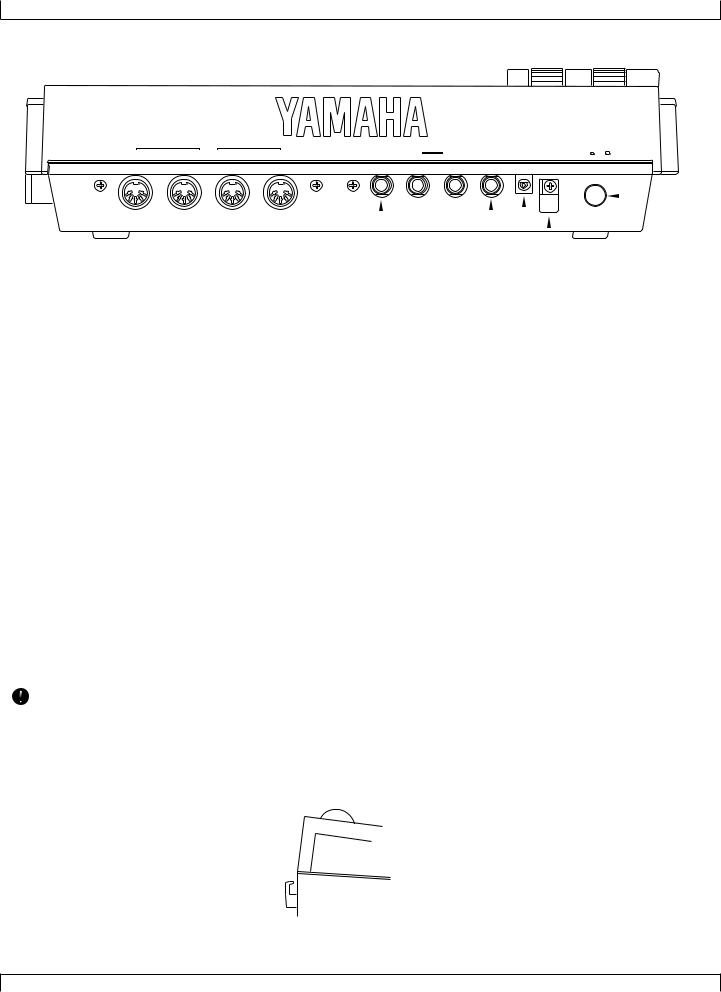
Rear panel
|
|
MIDI |
|
|
|
OUTPUT |
|
|
POWER |
OUT-B |
OUT-A |
IN-B |
IN-A |
FOOT SW |
R |
L/MONO |
PHONES |
DC IN |
ON OFF |
|
|
|
|
|
|
|
|
|
|
|
|
|
|
|
|
|
|
|
|
|
|
|
|
|
|
|
|
|
|
|
|
|
|
|
|
|
|
|
|
|
|
|
|
|
|
|
|
|
|
|
|
1. MIDI connectors |
2. FOOT SW (Foot switch) jack |
|
|
|
6. Cable clip |
|
||||||
|
|
|
|
|
|
|
|
|
|
|
|
|
|
|
|
|
|
|
|
|
5. DC IN (Power supply) jack |
|
|||
|
|
|
|
|
|
4. PHONES (Headphones) jack |
|
|||||
|
|
|
|
3. OUTPUT jacks |
|
|
|
7. POWER switch |
||||
1. MIDI connectors
These connectors are used to connect external MIDI devices via a MIDI cable. There are four MIDI connectors: IN-A, IN-B, OUT-A, and OUT-B. IN-A and IN-B are inputs, and OUT-A and OUT-B are outputs. (→ p.20)
2. FOOT SW (Foot switch) jack
A foot switch (FC4, FC5: option) can be connected to this jack. A connected foot switch can be used during performance as a sustain pedal or as a start/stop switch. (→ p.290)
3. OUTPUT jacks
These jacks are for line connections to powered speakers or a mixer. When playing in stereo, connect both jacks. When playing in mono, connect the L/MONO jack. (→ p.19)
4. PHONES (Headphones) jack
A set of headphones with a stereo phone plug can be connected to this jack. (HPE-170 or other Yamaha recommended headphones: impedance 8 – 150 ohms.) The headphone volume is adjusted by the Volume control.→( p.19)
5. DC IN (Power supply) jack
Connect the included PA-5B AC adaptor to this jack. (→ p.18)
• Before connecting the AC adaptor, make sure that the power switch of the QY700 is turned off. First connect the AC adaptor to the power supply jack, and then plug it into an AC outlet.
•Use only the included PA-5B AC adaptor. Using other AC adaptors will cause malfunctions. Also, be sure to unplug the AC adaptor from the AC outlet if you will not be using the unit for an extended period of time.
6. Cable clip
Wrap the AC adaptor power cable around this clip as shown in the diagram. This will decrease the possibility of the power cable being pulled out accidentally.
Cable clip 
7. POWER switch
This switch turns the power on/off. The power is on when the switch is pressed in. (→ p.18)
16
SETUP
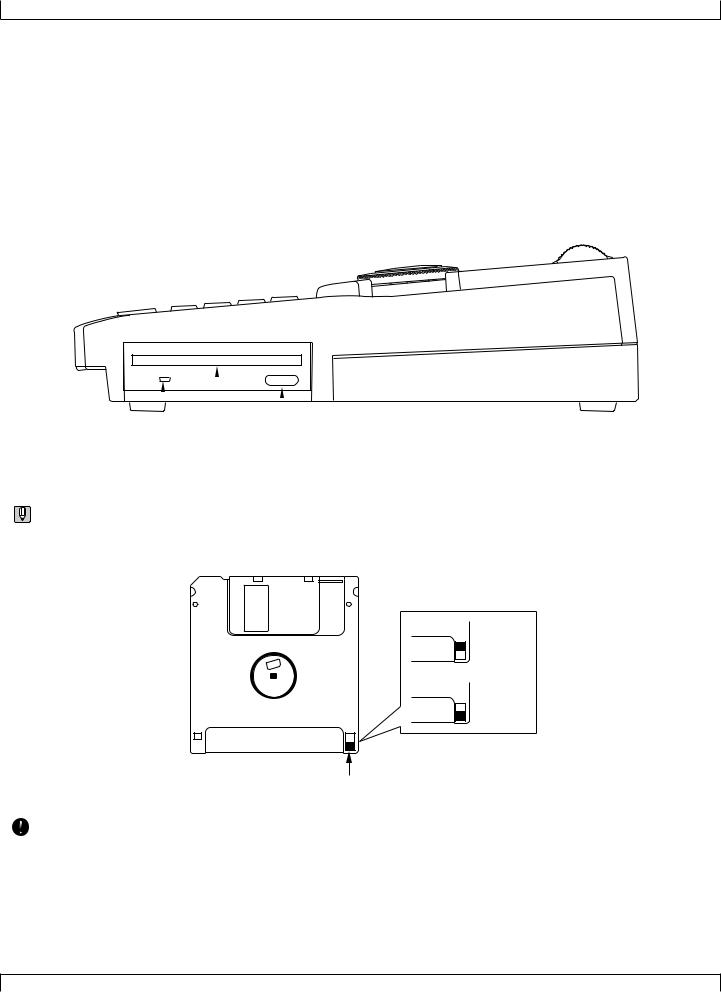
Floppy disk drive
1. Floppy disk slot
This is where floppy disks are inserted for loading or saving data. 3.5 inch 2HD (MF2HD) or 2DD (MF2DD) floppy disks can be used. (→ p.302)
2. Disk-in-use indicator
This indicator will light while data is being read from or written to the floppy disk. Never attempt to remove the disk while this indicator is lit.
3. Eject button
Press this button to remove the floppy disk. Disks must be inserted or removed gently and firmly, and only while the access indicator is dark.
|
|
|
|
|
|
|
|
|
|
|
|
2. Disk-in-use indicator |
3. Eject button |
||
|
|
|
|
1. Floppy disk slot
• The back of a floppy disk contains a write protect tab as shown in the following illustration. When this tab is in the downward position (with the window open), it will not be possible to modify, add, or delete data. When you wish to protect important data, you should leave the tab in this position.
Write permit
Write prohibit
Write protect tab
• Be aware that Yamaha can make no guarantee regarding data damage that results from improper use.
17

SETUP
2. Connections
In order to use the QY700, the included AC adaptor and an amp system etc. must be connected. If you use external MIDI devices or controllers, these must also be connected.
This sections explains how to make these connections.
• Be sure to turn off the power before making any connections. If you make connections while the power is on, you risk damaging external equipment such as the amp or speakers.
Power supply connections
1.Make sure that the power switch of the QY700 is turned off, and connect the included AC adaptor (PA-5B) to the power supply jack.
2.Plug the AC adaptor into an AC outlet, and turn on the QY700 power switch.
• Use only the included PA-5B AC adaptor. Using other AC adaptors will cause malfunctions. Also, be sure to unplug the AC adaptor from the AC outlet if you will not be using the unit for an extended period of time.
18
SETUP
Audio equipment connections
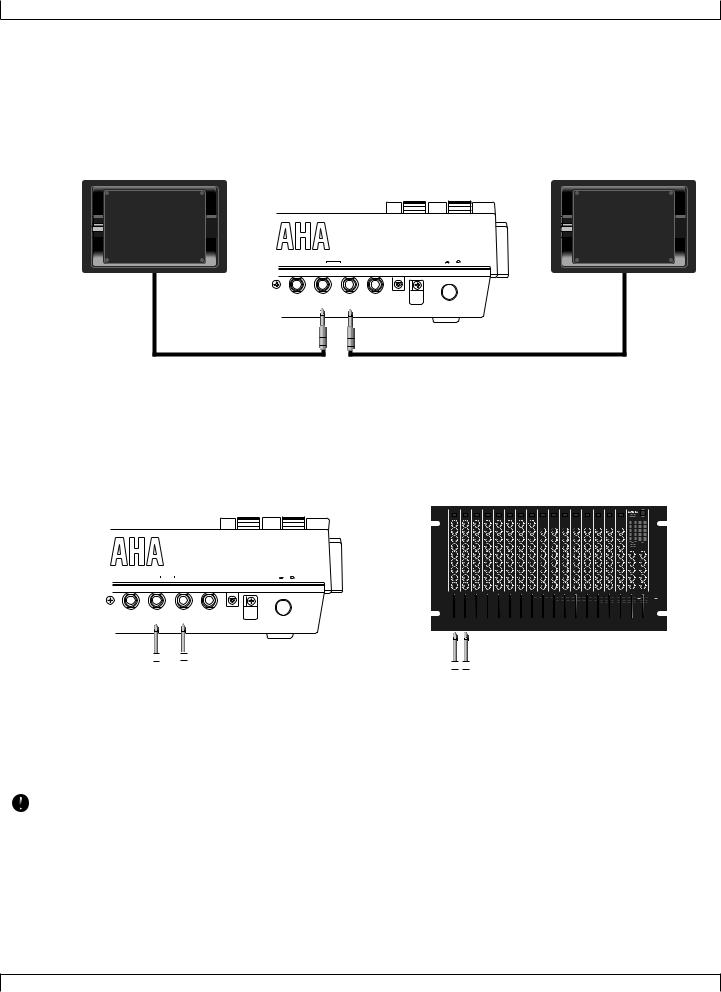
To output the sound of the QY700, connect an amp or mixer to the output jacks.
Connection to powered speakers
Connect two powered speakers (left and right) to the output jacks (L/MONO, R).
If you are connecting only one powered speaker, use the L/MONO jack.
FOOT SW |
R |
OUTPUT |
|
|
POWER |
L/MONO |
PHONES |
DC IN |
ON OFF |
Connection to a mixer
Connect the output jacks (L/MONO, R) to two channels of the mixer. The channel connected to the L/MONO jack should be panned left, and the channel connected to the R jack should be panned right.
Make the same type of connections if you are connecting the QY700 to an MTR or cassette deck.
2 |
2 |
2 |
2 |
2 |
2 |
2 |
2 |
2 |
2 |
2 |
2 |
2 |
2 |
2 |
2 |
|
|
|
|
|
|
|
|
|
|
|
|
|
|
|
|
|
06 |
06 |
|
|
|
|
|
|
|
|
|
|
|
|
|
|
|
|
5 |
5 |
|
|
|
|
|
|
|
|
|
|
|
|
|
|
|
|
06 |
06 |
|
|
|
|
|
|
|
|
|
|
|
|
|
|
|
|
5 |
5 |
|
|
|
|
|
|
|
|
|
|
|
|
|
|
|
|
06 |
06 |
|
|
|
|
|
|
|
|
|
|
|
|
|
|
|
|
5 |
5 |
|
|
|
|
|
|
|
|
|
|
|
|
|
|
|
|
06 |
06 |
|
|
|
|
|
|
|
|
|
|
|
|
|
|
|
|
5 |
5 |
|
|
|
|
|
|
|
|
|
|
|
|
|
|
|
|
06 |
06 |
|
|
|
|
|
|
|
|
|
|
|
|
|
|
|
|
5 |
5 |
|
|
|
|
|
|
|
|
|
|
|
|
|
|
|
|
|
|
|
|
|
OUTPUT |
|
|
POWER |
|
|
|
|
|
|
|
|
|
|
|
|
|
|
|
|
|
|
|
|
|
|
|
|
|
|
|
|
|
|
|
|
|
|
|
|
|
|
|
||
FOOT SW |
R |
|
L/MONO |
PHONES |
DC IN |
ON OFF |
|
|
|
|
|
|
|
|
|
|
|
|
|
|
|
|
|
|
|
|
|
|
|
|
|
|
|
|
|
|
|
|
|
|
|
|
|
|
|
|
|
|
|
|
|
|
|
6 |
6 |
6 |
6 |
6 |
6 |
6 |
6 |
6 |
6 |
6 |
6 |
6 |
6 |
|
6 |
6 |
6 |
6 |
6 |
6 |
|||||||||||||||||||
|
|
|
|
|
|
|
0 |
0 |
0 |
0 |
0 |
0 |
0 |
0 |
0 |
0 |
0 |
0 |
0 |
0 |
|
0 |
0 |
0 |
0 |
0 |
0 |
|||||||||||||||||||
|
|
|
|
|
|
|
5 |
5 |
5 |
5 |
5 |
5 |
5 |
5 |
5 |
5 |
5 |
5 |
5 |
5 |
|
5 |
5 |
5 |
5 |
5 |
5 |
|||||||||||||||||||
|
|
|
|
|
|
|
10 |
10 |
10 |
10 |
10 |
10 |
10 |
10 |
10 |
10 |
10 |
10 |
10 |
10 |
|
10 |
10 |
10 |
10 |
10 |
10 |
|||||||||||||||||||
|
|
|
|
|
|
|
0 |
0 |
0 |
0 |
0 |
0 |
0 |
0 |
0 |
0 |
0 |
0 |
0 |
0 |
|
0 |
0 |
0 |
0 |
0 |
0 |
|||||||||||||||||||
|
|
|
|
|
|
|
5 |
5 |
5 |
5 |
5 |
5 |
5 |
5 |
5 |
5 |
5 |
5 |
5 |
5 |
|
5 |
5 |
5 |
5 |
5 |
5 |
|||||||||||||||||||
|
|
|
|
|
|
|
10 |
10 |
10 |
10 |
10 |
10 |
10 |
10 |
10 |
10 |
10 |
10 |
10 |
10 |
|
10 |
10 |
10 |
10 |
10 |
10 |
|||||||||||||||||||
|
|
|
|
|
|
|
20 |
20 |
20 |
20 |
20 |
20 |
20 |
20 |
20 |
20 |
20 |
20 |
20 |
20 |
|
20 |
20 |
20 |
20 |
20 |
20 |
|||||||||||||||||||
|
|
|
|
|
|
|
|
|
|
|
|
|
|
|
|
|
|
|
|
|
|
|
|
|
|
|
|
|
|
|
|
|
|
|
|
|
|
|
|
|
|
|
|
|
|
|
|
|
|
|
|
|
|
|
1 |
|
2 |
|
4 |
|
5 |
|
6 |
|
7 |
|
8 |
|
9 |
|
10 |
|
12 |
|
13 |
|
14 |
|
15 16 |
|
ST |
R |
ST |
|
|
|
ST |
||||||
|
|
|
|
|
|
|
|
|
|
|
|
|
|
|
|
|
|
|
|
|
|
|
|
|
|
|
|
|
|
|
|
|
|
|
|
|
|
|
|
|
|
|
|
|
|
|
|
|
|
|
|
|
|
|
|
|
|
|
|
|
|
|
|
|
|
|
|
|
|
|
|
|
|
|
|
|
|
|
|
|
|
|
|
|
|
|
|
|
|
|
|
|
|
|
|
|
|
|
|
|
|
|
|
|
|
|
|
|
|
|
|
|
|
|
|
|
|
|
|
|
|
|
|
|
|
|
|
|
|
|
|
|
|
|
|
|
|
|
|
|
|
|
|
|
|
|
|
|
|
|
|
|
|
|
|
|
|
|
|
|
|
|
|
|
|
|
|
|
|
|
|
|
|
|
|
|
|
|
|
|
|
|
|
|
|
|
|
|
|
|
|
|
|
|
|
|
|
|
|
|
|
|
|
|
|
|
|
|
|
|
|
|
|
|
|
|
|
|
|
|
|
|
|
|
|
|
|
|
|
|
|
|
|
|
|
|
|
|
|
|
|
|
|
|
|
|
|
|
|
|
|
|
|
|
|
|
|
|
|
|
|
|
|
|
|
|
|
|
|
|
|
|
|
|
|
|
|
|
|
|
|
|
|
|
|
|
|
|
|
|
|
|
|
|
|
|
|
|
|
|
|
|
|
|
|
|
|
|
|
|
|
|
|
|
|
|
|
|
|
|
|
|
|
|
|
|
|
|
Using headphones
If you are using headphones, connect them to the rear panel PHONES (headphones) jack.
When using headphones, adjust the volume to an appropriate level that will not harm your hearing.
•Do not connect the output jacks of the QY700 to the mic input jacks of an amp or cassette deck etc. If they are connected to mic inputs, the sound quality may be impaired, and the device may be damaged. Also, when connecting the QY700 to a mixer or similar device, set the mixer channels to the Line Input position.
19
SETUP
Connecting a foot switch
When using a separately sold FC4 or FC5 foot switch, insert the foot switch plug into the foot switch jack located on the rear panel.
FC4 or FC5
|
|
OUTPUT |
|
|
POWER |
FOOT SW |
R |
L/MONO |
PHONES |
DC IN |
ON OFF |
Connecting external MIDI devices
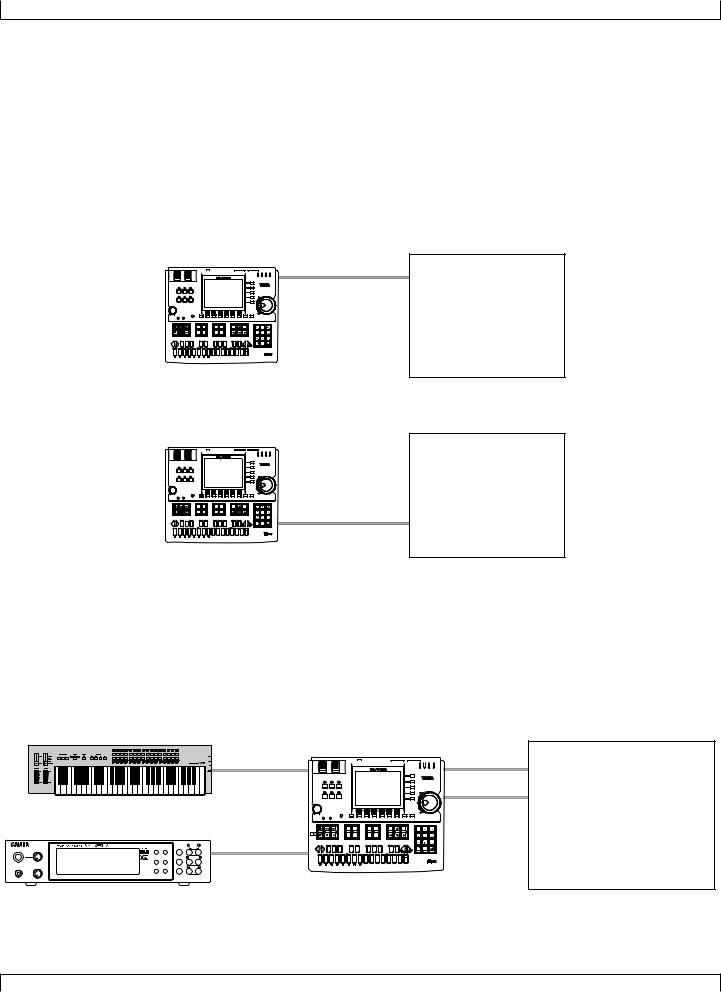
Connecting a MIDI keyboard
Realtime recording or fingered chord input will be easier if you use a MIDI keyboard.
Use a MIDI cable to connect the MIDI OUT of the external MIDI keyboard to the MIDI IN-A or IN-B connector on the rear panel.
|
|
MIDI |
A B C D |
|
|
|
|
OUT-B |
OUT-A |
IN-B |
IN-A |
MIDI
OUT
Connecting a tone generator module
QY700 song and pattern playback data can be used to play an external tone generator module.
Use a MIDI cable to connect the MIDI OUT-A or OUT-B connector on the rear panel to the MIDI IN connector of the external MIDI device.
MIDI IN 

PLAY EDIT |
MUTE/ |
PART |
SOLO |
ALL |
|
|
MIDI |
|
A/D |
|
OUT-B |
OUT-A |
IN-B |
IN-A |
||
INPUT |
|||||
|
|
|
|
UTIL EFFECT ENTER SELECT
XG
PHONES POWER/VOL TG300B MODE EQ EXIT VALUE
C/M
PERFORM
PART |
MIDI |
BANK/PGM# VOL EXP PAN REV CHO VAR KEY |
PUSH ON/OFF
20
SETUP
Connecting an MTR (multi-track recorder)
Since the QY700 implements MTC (MIDI Time Code) and MMC (MIDI Machine Control), you can produce music while synchronized to an MTCor MMC-compatible multi-track recorder.
Since the QY700 does not output MTC, you will need a device that is able to output MTC (such as the Yamaha MD4) if you wish to use MTC for synchronization. In this case, use a MIDI cable to connect the MIDI IN-A or IN-B connector of the QY700 to the MIDI OUT connector of the external device. MTC messages will be transmitted from the external device to the QY700, and the QY700 will synchronize to the clock of the external device.
If you wish to remotely control operations such as start/stop and fast-forward/rewind on an external MMC-compatible device, use a MIDI cable to connect the MIDI OUT-A or OUT-B connector of the QY700 to the MIDI IN connector of the external device. MMC messages will be transmitted from the QY700 to the external device, and the QY700 will remotely control the external device.
In this case, set MIDI Sync to “MTC:MIDI-A” or “MTC:MIDI-B” in the MIDI page of Utility mode. ( → p.291)
Synchronizing the QY700 by MTC from an external device
MIDI OUT
MIDI IN-A
or IN-B
MTR (MTC,MMC-compatible)
|
|
|
|
|
|
|
|
-1 |
+1 |
7 |
8 |
9 |
|
|
|
|
|
|
|
|
|
|
4 |
5 |
6 |
|
|
|
|
|
|
|
|
|
|
1 |
2 |
3 |
# |
# |
# |
|
# |
# |
# |
# |
b |
# |
0 |
- |
|
b |
b |
b |
c |
b |
b |
b |
b |
c |
|
|
|
b
Controlling an external device via MMC from the QY700
|
|
|
|
|
|
|
|
-1 |
+1 |
7 |
8 |
9 |
|
|
|
|
|
|
|
|
|
|
4 |
5 |
6 |
|
|
|
|
|
|
|
|
|
|
1 |
2 |
3 |
# |
# |
# |
|
# |
# |
# |
# |
b |
# |
0 |
- |
|
b |
b |
b |
c |
b |
b |
b |
b |
c |
|
|
|
MTR
MIDI OUT-A (MTC,MMC-compatible)
or OUT-B
MIDI IN
b
Connecting two or more devices
Since the QY700 provides two sets of MIDI connectors, you can connect two or more MIDI devices.
In the example below, the rear panel MIDI IN-A is connected to a MIDI keyboard, the MIDI OUT-A to a tone generator module, and MIDI IN- B and OUT-B are connected to an MTR.
If you use MTC or MMC to control an MTR, set the Utility mode MIDI page MIDI Sync setting to “MTC:MIDI-B.” ( → p.291)
If you wish to use the MIDI keyboard to record parts which use the tone generator module, set the Utility mode MIDI page Echo Back setting to “RecMonitor.” ( → p.292)
PLAY EDIT |
MUTE/ |
PART |
SOLO |
ALL |
A/D INPUT
UTIL EFFECT ENTER SELECT
XG
PHONES POWER/VOL TG300B MODE EQ EXIT VALUE
C/M PERFORM
PART |
MIDI |
BANK/PGM# VOL EXP PAN REV CHO VAR KEY |
PUSH ON/OFF
MIDI IN-A
MIDI OUT
MIDI OUT-A
MIDI IN
|
|
|
|
|
|
|
|
|
|
|
|
|
|
MIDI IN-B |
MIDI OUT |
PITCH |
ASSIGNABLE |
|
|
|
|
|
|
|
|
|
|
|
|
||
|
|
|
|
|
|
|
|
|
|
|
|
|
|||
SONG |
|
|
|
|
|
|
|
|
|
|
|
|
|
|
|
VOICE |
|
DISK |
|
|
|
|
|
|
|
|
|
|
|
|
MIDI IN |
|
|
|
|
|
|
|
|
|
|
|
|
|
|
MIDI OUT-B |
MTR |
|
|
|
SHIFT |
F1 |
F2 |
|
F3 |
F4 |
F5 |
F6 |
SHIFT |
EXIT |
|
|
(MTC/MMC-compatible) |
|
|
|
EDIT |
JOB |
|
|
|
|
-1 |
|
+1 |
7 |
8 |
9 |
|
|
|
|
LOC 1 |
LOC 2 |
MUTE |
|
SOLO |
|
|
|
|
4 |
5 |
6 |
|
|
|
|
|
|
REST |
|
TIE |
|
|
|
|
1 |
2 |
3 |
|
F# |
G# |
A# |
C# |
D# |
7(#5) |
|
7(#9) |
7(b13) |
a |
|
|
0 |
- |
|
|
|
I 7sus4 |
J m7(11) |
|
|
|
||||||||||
Gb |
Ab |
Bb |
Db |
Eb |
7(b5) |
|
7(b9) |
7(13) |
sus4 |
7(#11) |
|
|
|
|
|
|
|
|
c |
|
|
|
|
|
c |
|
|
|
|
|
|
E F G |
A |
B |
C |
D add9 |
M7(9) |
6(9) |
7(9) |
add9 |
m7 |
mM7 |
dim |
|
|
|
|
|
|
|
|
M |
M7 |
6 |
7 |
m |
m7 |
m6 |
m7 b aug |
|
|
|
|
21
SETUP
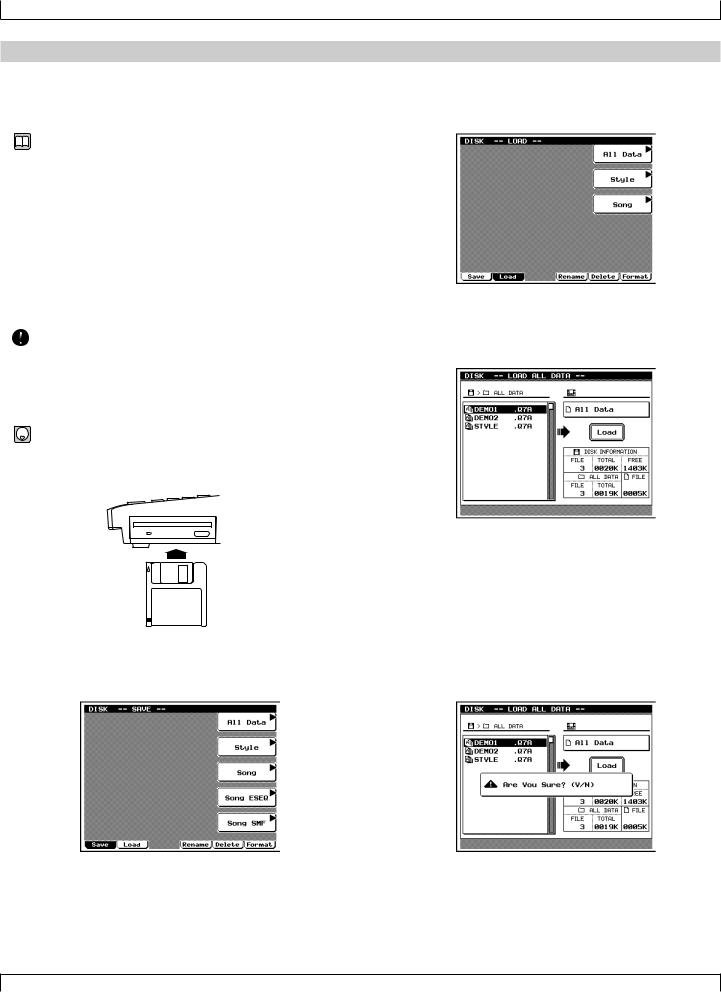
3. Using the Style and Demonstration disk
Here’s how to use the included “STYLE & DEMONSTRATION” disk.
Contents of the disk
• The included disk contains “STYLE,” “DEMO 1” and “DEMO 2.”
•“DEMO 1” and “DEMO 2” allow you to enjoy demo playback, and to playback songs while adjusting the Play Effects or Multi to experience the possibilities of the QY700.
•“STYLE” allows you to restore the factory settings of the QY700.
Listening to the demo playback
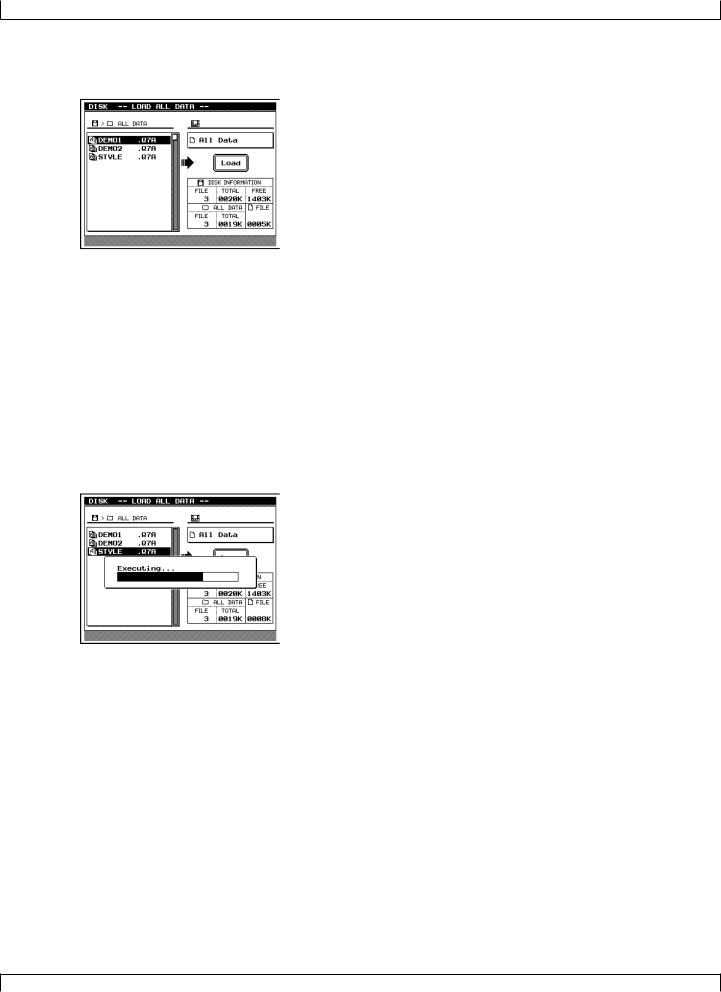
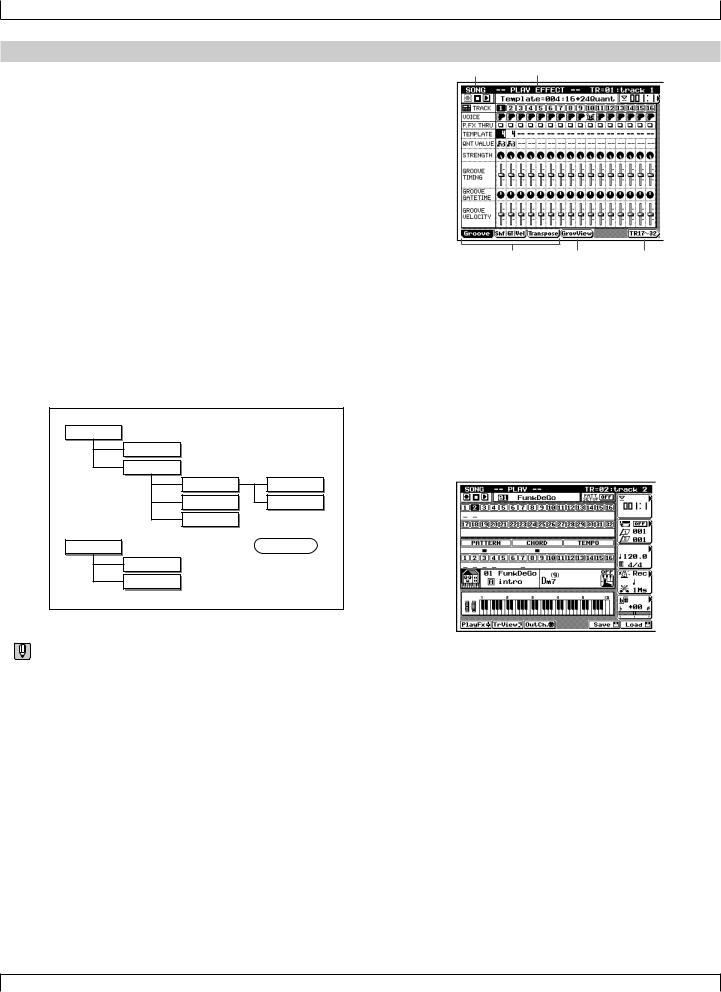
• Here’s how to load a demo song file from disk and enjoy the demo playback.
• When “DEMO 1” or “DEMO 2” is loaded from disk, all internal memory will be rewritten by the demo playback data. If internal memory contains any important data that you wish to keep, save the data before loading the demo.
1. With the label facing upward, insert the disk into the floppy disk slot.
▼ Insert the disk all the way until it clicks into place.
2.Press d.
▼You will enter Disk mode.
3.Press 2 (Load).
▼You will enter Load sub-mode, and the top line of the display will indicate “DISK -- LOAD --”.
4.Press d [D1] (All Data).
▼The Load All Data page will appear, and the filenames will be displayed.
5.Use the cursor keys / data dial to move the cursor to “DEMO 1” or “DEMO 2” and press e.
▼A message of “Are You Sure? (Y/N)” will appear, asking whether it is OK to erase the data in internal memory and load the data from disk.
• If you do not wish to erase the data currently in memory, press n to halt loading. Then save the data in memory to a disk, and perform the loading procedure once again. (→ p.307)
22
SETUP
6.Press y.
▼The display will indicate “Executing...” and the data will be loaded.
7.Press s.
▼You will return to the Song mode display.
8.Use the cursor keys to move the cursor to the song
number, and use the data dial, n/y or the numeric keypad → e to set the song number to 01.
9.Press r to playback the demo song.
▼Playback will begin, so use the volume control to adjust the volume to a suitable level.
•Pressing s will stop playback.
•By changing the song number in step 8 you can playback other songs.
Restoring the factory settings
• Here’s how to restore the QY700 to the factory settings.
• When you load “STYLE” from the disk, all internal memory will be rewritten to the factory settings. If internal memory contains any data that you wish to keep, save the data before loading the “STYLE” data.
1. With the label facing upward, insert the disk into the floppy disk slot.
▼ Insert the disk all the way until it clicks into place.
2.Press d.
▼You will enter Disk mode.
3.Press 2 (Load).
▼You will enter Load sub-mode, and the top line of the display will indicate “DISK -- LOAD --”.
23
SETUP
4.Press d [D1] (All Data).
▼The Load All Data page will appear, and the filenames will be displayed.
5.Use the cursor keys / data dial to move the cursor to “STYLE” and press e.
▼A message of “Are You Sure? (Y/N)” will appear, asking whether it is OK to erase the data in internal memory and load the data from disk.
• If you do not wish to erase the data currently in memory, press n to halt loading. Then save the data in memory to a disk, and perform the loading procedure once again. (→ p.307)
6.Press y.
▼The display will indicate “Executing...” and the data will be loaded.
24

1
Chapter 1. BASIC CONCEPTS
This chapter explains the basic concepts that you need to know before use, such as the mode structure and the internal structure of the QY700.
1. |
Mode structure ........................................... |
26 |
2. |
Function tree .............................................. |
34 |
3. |
How the QY700 is organized ...................... |
36 |
4. |
Sequencer block ........................................ |
37 |
5. |
The tone generator block ........................... |
43 |
6. |
Controller block .......................................... |
46 |
7. |
Effect block ................................................. |
47 |
8. |
Basic operation .......................................... |
51 |
9. |
Song creating procedure ............................ |
56 |
BASIC CONCEPTS
1. Mode structure
About modes
•The many functions of the QY700 are grouped by type into modes, sub-modes, and pages (see the diagram below). When operating the QY700, you will arrive at the desired function by first selecting the mode, then the sub-mode, and finally the page.
•Modes are the largest division of functions. Use the Mode buttons to switch between modes.
•Sub-modes are broad divisions of the functions within each mode. If the bottom line of the display shows a menu shaped like buttons, you can press the corresponding function button to select the desired sub-mode. In some cases, you will enter a sub-mode by pressing the s, e, or j keys.
•Pages contain groups of related parameters within a submode. If the bottom line of the sub-mode display shows a tab-shaped menu, you can press the corresponding function button to switch pages. In some sub-modes, you can select sub-pages within a page, or move to a special page to make settings.
Mode |
Sub-mode
Sub-mode
Mode |
Sub-mode
Sub-mode
Page |
Page |
Page |
Sub-page
Sub-page
Special page
• The following example shows the Song (mode) Play Effect (sub-mode) Groove Quantize (page) display.
Mode name |
Sub-mode name |
Page name Sub-page name Special page name
Modes and sub-modes
The QY700 has the following modes and sub-modes.
■ Song mode
Here you can record or playback songs. (→ p.70)
The Auto-accompaniment functions allow you to create music efficiently.
Press s to enter this mode.
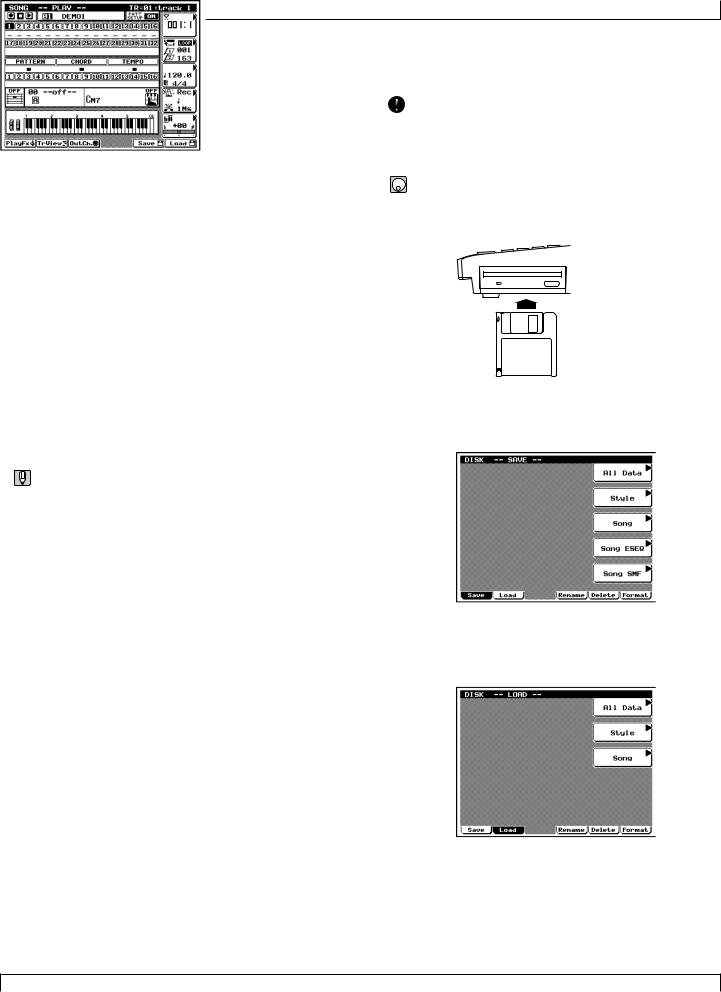
Song Play
Here you can select and playback songs. (→ p.72)
This is the first sub-mode you will enter when you press s.
26 |
Chapter 1 |
BASIC CONCEPTS
Play Effect
Here you can make temporary adjustments to the note timing and dynamics for song playback. (→ p.80)
In Song Play, press 1 (PlayFx) to enter this sub-mode.
Song Recording
Here you can record song data onto the tracks of a song. (→ p.106) 1 In Song Play, press e to enter this sub-mode.
Track View
This display shows the measures in which data has been input in each track. (→ p.100)
In Song Play, press 2 (TrView) to enter this sub-mode.
Song Edit
Here you can modify the song data of a song, or insert new data. (→ p.129)
In Song Play, press e to enter this sub-mode.
Out Channel
Here you can set the output channel for each of the tracks and patterns which make up the song, determining how they will be transmitted to the tone generator block and to the MIDI OUT connectors. (→ p.103)
In Song Play, press 3 (OutCh.) to enter this sub-mode.
Song Job
Here you select and execute song jobs to edit or modify a song. (→ p.138)
In Song Play, press j to enter this sub-mode.
Chapter 1 |
27 |
BASIC CONCEPTS
■ Voice mode
Here you can make tone generator settings such as voice and volume for each part, determining how each part will sound when the song is played back. (→ p.168)
Press v to enter this mode.
Mixer
Here you can make tone generator settings such as voice, pan and volume for each part. (→ p.170)
In Voice mode, press 1 (Mixer) to enter this sub-mode.
Tune
Here you can transpose or tune each part. (→ p.174)
In Voice mode, press 2 (Tune) to enter this sub-mode.
Voice Edit
Here you can modify parameter values for each part to modify the voice. (→ p.176)
In Voice mode, press 3 (VoicEdit) to enter this sub-mode.
Drum Setup Edit
Here you can edit Drum Setup 1 and 2 to indirectly modify drum voices. (→ p.182)
After selecting Drum Setup 1 or 2 as the voice category in Voice mode, press 4 or 5 to enter this sub-mode.
■ Effect mode
Here you can make settings for the effects used in a song. (→ p.188)
Press e to enter this mode.
Effect Connection
Here you can select the way in which the Variation effect is connected. (→ p.190)
In Effect mode, press 1 (Connect) to enter this sub-mode.
28 |
Chapter 1 |

BASIC CONCEPTS
Effect Reverb Edit
Here you can make settings for the Reverb effect. (→ p.193) In Effect mode, press 2 (Reverb) to enter this sub-mode.
Effect Chorus Edit
Here you can make settings for the Chorus effect. (→ p.193) In Effect mode, press 3 (Chorus) to enter this sub-mode.
■ Pattern mode
Here you can create and playback patterns or phrases. (→ p.200) |
1 |
Press p to enter this mode. |
|
Patch |
Here you can select and playback patterns. Patterns are created by assigning phrases to each track of the pattern. (→ p.200) This is the sub-mode that you will enter when you first press p .
Play Effect
Here you can make temporary changes in the timing and dynamics of pattern playback. (→ p.212)
In Patch, press 1 (PlayFx) to enter this sub-mode.
Effect Variation Edit
Here you can make settings for the Variation effect. (→ p.193) In Effect mode, press 4 (Vari.) to enter this sub-mode.
Chapter 1 |
29 |
 Loading...