


FCC INFORMATION (U.S.A.)
1.IMPORTANT NOTICE: DO NOT MODIFY THIS UNIT!
This product, when installed as indicated in the instructions contained in this manual, meets FCC requirements. Modifications not expressly approved by Yamaha may void your authority, granted by the FCC, to use the product.
2.IMPORTANT: When connecting this product to accessories and/or another product use only high quality shielded cables. Cable/s supplied with this product MUST be used. Follow all installation instructions. Failure to follow instructions could void your FCC authorization to use this product in the USA.
3.NOTE: This product has been tested and found to comply with the requirements listed in FCC Regulations, Part 15 for Class ”B” digital devices. Compliance with these requirements provides a reasonable level of assurance that your use of this product in a residential environment will not result in harmful interference with other electronic devices. This equipment generates/uses radio frequencies and, if not installed and used according to the instructions found in the users manual, may cause interference harmful to the operation of other electronic devices. Compliance with FCC regulations does not guarantee that interference will not occur in all installations. If this product is found to be the source of interference, which can be determined by turning the unit ”OFF” and ”ON”, please try to eliminate the problem by using one of the following measures:
Relocate either this product or the device that is being affected by the interference.
Utilize power outlets that are on different branch (circuit breaker or fuse) circuits or install AC line filter/s.
In the case of radio or TV interference, relocate/reorient the antenna. If the antenna lead-in is 300 ohm ribbon lead, change the lead-in to coaxial type cable.
If these corrective measures do not produce satisfactory results, please contact the local retailer authorized to distribute this type of product. If you can not locate the appropriate retailer, please contact Yamaha Corporation of America, Electronic Service Division, 6600 Orangethorpe Ave, Buena Park, CA 90620
The above statements apply ONLY to those products distributed by Yamaha Corporation of America or its subsidiaries.
*This applies only to products distributed by YAMAHA CORPORATION OF AMERICA.
Bescheinigung des Importeurs
Hiermit wird bescheinigt, daß der/die/das
Music Accompaniment Player Typ: QR10
- - - - - - - - - - - - - - - - - - - - - - - - - - - - - - - - - - - - - - - - - - - - - - - - - - - - - - - - - - - - - - - - - - - - - - - - - - - - - - - - - - - - -
(Gerät, Typ, Bezeichnung)
in Übereinstimmung mit den Bestimmungen der
VERFÜGUNG 1046/84
- - - - - - - - - - - - - - - - - - - - - - - - - - - - - - - - - - - - - - - - - - - - - - -
(Amtsblattverfügung)
funk-entstört ist.
Der Deutschen Bundespost wurde das Inverkehrbringen dieses Gerätes angezeigt und die Berechtigung zur Überprüfung der Serie auf Einhaltung der Bestimmungen eingeräumt.
Yamaha Europa GmbH
- - - - - - - - - - - - - - - - - - - - - - - - - - - - - - - - - - - - - - - - - - - - - - - - -
Name des Importeurs
Dette apparat overholder det gaeldende EF-direktiv vedrørende radiostøj.
Cet appareil est conforme aux prescriptions de la directive communautaire 87/308/CEE.
Diese Geräte entsprechen der EG-Richtlinie 82/499/ EWG und/oder 87/308/EWG.
This product complies with the radio frequency interference requirements of the Council Directive 82/499/ EEC and/or 87/308/EEC.
Questo apparecchio è conforme al D.M.13 aprile 1989 (Direttiva CEE/87/308) sulla soppressione dei radiodisturbi.
Este producto está de acuerdo con los requisitos sobre interferencias de radio frequencia fijados por el Consejo Directivo 87/308/CEE.
YAMAHA CORPORATION
Litiumbatteri!
Bör endast bytas av servicepersonal. Explosionsfara vid felaktig hantering.
VAROITUS!
Lithiumparisto, Räjähdysvaara. Pariston saa vaihtaa ainoastaan alan ammattimies.
ADVARSEL!
Lithiumbatteri!
Eksplosionsfare. Udskiftning må kun foretages af en sagkyndig, – og som beskrevet i servicemanualen.
CANADA
THIS DIGITAL APPARATUS DOES NOT EXCEED THE “CLASS B” LIMITS FOR RADIO
NOISE EMISSIONS FROM DIGITAL APPARATUS SET OUT IN THE RADIO INTERFER-
ENCE REGULATION OF THE CANADIAN DEPARTMENT OF COMMUNICATIONS.
LE PRESENT APPAREIL NUMERIQUE N’EMET PAS DE BRUITS RADIOELECTRIQUES
DEPASSANT LES LIMITES APPLICABLES AUX APPAREILS NUMERIQUES DE LA “CLASSE
B” PRESCRITES DANS LE REGLEMENT SUR LE BROUILLAGE RADIOELECTRIQUE
EDICTE PAR LE MINISTERE DES COMMUNICATIONS DU CANADA.
* This applies only to products distributed by YAMAHA CANADA MUSIC LTD.
SPECIAL MESSAGE SECTION
This product utilizes or an external power supply (adapter). DO NOT connect this product to any power supply or adapter other than one described in the manual, on the name plate, or specifically recommended by Yamaha.
WARNING: Do not place this product in a where anyone could walk on, trip over, or roll anything over power or connecting cords of any kind. The use of an extension cord is not recommended! If you must use an extension cord, the minimum wire size for a 25’ cord (or 1 cm) is I8 AWG. NOTE: The smaller the AWG number, the larger the current handling capacity. For longer extension cords, consult a local electrician.
This product should be used only with the components supplied or; a cart, rack, or stand that is recommended by Yamaha. If a cart, etc., is used, please observe all safety markings and instructions that accompany the accessory product.
SPECIFICATIONS SUBJECT TO CHANGE: The information contained in this manual is believed to be correct at the time of printing. However, Yamaha reserves the right to change or modify any of the specifications without notice or obligation to update existing units.
Do not attempt to service this product beyond that described in the user-maintenance instructions. All other servicing should be referred to qualified service personnel.
This product, either alone or in combination with an amplifier and headphones or speaker/s, may be capable of producing sound levels that could cause permanent hearing loss. DO NOT operate for long periods of time at a high volume level or at a level that is uncomfortable. If you experience any hearing loss or ringing in the ears, you should consult an audiologist. IMPORTANT: The louder the sound, the shorter the time period before damage occurs.
Some Yamaha products may have benches and/or accessory mounting fixtures that are either supplied with the product or as optional accessories. Some of these items are designed to be dealer assembled or installed. Please make sure that benches are stable and any optional fixtures (where applicable) are well secured BEFORE using. Benches supplied by Yamaha are designed for seating only. No other uses are recommended.
NOTICE: Service charges incurred due to lack of knowledge relating to how a function or effect works (when the unit is operating as designed) are not covered by the manufacturer’s warranty, and are therefore the owners responsibility. Please study this manual carefully and consult your dealer before requesting service.
ENVIRONMENTAL ISSUES: Yamaha strives to produce products that are both user safe and environmentally friendly. We sincerely believe that our products and the production methods used to produce them, meet these goals. In keeping with both the letter and the spirit of the law, we want you to be aware of the following:
Battery Notice: This product MAY contain a small non-recharge- able battery which (if applicable) is soldered in place. The average life span of this type of battery is approximately five years. When replacement becomes necessary, contact a qualified service representative to perform the replacement.
This product may also use “household” type batteries. Some of these may be rechargeable. Make sure that the battery being charged is a rechargeable type and that the charger is intended for the battery being charged.
When installing batteries, do not mix old batteries with new, or with batteries of a different type. Batteries MUST be installed correctly. Mismatches or incorrect installation may result in overheating and battery case rupture.
Warning: Do not attempt to disassemble, or incinerate any battery. Keep all batteries away from children. Dispose of used batteries promptly and as regulated by the laws in your area. Note: Check with any retailer of household type batteries in your area for battery disposal information.
Disposal Notice: Should this product become damaged beyond repair, or for some reason its useful life is considered to be at an end, please observe all local, state, and federal regulations that relate to the disposal of products that contain lead, batteries, plastics, etc. If your dealer is unable to assist you, please contact Yamaha directly.
NAME PLATE LOCATION: The graphic below indicates the location of the name plate for this model. The model number, serial number, power requirements, etc., are located on this plate. You should record the model number, serial number, and the date of purchase in the spaces provided below and retain this manual as a permanent record of your purchase.
|
|
|
|
|
|
|
POWER; |
|
PHONES; |
OUTPUT; |
INPUT; |
OUT; |
MIDI; |
I N ; |
DC IN; |
ON; |
OFF; |
|
|
|||||||
|
|
|
; |
; |
|
|
; |
; |
|
|
|
|
|
|
|
||
Model
Serial No.
Purchase Date
PLEASE KEEP THIS MANUAL
92-BP

■ Contents |
|
■ Precautions ................................................................. |
i |
■ About This Manual ..................................................... |
ii |
1: QR10 Features & Applications .................................. |
1 |
Features ....................................................................... |
1 |
Applications ................................................................ |
1 |
2: Setting Up: Power & Connections ............................. |
3 |
Power Supply .............................................................. |
3 |
Using a Power Adaptor ............................................ |
3 |
Using Batteries ......................................................... |
3 |
When to Replace the Batteries ................................. |
3 |
Setting Up Your System ............................................. |
4 |
The Connectors ........................................................ |
4 |
Audio Connections .................................................. |
5 |
Setting the Input Gain .............................................. |
5 |
3: The QR10 Controls .................................................... |
6 |
Play the Demo ............................................................. |
9 |
4: Playing the Patterns & Their Variations ..................... |
10 |
Selecting & Playing a Pattern ..................................... |
10 |
The Beat Display .................................................. |
11 |
To Continue Playback from the Point at Which |
|
It Was Stopped .................................................. |
11 |
Using a Footswitch for Start/Stop Control .............. |
11 |
Using the Pattern Variations ....................................... |
12 |
Changing the Tempo ................................................... |
13 |
Changing Chords ......................................................... |
14 |
The Chord Types .................................................. |
16 |
Turning Tracks On and Off ......................................... |
16 |
5: More Creative Control................................................ |
17 |
Changing Voices ......................................................... |
17 |
The MELODY, CHORD, and BASS tracks. ....... |
18 |
The RHYTHM track. ........................................... |
18 |
Voice Sampling ........................................................... |
19 |
Input Level Indicator ............................................ |
19 |
Setting the Sampling Frequency .......................... |
20 |
Adjusting the Volume of the Tracks ........................... |
21 |
Transposition ............................................................... |
21 |
Making Your Patterns Swing ...................................... |
22 |
6: Playing the Preset Songs ............................................ |
23 |
Selecting & Playing a Song ........................................ |
23 |
The SONG Mode Chord Display ......................... |
23 |
To Continue Playback from the Point at Which |
|
It Was Stopped .................................................. |
24 |
Starting Playback from a Specific |
|
Measure Number ................................................ |
24 |
Repeat Playback ................................................... |
24 |
Segment Repeat .................................................... |
25 |
Tempo Settings, Track Muting, Voice Selection, |
|
and Pattern Selection in the SONG Mode ......... |
25 |
Volume Settings in the SONG Mode ................... |
25 |
The PHRASE Keys ..................................................... |
26 |
Selecting Different Phrases .................................. |
26 |
Setting the Phrase Volume ................................... |
27 |
7: Recording Original Songs .......................................... |
28 |
Basic Song Recording ................................................. |
28 |
Overdubbing ............................................................ |
30 |
Recording a MELODY Track ................................. |
30 |
Fixing Mistakes — Deleting Unwanted Changes ... |
32 |
The Accompaniment Tracks .................................... |
32 |
The Melody Track ................................................... |
32 |
Easy “ CHORD PROGRESSION” Recording ............ |
33 |
The Song Clear & Copy Functions ............................. |
34 |
Song Clear ............................................................... |
34 |
Song Copy ............................................................... |
35 |
8: Recording Original Patterns ....................................... |
36 |
Recording the Combination Patterns .......................... |
36 |
Recording the User Patterns ........................................ |
37 |
Quantize ............................................................... |
38 |
Time Signature (TS) ............................................. |
38 |
Pattern Length ...................................................... |
38 |
The Pattern Clear & Copy Functions .......................... |
40 |
Pattern Clear ............................................................ |
40 |
Pattern Copy ............................................................ |
41 |
9: MIDI Utilities ............................................................. |
43 |
Bulk Dump .................................................................. |
43 |
Bulk Reception of Song & Pattern Data .................. |
43 |
MIDI Synchronization Mode ...................................... |
44 |
The QR10 as an ABC Expander ................................. |
44 |
The ABC Settings ................................................. |
44 |
ABC: MIDI ABC Mode ON/OFF ........................ |
45 |
LOWr: Lower ABC Zone Limit ........................... |
45 |
UPPr: Upper ABC Zone Limit ............................. |
45 |
Appendix ........................................................................ |
46 |
Total Reset Procedure ................................................. |
46 |
Voice List & Polyphony Information ......................... |
46 |
Preset Pattern & Song List .......................................... |
47 |
Rhythm Voice List ...................................................... |
47 |
Troubleshooting .......................................................... |
48 |
Error Messages ............................................................ |
48 |
Specifications .............................................................. |
49 |
MIDI Data Format ...................................................... |
50 |
MIDI IMPLEMENTATION CHART ........................ |
52 |
Index ............................................................................... |
53 |

■ Precautions
Your QR10 will give you years of reliable service if you follow the simple rules given below:
■Location
Do not expose the instrument to the following conditions to avoid deformation, discoloration, or more serious damage.
•Direct sunlight (e.g. near a window).
•High temperatures (e.g. near a heat source, outside, or in a car during the daytime).
•Excessive humidity.
•Excessive dust.
•Strong vibration.
■Power Supply
•Turn the power switch OFF when the instrument is not in use.
•If you use an AC power adaptor, unplug the adaptor from the AC outlet if the instrument is not to be used for an extended period of time.
•Do not attempt to use an AC adaptor other than the specified unit (PA-3) or an appropriate replacement provided by your Yamaha dealer to power the QR10. The use of an incompatible adaptor may cause irreparable damage to the QR10, and might pose a serious shock hazard!
•Unplug the AC power adaptor during electric storms.
•Avoid plugging an AC power adaptor used with the QR10 into the same AC outlet as appliances with high power consumption, such as electric heaters or ovens. Also avoid using multi-plug adaptors since these can result in reduced sound quality and possibly damage.
■Turn Power OFF When Making Connections
•To avoid damage to the instrument and other devices to which it is connected (a sound system, for example), turn the power switches of all related devices OFF prior to connecting or disconnecting audio and MIDI cables.
■Handling and Transport
•Never apply excessive force to the controls, connectors or other parts of the instrument.
•Always unplug cables by gripping the plug firmly, not by pulling on the cable.
•Disconnect all cables before moving the instrument.
•Physical shocks caused by dropping, bumping, or placing heavy objects on the instrument can result in scratches and more serious damage.
■Cleaning
•Clean the cabinet and panel with a dry soft cloth.
•A slightly damp cloth may be used to remove stubborn grime and dirt.
•Never use cleaners such as alcohol or thinner.
•Avoid placing vinyl objects on top of the instrument (vinyl can stick to and discolor the surface).
■Electrical Interference
•This instrument contains digital circuitry and may cause interference if placed too close to radio or television receivers. If this occurs, move the instrument further away from the affected equipment.
■Data Backup
•The QR10 contains a special long-life battery that retains the contents of its internal RAM memory even when the power is turned OFF. The backup battery should last for several years. When the backup battery needs to be replaced, “ERR 9” will appear on the display when the power is turned on. When this happens, have the backup battery replaced by qualified Yamaha service personnel. DO NOT ATTEMPT TO REPLACE THE BACKUP BATTERY YOURSELF!
•Internal memory data can be corrupted due to incorrect operation. We recommend that you use the QR10 MIDI bulk dump utility (see page 43 for details) to transfer important data to a MIDI data recorder such as the Yamaha MDF2 for safe longterm storage. Yamaha cannot be held responsible for data loss caused by battery failure or improper operation of the QR10!
•Always turn the QR10 OFF before disconnecting the AC power adaptor to minimize unnecessary drain on the backup battery.
■Service and Modification
•The QR10 contains no user serviceable parts. Opening it or tampering with it in anyway can lead to irreparable damage and possibly electric shock. Refer all servicing to qualified YAMAHA personnel.
YAMAHA is not responsible for damage caused by improper handling or operation.
i
■ About This Manual
The following simple icons are used throughout this manual to draw attention to important points and information where necessary. The icons also make it easier to differentiate between information that you should read immediately and information that can be skipped until later, helping you to become familiar with the QR10 in the quickest, most efficient manner possible.
This icon warns of possible hardware damage, software malfunction, or any other serious problem that may occur due to improper operation or set up.
CAUTION
This icon marks information that you must read — i.e. important steps or procedures that are essential for proper, efficient, or easy operation.
IMPORTANT
The magnifying-glass icon indicates information that may not be essential for general operation, but is a more detailed explanation of a feature, a description of the principle involved, etc. You can skip
DETAIL this information if full details are not required immediately.
Suggestions as to how a feature or function can be applied musically are identified by this icon.
MUSICAL
NOTE
Hints or ideas that are not specifically musical but may make operation easier or more interesting are marked by the light-bulb icon.
HINT
ii

1: QR10 Features & Applications
Features
The QR10 is a new concept in musical accompaniment. For the first time ever it gives singers, guitarists, and other performers fully orchestrated backing that’s easy to produce and fun to use. Most important of all, the QR10 doesn’t require any keyboard skills or programming ability. Accompaniments are created by playing “patterns” and changing chords manually in real time, or by recording the required pattern and chord changes in the form of complete “songs” that can then be played back as required. Selecting patterns and changing chords is a simple process that can be learned in just a few minutes. Recording the pattern and chord changes is no more difficult. Many other easy-to-use features give the QR10 the versatility needed to create accompaniments for all types of music and performance styles.
Here are a few of the QR10’s most important features …
•50 preset accompaniment patterns covering a wide variety of musical styles that you can simply select and play. Each pattern has six variations that can be selected at the touch of a button: introduction, normal, variation, fill-in 1, fill-in 2, and ending. All patterns have two chord parts, a bass part, and a rhythm part (> page 10).
•Change chords simply by pressing large, clearly-marked keys on the QR10 panel (> page 14).
•24 chord types are provided — from simple major and minor triads to jazz-style tension chords (> page 16).
•40 “combination patterns” let you easily combine the chord 1, chord 2, bass, and rhythm parts from different patterns to create an endless variety of new patterns (> page 36).
•10 fully-programmable patterns are provided for those who want to program totally original patterns from scratch
(> page 37).
•69 superb normal voices and 60 percussion voices — change the voices in the preset patterns as required, and assign them to your combination and original patterns (> page 17).
•Built in “sampler” function lets you record two different sounds — either via the built-in microphone or line-in jack
— that can be selected and used in patterns in the same way as the preset voices (> page 19).
•Song mode includes 50 preset songs with common chord progressions that you can simply select and play or practice along with (> page 23).
•50 programmable songs can be used to store patterns and chord progressions that you specify (> page 28).
•Songs are recorded by simply changing patterns and chords in real time — no complex step-record or editing procedures required (> page 28).
•A unique “Chord Progression” recording mode makes it simple to enter even complex chord progressions with perfect timing (> page 33).
•Two “phrase” keys play special phrases individually programmed for each preset song: 50 preset songs × 2
phrase keys = 100 phrases (> page 26).
•Built in speaker lets you play without the need for external equipment and cables (> page 8).
•Input jack accepts guitar or keyboard input so you can play along with the QR10 without additional amplification
(> page 4).
Applications
Here are a few ideas on how you can use the QR10. There’s no way we can cover all possibilities, but the ideas presented might help to spark some new and interesting applications.
■ A Super Practice Tool |
Create accompaniments that you can practice with on your guitar, keyboard, or any |
|
other instrument (vocals too, of course). That way you have the advantage of practicing |
|
with a bass line and chords instead of just a metronome or drum machine. |
■ Accompaniment for Live |
The QR10’s excellent sound quality makes it a super accompaniment tool for live |
Performance |
performances, too. Sing, rap, or play along with the QR10 anywhere, anytime. |
1
1:QR10 Features & Applications (continued)
■Use It as a Drum Machine Use the rhythm tracks of the preset patterns or program your own. The QR10’s drum
sounds are just and realistic and powerful as those on many dedicated rhythm machines.
■ Develop Musical Ideas The QR10’s outstanding voices and versatile programming features make it an ideal tool for trying out musical ideas. It’s also a great way to present you ideas to others.
■ Use it in a MIDI Music Use the QR10 as an adjunct to music recording and production in a MIDI music system. System It can, for example, be MIDI-clock synchronized to other MIDI equipment in order to
add extra tracks to an arrangement.
■ Use It as a Tone |
The QR10’s AWM (Advanced Wave Memory) tone generator is in no way a |
Generator |
compromise. You get outstanding AWM sound quality that’s on a par with some of the |
|
finest full-size synthesizers. You can play the QR10 remotely from just about any MIDI |
|
keyboard, computer, or other controller. |
■ Add ABC Capability to Use the QR10 as an “ABC expander” for your MIDI keyboard. Auto-accompaniment Your MIDI Keyboard can makes playing at home more fun, and it can be a tremendous sound-booster at
1-performer live gigs.
|
QR10 System Overview |
||
PATTERN MODE |
|
VOICES |
|
● 50 Preset Patterns (00...49) |
● 69 Normal (00...68) |
||
● 10 User Patterns (50...59) |
|
● 2 Sampled (69, 70) |
|
● 40 Combination Patterns (60...99) |
● 60 Percussion (71) |
||
Ending |
|
|
|
Fill 2 |
|
|
|
Fill 1 |
|
CHORDS |
|
Variation |
|
||
|
● |
24 Chord Types |
|
Normal |
|
||
|
|
|
|
Intro |
CHORD 1 TRACK |
|
|
|
|
|
|
|
CHORD 2 TRACK |
|
|
|
BASS TRACK |
|
|
|
RHYTHM TRACK |
|
|
SONG MODE |
|
|
|
● 50 Preset Songs (00...49) |
ACCOMPANIMENT TRACK |
|
|
● 50 User Songs (50...99) |
PHRASE KEYS |
||
|
Songs use patterns from |
||
|
pattern mode. |
|
● 100 Phrases |
|
|
|
CHORD PROGRESSION |
|
MELODY TRACK |
|
KEY |
|
|
|
|
External input |
Internal & external |
|
|
sound mixed. |
|
|
|
|
|
|
|
|
|
|
Sound output |
2 |
|
|
|
2: Setting Up: Power & Connections
Power Supply
Your QR10 will run either from an optional AC adaptor or batteries. We recommend the use of the optional Yamaha PA-3 AC Adaptor for most applications. Follow the instructions below according to the power source you intend to use.
■ Using a Power Adaptor
Plug the DC output cable from an optional Yamaha PA-3 AC Adaptor (available from your Yamaha dealer) into the DC IN jack on the rear panel, then plug the adaptor into a convenient wall AC power outlet.
Do not attempt to use an AC adaptor other than the PA-3. The use of an incompatible CAUTION adaptor may cause irreparable damage to
the QR10, and might pose a serious shock hazard! Be sure to unplug the AC adaptor from the AC mains outlet when the QR10 is not in use.
POWER
PHONES |
OUTPUT |
INPUT |
OUT |
MIDI |
I N |
DC IN |
ON OFF |
PA-3
■ Using Batteries
Six 1.5V AA size (SUM-3 or R6P) or equivalent alkaline batteries must first be installed in the battery compartment. Please note that the average life of a full set of new manganese batteries is approximately one hour or less of continuous playback at maximum volume. Alkaline batteries may last as long as four hours. Please use an AC power adaptor (see above) wherever possible.
1 Open Battery Compartment Cover
Open the battery compartment cover — located on the instrument’s bottom panel — by pressing on the two latches on the cover and pulling outward, as shown in the illustration.
2 Insert Batteries
Insert the six batteries, being careful to follow the polarity markings on the bottom panel.
3 Replace Cover
Replace the compartment cover, making sure that it locks firmly in place.
■ When to Replace the Batteries
When the batteries run down and are no longer able to operate the QR10, playback or recording will stop and the display shown to the right will appear: If the battery voltage drops too low to maintain the
error display, a random, meaningless display will appear. When these displays appear, replace the batteries
with a complete set of six new batteries. NEVER mix old and new, or different type of batteries!
Never unplug the AC adaptor from the QR10 when a set of batteries is installed and the power is turned ON. Turn the power OFF first.
CAUTION
To prevent possible damage due to battery leakage, remove the batteries from the instrument if it is not to be used for an extended period of time.
CAUTION
3
2: Setting Up: Power & Connections (continued)
Setting Up Your System
The QR10 provides plenty of musical potential by itself, without extra equipment and complicated connections. It can, however, be used with other equipment in a variety ways to meet a wide range of individual needs. A few examples are provided below to help you get started.
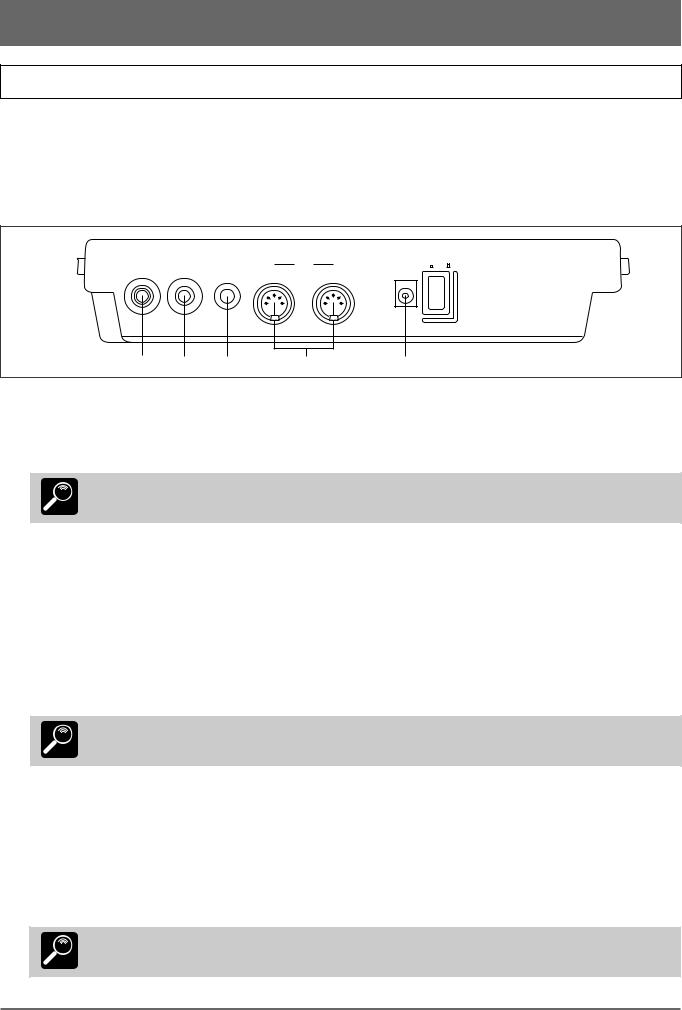
■ The Connectors |
|
|
|
|
|
|
|
|
|
|
|
|
|
|
|
POWER |
|
PHONES |
OUTPUT |
INPUT |
OUT |
MIDI |
I N |
DC IN |
ON |
OFF |
|
|
|
|
|||||
|
|
|
|
|
|
|
|
|
|
|
|
|
|
|
|
|
|
1 |
2 |
3 |
|
4 |
|
5 |
|
|
1 PHONES Jack
Any pair of stereo headphones with a miniature stereo phone plug can be plugged in here for convenient monitoring. The PHONES output level is adjusted via the VOLUME control on the right side panel.
The built-in speaker is automatically shut off when a pair of headphones is plugged into the PHONES jack.
DETAIL
2 OUTPUT Jack
This miniature stereo phone plug delivers a line-level stereo output signal from the QR10 for connection to a stereo sound system (see “Audio Connections,” below). The output level is adjusted via the VOLUME control on the right side panel.
3 INPUT Jack
This 1/4" monaural phone jack accepts input from an electric guitar or bass, an electronic keyboard, a microphone (highimpedance types), or other audio source. The signal received at the INPUT jack is mixed with the QR10’s own sound and delivered via the built-in speaker system, the OUTPUT jack (above), or the PHONES jack (also above) as required.
The INPUT GAIN function described on page 5 should be used to match the input gain of the QR10 to the connected instrument or source.
The INPUT jack can also be used as a footswitch jack for playback start/stop and chord change operation when the FOOTSWITCH function is turned ON (> page 11).
DETAIL
4 MIDI IN & OUT Connectors
If you plan to use a MIDI keyboard or other instrument to play and program the QR10, it should be connected to QR10 MIDI IN connector. The MIDI OUT connector can be connected to an external MIDI data recorder such as the Yamaha MDF2 if you want to store your songs and patterns to floppy disk (> page 43).
5 DC IN Jack
This jack is only used when you are powering the QR10 from an optional AC adaptor instead of batteries. The DC output cable from an optional Yamaha PA-3 AC Power Adaptor is plugged in here.
The batteries are automatically disconnected when a plug is inserted into the DC IN jack.
DETAIL
4
2: Setting Up: Power & Connections (continued)
■ Audio Connections
The simplest way to monitor the QR10 sound is via the built-in speaker. If you want to keep the QR10 sound to yourself, without bothering others, a pair of stereo headphones (miniature stereo phone plug type) plugged into the PHONES jack provides convenient monitoring while automatically shutting off the internal speaker system.
If you want to use an external stereo sound system, however, use the OUTPUT jack and an optional “Y” cable (miniature stereo phone plug to dual RCA pin plugs). The white RCA pin plug goes to the left-channel input of your stereo sound system and the red plug goes to the right-channel input.
If you will be connecting a guitar or keyboard to the INPUT jack, use a standard 1/4" phone-phone plug instrument cable.
Make sure that both the QR10 and your sound system are turned OFF when making connections.
CAUTION
■ Setting the Input Gain
The QR10 has two input gain settings: HI (high) and LO (low). Use the HI setting for microphone input. Use the LO setting for electric guitar, bass, electronic keyboards and other line-level sources. Here’s how to set the gain:
1 Press the [INPUT GAIN] key (this is the same as the number-4 numeric key) while holding the [SHIFT] key.
2 Press the [–1] key to select the LO setting, or the [+1] key to select the HI setting.
3 Press the [EXIT] key (this is the same as the [PATTERN/SONG] key) to exit from the INPUT GAIN function.
5
3: The QR10 Controls
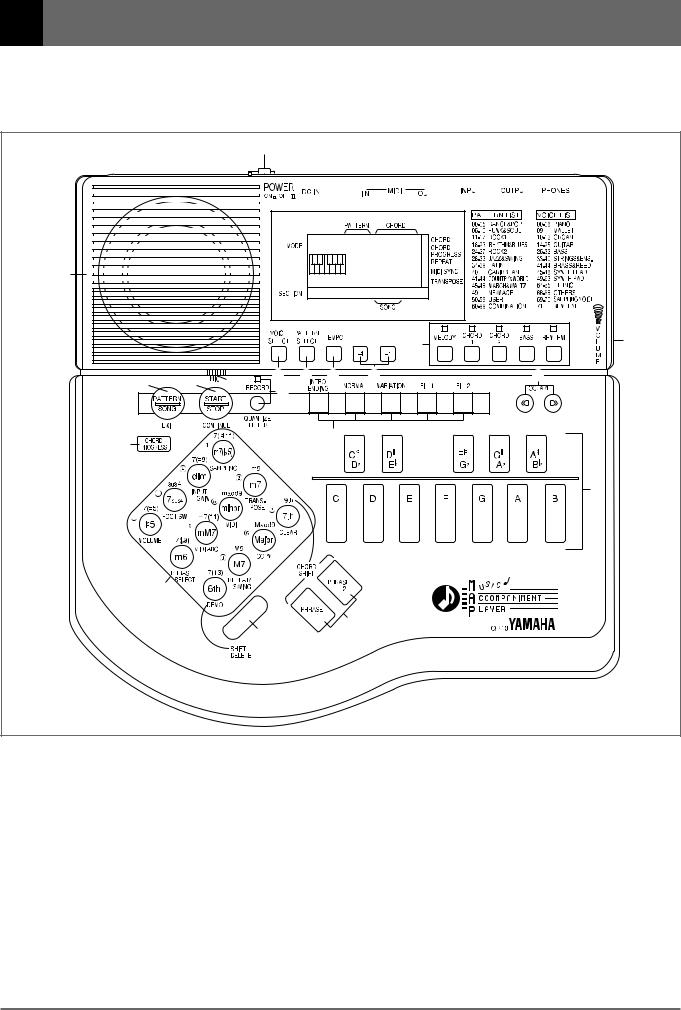
The QR10 has simple, consistent control interface that, once understood, makes operation fast and easy. The main functions of the controls are summarized below. Full operational details are given in the following sections.
|
|
1 |
|
|
|
|
|
|
|
|
|
2 |
|
20 |
|
|
|
|
|
|
|
|
|
|
|
7 |
18 |
|
|
|
|
|
|
|
8 |
9 |
3 |
4 |
5 |
6 |
13 |
19 |
|
|
|
|
||
|
|
10 |
|
|
|
|
16 |
|
|
|
11 |
|
|
|
|
|
|
|
|
|
|
|
|
|
|
|
12 |
|
14 |
|
|
|
|
|
|
|
15 |
|
|
17 |
|
|
|
|
|
|
|
|
1 POWER Switch |
|
|
|
|
4 [PATTERN SELECT] Key |
|
Press in to turn the QR10 on. Press again to turn it off.
2 LCD Panel
This large multi-function liquid crystal display panel shows all parameters and prompts you need to operate the QR10 with optimum ease and efficiency.
3 [VOICE SELECT] Key
The [VOICE SELECT] key allows any of the QR10’s voices to be assigned to the five tracks: MELODY, CHORD 1, CHORD 2, BASS, and RHYTHM (> page 17).
This key is used to select any of the QR10’s 100 patterns for playback in the PATTERN or SONG mode (> page 10).
5 [TEMPO] Key
The tempo of pattern and song playback can be set anywhere between 40 and 250 beats per minute by using this key (> page 13).
6

3: The QR10 Controls (continued)
6 [–1] and [+1] Keys
These keys are used to select pattern numbers, song numbers, tempo values, and many other numeric settings. The [–1] key decrements (decreases stepwise) the value, while the [+1] key increments (increases stepwise) the value. Press either key briefly to decrement or increment the parameter by one, or hold the key for continuous decrementing or incrementing in the specified direction
(> page 10).
The [–1] and [+1] keys are also used to turn some functions ON (+1) or OFF (–1).
7 Track Keys & Indicators
The track keys are used to independently turn the QR10’s five tracks (MELODY, CHORD 1, CHORD 2, BASS, and RHYTHM) ON or OFF. This makes it possible to play back any specified group of tracks, or even a single track, as required (> page 16). When a track indicator is lit, the corresponding track is turned ON.
8 [PATTERN/SONG] Key
Use this key to switch between the QR10’s PATTERN and SONG modes. It also functions as an [EXIT] key that allows you to exit from any of the QR10’s other functional modes (> pages 10, 23).
9 [START/STOP] Key
Press the [START/STOP] key once to begin playback of the selected pattern or song, and a second time to stop playback (> page 9).
The [START/STOP] key also has a [CONTINUE] function: press [START/STOP] while holding the [SHIFT] key to continue playback from the point at which it was last stopped rather than starting again from the beginning of the pattern or song (> pages 11, 24). Other functions include record start/stop (> pages 29, 36), clear (> pages 34, 40), and copy (> pages 35, 41).
0 [RECORD] Key & Indicator
The [RECORD] key is used to engage the pattern and song record modes (> pages 28, 36). This key also selects the QR10’s QUANTIZE (> pages 31, 38) and METER (> page 38) functions, used when recording original patterns.
!Section Keys
These keys are used to select the 6 variations or “sec-
tions” provided for each of the QR10’s patterns: INTRO, NORMAL, VARIATION, FILL 1, FILL 2, and ENDING. The various sections can be selected while playing patterns in the PATTERN mode (> page 12), or in the SONG mode.
@Micro-keyboard
This miniature 1-octave keyboard, used in conjunction
with the chord type keys (below), makes it easy to specify chord changes for your accompaniments (> page 14). It is also used to enter single notes when recording a melody track in the song mode (> page 31).
#[OCTAVE] Keys
Since the 1-octave range of the QR10 micro-keyboard
may not be sufficient for some operations, the [OCT  ] and [OCT
  ] keys allow the pitch of the keyboard to be shifted up or down in octave steps, over a range of 5 octaves. Each time the [OCT
  ] key is pressed the pitch of the keyboard is shifted down by one octave, until the lower limit is reached. The [OCT
  ] key shifts the pitch of the keyboard up in the same way (> page 18).
$ Chord Type/Number Keys
These keys perform three different functions.
When changing chords they are used to specify the chord type (e.g. major, minor, seventh, etc.) (> page 14).
They can also be used for direct number entry in many situations in which the [–1] and [+1] keys can be used to specify a value (> page 9).
If pressed while the [SHIFT] key is held these keys access a range of other important functions:
•Voice sampling (> page 19).
•Input gain (> page 5).
•Foot switch operation (> page 11).
•Track volume (> page 21).
•Transposition (> page 21).
• MIDI bulk dump & synchronization (> pages 43, 44).
•MIDI ABC (Auto Bass Chord) (> page 44).
•Phrase-key phrase selection (> page 26).
•Pattern & song clear (> pages 34, 40).
•Pattern & song copy (> pages 35, 41).
•Repeat/swing (> pages 22, 24).
•Demo playback (> page 9).
%[SHIFT/DELETE] Key
As mentioned in $ “Chord Type/Number Keys”, above,
the [SHIFT/DELETE] key is used in conjunction with those keys to access a range of “shift functions”. It can also be used to delete mistakes and unwanted material in the pattern and song record modes (> pages 32, 40).
^[CHORD PROGRESS] Key
When programming songs in the SONG mode, the
[CHORD PROGRESS] key can make entering even fastmoving chord progressions easy (> page 33). It can also be used to shift chord timing in the song playback mode.
&[PHRASE/CHORD SHIFT] Keys
In addition to playing any of 100 short phrases for added
variety and creative control during song playback (> page 26), these keys are used to access the “shift chords” listed above the chord type keys (> page 15).
7

3: The QR10 Controls (continued)
|
|
1 |
|
|
|
|
|
|
|
|
|
|
2 |
|
|
20 |
|
|
|
|
|
|
|
|
|
|
|
|
|
7 |
18 |
|
|
|
|
|
|
|
|
8 |
9 |
3 |
4 |
5 |
6 |
|
13 |
19 |
|
|
|
|
|
||
|
|
10 |
|
|
|
|
|
16 |
|
|
|
11 |
|
|
|
|
|
|
|
|
|
|
|
|
|
|
|
|
|
|
12 |
|
14 |
|
|
|
|
|
|
|
|
15 |
|
|
17 |
|
|
|
|
|
|
|
|
|
|
* VOLUME Control |
|
|
|
|
|
|
|
The VOLUME control adjusts the volume of the sound delivered via both the OUTPUT and PHONES jacks. Slide the control toward you (i.e. toward the front of the QR10) to decrease the volume or toward the rear panel to increase the volume.
CAUTION Set the VOLUME control to the lowest volume when connecting the QR10 to a sound system for the
first time, then gradually raise the volume level until the required listening level is reached. This simple precaution can prevent unexpectedly high volume levels from damaging your speaker system (and maybe even your ears!).
( Microphone
When no source is connected to the rear-panel INPUT jack, the QR10’s “sampling voices” (voice numbers 69 and 70) can be recorded via this built-in microphone
(> page 19).
) Speaker
The QR10’s built-in amplifier and speaker system provides convenient sound output without the need for any external equipment. The speaker is automatically shut off when a pair of headphones is plugged into the rear-panel PHONES jack.
8
3: The QR10 Controls (continued)
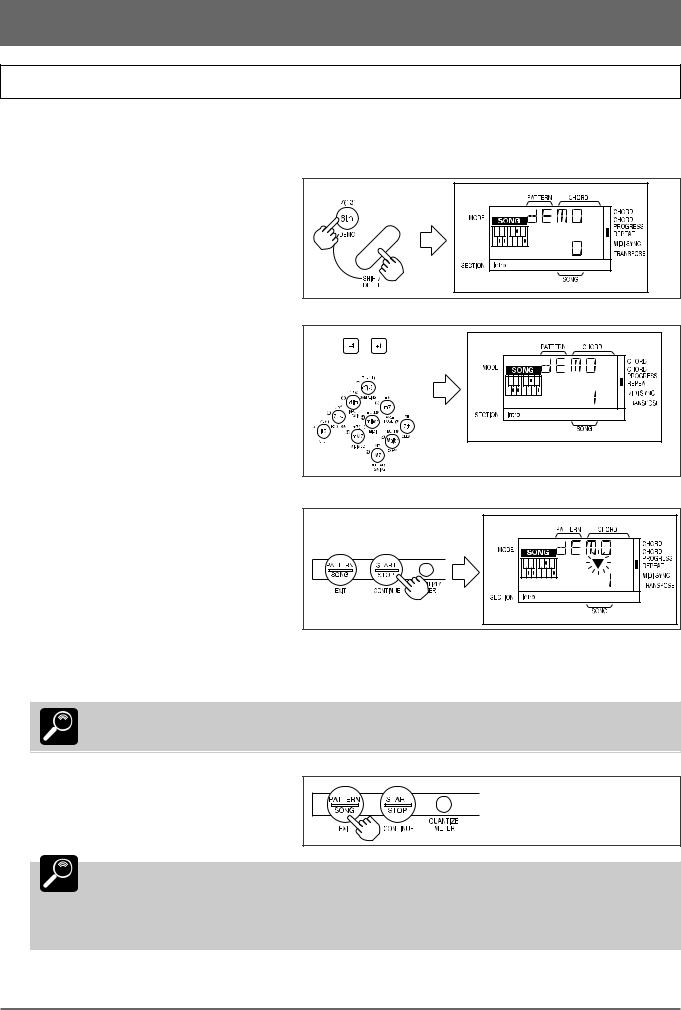
Play the Demo
Once you’ve set up your QR10 and become familiar with the controls, you might like to play back the pre-programmed demonstration for a sample of what the QR10 can do.
1 Press the [DEMO] key (this is the same as the “6th” chord type key) while holding the
[SHIFT] key.
2Use the [–1] and [+1] keys, or the number keys, to enter the number of the demo song you want to play (0 through 2).
3Press the [START/STOP] key to begin playback.
If demo song number 0 or 1 is selected, demo song numbers 0 and 1 will play alternately and repeat until stopped.
If demo song number 2 is selected it will repeat until stopped.
or
4 Press the [START/STOP] key again when you’re ready to stop playback.
Demo playback will repeat continuously until stopped by pressing the [START/STOP] key.
DETAIL
5 Press the [EXIT] key (this is the same as the [PATTERN/SONG] key) to exit from the DEMO function.
Demo song number 0 is a complete song including melody and accompaniment parts.
DETAIL Demo song number 1 shows how the QR10 Phrase function (page 26) can be used to add variety and interest to your songs.
Any of 100 phrases can be added at any point in a song simply by pressing one of the QR10 PHRASE keys.
Demo song number 2 plays all 50 preset songs in sequence.
9
4: Playing the Patterns & Their Variations
The QR10 allows you to select and play any of 100 different patterns:
•Pattern numbers 00 through 49 are preset patterns.
•50 through 59 are “user” patterns that you can program from scratch (these patterns are initially empty).
•60 through 99 are “combination” patterns that can easily be “assembled” by combining parts from
different preset or user patterns.
The procedures for creating original combination and user patterns are described later in the manual. For now we’ll learn how to select and play the QR10’s preset patterns and their variations.
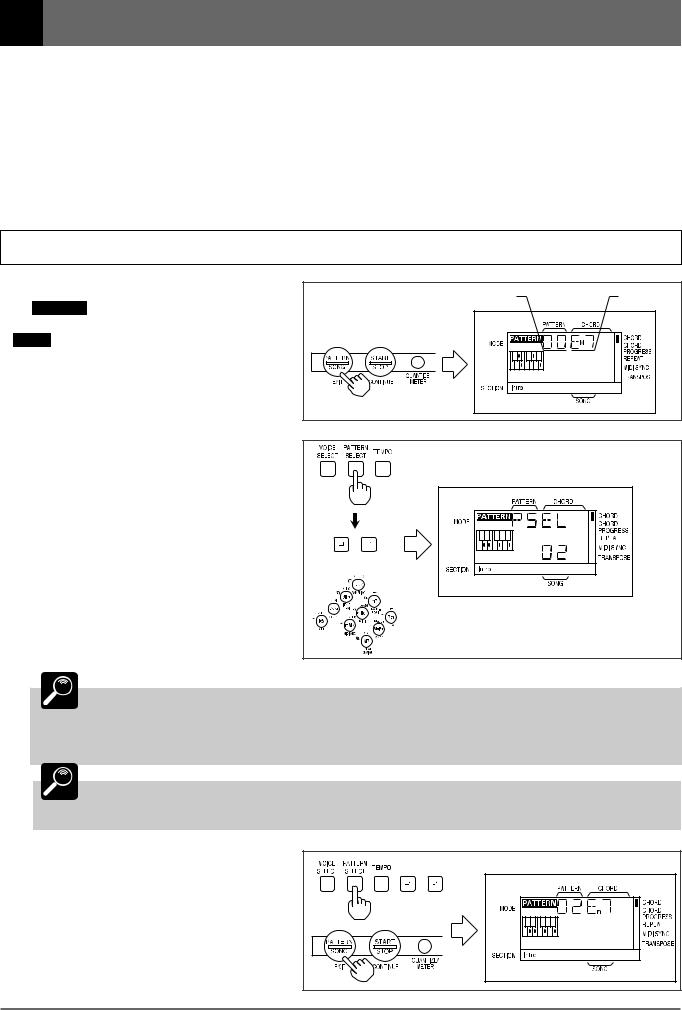
Selecting & Playing a Pattern
1 Select the Pattern Mode
If PATTERN is showing in the upper left corner of the display, the pattern mode is already selected. If SONG is showing, however, press the [PATTERN/SONG] key to switch to the PATTERN mode.
Pattern Number |
Chord Type |
2 Select a Pattern Number
Press the [PATTERN SELECT] key. “PSEL” will appear on the upper line of the display (“PSEL” is an abbreviation of “PATTERN SELECT”), and the number of the currently selected pattern will appear on the lower line.
Use the [–1] and [+1] keys, or the number keys, to select the number of the pattern you want to play. When using the number keys to enter a pattern number, you must enter two digits. For example, to enter pattern number “35”, first press the [3] key and then the [5] key. To enter pattern number “9”, press the [0] key and then the [9] key.
The preset patterns are numbered from “00” to “49”.
or |
DETAIL Pressing the [–1] key briefly decreases the pattern number by one (technically, this is known as “decrementing”), and pressing the [+1] key briefly increases (“increments”) the pattern number
by one. If you press and hold either the [–1] or [+1] key, the pattern number will decrease or increase continuously and rapidly until the key is released. You can’t select a pattern number lower than “00” or higher than “99”.
DETAIL The “Preset Pattern & Song List” to the right of the display lists the basic preset pattern categories. A complete list is given in the “Appendix” on page 47.
3 Return to the Pattern Play Mode
Return to the pattern play mode either by pressing the [PATTERN SELECT] key a second time, or by pressing the [EXIT] key (this is the same as the [PATTERN/SONG] key). The selected pattern number appears under “PATTERN” on the display.
or |
10
4: Playing the Patterns & Their Variations (continued)
4 Start Playback
Press the [START/STOP] key to begin playback of the selected pattern. Make sure that the VOLUME control is set to an appropriate level.
■ The Beat Display
As the pattern plays, a triangular beat indicator will flash in time with the music, and two digits immediately below the flashing triangle show the current measure and beat. The left digit is the measure number, and right digit is the quarter-note or eighth-note beat within that measure.
Beat |
Measure Number |
The “Normal” variations of all the preset patterns consist of up to 4 measures that
repeat continuously. The measure number will therefore go from “1” to “4”, and then
DETAIL back to “1” again. If the pattern is in 4/4 time (i.e. 4 quarter-notes per measure), then the beat number will go from “1” to “4” within each measure. The measure and beat numbers
for one full cycle of a 4-measure pattern in 4/4 time are as follows.
5 Stop Playback
Pressing the [START/STOP] key while a pattern is playing stops playback immediately.
You can change patterns during playback by following the standard pattern selection procedure: press [PATTERN SELECT], use
HINT |
the [–1] and [+1] or number keys to select a pattern, then press [EXIT]. |
|
DETAIL Whenever you turn the QR10 power on, or select the PATTERN mode from the SONG mode, the previously selected pattern number will automatically be re-selected.
■ To Continue Playback from the Point at Which It Was Stopped
Each time you press the [START/STOP] key while playback is stopped the pattern will begin playing from the first beat of the first measure.
If you press the [START/STOP] key while holding the [SHIFT] key, however, playback will continue from the point at which it was stopped.
■ Using a Footswitch for Start/Stop Control
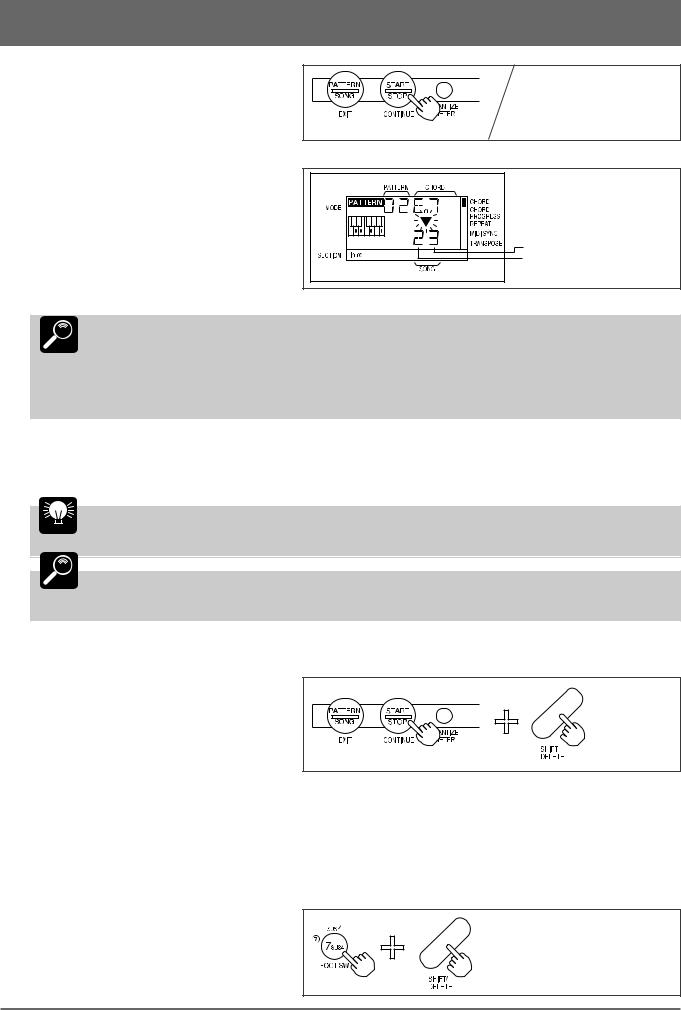
If the QR10 FOOT SW function is turned ON, you can use an optional footswitch (Yamaha FC4 or FC5) connected to the rear-panel INPUT jack to start and stop pattern playback instead of the panel [START/STOP] key. This leaves your hands free to play an instrument or perform other operations. To turn the FOOT SW function on:
1 Engage the FOOT SW Function
Press the [FOOT SW] key (the number “7” key) while holding the [SHIFT] key to engage the FOOT SW function.
11
4: Playing the Patterns & Their Variations (continued)
2 Turn ON or OFF
Use the [+1] key to turn the FOOT SW function “on”, or the [–1] key to turn it off (“,F” on the display).
CAUTION Do not use a footswitch when the FOOT SW function is turned off! If a footswitch is connected to the INPUT jack and the footswitch function is turned OFF, operating the footswitch may cause damage to the QR10.
IMPORTANT The sound of an instrument or other external audio source will not
be heard via the QR10 speaker when the FOOT SW function is turned on. Connecting an instrument or audio source to the INPUT jack when the FOOT SW function is turned on may actually damage the connected device.
3 Exit
Press the [EXIT] key when done.
Using the Pattern Variations
Each preset pattern has 6 variations or “sections” — INTRO, NORMAL, VARIATION, FILL 1, FILL 2, and ENDING.
INTRO ................... |
introduction. |
|
|
|
|
|
|
|
|
|
|
||
NORMAL .............. |
normal pattern, used for the “verse” of a song. |
|
|
|
|
|
|
|
|
||||
VARIATION ........ |
normally used as a chorus or bridge. |
|
|
|
|
|
|
|
|
|
|
||
FILL 1 ................... |
fill-in 1, transition (from normal) to variation. |
|
|
|
|
|
|
|
|
||||
FILL 2 ................... |
fill-in 2, transition (from variation) to normal. |
|
|
|
|
|
|
|
|
||||
ENDING ................ |
ending pattern. |
|
|
|
|
|
|
|
|
|
|
|
|
|
|
Start |
|
|
|
|
|
|
|
|
|
||
When the INTRO, FILL 1, and FILL 2 sections |
INTRO |
|
NORMAL |
|
|
|
|
|
|||||
|
|
|
|
|
|
|
|||||||
|
|
|
|
|
|
|
|
|
|
|
|
||
are selected, the section plays through once and is |
|
|
|
|
|
|
|
|
|
|
|
Stop |
|
automatically followed by either the NORMAL or |
|
|
|
|
FILL 1 |
|
FILL 2 |
|
|
ENDING |
|
||
|
|
|
|
|
|
|
|
|
|
|
|
||
VARIATION pattern. INTRO is followed by |
|
|
|
|
|
|
|
|
|
|
|
|
|
NORMAL, FILL 1 is followed by VARIATION and |
|
|
|
|
|
|
|
|
|
|
|||
|
|
|
|
VARIATION |
|
|
|
|
|
||||
|
|
|
|
|
|
|
|
|
|||||
FILL 2 is followed by NORMAL. The FILL 1 and |
|
|
|
|
|
|
|
|
|
|
|
|
|
|
|
|
|
|
|
|
|
|
|
|
|
||
FILL 2 patterns automatically provide smooth, |
|
|
|
|
|
|
|
|
|
|
|||
“musical” transitions between the NORMAL and VARIATION sections. Playback stops automatically after the ENDING section.
The fill-ins — FILL 1 and FILL 2 — will play repeatedly as long as the button is held.
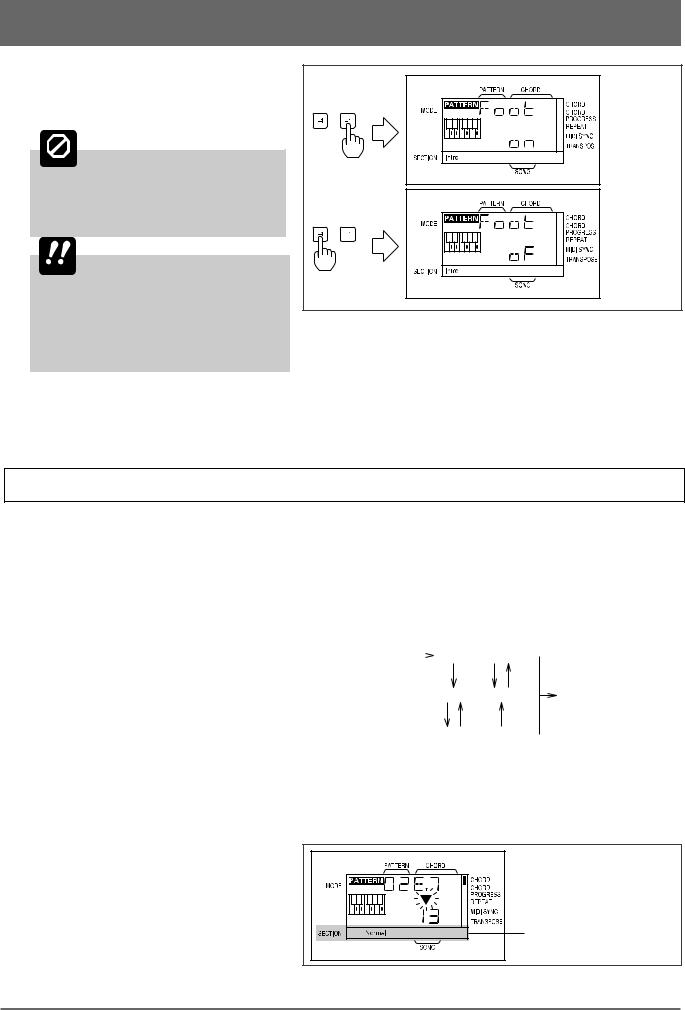
The currently selected section is shown in the “SECTION” area of the display.
Section Area
12
4: Playing the Patterns & Their Variations (continued)
You can change sections directly by pressing the appropriate section key. The newly selected section
— INTRO, NORMAL, VARIATION, or ENDING
— will begin playing from the top of the next measure. FILL 1 and FILL 2 begin as soon as the key is pressed. The newly selected section name will flash on the display until the new section actually begins playing.
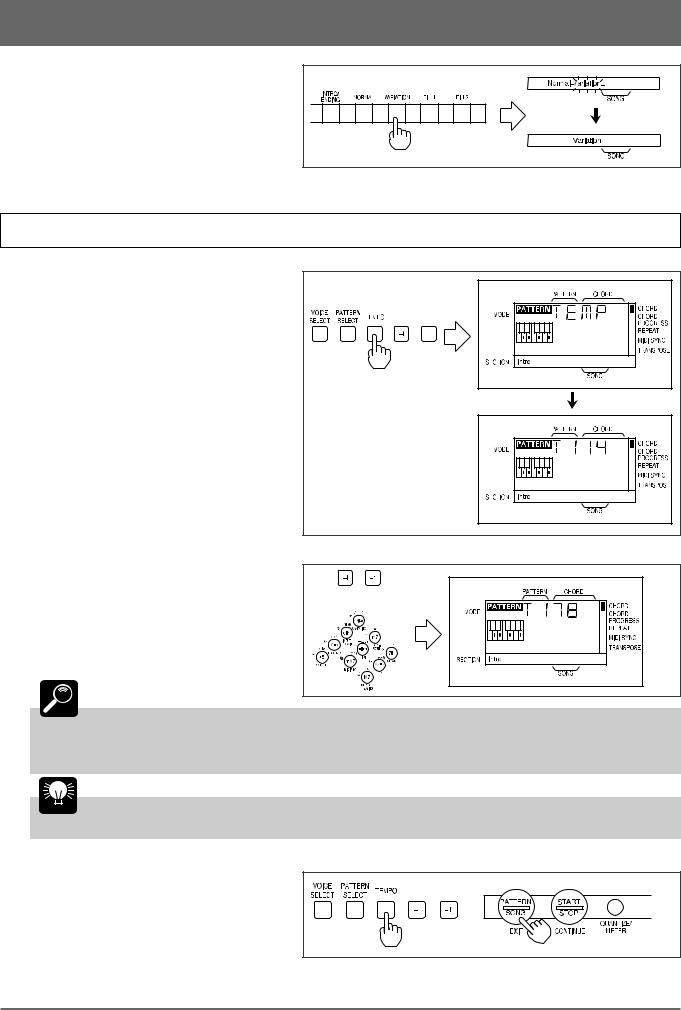
Changing the Tempo
1 Engage the Tempo Change Mode
Press the [TEMPO] key to engage the tempo change mode. “TEMP” will appear on the display while the [TEMPO] key is held, the letter “T” (for Tempo) will appear, followed by the current tempo in quarter-notes per measure, when the [TEMPO] key is released.
2 Set the Tempo
Use the [–1] and [+1] keys, or the number keys, to set the tempo as required. The slowest tempo is 40 beats per minute, and the fastest is 250.
or |
DETAIL The tempo value can be adjusted in 1-beat increments. As with pattern selection, pressing the
[–1] or [+1] key briefly decrements or increments the tempo value by 1, respectively. Press and hold the [–1] or [+1] key to continuously decrement or increment the tempo value. When using the number keys to enter a tempo value, you must enter two digits to enter values from
40 to 99, and three digits to enter tempo values from 100 to 250.
HINT You can set the tempo either before starting playback of a pattern, or while a pattern is playing.
3 Return to the Pattern Play Mode |
|
Return to the pattern play mode either by |
or |
pressing the [TEMPO] key a second time, or by |
|
pressing the [EXIT] key. |
|
13
 Loading...