


TOOLS for P-250
Installation Guide/Installationshandbuch/ Manuel d’installation/Guía de instalación
SPECIAL NOTICES
•The software and this Installation Guide are exclusive copyrights of Yamaha Corporation.
•Use of the software and this guide is governed by the SOFTWARE LICENSING AGREEMENT which the purchaser fully agrees to upon breaking the seal of the software packaging. (Please read carefully the AGREEMENT at the end of this guide before installing the application.)
•Copying of the software or reproduction of this guide in whole or in part by any means is expressly forbidden without the written consent of the manufacturer.
•Yamaha makes no representations or warranties with regard to the use of the software and documentation and cannot be held responsible for the results of the use of this guide and the software.
•This disc is a CD-ROM. Do not attempt to play the disc on an audio CD player. Doing so may result in irreparable damage to your audio CD player.
•Copying of the commercially available music data is strictly prohibited except for your personal use.
•The company names and product names in this Installation Guide are the trademarks or registered trademarks of their respective companies.
•Future upgrades of application and system software and any changes in specifications and functions will be announced separately.
•Depending on the version of your operating system, the screen shots and messages shown in this guide may differ to those that you see on your computer screen.
BESONDERE HINWEISE
•Dieses Programm und diese Installationsanleitung sind im Sinne des Urheberrechts alleiniges Eigentum der Yamaha Corporation.
•Die Benutzung des Programms und dieser Anleitung unterliegt der SOFTWARE-LIZENZVEREINBARUNG, mit der sich der Erwerber durch Ö ffnen des Siegels der Programmverpackung uneingeschränkt einverstanden erklärt. (Bitte lesen Sie die VEREINBARUNG am Ende dieser Anleitung vor Instal lation der Anwendung sorgfältig durch.)
•Das Kopieren der Software und die Reproduktion dieser Anleitung, in welcher Form auch immer, in Teilen oder als Ganzes, sind nur mit schriftlicher Genehmigung des Herstellers erlaubt und sonst ausdrücklich verboten.
•Yamaha leistet keinerlei Garantie hinsichtlich der Benutzung des Programms und der zugehörigen Dokumentation und übernimmt kei ne Verantwortung für die Ergebnisse der Benutzung dieser Anleitung oder des Programms.
•Bei dieser CD handelt es sich um eine CD-ROM. Versuchen Sie bitte nicht, diese CD-ROM auf einem Audio-CD-Player abzuspielen, da dies zu irreparablen Schäden am Audio-CD-Player führen kann.
•Das Kopieren im Handel erhältlicher Musikdaten ist nur für Ihren Privatgebrauch zulässig und sonst streng untersagt.
•Die in dieser Installationsanleitung erwähnten Firmenund Produktnamen sind Warenzeichen bzw. eingetragene Warenzeichen der betreffenden Firmen.
• Zukünftige Aktualisierungen von Anwendungsund Systemsoftware sowie jede Änderung der technischen Daten und Funktionen werden separat bekanntgegeben.
•Je nach der Version Ihres Betriebssystems unterscheiden sich die hier dargestellten Screenshots und Meldungen von der tatsächlichen Anzeige auf Ihrem Computermonitor.
English
 Français Deutsch
REMARQUES PARTICULIERES
•Les droits d’auteurs (copyright) de ce logiciel et de ce manuel d’installation appartiennent exclusivement à Yamaha Corporation.
•L’usage de ce logiciel et de ce manuel est défini par l’accord de licence auquel l’acheteur déclare souscrire sans réserve lors qu’il ouvre le sceau de l’emballage du
logiciel. (Veuillez donc lire attentivement l’accord de licence du logiciel situé à la fin de ce manuel avant d’installer le log iciel.)
•Toute copie du logiciel et toute reproduction totale ou partielle de ce manuel, par quel moyen que ce soit, est expressément interdite sans l’autorisation écrite du fabricant.
•Yamaha n’offre aucune garantie en ce qui concerne l’utilisation du logiciel et de la documentation. Yamaha ne peut en aucun cas être tenu responsable des dommages éventuels résultant de l’utilisation de ce manuel et de ce logiciel.
•Ce disque est un CD-ROM. N’essayez donc pas de l’insérer dans un lecteur de CD audio. Vous risqueriez d’endommager ce dernier de manière irréversible.
•Toute copie de données musicales commercialisées est formellement interdite, sauf pour usage personnel.
•Les noms des firmes et des produits apparaissant dans ce manuel d’installation sont des marques commerciales ou des marques déposées appartenant à leurs détenteurs respectifs.
•Les remises à jour du programme et du système ainsi que toute modification des caractéristiques et fonctions seront annoncées s éparément.
•En fonction de la version du système d’exploitation que vous utilisez, les captures d’écran et les messages qui figurent dans c e manuel peuvent différer de ceux qui apparaissent sur l’écran de votre ordinateur.
AVISOS ESPECIALES
•El copyright del software y de la guía de instalación es propiedad exclusiva de Yamaha Corporation.
•La utilización de este software y de esta guía debe ajustarse al CONTRATO PARA USO DE SOFTWARE BAJO LICENCIA, con el que el comprador manifiesta su
total conformidad al abrir el paquete de software. (Lea detenidamente el CONTRATO que se incluye al final de esta guía antes de instalar la aplicación).
•La copia del software o la reproducción total o parcial de este manual por cualquier medio sin la autorización escrita del fab ricante está expresamente prohibida.
•Yamaha no asume responsabilidad alguna ni ofrece garantía alguna en relación con el uso del software y de la documentación, y no puede ser declarada responsable de los resultados de la utilización de este manual ni del software.
•Este disco es un CD-ROM. No intente reproducirlo en un reproductor de CD de audio, porque al hacerlo se podrían causar daños irreparables en el reproductor.
•Queda terminantemente prohibida la copia de datos musicales disponibles comercialmente, excepto para uso personal.
•Los nombres de compañías y de productos que aparecen en esta guía de instalación son marcas o marcas registradas de sus respectivas compañías.
•Las futuras actualizaciones de la aplicación y del software del sistema, y cualquier cambio en las especificaciones y funciones , se anunciarán independientemente.
•Según las versiones del sistema operativo, las capturas de pantalla y los mensajes que aparecen en esta guía podrían diferir de los que aparecen en la pantalla del ordenador .
Español
TOOLS for P-250 Installation Guide 1

English
Important Notices about the CD-ROM
Data Types
This CD-ROM includes application software.
Please refer to page 4 (Windows) and 10 (Macintosh) for details about the software and how to install it.
These applications allow you to transfer data between your computer and the P-250.
Never attempt to play back the included CD-ROM on an audio CD player. Doing so may result in damage to your hearing as well as to your CD player/ audio speakers.
Operating System (OS)
The applications in this CD-ROM are provided in versions for both Windows and Macintosh operating systems. The installation procedure and the applications themselves differ depending on the operating system that you are using. Please refer to the appropriate installation instructions.
→ |
Windows |
Read page 3, |
6, 14. |
→ |
Macintosh |
Read page 3, |
11, 14. |
Media format
The P-250 and the File Utility software are compatible with the MS-DOS format media.
2 TOOLS for P-250 Installation Guide

CD-ROM installation procedure
The following steps are the same for both Windows and Macintosh.
1 Verify that your system meets the operating requirements of the software (File Utility, driver, etc.) (Windows page 6, Macintosh page 11).
2Connect the P-250 to your computer.
Refer to the owner’s manual for details on connections.
nDepending on the computer system you are using, some types of connections may not be possible.
3Install the driver appropriate for your type of connection into your computer, and make the necessary settings. The arrow symbols shown below represent cables.
•Connection using a USB cable
USB connector of the P-250 ↔ USB connector of the computer … Windows page 6, Macintosh page 11
•Connection using a serial cable
TO HOST connector of the P-250 ↔ Serial port of the computer (RS-232C or RS-422 connector) … page 8
•Connection using MIDI cables
MIDI connector of the P-250 ← MIDI interface device → Computer … Windows page 6, Macintosh page 11
4Install the software (File Utility, etc.)
Refer to pages 6 (Windows) or 11 (Macintosh) for the installation procedure.
5 Start up the software.
For subsequent operation, refer to the owner’s manual for each software program (online help/PDF manual).
nIn order to view PDF files, you will need to install Acrobat Reader in your computer (Windows page 6, Macintosh page 11).
Limitations on the P-250 when using the File Utility
The TOOLS for P-250 CD-ROM contains a File Utility program.
By using this software, you can transfer files between the internal memory of the P-250 and your computer, and edit them.
There are some operating states of the P-250 in which it is not possible to use the File Utility or in which some File Utility functions are not available.
You cannot use File Utility to perform file operations in the following states.
•Demo song mode
•Song recording/playback mode
•During file operations
•During the various [SONG FILE] operations
•During the various [PERFORM.FILE] operations
•During MIDI bulk data transmission and reception
•While MIDI transmission is stopped
The following operations cannot be performed while File Utility is running.
•File operations
•Song loading
•Song playback
•Track button on/off
The following operations cannot be performed on the P-250.
•Changing the filename extension of a file
•Japanese display in the LCD screen
•Creating a folder
•Copying a folder from the computer to the storage memory
•Transmitting a protected song to the computer
•Transmitting path information to a device
nWhen transferring a file between the P-250 and your computer, you must set the type of characters on your P-250 ([CharacterCode]) to match the language of the operating system for the computer in which you installed File Utility.
If the character code of the P-250 does not match the language of the computer that is running File Utility, the file may not be handled correctly.
nOn the P-250, the File Utility ID is fixed at “1”. If you specify an ID other than “1,” you will be unable to transmit or receive data. For details on the File Utility ID, refer to the File Utility PDF manual.
English
TOOLS for P-250 Installation Guide 3

For Windows Users
Contents of the CD-ROM
The CD-ROM contains a variety of applications (with installers) and data in the following folders.
|
|
Folder Name |
Application Name |
Contents |
|
|
|
|
|
|
|
Acroread_ |
Acrobat Reader *1 *2 |
PDF (Portable Document Format) viewer. Enables you to view each PDF manual |
|
|
|
|
for the applications. |
|
|
|
|
|
|
|
|
|
|
English |
|
FileUtil_ |
File Utility *2 |
Enables you to manage files in the storage memory on the P-250. |
|
|
|
|
|
|
USBdrv_ |
YAMAHA USB MIDI Driver (for Win98, Me) |
Enables your computer to communicate with the P-250 when your computer and |
|
|
|
|||
|
|
|
|
the P-250 are connected using a USB cable. |
|
|
USBdrv2k_ |
YAMAHA USB MIDI Driver (for Win2000, XP) |
|
|
|
|
||
|
|
|
|
|
|
|
Mididrv_ |
YAMAHA CBX Driver |
Allows the serial port of your computer to be connected directly to the P-250 so |
|
|
|
|
that MIDI messages can be transferred. |
|
|
|
|
|
|
|
SongData |
Demonstration Song |
Enables you to use the File Utility to transmit data to the P-250 so you can enjoy |
|
|
|
|
demo song (SMF file) playback on the P-250. |
|
|
|
|
|
*1 Unfortunately, Yamaha makes no guarantee concerning the stability of this program nor can it offer user support for it. *2 The applications are supplied with online/PDF manuals.
*You can start the File Utility as either a stand-alone software or a plug-in application in the Open Plug-in Technology compatible application. See next page for details about Open Plug-in Technology.
4 TOOLS for P-250 Installation Guide
You can start the File Utility software as either a stand-alone software or a plug-in application in the Open Plug-in Technology compatible application.
Refer to the owner's manual of the client application (sequencer, etc.) for details on using the File Utility as a plug-in software.
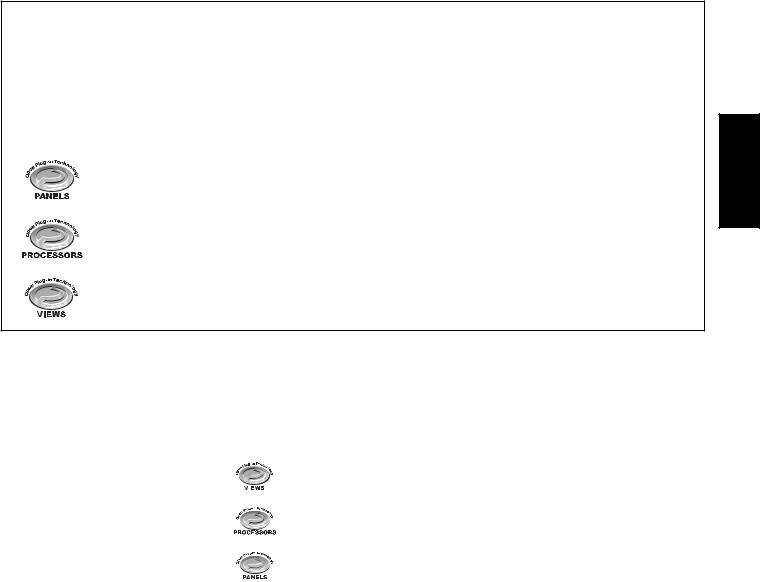
About Open Plug-in Technology
Open Plug-in Technology (OPT) is a newly developed software format that allows control over MIDI devices from a music software sequencer. For example, this allows you to start up and operate various parts of your music system, such as plug-in board editors, and mixing control editors - directly from an OPT-compatible sequencer, without having to use each separately. This also makes it unnecessary to set MIDI drivers for each application, streamlining your music production system and making all operations more convenient and seamless.
About the OPT Levels
The client application and its compatibility with OPT can be divided into three levels, as shown below.
Level 1 – OPT Panels provides basic support for opening and displaying OPT control panels that can transmit data via the clients’ external MIDI ports.
Typically this will allow basic hardware editor control panels to operate properly.
Level 2 – OPT Processors provides support for real-time MIDI processors and panel automation.
Typically this will allow both real-time and offline MIDI effects (e.g. Arpeggiators, transposers etc.) to operate properly and supply automation to OPT panels.
Level 3 – OPT Views provides support for edit views and MIDI processors/panels that require direct access to client sequencer storage structures. Typically this will allow sophisticated MIDI edit views to be supported (e.g. List editors, Auto Accompaniment, Data Checkers etc.).
OPT Level Implementation for the File Utility
This chart shows the OPT-compatibility of the File Utility.
|
|
OPT levels of the client application |
|
File Utility operation |
||||||
|
|
|
|
|
||||||
Operation support |
|
Operation limits |
||||||||
|
|
|
|
|
|
|
|
|
||
|
|
|
|
|
|
|
|
|
|
|
|
|
|
|
|
|
|
|
|
||
|
|
VIEWS (Level3) |
|
|
|
|
Yes |
|
None |
|
|
|
|
|
|
|
|
|
|
|
|
|
|
|
|
|
|
|
|
|
|
|
|
|
|
|
|
|
|
|
|
|
|
|
|
|
|
|
|
|||||
|
|
PROCESSORS (Level2) |
|
|
Yes |
|
None |
|||
|
|
|
|
|
|
|
|
|
|
|
|
|
|
|
|
|
|
|
|
|
|
|
|
|
|
|
|
|||||
|
|
PANELS (Level1) |
|
|
No |
|
— |
|||
|
|
|
|
|
|
|
|
|
|
|
|
|
|
|
|
|
|
|
|
|
|
nCertain operations may not work as expected if there is no corresponding function in the client application (sequencer, etc.). The highest level of implementation for the client application is indicated in the OPT logo (which appears along with the version information in the application).
English
TOOLS for P-250 Installation Guide 5
English
Minimum System Requirements
nDepending on your operating system, it may be necessary to satisfy conditions in addition to those listed below.
• File Utility (including MIDI setup)
Computer: |
PC with 160 megahertz (MHz); Intel® Pentium®/ |
|
Celeron® family |
OS: |
Windows® 98/98SE/Me/2000/XP Home Edition/XP |
|
Professional |
Available Memory: 32 MB or more |
|
Hard Disk: |
6 MB or more |
Display: |
640 × 480, High Color (16 bit) |
• USB MIDI Driver
Computer: |
PC (with USB port) with 166 megahertz (MHz); |
|
Intel® Pentium®/Celeron® family |
OS: |
Windows® 98/98SE/Me/2000/XP Home Edition/XP |
|
Professional |
Available Memory: 32 MB or more |
|
Hard Disk: |
2 MB or more |
• YAMAHA CBX Driver
OS: Windows® 95/98/98SE/Me/NT4.0/2000/XP Home Edition/XP Professional
Software Installation
nFor details about the application software which has no installation guide described below, refer to the online manual of each software.
Uninstalling the application software
Follow the procedure below to remove the installed software. Select [Start] → [Settings] → [Control Panel] → [Add/Remove Programs] → [Install/Uninstall] to specify the item you wish to remove, then click [Add/Remove...]. A dialog panel appears. Follow the instructions on screen to uninstall the application software.
nThe menu or button names may vary depending on the OS.
Acrobat Reader
In order to view the PDF manuals included with each application, you’ll need to install Acrobat Reader.
nIf an older version of Acrobat Reader is installed on your PC, you’ll need to uninstall it before proceeding.
1Double-click on the “Acroread_” folder.
Five different language folders will be displayed.
2Select the language you want to use and double-click on its folder. “ar******.exe” file will be displayed. (“***” indicates the Acrobat Reader version and the selected language.)
nThe file name might change if the application software has been upgraded.
3Double-click on the “ar******.exe.”
Acrobat Reader Setup Dialog box will be displayed.
4Execute the installation by following the on-screen directions. After installation is complete, the Acrobat folder appears on your PC (in Program Files, as the default).
For information on using the Acrobat Reader, refer to the Reader Guide in the Help menu.
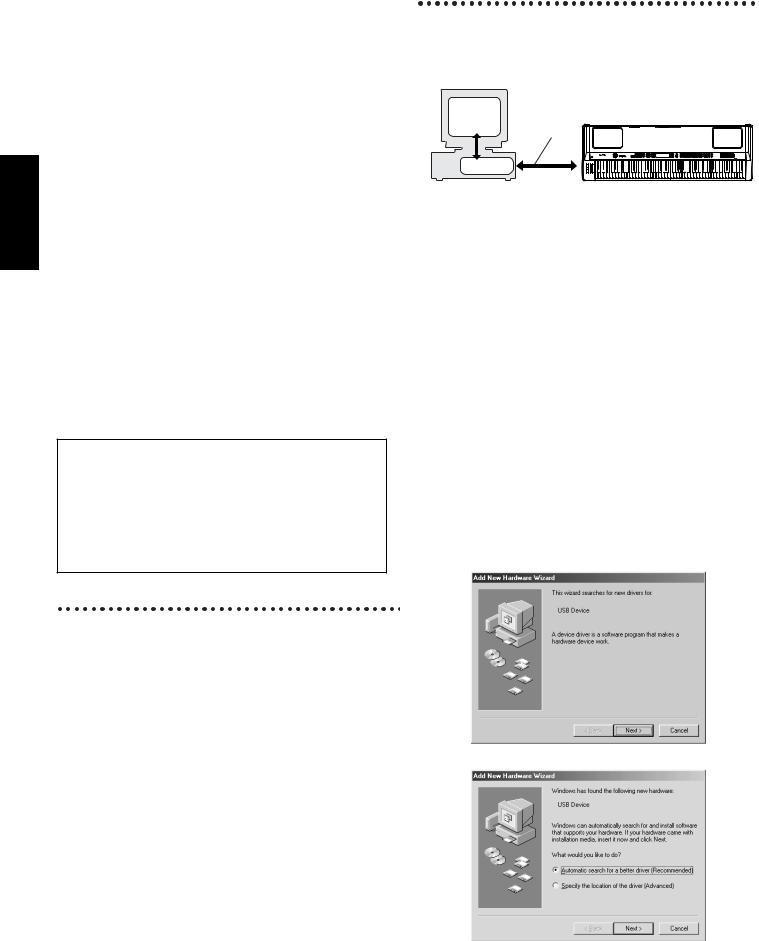
USB MIDI Driver
To operate the P-250 from your computer via USB, you’ll need to install the appropriate driver software.
The USB-MIDI driver is software that transfers MIDI data back and forth between sequence software and the P-250 via a USB cable.
Computer |
|
|
Sequence |
P-250 |
|
Software |
||
|
||
USB cable |
|
|
Driver |
|
|
→ Windows 98/Me users |
See below. |
|
→ Windows 2000 users |
See page 7. |
|
→ Windows XP users |
See page 8. |
nBefore you install the USB MIDI driver, you can minimize the possibility of problems by putting your computer in the following state.
•Close all applications and windows that you are not using.
•Disconnect all cables from the P-250 except for the cable whose driver you are installing.
●Installing the driver on a Windows 98/Me system
1 Start the computer.
2 Insert the included CD-ROM into the CD-ROM drive.
3Make sure the POWER switch on the P-250 is set to OFF and use the USB cable to connect the USB terminal of the computer (or the USB hub) to the USB terminal of the P-250. When the P-250 is turned on, the computer automatically displays the “Add New Hardware Wizard.” If the Add New Hardware Wizard does not appear, click “Add New Hardware” in the Control Panel.
nFor Windows Me users, check the radio button to the left of “Automatic search for a better driver (Recommended)” and click [Next]. The system automatically starts searching and installing the driver. Proceed to Step 8. If the system does not detect the driver, select “Specify the location of the driver (Advanced)” and specify the CDROM drive’s root directory (e.g., D:\) to install the driver.
Windows 98
Windows Me
6 TOOLS for P-250 Installation Guide

4Click [Next].
The window below enables you to select the search method.
5Check the radio button to the left of “Search for the best driver for your device. (Recommended).” Click [Next].
The window below enables you to select a location in which to install the driver.
6Check the “CD-ROM drive” box and uncheck all other items. Click [Next].
nThe system may ask you to insert a Windows CD-ROM while it checks for the driver. Specify the USBdrv_ directory of the CD-ROM drive (such as D:\USBdrv_\) and continue the installation.
nWhen using the Windows 98, specify the USBdrv_ directory of the CD-ROM drive (such as D:\USBdrv_\) and continue the installation.
7When the system detects the driver on the CD-ROM and is ready for installation, it displays the following screen.
Make sure that the “YAMAHA USB MIDI Driver” is listed, and click [Next]. The system starts the installation.
8When the installation is complete, the following screen appears. Click [Finish].
nSome computers may take about ten seconds to show this screen after the installation is complete.
Windows 98
Windows Me
The driver has been installed.
●Installing the driver on a Windows 2000 system
1Start the computer and use the “Administrator” account to log into Windows 2000.
2Select [My Computer | Control Panel | System | Hardware | Driver Signing | File Signature Verification], and check the radio button to the left of “Ignore -Install all files, regardless of file signature” and click [OK].
3 Insert the included CD-ROM into the CD-ROM drive.
4Make sure the POWER switch on the P-250 is set to OFF and use the USB cable to connect the USB terminal of the computer (or the USB hub) to the USB terminal of the P-250. When the P-250 is turned on, the computer automatically displays the “Found New Hardware Wizard.” Click [Next].
5Check the radio button to the left of “Search for a suitable driver for my device. (Recommended).” Click [Next].
The window that appears enables you to select a location in which to install the driver.
6Check the “CD-ROM drives” box and uncheck all other items. Click [Next].
nThe system may ask you to insert a Windows CD-ROM while it checks for the driver. Specify the “USBdrv2k_” directory of the CDROM drive (such as D:\USBdrv2k_\) and continue the installation.
7When the installation is complete, the system displays “Completing the Found New Hardware Wizard.” Click [Finish].
nSome computers may take about ten seconds to show this screen after the installation is complete.
8Restart the computer.
The driver has been installed.
English
TOOLS for P-250 Installation Guide 7
 Loading...