


YPG-225

Owner’s Manual
EN
DE
FR
ES
EN

SPECIAL MESSAGE SECTION
This product utilizes batteries or an external power supply (adapter).
DO NOT connect this product to any power supply or adapter other
than one described in the manual, on the name plate, or specifically
recommended by Yamaha.
This product should be used only with the components supplied or; a
cart, rack, or stand that is recommended by Yamaha. If a cart, etc., is
used, please observe all safety markings and instructions that accompany the accessory product.
SPECIFICATIONS SUBJECT TO CHANGE:
The information contained in this manual is believed to be correct at the
time of printing. However, Yamaha reserves the right to change or modify any of the specifications without notice or obligation to update existing units.
This product, either alone or in combination with an amplifier and headphones or speaker/s, may be capable of producing sound levels that
could cause permanent hearing loss. DO NOT operate for long periods
of time at a high volume level or at a level that is uncomfortable. If you
experience any hearing loss or ringing in the ears, you should consult
an audiologist.
IMPORTANT: The louder the sound, the shorter the time period before
damage occurs.
NOTICE:
Service charges incurred due to a lack of knowledge relating to how a
function or effect works (when the unit is operating as designed) are not
covered by the manufacturer’s warranty, and are therefore the owners
responsibility. Please study this manual carefully and consult your
dealer before requesting service.
ENVIRONMENTAL ISSUES:
Yamaha strives to produce products that are both user safe and environmentally friendly. We sincerely believe that our products and the production methods used to produce them, meet these goals. In keeping
with both the letter and the spirit of the law, we want you to be aware of
the following:
Battery Notice:
This product MAY contain a small non-rechargeable battery which (if
applicable) is soldered in place. The average life span of this type of
battery is approximately five years. When replacement becomes necessary, contact a qualified service representative to perform the replacement.
This product may also use “household” type batteries. Some of these
may be rechargeable. Make sure that the battery being charged is a
rechargeable type and that the charger is intended for the battery being
charged.
When installing batteries, do not mix batteries with new, or with batteries of a different type. Batteries MUST be installed correctly. Mismatches or incorrect installation may result in overheating and battery
case rupture.
Warning:
Do not attempt to disassemble, or incinerate any battery. Keep all batteries away from children. Dispose of used batteries promptly and as
regulated by the laws in your area. Note: Check with any retailer of
household type batteries in your area for battery disposal information.
Disposal Notice:
Should this product become damaged beyond repair, or for some reason its useful life is considered to be at an end, please observe all local,
state, and federal regulations that relate to the disposal of products that
contain lead, batteries, plastics, etc. If your dealer is unable to assist
you, please contact Yamaha directly.
NAME PLATE LOCATION:
The name plate is located on the bottom of the product. The model
number, serial number, power requirements, etc., are located on this
plate. You should record the model number, serial number, and the date
of purchase in the spaces provided below and retain this manual as a
permanent record of your purchase.
Model
Serial No.
Purchase Date
92-BP (bottom)
PLEASE KEEP THIS MANUAL
2 DGX-220/YPG-225 Owner’s Manual
FCC INFORMATION (U.S.A.)
1. IMPORTANT NOTICE: DO NOT MODIFY THIS UNIT!
This product, when installed as indicated in the instructions contained in this manual, meets FCC requirements. Modifications not
expressly approved by Yamaha may void your authority, granted by
the FCC, to use the product.
2. IMPORTANT: When connecting this product to accessories and/
or another product use only high quality shielded cables. Cable/s
supplied with this product MUST be used. Follow all installation
instructions. Failure to follow instructions could void your FCC
authorization to use this product in the USA.
3. NOTE: This product has been tested and found to comply with the
requirements listed in FCC Regulations, Part 15 for Class “B” digital
devices. Compliance with these requirements provides a reasonable level of assurance that your use of this product in a residential
environment will not result in harmful interference with other electronic devices. This equipment generates/uses radio frequencies
and, if not installed and used according to the instructions found in
the users manual, may cause interference harmful to the operation
of other electronic devices. Compliance with FCC regulations does
* This applies only to products distributed by YAMAHA CORPORATION OF AMERICA.
OBSERVERA!
Apparaten kopplas inte ur växelströmskällan (nätet) så länge som den ar
ansluten till vägguttaget, även om själva apparaten har stängts av.
ADVARSEL: Netspæendingen til dette apparat er IKKE afbrudt, sålæenge
netledningen siddr i en stikkontakt, som er t endt — også selvom der or
slukket på apparatets afbryder.
VAR OITUS: Laitteen toisiopiiriin kytketty käyttökytkin ei irroita koko laitetta
verkosta.
not guarantee that interference will not occur in all installations. If
this product is found to be the source of interference, which can be
determined by turning the unit “OFF” and “ON”, please try to eliminate the problem by using one of the following measures:
Relocate either this product or the device that is being affected by
the interference.
Utilize power outlets that are on different branch (circuit breaker or
fuse) circuits or install AC line filter/s.
In the case of radio or TV interference, relocate/reorient the
antenna. If the antenna lead-in is 300 ohm ribbon lead, change the
lead-in to co-axial type cable.
If these corrective measures do not produce satisfactory results,
please contact the local retailer authorized to distribute this type of
product. If you can not locate the appropriate retailer, please contact
Yamaha Corporation of America, Electronic Service Division, 6600
Orangethorpe Ave, Buena Park, CA90620
The above statements apply ONLY to those products distributed by
Yamaha Corporation of America or its subsidiaries.
(class B)
(standby)
Entsorgung leerer Batterien (nur innerhalb Deutschlands)
Leisten Sie einen Beitrag zum Umweltschutz. Verbrauchte Batterien oder
Akkumulatoren dürfen nicht in den Hausmüll. Sie können bei einer Sammelstelle für Altbatterien bzw. Sondermüll abgegeben werden. Informieren
Sie sich bei Ihrer Kommune.
(battery)
DGX-220/YPG-225 Owner’s Manual 3
PRECAUTIONS
PLEASE READ CAREFULLY BEFORE PROCEEDING
* Please keep this manual in a safe place for future reference.
WARNING
Always follow the basic precautions listed below to avoid the possibility of serious injury or even death from electrical
shock, short-circuiting, damages, fire or other hazards. These precautions include, but are not limited to, the following:
Power supply/AC power adaptor
• Only use the voltage specified as correct for the instrument. The required
voltage is printed on the name plate of the instrument.
• Use the specified adaptor (PA-5D or an equivalent recommended by Yamaha)
only. Using the wrong adaptor can result in damage to the instrument or
overheating.
• Check the electric plug periodically and remove any dirt or dust which may have
accumulated on it.
• Do not place the AC adaptor cord near heat sources such as heaters or radiators,
and do not excessively bend or otherwise damage the cord, place heavy objects
on it, or place it in a position where anyone could walk on, trip over, or roll
anything over it.
Do not open
• Do not open the instrument or attempt to disassemble the internal parts or
modify them in any way. The instrument contains no user-serviceable parts. If it
should appear to be malfunctioning, discontinue use immediately and have it
inspected by qualified Yamaha service personnel.
Water warning
• Do not expose the instrument to rain, use it near water or in damp or wet
conditions, or place containers on it containing liquids which might spill into
any openings.
• Never insert or remove an electric plug with wet hands.
Fire warning
• Do not put burning items, such as candles, on the unit.
A burning item may fall over and cause a fire.
If you notice any abnormality
• If the AC adaptor cord or plug becomes frayed or damaged, or if there is a
sudden loss of sound during use of the instrument, or if any unusual smells or
smoke should appear to be caused by it, immediately turn off the power switch,
disconnect the adaptor plug from the outlet, and have the instrument inspected
by qualified Yamaha service personnel.
CAUTION
Always follow the basic precautions listed below to avoid the possibility of physical injury to you or others, or damage
to the instrument or other property. These precautions include, but are not limited to, the following:
Power supply/AC power adaptor
• When removing the electric plug from the instrument or an outlet, always hold
the plug itself and not the cord.
• Unplug the AC power adaptor when not using the instrument, or during
electrical storms.
• Do not connect the instrument to an electrical outlet using a multiple-connector.
Doing so can result in lower sound quality, or possibly cause overheating in the
outlet.
Battery
• Always make sure all batteries are inserted in conformity with the +/- polarity
markings. Failure to do so might result in overheating, fire, or battery fluid
leakage.
• Always replace all batteries at the same time. Do not use new batteries together
with old ones. Also, do not mix battery types, such as alkaline batteries with
manganese batteries, or batteries from different makers, or different types of
batteries from the same maker, since this can cause overheating, fire, or battery
fluid leakage.
• Do not dispose of batteries in fire.
• Do not attempt to recharge batteries that are not intended to be charged.
• When the batteries run out, or if the instrument is not to be used for a long time,
remove the batteries from the instrument to prevent possible leakage of the
battery fluid.
• Keep batteries away from children.
• If the batteries do leak, avoid contact with the leaked fluid. If the battery fluid
should come in contact with your eyes, mouth, or skin, wash immediately with
water and consult a doctor. Battery fluid is corrosive and may possibly cause
loss of sight or chemical burns.
Location
• Do not expose the instrument to excessive dust or vibrations, or extreme cold or
heat (such as in direct sunlight, near a heater, or in a car during the day) to
prevent the possibility of panel disfiguration or damage to the internal
components.
• Do not use the instrument in the vicinity of a TV, radio, stereo equipment,
mobile phone, or other electric devices. Otherwise, the instrument, TV, or radio
may generate noise.
• Do not place the instrument in an unstable position where it might accidentally
fall over.
(4)-10 1/2
4 DGX-220/YPG-225 Owner’s Manual
• Before moving the instrument, remove all connected adaptor and other cables.
• When setting up the instrument, make sure that the AC outlet you are using is
easily accessible. If some trouble or malfunction occurs, immediately turn off
the power switch and disconnect the plug from the outlet.
• Use only the stand specified for the instrument. When attaching the stand or
rack, use the provided screws only. Failure to do so could cause damage to the
internal components or result in the instrument falling over.
Connections
• Before connecting the instrument to other electronic components, turn off the
power for all components. Before turning the power on or off for all
components, set all volume levels to minimum. Also, be sure to set the volumes
of all components at their minimum levels and gradually raise the volume
controls while playing the instrument to set the desired listening level.
Handling caution
• Do not insert a finger or hand in any gaps on the instrument.
• Never insert or drop paper, metallic, or other objects into the gaps on the panel
or keyboard. If this happens, turn off the power immediately and unplug the
power cord from the AC outlet. Then have the instrument inspected by qualified
Yamaha service personnel.
• Do not place vinyl, plastic or rubber objects on the instrument, since this might
discolor the panel or keyboard.
• Do not rest your weight on, or place heavy objects on the instrument, and do not
use excessive force on the buttons, switches or connectors.
• Do not operate the instrument for a long period of time at a high or
uncomfortable volume level, since this can cause permanent hearing loss. If you
experience any hearing loss or ringing in the ears, consult a physician.
Maintenance
• When cleaning the instrument, use a soft, dry cloth. Do not use paint thinners,
solvents, cleaning fluids, or chemical-impregnated wiping cloths.
Saving data
Saving and backing up your data
The panel settings and some other types of data is lost when you turn off the power
to the instrument. Save the data to the Registration Memory (page 73.)
Saved data may be lost due to malfunction or incorrect operation.
Save important data to an external device such as a computer. (page 84.)
Backing up the external media
•To protect against data loss through media damage, we recommend that you
save your important data onto two external media.
Yamaha cannot be held responsible for damage caused by improper use or modifications to the instrument, or data that is lost or destroyed.
Always turn the power off when the instrument is not in use.
When using a power adaptor, even when the power switch is in the “STANDBY” position, electricity is still flowing to the instrument at the minimum level. When you are not
using the instrument for a long time, make sure you unplug the AC power adaptor from the wall AC outlet.
Make sure to discard used batteries according to local regulations.
The illustrations and LCD screens as shown in this owner’s manual are for instructional purposes only, and may be different from the ones on your
instrument.
● Trademarks
•Windows is the registered trademark of Microsoft
®
Corporation.
• The company names and product names in this Owner’s Manual are the trademarks or registered trademarks of their respective companies.
(4)-10 2/2
DGX-220/YPG-225 Owner’s Manual 5

Copyright Notice
The following is the title, credits and copyright notices for the song pre-installed in this electronic keyboard:
Mona Lisa
from the Paramount Picture CAPTAIN CAREY, U.S.A.
Words and Music by Jay Livingston and Ray Evans
Copyright © 1949 (Renewed 1976) by Famous Music Corporation
International Copyright Secured All Rights Reserved
Composition Title : Against All Odds
Composer’s Name : Collins 0007403
Copyright Owner’s Name : EMI MUSIC PUBLISHING LTD /
HIT & RUN MUSIC LTD
All Rights Reserved, Unauthorized copying, public performance and broadcasting are strictly prohibited.
Can’t Help Falling In Love
from the Paramount Picture BLUE HAWAII
Words and Music by George David Weiss,
Hugo Peretti and Luigi Creatore
Copyright © 1961 by Gladys Music, Inc.
Copyright Renewed and Assigned to Gladys Music
All Rights Administered by Cherry Lane Music Publishing Com-
pany, Inc. and Chrysalis Music
International Copyright Secured All Rights Reserved
This product incorporates and bundles computer programs and contents in which Yamaha owns copyrights or with
respect to which it has license to use others’ copyrights. Such copyrighted materials include, without limitation, all
computer software, style files, MIDI files, WAVE data, musical scores and sound recordings. Any unauthorized use of
such programs and contents outside of personal use is not permitted under relevant laws. Any violation of copyright
has legal consequences. DON’T MAKE, DISTRIBUTE OR USE ILLEGAL COPIES.
This device is capable of using various types/formats of music data by optimizing them to the proper format music
data for use with the device in advance. As a result, this device may not play them back precisely as their producers
or composers originally intended.
Copying of the commercially available musical data including but not limited to MIDI data and/or audio data is
strictly prohibited except for your personal use.
Panel Logos
GM System Level 1
“GM System Level 1” is an addition to the MIDI standard which ensures that any GM-compatible music
data can be accurately played by any GM-compatible tone generator, regardless of manufacturer. The GM
mark is affixed to all software and hardware products that support GM System Level.
XGlite
As its name implies, “XGlite” is a simplified version of Yamaha’s high-quality XG tone generation format.
Naturally, you can play back any XG song data using an XGlite tone generator. However, keep in mind that
some songs may play back differently compared to the original data, due to the reduced set of control
parameters and effects.
USB
USB is an abbreviation for Universal Serial Bus. It is a serial interface for connecting a computer with
peripheral Devices. It allows “hot swapping” (connecting peripheral devices while the power to the computer is on).
STYLE FILE
The Style File Format is Yamaha’s original style file format which uses a unique conversion system to provide high-quality automatic accompaniment based on a wide range of chord types.
6 DGX-220/YPG-225 Owner’s Manual
Congratulations and thank you for purchasing
the Yamaha DGX-220/YPG-225 Portable Grand!
Please read this owner’s manual carefully before using the instrument
in order to take full advantage of its various features.
Make sure to keep this manual in a safe and handy place even after you finish reading,
and refer to it often when you need to better understand an operation or function.
Accessories
The DGX-220/YPG-225 package includes the following items. Please check that you have them all.
• Owner’s Manual
• Music rest
• Accessory CD-ROM
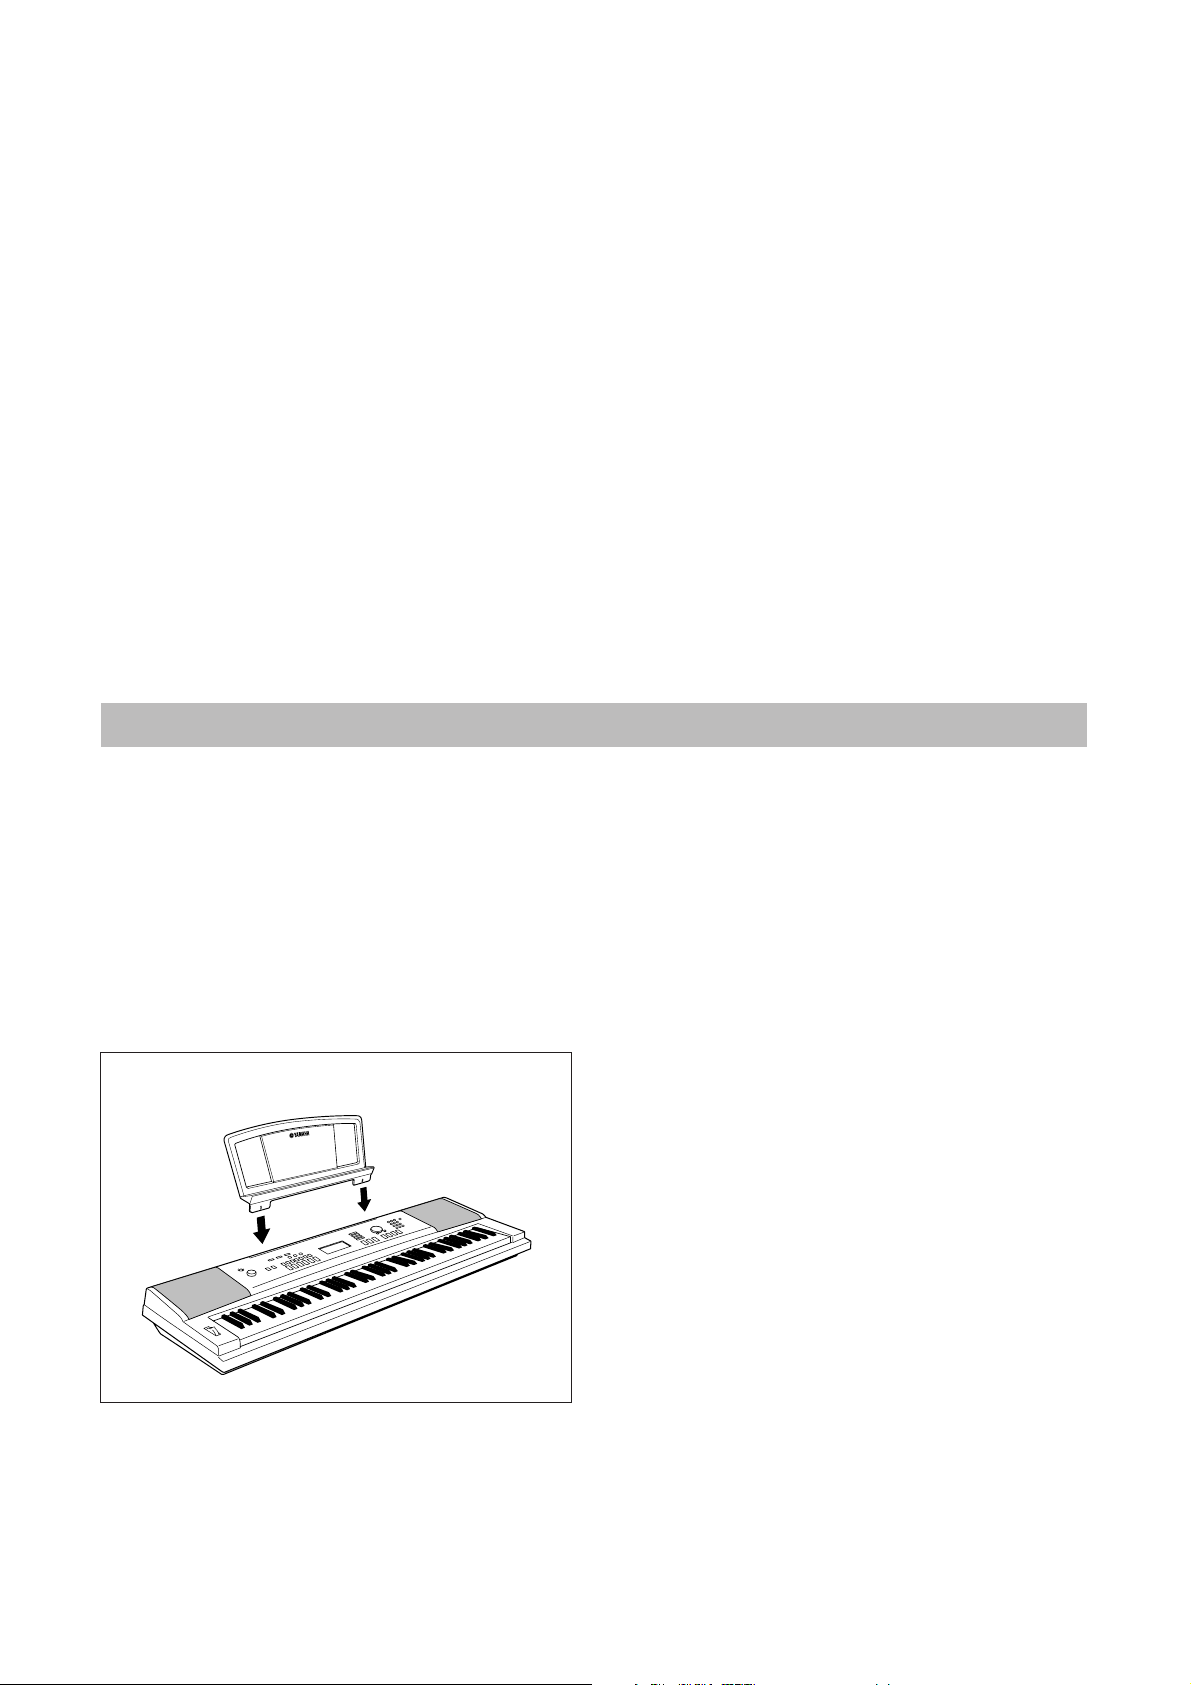
● Music Rest
Insert the music rest
into the slots as shown.
DGX-220/YPG-225 Owner’s Manual 7
Special Features of the DGX-220/YPG-225
■ Play a Variety of Instrument Voices Page 14
The instrument voice that sounds when you play the keyboard can be
changed to violin, flute, harp, or any of an extensive range of voices. You can
change the mood of a song written for piano, for example, by using violin to
play it instead. Experience a whole new world of musical variety.
■ Play Along with Styles Page 19
Want to play with full accompaniment? Try the auto-accompaniment Styles.
The accompaniment styles provide the equivalent of a full backing band covering a wide variety of styles from waltzes to 8-beat to euro-trance ... and
much more. Select a style that matches the music you want to play, or experiment with new styles to expand your musical horizons.
PopBossa
087
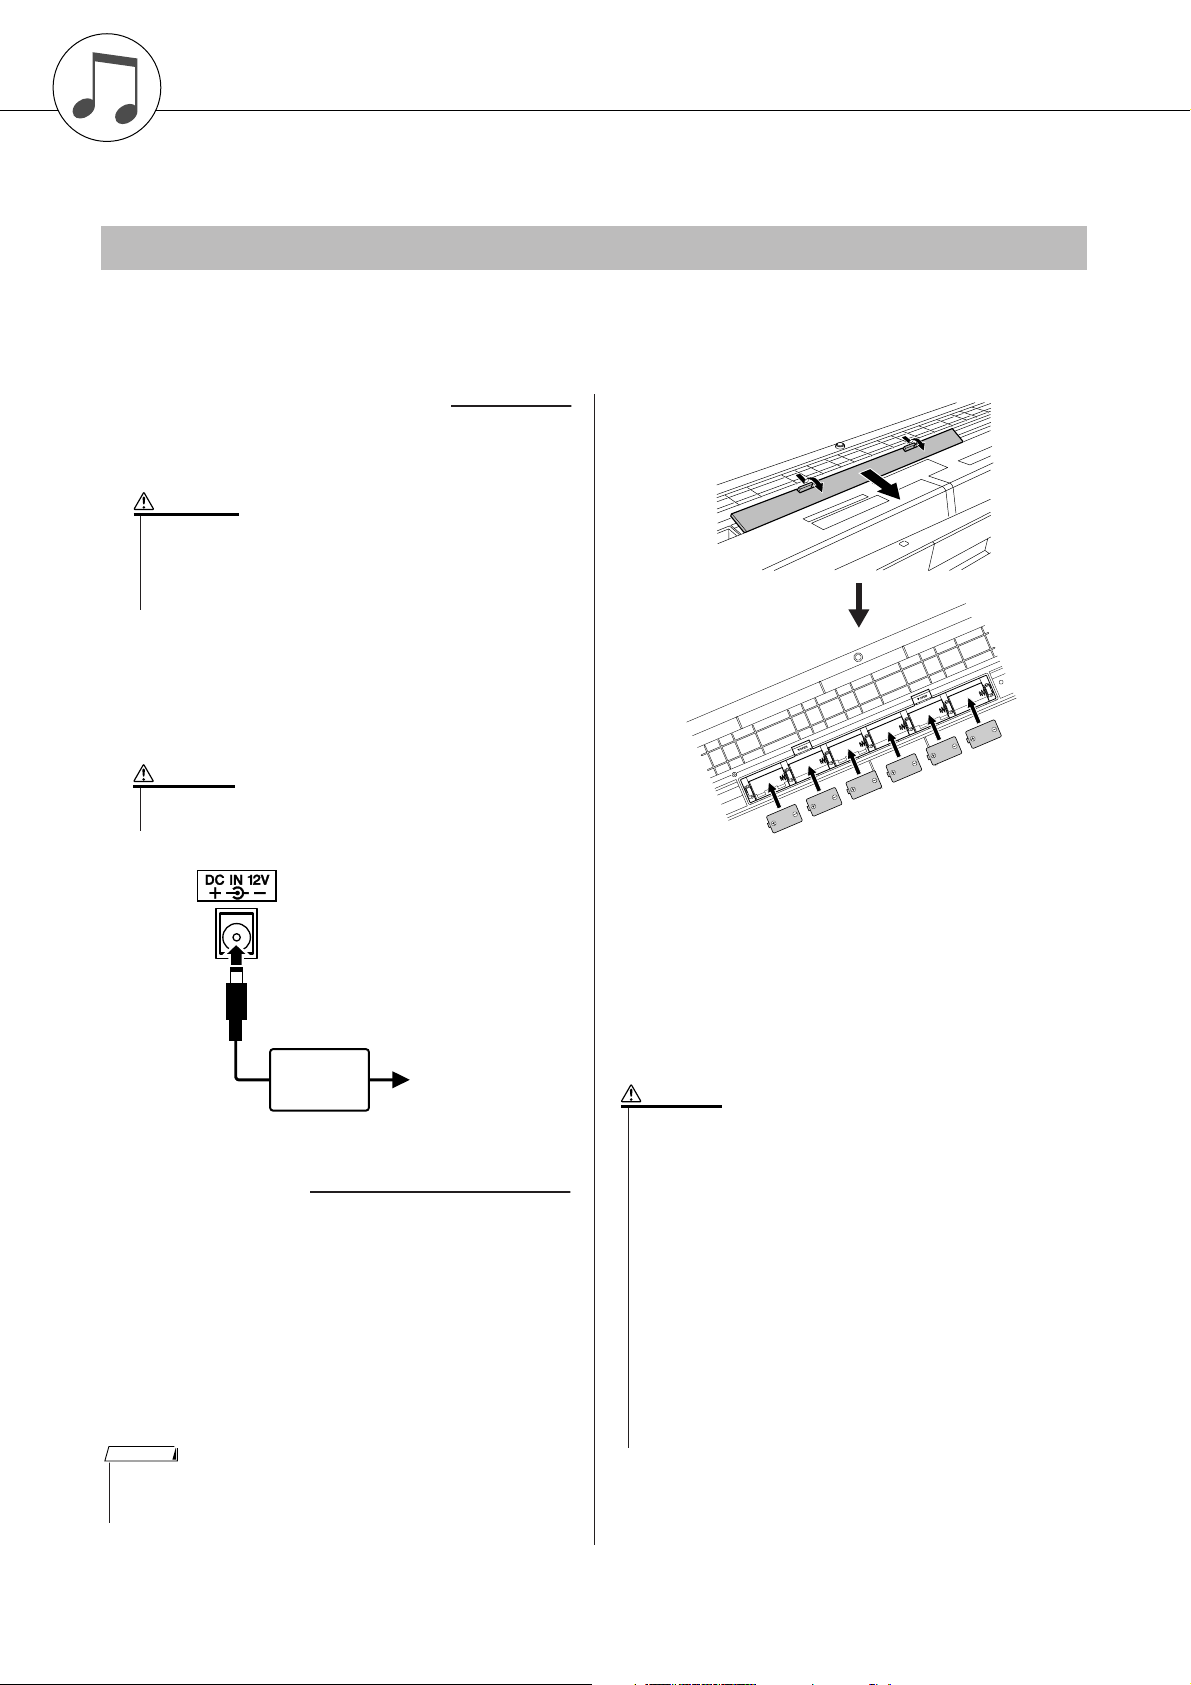
■ Performance assistant technology Page 29
Play along with a song on the instrument’s keyboard and produce a perfect
performance every time ... even if you play wrong notes! All you have to do
is play on the keyboard—alternately on the left- and right-hand ranges of the
keyboard, for example—and you’ll sound like a pro as long as you play in
time with the music.
■ Learning Music is Fun Page 36
This instrument includes a range of songs covering a variety of genres that
are enjoyable to listen to, or to play along with. You can start practicing with
just one hand, and you can even practice at your own tempo, one note at a
time as slowly as you like, until you are able to play at full speed. Song playback will automatically follow your tempo. You can also use songs you have
downloaded from the Internet for lessons, so your musical resources are
essentially unlimited! The instrument will even evaluate and grade your performance for you!
Excellen
8 DGX-220/YPG-225 Owner’s Manual
Contents
Copyright Notice ....................................................................6
Panel Logos ........................................................................... 6
Accessories............................................................................ 7
Special Features of the DGX-220/YPG-225 .......................... 8
Setting Up 10
Power Requirements ...........................................................10
Connecting Headphones (PHONES/OUTPUT Jack)........... 11
Connecting a Footswitch (SUSTAIN Jack) .......................... 11
Connecting to a Computer (USB Terminal) ......................... 11
Turning the Power On.......................................................... 11
Panel Controls and Terminals 12
Front Panel ..........................................................................12
Rear Panel ........................................................................... 13
Quick Guide
Try Playing a Variety of Instrument Voices 14
Select and Play a Voice—MAIN ..........................................14
Play Two Voices Simultaneously—DUAL............................ 15
Play Different Voices with the Left and Right Hands
—SPLIT ..........................................................................16
Play the Grand Piano Voice................................................. 17
Fun Sounds 18
Drum Kits ............................................................................. 18
Sound Effects....................................................................... 18
Playing Styles 19
Select a Style Rhythm.......................................................... 19
Play Along with a Style ........................................................20
Playing Auto-accompaniment Chords.................................. 24
Using Songs 25
Select and Listen to a Song ................................................. 25
Song Fast Forward, Fast Reverse, and Pause.................... 26
Types of Songs .................................................................... 28
The Easy Way to Play Piano 29
CHORD Type—Play with Both Hands ................................. 30
CHD/FREE Type—Applying the Chord Type
to the Left Hand Only...................................................... 32
Change the Song Tempo..................................................... 35
Select a Song For a Lesson 36
Lesson 1—Waiting............................................................... 36
Lesson 2—Your Tempo ....................................................... 39
Lesson 3—Minus One .........................................................40
Practice Makes Perfect—Repeat and Learn........................ 41
Play Using the Music Database 42
Change a Song’s Style 43
Listen to the DEMO Song for Easy Song Arranger.............. 43
Using the Easy Song Arranger ............................................43
Record Your Own Performance 45
Track Configuration.............................................................. 45
Recording Procedure ........................................................... 45
Song Clear—Deleting User Songs ......................................48
Track Clear—Deleting a Specified Track
from a User Song............................................................ 48
Backup and Initialization 49
Backup ................................................................................. 49
Initialization .......................................................................... 49
Basic Operation and Displays 50
Basic Operation ...................................................................50
Display Items .......................................................................52
Reference
Adding Effects 53
Harmony...............................................................................53
Adding Reverb .....................................................................54
Adding Chorus .....................................................................55
Handy Performance Features 56
The Metronome.................................................................... 56
Tap Start ..............................................................................58
Touch Response Sensitivity................................................. 58
Panel Sustain.......................................................................59
Pitch Bend............................................................................ 59
Pitch Controls....................................................................... 60
One Touch Setting ............................................................... 61
Adjusting the Harmony Volume............................................62
Select an EQ Setting for the Best Sound.............................62
Style (Auto-accompaniment) Functions 63
Pattern Variation (Sections) ................................................. 63
Adjusting the Style Volume .................................................. 65
Setting the Split Point........................................................... 65
Play a Style with Chords but No Rhythm
(Stop Accompaniment) ...................................................66
Playing Styles Using the Entire Keyboard............................66
Loading Style Files............................................................... 67
Chord Basics........................................................................ 68
Looking Up Chords Using the Chord Dictionary ..................70
Song Settings 71
Song Volume........................................................................71
A-B Repeat...........................................................................71
Muting Independent Song Parts...........................................72
Change the Melody Voice....................................................72
Memorize Your Favorite Panel Settings 73
Saving to the Registration Memory......................................73
Recalling a Registration Memory ......................................... 74
The Functions 75
Selecting and Setting Functions...........................................75
Connecting to a Computer 78
What Is MIDI? ......................................................................78
Connecting a Personal Computer........................................79
Transferring Performance Data to and from a Computer.....80
Remote Control of MIDI Devices..........................................81
Initial Send ...........................................................................82
Transferring Data between the Computer and Instrument... 82
Accessory CD-ROM Installation Guide 85
Important Notices about the CD-ROM ................................. 85
CD-ROM Contents...............................................................86
System Requirements.......................................................... 87
Software Installation............................................................. 87
Appendix
Troubleshooting................................................................. 92
Scores ................................................................................. 94
Voice List .......................................................................... 100
Drum Kit List.....................................................................104
Style List ........................................................................... 106
Music Database List.........................................................107
Songs Provided On the Supplied CD-ROM ...................108
Effect Type List ................................................................109
MIDI Implementation Chart..............................................110
MIDI Data Format..............................................................112
Specifications................................................................... 113
Index.................................................................................. 114
DGX-220/YPG-225 Owner’s Manual 9
Setting Up
• Use only manganese or alkaline batteries for this instrument.
Other types of batteries (including rechargeable batteries) may
exhibit a sudden drop in power when the batteries are low, possibly resulting in a loss of flash memory data.
• Be sure to install the batteries in the same direction, maintaining
the correct polarity (as shown). Incorrect battery installation may
result in heat, fire and/or leaking of corrosive chemicals.
• When the batteries run down, replace them with a complete set of
six new batteries. NEVER mix old and new batteries. Do not use
different kinds of batteries (e.g. alkaline and manganese) at the
same time.
• If the instrument will not be used for an extended period of time,
remove the batteries to prevent possible fluid leakage.
• Please use the power adaptor when transferring data to flash
memory. Batteries (including rechargeable types) can be drained
rapidly by this type of operation. If the batteries do become
drained during a data transfer, both the data being transferred and
the data currently in the transfer destination will be lost.
Be sure to do the following operations BEFORE turning on the power.
Power Requirements
Although the instrument will run either from an optional AC adaptor or batteries, Yamaha recommends use of an AC
adaptor whenever possible. An AC adaptor is more environmentally friendly than batteries and does not deplete
resources.
■ Using an AC Power Adaptor
Make sure that the [STANDBY/ON] switch of the
instrument is set to STANDBY.
WARNING
• Use ONLY a Yamaha PA-5D AC Power Adaptor (or other adaptor specifically recommended by Yamaha) to power your
instrument from the AC mains. The use of other adaptors may
result in irreparable damage to both the adaptor and the
instrument.
Connect the AC adaptor (PA-5D or other adaptor
specifically recommended by Yamaha) to the power
supply jack.
Plug the AC adaptor into an AC outlet.
CAUTION
• Unplug the AC Power Adaptor when not using the instrument,
or during electrical storms.
PA-5D
AC outlet
■ Using Batteries
Open the battery compartment cover located on the
instrument’s bottom panel.
Insert the six new batteries, being careful to follow
the polarity markings on the inside of the compartment.
Replace the compartment cover, making sure that it
locks firmly in place.
NOTE
• Connecting the AC power adaptor automatically supplies power from
the adaptor and overrides battery power, even when batteries are
installed.
10 DGX-220/YPG-225 Owner’s Manual
For battery operation the instrument requires six 1.5V
“D” size, R20P (LR20) or equivalent batteries. (Alkaline
batteries are recommended.) When battery power
becomes too low for proper operation, make sure to
replace all batteries, following the precautions listed
below.
If necessary, also make sure to save all important User
data (see page 49), since custom panel settings are
lost when the batteries are removed.
CAUTION

Make all necessary connections below BEFORE turning the power on.
• Even when the switch is in the “STANDBY” position, electricity is
still flowing to the instrument at the minimum level. When you are
not using the instrument for a long time, make sure you unplug the
AC power adaptor from the wall AC outlet, and/or remove the batteries from the instrument.
•Never attempt to turn the power off when a “WRITING!” message
is shown in the display. Doing so can damage the flash memory
and result in data loss.
Setting Up
Connecting Headphones (PHONES/OUTPUT Jack)
The DGX-220/YPG-225 speakers are automatically
shut off when a plug is inserted into this jack.
The PHONES/OUTPUT jack also functions as an external output. You can connect the PHONES/OUTPUT
jack to a keyboard amplifier, stereo system, mixer, tape
recorder, or other line-level audio device to send the
instrument’s output signal to that device.
WARNING
•Avoid listening with the headphones at high volume for long periods of time; doing so may not only result in ear fatigue, it may be
damaging to your hearing.
CAUTION
•To prevent damage to the speakers, set the volume of the external
devices at the minimum setting before connecting them. Failure to
observe these cautions may result in electric shock or equipment
damage. Also, be sure to set the volumes of all devices at their
minimum levels and gradually raise the volume controls while
playing the instrument to set the desired listening level.
Connecting to a Computer (USB Terminal)
Connect the instrument’s USB terminal to the USB terminal of a computer, and you can transfer performance
data and song files between the two (page 79). To use
the USB data-transfer features you’ll need to do the following:
• First, make sure the POWER switch on the instrument is set to OFF, then use a USB cable to connect the instrument to the computer. After making
the connections, turn on the power of the instrument.
• Install the USB MIDI driver on your computer.
Installation of the USB MIDI driver is described on
page 87.
NOTE
• Make sure to purchase a quality USB cable at a musical instrument
store, computer store or electrical appliance store.
Connecting a Footswitch (SUSTAIN Jack)
The sustain function lets you produce a natural sustain
as you play by pressing a footswitch. Plug the Yamaha
FC4 or FC5 footswitch into this jack and use it to switch
sustain on and off.
NOTE
• Make sure that the footswitch plug is properly connected to the SUSTAIN jack before turning on the power.
• Do not press the footswitch while turning the power on. Doing this
changes the recognized polarity of the footswitch, resulting in reversed
footswitch operation.
Turning the Power On
Turn down the volume by turning the [MASTER VOLUME] control to the left and press the [STANDBY/ON]
switch to turn on the power. Press the [STANDBY/ON]
switch again to turn the power OFF.
Backup data in the flash memory is loaded to the instrument when the power is turned on. If no backup data
exists on flash memory, all instrument settings are
restored to the initial factory defaults when the power is
turned on.
CAUTION
CAUTION
DGX-220/YPG-225 Owner’s Manual 11
Panel Controls and Terminals
Front Panel
Style Category List (page 106) Display (page 52)
@9
Song Category List (page 27)
q
w
u
e r t
i
!0 !1 !2 !3 !4 !5
Music Database List
(page 107)
y
o
GrandPno
001
001
Front Panel
q [STANDBY/ON] switch .................... page 11
w [MASTER VOLUME] control.... pages 11, 50
e [P.A.T. ON/OFF] button.................... page 30
r [MUSIC DATABASE] button............ page 42
t [FUNCTION] button ......................... page 75
y LESSON [L], [R], [START] buttons . page 37
u [METRONOME ON/OFF] button ..... page 56
i [TEMPO/TAP] button ....................... page 35
o SONG MEMORY
[REC], [1]–[5], [A] buttons............... page 45
!0 [REPEAT & LEARN]/
[ACMP ON/OFF] button........... pages 41, 20
!1 [A-B REPEAT]/
[INTRO/ENDING/rit.] button.... pages 71, 64
12 DGX-220/YPG-225 Owner’s Manual
!2 [REW]/
[MAIN/AUTO FILL] button........pages 26, 64
!3 [FF]/
[SYNC STOP] button................pages 26, 64
!4 [PAUSE]/
[SYNC START] button..............pages 26, 63
!5 [START/STOP] button ........pages 19, 26, 51
!6 [SONG] button................................. page 25
!7 [EASY SONG ARRANGER]
button............................................... page 43
!8 [STYLE] button................................ page 19
!9 [VOICE] button ................................ page 14
@0 Dial ............................................pages 51, 75
@1 CATEGORY [ ] and [ ]
f
r
buttons......................................pages 51, 75

Voice Category List (page 100)
Panel Controls and Terminals
!6
o
001
!7
!8
!9
@4
@0
@5
@1
@2
@6 @7 @8
@3
Rear Panel
#0 #1 #2 #3
@2 Number buttons [0]–[9],
[+] and [-] buttons.................... pages 51, 75
@3 [DEMO] button................................. page 26
@4 REGIST MEMORY
[MEMORY/BANK],
[1], [2] buttons ................................. page 73
@5 [PORTABLE GRAND] button .......... page 17
@6 [SPLIT ON/OFF] button................... page 16
@7 [DUAL ON/OFF] button ...................page 15
@8 [HARMONY ON/OFF] button .......... page 53
@9 PITCH BEND wheel ......................... page 59
Rear Panel
#0 USB terminal ............................pages 11, 79
#1 SUSTAIN jack................................... page 11
#2 PHONES/OUTPUT jack................... page 11
#3 DC IN 12V jack................................. page 10
DGX-220/YPG-225 Owner’s Manual 13
G
k
u
c
i
u
Q
i
d
e
Try Playing a Variety of Instrument Voices
Quick Guide
In addition to piano, organ, and other “standard” keyboard instruments,
this instrument has a large range of voices that includes guitar, bass,
strings, sax, trumpet, drums and percussion, sound effects ... a wide
variety of musical sounds.
Select and Play a Voice—MAIN
This procedure selects the main voice you will play on the keyboard.
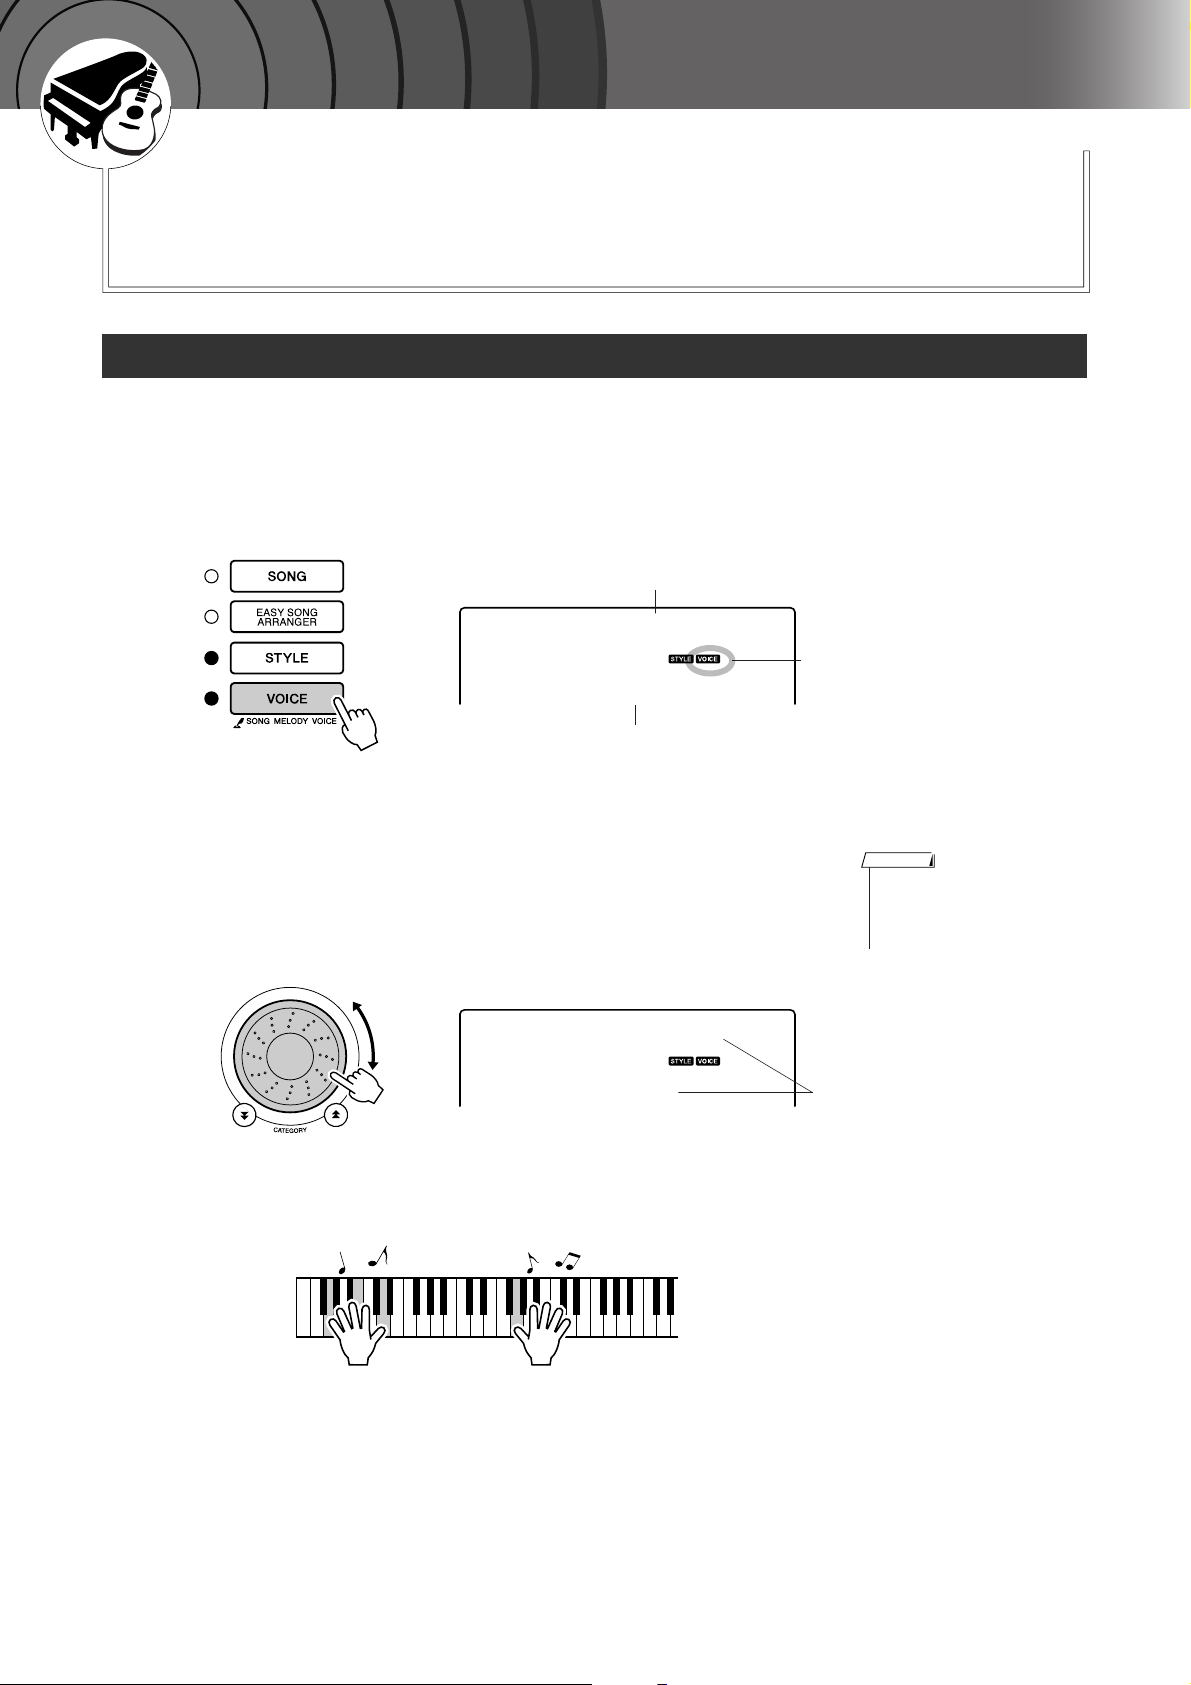
Press the [VOICE] button.
1
The voice number and name will be displayed.
Voice name
GrandPno
001
Voice number
Select the voice you want to play.
2
While watching the displayed voice name rotate the dial. The available
voices will be selected and displayed in sequence. The voice selected
here becomes the main voice.
For this example select the “092 Flute” voice.
Flute
092
Play the keyboard.
3
Appears when the Voice mode
is engaged.
NOTE
•You can also select the voice
using the CATEGORY [ ] and
[] buttons after pressing the
r
[VOICE] button. (page 51)
Select 092 Flute
f
Try selecting and playing a variety of voices.
14 DGX-220/YPG-225 Owner’s Manual
Try Playing a Variety of Instrument Voices
Play Two Voices Simultaneously—DUAL
You can select a second voice which will play in addition to the main voice when you play the keyboard.
The second voice is known as the “dual” voice.
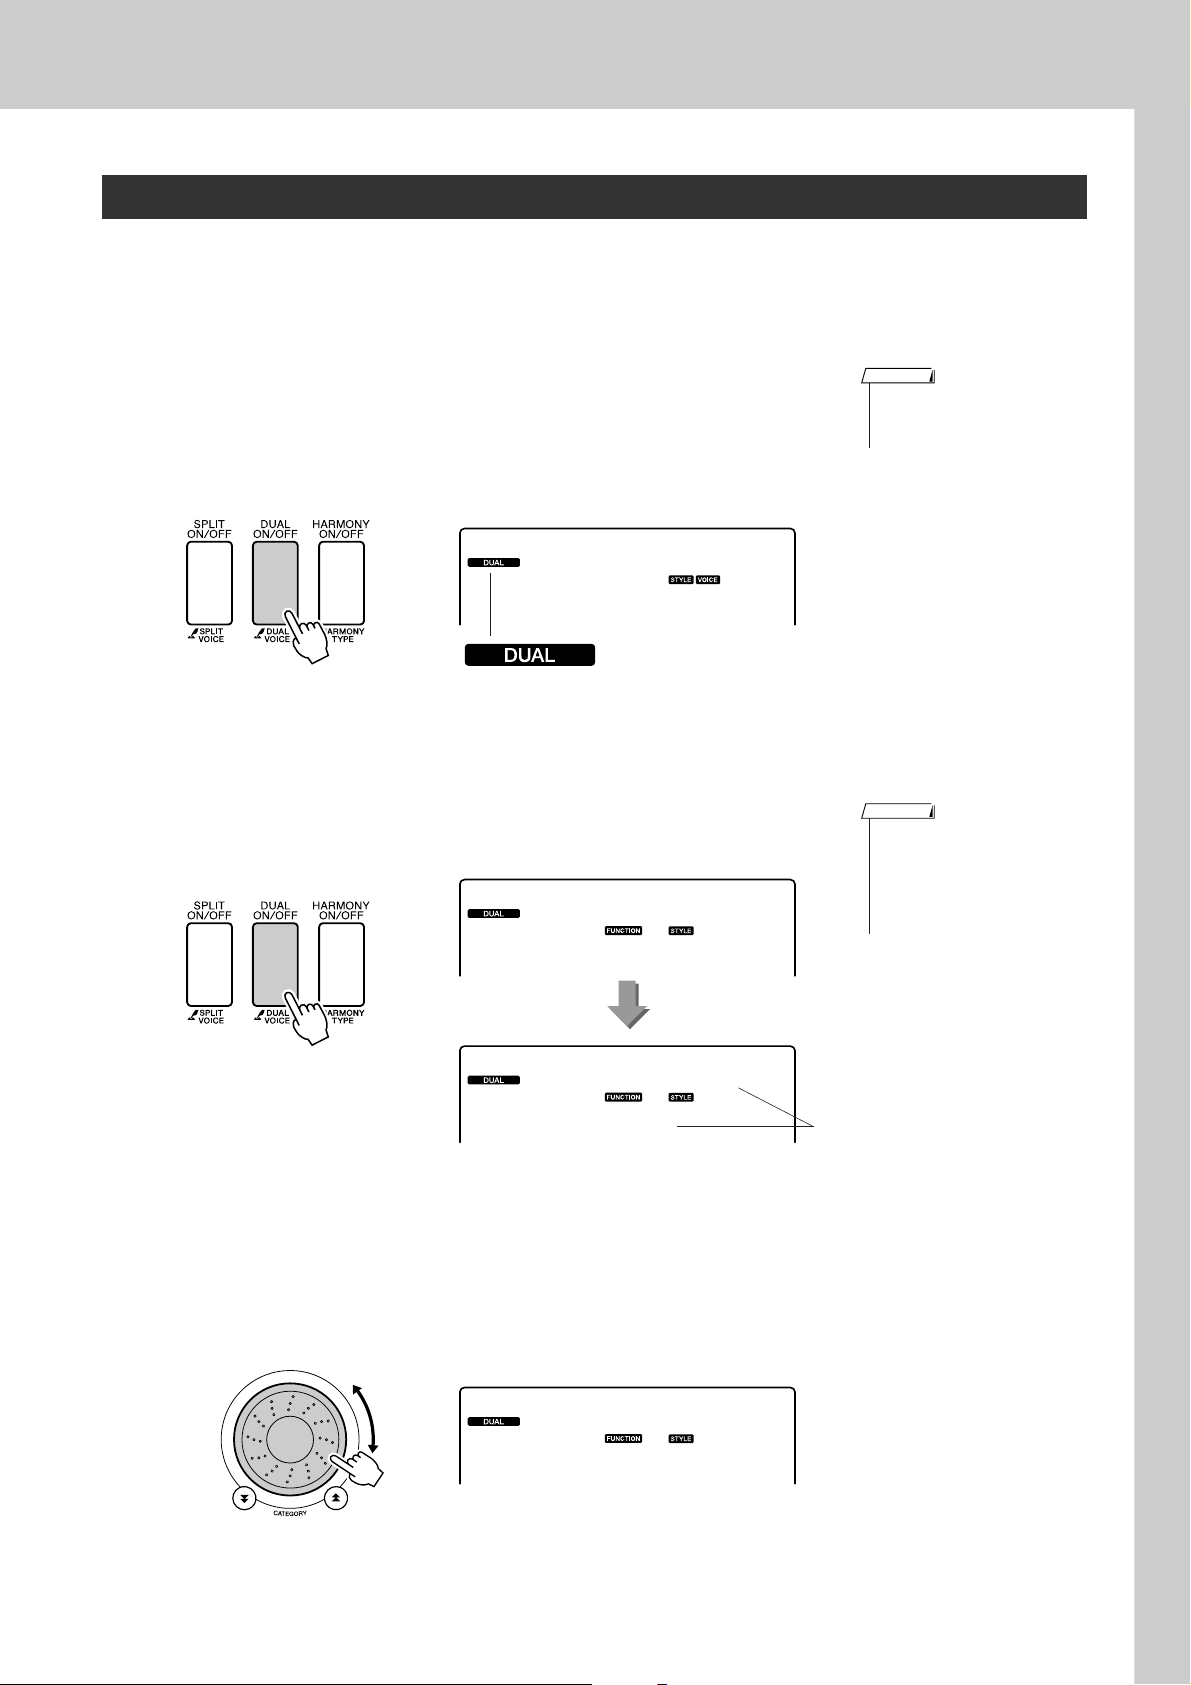
Press the [DUAL ON/OFF] button.
1
The [DUAL ON/OFF] button turns the dual voice on or off.
When turned on the dual voice icon will appear in the display. The currently selected dual voice will sound in addition to the main voice when
you play the keyboard.
NOTE
• The dual voice feature cannot
be used during a song lesson
(page 36).
Flute
092
Dual voice icon
Press and hold the [DUAL ON/OFF] button for longer than
a second.
2
“D.VOICE” appears in the display for a few seconds, then the currently
selected dual voice will be displayed.
D.Voice
Hold for longer
than a second
Select the desired dual voice.
3
Watch the displayed dual voice and rotate the dial until the voice you
want to use is selected. The voice selected here becomes the dual voice.
For this example try selecting the “109 Vibraphone” voice.
Marimba
110
NOTE
•You can also select the Dual
Voice display by pressing the
[FUNCTION] button and then
using the CATEGORY [ ] and
[] buttons to select the
r
“D.Voice” item.
The currently selected
dual voice
f
Vibes
109
DGX-220/YPG-225 Owner’s Manual 15
Try Playing a Variety of Instrument Voices
Play the keyboard.
4
Tw o voices will sound at the same time.
Try selecting and playing a range of dual voices.
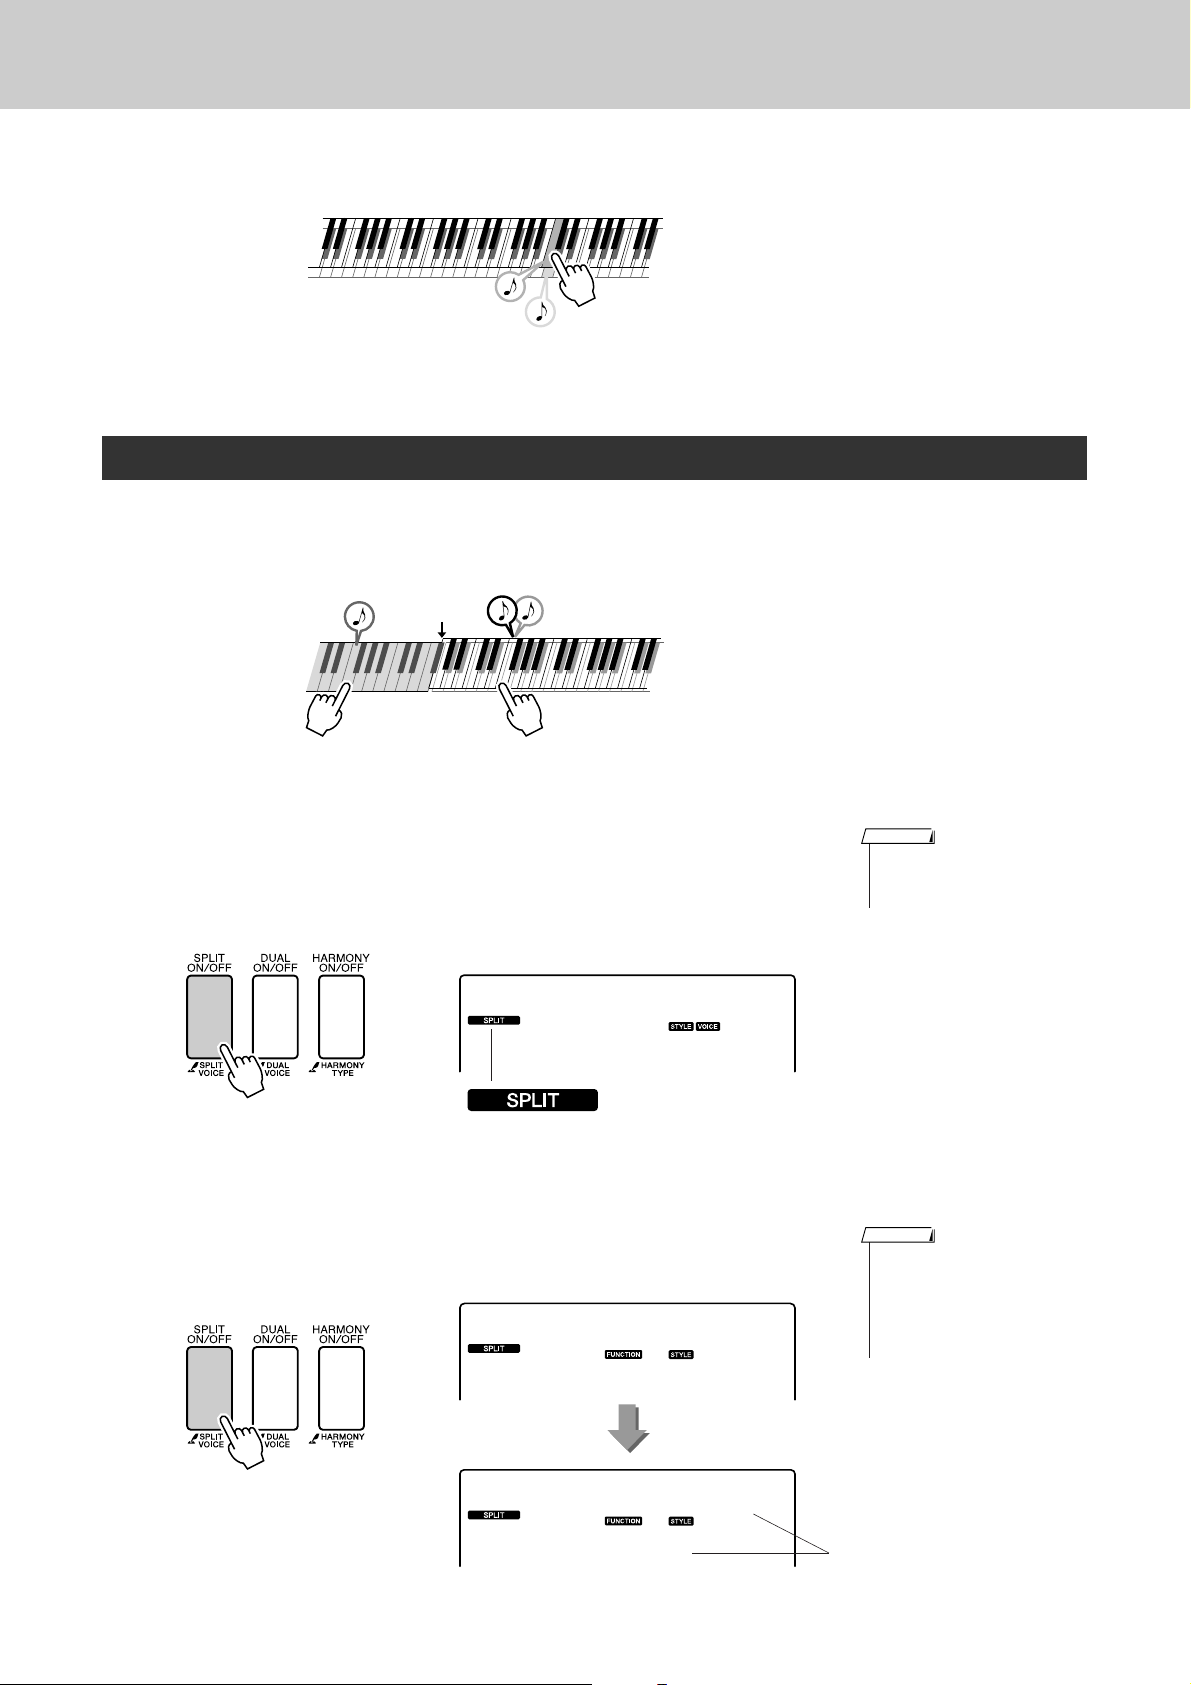
Play Different Voices with the Left and Right Hands—SPLIT
In the split mode you can play different voices to the left and right of the keyboard “split point”. The main
and dual voices can be played to the right of the split point, while the voice played to the left of the split
point is known as the “split voice”. The split point setting can be changed as required (page 65).
Split point
Main voice and dual voiceSplit voice
Press the [SPLIT ON/OFF] button.
1
The [SPLIT ON/OFF] button turns the split voice on or off.
When turned on the split voice icon will appear in the display. The currently selected split voice will sound to the left of the keyboard split
point.
Flute
092
Split voice icon
Press and hold the [SPLIT ON/OFF] button for longer than
a second.
2
“S.VOICE” appears in the display for a few seconds, then the currently
selected split voice will be displayed.
S.Voice
NOTE
• The split voice feature cannot
be used during a song lesson
(page 36).
NOTE
•You can also select the Split
Voice display by pressing the
[FUNCTION] button and then
using the CATEGORY [ ] and
[] buttons to select the
r
“S.Voice” item.
f
Hold for longer than a second
16 DGX-220/YPG-225 Owner’s Manual
FngrBass
042
The currently selected
SPLIT voice

Select the desired split voice.
3
Watch the displayed split voice and rotate the dial until the voice you
want to use is selected. The voice selected here becomes the split voice
which will play to the left of the keyboard split point. For this example
try selecting the “033 Folk Guitar” voice.
Folk Gtr
033
Play the keyboard.
4
Try Playing a Variety of Instrument Voices
Try selecting and playing a range of split voices.
Play the Grand Piano Voice
When you just want to play piano, all you have to do is press one convenient button.
Press the [PORTABLE GRAND] button.
The “001 Grand Piano” voice will be selected.
NOTE
• When you press the [PORTABLE GRAND] button all settings
other than touch sensitivity are
turned off. The dual and split
voices will also be turned off, so
only the Grand Piano voice will
play over the entire keyboard.
DGX-220/YPG-225 Owner’s Manual 17
Fun Sounds
This instrument includes a range of drum kits and unique sound effects you can
use for entertainment. Laughter, babbling brooks, jet fly-bys, eerie effects, and
much more. These sounds can be a great way to enhance the mood at parties.
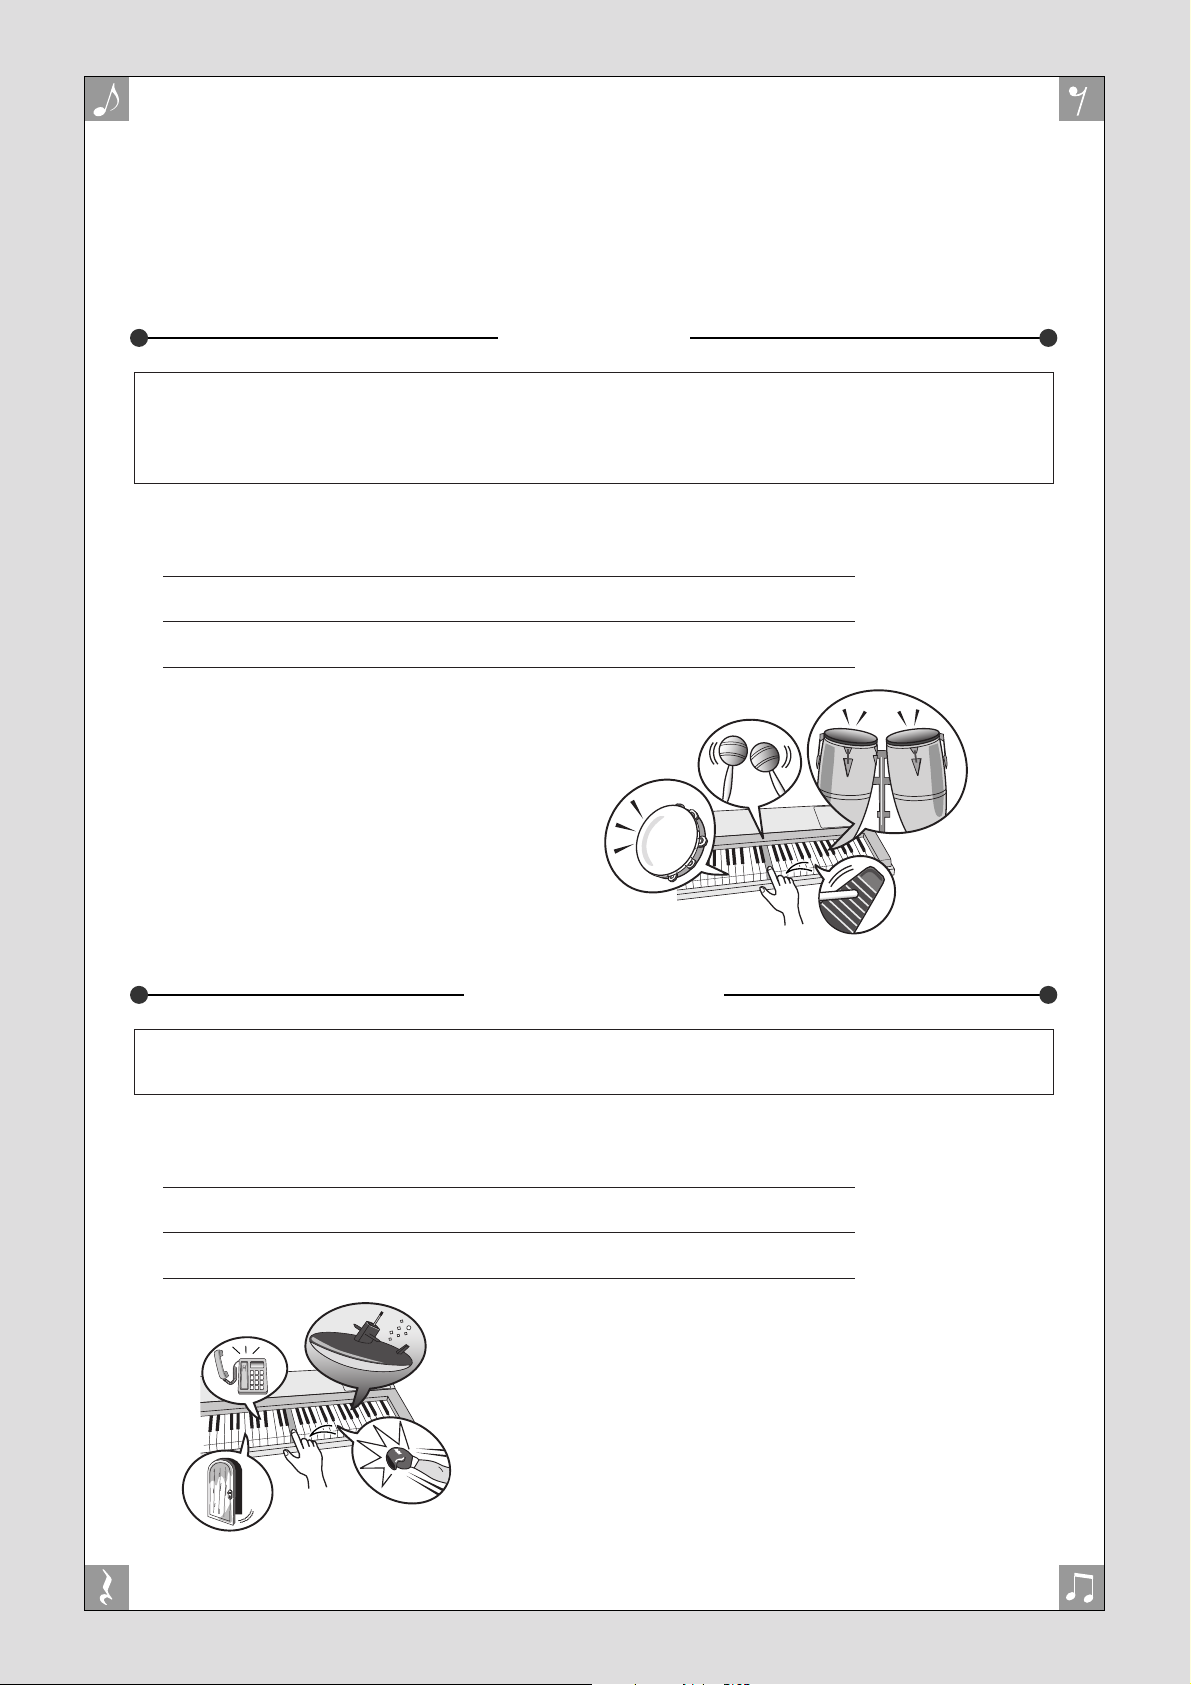
Drum Kits
Drum kits are collections of drum and percussion instruments. When you select a violin or other normal
instrument main voice, for example, all keys produce the sound of the same violin, only at different pitches. If
you select a drum kit as the main voice, however, each key produces the sound of a different drum or percussion instrument.
◆ Drum Kit Selection Procedure ➔ (refer to steps 1 and 2 on page 14)
1 Press the [VOICE] button.
2 Use the dial to select “117 Std.Kit1”.
3 Tr y out each key and enjoy the drum and percussion sounds!
Try out each key and enjoy the drum and
percussion sounds! Don’t forget the black
keys! You’ll hear a triangle, maracas, bongos, drums ... a comprehensive variety of
drum and percussion sounds. For details on
the instruments included in the drum kit
voices (voice numbers 117 to 128), see the
“Drum Kit List” on page 104.
Sound Effects
The sound effects are included in the drum kit voice group (voice numbers 127 and 128). When either of these
voices are selected you will be able to play a range of sound effects on the keyboard.
◆ Sound Effect Selection Procedure ➔ (refer to steps 1 and 2 on page 14)
1 Press the [VOICE] button.
2 Use the dial to select “128 SFX Kit2”.
3 Tr y out each key and enjoy the sound effects!
As you try out the various keys you’ll hear the sound
of a submarine, a telephone bell, a creaking door,
laughter, and many other useful effects. “127 SFX
Kit1” includes lightning, running water, dogs barking, and others. Some keys do not have assigned
sound effects, and will therefore produce no sound.
For details on the instruments included in the SFX kit
voices, see “SFX Kit 1” and “SFX Kit 2” in the
“Drum Kit List” on page 104.
18 DGX-220/YPG-225 Owner’s Manual

G
k
u
c
i
u
Q
i
d
e
Playing Styles
This instrument has an auto accompaniment feature that produces
accompaniment (rhythm + bass + chords) in the style you choose to
match chords you play with your left hand. You can select from 150 different styles covering a range of musical genres and time signatures
(see page 106 for a complete list of the available styles).
In this section we’ll learn how to use the auto accompaniment features.
Select a Style Rhythm
Most styles includes a rhythm part. You can select from a wide variety of rhythmic types—rock, blues, Euro
trance, and many, many more. Let’s begin by listening to just the basic rhythm. The rhythm part is played
using percussion instruments only.
Press the [STYLE] button.
1
The style number and name will appear in the display.
Style Name
8BtModrn
001
Style Number
Select a style.
2
Use the dial to select the style you want to use.
A list of all the available styles is provided on page 106.
PopBossa
087
Press the [START/STOP] button.
3
The style rhythm will start playing.
Press the [START/STOP] button a second time when you want to stop
playback.
This icon appears when a style
number and name is displayed.
NOTE
• Style numbers 121, 133–150
have no rhythm part and therefore no rhythm will play if you
use them for the above example. For these styles first turn
auto accompaniment on as
described on page 20, press the
[START/STOP] button, and the
accompaniment bass and chord
parts will begin playing when
you play a key to the left of the
keyboard split point.
DGX-220/YPG-225 Owner’s Manual 19

Playing Styles
Play Along with a Style
You learned how to select a style rhythm on the preceding page.
Here we’ll see how to add bass and chord accompaniment to the basic rhythm to produce a full, rich accompaniment that you can play along with.
Press the [STYLE] button and select the desired style.
1
Turn automatic accompaniment on.
2
Press the [ACMP ON/OFF] button.
Pressing this button a second time will turn automatic accompaniment
off.
PopBossa
087
● When automatic accompaniment is on ...
The area of the keyboard to the left of the split point (54 : F#2) becomes the
“auto accompaniment region” and is used only for specifying the
accompaniment chords.
Split point (54 : F#2)
Auto accompaniment
region
Turn sync start on.
3
Press the [SYNC START] button to turn the sync start function on.
This icon appears when automatic accompaniment is on.
NOTE
• The keyboard split point can be
changed as required: refer to
page 65.
PopBossa
When sync start is on, the bass and chord accompaniment included in a
style will start playing as soon as you play a note to left of the keyboard
split point. Press the button a second time to turn the sync start function
off.
20 DGX-220/YPG-225 Owner’s Manual
087
Flashes when sync
start is on.

Play a left-hand chord to start the style.
4
You can still “play” chords even if you don’t actually know any chords.
This instrument will recognize even a single note as a chord. Try playing from one to three notes at the same time to the left of the split point.
The accompaniment will change according to the left-hand notes you
play.
Try this!
Scores for some chord progressions are provided on page 22.
These examples should help you get a feel for what types of chord
progressions sound good with the styles.
Split point
Playing Styles
Auto accompaniment
region
Play a variety of left-hand chords while playing a melody
with your right hand.
5
Split point
Auto accompaniment
region
Press the [START/STOP] button to stop style playback
when you’re done.
6
You can switch style “sections” to add variety to the accompaniment.
Refer to “Pattern Variation (Sections)” on page 63.
DGX-220/YPG-225 Owner’s Manual 21
Playing Styles
Styles Are More Fun When You Understand Chords
Chords, created by playing multiple notes at the same time, are the basis for harmonic accompaniment.
In this section we’ll take a look at sequences of different chords played one after another, or “chord
sequences”. Since each chord has it’s own unique “color”—even if it’s different fingerings of the same
chord—the chords you choose to use in your chord progressions have a huge influence on the overall
feel of the music you play.
On page 20 you learned how to play colorful accompaniments using styles. Chord progressions are vital
to creating interesting accompaniments, and with a little chord know-how you should be able to take
your accompaniments to a new level.
On these pages we’ll introduce three easy-to-use chord progressions. Be sure to try them out with the
instrument’s accompaniment styles. The style will respond to the chord progression you play, effectively
creating a complete song.
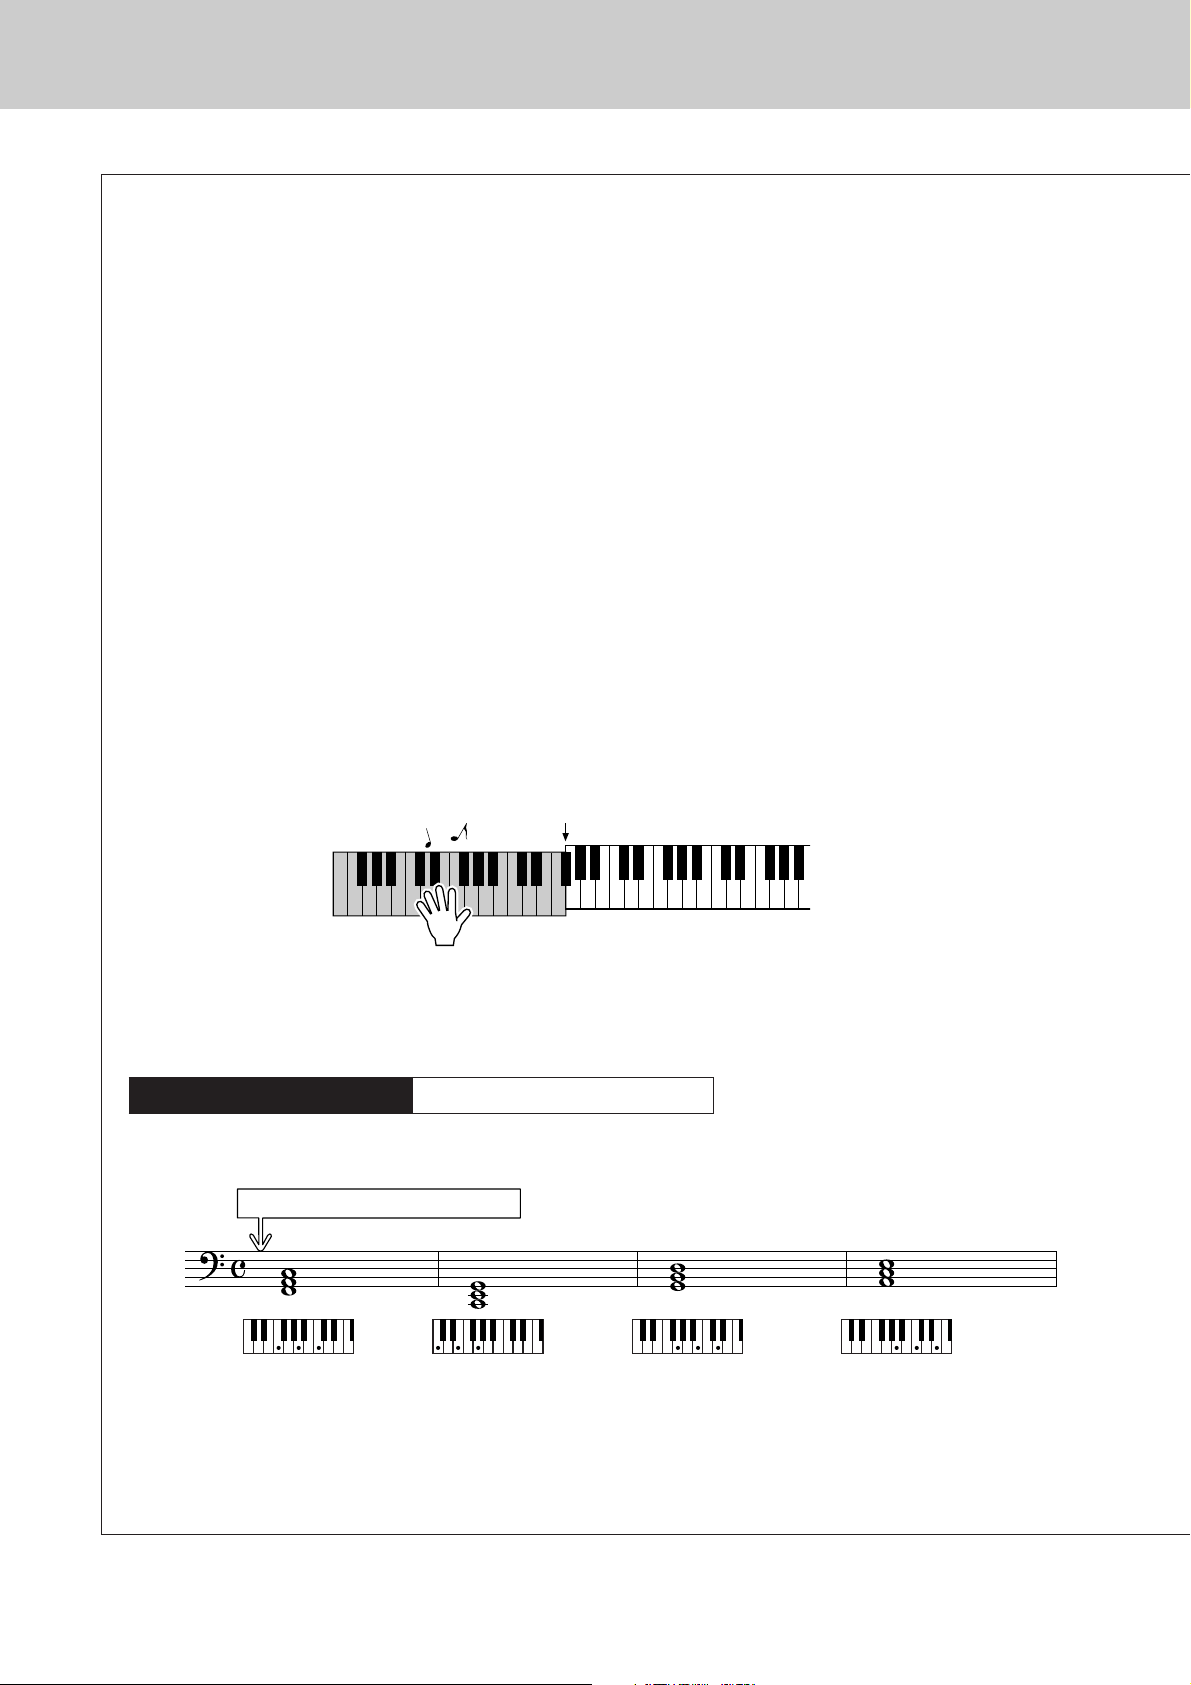
■Playing the Chord Progressions ● ● ● ● ● ● ● ● ● ● ● ● ● ● ● ● ● ● ● ● ● ● ● ● ● ● ● ● ●
Play the scores with the left hand.
Before playing the scores follow steps 1 through 3 of “
* The scores provided here are not standard song scores, but rather simplified scores that indicate which notes to play to
produce the chord progressions.
Play to the left of the split point.
Recommended Style
031 Euro Trance
Play Along with a Style” on page 20.
Split point
—Dance music with simple chords—
Press the [INTRO/ENDING/rit.] button.
F
C G Am
This is a simple-but-effective chord progression. When you play through to the end of the score, start
again from the beginning. When you’re ready to stop playing press the [INTRO/ENDING/rit.] button
and the auto accompaniment function will create a perfect ending.
22 DGX-220/YPG-225 Owner’s Manual
Playing Styles
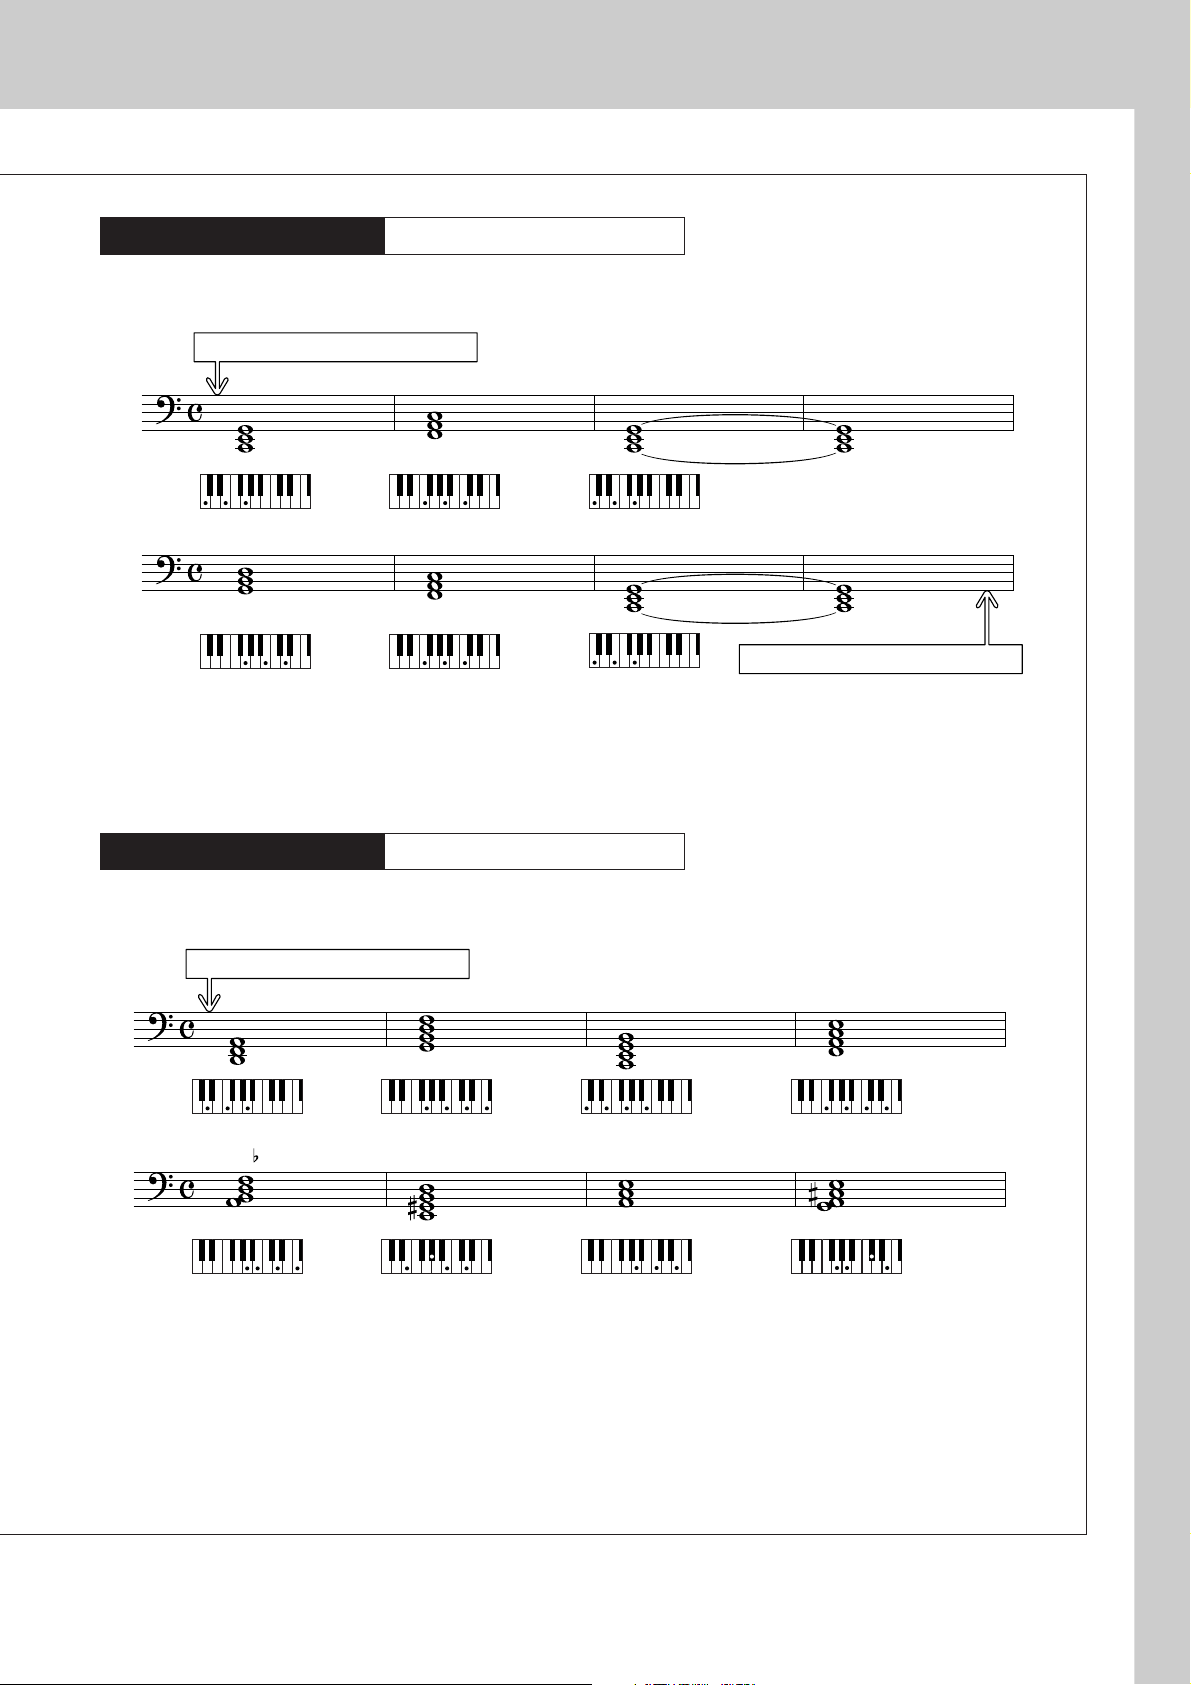
Recommended Style
138 Piano Boogie
—3-chord boogie-woogie—
Press the [INTRO/ENDING/rit.] button.
C C
G
F
F
C
Press the [INTRO/ENDING/rit.] button.
This progression provides varied harmonic backing with just three chords. When you get a feel for the
progression in the score, try changing the order of the chords!
Recommended Style
086 Bossa Nova
—Bossa nova with jazz-style chords—
Press the [INTRO/ENDING/rit.] button.
Dm CM7
5
Bm7
G7
E7
FM7
Am A7
This progression includes jazzy “two-five” (II-V) changes. Try playing it through several times. When
you’re ready to stop playing press the [INTRO/ENDING/rit.] button.
DGX-220/YPG-225 Owner’s Manual 23
Playing Styles
( )
( )
( )
( )
( )
( )
( )
( )
( )
( )
( )
( )
( )
( )
( )
( )
( )
( )
( )
CmM7
CM7
C6
Csus4
Caug
CM7aug
C7aug
C7sus4
C1+2+5
C7
Cm
Cdim
Cdim7
C7
CmM7
(9)
CM7
(9)
Cm7
(9)
C7
(b9)
C7
(
b13
)
Cm7
(11)
CM7
(
#11
)
C
(b5)
C
(9)
(
9
)
C6
(9)
Cm
(9)
C7
(
#11
)
C7
(#9)
C7
(13)
C7
Cm6
Cm7
C
(b5)
CM7
(b5)
Cm7
(b5)
CmM7
(b5)
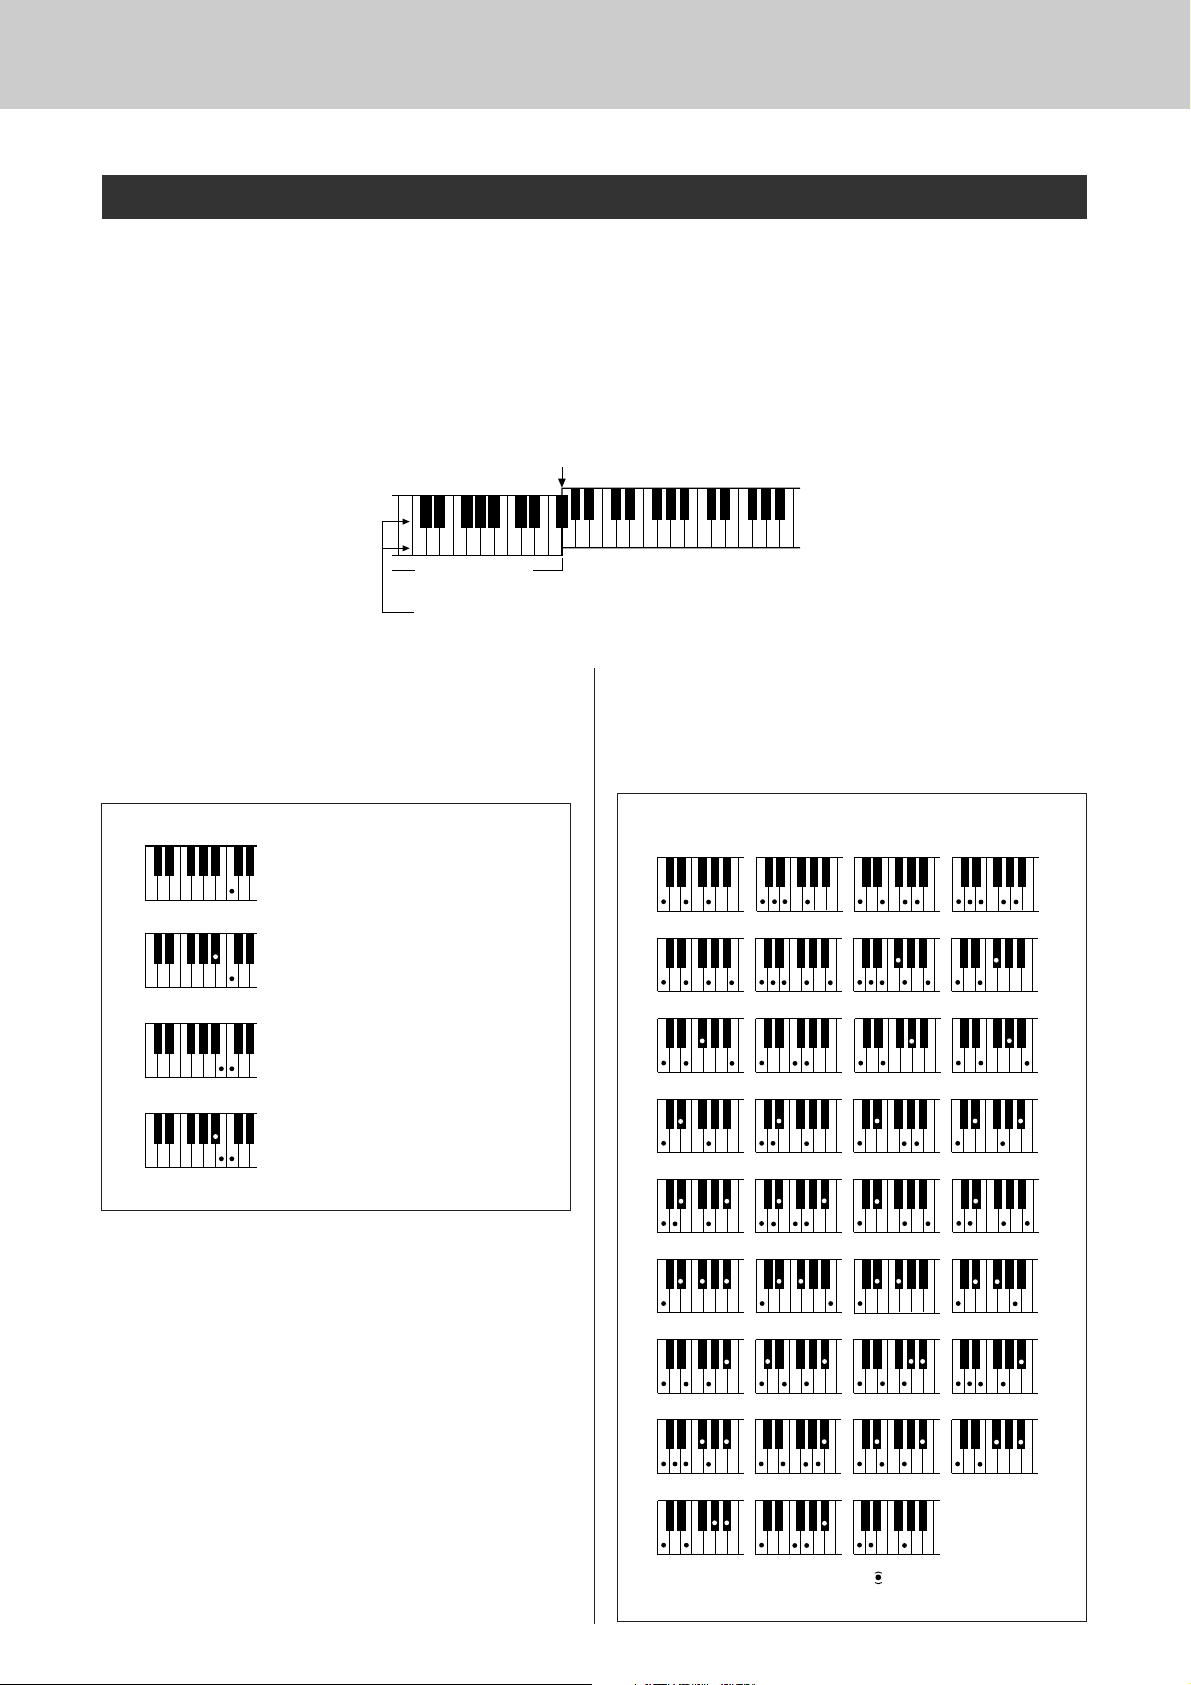
● How to play Standard Chords [Example for “C” chords]
* Notes enclosed in parentheses ( ) are optional; the chords
will be recognized without them.
Playing Auto-accompaniment Chords
There are two ways of playing auto-accompaniment chords:
● Easy Chords
● Standard Chords
The instrument will automatically recognize the different chord types. This function is called Multi Fingering.
Press the [ACMP ON/OFF] button to turn auto-accompaniment on (page 20). The keyboard to the left of
the split point (default: 54/F#2) becomes the “accompaniment range”. Play the accompaniment chords in
this area of the keyboard.
Split point (default: 54/F#2)
DbEbF#G#BbDbEbF
C
DEFGABCDEF
Accompaniment
Root notes and the corresponding keys
■Easy Chords ● ● ● ● ● ● ● ● ● ● ● ● ● ● ● ●
This method lets you easily play chords in the
accompaniment range of the keyboard using only
one, two, or three fingers.
C
Cm
C7
Cm7
•To play a major chord
Press the root note of the chord.
•To play a minor chord
Press the root note together with the
nearest black key to the left of it.
•To play a seventh chord
Press the root note together with the
nearest white key to the left of it.
•To play a minor seventh chord
Press the root note together with the
nearest white and black keys to the left
of it (three keys altogether).
#
range
■Standard Chords ● ● ● ● ● ● ● ● ● ● ● ● ●
This method lets you produce accompaniment by
playing chords using normal fingerings in the
accompaniment range of the keyboard.
24 DGX-220/YPG-225 Owner’s Manual
G
k
u
c
i
u
Q
i
d
e
Using Songs
With this instrument the term “song” refers the data that makes up a
piece of music. You can simply enjoy listening to the 30 internal songs,
or use them with just about any of the many functions provided—the
performance assistant technology feature, lessons, and more. The
songs are organized by category.
In this section we’ll learn how to select and play songs, and briefly
describe the 30 songs provided.
Song
Listen Lesson Record
Select and Listen to a Song
Press the [SONG] button.
1
The song number and name will be displayed.
You can use the dial to select a different song.
Nocturne
011
Select a song.
2
Select a song after referring to the preset song category list on page 27.
Use the dial to select the song you want to listen to.
ForElise
The currently selected song
and number are displayed
NOTE
•You can also play songs you
have recorded yourself (User
Songs) or songs that have been
transferred to the instrument
from a computer in the same
way that you play the internal
songs.
012
The song displayed here
can be played
DGX-220/YPG-225 Owner’s Manual 25
Using Songs
Listen to the song.
3
Press the [START/STOP] button to begin playback of the selected song.
You can stop playback at any time by pressing the [START/STOP] button again.
001–030 Built in Songs (see next page)
031–035 User Songs (Songs you record yourself).
036– Songs transferred from a computer (pages 82–84)
Song start!
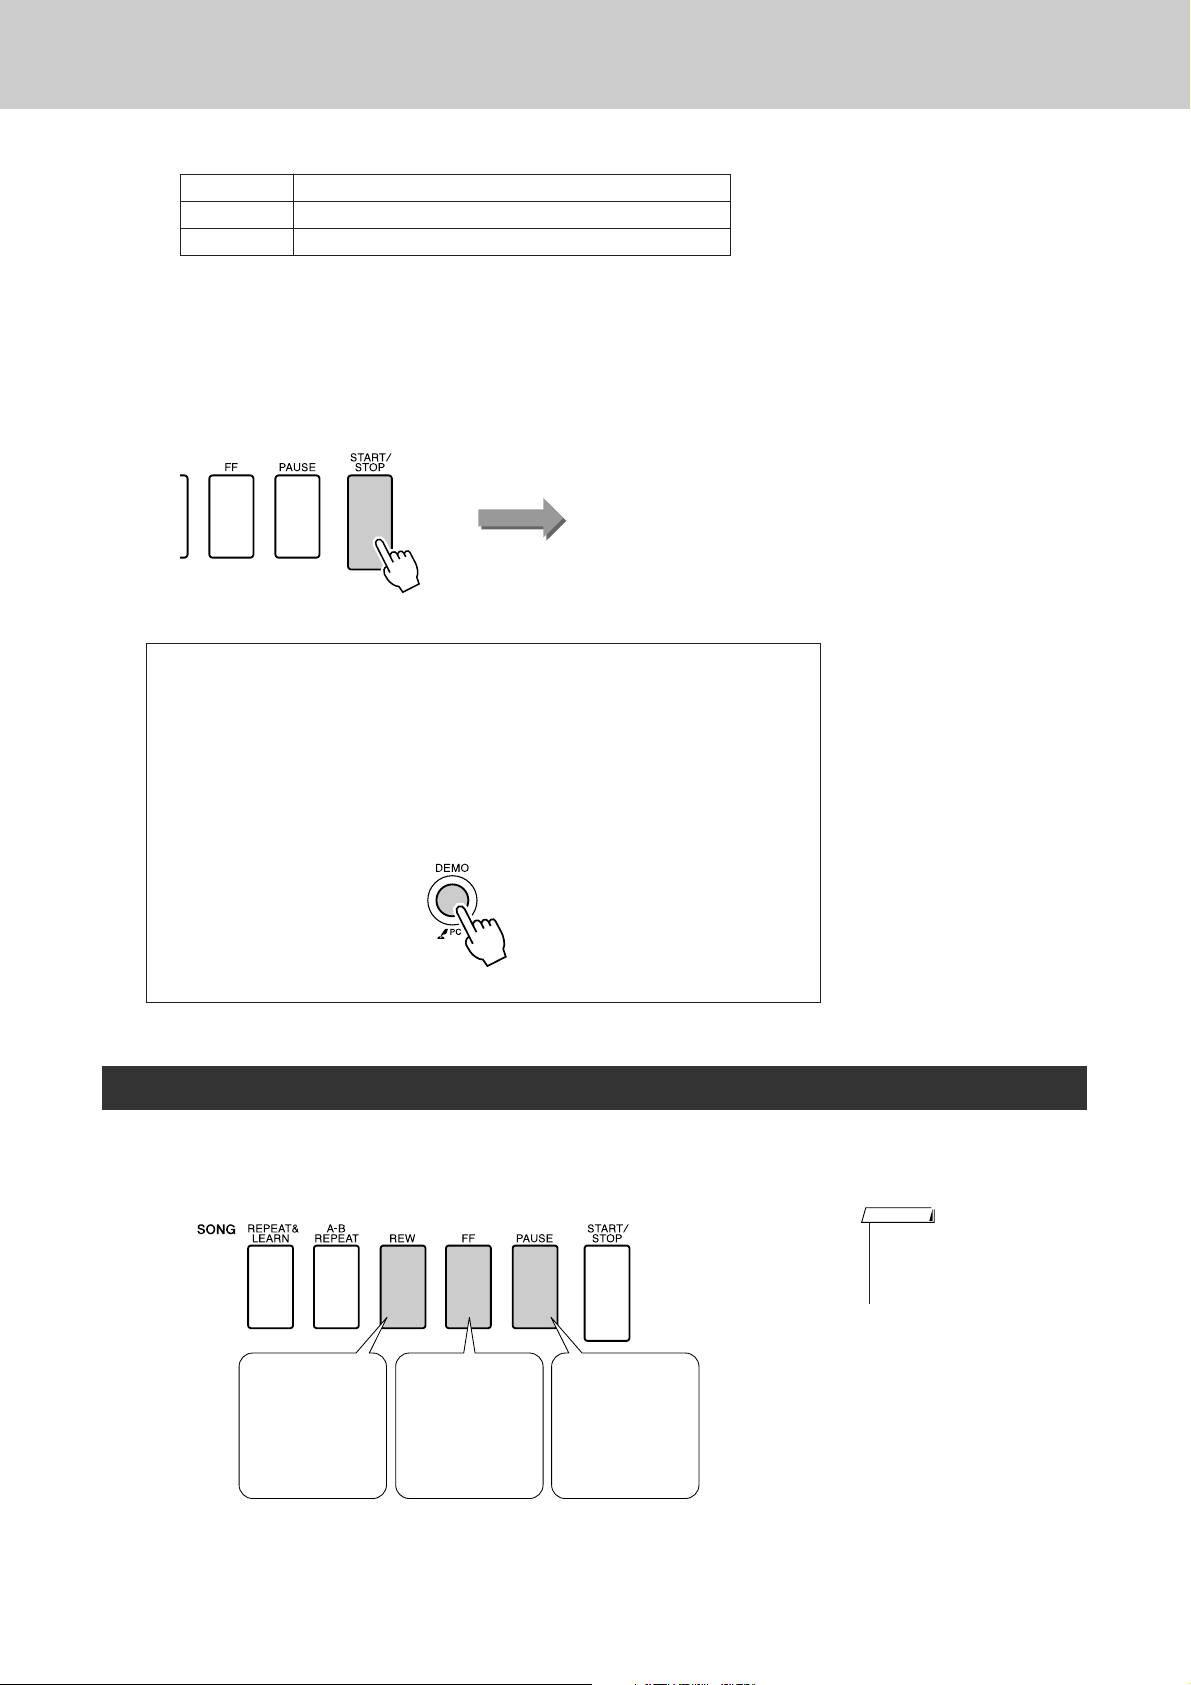
● Using the [DEMO] button
Press the [DEMO] button to play Songs 001–008 in sequence. Playback
will repeat when the end of the sequence is reached, starting again from the
first Song (001).
You can select a song by using the [-] and [+] buttons after pressing the
[DEMO] button.
You can stop playback at any time by pressing the [DEMO] button.
Song Fast Forward, Fast Reverse, and Pause
These are just like the transport controls on a cassette deck or CD player, letting you fast forward [FF],
rewind [REW] and pause [PAUSE] playback of the song.
NOTE
• When an A-B repeat range is
specified the fast reverse and
forward function will only work
within that range.
REW
Press the fast
reverse button to
rapidly return to
an earlier point in
the song.
26 DGX-220/YPG-225 Owner’s Manual
FF
Press the fast forward button to
rapidly skip
ahead to a later
point in the song.
PAUSE
Press the pause
button to pause
playback.
Using Songs
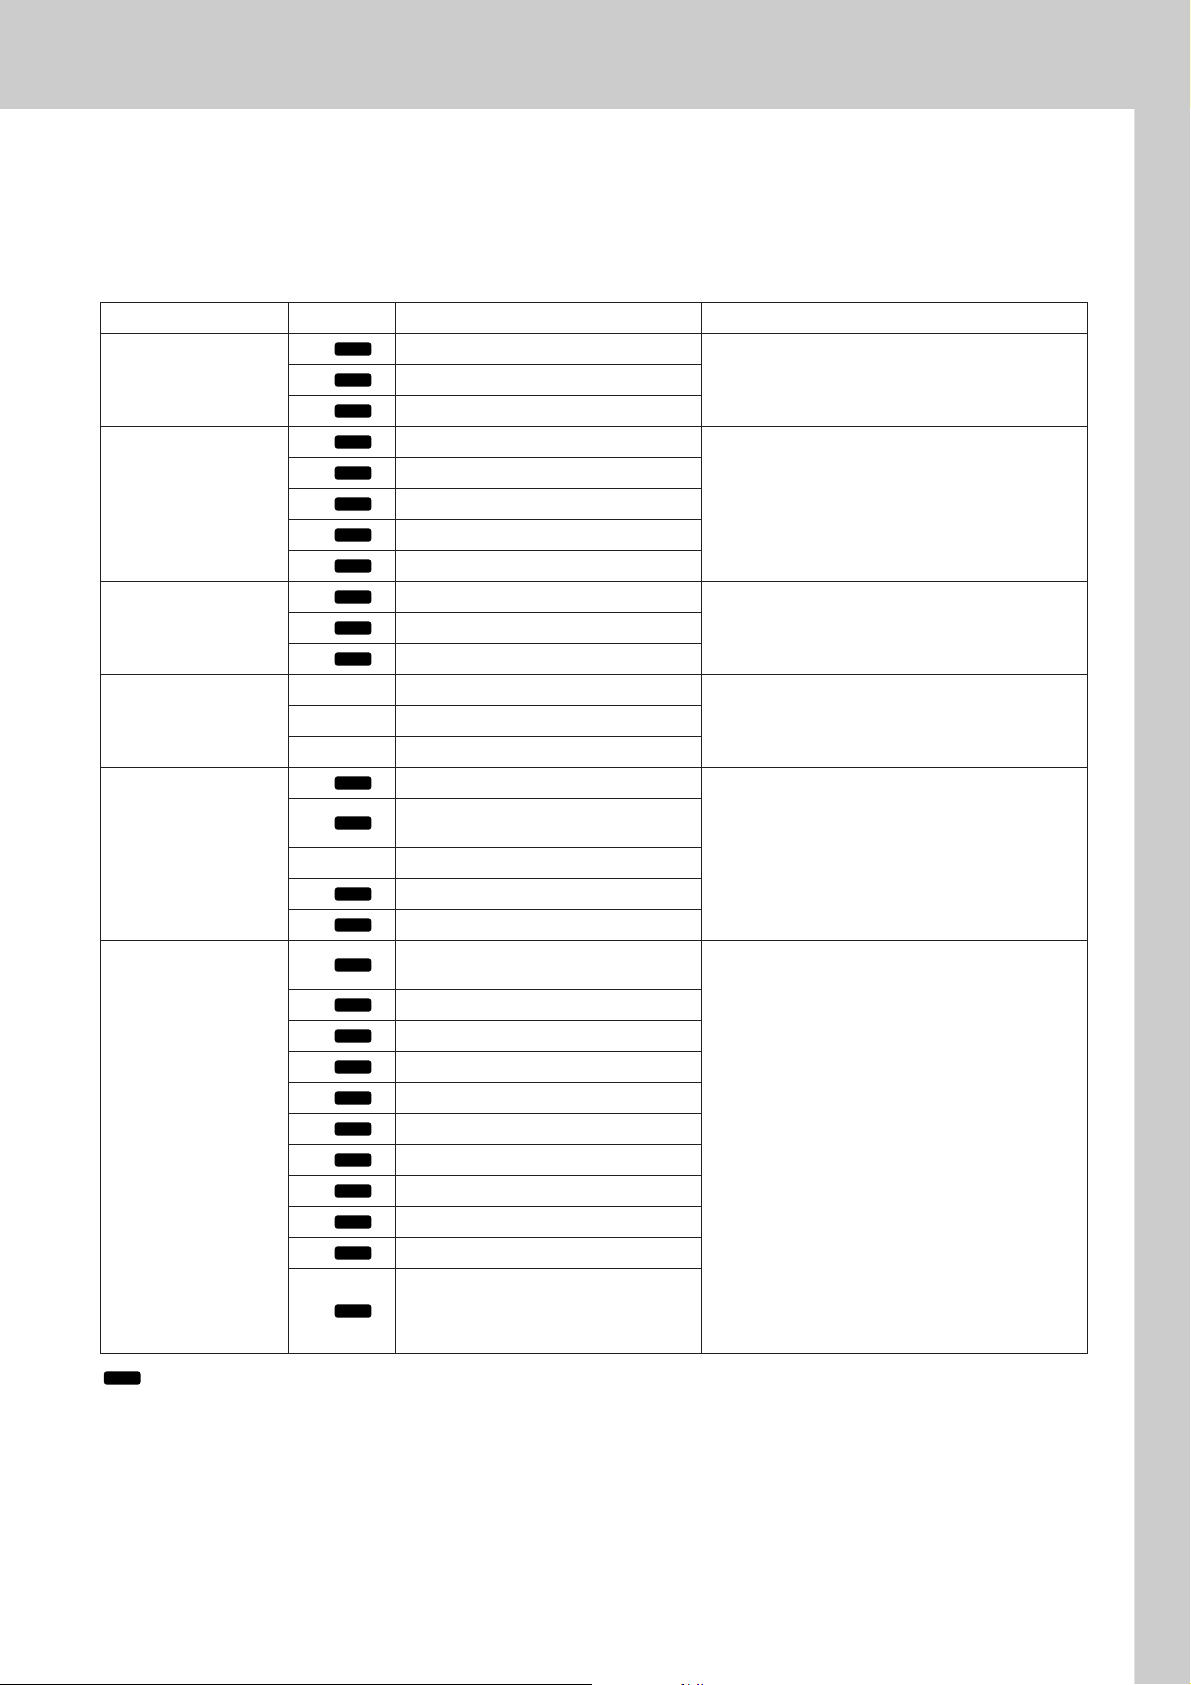
● Song List
These 30 songs include songs that effectively demonstrate the instrument’s easy song arranger feature,
songs that are ideally suited for use with the performance assistant technology feature, and more. The “Suggested Uses” column provides some ideas as to how the songs can most effectively used.
Category No. Name Suggested Uses
CHORD
Main Demo
Voice Demo
Funciton Demo
Piano Solo
Piano Ensemble
Piano Accompaniment
1 Magnetic
CHORD
2 Jessica
CHORD
3 Winter Serenade
CHORD
4Grand Piano Demo
CHORD
5Sweet! TenorSax Demo
CHORD
6 Cool! RotorOrgan Demo
CHORD
7 Cool! Galaxy Electric Piano Demo
CHORD
8 ModernHarp & Sweet Soprano Demo
CHORD
9 Hallelujah Chorus
CHORD
10 Ave Maria
CHORD
11 Nocturne op.9-2
12 For Elise
13 Maple Leaf Rag
14 Jeanie with the Light Brown Hair
CHORD
15 Amazing Grace
16
CHORD
Mona Lisa
(Jay Livingston and Ray Evans)
17 Piano Concerto No.21 2nd mov.
CHORD
18 Scarborough Fair
CHORD
19 Old Folks at Home
CHORD
20
CHORD
21 Ep Ballad
CHORD
22 Boogie Woogie
CHORD
23 Rock Piano
CHORD
24 Salsa
CHORD
25 Country Piano
CHORD
26 Gospel R&B
CHORD
27 Medium Swing
CHORD
28 Jazz Waltz
CHORD
29 Medium Bossa
Ac Ballad
(Against All Odds: Collins 0007403)
Slow Rock
30
CHORD
(Can’t Help Falling In Love: George
David Weiss, Hugo Peretti and Luigi
Creatore)
The songs in this category have been created to
give you an idea of the advanced capabilities of this
instrument. They’re great for listening, or for use with
the performance assistant technology feature.
These songs features some of the instrument’s
many useful voices. They make maximum use of the
characteristics of each voice, and might serve as
inspiration for your own compositions.
Use these songs to experience some of the
instrument’s advanced features: song number 9 for
the easy song arranger, and songs 10 and 11 for the
performance assistant technology feature.
These piano solo pieces are ideally suited for use as
lesson songs.
A selection of piano ensemble songs that are also
well suited for use as lesson songs.
When you need to practice backing
(accompaniment) patterns, these are the songs to
do it with. This is ability you’ll need if you’re invited to
play with a band. These songs allow you to practice
backing parts one hand at a time, which can be the
easiest way to master this important skill.
CHORD
: Includes chord data.
The scores for the internal songs—except for songs 1–11, and song 16, 20 and 30 which is copyrighted, are provided in the Song
Book on the CD-ROM. The scores for songs 9–11 are provided in this manual.
Some of the classic and/or traditional songs have been edited for length or for ease in learning, and may not be exactly the same
as the original.
DGX-220/YPG-225 Owner’s Manual 27
Using Songs
Types of Songs
The following three types of songs can be used by the DGX-220/YPG-225.
● Preset Songs (the 30 songs built into the instrument) ................ Song numbers 001–030.
● User Songs (recordings of your own performances) ..................Song numbers 031–035.
● External song files (song data transferred from a computer*) ...Song numbers 036–.
* The Accessory CD-ROM includes a selection of 70 MIDI songs. See page 83 for instructions on how to
transfer the songs to the instrument.
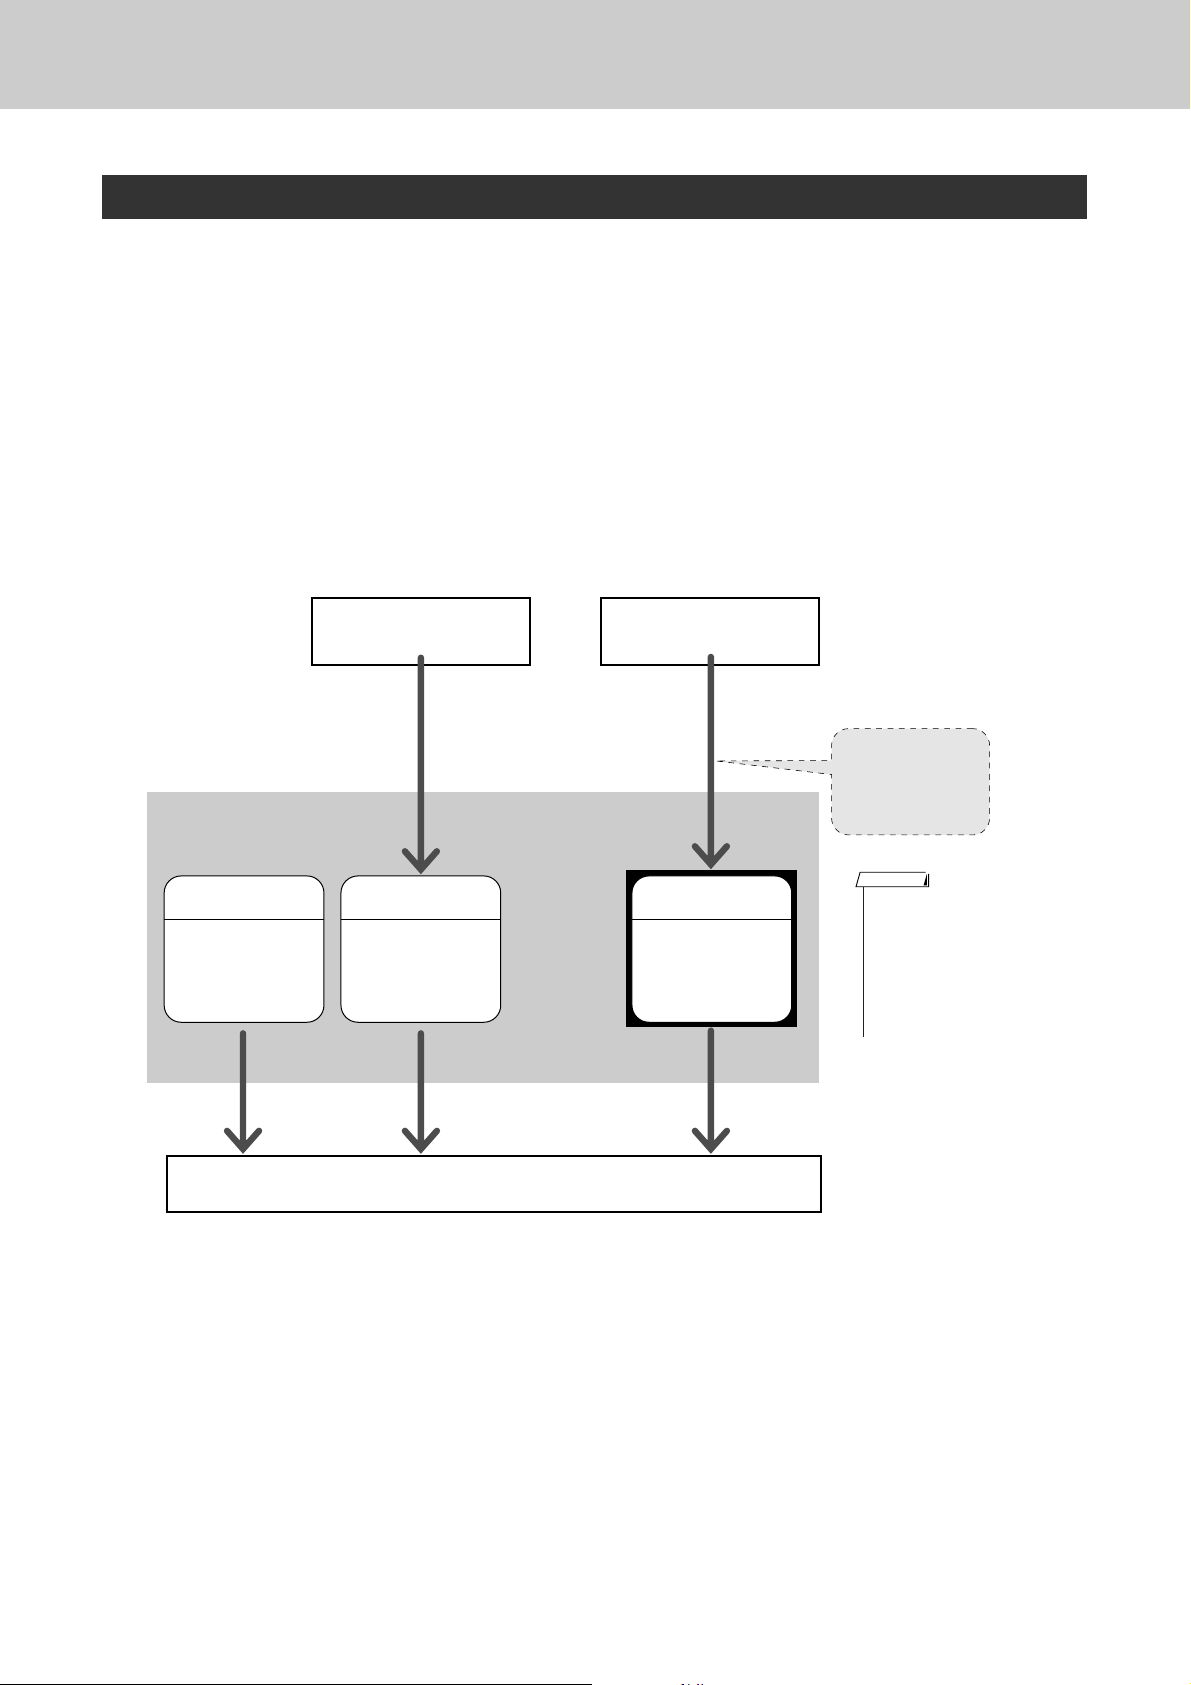
The chart below shows the basic DGX-220/YPG-225 processes flow for using the preset songs, user songs,
and external song files—from storage to playback.
Computer
Your own performance
DGX-220/YPG-225 Song
Storage locations
Preset Songs
(001–030)
The 30 songs built
into the instrument.
Record
(page 45)
User Songs
(031–035)
Stored in the internal flash memory.
Play
External song file
Transfer
(page 83)
Flash Memory
(036–)
Save to internal
flash memory. Currently available.
External song files
can be saved to flash
memory
NOTE
• Different flash memory areas
are used to store user songs
and external song files transferred from a computer. User
songs cannot be directly transferred to the external song file
flash memory area, and vice
versa.
28 DGX-220/YPG-225 Owner’s Manual

G
k
u
c
i
u
Q
i
d
e
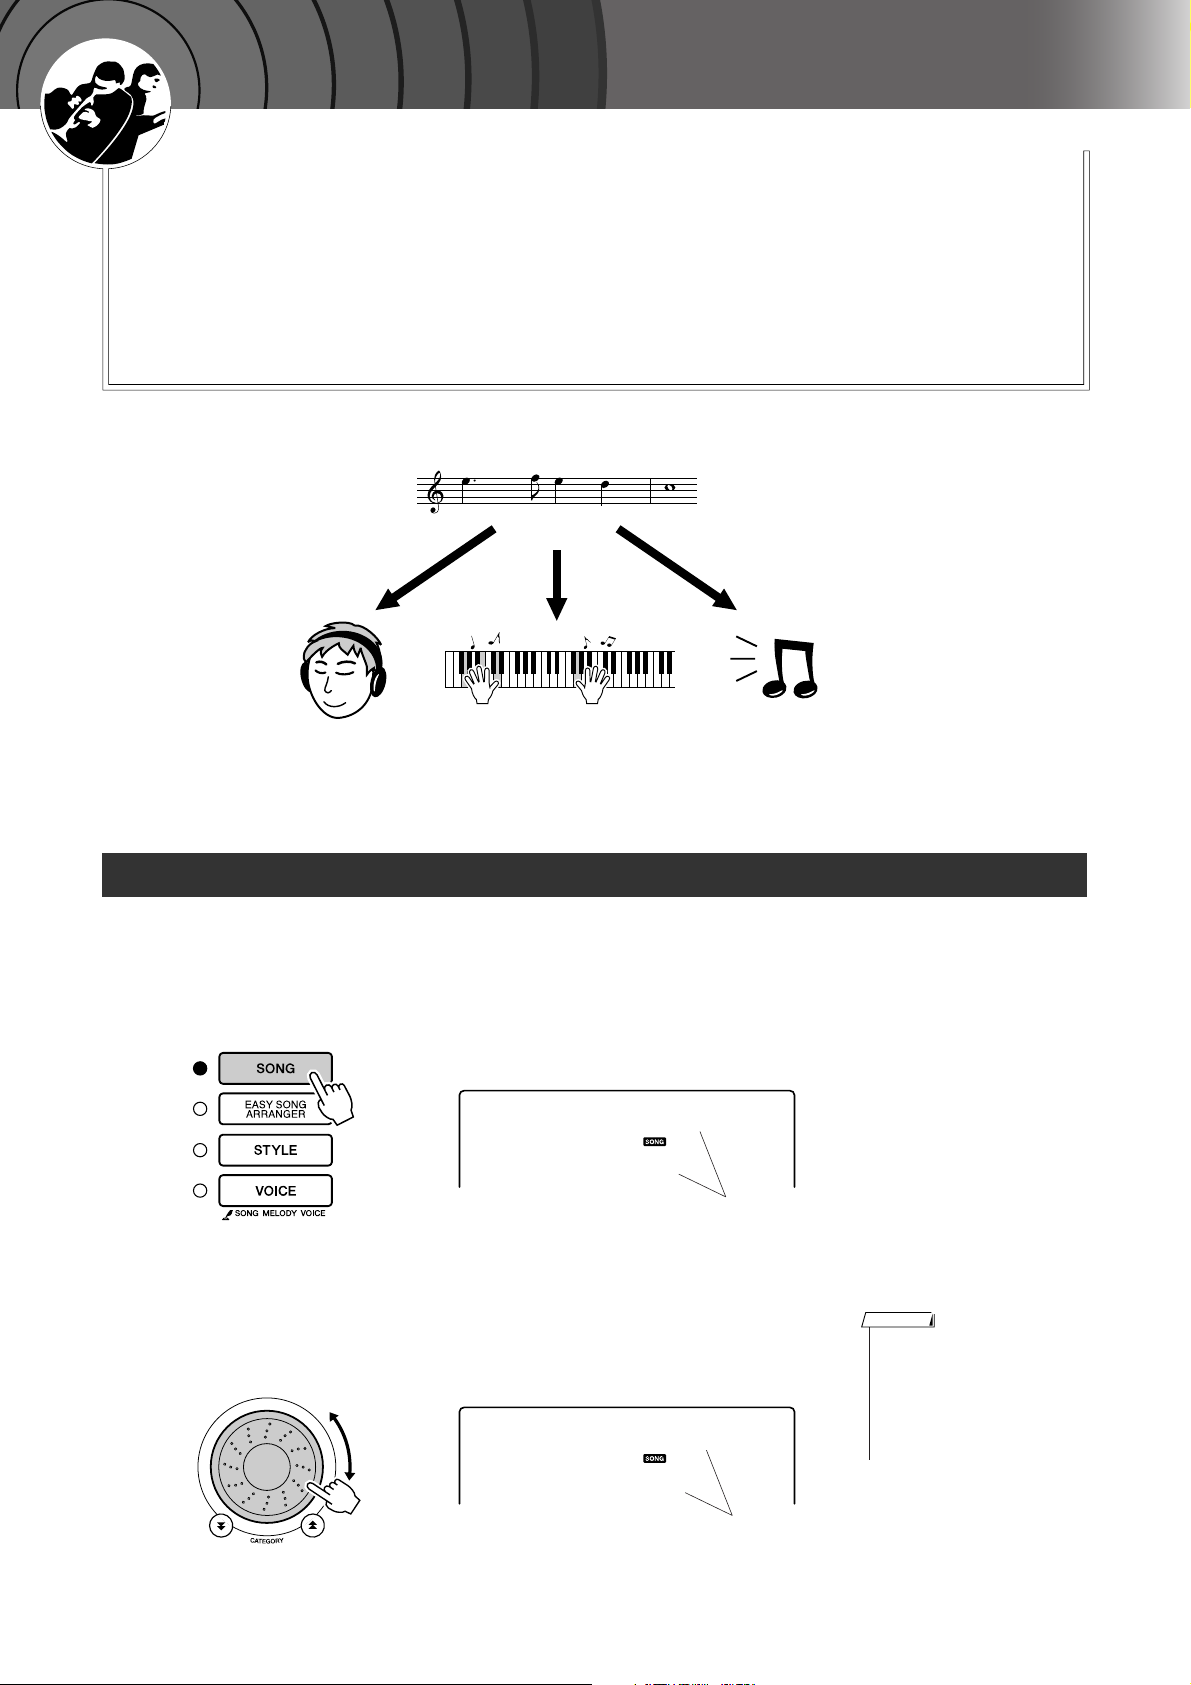
The Easy Way to Play Piano
This instrument includes a performance assistant technology feature
that lets you play along with a song and sound like a great pianist (even
though you might be making lots of mistakes)! In fact, you can play any
notes and still sound good! So even if you can’t play piano and can’t
read a note of music, you can have some musical fun.
Performance assistant technology offers two selectable types. Select the type that produces the best results
for you.
● Chord................. No matter where or what you play, the result will be musical, well-balanced
sound. This type offers the greatest freedom, allowing you to play anything
with both your left and right hands.
● Chord/Free (CHD/FREE)
...............If you can play simple right-hand melodies but have trouble with left-hand
chords, this is the type for you. The Chord type applies to only the left-hand
section of the keyboard, allowing you to easily play chords to support the
melody you are playing with your right hand.
Split point
Play your own melody with the right hand.
Refer to page 34 for more information on using performance assistant technology to help you play.
DGX-220/YPG-225 Owner’s Manual 29
The Easy Way to Play Piano
CHORD Type—Play with Both Hands
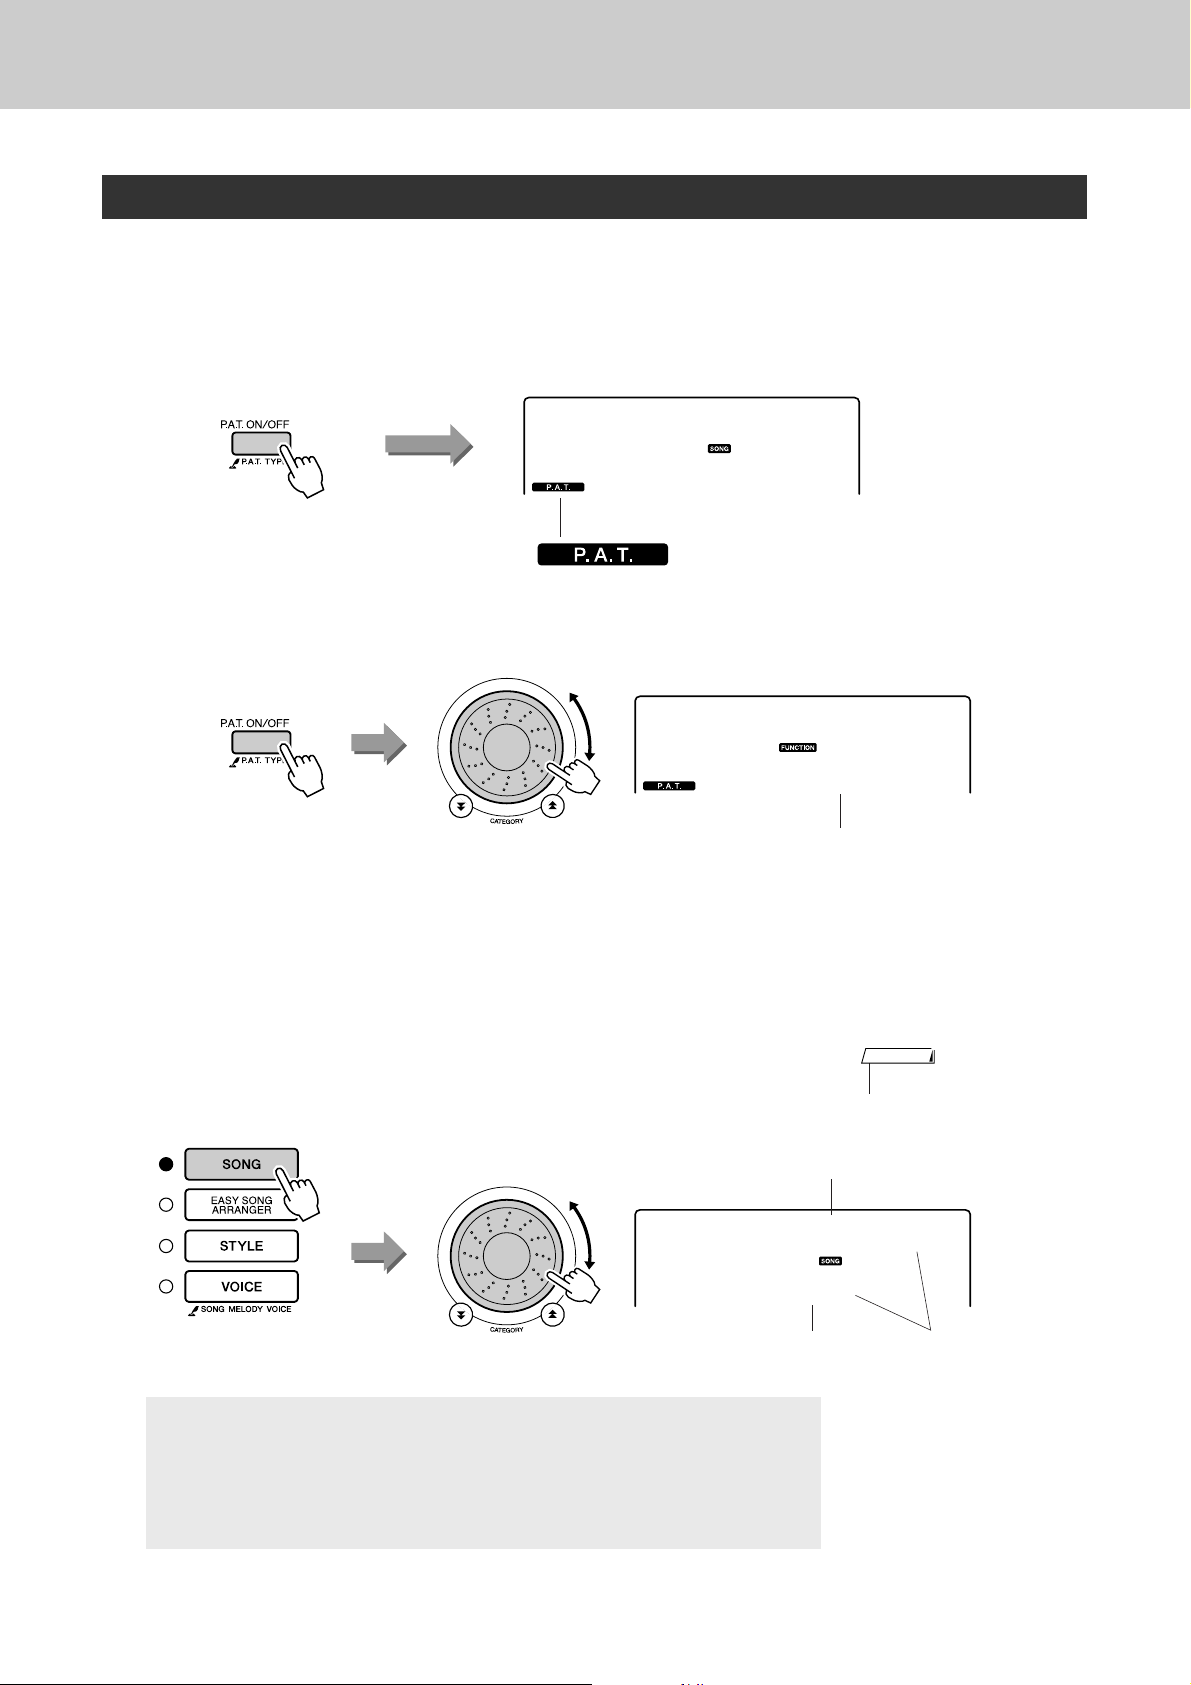
Press the [P.A.T. ON/OFF] button.
1
This turns on the performance assistant technology feature.
The P.A.T. icon will appear when the performance assistant technology
feature is on.
Press the [P.A.T. ON/OFF] button
to turn the function on or off.
Select the CHORD type.
2
Nocturne
011
Icon will appear when performance
assistant technology is on.
Hold for longer than
a second
Press and hold the [P.A.T. ON/OFF] button for longer than a second.
“PAT Type” appears in the display for a few seconds, then the currently
selected performance assistant technology type will be displayed. Select
the Chord type by using the dial.
Select a song.
3
Press the [SONG] button, and the Song Select display appears. Select a
song by using the dial. For this example try selecting the “010 Ave
Maria”.
CHORD
1
Select Chord
NOTE
• Using Songs (page 25)
Song name
AveMaria
010
● What is a Song?
You know the normal meaning of this word, but in this instrument the term
“Song” refers to the data that makes up a complete song. The performance
assistant technology features uses the chord and melody data, and should
always be used with a song (page 25).
30 DGX-220/YPG-225 Owner’s Manual
Song number
The song displayed here
will be played.
 Loading...