


SPECIAL MESSAGE SECTION
This product utilizes batteries or an external power supply (adapter). DO NOT connect this product to any power supply or adapter other than one described in the manual, on the name plate, or specifically recommended by Yamaha.
WARNING: Do not place this product in a position where anyone could walk on, trip over ,or roll anything over power or connecting cords of any kind. The use of an extension cord is not recommended! IF you must use an extension cord, the minimum wire size for a 25' cord (or less ) is 18 AWG. NOTE: The smaller the AWG number ,the larger the current handling capacity. For longer extension cords, consult a local electrician.
This product should be used only with the components supplied or; a cart, rack, or stand that is recommended by Yamaha. If a cart, etc., is used, please observe all safety markings and instructions that accompany the accessory product.
SPECIFICATIONS SUBJECT TO CHANGE:
The information contained in this manual is believed to be correct at the time of printing. However, Yamaha reserves the right to change or modify any of the specifications without notice or obligation to update existing units.
This product, either alone or in combination with an amplifier and headphones or speaker/s, may be capable of producing sound levels that could cause permanent hearing loss. DO NOT operate for long periods of time at a high volume level or at a level that is uncomfortable. If you experience any hearing loss or ringing in the ears, you should consult an audiologist.
IMPORTANT: The louder the sound, the shorter the time period before damage occurs.
Some Yamaha products may have benches and / or accessory mounting fixtures that are either supplied with the product or as optional accessories. Some of these items are designed to be dealer assembled or installed. Please make sure that benches are stable and any optional fixtures (where applicable) are well secured BEFORE using.
Benches supplied by Yamaha are designed for seating only. No other uses are recommended.
NOTICE:
Service charges incurred due to a lack of knowledge relating to how a function or effect works (when the unit is operating as designed) are not covered by the manufacturer’s warranty, and are therefore the owners responsibility. Please study this manual carefully and consult your dealer before requesting service.
ENVIRONMENTAL ISSUES:
Yamaha strives to produce products that are both user safe and environmentally friendly. We sincerely believe that our products and the production methods used to produce them, meet these goals. In keeping with both the letter and the spirit of the law, we want you to be aware of the following:
Battery Notice:
This product MAY contain a small non-rechargeable battery which (if applicable) is soldered in place. The average life span of this type of battery is approximately five years. When replacement becomes necessary, contact a qualified service representative to perform the replacement.
This product may also use “household” type batteries. Some of these may be rechargeable. Make sure that the battery being charged is a rechargeable type and that the charger is intended for the battery being charged.
When installing batteries, do not mix batteries with new, or with batteries of a different type. Batteries MUST be installed correctly. Mismatches or incorrect installation may result in overheating and battery case rupture.
Warning:
Do not attempt to disassemble, or incinerate any battery. Keep all batteries away from children. Dispose of used batteries promptly and as regulated by the laws in your area. Note: Check with any retailer of household type batteries in your area for battery disposal information.
Disposal Notice:
Should this product become damaged beyond repair, or for some reason its useful life is considered to be at an end, please observe all local, state, and federal regulations that relate to the disposal of products that contain lead, batteries, plastics, etc. If your dealer is unable to assist you, please contact Yamaha directly.
NAME PLATE LOCATION:
The name plate is located on the bottom of the product. The model number, serial number, power requirements, etc., are located on this plate. You should record the model number, serial number, and the date of purchase in the spaces provided below and retain this manual as a permanent record of your purchase.
Model
Serial No.
Purchase Date
PLEASE KEEP THIS MANUAL
92-BP (bottom)
2

FCC INFORMATION (U.S.A.)
1.IMPORTANT NOTICE: DO NOT MODIFY THIS UNIT!
This product, when installed as indicated in the instructions contained in this manual, meets FCC requirements. Modifications not expressly approved by Yamaha may void your authority, granted by the FCC, to use the product.
2.IMPORTANT: When connecting this product to accessories and/or another product use only high quality shielded cables. Cable/s supplied with this product MUST be used. Follow all installation instructions. Failure to follow instructions could void your FCC authorization to use this product in the USA.
3.NOTE: This product has been tested and found to comply with the requirements listed in FCC Regulations, Part 15 for Class “B” digital devices. Compliance with these requirements provides a reasonable level of assurance that your use of this product in a residential environment will not result in harmful interference with other electronic devices. This equipment generates/uses radio frequencies and, if not installed and used according to the instructions found in the users manual, may cause interference harmful to the operation of other electronic
devices. Compliance with FCC regulations does not guarantee that interference will not occur in all installations. If this product is found to be the source of interference, which can be determined by turning the unit “OFF” and “ON”, please try to eliminate the problem by using one of the following measures:
Relocate either this product or the device that is being affected by the interference.
Utilize power outlets that are on different branch (circuit breaker or fuse) circuits or install AC line filter/s.
In the case of radio or TV interference, relocate/reorient the antenna. If the antenna lead-in is 300 ohm ribbon lead, change the lead-in to co-axial type cable.
If these corrective measures do not produce satisfactory results, please contact the local retailer authorized to distribute this type of product. If you can not locate the appropriate retailer, please contact Yamaha Corporation of America, Electronic Service Division, 6600 Orangethorpe Ave, Buena Park, CA90620
The above statements apply ONLY to those products distributed by Yamaha Corporation of America or its subsidiaries.
* This applies only to products distributed by YAMAHA CORPORATION OF AMERICA. |
(class B) |
ADVARSEL!
Lithiumbatteri—Eksplosionsfare ved fejlagtig håndtering. Udskiftning må kun ske med batteri af samme fabrikat og type. Levér det brugte batteri tilbage til leverandoren.
VARNING
Explosionsfara vid felaktigt batteribyte. Använd samma batterityp eller en ekvivalent typ som rekommenderas av apparattillverkaren. Kassera använt batteri enligt fabrikantens instruktion.
VAROITUS
Paristo voi räjähtää, jos se on virheellisesti asennettu. Vaihda paristo ainoastaan laitevalmistajan suosittelemaan tyyppiin. Hävitä käytetty paristo valmistajan ohjeiden mukaisesti.
(lithium caution)
NEDERLAND / THE NETHERLANDS
•Dit apparaat bevat een lithium batterij voor geheugen back-up.
•This apparatus contains a lithium battery for memory back-up.
•Raadpleeg uw leverancier over de verwijdering van de batterij op het moment dat u het apparaat ann het einde van de levensduur afdankt of de volgende Yamaha Service Afdeiing:
Yamaha Music Nederland Service Afdeiing Kanaalweg 18-G, 3526 KL UTRECHT
Tel. 030-2828425
•For the removal of the battery at the moment of the disposal at the end of the service life please consult your retailer or Yamaha Service Center as follows:
Yamaha Music Nederland Service Center Address : Kanaalweg 18-G, 3526 KL UTRECHT
Tel : 030-2828425
•Gooi de batterij niet weg, maar lever hem in als KCA.
•Do not throw away the battery. Instead, hand it in as small chemical waste.
(lithium disposal)
3
PRECAUTIONS
PLEASE READ CAREFULLY BEFORE PROCEEDING
* Please keep these precautions in a safe place for future reference.
 WARNING
Always follow the basic precautions listed below to avoid the possibility of serious injury or even death from electrical shock, short-circuiting, damages, fire or other hazards. These precautions include, but are not limited to, the following:
•Do not open the instrument or attempt to disassemble the internal parts or modify them in any way. The instrument contains no user-serviceable parts. If it should appear to be malfunctioning, discontinue use immediately and have it inspected by qualified Yamaha service personnel.
•Do not expose the instrument to rain, use it near water or in damp or wet conditions, or place containers on it containing liquids which might spill into any openings.
•If the AC adaptor cord or plug becomes frayed or damaged, or if there is a sudden loss of sound during use of the instrument, or if any unusual smells or smoke should appear to be caused by it, immediately turn off the
power switch, disconnect the adaptor plug from the outlet, and have the instrument inspected by qualified Yamaha service personnel.
•Use the specified adaptor (PA-3B or an equivalent recommended by Yamaha) only. Using the wrong adaptor can result in damage to the instrument or overheating.
•Before cleaning the instrument, always remove the electric plug from the outlet. Never insert or remove an electric plug with wet hands.
•Check the electric plug periodically and remove any dirt or dust which may have accumulated on it.
 CAUTION
Always follow the basic precautions listed below to avoid the possibility of physical injury to you or others, or damage to the instrument or other property. These precautions include, but are not limited to, the following:
•Do not place the AC adaptor cord near heat sources such as heaters or radiators, and do not excessively bend or otherwise damage the cord, place heavy objects on it, or place it in a position where anyone could walk on, trip over, or roll anything over it.
•When removing the electric plug from the instrument or an outlet, always hold the plug itself and not the cord.
•Do not connect the instrument to an electrical outlet using a multiple-con- nector. Doing so can result in lower sound quality, or possibly cause overheating in the outlet.
•Unplug the AC power adaptor when not using the instrument, or during electrical storms.
•Before connecting the instrument to other electronic components, turn off the power for all components. Before turning the power on or off for all components, set all volume levels to minimum. Also, be sure to set the volumes of all components at their minimum levels and gradually raise the volume controls while playing the instrument to set the desired listening level.
•Do not expose the instrument to excessive dust or vibrations, or extreme cold or heat (such as in direct sunlight, near a heater, or in a car during the day) to prevent the possibility of panel disfiguration or damage to the internal components.
•Do not use the instrument near other electrical products such as televisions, radios, or speakers, since this might cause interference which can affect proper operation of the other products.
•Do not place the instrument in an unstable position where it might accidentally fall over.
•Before moving the instrument, remove all connected adaptor and other cables.
•When cleaning the instrument, use a soft, dry cloth. Do not use paint thinners, solvents, cleaning fluids, or chemical-impregnated wiping cloths. Also, do not place vinyl, plastic or rubber objects on the instrument, since this might discolor the panel or keyboard.
•Do not rest your weight on, or place heavy objects on the instrument, and do not use excessive force on the buttons, switches or connectors.
•Do not operate the instrument for a long period of time at a high or uncomfortable volume level, since this can cause permanent hearing loss. If you experience any hearing loss or ringing in the ears, consult a physician.
■ REPLACING THE BACKUP BATTERY
•This instrument contains a non rechargeable internal backup battery which permits internal data to remain stored even when the power is off. When the backup battery needs replacing, the message "Err1" appears in the display. When this happens, immediately back up your data (using an external device such as the floppy disk-based Yamaha MIDI Data Filer MDF3), then have qualified Yamaha service personnel replace the backup battery.
•Do not attempt to replace the backup battery yourself, in order to prevent the possible serious hazards. Always have qualified Yamaha service personnel replace the backup battery.
•Never place the backup battery in a location that a child can reach, since a child might accidentally swallow the battery. If this should happen, consult a physician immediately.
■ SAVING USER DATA
•Save all data to an external device such as the Yamaha MIDI Data Filer MDF3, in order to help prevent the loss of important data due to a malfunction or user operating error.
Yamaha cannot be held responsible for damage caused by improper use or modifications to the instrument, or data that is lost or destroyed.
Always turn the power off when the instrument is not in use.
(3)-6
4
Congratulations and thank you for purchasing the Yamaha AN200 Desktop Control Synthesizer!
The AN200 is a combination tone generator and sequencer that puts an enormous amount of sonic power and real-time performance control in an exceptionally compact and easy-to-use “desktop” package. As one of the Loopfactory group of instruments, it’s an amazingly high-quality and versatile tool for loop-based music production. Use it on your gigs, as part of your DJ setup — or as your secret weapon in your studio arsenal.
With eighteen knobs and umpteen switches, many of them “dedicated” — meaning that a control does specifically and ONLY what its name indicates — the AN200 is a synthesizer control freak’s dream.
Powering the incredibly rich and huge analog-like Voices of the AN200 is the Analog Physical Modeling synthesis system. It not only features the same familiar oscillator, filter and other soundshaping controls found on traditional analog synthesizers — it gives you the full spectrum of warm, fat, and punchy sounds that made those legendary instruments famous.
Play the exceptionally high-quality analog-style Voices of the AN200 with full 5-note polyphony
— from the built-in keyboard or from a MIDI device. Use the built-in 16-step sequencer to create your own synth and rhythm sequences. And power up the full-featured AN200 Editor on your computer — to tap into ALL the amazing sonic power the AN200 has to offer.
There’s a lot of important, helpful information in these pages. So read through this manual carefully — and get the most out of your sophisticated new AN200.
● Packing List
The following items have been included with your AN200. Check to see that you have everything listed here.
•Owner's Manual
•CD-ROM
•AC Power Adaptor*
*Power supply recommendation may vary from country to country. Please check with your nearest Yamaha dealer for further details.
*The company names and product names in this Owner’s Manual are the trademarks or registered trademarks of their respective companies.
*The screens as illustrated in this owner’s manual are for instructional purposes only, and may appear somewhat different from the ones of your instrument.
5

Contents |
|
Contents ............................................................ |
6 |
|
|
How to Use This Manual .................................. |
8 |
|
|
Panel Controls .................................................. |
9 |
|
|
Quick Start Guide ........................................... |
11 |
|
|
Parameter Structure ....................................... |
12 |
|
|
Tone Generator Signal Flow & |
|
|
|
|
Effect Block Diagram .............................. |
13 |
|
Chapter 1 |
|
|
|
Pattern Basics ........................ |
15 |
|
|
Tip 1 |
Playing a Pattern ............................................... |
15 |
|
Tip 2 |
Exploring other Patterns.................................... |
15 |
|
Tip 3 |
Switching Patterns on the fly ............................ |
16 |
|
Tip 4 |
Playing it backwards ......................................... |
17 |
|
Tip 5 |
Changing the bpm ............................................. |
17 |
|
Tip 6 |
Messing with the Beat....................................... |
18 |
|
Tip 7 |
Double time, half time....................................... |
18 |
|
Chapter 2 |
|
|
|
Song Playback......................... |
19 |
|
|
Tip 8 |
Playing a Song................................................... |
19 |
|
Chapter 3 |
|
|
|
The Keyboard.......................... |
20 |
|
|
Tip 9 |
Playing the keyboard......................................... |
20 |
|
Tip 10 |
Changing octaves .............................................. |
20 |
|
Tip 11 |
Playing the Rhythm track.................................. |
21 |
|
Tip 12 |
Velocity ............................................................. |
21 |
|
Chapter 4 |
|
|
|
Scene Basics........................... |
22 |
|
|
Tip 13 |
Switching Scenes .............................................. |
22 |
|
Tip 14 |
Morphing........................................................... |
22 |
|
Chapter 5 |
|
|
|
Effects.................................... |
23 |
|
|
Tip 15 |
What is an Effect? ............................................. |
23 |
|
Tip 16 |
Playing with the Effects .................................... |
24 |
|
Tip 17 |
Distortion........................................................... |
26 |
|
Chapter 6 |
|
|
|
Filter (VCF) .............................. |
27 |
|
|
Tip 18 |
Cutoff and Resonance ....................................... |
27 |
|
Tip 19 |
Wild, wild filter sweeps — VCF Types............ |
28 |
|
Tip 20 |
FEG Depth ........................................................ |
30 |
|
Chapter 7 |
|
|
|
Nuts and Bolts ........................ |
31 |
|
|
Tip 21 |
Show Value ....................................................... |
31 |
|
Tip 22 |
Original Value................................................... |
32 |
|
Tip 23 |
Panic! (or “Uh-oh...What do I do now?”) ......... |
33 |
6 |
Tip 24 |
Factory Reset..................................................... |
34 |
Chapter 8 |
|
|
Pattern Playback .................... |
35 |
|
Tip 25 Adjusting the Gate Time.................................... |
35 |
|
Tip 26 Transposing the key ........................................... |
36 |
|
Tip 27 |
Swing ................................................................. |
37 |
Tip 28 |
Muting tracks ..................................................... |
37 |
Tip 29 Muting notes during playback ........................... |
38 |
|
Tip 30 Mixer controls — Pan and Volume ................... |
39 |
|
Tip 31 Assigning Patterns to the keyboard buttons....... |
40 |
|
Chapter 9 |
|
|
LFO Modulation........................ |
41 |
|
Tip 32 Modulating the volume...................................... |
41 |
|
Tip 33 Modulating the Filter ......................................... |
42 |
|
Tip 34 Modulating the pitch.......................................... |
42 |
|
Tip 35 Changing the LFO wave .................................... |
43 |
|
Chapter 10 |
|
|
EG Basics ............................... |
46 |
|
Tip 36 Shaping the sound with EG ............................... |
46 |
|
Tip 37 Using EG to control the Filter (FEG) ................ |
49 |
|
Tip 38 More about FEG Depth...................................... |
50 |
|
Tip 39 Going negative — with FEG Depth .................. |
51 |
|
Chapter 11 |
|
|
Advanced Sound Shaping |
|
|
Controls ................................. |
52 |
|
Tip 40 Portamento — the famous gliding pitch effect..52 |
||
Tip 41 Metallic sounds and more — with FM Depth |
...53 |
|
Tip 42 Balancing the waves — VCO 1 and 2 ............... |
54 |
|
Tip 43 |
Noise Level ........................................................ |
55 |
Tip 44 Making waves — VCO 1 and VCO 2 ............... |
55 |
|
Tip 45 Fat, phatter and phattest!.................................... |
57 |
|
Tip 46 Sync Mode and Sync Pitch ................................ |
58 |
|
Tip 47 Creating your own original Scenes — |
|
|
|
and saving them ................................................. |
59 |
Chapter 12 |
|
|
Free EG .................................. |
60 |
|
Tip 48 |
Free EG .............................................................. |
60 |
Tip 49 Changing the Length of your Free EG tracks .... |
62 |
|
Chapter 13 |
|
|
Pattern Power Tips................. |
63 |
|
Tip 50 Hit the top of the Pattern! .................................. |
63 |
|
Tip 51 Shake, Retrigger, and Roll!................................ |
64 |
|
Tip 52 Selecting a Voice (Copy Voice) ........................ |
65 |
|
Tip 53 Starting a Pattern on a different note ................. |
65 |
|
Tip 54 Transposing the pitch of a Pattern ..................... |
66 |
|
Tip 55 Copying a Pattern (Sequence)............................ |
67 |
|


 Contents


Chapter 14 Chapter 19
Pattern Recording................... |
68 Master Class 2 — |
|
|
|
|
Tip 56 Erasing a Pattern — and starting from scratch.. 68 |
Advanced Music Production ... |
103 |
|
|
|
Tip 57 Setting the Metronome lead-in.......................... |
69 |
Tip 86 Playing the AN200 as a synthesizer ................ |
103 |
|
|
Tip 58 Recording a Pattern in real time........................ |
70 |
Tip 87 Recording to a sequencer................................. |
104 |
|
|
Tip 59 Step Recording .................................................. |
72 |
Tip 88 Recording AN200 knob moves to a sequencer105 |
|
||
Tip 60 Storing your new Pattern................................... |
79 |
Tip 89 Editing the AN200 from a computer ............... |
106 |
|
|
|
|
Tip 90 MIDI sequencer controls — |
|
|
|
Chapter 15 |
|
Start, Continue, Stop........................................ |
107 |
|
|
|
Tip 91 Saving Patterns and Songs to a MIDI data |
|
|
|
|
Song Recording ....................... |
81 |
108 |
|
|
|
Tip 61 Erasing a Song — and starting from scratch |
81 |
filer................................................................... |
|
|
|
Tip 92 Loading back your saved Patterns and Songs..109 |
|
||||
Tip 62 Creating a Song |
82 |
|
|||
|
|
|
|
||
Tip 63 Setting the BPM (tempo) for your new Song.... |
84 |
|
|
|
|
Tip 64 More Song editing features ............................... |
85 |
|
|
|
|
Tip 65 Adding Patterns to your Song — Insert Pattern 87 |
|
|
|
|
|
Tip 66 Taking Patterns out of your Song — |
|
|
|
|
|
Delete Pattern .................................................... |
88 |
|
|
|
|
Appendix |
|
|
|
||
Tip 67 Storing your new Song...................................... |
89 |
|
|
|
|
|
|
|
|
|
|
|
|
Function Index............................................... |
110 |
|
|
|
|
|
|||
Chapter 16 |
|
About the Included CD-ROM ........................ |
112 |
|
|
Speed Tips for Power Users |
90 |
Specifications ................................................ |
114 |
|
|
Error Messages |
114 |
|
|
||
Tip 68 Using [SHIFT] with the [DATA] knob — |
|
|
|
||
|
Troubleshooting |
115 |
|
|
|
for leaps and bounds! |
90 |
|
|
||
Analog Physical Modeling Synthesis |
|
|
|
||
Tip 69 Using [SHIFT] to “hold” a setting |
91 |
|
|
|
|
and the AN200 |
116 |
|
|
||
Tip 70 Gang-editing a group of Steps |
91 |
|
|
||
MIDI Data Format |
118 |
|
|
||
|
|
|
|
||
|
|
...........................MIDI Implementation Chart |
139 |
|
|
Chapter 17 |
|
Rhythm Track Instrument List ..................... |
140 |
|
|
Real World Tips ....................... |
92 |
Pattern List..................................................... |
141 |
|
|
7
How to Use This Manual |
How to USE a manual? Sounds a bit obvious, we admit. (“Open it and read it.”) But here goes:
1 Go straight to the Quick Start Guide.
This tells you simply and in no uncertain terms how to set up your new AN200 and get sound out of it.
2 Work through the 92 Tips.
These are practical, no-nonsense applications that get you actually USING the machine.
If this is your first tone generator or synthesizer, fire up the AN200, open up the manual to Tip 1, and go from there. Think of it as a game — the more tips you complete, the better you know the machine, and the sooner you can reach your goal of becoming a true synth wizard. Pay particularly close attention to the Power Hints scattered throughout — they’re great for further exploration.
If you have years of experience with analog synthesizers, and know all about cutoff frequency, resonance, pulse waves, amplitude modulation, LFOs, VCOs, EGs, and MIDI — and you even dream in hexadecimal — skim through the tips anyway. There’s bound to be some interesting and helpful stuff here, no matter what your level of expertise. If you need some pertinent info quickly, check the Tech Talk boxes.
3 Refer to the Appendix when necessary.
Lots of helpful, convenient information in this section, too. If something doesn’t work as expected, go to Troubleshooting (page 115). If you want a clear, concise explanation of how the synthesizer of the AN200 works, see Analog Physical Modeling Synthesis and the AN200 (page 116). If you’re not sure where to go for help but you’ve got a key word in mind, check the Contents (page 6) or look through the
Function Index (page 110).
Have fun!
8
Panel Controls |
|
|
|
|
|
|
|
|
|
Main |
|
|
|
|
|
|
|
|
|
|
|
|
|
Voice |
|
|
|||||||
|
|
|
|
|
|
|
|
|
|
|
|
|
|
|
|
|
|
|
|
|
|
|
|
|
|
|
|
|
|
|
|
|
|
|
|
|
|
|
|
|
|
|
|
|
|
|
|
|
|
|
|
|
|
|
|
|
|
|
|
|
|
|
|
|
|
|
|
|
|
|
|
|
|
|
|
|
|
|
|
|
|
|
|
|
|
|
|
|
|
|
|
|
|
|
|
|
|
|
|
|
|
|
|
|
|
|
|
|
|
|
|
|
|
|
|
|
|
|
|
|
|
|
|
|
|
|
|
|
|
|
|
|
|
|
|
|
|
|
|
|
|
|
|
|
|
|
|
|
|
|
|
|
|
|
|
|
|
|
|
|
|
|
|
|
|
|
|
|
|
|
|
|
|
|
|
|
|
|
|
|
|
|
|
|
|
|
|
|
|
|
|
|
|
|
|
|
|
|
|
|
|
|
|
|
|
|
|
|
|
|
|
|
|
|
|
|
|
|
|
|
|
|
|
|
|
|
|
|
|
|
|
|
|
|
|
|
|
|
|
|
|
|
|
|
|
|
|
|
|
|
|
|
|
|
|
|
|
|
|
|
|
|
|
|
|
|
|
|
|
|
|
|
|
|
|
|
|
|
|
|
|
|
|
|
|
|
|
|
|
|
|
|
|
|
|
|
|
|
|
|
|
|
|
|
|
|
|
|
|
|
|
|
|
|
|
|
|
|
|
|
|
|
|
|
|
|
|
|
|
|
|
|
|
|
|
|
|
|
|
|
|
|
|
|
|
|
|
|
|
|
|
|
|
|
|
|
|
|
|
|
|
|
|
|
|
|
|
|
|
|
|
|
|
|
|
|
|
|
|
|
|
|
|
|
|
|
|
|
|
|
|
|
|
|
|
|
|
|
|
|
|
|
|
|
|
|
|
|
|
|
|
|
|
|
|
|
|
|
|
|
|
|
|
|
|
|
|
|
|
|
|
|
|
|
|
|
|
|
|
|
|
|
|
|
|
|
|
|
|
|
|
|
|
|
|
|
|
|
|
|
|
|
|
|
|
|
|
|
|
|
|
|
|
|
|
|
|
|
|
|
|
|
|
|
|
|
|
|
|
|
|
|
|
|
|
|
|
|
|
|
|
|
|
|
|
|
|
|
|
|
|
|
|
|
|
|
|
|
|
|
|
|
|
|
|
|
|
|
|
|
|
|
|
|
|
|
|
|
|
|
|
|
|
|
|
|
|
|
|
|
|
|
|
|
|
|
|
|
|
|
|
|
|
|
|
|
|
|
|
|
|
|
|
|
|
|
|
|
|
|
|
|
|
|
|
|
|
|
|
|
|
|
|
|
|
|
|
|
|
|
|
|
|
|
|
|
|
|
|
|
|
|
|
|
|
|
|
|
|
|
|
|
|
|
|
|
|
|
|
|
|
|
|
|
|
|
|
|
|
|
|
|
|
|
|
|
|
|
|
|
|
|
|
|
|
|
|
|
|
|
|
|
|
|
|
|
|
|
|
|
|
|
|
|
|
|
|
|
|
|
|
|
|
|
|
|
|
|
|
|
|
|
|
|
|
|
|
|
|
|
|
|
|
|
|
|
|
|
|
|
|
|
|
|
|
|
|
|
|
|
|
|
|
|
|
|
|
|
|
|
|
|
|
|
|
|
|
|
|
|
|
|
|
|
|
|
|
|
|
|
|
|
|
|
|
|
|
|
|
|
|
|
|
|
|
|
|
|
|
|
|
|
|
|
|
|
|
|
|
|
|
|
|
|
|
|
|
|
|
|
|
|
|
|
|
|
|
|
|
|
|
|
|
|
|
|
|
|
|
|
|
|
|
|
|
|
|
|
|
|
|
|
|
|
|
|
|
|
|
|
|
|
|
|
|
|
|
|
|
|
|
|
|
|
|
|
|
|
|
|
|
|
|
|
|
|
|
Control |
|
Keyboard |
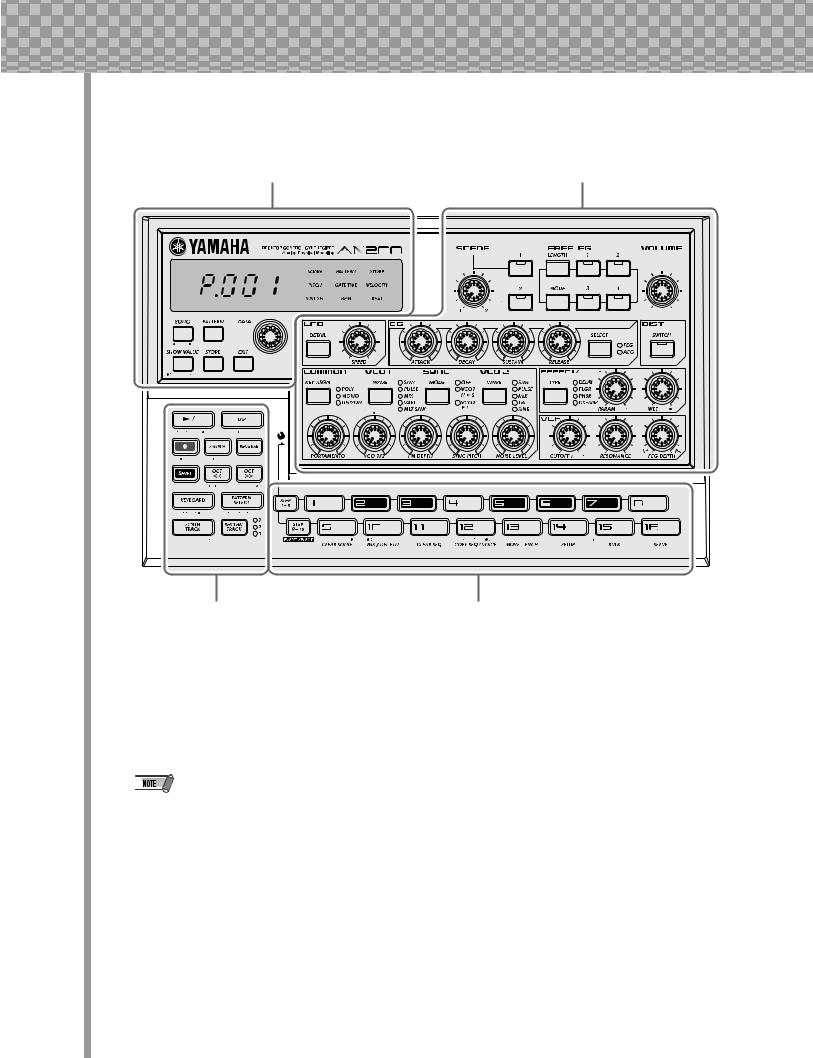
Here’s a quick way to get familiar with your AN200! The front (or top) panel of the AN200 can be roughly divided into four sections: Main, Control, Voice, and Keyboard. Look through the controls here, and check out the Tips related to each of them for more information.
The Tip references by each control are not meant to be comprehensive. They either give the first (or main) Tip in which the control appears, or the group of Tips that are most closely related.
9

Panel Controls |
Main
These are the fundamental controls of the AN200 — for changing modes, adjusting values, exiting from functions, and so on.
|
Display and indicators |
|
|
[SONG] .................................. |
Tips 8, 62 |
|
[PATTERN] ..................................... |
Tip 1 |
|
[DATA] knob ............................ |
Tips 2, 68 |
|
[SHOW VALUE] ....................... |
Tips 21, 22 |
|
[STORE]........................... |
Tips 47, 60, 67 |
|
[EXIT]......................................... |
Tip 23 |
|
|
|
|
|
|
Voice
These controls are for editing and changing the sound of the Voices.
[SCENE] ................................ |
Tips 13, 14 |
[FREE EG] .............................. |
Tips 48, 49 |
[VOLUME] |
|
[LFO]................................. |
Tips 32 — 35 |
[EG] .................................. |
Tips 36 — 39 |
[DIST]......................................... |
Tip 17 |
[COMMON]................................... |
Tip 45 |
[VCO 1] ....................................... |
Tip 44 |
[SYNC]........................................ |
Tip 46 |
[VCO 2] ....................................... |
Tip 44 |
[EFFECT/MIXER] ................. |
Tips 15, 16, 30 |
[PORTAMENTO] ............................. |
Tip 40 |
[FM DEPTH] ................................. |
Tip 41 |
[NOISE LEVEL] .............................. |
Tip 43 |
[VCF]................................. |
Tips 18 — 20 |
Control
For the most part, these buttons are related to the Patterns — especially for controlling record and playback operations.
Start/Stop ...................................... |
Tip 1 |
[TAP] ........................................... |
Tip 5 |
Record ....................... |
Tips 48, 50, 58, 59 |
[SWING] ................................ |
Tips 6, 27 |
[REVERSE].............................. |
Tips 4, 25 |
[SHIFT]................................. |
Tips 68, 69 |
[OCT <<] ............................... |
Tips 10, 62 |
[OCT >>] ............................... |
Tips 10, 62 |
[KEYBOARD] ........................... |
Tips 9, 26 |
[PATTERN SELECT]........... |
Tips 3, 31, 77, 78 |
[SYNTH TRACK]............................. |
Tip 28 |
[RHYTHM TRACK] .......................... |
Tip 28 |
Keyboard
The Keyboard section has several main uses:
• Playing the Voices |
................... Tips 9, |
86 |
• Selecting Patterns ...... |
Tips 2, 3, 31, 77, |
78 |
• Controlling the Sequence Steps
..................................... Tips 29, 58, 59
• Selecting functions and operations
. Tips 28, 51 – 57, 59, 61, 65, 66, 79, 80, 85, 90 – 92
10
Quick Start Guide |
Once that you’ve got the AN200 out of the box and checked that all included items were indeed included, it’s time to set everything up and get playing.
1Turn the VOLUME control all the way down to the minimum.
2Connect the OUTPUT jacks (L/MONO and R) to the inputs of your
recorder/mixer/amplifier.
If you’re using a mono system, use only the L/MONO jack. If you’re using headphones, connect them to the PHONES jack.
AN200 |
DC IN |
OUTPUT |
|
|
PHONES |
AC outlet |
AC |
|
|
|
|
|
Adaptor |
|
|
|
Headphones |
|
Mixer |
|
Recorder |
|
Amplifer |
or |
|
or |
3Plug in the included power adaptor — first, one end into the DC IN terminal, then the other into an AC outlet.
4Turn on the power with the rear panel power switch. Then, turn on the power of your recorder/mixer/amplifier.
The AN200 takes a little time to “warm up” after being turned on – roughly 20 seconds. After the startup routine is finished, your AN200 is ready to play.
5 Press the Start/Stop button on the AN200 to start a Pattern and slowly turn up the VOLUME control until the level is appropriate.
To stop the Pattern, simply press the Start/Stop button again.
And that’s all there is to it. Now go on to the Tips and start playing!
11
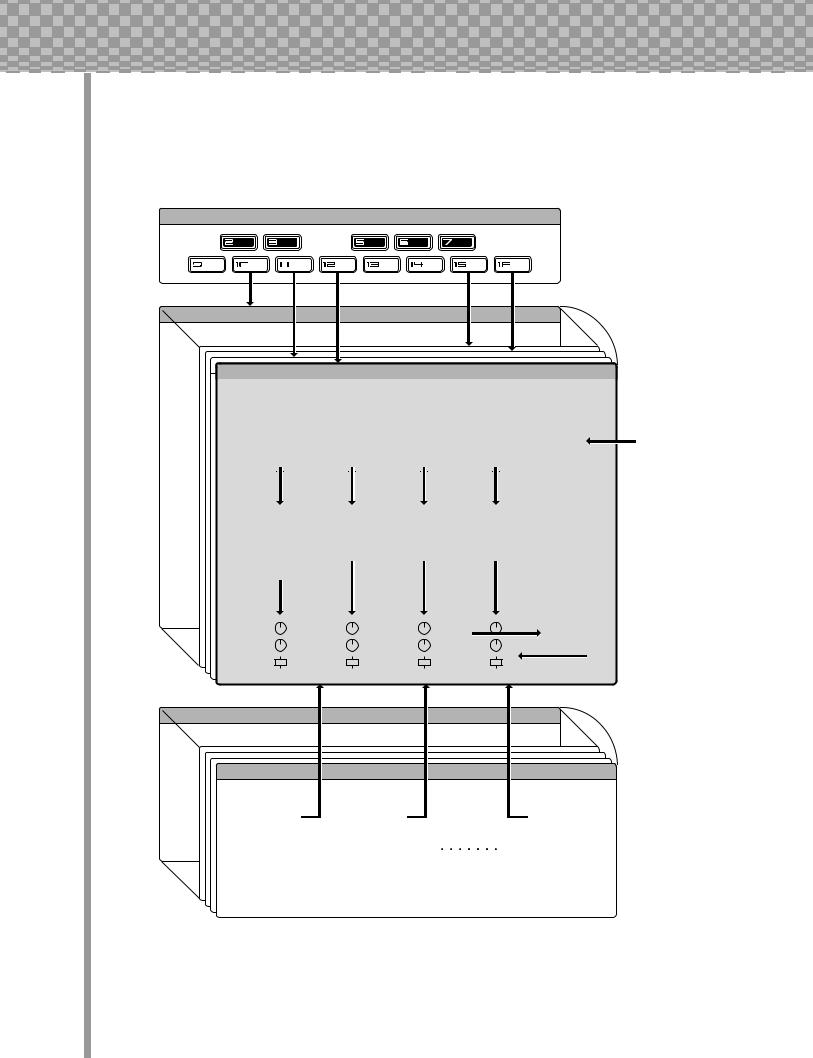
Parameter Structure |
This diagram shows the structure and hierarchy of the Songs, Patterns and Voices of the AN200. As you work with the AN200 and explore its various functions and features, refer back to this diagram to see how all the pieces of the puzzle fit together.
Pattern Select Setup
|
User Pattern 128 |
|
|
|
|
|
|
|
|
|
|
|
|
|
|
|
|
|
|
|
|
|
|
|
|
|
|
|
|
|
256 Preset Patterns |
||||||||||||
|
|
|
|
|
|
|
|
|
|
|
|
|
|
|
|
|
|
|
|
|
|
|
|
|
|
|
|
|
|
|
|
|
|
|
|
|
|
|
|
128 User Patterns |
|||
|
|
|
|
|
|
|
|
|
|
|
|
|
|
|
|
|
|
|
|
|
|
|
|
|
|
|
|
|
|
|
|
|
|
|
|
|
|
|
|
|
|
|
|
|
|
|
|
|
|
|
|
|
|
|
|
|
|
|
|
|
|
|
|
|
|
|
|
|
|
|
|
|
|
|
|
|
|
|
|
|
|
|
|
|
|
|
|
|
|
|
|
Preset Pattern 1 |
|
|
|
|
|
|
|
|
|
|
|
|
|
|
|
|
|
|
|
|
|
|
|
|
|
|
|
|
|
|
|||||||||
|
|
|
|
|
|
|
|
|
|
|
|
|
|
|
|
|
|
|
|
|
|
|
|
|
|
|
|
|
|
|
|
|
|
|
|
|
|
|
|
|
|
|
|
|
|
|
|
|
|
Sequence |
|
|
|
|
|
|
|
|
|
|
|
|
|
|
|
|
|
|
|
|
|
|
|
|
|
|
|
|
|
|
|||||||
|
|
|
|
|
|
|
|
|
|
|
|
|
|
|
|
|
|
|
|
|
|
|
|
|
|
|
|
|
|
|
|
|
|
|
|
|
|
|
|
|
|||
|
|
|
|
|
|
|
Synth |
|
|
|
|
Rhythm |
|
Rhythm |
|
Rhythm |
|
|
|
|
|
|
|
|
System |
|
|||||||||||||||||
|
|
|
|
|
|
|
Track |
|
|
|
|
Track 1 |
|
Track 2 |
|
Track 3 |
|
BPM |
|
|
|
|
|
Gate Time |
|
||||||||||||||||||
|
|
|
|
|
|
|
|
|
|||||||||||||||||||||||||||||||||||
|
|
|
|
|
|
|
|
|
|
|
|
|
|
|
|
|
|
|
|
|
|
|
|
|
|
|
|
|
|
|
|
|
|
|
Beat |
|
|
|
|
|
|
|
|
|
|
|
|
|
|
|
|
Step |
|
|
|
|
|
Step |
|
|
Step |
|
|
|
|
Step |
|
|
|
|
|
|
|
|
|
Reverse |
|
||||||||||
|
|
|
|
|
|
|
|
|
|
|
|
|
|
|
|
|
|
|
|
|
|
|
Swing |
|
|
|
|
|
|
|
|||||||||||||
|
|
|
|
|
1 |
|
16 |
|
|
|
1 |
|
|
16 |
|
|
|
1 |
|
16 |
|
|
|
1 |
|
16 |
|
|
|
|
|
|
|
|
|
|
|
|
|||||
|
|
|
|
|
|
|
|
|
|
|
|
|
|
|
|
|
|
|
|
|
|
|
|
|
|
|
|
|
|
|
|
|
|
||||||||||
|
|
|
|
|
|
|
|
|
|
|
|
|
|
|
|
|
|
|
|
|
|
|
|
|
|
|
|
|
|
|
|
|
|
|
|
|
|
|
|
|
|
|
|
|
|
|
|
|
|
|
|
|
|
|
|
|
|
|
|
|
|
|
|
|
|
|
|
|
|
|
|
|
|
|
|
|
|
|
|
|
|
|
|
|
|
|
|
|
|
|
|
|
|
|
|
|
|
|
|
|
|
|
|
|
|
|
|
|
|
|
|
|
|
|
|
|
|
|
|
|
|
|
|
|
|
|
|
||||
|
|
|
|
|
|
|
Synth |
|
|
|
|
Rhythm |
|
Rhythm |
|
Rhythm |
|
|
|
|
|
|
|
|
|
|
|||||||||||||||||
|
|
|
|
|
|
|
Voice |
|
|
|
|
Voice 1 |
|
Voice 2 |
|
Voice 3 |
|
|
|
|
|
|
|
|
|
|
|||||||||||||||||
|
|
|
|
|
|
|
|
LFO |
|
|
|
|
Cutoff |
|
Cutoff |
|
|
|
Cutoff |
|
|
|
|
|
|
|
|
|
|
|
|
|
|||||||||||
|
|
|
|
|
|
|
|
EG |
|
|
|
|
Resonance |
|
Resonance |
|
Resonance |
|
|
|
|
|
|
|
|
|
|
||||||||||||||||
|
|
|
|
|
|
|
|
etc. |
|
|
|
|
|
|
|
|
|
|
|
|
|
|
|
|
|
|
|
|
|
|
|
|
|
|
|
|
|
|
|
|
|
|
|
|
|
|
|
|
|
|
|
|
|
|
|
|
|
|
|
|
|
|
|
|
|
|
|
|
|
|
|
|
|
|
|
|
|
|
|
|
|
|
|
|
|
||
|
|
|
|
|
|
|
|
|
|
|
|
|
|
|
|
|
|
|
|
|
|
|
|
|
|
|
|
|
|
|
|
|
|
|
|
|
|
|
|
|
|||
|
|
|
|
|
|
|
|
Free EG |
|
|
|
|
|
|
|
|
|
|
|
|
|
|
|
|
|
|
|
|
|
|
|
|
|
|
|
|
|
|
|
|
|||
|
|
|
|
|
|
|
|
|
|
|
|
|
|
|
|
|
|
|
|
|
|
|
|
|
|
|
|
|
|
|
|
|
|
|
|
|
|
|
|
|
|
|
|
|
|
|
|
|
|
|
|
|
|
|
|
|
|
|
|
|
|
|
|
|
|
|
|
|
|
|
|
|
|
|
|
|
|
|
|
|
|
|
|
|
|
|
|
|
|
|
|
|
|
Pan |
|
|
|
|
|
|
|
|
|
|
|
|
|
|
|
|
|
|
|
|
|
|
|
|
|
Effect |
|
|
|
|
|
|
|||||
|
|
|
|
|
|
|
|
|
|
|
|
|
|
|
|
|
|
|
|
|
|
|
|
|
|
|
|
|
|
|
|
|
|
|
|
|
|
|
|
||||
|
|
|
|
|
|
Wet |
|
|
|
|
|
|
|
|
|
|
|
|
|
|
|
|
|
|
|
|
|
|
|
|
|
Type |
|
|
|
|
|
|
|||||
|
|
|
|
|
|
Vol |
|
|
|
|
|
|
|
|
|
|
|
|
|
|
|
|
|
|
|
|
|
|
|
|
|
|
Param |
|
|
|
|
|
|
||||
|
|
|
|
|
|
|
|
|
|
|
|
|
|
|
|
|
|
|
|
|
|
|
|
|
|
|
|
|
|
|
|
|
|
|
|
|
|
|
|
|
|||
|
|
|
|
|
|
|
|
|
|
|
|
|
|
|
|
|
|
|
|
|
|
|
|
|
|
|
|
|
|
|
|
|
|
|
|
|
|
|
|
|
|||
|
Song 10 |
|
|
|
|
|
|
|
|
|
|
|
|
|
|
|
|
|
|
|
|
|
|
|
|
|
|
|
|
|
|
10 User Songs |
|||||||||||
|
|
|
|
|
|
|
|
|
|
|
|
|
|
|
|
|
|
|
|
|
|
|
|
|
|
|
|
|
|
|
|
|
|
|
|
|
|
|
|
||||
|
|
|
|
|
|
|
|
|
|
|
|
|
|
|
|
|
|
|
|
|
|
|
|
|
|
|
|
|
|
|
|
|
|
|
|
|
|
|
|
|
|
|
|
|
|
|
|
Song 1 |
|
|
|
|
|
|
|
|
|
|
|
|
|
|
|
|
|
|
|
|
|
|
|
|
|
|
|
|
|
|
|
|
|
|
|||||
|
|
|
|
|
|
|
|
|
|
|
|
|
|
|
|
|
|
|
|
|
|
|
|
|
|
|
|
|
|
|
|
|
|
|
|
|
|
|
|
|
|
|
|
|
|
|
|
|
Measure 1 |
|
|
|
|
Measure 2 |
|
|
|
|
|
|
|
|
|
|
Measure 256 |
|
|
|
|
|
|
||||||||||||||||
|
|
|
|
|
|
|
|
|
|
|
|
|
|
|
|
|
|
|
|
|
|
|
|
|
|
|
|
|
|
|
|
|
|
|
|
|
|
|
|
|
|
|
|
|
|
|
|
|
|
Pattern No. |
|
|
|
|
|
|
Pattern No. |
|
|
|
|
|
|
|
|
|
|
|
Pattern No. |
|
|
|
|
|
|
|
|||||||||||
|
|
|
|
|
|
Pitch Offset |
|
|
|
|
Pitch Offset |
|
|
|
|
|
|
|
|
|
|
Pitch Offset |
|
|
|
|
|
|
|||||||||||||||
|
|
|
|
|
|
Beat |
|
|
|
|
|
|
|
Beat |
|
|
|
|
|
|
|
|
|
|
|
|
|
Beat |
|
|
|
|
|
|
|||||||||
|
|
|
|
|
|
Swing |
|
|
|
|
|
|
|
Swing |
|
|
|
|
|
|
|
|
|
|
|
|
|
Swing |
|
|
|
|
|
|
|||||||||
|
|
|
|
|
|
Gate Time |
|
|
|
|
Gate Time |
|
|
|
|
|
|
|
|
|
|
Gate Time |
|
|
|
|
|
|
|||||||||||||||
|
|
|
|
|
|
Reverse |
|
|
|
|
|
|
|
Reverse |
|
|
|
|
|
|
|
|
|
|
|
|
|
Reverse |
|
|
|
|
|
|
|||||||||
|
|
|
|
|
|
Track Mute |
|
|
|
|
Track Mute |
|
|
|
|
|
|
|
|
|
|
Track Mute |
|
|
|
|
|
|
|||||||||||||||
|
|
|
|
|
|
|
|
|
|
|
|
|
|
|
|
|
|
|
|
|
|
|
|
|
|
|
|
|
|
|
|
|
|
|
|
|
|
|
|
|
|
|
|
12
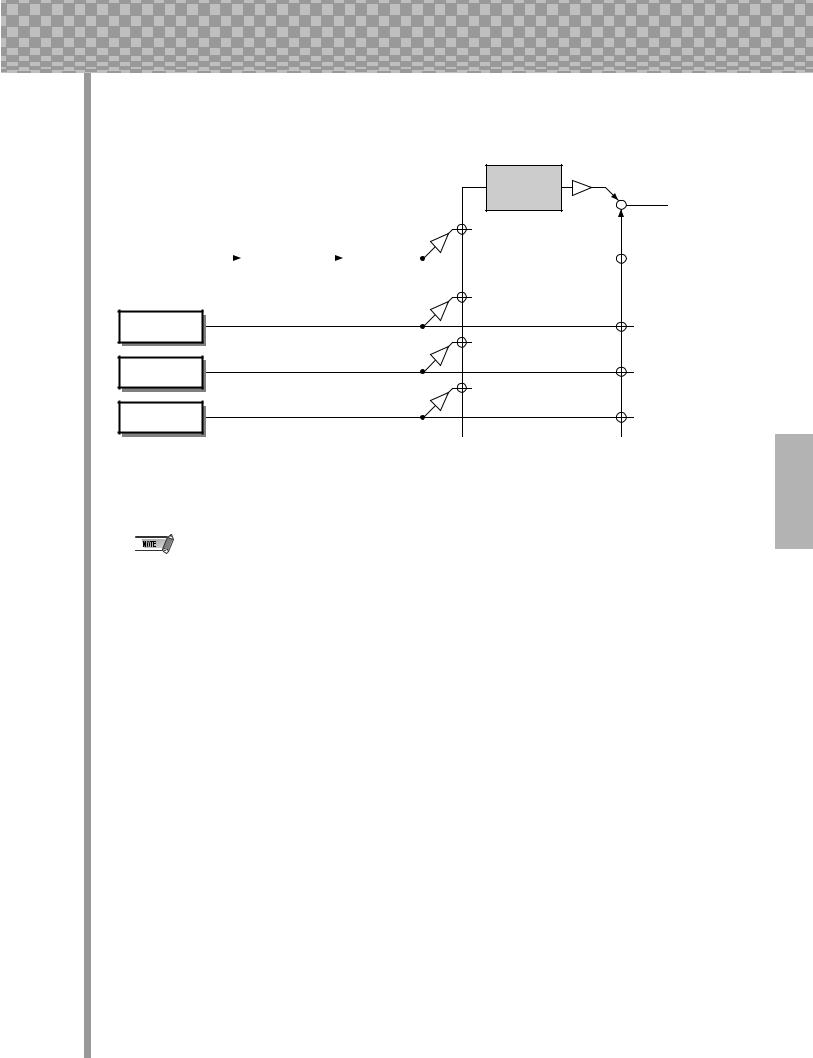
Tone Generator Signal Flow & Effect Block Diagram |
 Effect section
 Out
Out
|
Synth track |
|
Distortion |
|
EQ |
|
|
|
|
|
|||
|
|
|
|
|||
|
|
|
|
|
|
|
|
|
|
|
|
|
|
Rhythm track 1
Rhythm track 2
Rhythm track 3
The EQ processing is accessible only with the AN200 Editor software.
13
This is NOT an owner’s manual!
At least not an ordinary one. But, then again, the AN200 is no ordinary instrument. It’s packed with exciting, powerful, yet easy-to-use features that give you complete, hands-on sonic control — plus tons of dynamic real-time functions that can bring an extra edge to your live performances!
With all the digital power under this small hood, the AN200 is a stunning new instrument of the future. Yet it also brings you the very best of the old analog world — just look at all those knobs for twisting and tweaking your sound!
We know you don’t like reading manuals. But you owe it to yourself to look through this collection of hot tips. They show you how to get the most out of your new AN200 in the shortest time possible.
It’s like having an expert programmer take you by the hand and show you the ropes, sharing all the tricks and techniques you need to be a master on the instrument yourself. These tips take you from the bare-bones basics, to advanced power tips that get you pumping out fat sounds and happening tracks — in no time flat!
So jump in …
14 |

Chapter 1 |
Pattern Basics |
Start your synthesizer apprenticeship right here. In this section, you’ll learn about playing Patterns, and how to use some of the AN200’s powerful tools to change the sound as it’s playing.
 1 Playing a Pattern
Here’s where all the fun starts — with the pre-programmed Patterns.
Just press the Start/Stop button, and listen to the Pattern play. The Pattern repeats (loops) until you press the button again to stop it.
● What exactly are Patterns? |
|
|
|
|
|
|
|
The Patterns are the basic musical building blocks of the AN200 — they pro- |
|
|
|
vide an instrument sound (also called a “Voice”), plus a looping phrase using |
Pattern Mode |
|
|
that Voice. |
|
|
|
Select the Pattern mode by pressing the |
|
|
|
|
|
|
|
These pre-recorded Patterns give you the rhythmic and melodic foundation you |
[PATTERN] button. The letter “P” in the dis- |
|
|
play indicates the Pattern mode. |
|
|
|
need for laying down tracks — in your own recording or in performance. Keep |
|
|
|
|
|
|
|
|
|
|
|
in mind that you can create your own Patterns as well. (See page 68.) |
|
|
|
|
|
|
 2 Exploring other Patterns
The AN200 features a total of 256 specially pre-programmed Patterns. Try some of these out now.
Use the [DATA] knob to select a different Pattern. Notice how the Pattern number in the display changes.
Then press the Start/Stop button to play the Pattern.
You can also change Patterns during playback! Turn the [DATA] knob while the Pattern is playing — the new Pattern starts playing immediately after the previous one is finished.
Keep in mind that you cannot select Voices separate from the Patterns. If you want to hear a certain Voice, select the Pattern con- 

 taining that Voice. You can copy that Voice
 to a different Pattern; see Tip 52.


15
 Chapter 1 Pattern Basics
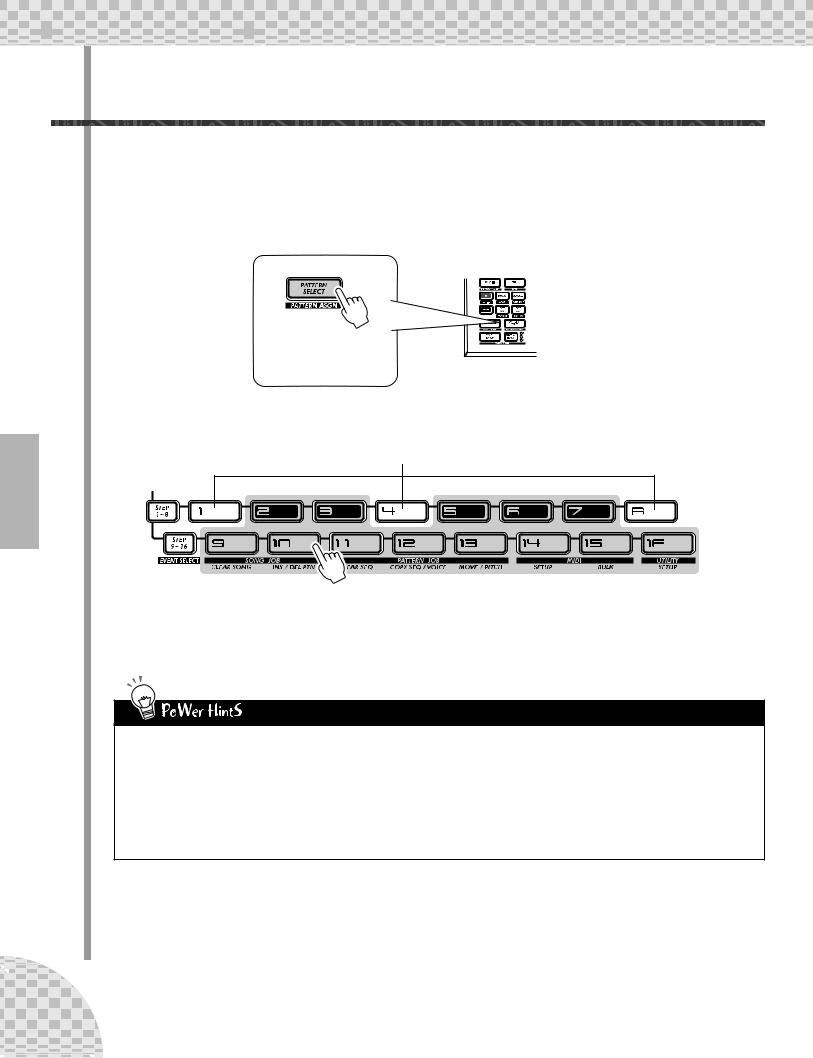
 3 Switching Patterns on the fly
Try mixing it up now. The AN200 lets you change Patterns as easily as pressing a button...
Thanks to the Pattern Select function, you can chain together Patterns in real time from the keyboard — as you perform.
Select a Pattern, then press [PATTERN SELECT].
The button lights.
Start the Pattern. While the Pattern is playing, press one of the keyboard buttons (except 1, 4, and 8).
Avoid these keys — they won’t change the Pattern.
Notice how a new Pattern starts playing as soon as the previous one is finished. This is a great way to string together various Patterns in a live performance — and create your own songs on the fly. If you want, you can use the keys to select a Pattern before starting playback as well.
•Repeats
Unless you want the same Pattern to repeat several times, don’t press a keyboard button more than once. On the other hand, you can quickly program the Pattern sequence for an entire song if you want, without having wait for each Pattern to play back. The AN200 remembers all the buttons you press and how many times you press them, and automatically plays back the Patterns as you programmed — repeats and all.
•Other octaves, more Patterns
Before starting the Pattern, use the [OCT <<]/[OCT >>] buttons to change the octave range of the keys. That’ll let you select other Patterns!
•Assign them yourself
The Pattern-to-key assignments have been made for you. However, you can make your own assignments, and put the Patterns you want to use close together for easy access. (See page 40.)
16 |
Chapter 1 Pattern Basics
 4 Playing it backwards
The Reverse function lets you completely turn the Pattern around, and play all the notes backwards.
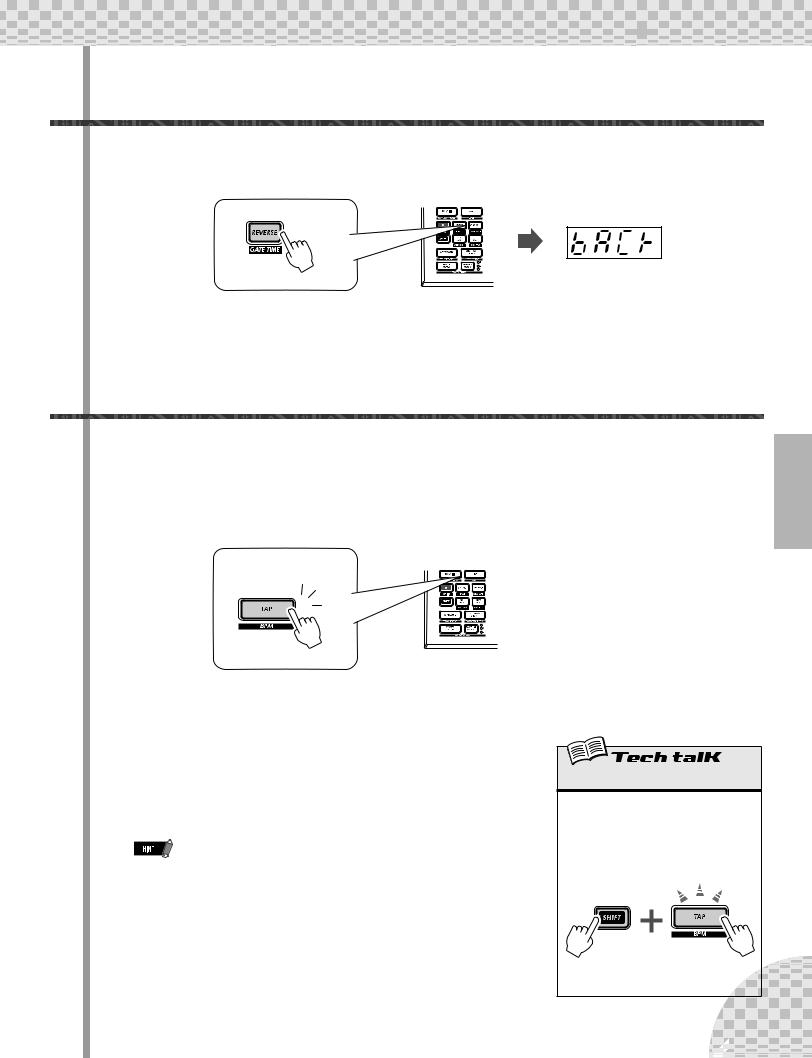
Before you start the Pattern (or during playback, if you want), simply press the [REVERSE] button.
 5 Changing the bpm
Now, that you’ve got a Pattern playing, try changing its speed. (This is also called “bpm” — beats per minute.) The AN200 gives you two ways to do this — tapping out the speed manually, or using the [DATA] knob to adjust it.
1 Tap the [TAP] button three or four times at the desired speed.
1
2
3
The new bpm is shown in the display. The [TAP] button and BPM lamp flash in time.
2If you want, adjust the bpm by turning the [DATA] knob.
3Press the Start/Stop button to start the Pattern at the new bpm.
You can also change the bpm while the Pattern is playing. To do this, simply start the Pattern before step #1 above.
BPM
Determines the speed or tempo of a Pattern.
Operation
Use [TAP] button to tap tempo; then adjust with [DATA] knob. Or hold down [SHIFT] and press [TAP/BPM]; then use [DATA] knob.
Range
20.0 — 300.0 bpm
17
 Chapter 1 Pattern Basics
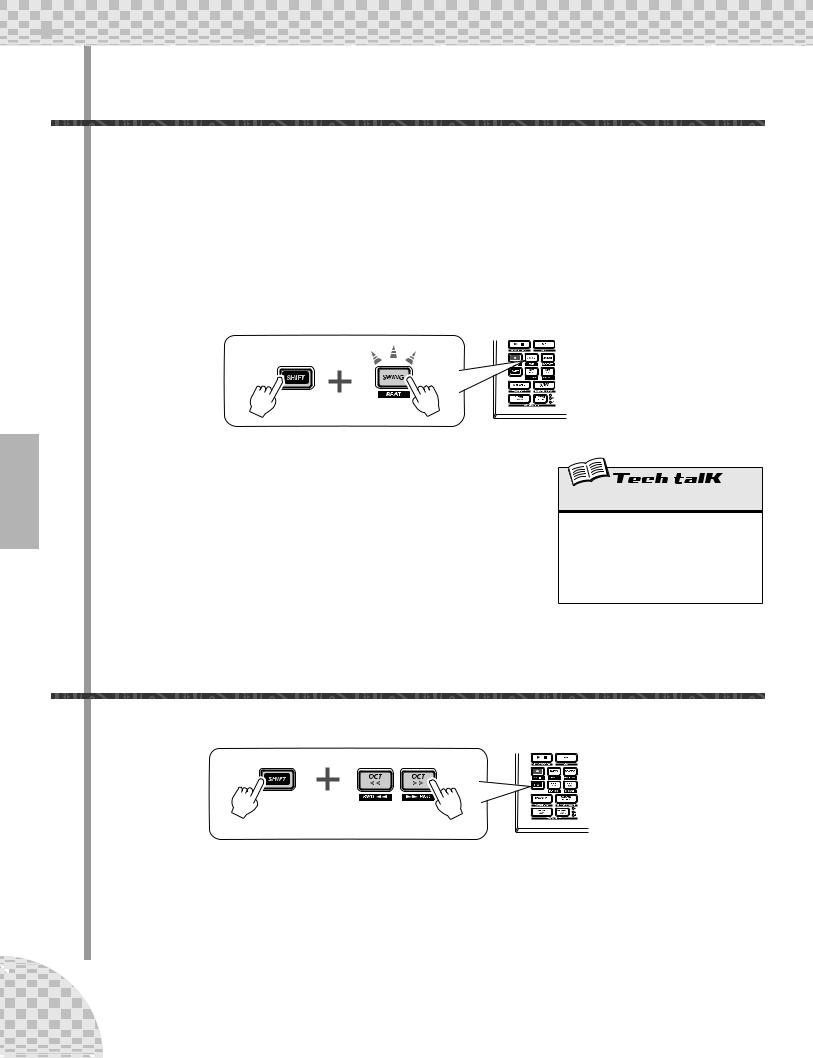
 6 Messing with the Beat
There’s more than one way to mess with the rhythm. Actually, the AN200 gives you a truckload of ways you can disturb and deconstruct your beats. One of these is the (appropriately named) Beat function.
You’ll be meeting up with this control again when you record your own Patterns. But let’s see how you can
use it now to change the feel of a Pattern while it’s actually playing...
1Select a Pattern and start it by pressing the Start/Stop button.
2While the Pattern is running, hold down [SHIFT] and press [SWING] (BEAT).
Now, you’ve got Beat called up and ready, so turn the [DATA] knob to change the setting.
You can tell from the lit number buttons how the Pattern is affected. When set to “16,” all 16 step buttons are lit and all 16 steps play back normally. Change the setting to “12,” and Steps 13 - 16 drop out. Notice how the Pattern not only slows down but “feels” different, too. Change Beat to “8,” and you’ve only got Steps 1 - 8 happening. That’s half of the original 16step Pattern, and naturally, it plays back at half the speed.
Beat
Determines the number of steps in the selected Pattern for playback: 16, 12, or 8. To set, hold [SHIFT] and press [SWING], then use the [DATA] knob.
Range
16, 12, 8 steps
 7 Double time, half time
Here’s a dramatic way to instantly double the speed of a Pattern — or slow it down by one-half.
Simply hold down [SHIFT] and press the [OCT <<] button — just before the beginning of the Pattern — to slow down the bpm by one-half. The first half of the Pattern plays at the new speed, before returning to the original speed.
To double the bpm, hold down [SHIFT] and press the [OCT >>] button just before the top of the Pattern. The Pattern plays back twice at the new speed, then returns to normal.
18 |

Chapter 2 |
Song Playback |
As we said before, the Patterns are the basic building blocks of the AN200.
But what can you build with them?
Songs!
Our team of expert programmers has created a few Songs using the various Patterns of the AN200. Check these out and hear just how powerful and versatile the AN200 can be for recording your own material.
 8 Playing a Song
Let’s select a Song now and play it.
1 Press the [SONG] button.
2 Select the desired Song by turning the [DATA] knob.
3 Press the Start/Stop button to play the Song.
For more about Songs and how to create your own, see page 81. |
Song Mode |
|
Pressing the [SONG] button selects the Song |
|
mode. |
|
The letter “S” indicates |
|
the Song mode. |
19 |

Chapter 3 |
The Keyboard |
Small and compact as it is, the AN200 also features a one-octave keyboard for playing and recording the sounds of the instrument.
 9 Playing the keyboard
The built-in keyboard is small — just one octave — but it lets you use all the features of the AN200 without having to connect a separate keyboard. Try it out now.
1Press [KEYBOARD].
2Play the keyboard.
The buttons give you a full octave, from C to C. Keep in mind that buttons 1, 4, and 8 don’t make any sound here — they’re not part of the scale.
The button lights.
|
Db (C#) |
Eb (D#) |
Gb (F#) |
|
Ab (G#) |
Bb (A#) |
|||||
|
|
|
|
|
|
|
|
|
|
|
|
|
|
|
|
|
|
|
|
|
|
|
|
|
|
|
|
|
|
|
|
|
|
|
|
C |
D |
E |
F |
G |
A B C
 10 Changing octaves
Naturally, one octave doesn’t cover a whole lot of ground. That’s why we’ve included convenient Octave buttons, so you can shift the octave range of the keyboard up or down as needed — quickly and easily.
1 While the [KEYBOARD] button is lit, press [OCT >>].
20 |
The display shows “C 4,” indicating the octave. (“C 3” is normal.) Play the keyboard and listen to the sound. Try some other octave settings, pressing [OCT <<] and [OCT >>] as desired to shift the octave.
Octave
Determines the octave range of the built-in keyboard. Press [OCT <<] or [OCT >>] to change. ([DATA] knob can also be used after pressing one of these buttons.) Press both buttons simultaneously to restore normal range. Some notes may not sound for the maximum values.
Range
C-2 — C3 (normal) — C8
Chapter 3 The Keyboard
 11 Playing the Rhythm track
The AN200 also has a special Rhythm track (actually there are three.) that let you play and record drum, percussion, bass and other sounds — giving you the power to easily create your own ultra-hip beats. Naturally, you can play all these sounds straight from the built-in keyboard...
1 With the [KEYBOARD] button lit, press [RHYTHM TRACK].
The button lights.
Press the button repeatedly to switch among the three Rhythm tracks: 1, 2, and 3.
2 Play the keyboard.
Remember — you can use the [OCT <<]/[OCT >>] buttons to change the range, and call up a whole different set of sounds. For more details on how to use the Rhythm tracks, see page 140.
 12 Velocity
All the keys of the built-in keyboard play at a fixed volume — no matter how hard or how soft you play them. However, you can set this fixed volume yourself, and make the sound as soft or as loud as you need it.
This Velocity setting also controls how loud the sounds are, when you record your own Patterns in Realtime recording (page 70).
1 Hold down [SHIFT] and press button [16], repeatedly
if necessary, until “<EL” appears in the display.
Velocity
Determines the default Velocity setting for the built-in keyboard of the AN200. This affects the loudness of the Synth and Rhythm track sounds, when played from the keyboard. It also affects the loudness of Real-time recorded tracks, when the built-in keyboard is used to record notes.
Velocity is set in the Utility parameters. Hold down [SHIFT] and press button [16], repeatedly if necessary, until “<EL” appears in the display. Use the [DATA] knob to change the value.
Range
1 — 127
2 Use the [DATA] knob to change the value.
Make sure the [KEYBOARD] button is lit, and try out different settings.
21 |

Chapter 4 |
Scene Basics |
Scene is one of the most powerful and exciting features of the AN200. It lets you “morph” between two completely different sounds — in real time, as the Pattern is playing.
 13 Switching Scenes
Here we’ll switch between Scenes, for instant sound changes.
Select a Pattern and start it up. While it’s playing, press the SCENE [2] button. Hear how the sound changes? Press SCENE [1] to go back to the first sound. Try to do this on the beat, alternating between the two in rhythm.
 14 Morphing
Let’s try something more subtle now! While playing back a Pattern, turn the [SCENE] knob slowly, back and forth.
Notice how the sound gradually “morphs” between 1 and 2 — in real time as you work the knob! Do this in sync with the rhythm and create your own shifting textures!
For more details on Scene, see page 59.
22 |
Chapter 5 |
Effects |
The effects of the AN200 are more than just icing on the cake — they’re powerful tools you can use to completely transform the sound, and put your tracks over the top.
 15 What is an Effect?
The Effects are the last element in the sound chain — they are the last bit of processing done to the sound before you hear it.
These real-time Effects — Delay, Flanger, Phaser, Overdrive/Amp — let you mangle the sound in wild and exciting ways. Although it’s not in the Effect section, there’s also a Distortion effect that lets you add anything from a warm grunge to a full-on metallic assault.
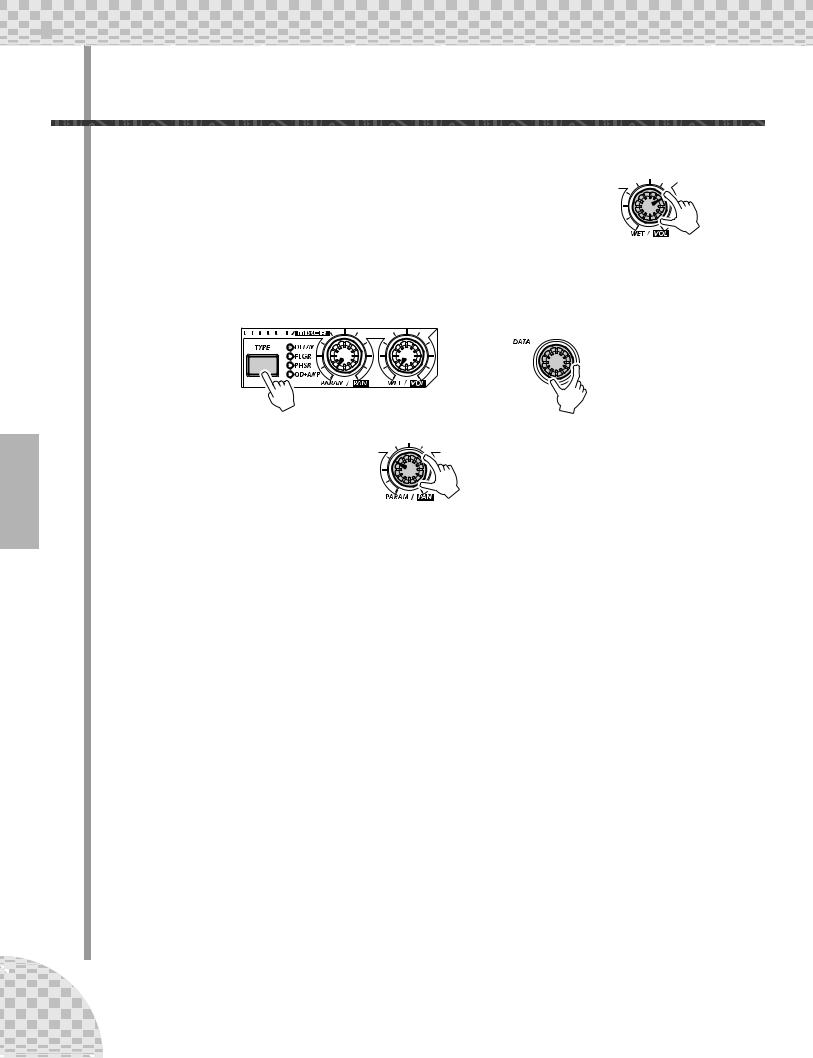
The Effect controls are exceptionally simple and easy to use. Pressing the [TYPE] button changes the Effect type, while the [PARAM] and [WET] knobs let you adjust the sound and depth of the Effect.
Changes the Effect |
Changes the depth or degree of the Effect. |
type (Delay, Flanger, |
When set to the minimum (all the way left), |
Phaser, Overdrive/ |
the Effect sound cannot be heard. |
Amp). |
|
Changes the sound of the Effect. (Each effect lets you control a different key parameter.)
[WET] knob
Range
0 — 127 (Same for all Effect types.)
23 |
 Chapter 5 Effects
 16 Playing with the Effects
Let’s take a look at each of the Effects, and try applying them to the sound.
Before you begin, set the [WET] knob up to about 2:00 or 3:00.
Generally, you should keep the knob at this position. This ensures that you can properly hear the Effect. (Tweak it later as needed to adjust the Effect balance.)
Now, try out each Effect, and use the same procedure:
1 Select the Effect type.
Press the [TYPE] button, then use the [DATA] knob. Thirteen different types are available.
2 Adjust the Effect depth.
Use the [PARAM] knob.
● Delay
(Delay 1 — 3)
Delay is a popular effect that repeats the sound in rhythm. Play a Pattern and select Delay 1 (dLY1). Try setting the [PARAM] knob to around 3:00. Hear how the Delay sound pulses with the original sound to create a different, more complex yet “spacier” feel. Try the other Delay types, too.
The key to using Delay effectively (no pun intended) is to keep it in sync with the Pattern. This is a little tricky and may take some practice. Slowly work the [PARAM] knob and listen carefully for changes in the rhythm. Keep in mind, there are no “wrong” or “right” settings here — use your ears to come up with settings that feel good.
● Reverb
Reverb (r<rb) is a “hidden” type in the Delay category and it lets you apply an ambient wash of reflections to the sound. Used subtly, it can make your tracks warmer and more natural sounding — as if they were being played in a concert hall. More extreme settings can drench the sound in reverb and produce spacy, other-worldly effects.
Try this out on one of the Patterns. Select the Pattern and play it, then tweak the [PARAM] and [WET] knobs, trying different settings, and hearing how they change the sound. Lower settings result in a shorter reverb time as well as an overall brighter sound. Higher settings produce a longer reverb time and dampen the high frequencies as well for a softer, more muffled sound.
Keep in mind that Reverb — like all the Effects — is applied to all tracks, Synth and Rhythm 1 - 3.
24 |
 Chapter 5 Effects
● Flanger
(Flanger 1, 2)
This modulation-based Effect produces a “swishing” or “tunneling” sound. Play a Pattern and select Flanger 1 (FLG1).
Take the [PARAM] knob from minimum to maximum, and notice how the sound grows from a subtle sweeping, metallic sound — like a jet airplane taking off — to a virtually pitch-less sonic meltdown.
● Chorus
Chorus is another modulation effect (“hidden” in the Flanger category) that adds a subtle warmth and depth to the sound — although you can go for some extreme effects, too.
Try Chorus (CHor) out on a Pattern. Play around with the [PARAM] knob, trying different settings — and listen for the changes.
Start out with [PARAM] set to 7:00 (minimum). This is no Chorus modulation at all. Now, bring it up slowly to 8:00, then around 9:00. Hear the modulation working? Doesn’t the sound seem more animated? Even fatter?
Try higher settings, as well — going to 12:00, then slowly up to 3:00 and beyond. Notice how the pitch wavers in strange ways — and hear how the sound even brightens up for the highest values.
● Phaser
(Phaser 1 - 3)
Another modulation Effect, Phaser is similar to Flanger, but much more subtle. It’s perfect for adding some warm animation and movement to the sound.
Play a Pattern and select (PHS1). Set the [PARAM] knob to the minimum (0) and gradually turn it up — and listen to how the modulation enhances the sound. Go on to the other Phaser types as well, for more sonic variations.
● Overdrive/Amp
(Amp 1 - 3)
This Effect simulates the overdriven sound of a guitar amp, and lets you apply varying degrees of distortion to the sound. Start a Pattern and try Amp 1 (AmP1), and tweak the [PARAM] knob. Notice how minimum values produce a warm, edgy “bite,” while maximum values deliver a full, heavy metal onslaught.
Try all three Overdrive/Amp types — the differences may not be dramatic, but they give you a variety of warm and crunch-laden distortion effects to work with. Some of the Patterns sound especially good with a little grunge...
Effect
Effect Type
Allows you to select one of thirteen Effect types for processing the sound of the tracks (Synth and Rhythm 1 - 3). Press the [TYPE] button, then use the [DATA] knob.
Settings
Delay 1 - 3, Reverb, Flanger 1 and 2, Chorus, Phaser 1 - 3, Overdrive/Amp 1 - 3
Parameter (PARAM)
In general, this allows you to control the depth of the Effect. (The actual parameter differs depending on the selected Effect type.) Use the [PARAM] knob to adjust.
Range
0 — 127
Wet
Allows you to control the volume of the Effect
— in other words, the wet/dry balance. Use the [WET] knob to adjust.
Range
0 — 127
25 |
 Chapter 5 Effects
 17 Distortion
The last tip introduced you to a distortion effect, the Overdrive/Amp types. Here’s yet another way to dirty up the sound — Distortion.
Although not strictly part of the Effect section, Distortion is a strong effect in its own right. Compared to the warm Overdrive/Amp Effect types, it has more edge and bite. When applied to many of the AN200’s Voices, it is capable of creating very convincing guitar-like distortion effects.
1 Press the DIST [SWITCH] button. (The lamp turns on.)
2 Adjust the balance with the [DATA] knob.
This lets you mix the “dry” no-Distortion sound with the “wet” Distortiononly sound. Try different settings and hear how they change the sound. Notice how a fully wet “U63” results in a very brittle, edgy sound.
Distortion
Allows you to apply a distortion effect to the Synth track. (Note that this does not affect any of the Rhythm tracks.) Press the DIST [SWITCH] button to turn Distortion on, then use the [DATA] knob to adjust the dry/wet balance. A value of “d63” has only the original, unprocessed sound, while a value of “U63” has only the Distortion-processed sound.
Range
d63 (dry) — d=U (dry = wet) — U63 (wet)
26 |
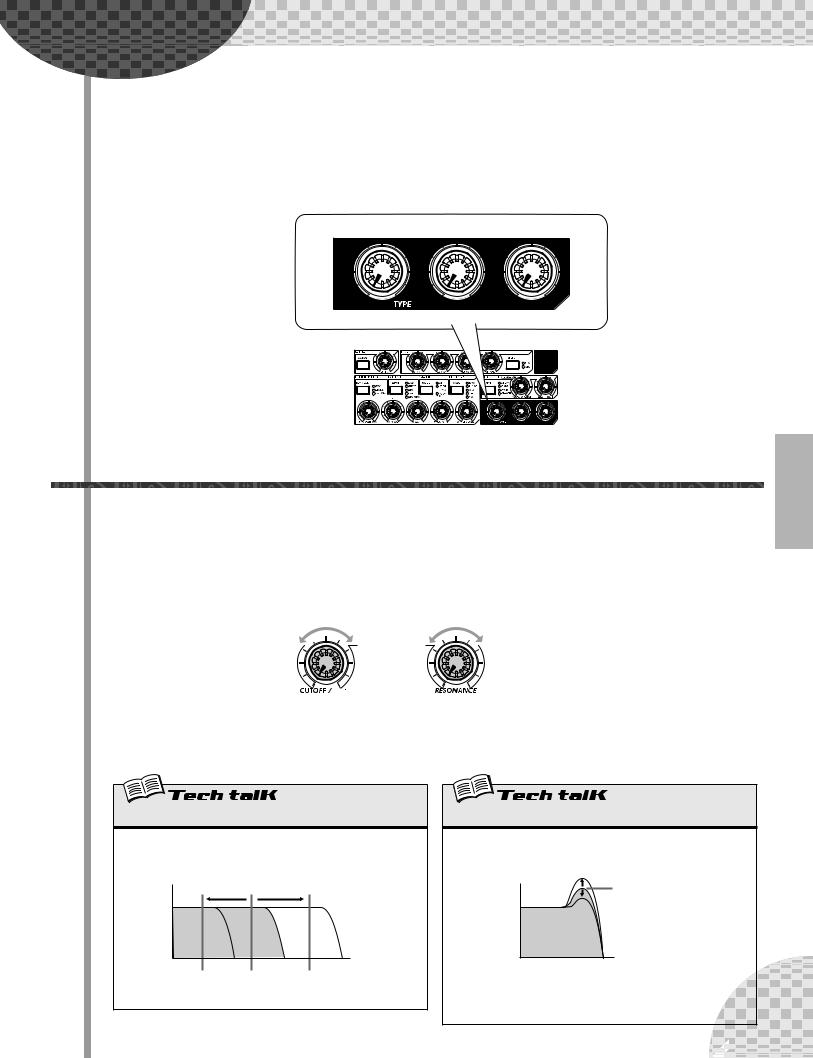
Chapter 6 |
Filter (VCF) |
The VCF or Filter section is one of the most powerful and dynamic on the entire instrument. Used in the right way, the VCF controls are capable of transforming sterile, boring sounds into something really dynamic and exciting. Try out the following Tips and see what we mean...
 18 Cutoff and Resonance
For your Filter explorations, here’s the best place to start.
These two Filter controls work interdependently — changing one of them affects the sound of the other.
Turn [CUTOFF] to the left and the sound becomes darker or “muffled.” Turn it to the right and the sound becomes brighter. Turn [RESONANCE] to the right and the Filter peak becomes sharper and more pronounced. Turn it to the left and hear how the Filter flattens out.
Darker |
Brighter |
Flatter |
More pronounced |
|
|
|
|
|
|
|
|
|
|
|
Also keep in mind that the overall effect of Cutoff and Resonance is controlled by FEG Depth (Tip 20 below). If FEG Depth is set too high or too low, you may hear little or no change in the sound — no matter how furiously you twist the [CUTOFF] and [RESONANCE] knobs.
Cutoff
Determines the frequency at which the Filter effect starts. The higher the value, the higher the frequency.
Volume
Cutoff frequency
Frequency (pitch)
Range
0 — 127
Resonance
Determines the emphasis of the resonant peak of the Filter (at the Cutoff frequency).
Volume |
Resonance |
Frequency (pitch)
Range
Synth track : -12 — 102
Rhythm track 1-3 : -64 — 63
27
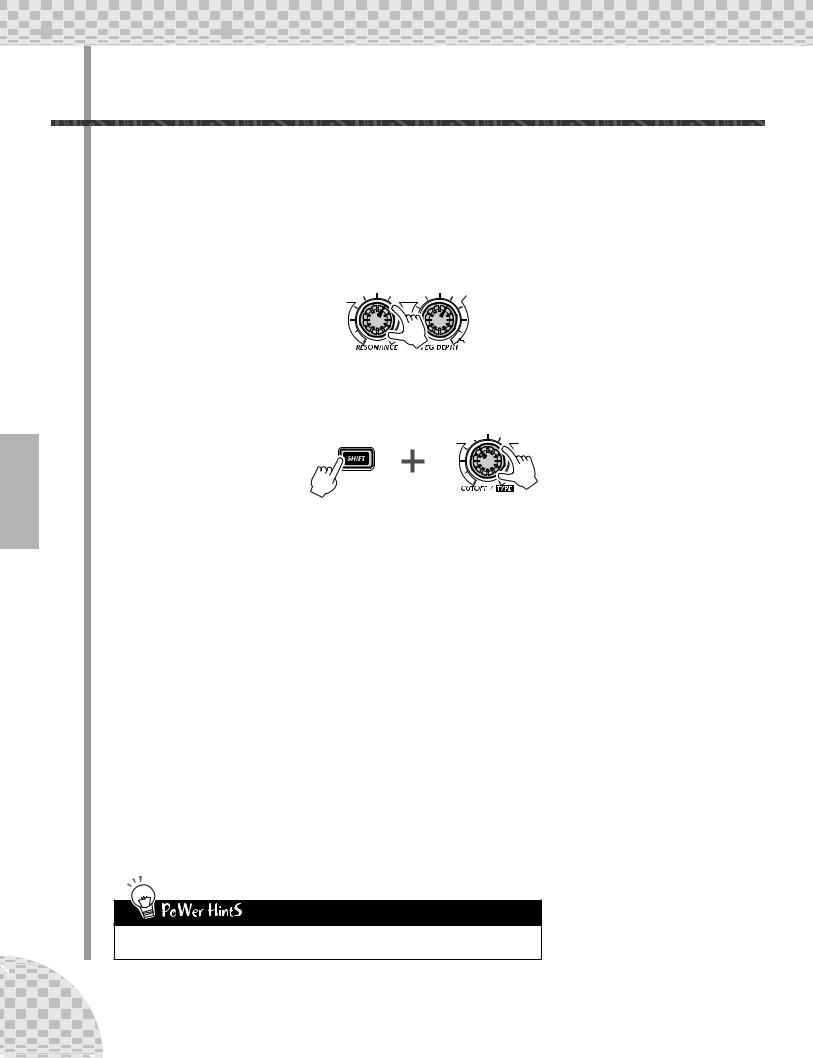
 Chapter 6 Filter (VCF)
 19 Wild, wild filter sweeps — VCF Types
The enormous power and versatility of the Filter section continues with the VCF Types. These hidden variations put some really heavy-duty sonic fireworks at your fingertips — just what you need to blow the crowd away.
Try these settings out for size...
1Call up a Pattern and press the Start/Stop button. Start out by setting both [RESONANCE] and [FEG DEPTH] to around 1:00.
2Simultaneously hold down [SHIFT] and turn the [CUTOFF] knob.
Keep your eyes on the display as you do this — the setting will change! For starters, select “12db” — which should be around 11:00.
In this shifted condition, the [CUTOFF] knob becomes the VCF Type selector. (That’s why “TYPE” is printed in black below the knob.)
3 Now, take your finger from the [SHIFT] button, and the knob reverts to its original identity as the Cutoff control.
Turn it very slowly — especially between 8:00 and 1:00 — as you listen to the gradual changes in the sound.
4 Not wild enough for you? Let’s move onto another type then...
Hold down [SHIFT] again and turn the [CUTOFF] knob to around 12:00, so that “bPF” is called up in the display.
Is that any wilder? Still too tame? Let go of [SHIFT] and try tweaking the [CUTOFF] knob between 8:00 and 2:00.
5Let’s try one more. Hold [SHIFT] and set the [CUTOFF] knob to around 2:00, so that the “HPF” type is selected.
Things can get kind of crazy here, too. Tweak the [CUTOFF] knob some more — especially between 12:00 and 3:00 — and hear what kind of madness you can generate.
Don’t forget the [RESONANCE] and [FEG DEPTH] knobs! Work with them too as you tweak the [CUTOFF] knob. There’s a lot of sonic variation to be had in just these three controls.
28 |

Chapter 6 Filter (VCF) 
VCF Type
Determines the filter type used for the VCF section. The filter passes only a specified range of frequencies while cutting off the rest. There are several completely different types, as well as a variety of filter slopes (see below).
Settings
24db (Low Pass Filter 24dB/octave), 18db (LPF 18dB/octave), 12db (LPF 12dB/octave), bPF (Band Pass Filter), HPF (High Pass Filter), bEF (Band Eliminate Filter)
24db, 18db, 12db
The Low Pass Filter passes only those frequencies below the specified cutoff point. Cutoff curves of 24dB/octave, 18dB/octave and 12dB/ octave can be selected.
Level |
Cutoff range |
|
12dB/oct |
|
18dB/oct |
|
24dB/oct |
Cutoff frequency Frequency
BPF
The Band Pass Filter passes only those frequencies in the specified
range, with a cutoff curve of 12dB/octave.
Level
Cutoff range Range passed Cutoff range
|
|
|
Center frequency |
Frequency |
|
HPF
The High Pass Filter passes only those frequencies above the specified cutoff point, with a cutoff curve of 12dB/octave.
Level
Cutoff range |
Range passed |
|
|
|
|
Cutoff frequency |
Frequency |
BEF
The Band Eliminate Filter passes only those frequencies outside the specified frequency range. The Resonance setting (see page 27) determines the eliminate range.
Level |
|
Range passed |
Cutoff range Range passed |
29 |

 Chapter 6 Filter (VCF)
 20 FEG Depth
Technically, the FEG Depth controls how the Filter works over time. This is even shown on the panel for you:
Indicates a “dip” in the filter, just at the start of each note.
Indicates a filter “peak,” just at the start of the note.
With the the [CUTOFF] and [RESONANCE] knobs set respectively to 9:00 and 3:00 (see above), slowly turn the [FEG DEPTH] knob.
Depending on the Pattern selected, negative settings (setting the knob left of 12:00) may result in little or no sound. But once you turn the knob past the halfway point (12:00), you’ll start to hear the filter “opening up.” Turn the knob slowly for gradual filter sweep effects. Also try working the knob in time with the rhythm for dynamic “wah” effects.
FEG Depth
Determines the degree or depth of the filter effect over time. Positive values result in a normal EG; negative values use a “reverse” EG — producing a filter sweep effect that dips and comes back up, rather than one that peaks and goes down.
Range
-128 — 127
30 |
 Loading...